In Monster Hunter Stories 3: Twisted Reflection, defeating special, powerful monsters called Invasive Monsters will reward you with rare and valuable Endangered Eggs.
Invasive Monsters are powerful versions of regular monsters that have moved into new areas. They’re threatening local, endangered creatures. Your mission is to defeat these Invasive Monsters and, by doing so, unlock special Endangered Eggs.
Table of contents
- How to repel all Invasive Monsties in Monster Hunter Stories 3
- Invasive Monstie 1 – Yian Garuga
- Invasive Monstie 2 – Seregios
- Invasive Monstie 3 – Plesioth
- Invasive onstie 4 – Arzuros
- Invasive Monstie 5 – Shogun Ceanataur
- Invasive Monstie 6 – Nerscylla
- Invasive Monstie 7 – Diablos
- Invasive Monstie 8 – Odogaron
- Invasive Monstie 9 – Khezu
How to repel all Invasive Monsties in Monster Hunter Stories 3
The first monster you need to find is simple to locate because it’s connected to the game’s story. I’ve also pinpointed all three monster locations on the Azuria map for you.
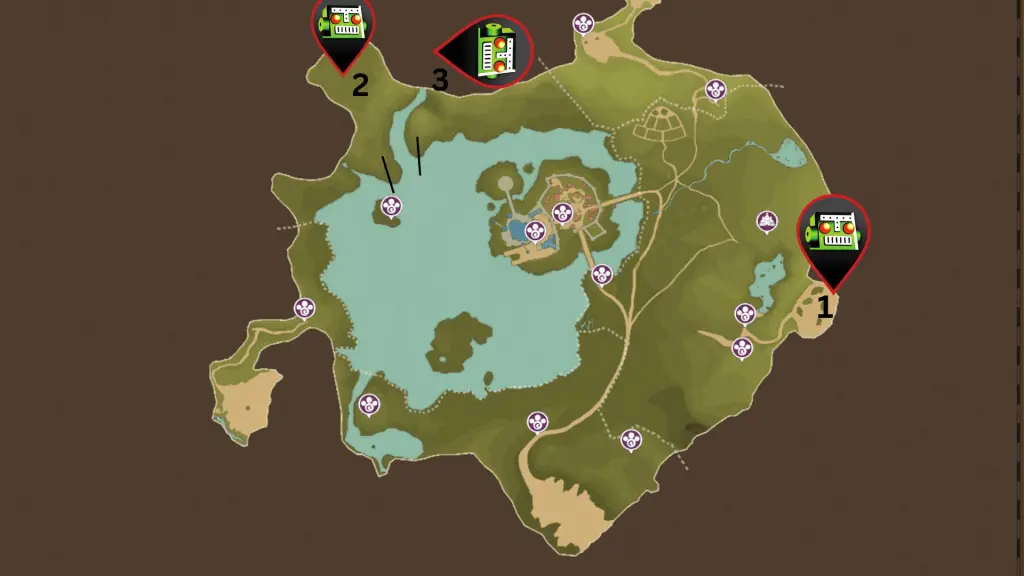
Invasive Monstie 1 – Yian Garuga
You’ll face this creature in Act 1, Chapter 6, where you first learn about Endangered Species. You can’t avoid this battle, but the Yian Garuga is a relatively easy opponent. The key to winning is to focus your attacks on its legs to cripple it.
After you beat Yian Garuga, you’ll be able to fight Rathian, and you can then upgrade the egg to a more unusual version.
Invasive Monstie 2 – Seregios
The second item is located on a cliff in the northern part of the map. You’ll need a flying monstie to get there at night. To easily beat or scare away Seregios, use a Hammer with the Perfect Crush ability. Also, pay attention to the color of its roars and try to attack its head directly.
- If the roar is red, use a Perfect Crush with Speed.
- If the roar is blue, use a Perfect Crush with Technical.
- If the roar is green, use a Perfect Crush with Power.
Repealing the Seregios will unlock the Astalos egg as a reward.
Invasive Monstie 3 – Plesioth
You can find the Plesioth near a cave north of the Mirror Lake Catavan Stand. To reach it, use a monster that can swim up the channel to the location shown in the image. When the Plesioth gets angry, the most effective tactic is to attack its head with a Fire-element attack.
Defeat the Plesioth to obtain a Lagiacrus Egg. Then, we’ll cover the two invasive monsters you’ll find in the Canalta Timberland.
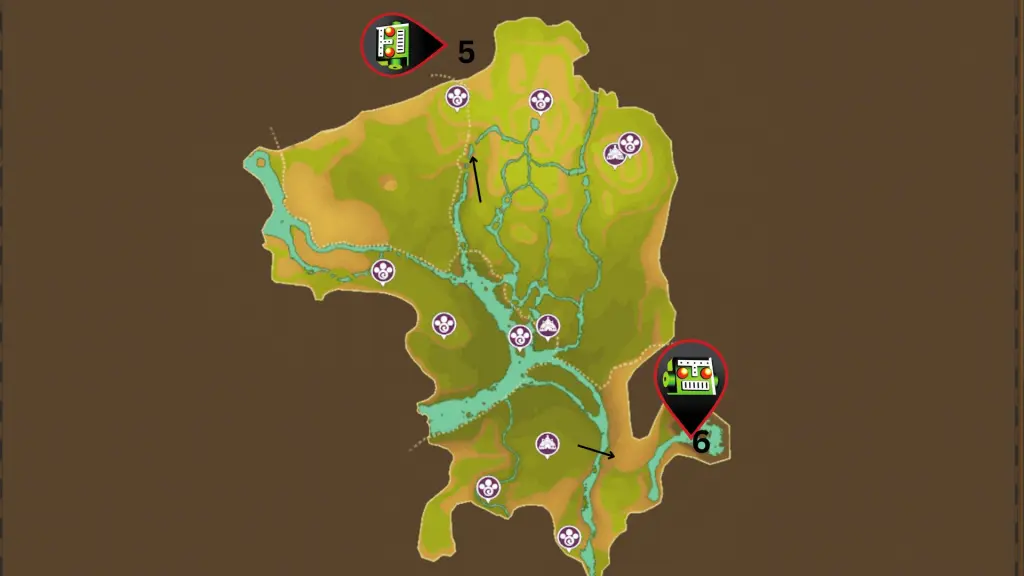
Invasive Monstie 4 – Arzuros
Okay, so you will run into the Arzuros eventually – you can’t avoid it! Just keep following the main story, and it’ll show up. When you fight it, the key is to focus your attacks on its Honey Supply. That’s how it keeps summoning more Arzuros, so taking that out is crucial. Also, I found that having a Speed-type monstie in my team really helped – it seems to counter the Arzuros’s strengths and made the whole fight a lot easier!
You’ll be rewarded with teh Canyne Egg for your efforts.
Invasive Monstie 5 – Shogun Ceanataur
You can find the Shogun Ceanataur hidden behind a waterfall in the location shown on the Canalta Timberland map. Be prepared for its powerful Killer Claw attacks – you’ll need strong defense! Boost your party’s defense with monsters or allies that have the Defense Up ability, or use Mega Armorskin on your creatures. Although its claws are dangerous, they break easily, so focusing on defense is key to surviving its attacks. Defeating the Shogun Ceanataur will reward you with a Mizutsune egg.
Invasive Monstie 6 – Nerscylla
Okay, so I finally tracked down the last Invasive Monster! It’s way over on the eastern side of the map. The easiest way to get there is to glide east from Blessing Hill camp – you’ll see its territory marked on the Canalta Timberland map. To beat it quickly, you need a Gunlance with the Wyvern’s Fire skill. Don’t waste energy on anything else, and just wait for the Nerscylla to disappear. As soon as it’s about to come back down and attack, hit it with Wyvern’s Fire – that’ll repel it for sure!
Repealing the Nerscylla unlocks the Nargacuga egg for you to obtain.
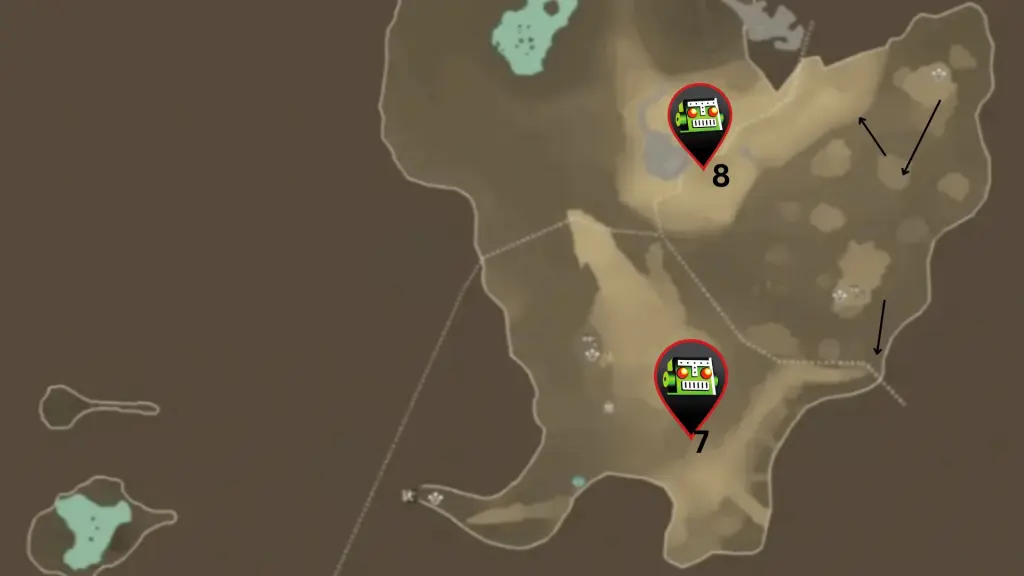
Invasive Monstie 7 – Diablos
Starting at the Rococo Rocks Catavan Stand at Lookout Point, head down to the ground floor and go southeast. You’ll find an opening leading into a ravine – follow that path. When the path ends, climb the wall, and you’ll encounter the Diablos.
To defeat the Diablos, use a Hammer with the Spinning Meteor ability. When it burrows underground and creates three holes, you need to time your Meteor strike perfectly. Watch for dust rising from one of the holes and hit it right then. If you’re too early or too late, the Diablos will pop out of a different hole and attack. Get the timing right, and you’ll drive it away, securing the Tigrex egg.
Invasive Monstie 8 – Odogaron
Start by gliding south from the Rococo Rocks Catavan Stand. Look for a rising column of air – use it to fly northwest towards an opening in the rocks. Once through the opening, follow the path and climb the wall to find the Odogaron.
To get a Zinogre egg, you’ll need a monster that knows a Mud-based move. Using moves like Mud Torrent repeatedly will lower the Odogaron’s defenses and break its claws. Once you’ve successfully repelled the Odogaron, you’ll receive the Zinogre egg.
Invasive Monstie 9 – Khezu
Okay, so from the starting point, I usually glide over those big rocks and head northeast. If I keep hopping from rock to rock, I eventually find the entrance. The trick is to wait until the Khezu shows that ‘Learning Complete’ message on the screen. Then, I just land a Double Kinship attack, and that’s usually enough to send it packing!
Once you repel the Khezu, you’ll unlock the Barioth.
Read More
- Off Campus Season 1 Soundtrack Guide
- Euphoria Season 3’s New R-Rated Sydney Sweeney Scene Proves The Show Is Trolling Us
- What is Omoggle? The AI face-rating platform taking over Twitch
- Man pulls car with his manhood while on fire to raise awareness for prostate cancer
- Gold Rate Forecast
- Why is there no Jujutsu Kaisen this week? Missing Season 3 Episode 8 explained
- Crimson Desert Guide – How to Pay Fines, Bounties & Debt
- Jailbreak codes (April 2026)
- Lord Of The Flies Review: Near-Perfect Adaptation Is A Reminder Of Classic Novel’s Haunting Power
- Popeye Slasher Horror Film Officially Kicks Off Production on ‘Bigger & Bloodier’ Sequel
2026-03-14 17:18