In the ongoing narrative of Amphoreus within Honkai: Star Rail, fresh territories emerge. Among them is the “Murmuring Woods” Grove Of Epiphany, which made its debut with the 3.1 update. This expansion offers a wealth of content to explore, including several hidden treasure chests just waiting to be claimed.
As an avid explorer in the mystical realm of Amphoreus, I can’t help but be drawn to the enigmatic treasures hidden throughout its various regions. In this guide, I’ll lead you on a journey to uncover both the World Chests and Spiritthief Chests nestled within the breathtaking Grove of Epiphany. Let’s embark on this adventure together!
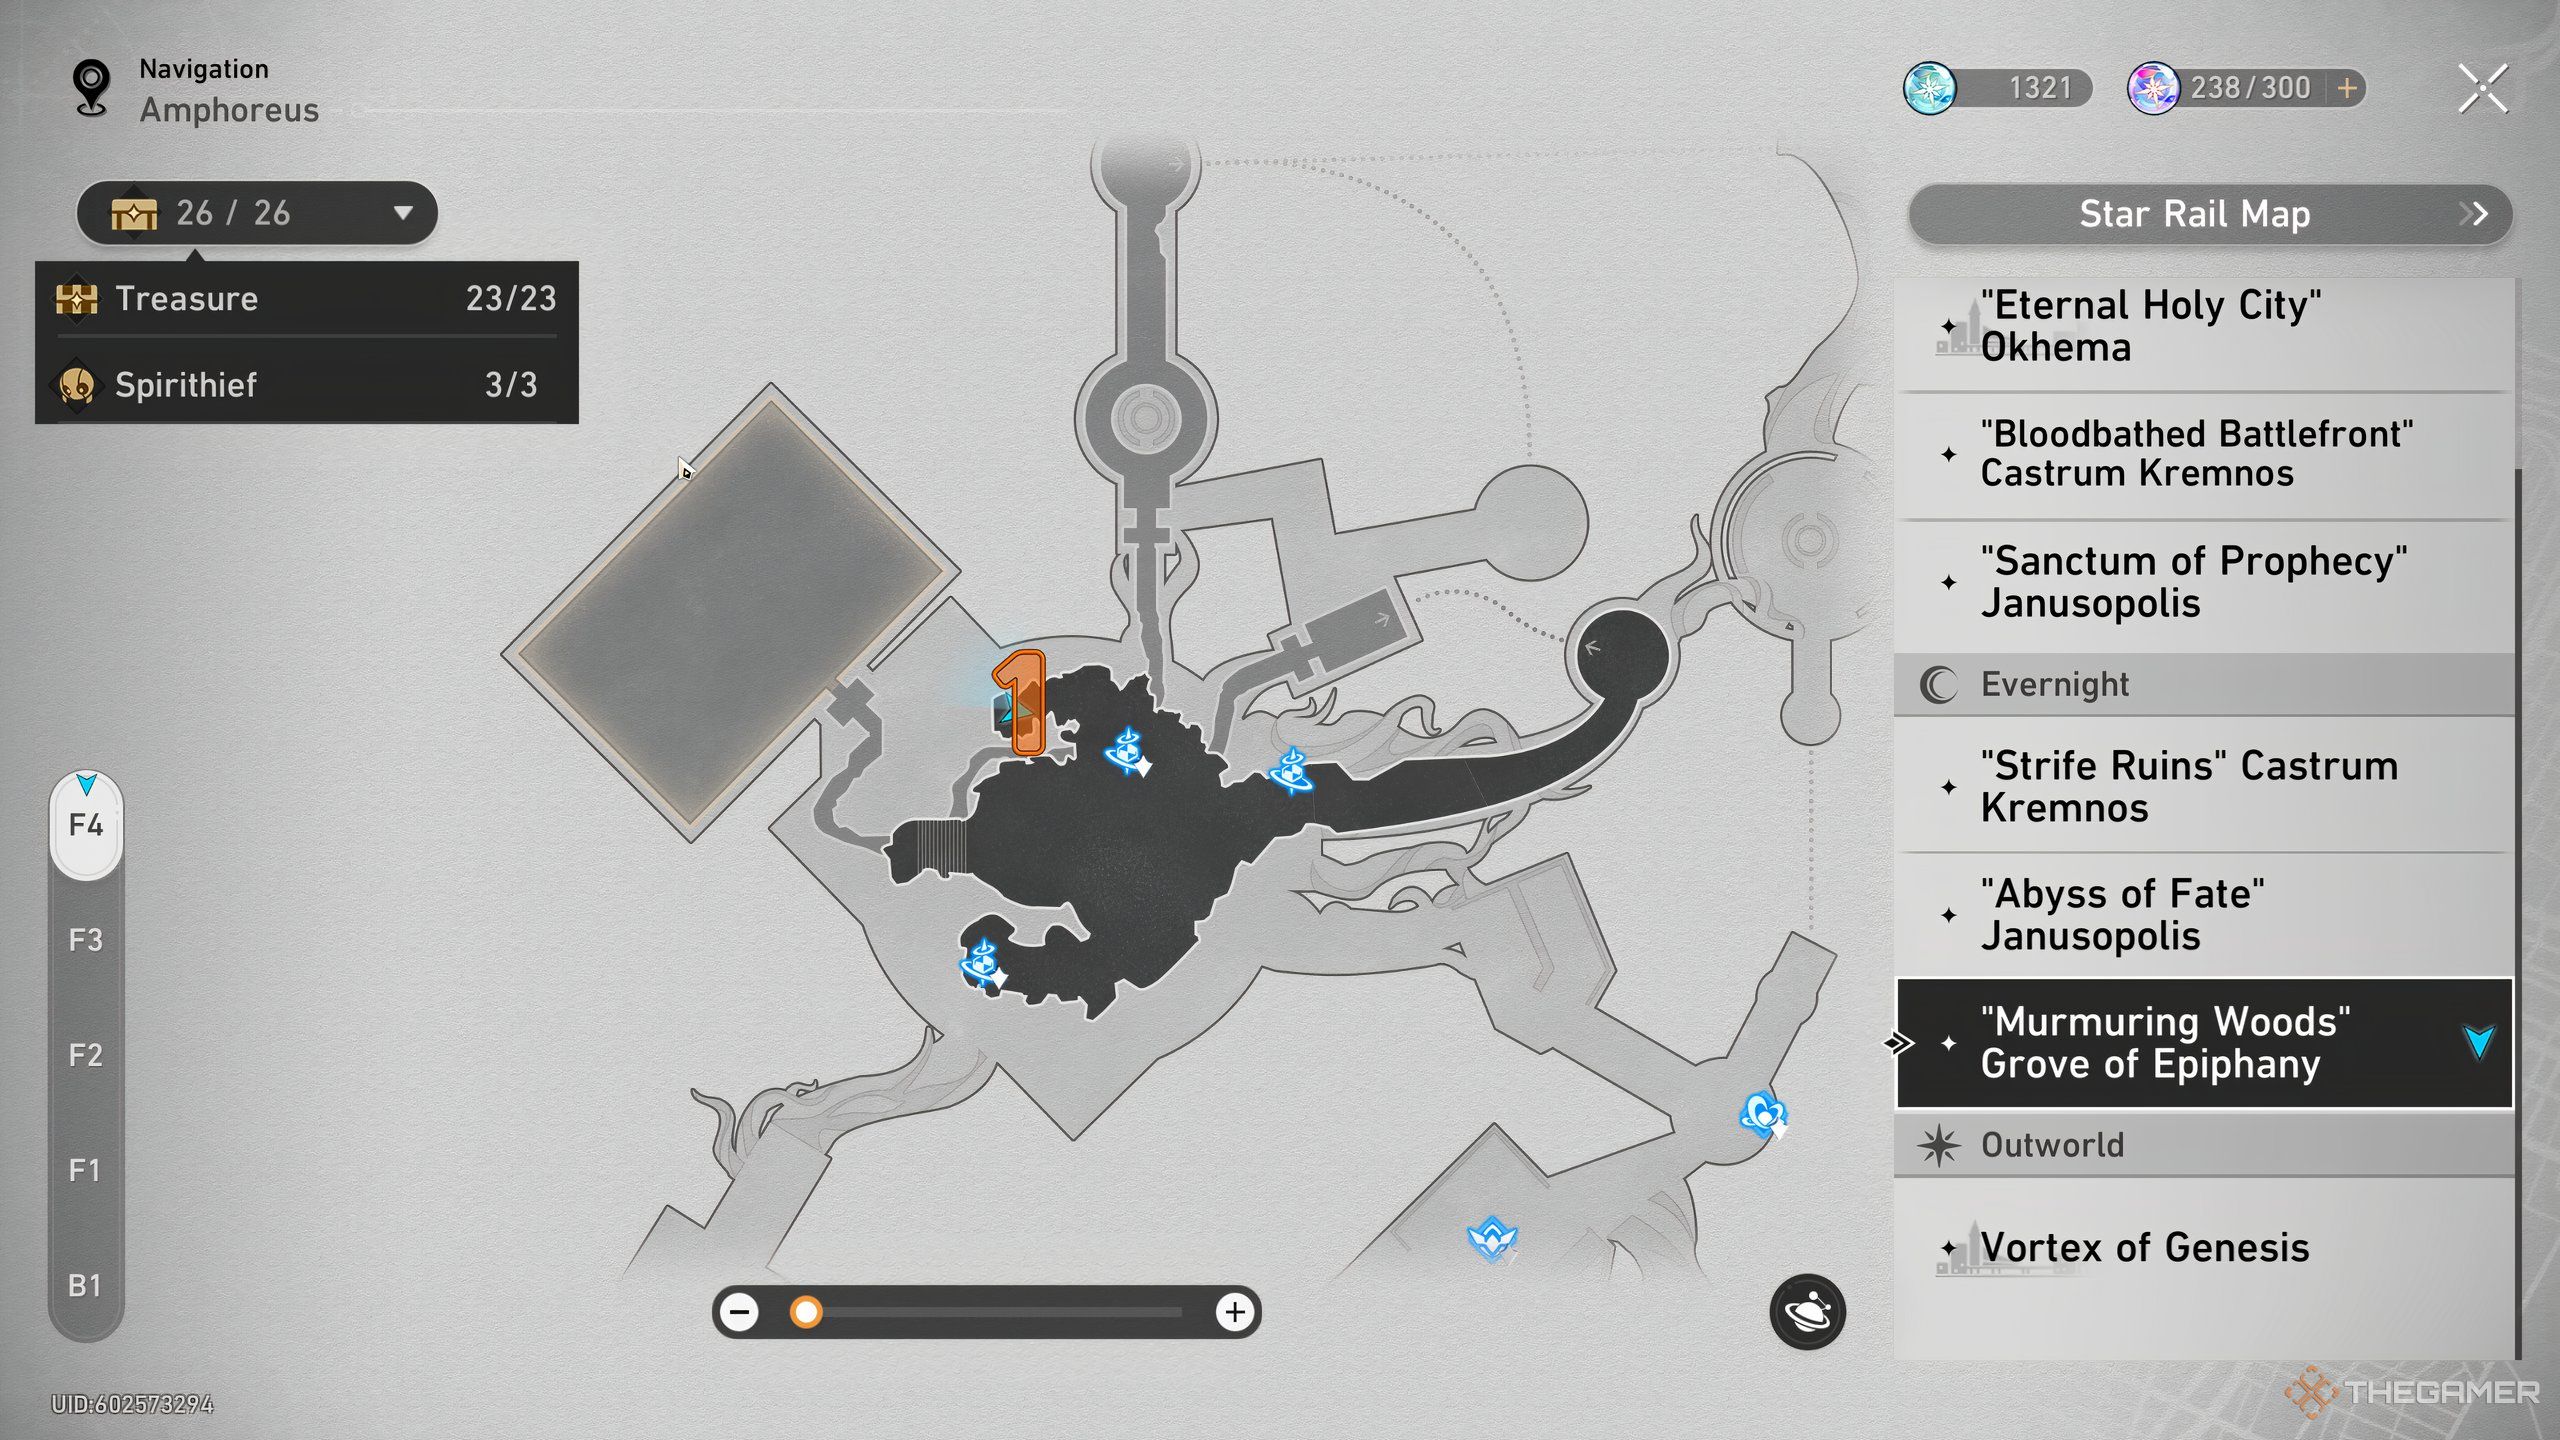
All Chest Locations In The Woven Trail
The Epiphany Grove is divided into two sections: one is the Woven Trail located in the south and the other is the Sacred Tree situated in the north. In total, there are 26 treasure chests scattered throughout the entire grove, with three of them being the Spiritthief chests.
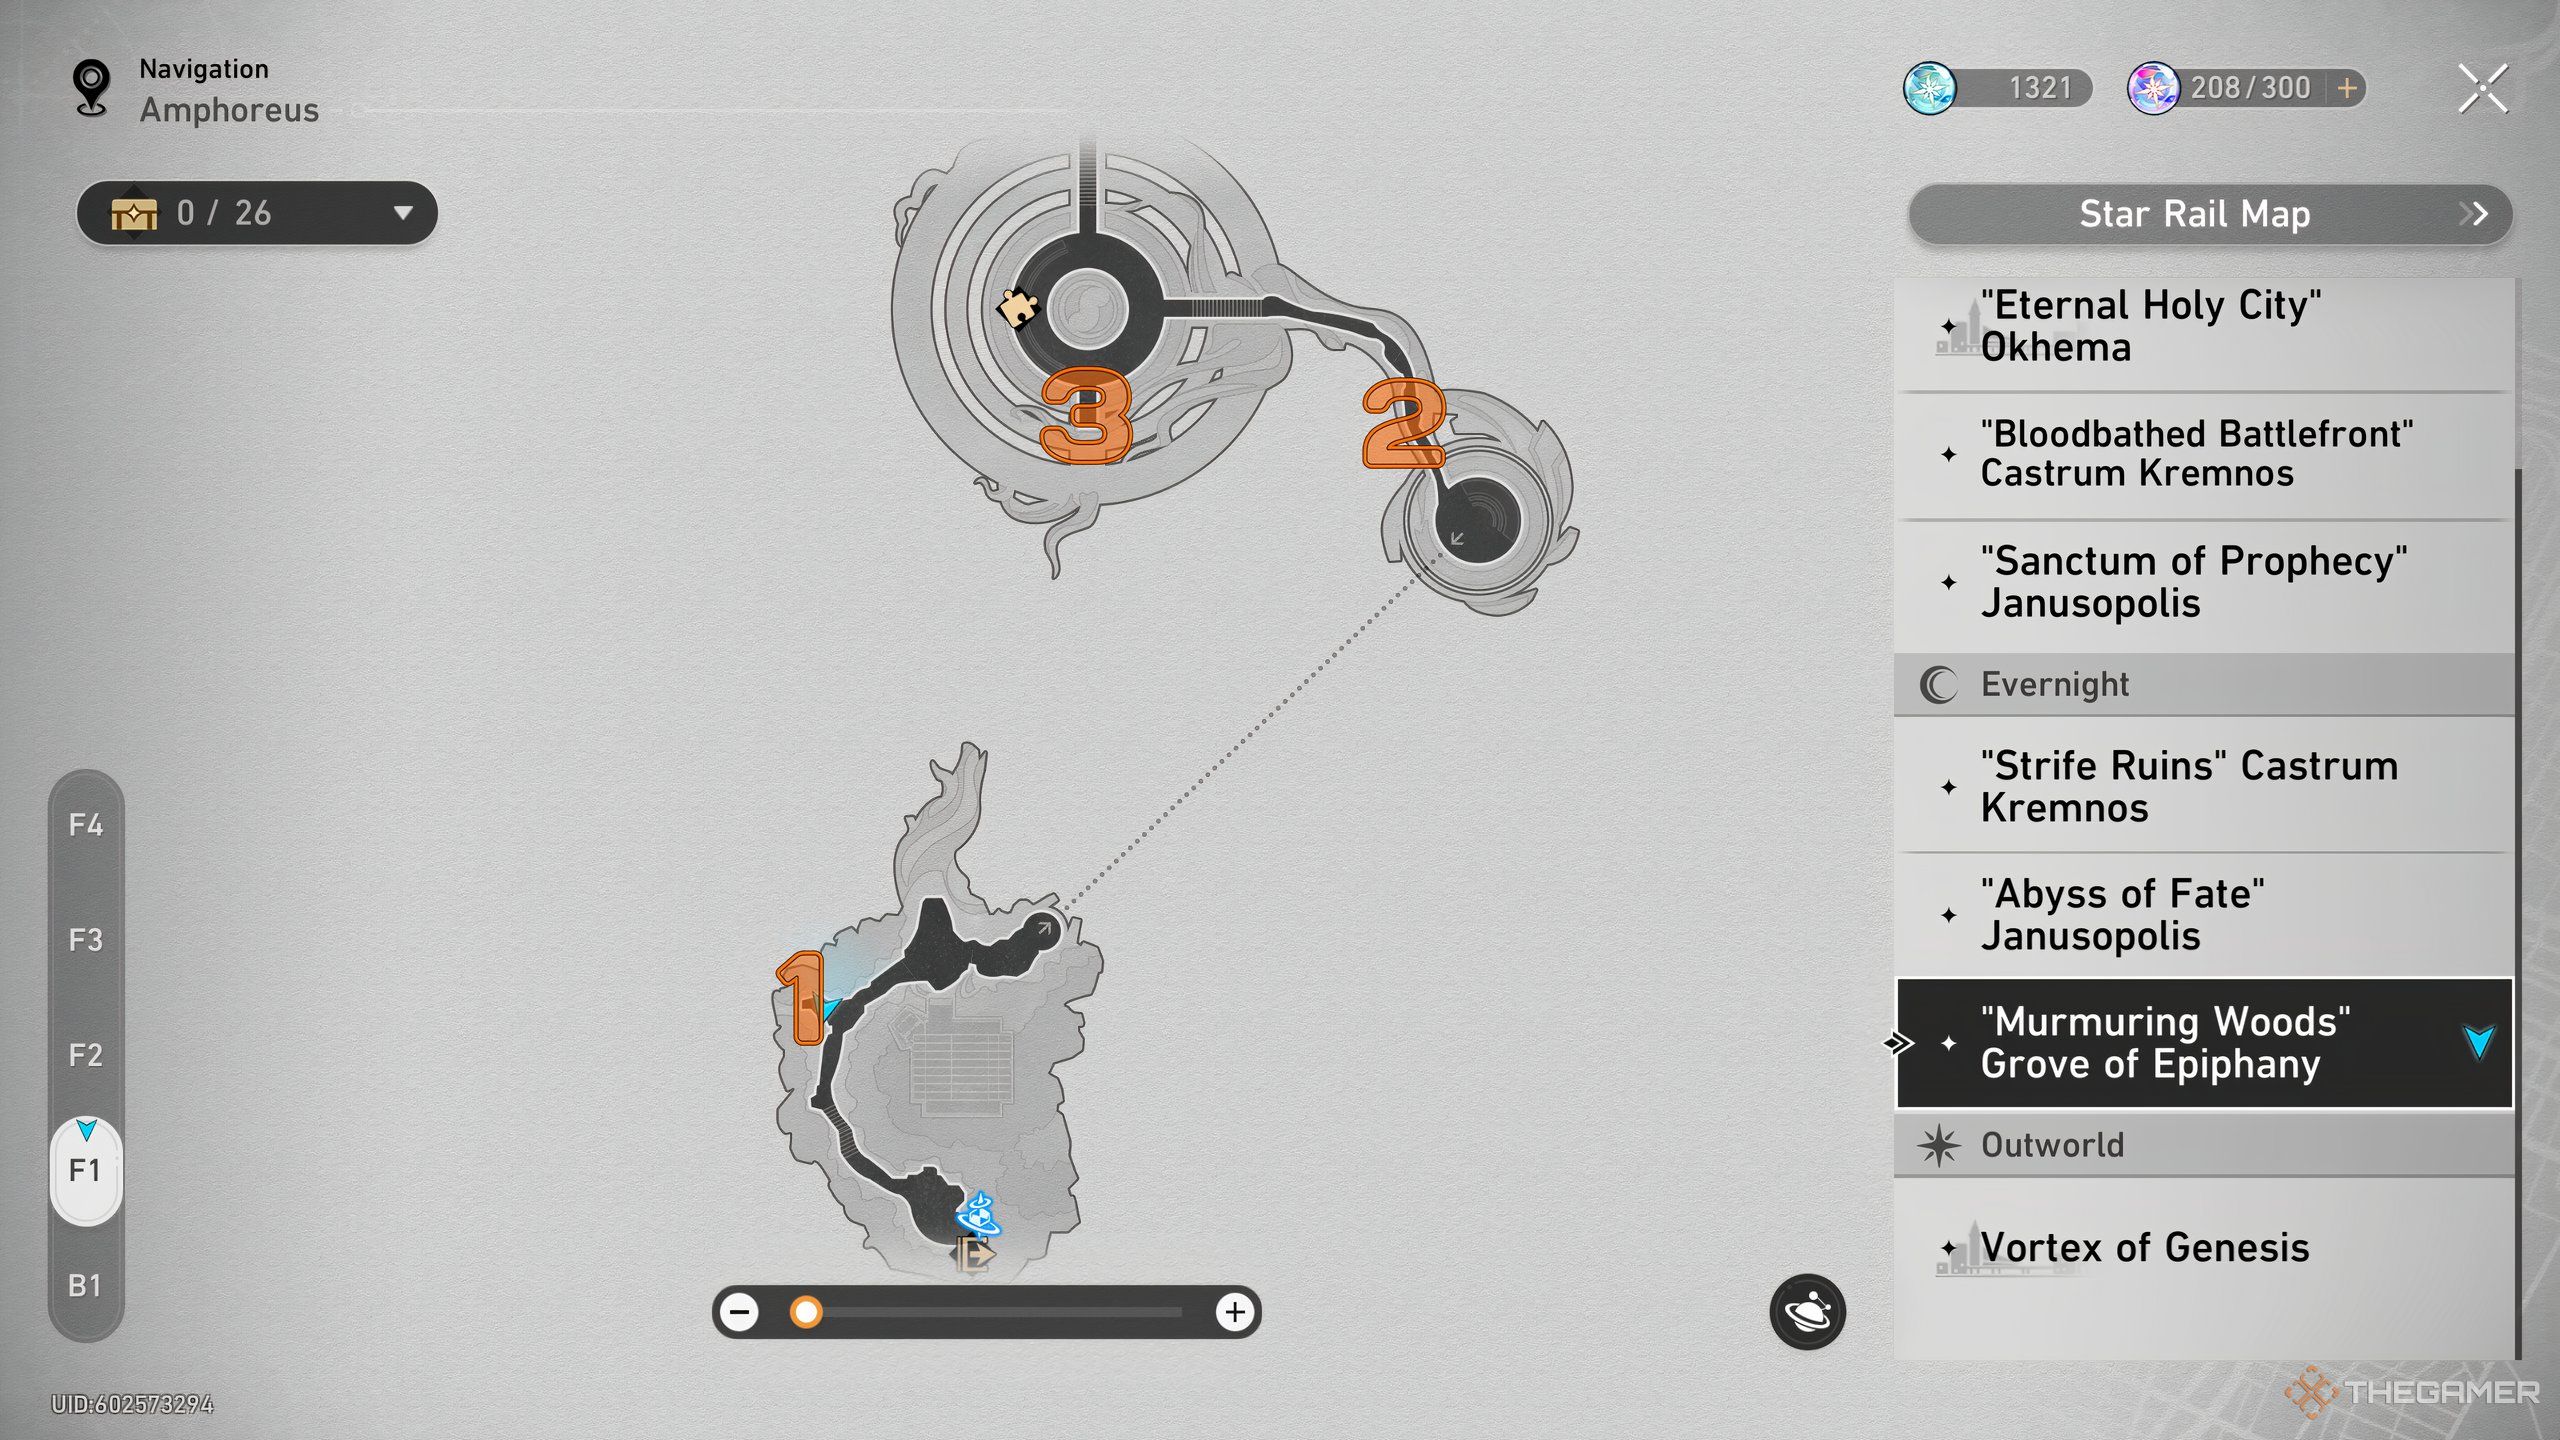
The “Woven Trail” serves as a compact area, or more precisely, a modest sector, that you initially explore when entering the Grove. It holds merely three treasure chests, making it an ideal launching pad for our quest to amass chests throughout this adventure.
| Chest Number | Location |
|---|---|
| 1 | The first chest is a little ways north of the Woven Trail Space Anchor, in a corner to the left as you overlook the Sacred Tree. |
| 2 | You’ll find this chest out in the open atop a branch bridge just after the first Janus Hidden Passage teleporter, northwest of the small rotunda with Janus’ Steed. |
| 3 | This chest hides behind a red, breakable shield to the south of the golden fish sculpture surrounded by columns. |
All Chest Locations On The Sacred Tree Basement Floor
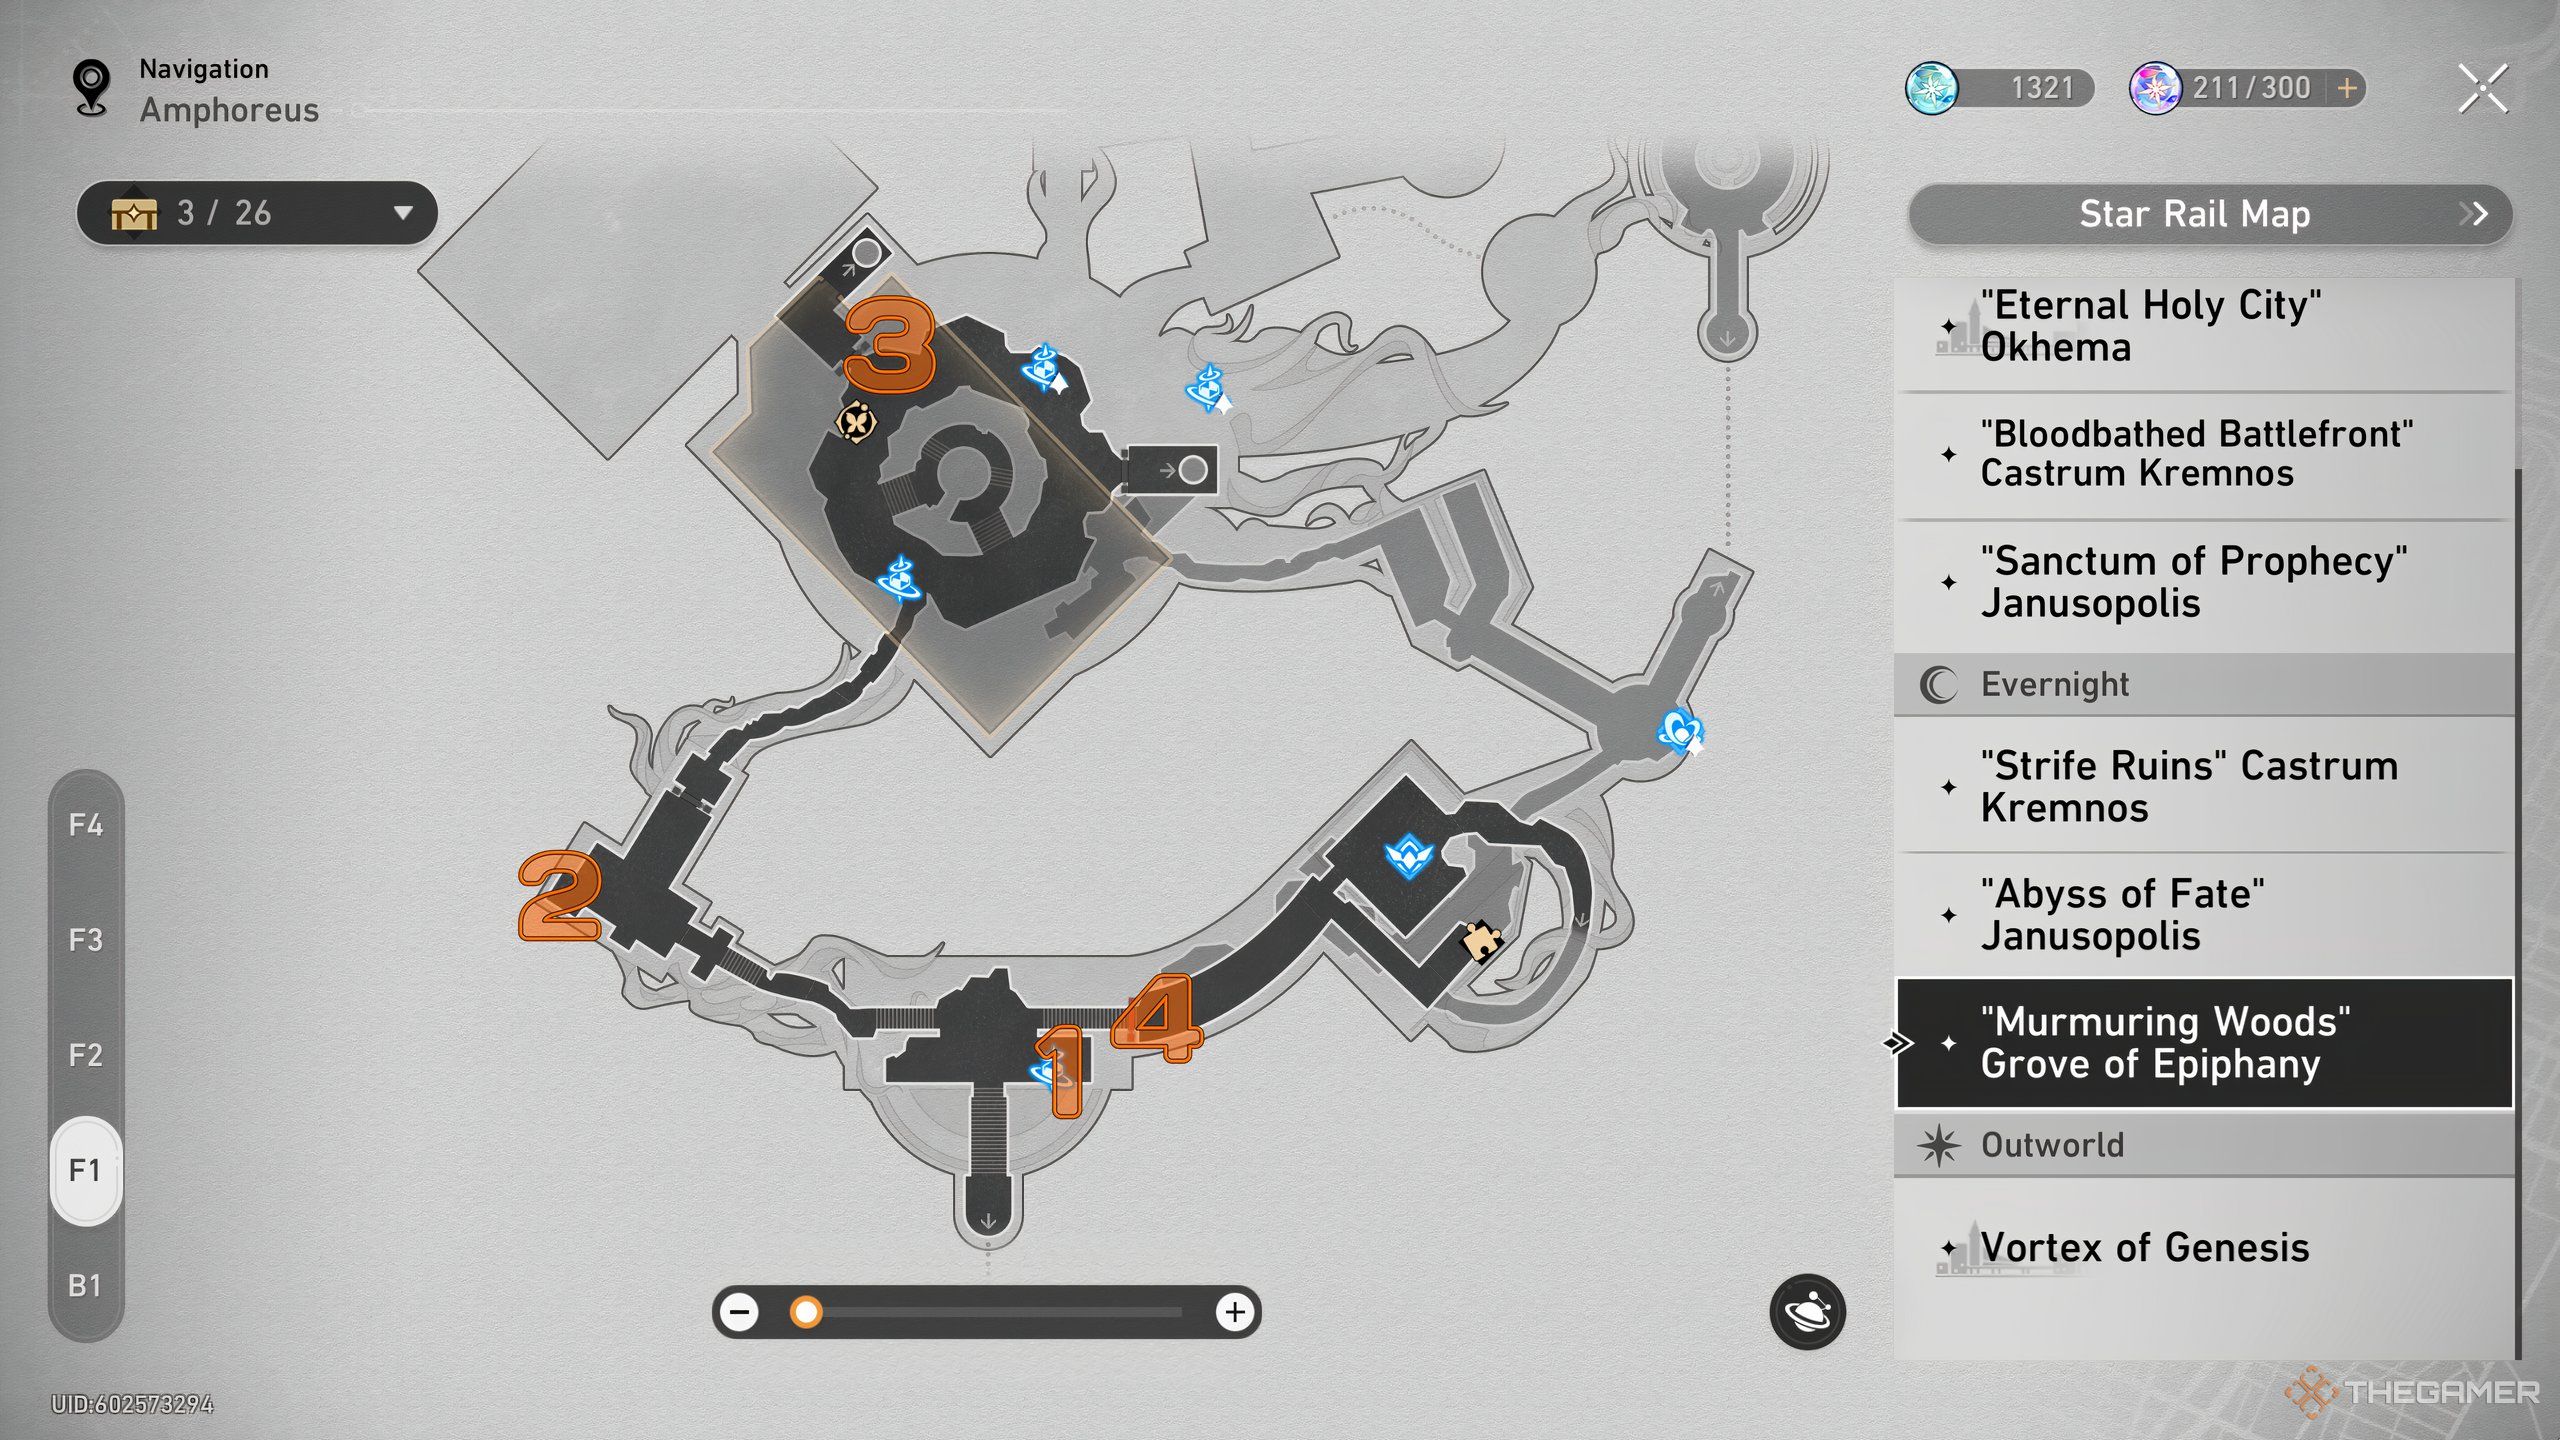
The lower part of the Sacred Tree predominantly serves as a area filled with puzzles, and you’ll discover no less than five hidden treasure chests there.
The underground part of the Holy Tree is mostly a puzzle-filled room, containing a total of five concealed treasure chests.
| Chest Number | Dawn/Evernight State | Description |
|---|---|---|
| 1 | Evernight | For this first chest, start at Dawn and take the flower down to the lower level. Change back to Evernight and cross to the middle of the lily pad bridge for your reward. |
| 2 | Evernight | Activate the Ichor Vessel to generate a flower elevator that can take you to the upper level. Unlock the gate, then activate the Miracle Orb to reveal the rest of the lily pad bridge. Go back down and cross the full bridge to find the chest near the pool. |
| 3 | Evernight |
Reaching this chest is involved. First, head up to the second level and move the Miracle Orb beam to shine under the right-hand bridge, revealing the chest. Next, you’ll need to solve the Prophecy Tablet across from the second chest. The steps are:
Solving the Prophecy Tablet opens another side of the Ichor Vessel. Return to it and take the newly available flower to the second level. Open the gate. Head to the end of the hallway across from the gate to reach the chest. |
| 4 | Dawn |
Continue left down the large hallway past the enemies, then open the gate by the Golden Scapegoat. Turn off the Miracle Orb, then retrace your steps and turn off the second Orb. From there, return to Oronyx’s Miracle to switch to Dawn. Cross the lily pad bridge, turn right, and claim your prize. |
| 5 | Dawn |
To reach this chest, turn the world back to Evernight and return to the Miracle Orb on the right-hand side of the room above the first Dawn chest. Turn it on and move its beam underneath the bridge across the room. Turn the time to Dawn and take the flower elevator on the left side of the room to the lower level. Your big reward awaits. |
All Chest Locations On The Sacred Tree First Floor
The Sacred Tree encompasses a total of four levels, and the treasure chests located on the ground level could necessitate traversing the upper floors if your intention is to access them.
The first floor only boasts four chests, but one takes some effort to reach.
| Chest Number | Location |
|---|---|
| 1 | You’ll find this chest next to the Serene Court of Learning Space Anchor shortly after you take the Hidden Passage across to the main section of the Sacred Tree. |
| 2 | Take the stairs left from the Serene Court Space Anchor, and you’ll find this chest behind a pair of breakable shields in the far southwest corner of the room you reach. |
| 3 | Proceed through the doors across from the second chest and into the Library of Philia. This chest is just north of the Garmentmaker who presides over the Grove. |
| 4 |
You’ll need to make a lot of additional progress to reach this chest. Take the waterwheel on the east side of the Library up and follow the path along the second floor, past and to the right of the Calyx, and to the ledge overlooking the blocked door at the entrance to the Sacred Tree. Best the Spiritthief to unlock the Ichor Vessel and use it to destroy the blocks on the floor below. Head back east and down to the first floor, past the Stagnant Shadow, then west to the chest near the locked door. |
All Chest Locations On The Sacred Tree Second Floor
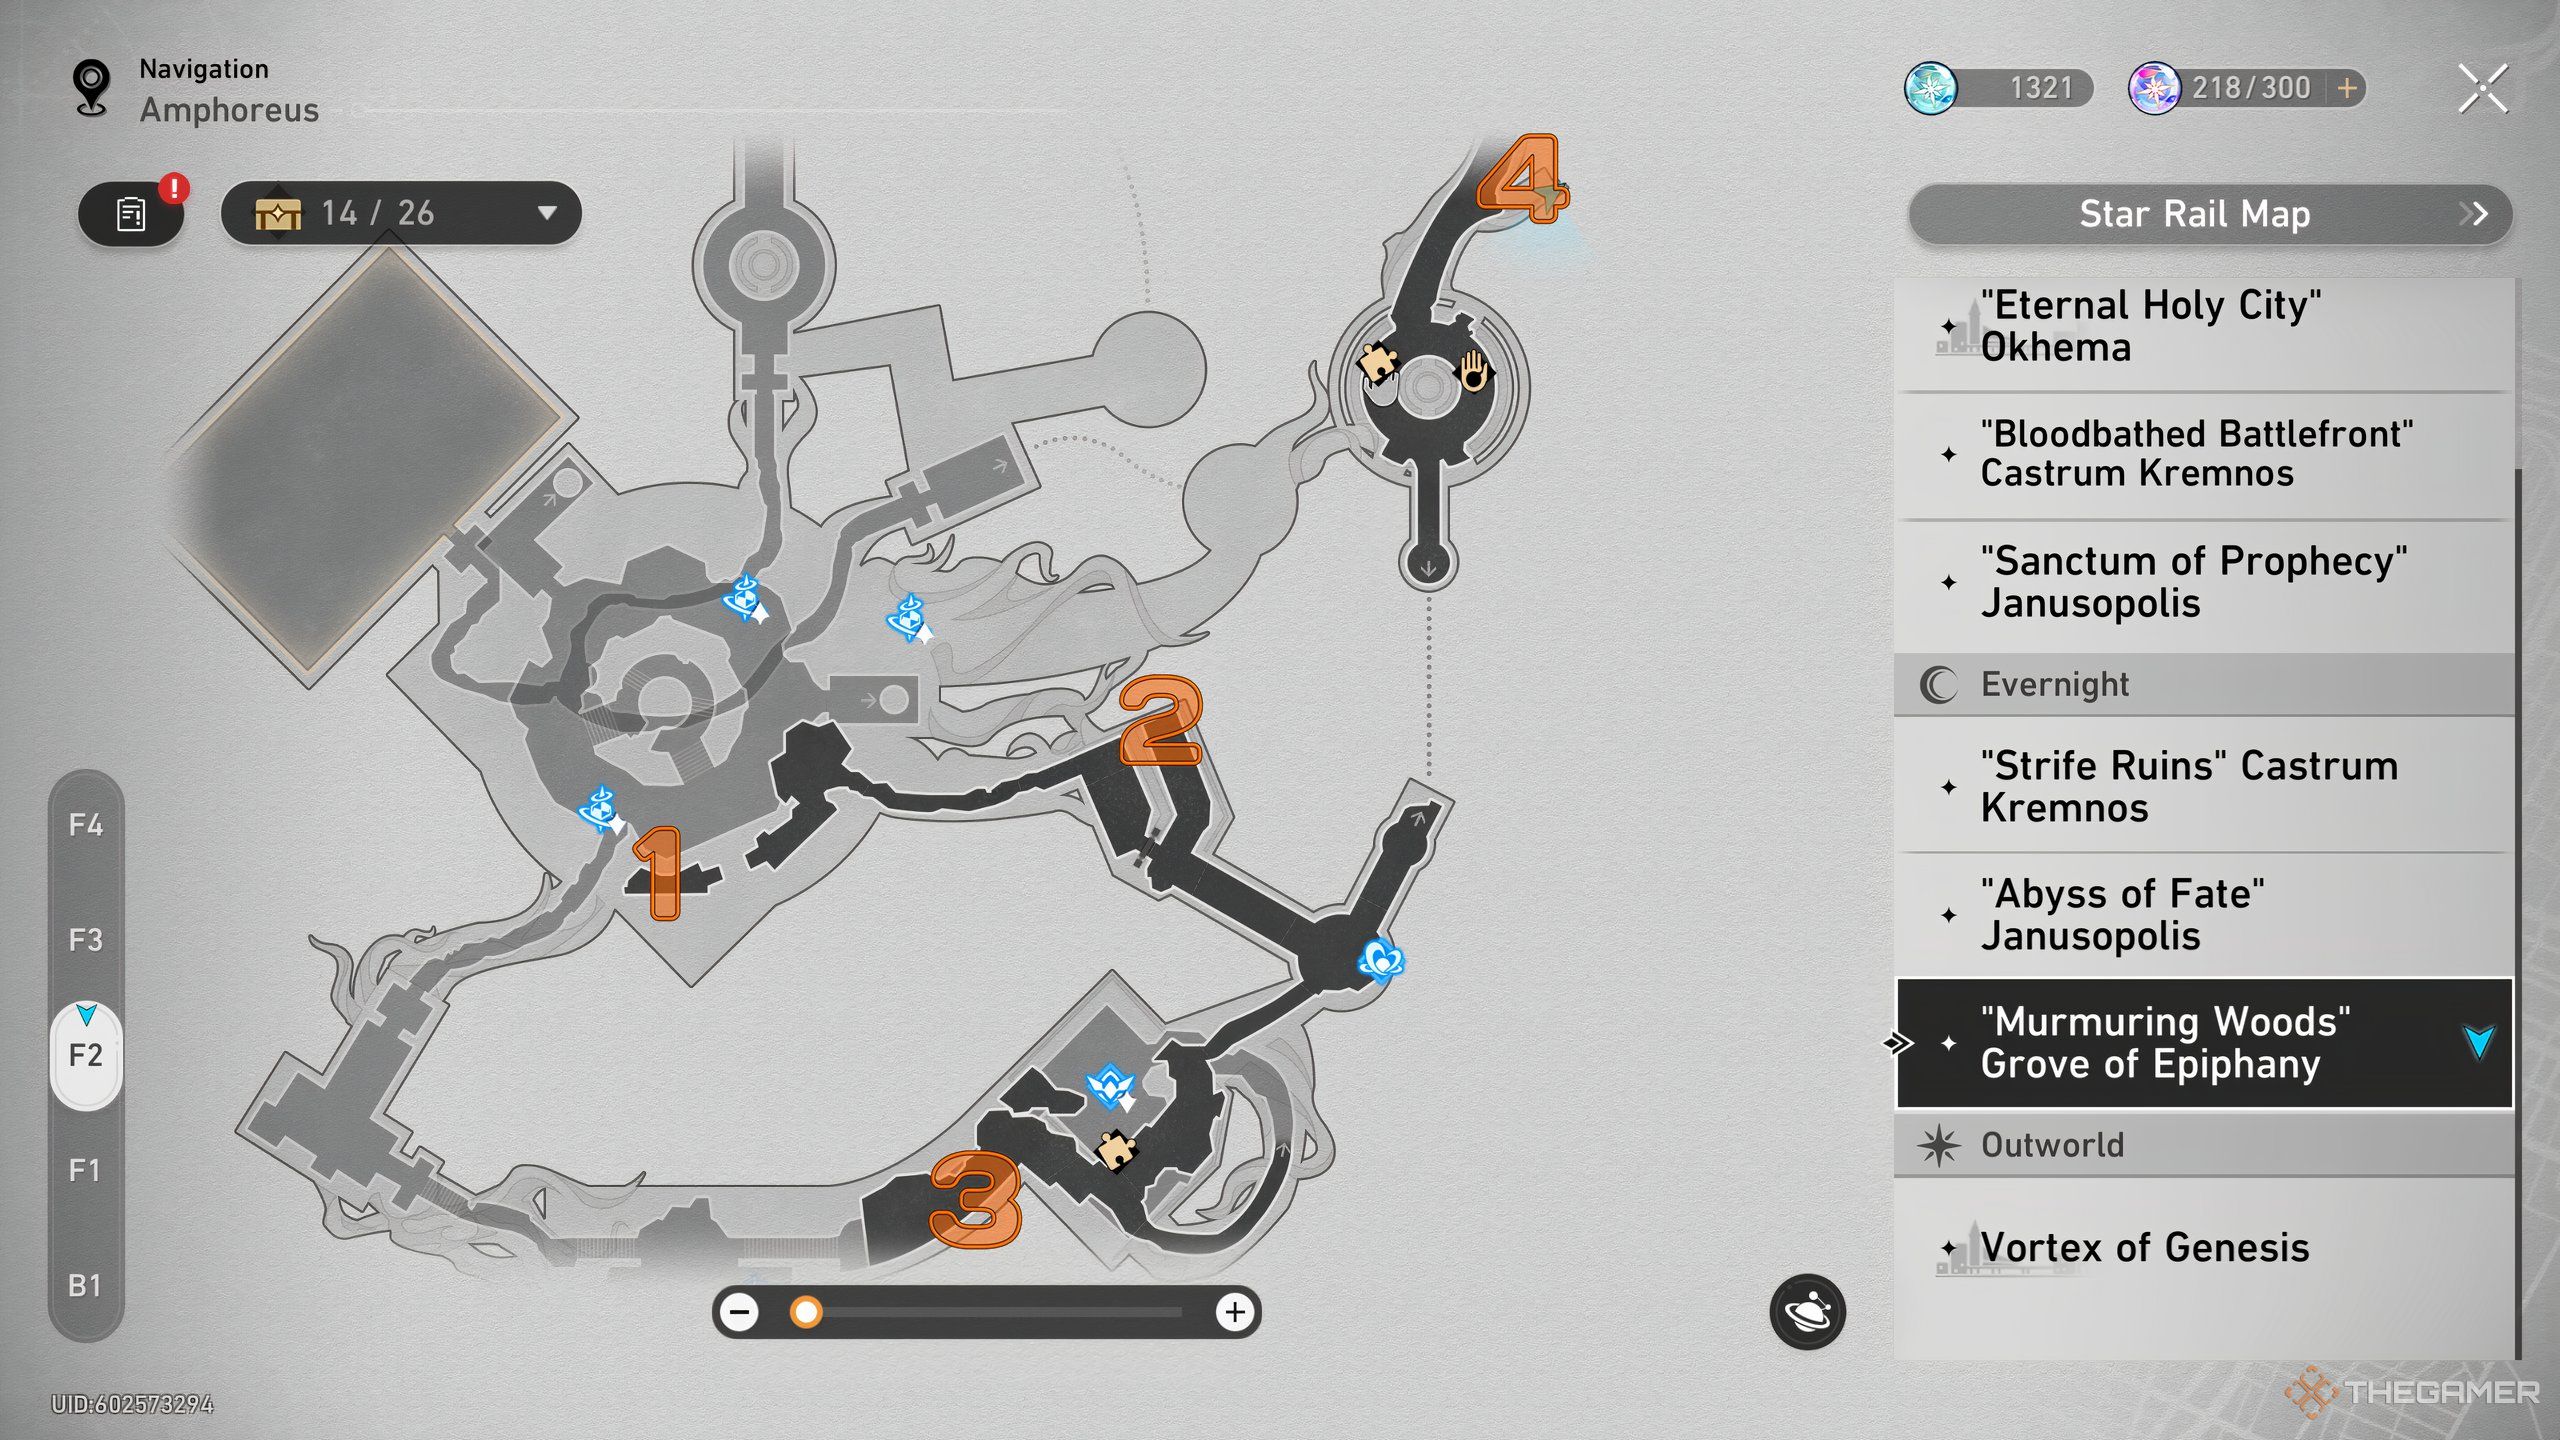
The second floor has four chests to find, some simple, others less so.
| Chest Number | Description |
|---|---|
| 1 |
To get to this chest, take the waterwheel up from the Library of Philia and make an immediate right at the top. You’ll need to best a Spiritthief to claim the chest, which means it will count for two on the tracker. The rewind marker is at the base of the golden flower in the center of the room if you have trouble finding it. |
| 2 | Proceed down the long hallway to the left of the waterwheel and through the door at the hallway’s end. The chest is in an alcove to the left beyond the door, guarded by a bird enemy. |
| 3 | To reach this chest, continue east until you come to an intersection with a Calyx. Keep right from the Calyx, and continue right until you get to a platform with an Ichor Vessel at its end. The chest is on the left-hand side of the platform before you reach the cube. |
| 4 | This chest is north of the Calyx at the intersection and beyond the Janus’ Hidden Passage teleporter. Head north through the rotunda, and you’ll see the chest on the right side of the path, guarded by a crouching enemy. You’ll need to capture the third and final Grove Spiritthief to get it, and you’ll get two chest markers for your trouble. |
All Chest Locations On The Sacred Tree Third Floor
You’ll move on to another area to collect almost all of the remaining chests. To get there, first use the Hidden Passage teleporter located north of Calyx, then continue along the path until you arrive at the zone where you previously saved Mem during the storyline.
| Chest Number | Dawn/Evernight State | Description |
|---|---|---|
| 1 | Dawn | For this chest, as soon as you enter the puzzle space from the seat, turn the room to Dawn. Then, take the stairs to your left and grab your reward next to Oronyx’s Miracle. |
| 2 | Evernight | This chest is nearby. Using the Miracle near the first chest, turn the time state to Evernight, then head past the elevator flower to the far wall. |
| 3 | Evernight | To find this chest, take the nearby elevator flower down, but don’t cross the bridge. Instead, open the gate and turn right to the other end of the pathway. At the top of the staircase on your left is an enemy guarding the chest and a dark tide purification node. |
| 4 | Evernight |
To get to this chest, ensure the lily pad bridge is complete. We’re still not crossing the bridge, instead going to the other end of the pathway to solve the Prophecy Tablet:
Solving the Tablet creates an elevator on the other side of the area, which you’ll need later. For now, head across the lily pad bridge, turn right, and grab the chest at the end of the path. |
| 5 | Evernight | To reach this chest, use the elevator flower you created to reach the upper level, then open the left-hand face of the Ichor Vessel to free the ball. Let the ball destroy the wooden blocks, then grab the chest that was once behind them. |
| 6 | Evernight | For the final chest of the puzzle space, take the nearby elevator flower down, then turn right, activate the Hidden Passage teleporter, and take another flower further down. Turn right from the crystal where you saved Mem for your reward. |
The Chest Location On The Sacred Tree Fourth Floor
There is a single chest located on the fourth floor of the Sacred Tree, specifically in the arena where your initial battle with the Flame Reaver took place. Since you were only aware of it as the unknown symbol at the time, you’ll need to revisit that area to retrieve the chest.
The chest can be found at the rear, slightly to the right side of the arena, positioned close to a mural displaying rocks and butterflies.
Read More
- Who Is Harley Wallace? The Heartbreaking Truth Behind Bring Her Back’s Dedication
- 50 Ankle Break & Score Sound ID Codes for Basketball Zero
- 50 Goal Sound ID Codes for Blue Lock Rivals
- KPop Demon Hunters: Real Ages Revealed?!
- Lottery apologizes after thousands mistakenly told they won millions
- 100 Most-Watched TV Series of 2024-25 Across Streaming, Broadcast and Cable: ‘Squid Game’ Leads This Season’s Rankers
- Umamusume: Pretty Derby Support Card Tier List [Release]
- J.K. Rowling isn’t as involved in the Harry Potter series from HBO Max as fans might have expected. The author has clarified what she is doing
- Ultimate AI Limit Beginner’s Guide [Best Stats, Gear, Weapons & More]
- Mirren Star Legends Tier List [Global Release] (May 2025)
2025-03-03 23:37