
A developer from the Arrowhead team is confident in their challenge and offering a $1,000 reward to the first team that can complete the hardest operation (Difficulty 10) under specific conditions. Players will need to leave their best equipment behind – no overpowered boosters or top-tier weapons allowed. The Oshaune Challenge isn’t just about finishing the operation, it’s about demonstrating mastery of the game using limited resources. It’s a tough test of skill with a valuable prize and serious bragging rights up for grabs.
Key Takeaways
- Focus on objectives, not elimination: Success on Difficulty 10 requires a tactical shift. Your goal is to complete the mission and extract, which means picking your battles, avoiding unnecessary fights, and prioritizing the small bots that call for reinforcements.
- Communication is non-negotiable: A successful run depends on your squad acting as a single, coordinated unit. Use your mic to call out patrols, announce stratagem throws, and stick to a shared plan, because teamwork is the only way to survive.
- Get creative with your classic gear: This challenge forces you to master the fundamentals without meta crutches. Build effective loadouts with your base game arsenal, focusing on synergy and tactical tools like smoke grenades to control the battlefield.
What is the Arrowhead Dev Oshaune Challenge?
Looking for the biggest challenge Helldivers has to offer? The Oshaune Challenge, created by one of the game’s developers, is a community event designed to truly test even the most experienced players. The rules are simple: finish and escape a Difficulty 10 operation using a specific, unconventional loadout – and broadcast the whole attempt live.
This isn’t just a test of endurance; it’s a chance to demonstrate your ability to win on skill alone, without depending on common strategies. It truly assesses your tactical thinking, how well you work as a team, and your capacity to handle intense situations. The game’s creator designed this difficult challenge to find out who can succeed even when facing the most challenging circumstances. If you’re confident in your abilities, now is the time to show what you’ve got.
The $1,000 Prize and Official Rules
Adding to the excitement, a $1,000 prize is up for grabs! The challenge creator will donate this amount to the first individual or team that manages to complete it. It’s a great motivation to participate and demonstrate your skills to the community. To succeed, you need to finish all objectives during a D10 operation and safely evacuate with your whole team. You can find complete details, including how to make your attempt official, in the original challenge post.
Banned Gear and Restricted Items
This challenge really pushes your abilities. To make sure it’s a true test of skill, we’re limiting the gear you can use. Specifically, the popular “Booster Trio” – Hellpod Space Optimization, Vitality Enhancement, and Stamina Enhancement – are banned because they’re considered overpowered. You’re also restricted to gear from the base game and the two latest Warbonds. This means you’ll need to be resourceful and experiment with less common weapons and tactics. It’s about stepping outside your usual gameplay and finding new ways to succeed, as you can’t rely on your favorite loadout. Every choice you make will be crucial.
Why Difficulty 10 is the Ultimate Test
If you’ve been playing Helldivers 2 and trying to liberate planets, you’ve probably noticed it’s a challenging game. The difficulty can range from very easy to incredibly hard, with Difficulty 10 being a real test. It’s not just about facing more enemies – D10 completely changes how you need to play. It’s a tough, relentless experience that pushes your skills – aiming, moving, strategy, and teamwork – to their absolute limit.
The Oshaune Challenge is so engaging because it’s incredibly difficult. It removes the usual advantages players rely on, forcing them to depend on genuine skill and teamwork. Succeeding on D10 demands a thorough knowledge of the game, how enemies act, and how to maximize limited resources. What you bring to the fight matters less than how you think. Each choice is critical, resources are scarce, and one error can quickly wipe out your entire team. This is when Helldivers truly comes alive, evolving from a lighthearted co-op shooter into a tense, tactical experience that builds strong bonds through hardship and triumph. It represents the best the game has to offer, testing even the most experienced players.
What Makes D10 So Brutal?
Moving to D10 difficulty is a huge leap. You’ll immediately encounter many tough, heavily armored enemies, frequent security breaches, and relentless waves of robots that are hard to control. The game throws everything at you all at once, demanding constant movement and quick thinking. However, the biggest challenge isn’t just the intensity – it’s the lack of room for mistakes. As one player noted, you can’t carry teammates who aren’t performing well. On D10, everyone needs to contribute fully. There’s no margin for error, making clear communication and strong teamwork essential to survive. It’s the hardest level, and it requires flawless play from the entire squad.
The Real Goal: Extraction or Objectives?
When playing on easier levels, you can usually defeat all enemies. But on the highest difficulty (D10), that strategy will lead to failure. The point isn’t to kill everything, it’s to finish your goals and escape. You’ll need to choose your fights carefully and know when to retreat. Success on D10 requires being efficient and moving strategically. Focus on what you need to do to complete the mission, and take the easiest path. This means targeting important enemies first – like those that call for backup – and using stealth and good positioning to avoid fights you don’t need. It’s about outsmarting the enemy, not overpowering them.
What Gear Can You Actually Use?
Now that the most powerful gear isn’t allowed, you might be thinking your options are limited. But don’t worry, you still have plenty of strong tools to use! The Oshaune Challenge isn’t about having the worst equipment – it’s about showing you can win even without the most commonly used, over-powered items. This is a great opportunity to be inventive and demonstrate how well you understand the fundamental parts of the game and its original weapons.
Winning depends on making clever decisions and using your equipment effectively. Instead of simply choosing the most powerful items, think about how they work together, how accurately you can use them, and how well they let you adjust to changing situations. Let’s take a look at the gear you’ll need to survive and successfully reach the extraction point.
Your Base Game Arsenal
Consider this challenge a chance to go back to basics. You can use almost any Warbond gear, excluding the two newest ones. That means your favorite, well-worn equipment from the beginning is useful again! Take a break from the newest items and concentrate on the gear you originally mastered. This creates a more even playing field and highlights player skill. It’s a perfect time to rediscover classic weapons and strategies you might not use often, but that are still powerful when used well.
Approved Warbond Alternatives
Okay, so forget about the standard strategies – they just won’t cut it here. It’s not really about what extra weapon I bring, but how I use what I’ve already got to deal with everything coming at me. Seriously, my biggest focus has to be taking out those little bots that call in more enemies. Specifically, I need to prioritize the sword guys and the rocket troopers first. If I let them get a signal out, things get really bad, really fast. By taking them down quickly, I can keep the battle under control and stop a simple fight from turning into a total disaster.
Winning Weapon and Stratagem Combos
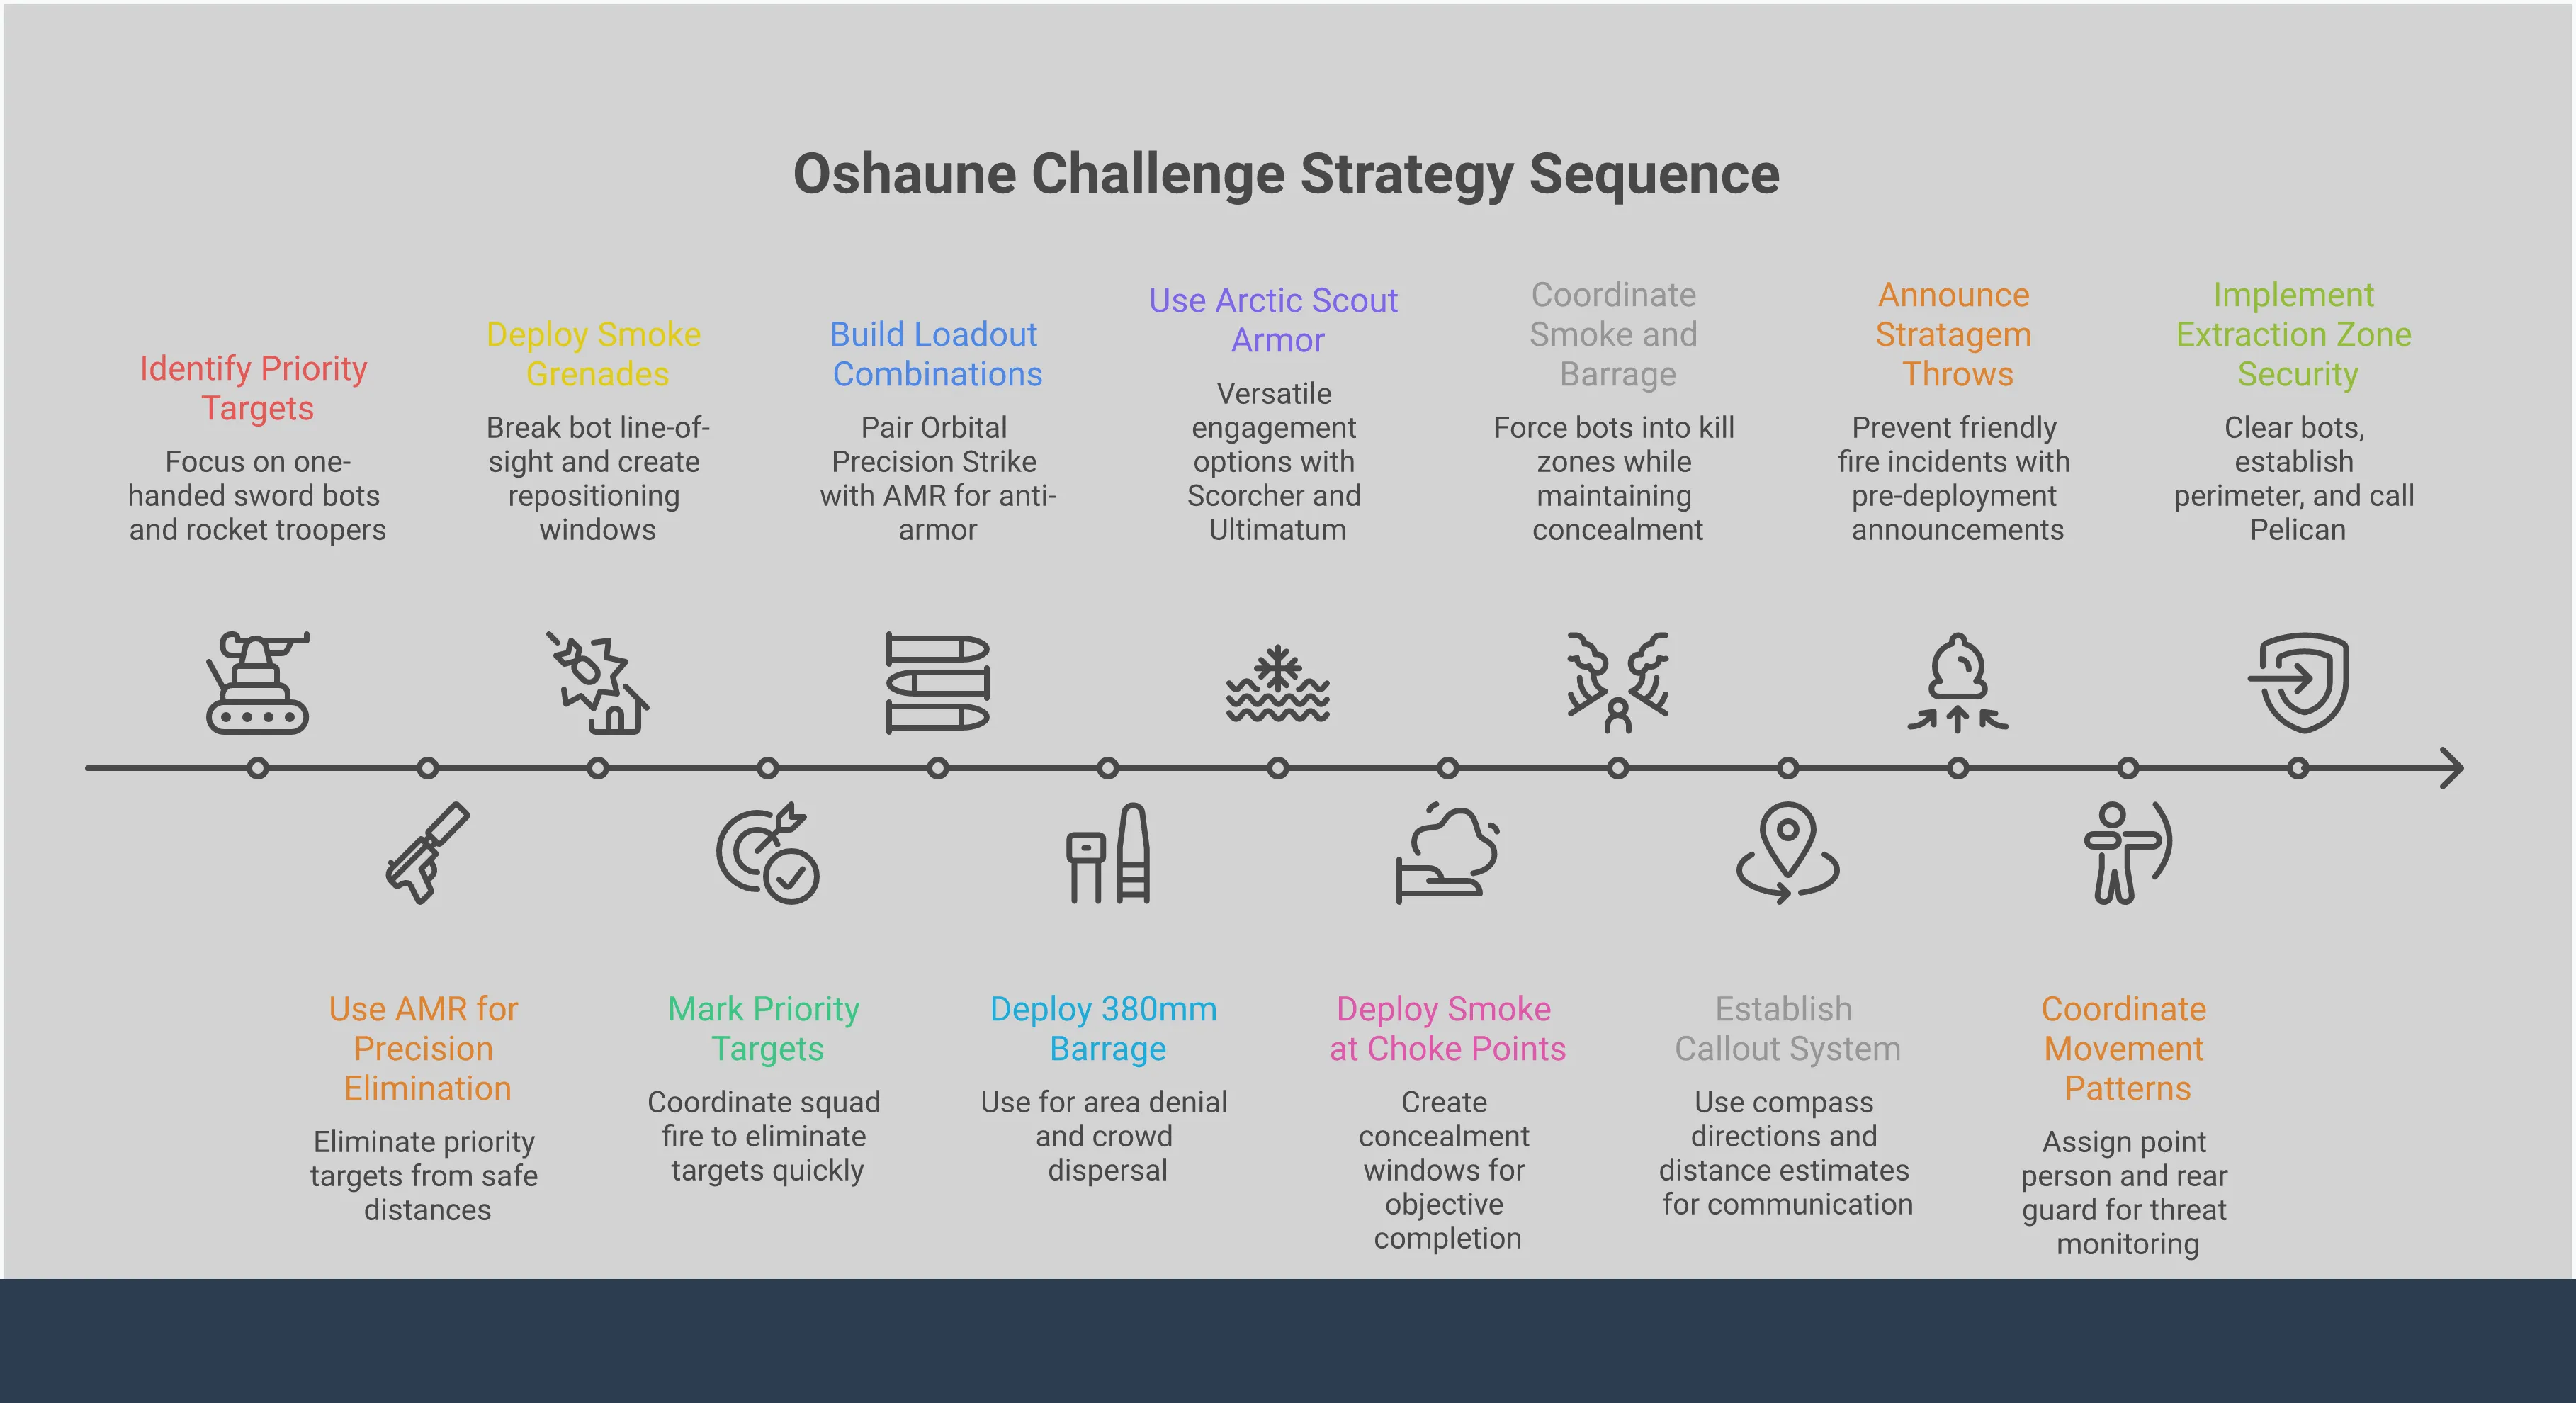
Players are discovering strong strategies that excel on the hardest difficulty (Difficulty 10). A popular approach combines Orbital Precision Strike, the 380mm Barrage, and an AMR weapon, leaving room for one more item tailored to the specific mission. This setup offers both focused damage against single targets and powerful area-of-effect attacks. Another effective strategy uses the Arctic Scout Armor for its versatility, alongside the Scorcher, Ultimatum pistol, and Thermite Grenades. These combinations show that even without the previously banned equipment, players can still be incredibly effective.
How to Survive D10 Without the Meta
Playing on the highest difficulty without your best equipment feels much harder, but it’s definitely achievable. Winning isn’t about having the strongest weapons; it’s about strategy and skill. Focus on the basics: choosing your battles carefully, coordinating with your team, and making every shot count. If you master those three things, even the most challenging missions will become easier.
Master Target Priority and Positioning
In a fight, it’s natural to target the biggest enemy, but resist that urge. Focus on smaller, weaker units first, particularly those that can call for backup. Eliminating quick threats like sword-wielders and rocket troopers before they alert others can prevent a small fight from becoming a huge problem. A key strategy for D10 missions is to prioritize the objective. Avoid getting stuck in unnecessary battles; if there’s an easier route, take it. Remember, your goal is to escape, not to eliminate every enemy.
Coordinate and Communicate with Your Squad
This challenge requires teamwork – you can’t complete it alone. Constant communication is key to success. Share information about enemy patrols, when you’re using special abilities, and make sure everyone understands the plan. If you’re playing with newer players, be patient and help them out. Helping a teammate can be tough, but it also strengthens your team’s bond. Don’t be afraid to change your strategy if things aren’t working. It’s better to succeed on a lower difficulty level with good coordination than to repeatedly fail on a higher one.
Conserve Your Ammo and Resources
In D10, every item and consumable is valuable, so careful planning is key. A strong, but not necessarily popular, setup often includes calling in an Orbital Precision Strike, using the 380mm Barrage to control areas, and employing an Anti-Material Rifle against high-priority targets. Beyond what you equip, smoke grenades are surprisingly useful. Throwing one down can block enemy vision, giving you vital time to reload, move to a safer spot, or escape trouble. Mastering smoke can often be the difference between success and failure, letting you dictate how fights play out.
The Most Effective Loadouts for the Challenge
Even though the challenge limits what gear you can use, you can still create a strong setup to help you survive and escape. Winning on the hardest difficulty isn’t about using the strongest abilities; it’s about combining abilities intelligently to cover all your needs. You’ll need a balance of long-range attacks, ways to control groups of enemies, and ways to move quickly to deal with the constant waves of robots. Don’t just pick the most popular choices – instead, focus on reliable combinations that require skill and teamwork. These setups will give you a good chance of survival, but only if you work together.
Precision Strike and AMR Combos
Need to take out tough enemies like Hulks or heavily armored towers from afar? The Anti-Material Rifle (AMR) is your go-to weapon. Combine it with an Orbital Precision Strike for a powerful one-two punch against high-priority targets – weaken them with the strike, then finish them off with a precise shot. One player recommends this combination as part of a D10 bot strategy, leaving a third slot open to customize for each mission. This setup gives you strong armor-piercing power while still letting you adapt to any challenge.
Crowd Control with the 380mm Barrage
As a Helldiver, I can tell you getting overrun by bots is the quickest way to end a mission. That’s where the 380mm Barrage really shines! It’s honestly a bit wild, but nothing beats how much area it covers with explosions. It’s perfect for breaking up those huge groups of bots and flushing them out of whatever they’re hiding behind. It’s not about pinpoint accuracy, it’s about creating total chaos. A lot of us agree the best way to use it is to “SMOKE OUT THE BOTS!” Seriously, it can wipe out a heavily defended spot, giving my team the space we need to either push forward or fall back safely. It’s a game-changer for controlling the battlefield.
Mobility with the Jump Pack
In the Oshaune Challenge, moving around effectively is just as crucial as accurate shooting. The Jump Pack is a powerful new tool that lets you quickly reach higher ground for a better view or escape dangerous situations. It allows for new strategies, like surprising enemies from the side or leading them away from your team. Players are already experimenting with different equipment setups, especially for team play. Having one or two players equipped with Jump Packs can significantly improve your team’s chances of survival and give you more tactical flexibility, letting you turn a difficult defense into a dynamic, mobile fight.
Common Mistakes That End a D10 Run
The Oshaune Challenge at Difficulty 10 is notoriously difficult, even for experienced Helldivers. One small mistake can force you to start over. Surprisingly, most failures aren’t due to a lack of skill, but simple, avoidable errors. To improve your chances of success, it’s important to know what can quickly turn a good mission into a failed attempt to escape. Here are the three most common mistakes that will end your D10 run quickly.
Ignoring Your Surroundings
In Helldivers, especially on the highest difficulty, staying alive depends on being completely aware of your surroundings. This means more than just watching for enemies – you need to understand the map, potential bottlenecks, and what your teammates are doing. One player noted that helping less skilled teammates adds extra challenge, so knowing everyone’s strengths and weaknesses is crucial. Are they staying together as a team? Are they using ammo effectively? If you don’t pay attention to these things, you won’t be able to adjust to the challenges of the mission. Always be aware of everything around you, not just what you’re aiming at.
Losing Control of the Battlefield
When a massive Bile Titan shows up, it’s tempting to panic, but it’s usually the smaller enemies that really cause problems in Helldivers. Letting those little threats build up quickly leads to chaos. As experienced players know, focusing on and eliminating small bots first is crucial – they constantly call in reinforcements. Just one bot summoning a dropship can turn a decent fight into a hopeless situation. Learning to prioritize targets is key, and always deal with the enemies that summon more first. Once you’re overwhelmed by enemy numbers, it’s incredibly difficult to recover.
Failing to Communicate and Coordinate
Even the best players will struggle if they don’t work as a team. On D10, a lack of communication can quickly lead to failure. Everyone in your squad needs to understand the plan and work together. As one player put it, focus on achieving the objective – whether that means pushing forward, defending a point, or finding an alternate route – and choose the easiest, most efficient way to do it. This requires constant communication: let your team know about enemy patrols, what tactical abilities you’re using, and agree on a strategy together. A well-coordinated team that works with a clear purpose will always be more effective than four players acting alone. Use your microphone and the ping system to keep everyone informed about the team’s plan.
How to Plan Your Challenge Run
Starting a D10 mission without a plan is a recipe for disaster. The Oshaune Challenge isn’t just about shooting well; it requires teamwork, strategy, and a clear plan before you begin. A little preparation in the pre-mission lobby can mean the difference between successfully completing the mission and failing quickly. Consider it a quick team meeting to discuss your goals, what everyone does best, and how you’ll react to the unpredictable challenges ahead. You don’t need a strict, detailed plan, but a flexible strategy that everyone understands and can adjust as things change.
Choose the Right Mission and Team
Let’s be clear: Helldiving is a team effort. Your success depends on working with a good squad – one that communicates well and stays focused on the mission. Experienced players recommend finding the easiest way forward, whether that’s a direct attack or a clever flanking move, and making sure everyone understands the plan. Don’t hesitate to include newer players, either. Helping a teammate learn is challenging, but incredibly satisfying when you all survive. It really tests your skills and builds strong teamwork.
Secure Your Extraction Zone
Reaching the extraction point is just the first step—you also need to hold your ground. Before the Pelican lands, your team must secure the area. Focus on eliminating small, fast-moving enemy bots that can call in reinforcements. Taking out these bots—especially those with swords or rocket launchers—will prevent a small fight from becoming a massive attack. Once those immediate threats are dealt with, set up a strong defense. Move to the front lines, block enemy paths, and create a safe zone around the landing site. A strong, proactive defense gives you the best chance of escaping safely.
Assign Roles and Have a Backup Plan
Successful teams work best when everyone has a specific job. Knowing who’s responsible for what – like taking out heavily armored enemies or managing groups of robots – is crucial. It’s also important to have a variety of weapons and abilities. For instance, one player could focus on taking down single, powerful targets, while another deals with large numbers of weaker enemies. But having the right equipment isn’t enough. You also need a plan. Using smoke to hide your movements and confuse robots is a simple but effective tactic, giving your team time to move or complete their goals. And always be prepared for things to go wrong – have a backup plan ready so your team doesn’t fall apart under pressure.
Skills to Master Before You Try
Before tackling a D10 mission for this challenge, make sure you’ve really mastered the basics. It’s not about having the best equipment, but about skillfully using what you have. Treat easier missions as practice. Focus on these core skills – they’re crucial for keeping yourself and your team alive when things get tough. Getting these fundamentals right can be the difference between a successful mission and a devastating failure.
Perfect Your Movement and Positioning
In D10, managing the hectic battles relies on quickly identifying and eliminating key threats. Focus on destroying the small, fast-moving robots – especially those with swords or rocket launchers. These units act as alarms, immediately summoning reinforcements that can quickly overwhelm you. Taking them out first prevents the situation from escalating. This is crucial for success on harder difficulty levels. Always keep track of where these robots are and make them your primary target.
Learn Enemy Attack Patterns
Success in D10 isn’t about quick reactions; it’s about anticipating what your opponents will do and stopping them. A really effective technique is to use smoke to hide your movements and confuse the enemy bots. Smoke grenades or similar tools let you break their vision, giving you time to move, reload, or help a teammate without getting shot at. This lets you fight on your own terms, rather than just responding to attacks. Mastering these strategies will significantly improve your chances of winning by putting you in control of the battle.
Nail Your Stratagem Timing
Good equipment is important, but knowing when to use it is what truly makes or breaks an operation. A strong setup for practice includes the Orbital Precision Strike and 380mm Barrage, along with an Anti-Material Rifle. However, timing is even more crucial. Simply calling in a barrage on a large enemy group isn’t enough. You need to predict where enemies will move and use your abilities to block their path or hit them as they appear. Becoming skilled at timing your favorite bot support tools is key to handling enemy waves successfully.
Why We Love an Impossible Challenge
There’s something incredibly appealing about tackling a challenge that feels impossible. Gamers especially understand this – we’re often attracted to quests that truly test our abilities, going beyond just fast reactions. The Oshaune Challenge is a great illustration of this. It removes common advantages and forces players to depend on their raw skill, smart planning, and cooperation. It’s more than just about winning or the rewards; it’s about the satisfaction of overcoming huge obstacles.
This type of challenge gets to the heart of what makes gaming fun. It’s about the excitement of a plan coming together flawlessly, or the funny chaos when things go completely wrong – something many gamers can relate to. It pushes you to improve your skills, stay patient, and work well with others, even when the pressure is on. What’s really special about a challenge like this is the feeling of accomplishment you get from solving something difficult, and the strong connections you make with the people you’re playing with. These shared experiences – the struggles and the victories – are what create the most lasting gaming memories.
The Thrill of Beating the Odds
There’s nothing quite like winning when you’ve been on the brink of losing. The hardest difficulty level is incredibly challenging, but definitely not impossible. The trick is to stop relying on overwhelming force and start focusing on smart, careful plays. As one experienced player said, you need to “fight for the objective… find the easiest, most efficient way forward.” Every choice you make is important – whether it’s building smaller units to call for backup or knowing when to retreat. It’s about being clever and strategic, not just having more firepower. This extra layer of strategy is what makes winning so rewarding. It feels like you’ve solved a difficult puzzle under intense pressure, with dangerous enemies constantly attacking.
Forging Friendships Through Failure
Although everyone strives to win, it’s often the shared failures that truly define the experience. There’s something special about bonding with teammates in tough situations – like when you’re all out of ammo and laughing at how crazy things have gotten. Many players actually enjoy helping less experienced teammates, seeing it as a fun challenge and appreciating their gratitude. It’s not about being better than others, but about working together and sharing the struggle. Events like the Oshaune Challenge highlight that the best part of gaming can be the sense of community that comes from tackling a difficult task as a team.
Related Articles
- Deus Ex LFG: Connect with Other Augs in LFG Feature on Z League App
Frequently Asked Questions
Why take away the strongest equipment? Shouldn’t the focus be on winning? While winning is the ultimate goal, this challenge is meant to test your skills, not just the gear you use. By limiting the most powerful, or ‘best,’ equipment, players are encouraged to focus on core skills like teamwork, smart positioning, and overall strategy. This creates a fairer playing field and ensures that victory truly reflects your abilities as a Helldiver, regardless of the tools you have.
You can try the challenge with fewer than four players, but it’s really meant to be played with a full team. Level 10 is extremely difficult, and succeeding depends a lot on everyone working together to handle lots of enemies. If you manage to complete it with just one or two people, that would be a very impressive accomplishment!
If you could focus on learning just one thing for this challenge, it should be how to prioritize targets. At the highest difficulty level, the biggest enemies aren’t necessarily the biggest threat. It’s crucial to quickly spot and destroy the smaller robots that call for backup. Letting even one of those bots raise an alarm can quickly lead to overwhelming numbers and mission failure. Keeping the number of enemies under control is the most important thing you can do.
When choosing a mission for this challenge, some types are better than others. Although any D10 operation will work, missions that emphasize speed and movement – like Blitz missions where you destroy Automaton Fabricators – can be easier to handle than those that require you to hold a position for a long time. The best approach is to prioritize objectives that let you quickly attack and reposition, reducing lengthy battles.
To claim your prize, you need to prove you completed the challenge. The best way to do this is by streaming your entire attempt, from beginning to end. This provides clear evidence of your progress, including your gear and the mission’s difficulty, and confirms you successfully finished. For detailed instructions on how to officially submit your proof, please check the original challenge post from the game developers.
Read More
- Off Campus Season 1 Soundtrack Guide
- Euphoria Season 3’s New R-Rated Sydney Sweeney Scene Proves The Show Is Trolling Us
- Man pulls car with his manhood while on fire to raise awareness for prostate cancer
- Gold Rate Forecast
- What is Omoggle? The AI face-rating platform taking over Twitch
- Popeye Slasher Horror Film Officially Kicks Off Production on ‘Bigger & Bloodier’ Sequel
- 8 Funniest Billy Butcher Quotes From The Boys
- Detonate codes (December 2025)
- Why is there no Jujutsu Kaisen this week? Missing Season 3 Episode 8 explained
- Crimson Desert Guide – How to Pay Fines, Bounties & Debt
2026-03-12 13:43