As a seasoned gamer with decades of gaming experience under my belt, I can confidently say that Silent Hill 2 Remake is a masterpiece in horror gaming. The various endings it offers are not just a cherry on top, but a whole cake of intrigue and suspense.
In this fresh take by Bloober Team, Silent Hill 2 Remake offers a comprehensive reinvention of the classic horror masterwork. Along James’ descent into the depths of Silent Hill, you’ll encounter both familiar enigmas and new horrors, as well as mysteries waiting to be unraveled. To aid you in your quest, here’s an extensive guide detailing the game’s various tasks, puzzles, and hidden secrets.
Silent Hill 2 Remake Story Walkthrough
Note: This walkthrough is a work-in-progress, with updates being made regularly as we finish exploring the rest of the game’s narrative. Keep coming back for the latest information!
This tutorial is designed with both levels of challenge (Combat and Puzzles) set at a moderate level, so if you’re playing on a different setting, there might be variations in the location or accessibility of certain items like healing potions and ammunition. Additionally, solutions to puzzles may differ.
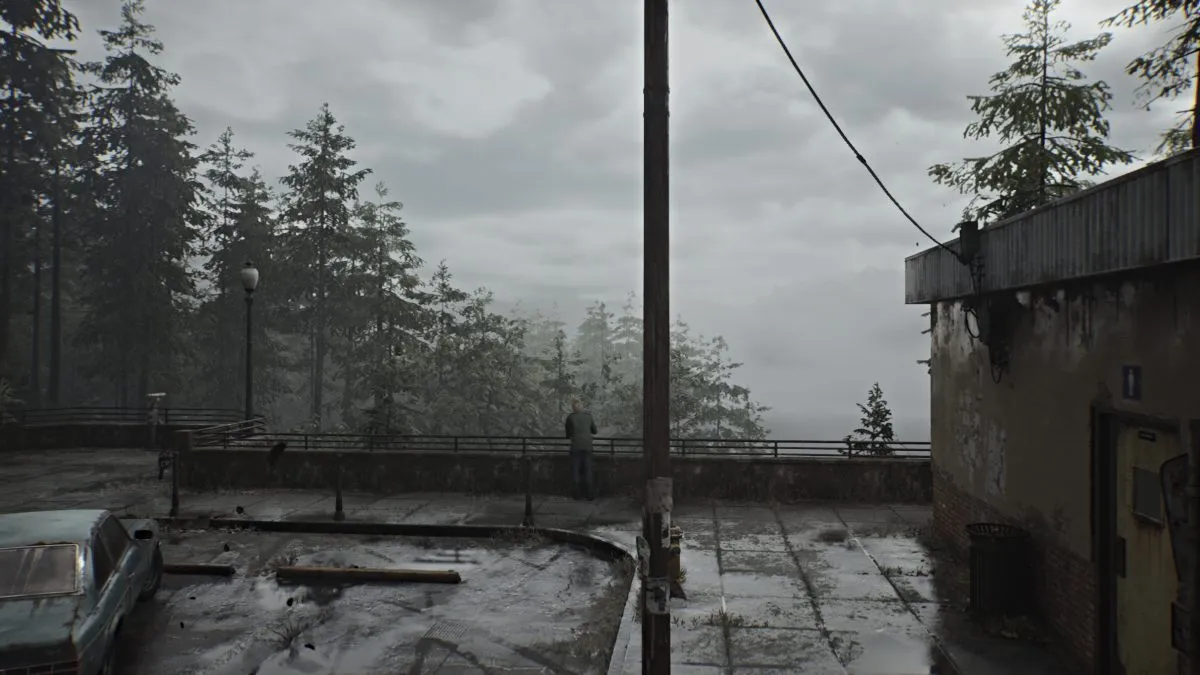
Observation Area and the Cemetery
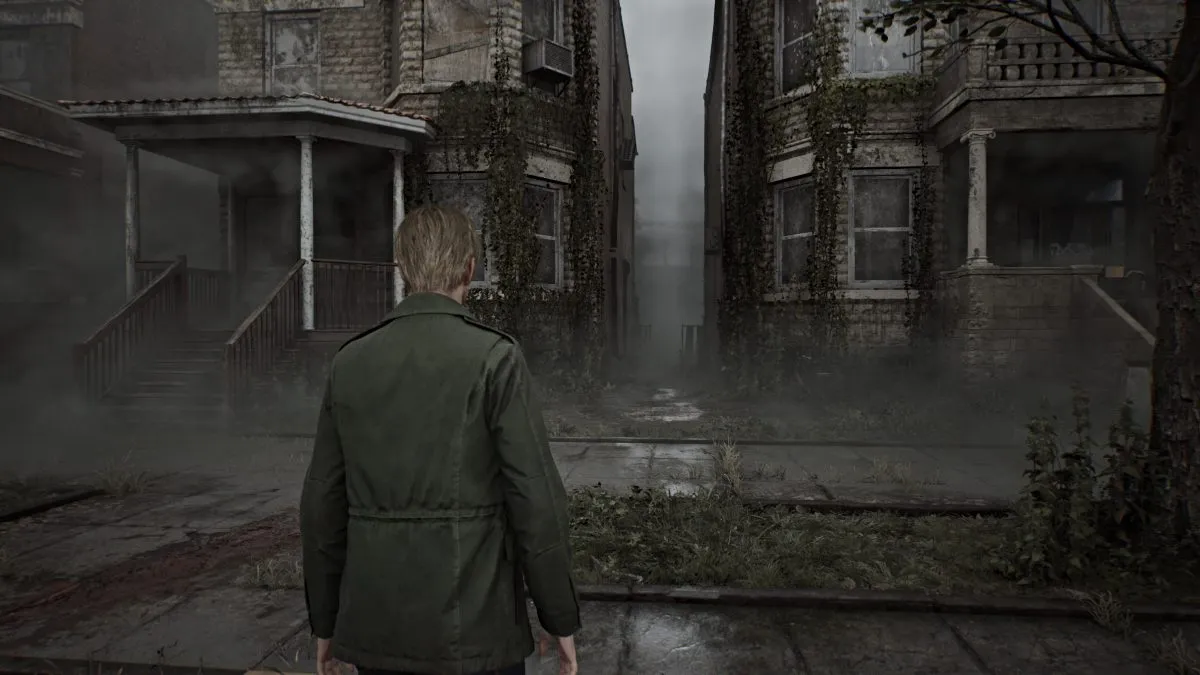
Following the memorable introduction sequence, familiarize yourself with James’ actions and navigation, then snag your initial map from the driver’s compartment of his car. As you traverse the Observation Area, endeavoring to travel against Silent Hill along the road, you’ll swiftly unlock the ‘No Turning Back’ achievement.
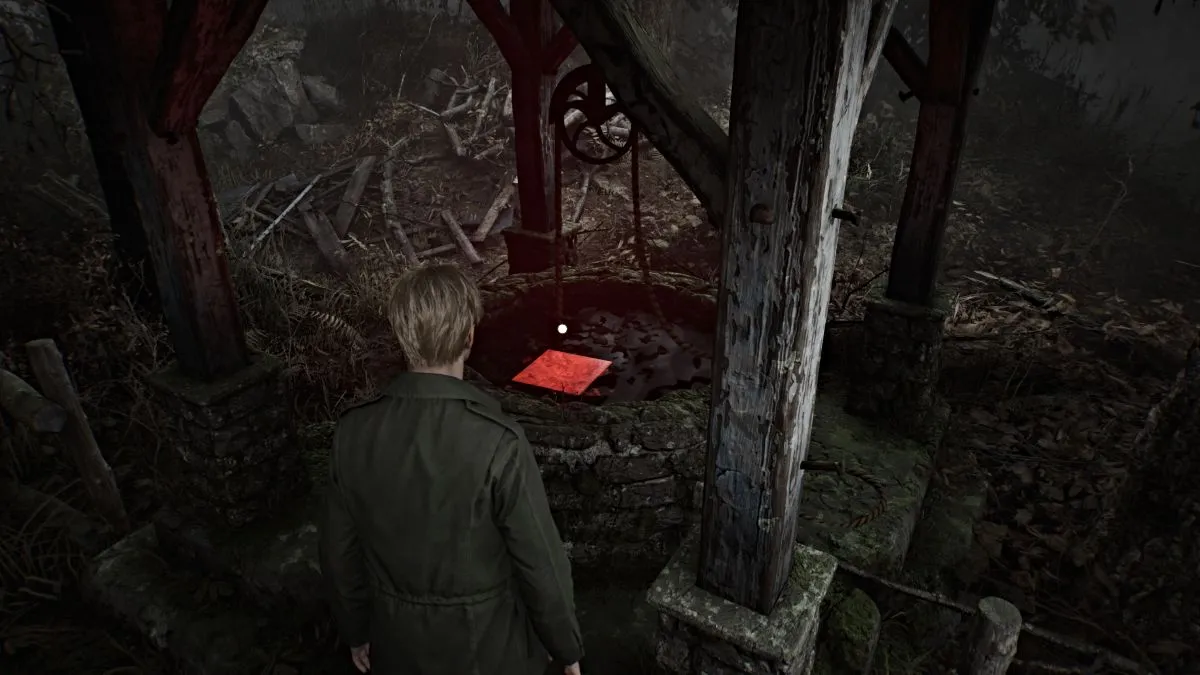
Make your way towards Silent Hill by strolling along the path in the Observation Area that ends with stairs. The route will be shrouded in fog. Along your journey, you’ll encounter a peculiar well that glows red. Approach it and notice a bright red square within, marking your first “Save Point” (which we’ll call “Red Save Points” from now on). Try to find and utilize as many of these as you can during your gameplay.
Follow the primary trail until you stumble upon a church with an attached cemetery, where you encounter Angela Orosco. She appears timid and confused, stating she’s searching for her mother together with her father and brother, yet provides few details. Post the cutscene, feel at liberty to investigate the surroundings, but there are no items to gather here. You may also engage Angela in conversation a few more times if you wish, for additional distinctive dialogue.
Silent Hill Ranch
Exit the cemetery and continue walking along the primary path that leads you through the Silent Hill Ranch region. If you’ve completed the game at least once, a unique weapon (the Chainsaw) will appear here near a white pickup truck piled high with logs. You can also earn the ‘Lumberjack’ achievement by using this weapon.
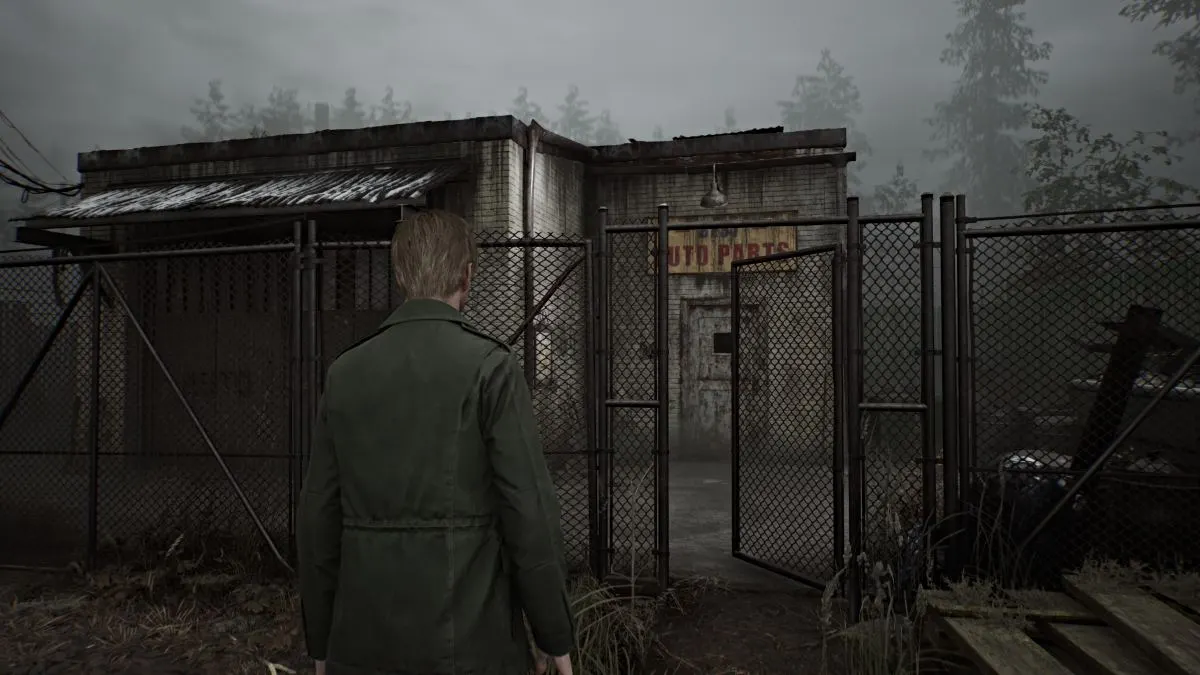
Keep going straight until you come across a massive roadblock with a tiny entrance door that’s securely locked. Search for a small auto parts store on your left, which appears to have an open gate. Make your way into the property and circle around the building to your left where you can squeeze through an open window. Inside, locate a well-lit desk, and in one of its drawers, you’ll find the Auto Parts Key that will unlock the door outside preventing your progress.
Continue walking along the straight path until you reach a place that might seem familiar, especially if you have played the original game. This spot is located beneath an overpass and features fencing and damaged boards. Although you can’t enter it, you can engage with this area as it serves as a hidden ‘Glimpse of the Past’ easter egg. If you manage to find all of these glimpses during a single playthrough, you will earn the ‘Echoes’ achievement.
Take a left turn at the open part of the overpass, then pass through the gate that follows, which will lead you to Witse Road and eventually bring you into the town of Silent Hill (as indicated on your map).
Entering Silent Hill
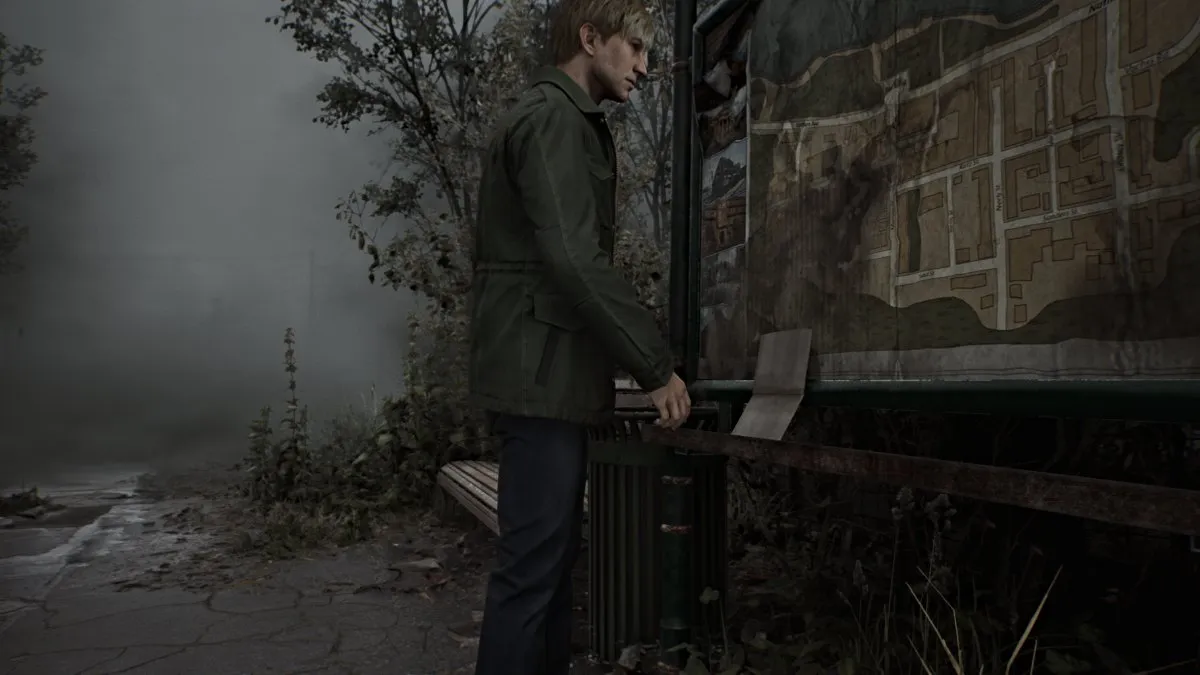
As you arrive at Sanders Street, a scene unfolds showing James discovering a larger, detailed town map tucked under a sign. This enables him to view not only the western part but also the eastern side of the town map from an aerial perspective, encompassing all significant landmarks.
Remarkable Tip: While roaming around town, James will automatically highlight significant landmarks on his map, including areas that are inaccessible (like streets, buildings, entrances), safe spots to return to, hidden pathways, specific objectives, and more. Make sure to traverse as extensively as possible, particularly during the daytime, so you can populate your map with these indicators and gain a comprehensive grasp of where you can and cannot venture (for now). This also presents an excellent chance for you to work towards unlocking the ‘You Never Know…’ achievement by breaking open numerous locked doors early on.
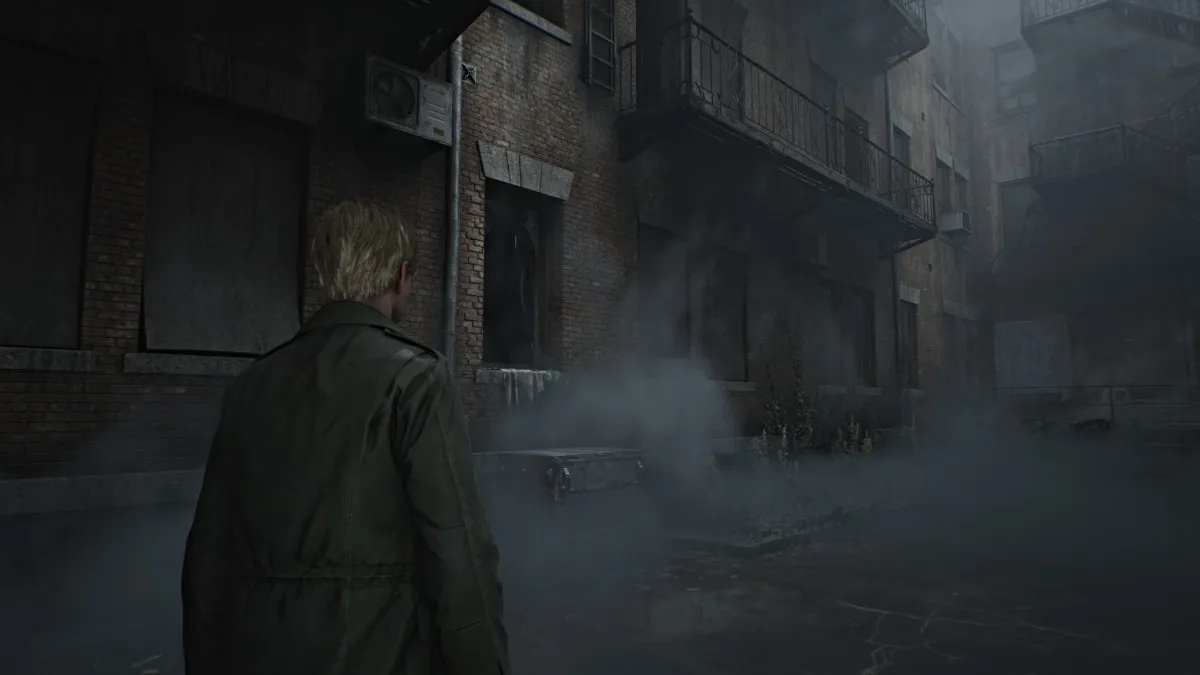
Initially, visit the flower shop located nearby and retrieve the ‘Flower Shop Message’ (one of several memos required for the ‘Archivist’ achievement) from the counter up front. There’s nothing else worth noting inside, so exit and proceed down Sanders Street. Soon, you’ll notice a larger blood trail that directs you towards Lindsey Street in the north. For now, all other routes are obstructed by large barriers, so simply follow the blood trail.
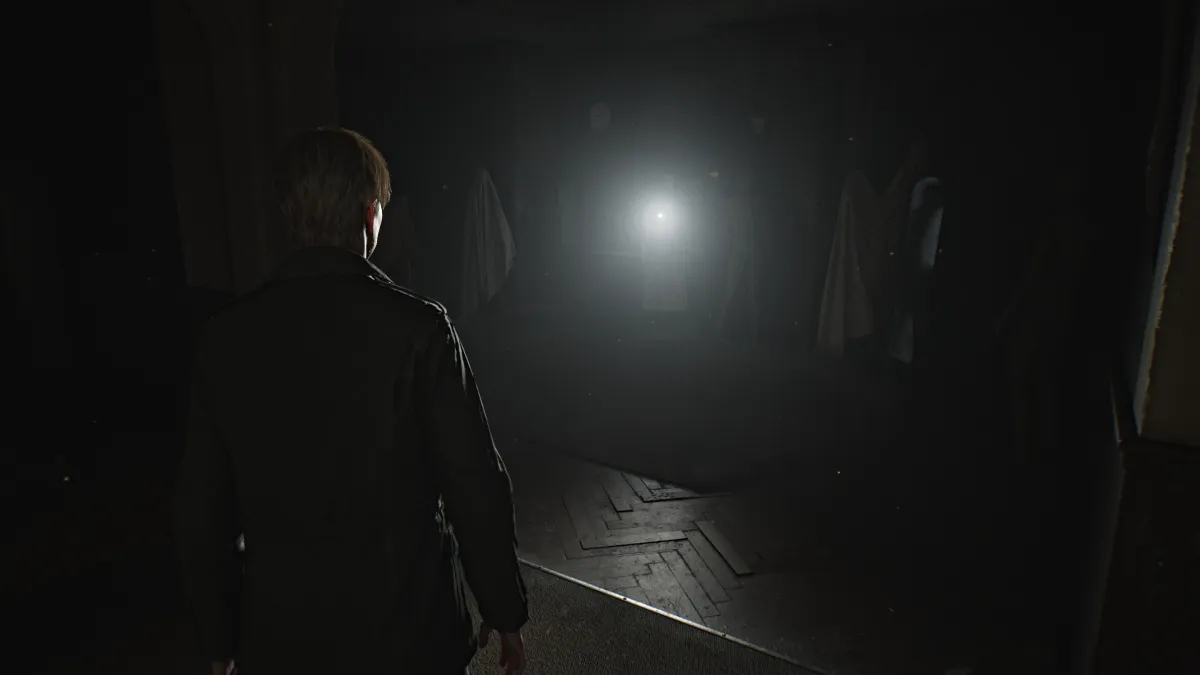
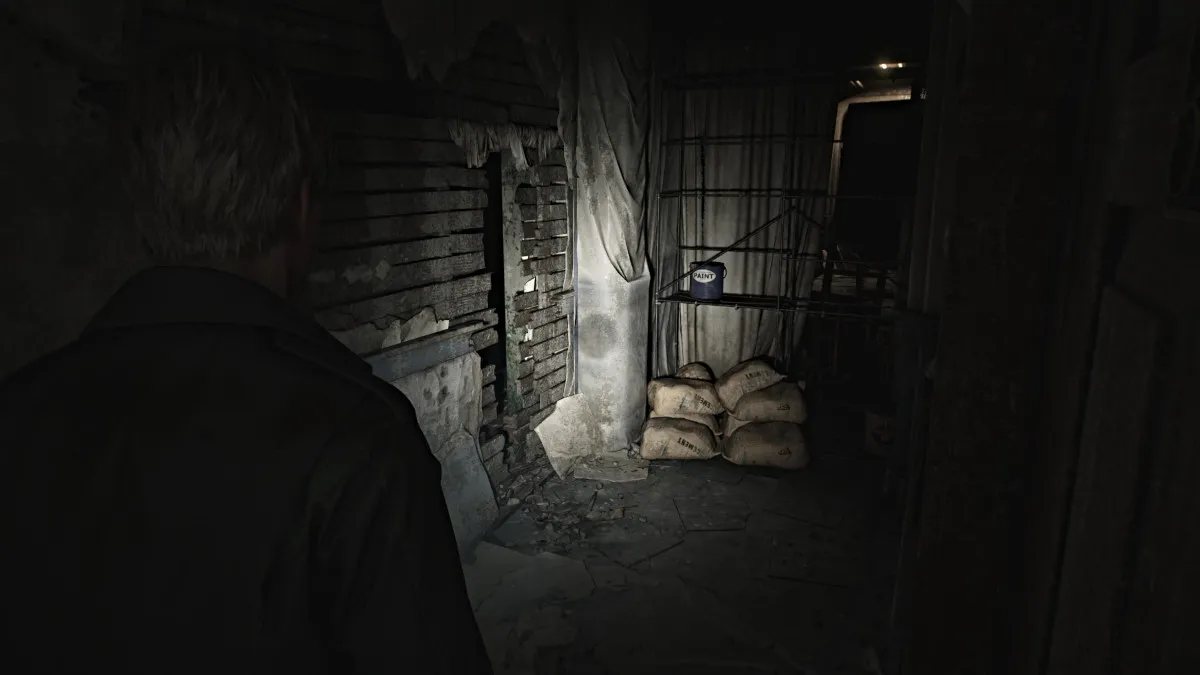
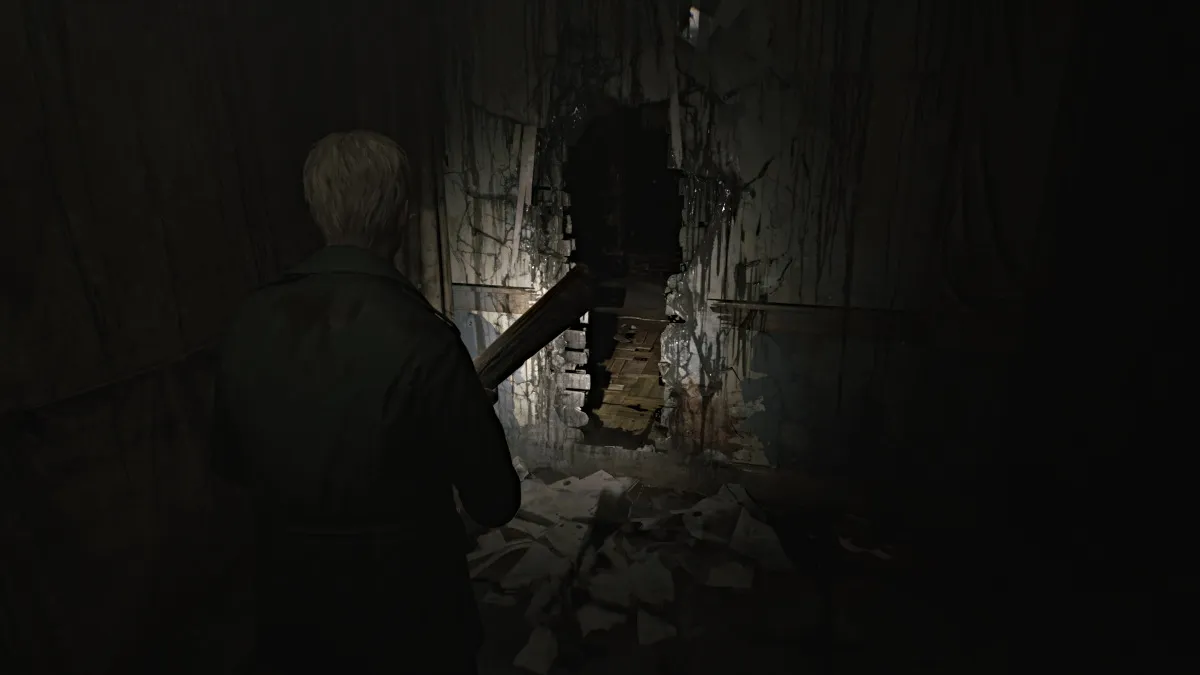
In the next sequence, a mysterious character is spotted wandering in the distance by James, prompting you to pursue it. Stick to your course and let the blood trails guide you towards a chilling deviation on the left side of the road, nestled between two structures (as shown earlier). Traverse the path and let the unsettling sounds direct you through the rear alleyway until you encounter a garage with a shattered door bottom. Squeeze through the damage to gain access to the house.
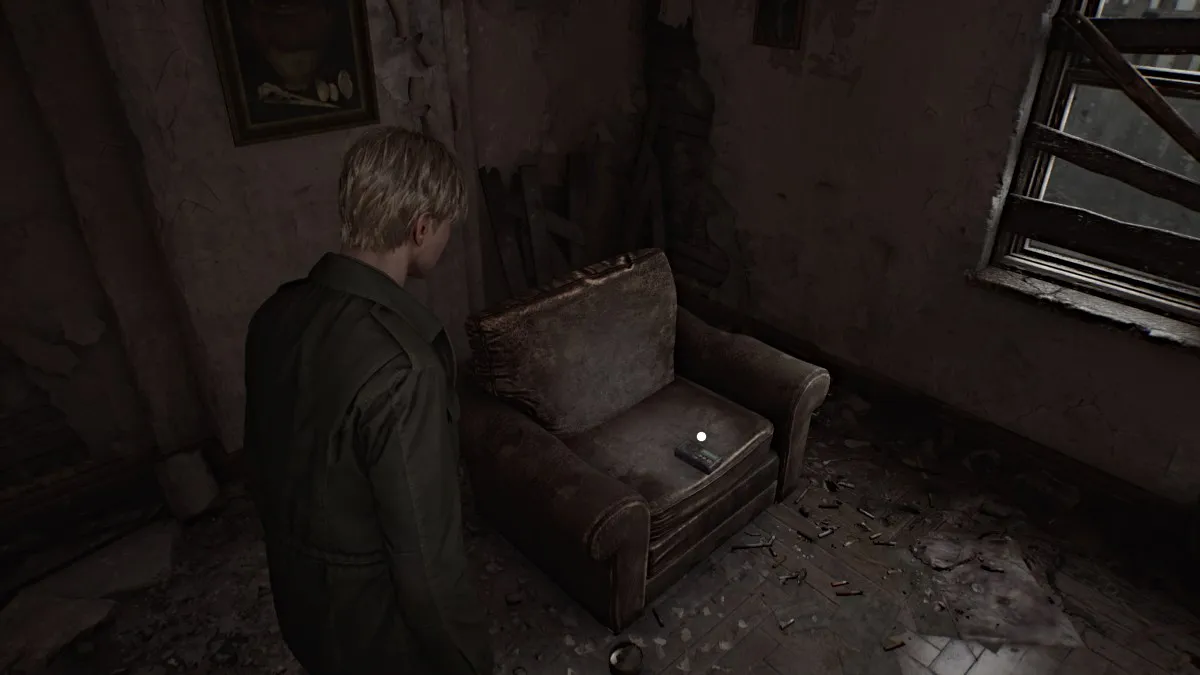
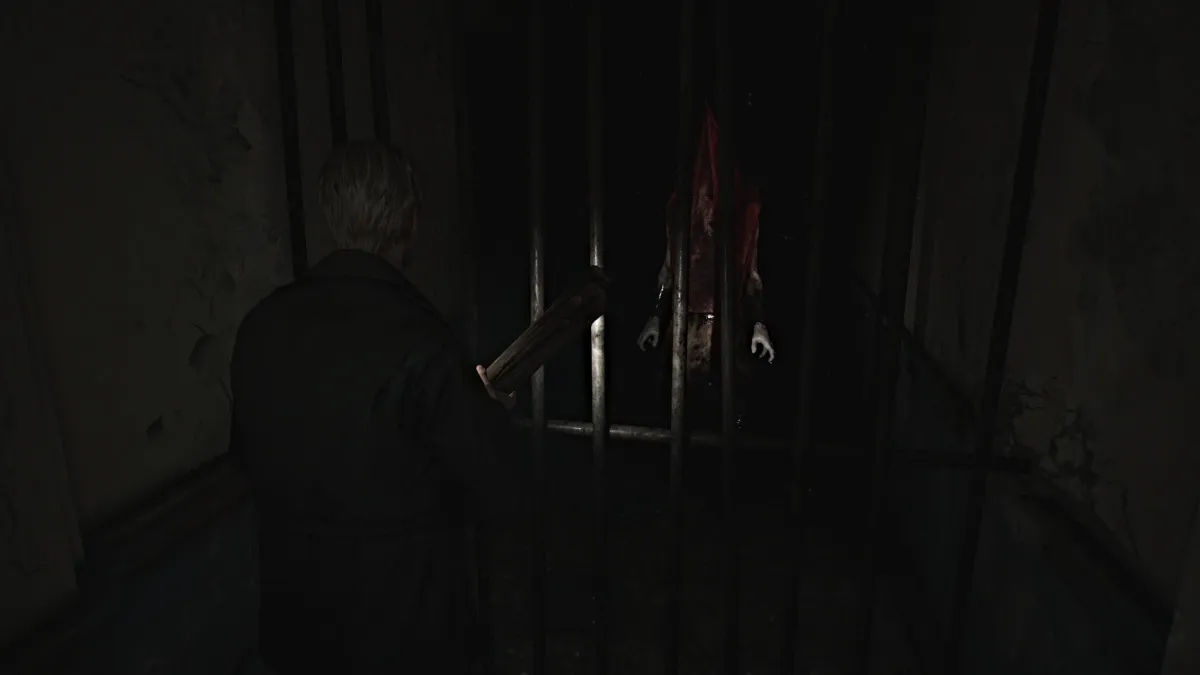
First, locate the Red Save Spot positioned against the nearby wall, then proceed right towards the kitchen. Search for a Health Restorative in one of the drawers and carry on your journey to the door on your left-hand side. Listen carefully as you move down the hallway, following sounds that resemble radio static. When you reach a point where you can enter a room on your right, do so. Inside this chamber, you’ll find a Radio perched upon an armchair. Snatch it and prepare yourself for a cutscene in which James encounters the same enigmatic figure, who is eventually revealed to be a monstrous entity known as the Deceitful Figure.
In this initial encounter, you’ll get acquainted with the game’s battle mechanics where you can both attack and dodge using designated keys. James equips a Wooden Plank for offensive moves, but be mindful of the Lying Figure’s physical and acid assaults. Continue to attack it until it falls to the ground, then repeatedly use the Attack button to stomp on it until it is defeated.
Make your way throughout the house until you discover a hole in the wall that you can squeeze through. Grab a syringe (a vital medical item) from the first aid kit on the desk to your right. To get out, smash the window ahead using your plank. Following a scene, proceed along Martin Street. Engage with the body lying on the sidewalk up ahead to retrieve a Matchbook from Neely’s Bar, one of your upcoming locations.
Big Jay’s Cafe, Music Shop, and Neely’s Bar
In the eerie world of Silent Hill, I find myself surrounded by an array of ominous creatures. Keeping a keen eye out for potential threats and choosing my engagements carefully will be crucial. It’s important to conserve my health resources, as they might just mean the difference between survival and becoming another victim in this haunting town.
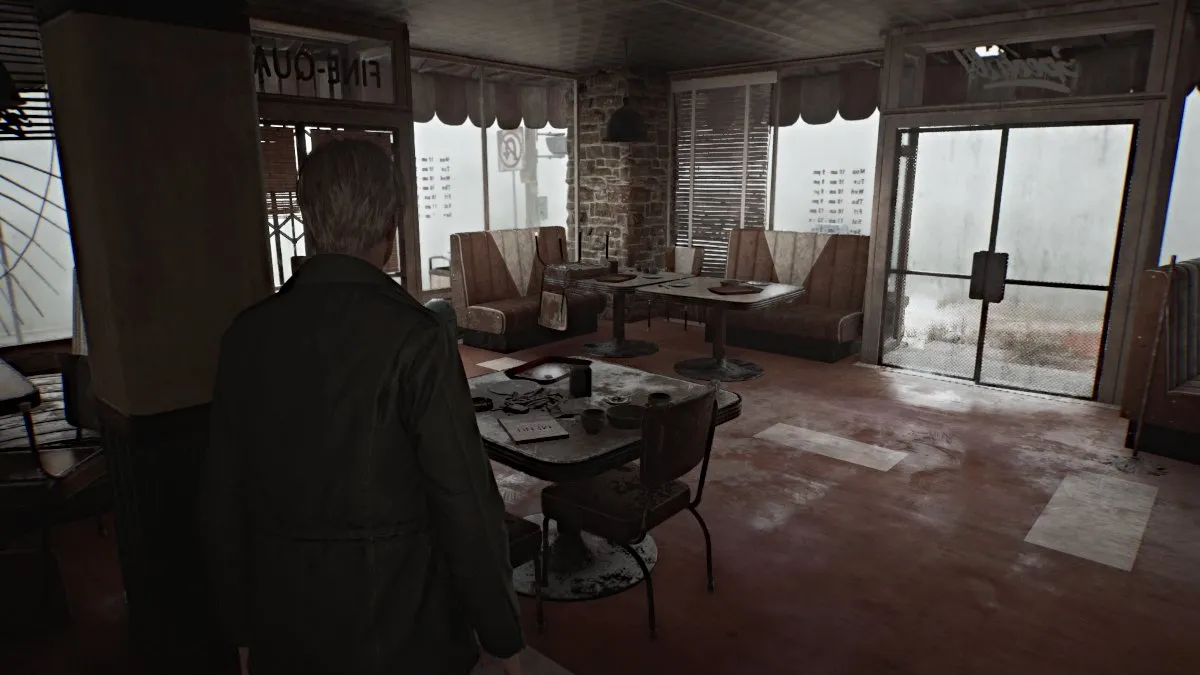
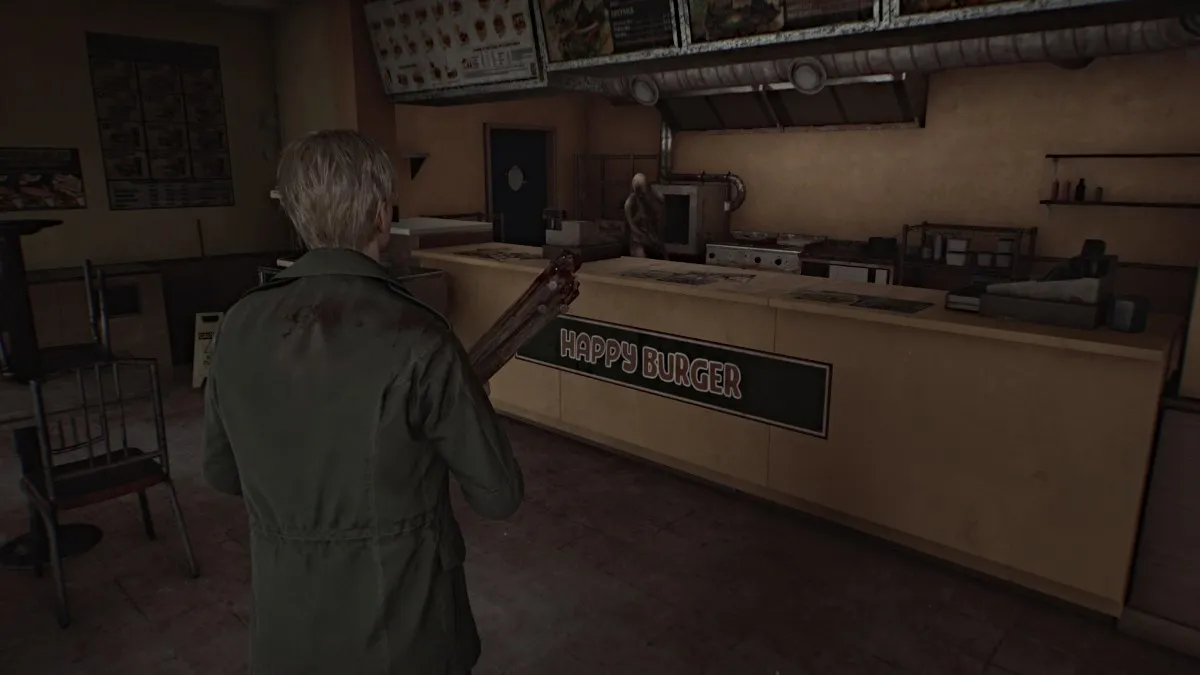
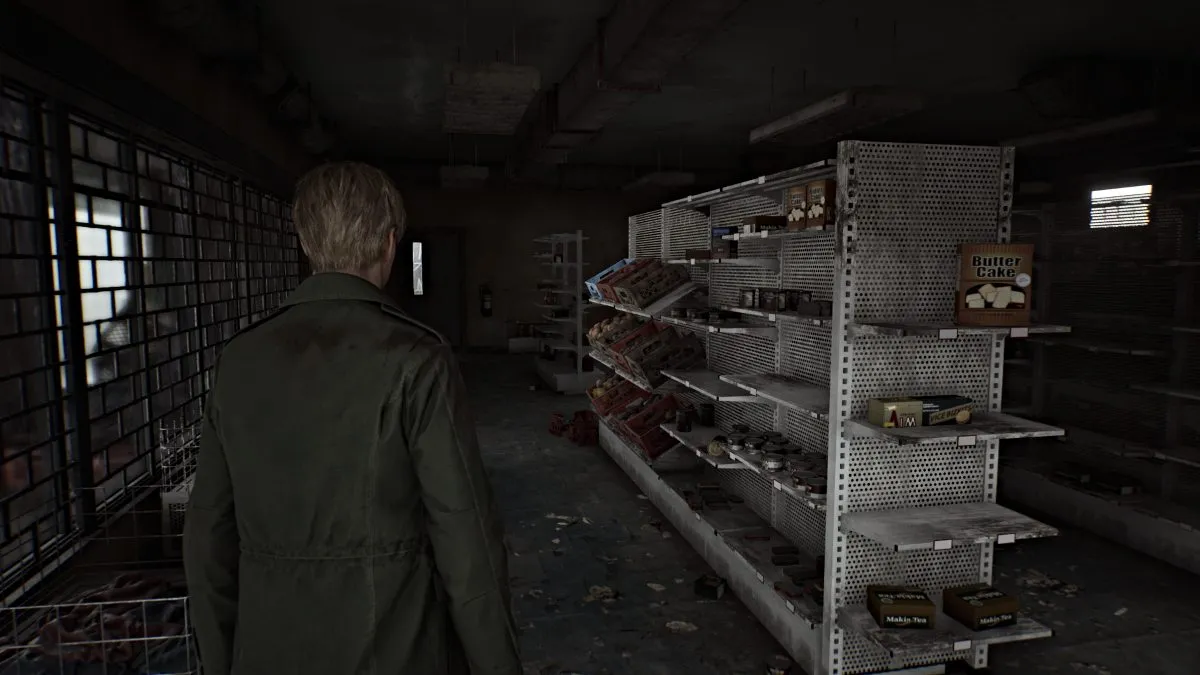
Keep walking down Katz Street until you reach the back entrance to Big Jay’s Cafe. Be cautious as there’s a deceptive figure inside. Handle the situation and move towards the front of the cafe where you’ll find Big Jay’s Note on one of the tables. A health drink can be found on another table in the booth section. Exit through the main entrance when you’re done, leading onto Neely Street.
Initially, travel north along Neely Street and shatter the windows of a nearby police vehicle to gather some essential Ammunition for Handguns. This will prove useful in the future. As you approach the “I Love Groovy Music Shop” (easily identified by its wind chimes), take a brief diversion to the alleyway across from it first. There, you’ll find a Table with a Revitalizing Drink. Be aware of some creepy Crawling Creatures lurking on the ground in the alley as well.
Return to the Music Store, enter its interior where you’ll encounter two Deceptive Figures. Try your best to handle them individually since you currently possess a plank for protection. After resolving matters with both, retrieve the Record Store Note from the counter. Subsequently, break one of the large windows at the back to access the record room. Inside the room, on a low table in the center, you’ll find Vinyl Adhesive and a Shattered Vinyl Disc.
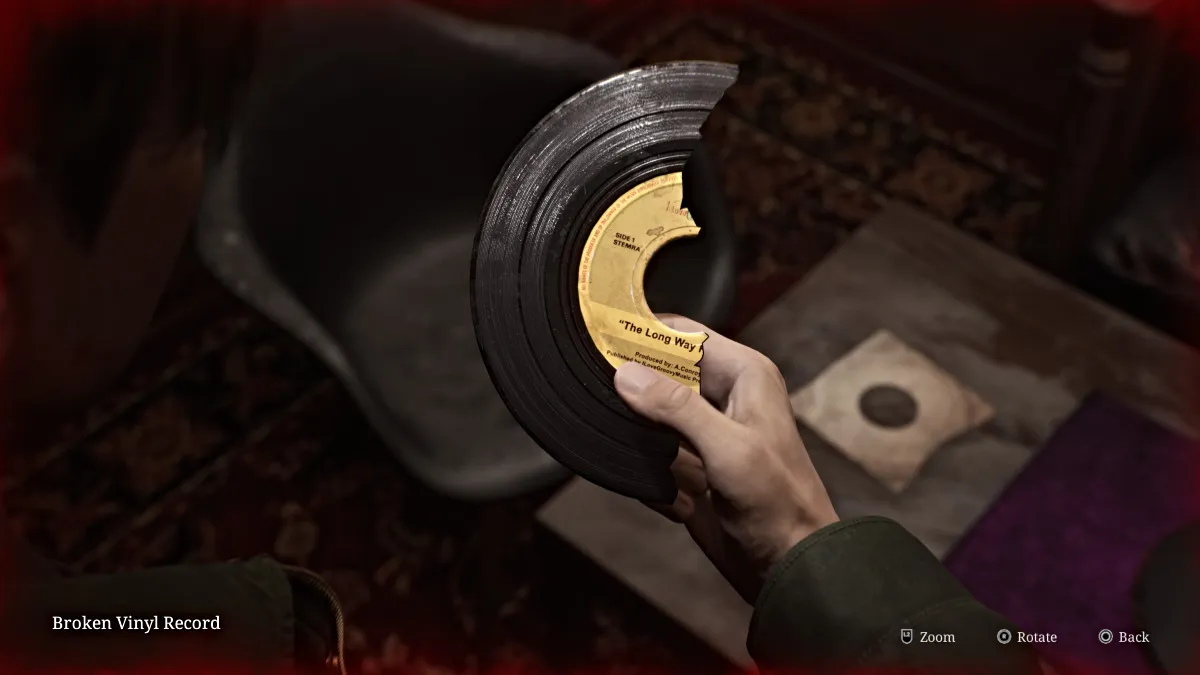
After exiting the store, you’ll eventually reach Neely’s Bar. Inside, you’ll find another Red Save Point on the wall to your left, a Neely’s Bar Note on the counter, and a locked door that needs a special key. On one of the windows is a chilling message, “A Hole was here. It’s disappeared now.” You should jot down this note for later. Towards the back wall stands a broken jukebox, serving as the first puzzle in the game.
Within this space lies a fragment of a shattered vinyl record, positioned on a turntable, eagerly awaiting its moment to spin. Engage with it to extract it from the device, storing it in your collection. Later, utilize the Vinyl Adhesive and the remaining half of the Damaged Vinyl Record to bond them together. This action results in the creation of the Adhered Vinyl Record, labeled “The Long Way Home”.
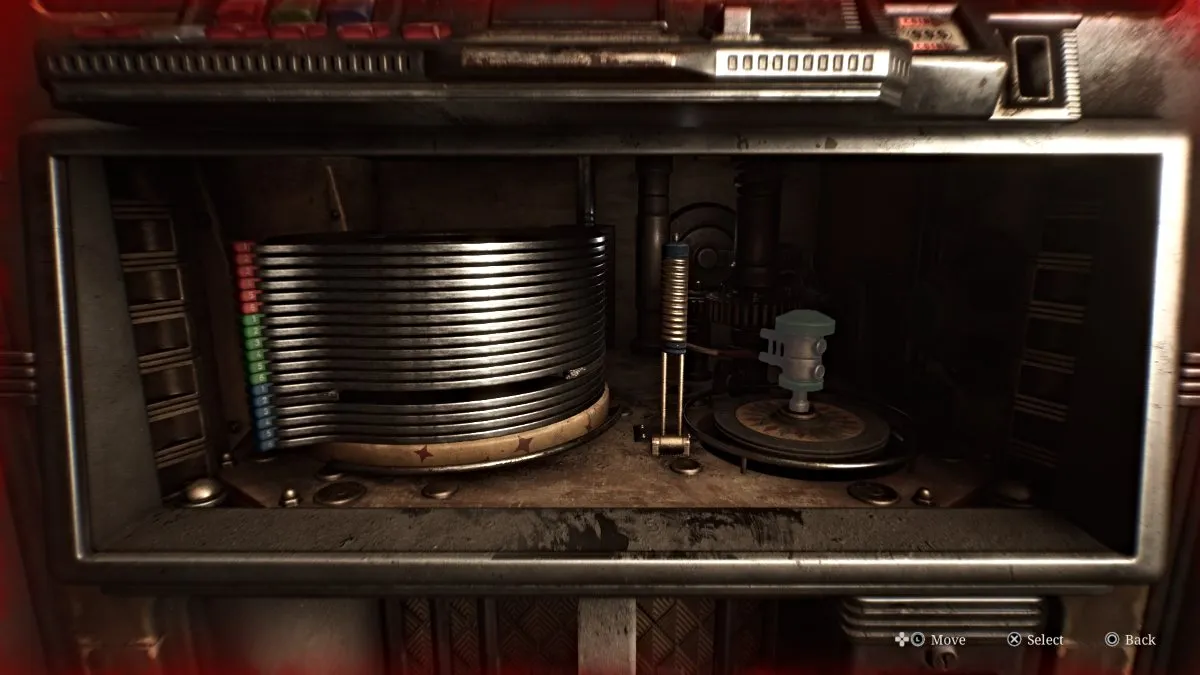
Afterward, you should ready the machine for playing the record. Inside, there are three movable parts, one in blue, another in red, and a third in green. Initially, your objective is to connect the red part with the green part so that they can slide back and out of the way of the blue part, which you need to push down.
After completing that task, locate the green section and give it a good push until it ejects the track for me to slot in my Glued Vinyl Record. Once the track mechanism pops up, I’ll need to hit the right buttons to start the record playing. Unfortunately, the ‘2’ button I require is nowhere to be found and I’m short a Coin to operate it. For now, I guess I’ll have to step away from this jukebox.
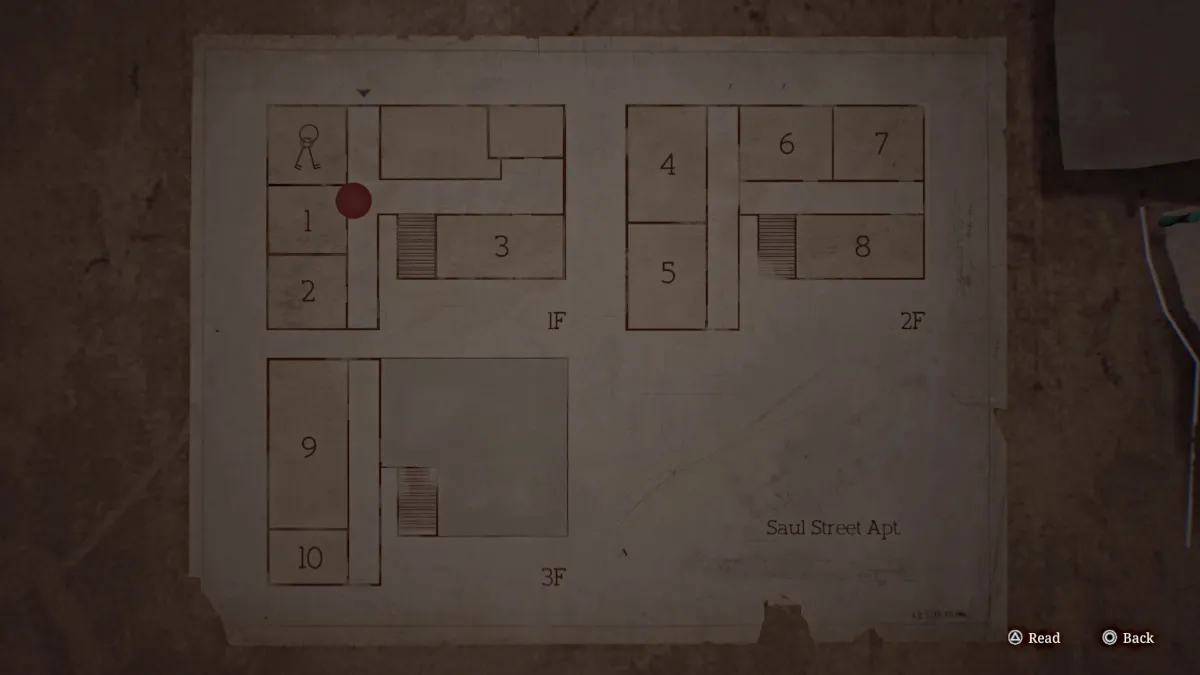
The Neely’s Bar Note reveals that a man stole a button and half a record (which you have already rectified), and he resides in Apartment 9 on Saul Street, near the pharmacy. On your map, the location of the Saul Street Apartments will be marked with a circle.
Happy Burger and Saul Street Apartments
Head on over to the Saul Street Apartments. If you fancy a quick bite, Happy Burger is en route, but beware, there are three statues that appear deceptive near it. Inside, you’ll find only a Health Beverage next to the window you leap through and a Syringe in the kitchen area, which is watched over by one of the creatures. If you feel daring enough to confront or evade it, go ahead; otherwise, we suggest just picking up the Health Beverage for now and moving on.
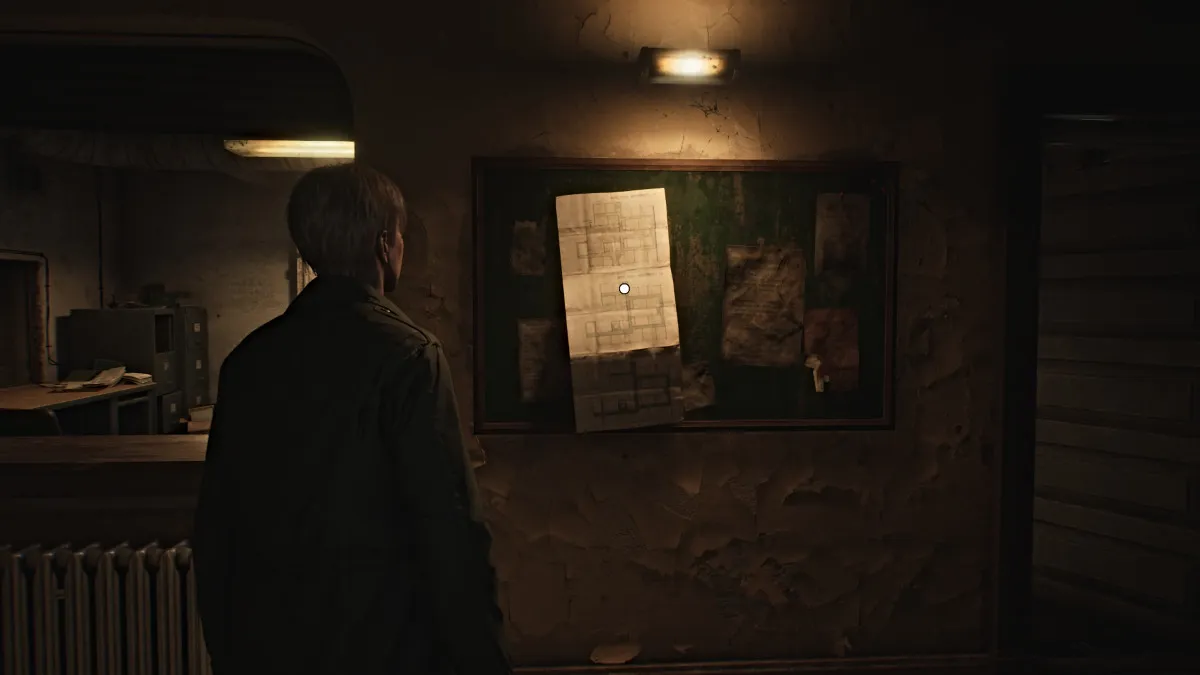
Step into the Saul Street Apartments, take notice of the office located straight to your right (it’s currently locked). To gain access, proceed along the corridor to the next door on your right (Apartment 1), where you can move a dresser aside. Inside the office, you’ll discover both the key for Apartment 5 and a Small Note about a leak in that apartment. Don’t forget to jot down the building layout from the map hanging in the hall as well, to help you navigate to the correct apartment.
Before reaching that place, veer left past the stairwell, pass through the door with a crack on the left (opposite Apartment 3), and you’ll find yourself at Green Pharmacy. Upon entering, a syringe is kept in a first aid kit positioned to your right on a table.
First, retrace your steps to the stairwell that ascends to the second floor of flats, then veer right until you spot a concealed entrance beside what is typically known as Apartment 7. Pass through it and within, you’ll discover the Tenant’s Note. Exit either way from the hidden entrance or the lockable door, and now proceed towards Apartment 5. Utilize the key to gain access and search for a wall opening that will transport you to Apartment 4. During a cinematic moment, the ruckus created by James will stir up a commotion on the third floor above in Apartment 9, where your next destination lies. Quite an adventure!
In this area, there are no things to gather. Proceed through the broken wall section in the hallway that’s filled with rubble. Climb out the open window onto the balcony and ascend the fire escape stairs until you locate another window on the far right at the top. Once you leap from the fire escape, there’s no turning back.
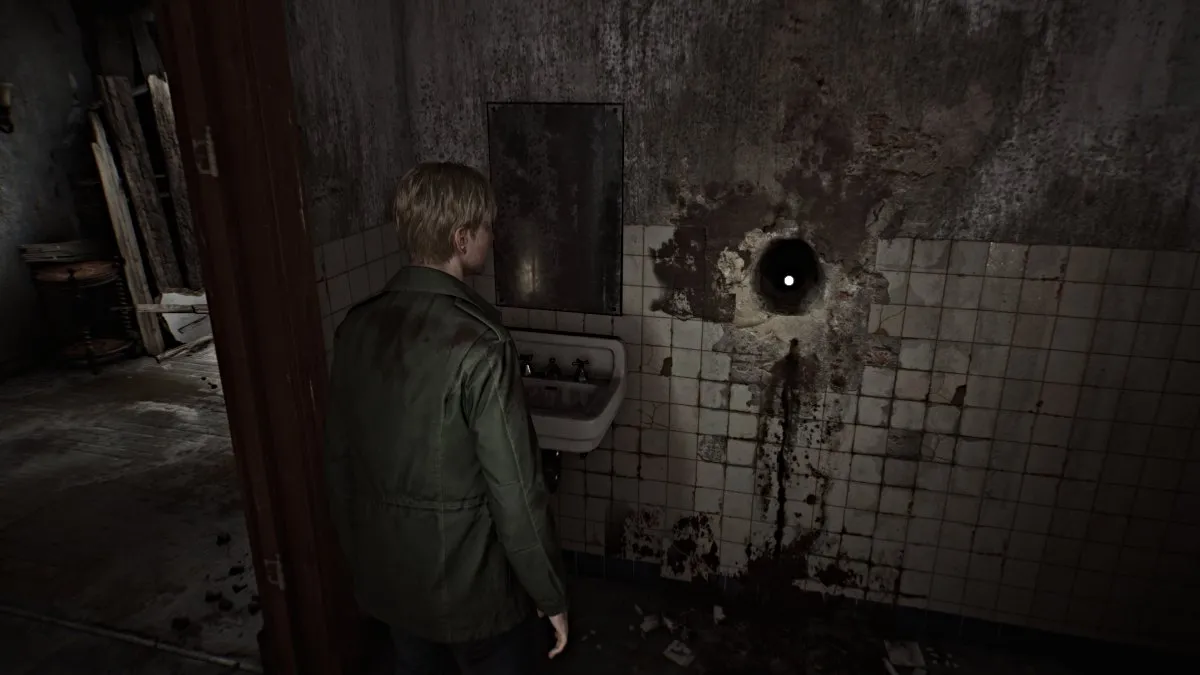
Proceed towards the door adjacent to the bathroom, and a scene will unfold showing James trying to open the door but finding it locked with a chain, emanating a foul odor, and his hand from the doorknob marked by a dark stain. Then, enter the bathroom beside it, where you’ll notice a sizable gap in the wall (previously visible). Interact with this hole to ‘explore’ it (accompanied by pleasant sounds), resulting in James retrieving the missing ‘2’ button for the jukebox.
Step outside onto the rooftop via the nearby door, and you’ll encounter a ladder straight ahead. The door to your right leads to a ruined indoor stairwell, so it’s not an option. Descend the ladder and you’ll find yourself in the building’s rubbish area. Leave through the door that was locked from this side instead.
As you proceed along Saul Street, you’ll notice a motor home situated behind an open gate on your left. A suspicious-looking character hanging around there may approach you. Handle the situation and then enter the motor home. Inside, you’ll find a note labeled “Motor Home Note” and a health drink. Before you leave, don’t forget to pick up the Saul Street Note lying on the ground. It reads, “They can be killed, but ensure they stay down.
Grand Market, Texan Cafe, and back to Neely’s Bar
Hey there! If you’re aiming to play that record at Neely’s Bar, hang on a moment before you head back. Instead, take a detour up Neely Street until you spot an open alleyway leading to the back door of Grand Market. Remember the code ‘4444’ (it’s a standard puzzle difficulty) to unlock the door. Once inside, you’ll be rewarded with four Health Drinks and two boxes of Handgun ammo, making this a pit stop worth taking!
As a devoted fan, I’d guide you this way: Swing right onto Katz Street and dash till you hit Texan Cafe at the end, near the grand barrier. Slip through the side door unlocked by magic, then make your way behind the counter to the register. Inside, grab the key and push the hidden button at the bottom to open the drawer and nab a Neely’s Bar Coin. Remember, be on the lookout for the Deceptive Statue lurking in ambush afterwards. With my mission accomplished, I’d make tracks back to good ol’ Neely’s Bar.
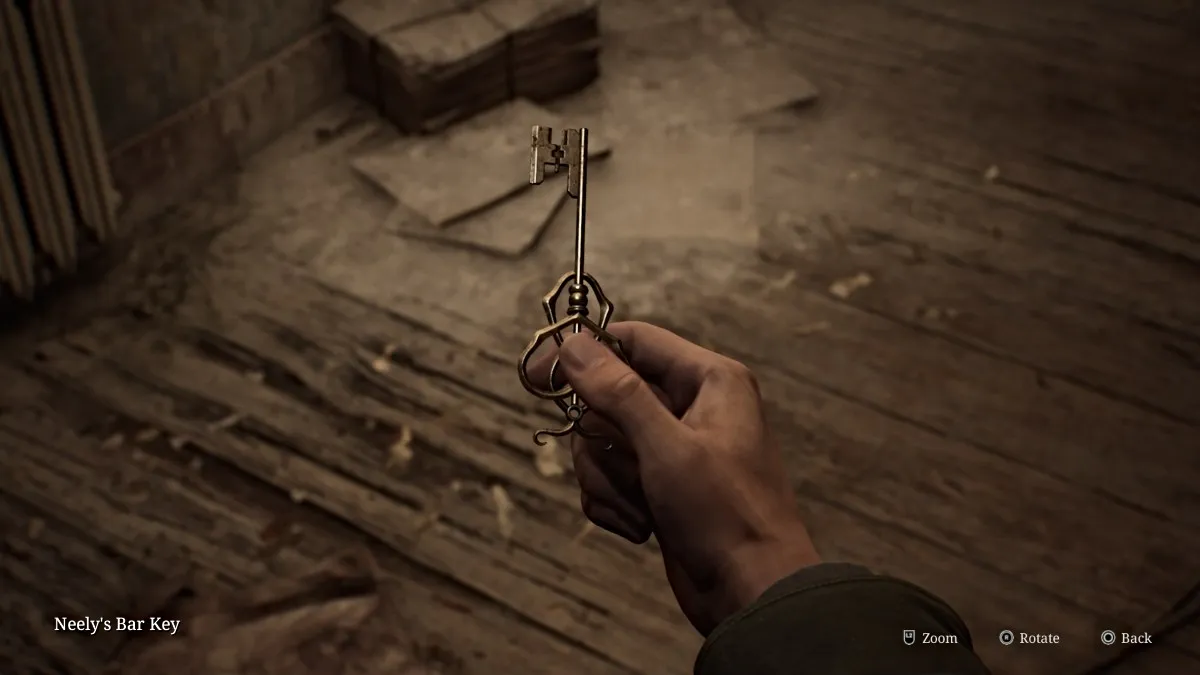
Place the Neely’s Bar Coin into the jukebox and press the ‘C’ and ‘2’ buttons to get a song playing. As James gets a jumbled memory, an old tune fills the air. Once done (or shattered might be more accurate), the jukebox returns the Neely’s Bar Key, useful for unlocking the nearby door.
Walk through the doorway, and directly turn your gaze to your right. Up on the wall, you’ll spot a narrow space that looks like a crawlspace. To access it, you’ll have to move the cart obstructing your path. Push it against the wall, then make your way up and through the opening.
First, get the Health Drink from the cabinet on the wall over there and move into the adjoining room next. On that desk, you’ll find a Letter for the Back Room. Afterward, look for a vehicle with a green-blue hue and an ending plate number ’06’ parked nearby. Exit through the back door, which opens onto a small alleyway filled with cars.
In the neighborhood, the only vehicle you’ll find with something inside is the car to your right, which stands out due to its vibrant green color. It’s at the intersection with Martin Street. Inside the driver’s seat, there will be a health drink. Proceed straight on your path as marked by James’ map, go past the barricade, and you’ll come across an abandoned car that appears both green and blue to your right. Near it, you’ll notice a pile of blood-stained clothing.
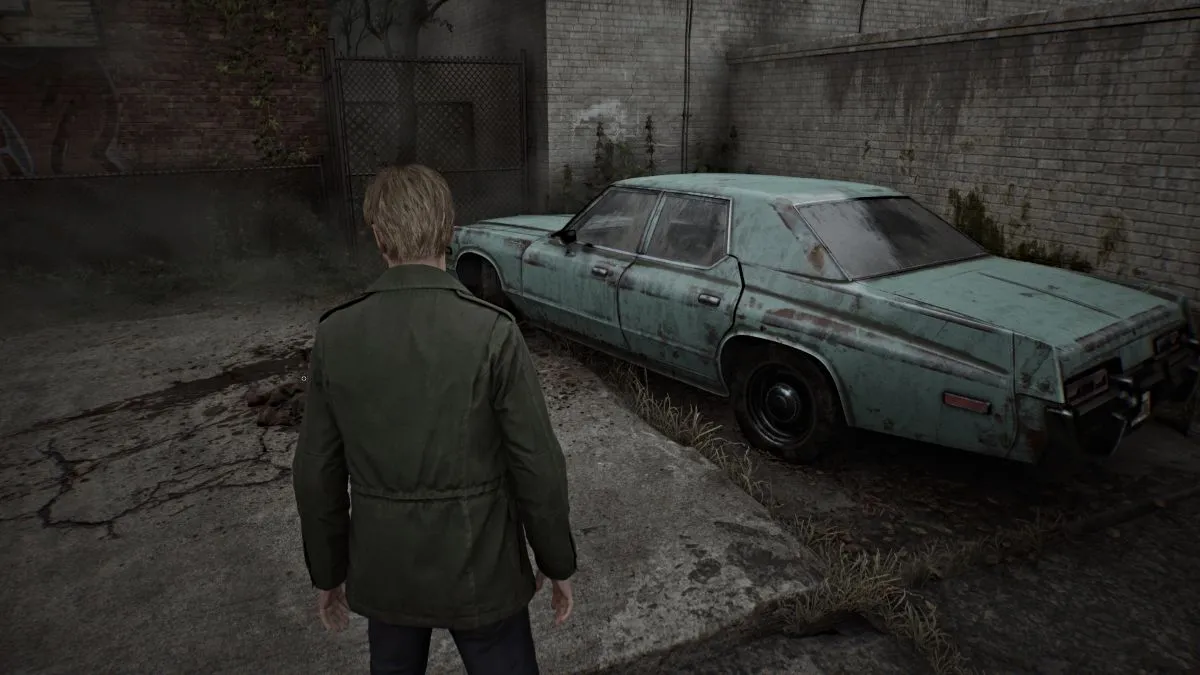
As I delve into it, James extracts the key to the Wood Side Apartments from within before getting surrounded by deceitful entities known as Lying Figures. Since overpowering them all seems impossible, I should seek a way out through a nearby alley that I entered earlier, for the door I just came from will be locked and inaccessible. This alley leads me back to Katz Street, which is now swarming with more of these treacherous figures I must evade to safeguard my health.
Initially, sprint westwards along Katz Street, keeping at it until you encounter a massive obstruction ahead. There, you’ll find a memo titled “Barrier Note” on the ground. After that, retrace your steps until you spot the Wood Side Apartments entrance on your left side. At this point, seize the “Texan Cafe Flyer” memo hanging on the nearby board, and then use the key to enter the building.
Wood Side Apartments (Floor 1)
Make your way to the building’s main hall and pick up the map of Wood Side Apartments (1F-3F) from the notice board on the wall. This map allows you to switch between each floor using a designated button. Following that, proceed to the lobby office and locate the Red Save Point on your left side. Inside the room beyond it, open the cabinet to your right for some Handgun Ammo.
Hidden beneath a blanket over yonder, I’ll stumble upon an enigmatic cabinet that seems to be my next challenge as a gamer. I’ve got to locate some peculiar coins to slot into its indents, so I guess I’ll have to revisit this puzzle at a later time.
Look for additional handgun ammunition in the bathroom to your right, which is next to the office. The other doors on that side are currently secured, so retrace your steps and head back to the left side of the floor. Proceed towards the back-left corner where a shelf filled with document binders can be found. Retrieve the “Administration Note” memo from it as it discusses gunshots originating from Apartment 217. Additionally, grab another health drink that is located underneath the stairs.
All other doors on the first floor are locked, so for now head upstairs to 2F.
Woodside Apartments (Floor 2) – Flashlight
As a curious fan peeking through the corridors, I notice that most of the upper level remains off-limits, save for the apartments on your right side. The entrance to Apartment 202 stands open invitingly, so let’s step inside. A striking light catches my eye, emanating from the living room, revealing a mannequin adorned in Mary’s attire, with a flashlight tucked neatly within it. Before I make off with the flashlight, though, let’s venture over to the kitchen area and snag a health drink from one of the cabinets first.
Next, make your way over there to grab the flashlight – it’ll come in handy later. However, be aware that a new type of creature lurking behind it, known as a Mannequin, will attack you suddenly. After a quick QTE sequence, use your plank to fend it off. Unlike the Lying Figures, it doesn’t shoot acid, but its physical attacks are strong, so watch out. It tends to strike when you least expect it and can even deceive your radio by remaining motionless.
Afterward, grab the Chute Courtyard Key from the nearby dresser and then leave the apartment.
Make your way swiftly up the stairs, skipping the locked doors on floors three and above, until you hit a wall without an exit. You’ll find more ammunition for Firearms on a nearby compact table. Then, go back down to the ground level.
Chute Courtyard and a Strange Girl
Use the Chute Courtyard Key on the door to the left of the janitorial bathroom, which will take you outside to an inner courtyard where the building’s main trash chute is. Notice an open window to the right of the chute and pull the nearby handcart towards it to climb through into Apartment 112.
In the room directly to your left, locate “Handgun Ammunition” inside a drawer of a dresser. On a table in the kitchen to your right, there’s a local news article about a convicted murderer named Walter Sullivan. Although you can’t physically grab it, remember the name Sullivan as it could be useful later. Exit the apartment and proceed down the hallway to Apartment 109.
A Dummy will conceal itself under a table in the living room, so get ready to engage in combat with it. Following this, retrieve ammunition for your handgun from the bedroom close by and then exit the apartment. Proceed along the hallway, turning right to find a door that opens onto the opposite side of the Courtyard with a Slide. Carry on to notice a key lying on the ground, blocked by some bars. Engage with it to trigger a cutscene.
Once the young girl flees by kicking the key, make your way back to the lobby area using the shortcut through the courtyard. You’ll see that both sides of the ground floor are now open for access and teeming with monsters, so be cautious. Start by moving down the right side first as that’s where you’ll find the key you need.
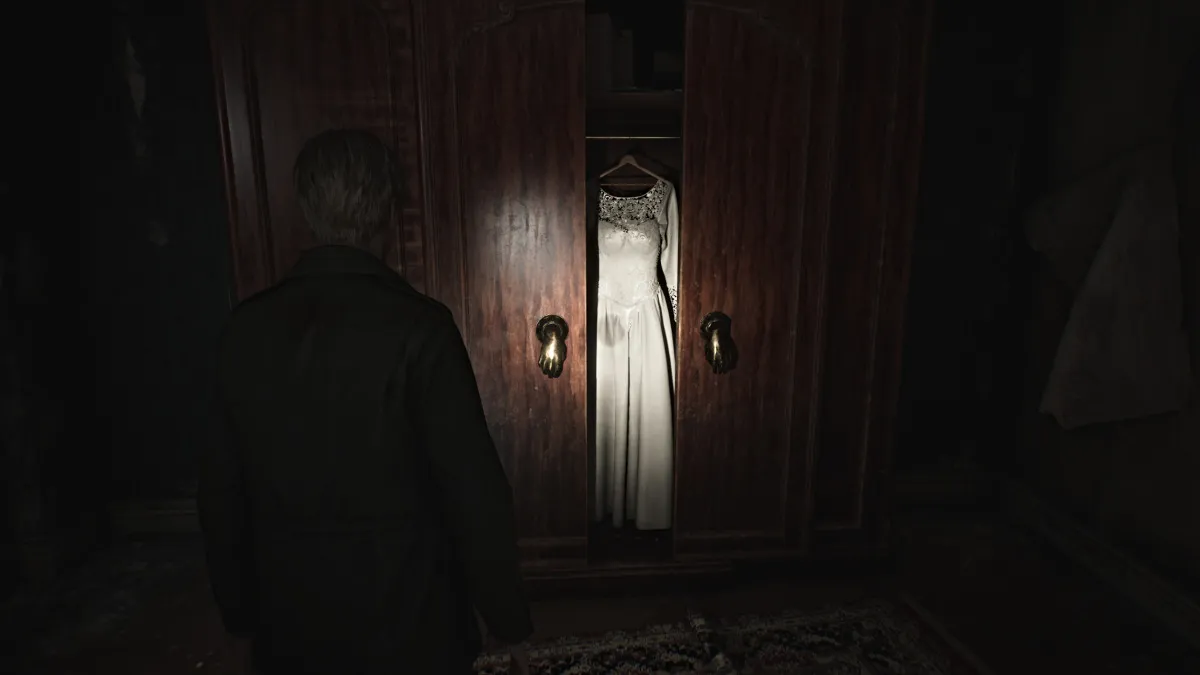
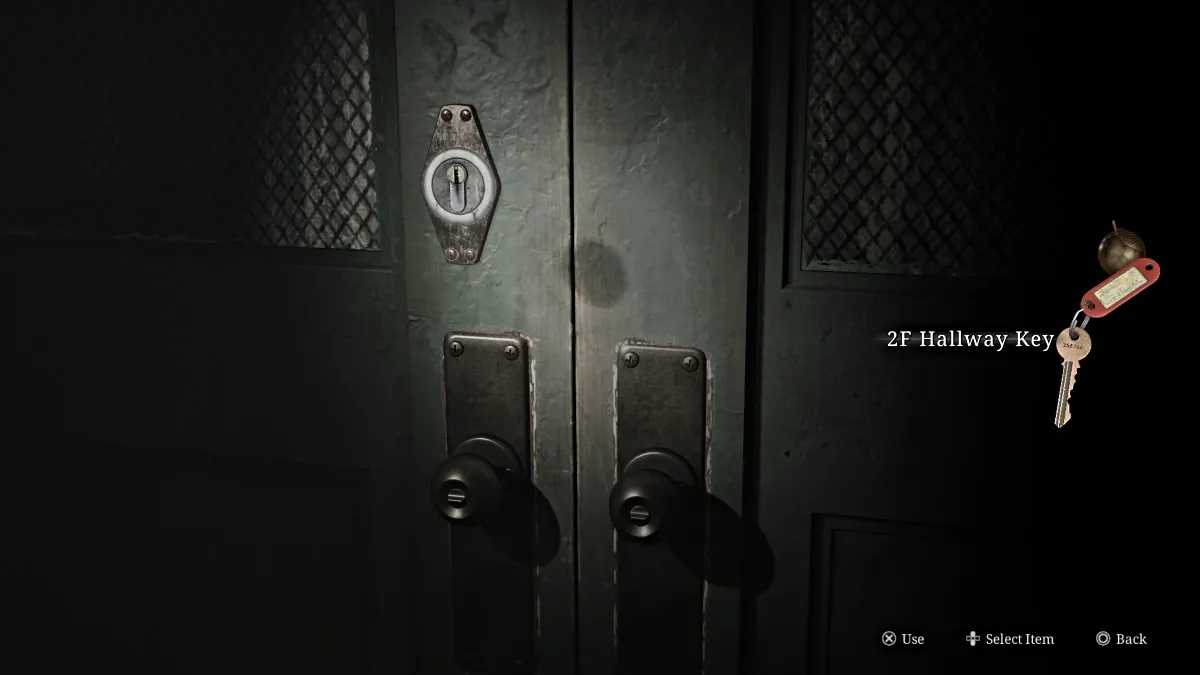
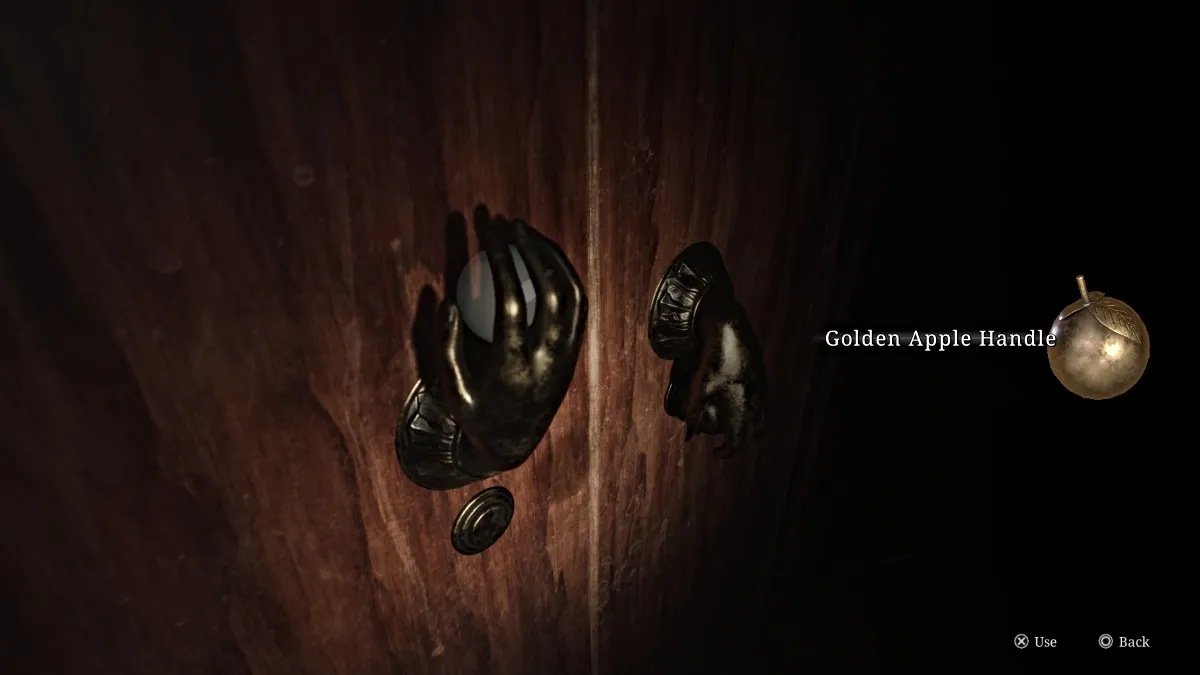
Visit Apartment 108, locate the large wardrobe in its bedroom with peculiar handle shapes resembling hands. Interact with the left-hand part of the wardrobe to make it swing downwards and dislodge the Golden Apple Handle. Retrieve it and depart from the apartment. Proceed down the hallway to pick up the 2F Hallway Key near the bars. Swiftly enter Apartment 107, which is opposite, grab a Health Drink from its bedroom dresser, and then exit.
The door to Apartment 106 is now open with a Lying Figure blocking your path. Defeat it and run into the apartment to grab some Handgun Ammo from a cabinet in the living room. Continue back towards the left side of the building.
Once you’ve handled some Deceitful Statues, proceed to Apartment 102 and grab a photograph (or memo) that’s close to a TV with a “Valentine’s Day” label. If you turn it over, you’ll see the number ‘4’ written on its reverse side.
Wood Side Apartments (Floor 2) – A Handgun (Finally) and a Red Nightmare
Move upstairs to the second level using your new key and find the green double doors to your left. Unlock them to gain access to the rest of the floor. As you walk down the hall, a peek through a window on your left reveals a baby carriage in an empty swimming pool outside the building. Be sure to note that.
Keep moving along the corridor, then take a turn to your right when you spot something reddish-glowing in the distance. As you get closer, it reveals itself as Pyramid Head. He’s gazing at James through another set of bars, and although it’s creepy, he doesn’t attack yet. So, retrace your steps a bit and head to Apartment 213 instead.
Inside that room, locate another area labeled “Flashback from Yesteryears” on the bedroom wall, then proceed to a hole in the wall close to the kitchen which is hidden behind a damaged door and leads to the other side of the hallway. Proceed towards Apartment 217 situated at the end.
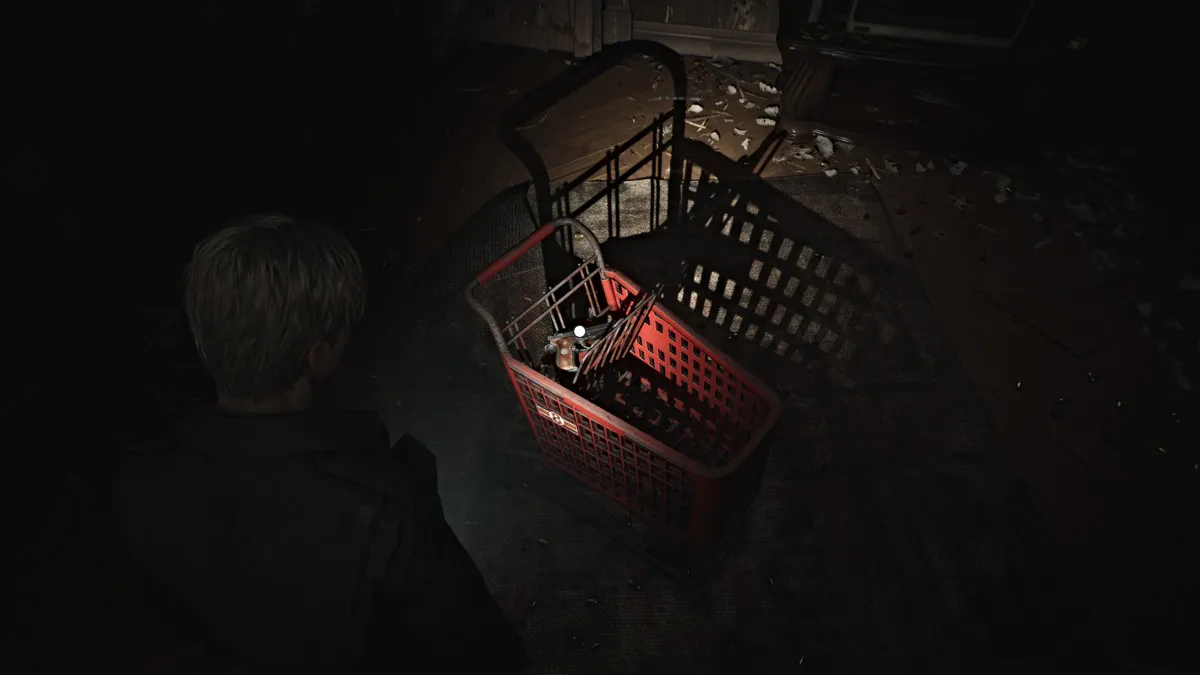
Step inside a living room riddled with bullet holes and spent shell casings, featuring a red shopping cart smack in the center. Peer into it, and there lies your second weapon – a firearm. As anticipated, the apartment is littered with ammunition for that same type of gun, so be sure to search every nook and cranny. If you’ve been meticulous about gathering ammo thus far, you should find around 20 rounds or more by now.
Exit the flat and re-enter through the hole in the wall towards Apartment 213, where a shrouded, bloodstained figure is seated before a frozen TV screen. Engage in a short sequence, then retrieve the Apartment Key of Number 212 from the nearby furniture. Depart the apartment, and you’ll find that Pyramid Head has vanished. Employ the key to access the other apartment.
As a gamer, I’ll dash off to grab a Health Drink from my kitchen, then stride through the wide-open door onto the balcony. Crossing over to the neighboring apartment, I’ll find a Mannequin and some Handgun Ammo in its open fridge. After leaving that place, I’ll navigate down the hallway, loop around to the southeast side of the floor, and make use of another balcony along the way. There, I’ll tug on the lever near the railing to lower the fire escape, providing a handy shortcut all the way down to ground level.
Wood Side Apartments (Floor 2) – Safe Puzzle and North Staircase
Enter apartment number 207 where you’ll discover a Deceitful Figure, a Mannequin concealed in the bathroom, as well as some Handgun Bullets. Unfortunately, apartment 205 is inaccessible from the balcony, so make your way back to the hallway and instead proceed to apartment 208.
Inside, there’s another magnificent wardrobe with golden handles. Approach it and apply the Golden Apple Key you got earlier to open it. Then, move to its left side and engage to shove it aside, uncovering a hidden room adorned with writing on the walls and a central, locked safe. As soon as you step inside, the door will shut automatically.
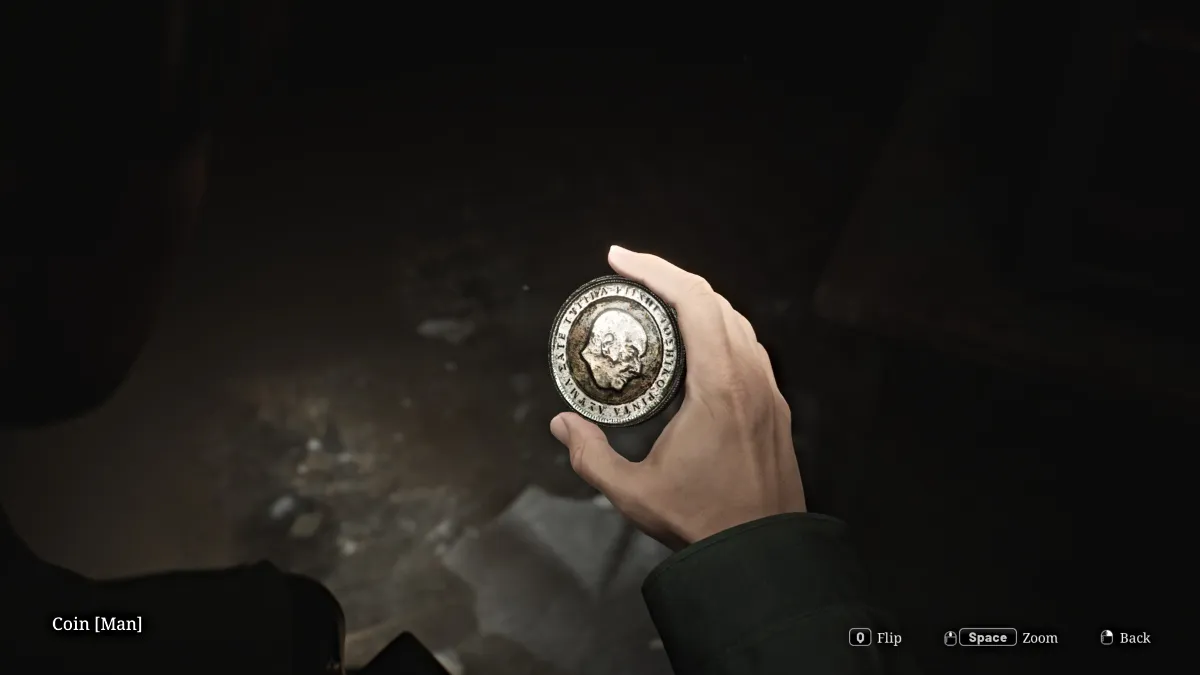
To unlock the safe, you’ll need the right combination, and the only clue is a passage written on the wall near your entry point. The sequence for the correct combination (of Standard Puzzle difficulty) is ‘turn right 13 times’, ‘then turn left 7 times’, followed by ‘turn right 11 times’. Upon opening the safe, you’ll find the Man Coin (for the puzzle downstairs involving coins), as well as a Steel Key that fits the door with white squares drawn on it across the room.
Step out from the room to find yourself back in the corridor, and there, the door to Apartment 205 stands ajar. Venture inside, and you’ll encounter some insectoid creatures, but also discover a Health Drink stored in a medicine tin, some Handgun Ammo hidden in the kitchen, and the Small Staircase Key for the second floor resting on a chair in the room.
Return to the stairway located on the north side of the floor, which is wrapped in plastic. Unlock it using the 2F Small Staircase Key you have. Once unlocked, proceed inside and utilize the Red Save Point. Then, make your way up to the third floor.
Wood Side Apartments (Floor 3 and 1) – A Maze, Canned Juice, and Eddie
On reaching the third floor, walk straight along the hallway initially to find some ammunition for a handgun sitting on an armchair at the end of it. Afterward, retrace your steps and head right until you come across another dead end and a wall opening that takes you into Apartment 311 (located below). Be cautious as there are two mannequins positioned to attack nearby.
Navigate towards Apartment 309 first, then step out momentarily into the corridor before moving on to Apartment 310. Be vigilant for hidden mannequins and utilize the balcony to transition into Apartment 312. Inside, you’ll discover a first aid kit containing a syringe, a health drink, and a sinister note affixed to the wall.
On the left portion of the apartment, you’ll find a crawlspace with black grime. Crawl through it and you’ll end up in the Laundry Room. Pick up the Canned Juice pack from the table and carry it towards the nearby opening to discard it. Doing so will trigger a pile of waste to fall into the Chute Courtyard, along with another Coin. Gather more Handgun Ammunition sitting on a washing machine as you exit.
Head down the north staircase, making my way to the first floor. I find what I’m looking for – more ammo for my handgun – on a box at the bottom. Stepping out into the hallway, I can’t shake off the sound of vomiting coming from my right. Curiosity piqued, I follow the noise all the way to Apartment 116, which is at the end of the hall. There, I find a chilling scene: a corpse sitting inside an open fridge, while someone else is retching in the nearby bathroom.
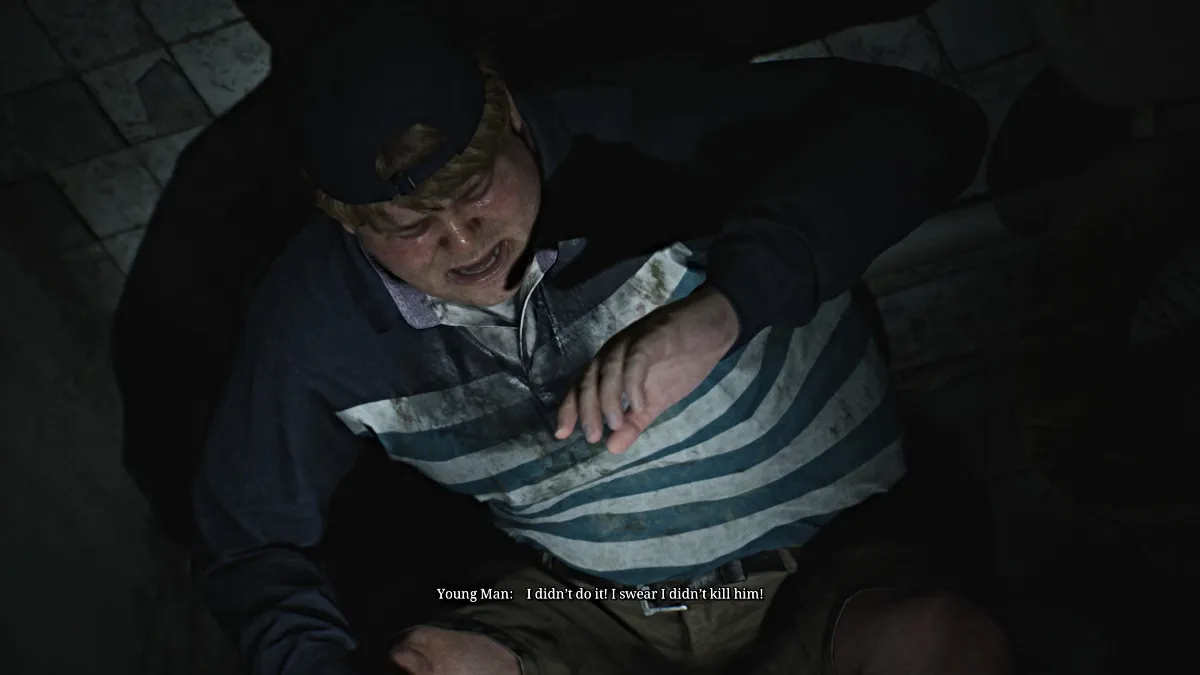
As you get closer, a cutscene unfolds, introducing you to Eddie Dombrowski. He appears unusually jittery and is obviously ill. He seems eager to depart the town and invites James, but James declines politely. After the cutscene ends, search his apartment for items. Before heading to the pool area, consider retracing your steps to the Chute Courtyard to pick up the “Woman Coin” that fell from the chute.
Next, return to Eddie’s apartment and enter the Pool Area via a window since it is swarming with Deceitful Characters, so proceed cautiously. Eliminate only when necessary and locate the pram in the pool that holds the Serpent Token. Flee the area using the same route and head back to the reception office to finally solve the puzzle.
Wood Side Apartments (Floor 1) – Coin Puzzle
To unlock the elegant display cabinet situated in the reception area, follow the instructions provided by the given poem. The poem changes after each move you make. This is the complete solution for the standard level challenge, broken down into sequential steps:
- Place the Woman Coin in the center slot (Woman’s face up)
- Place the Man Coin in the far left slot (Man’s face up)
- Flip the Snake Coin to the Flower Side and place it in the far right slot
- Flip the Man Coin to the Sword side and move it to the space left of the center
- Move the Woman Coin one space to the right
- Flip the Snake Coin back to the Snake Side
- Flip the Woman Coin to the Gravestone Side
- Flip the Man Coin back to the Man Side and move it back to the center slot
Here’s a suggestion for paraphrasing: In summary, the puzzle has only one more move left. This involves selecting among the three options (Man, Woman, or Snake). Regardless of your decision, it influences the final outcome you receive. Additionally, as a reward for your persistence, you will obtain the key to Apartment 201.
Wood Side Apartments (Floor 2) – A Close Call with Pyramid Head and the Otherworld
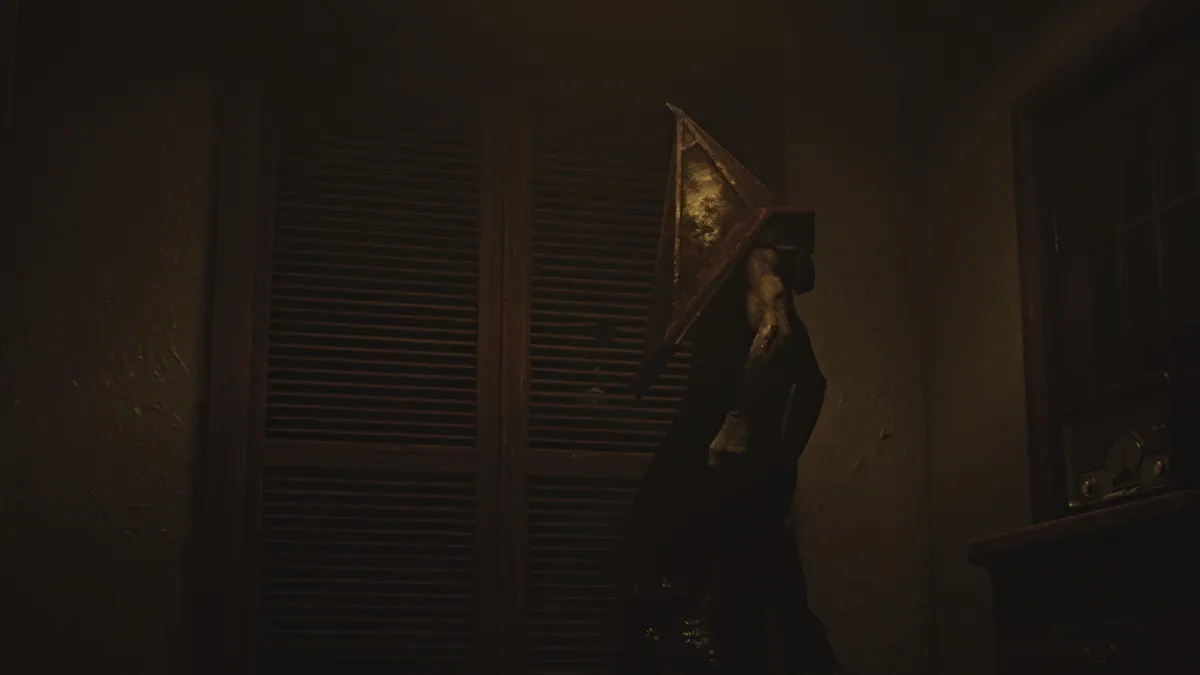
To ascend to the second floor, take the central staircase located in the lobby and then turn right towards Apartment 201. As you explore, you’ll encounter a Handkerchief on a writing desk which triggers an intriguing cutscene featuring Pyramid Head and Mannequins. Following his departure, return to the desk and pick up the Handkerchief. Subsequently, approach the conspicuously red door found in another part of the building for yet another captivating cutscene where the protagonist, James, must navigate between two structures. This specific location is known as Blue Creek Apartments, but it exists within an alternate dimension called Otherworld.
In this strange realm I find myself, what seems like an ordinary setting appears worn, rusted, and at times, reduced to a grimy skeleton. Since there’s no handy map on hand, you’ll have to navigate on your own for now. Start by venturing through the nearby blue door. You’ll notice some Handgun Ammo sitting on an armchair to your right, so don’t forget to pick it up. After that, head left along the hallway and follow it until you eventually stumble upon a map of Blue Creek Apts, specifically 2F-3F.
As I tread along the corridor, I spot what seems to be a fragile wall ahead. Using my trusty wooden plank, I shatter it open and squeeze through. A nearby drawer reveals some valuable Handgun Ammo, which I grab hold of. Proceeding with caution, I navigate to the other side of this apartment, keeping an eye out for any threats. Once I’ve taken care of them, I scavenge for more Handgun Ammo hidden in the kitchen area before making my exit back into the hallway.
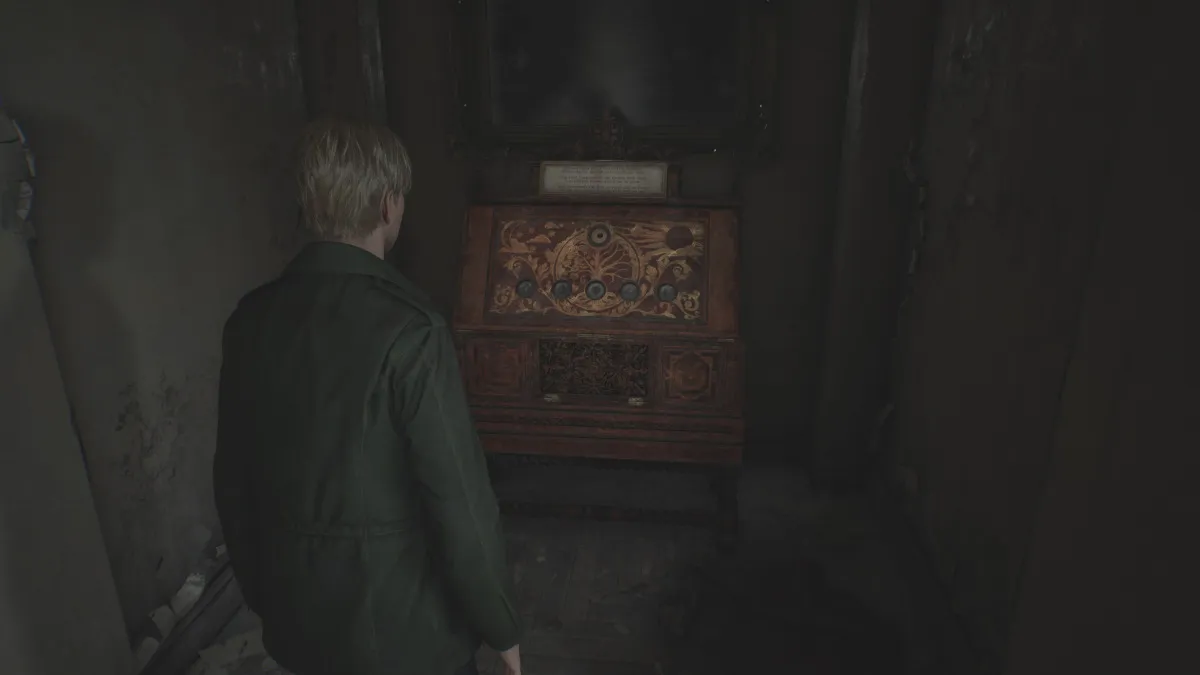
In my adventure, at some point, I’ll come across a blue door labeled ‘Apartment 202’, adorned with the letter ‘M’ and home to a few lifeless moths. I plan to revisit this place later on. For now, I’m heading into Apartment 212, where a Red Save Point and an intriguing Grandfather Clock await me. This clock is more than just a timepiece; it’s a puzzle! To solve it, I must first locate the missing Hour, Minute, and Second hands. Quite a challenge indeed!
Blue Creek Apartments (Floor 2 and 3) – Cranks, Clocks, and Radios
Head out onto the balcony, where you’ll find a metaphorical crossroads. To your right is a large ‘H’ marked on an orange door, but for now, it remains closed. For the time being, proceed left and enter Apartment 203. Inside the kitchen, you’ll find a syringe. Knock down the wall in the kitchen to gain access to Apartment 205.
Gather ammunition for your handgun from a crib located on the opposite side, then navigate until you find another open window leading to another balcony. Retrieve more handgun ammo stored in the bathroom nearby before proceeding. Ascend via the stairwell to the third floor and move through the crawlspace to arrive at Apartment 303.
Initially, make your way towards the kitchen, which has another fragile partition. Beyond that, you’ll arrive at the Utility Room, containing Handgun Ammo and a Health Drink. Exit into the corridor and head to Apartment 307, where a big Radio suspended from the ceiling plays tunes. After amassing more Handgun Ammo (you’ll find it quite useful in the near future), proceed to the room on the right with a Red Crank that seems to be without a valve.
Initially, proceed through the door in the room that leads to a balcony and ultimately brings you back to Apartment 305. The window will close automatically after you, requiring you to smash open the locked door nearby using the Red Crank mounted on the wall (visible above). Be prepared as two Deceptive Characters will swiftly assault you. Don’t forget to pick up the key for Apartment 306 from the table before departing.
Navigate towards Apartment 306, search for and gather as many Handgun Bullets and Health Beverages as possible. In the lounge area, you’ll spot a Red Handle. Rotate it to unlock a door on the opposite side, then pick up the Valve that detaches upon removal. Now return to Apartment 307 and apply the Valve to the wall handle to lower the enclosed Radio.
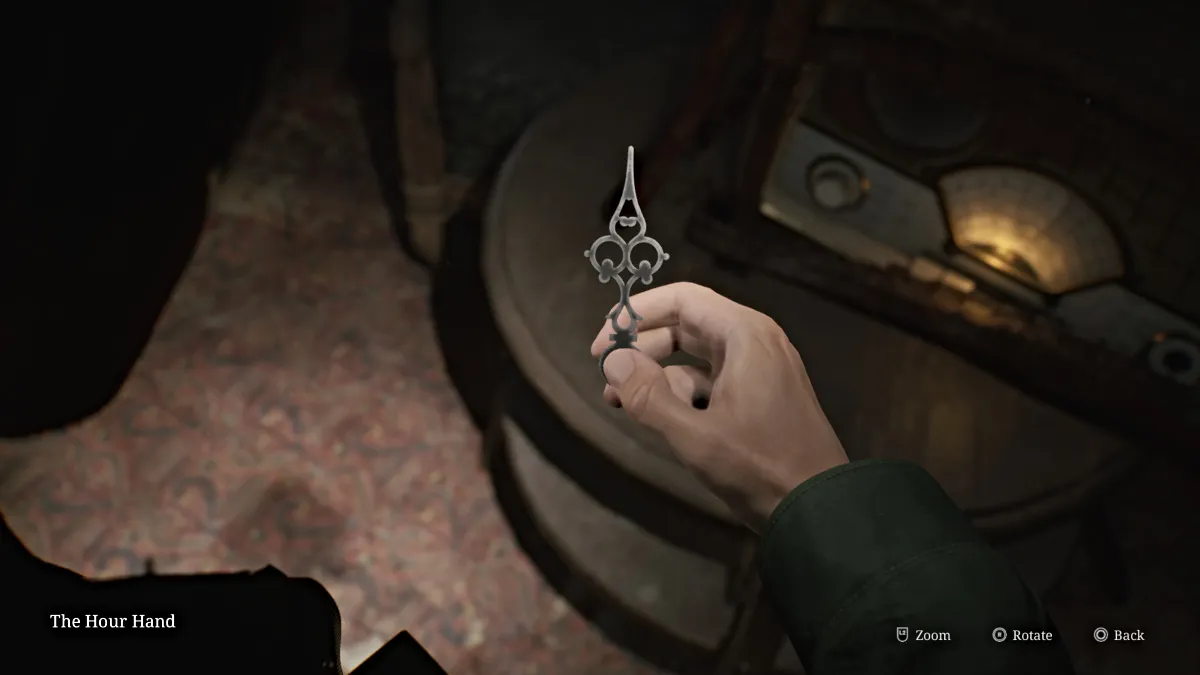
Afterward, retrieve the Hour Hand for the Grandfather Clock, then make your way down the fire escape to Apartment 212. Once there, insert the Hour Hand into the clock to initiate the initial puzzle.
In this scenario, point the hour hand of the clock to the 9th position, and only then will the orange ‘H’ door close by.
All Silent Hill 2 Remake Achievements/Trophies
In the following list, you’ll find all 43 achievable rewards or trophies from the Silent Hill 2 Remake, with 31 of these being hidden. To collect them all, you’ll need to play through the game more than once.
| Achievement/Trophy | How to Unlock |
|---|---|
| You Made Me Happy | Collect all other trophies/achievements in the game. |
| No Turning Back Now | Try to leave Silent Hill in the Observation area. (Walk down the opposite direction on the road at the start of the game until James turns back.) |
| Enjoy Your Stay | Reach Silent Hill. |
| Nice and Cozy | Reach Wood Side Apartments. |
| Let’s NOT Party! | Shoot all the balloons in Wood Side Apartments. (Shoot all balloons in the “Welcome Home” apartment; recommend saving before doing so to recover the bullets used.) |
| Otherworldly | Enter the Otherworld for the first time. |
| Passed | Made your way out of Blue Creek Apartments. |
| Uncanny | Meet Maria. |
| All Seems in Order | Discover the secret of Room 106. |
| Leftovers | Find the pizza in Pete’s Bowl-O-Rama |
| Admitted | Reach Brookhaven Hospital. |
| Nightmare Fuel | Defeat the Flesh Lip. |
| Alone Again. | Survive the Chase in Brookhaven Hospital. |
| Into the Abyss | Reach the end of the long staircase. |
| Unforgivable | Defeat the Abstract Daddy. |
| Inner Sanctum | Find His Room. |
| A Human Being | Kill Eddie. |
| Glimmer of Hope | Reach the Lakeview Hotel. |
| Scourge of Toluca Lake | Spend 10 minutes out of Toluca Lake. |
| Truly Special | Reach Room 312. |
| It’s Bread. | Interact with bread. |
| Obselete | Obsolete |
| That Part of Me. | Defeat Her. |
| Lumberjack | Find the chainsaw. |
| Merciless | Finish off 50 enemies with a stomp attack. |
| No Big Deal | Kill 75 enemies with ranged weapons. |
| Blunt Force Trauma | Kill 75 enemies with melee weapons. |
| You Never Know… | Try to open locked doors 50 times. |
| Shattered | Destroy 50 windows. |
| Making Peace | Reach the “Leave” ending |
| Vicious Circle | Reach the “Maria” ending |
| Only Way Out | Reach the “In Water” ending |
| Defy Even Death | Reach the “Rebirth” ending |
| The Goodest Boi | Reach the “Dog” ending |
| Tinfoil Hat | Reach the “UFO” ending |
| I Saw That Town | Complete New Game Plus on any difficulty. |
| Radio Silence | Complete the game without using the radio. |
| James of All Trades | Kill at least one enemy with Wooden Plank, Steel Pipe, Handgun, Shotgun and Rifle in a single playthrough. |
| Pieces Unarranged | Collect all the Strange Photos in a single playthrough. |
| Archivist | Collect all memos in a single playthrough. |
| Faster Than Fog | Complete the game in under 10 hours. |
| As Close as You Like | Finish the game without killing enemies using ranged weapons. |
| Party Like It’s 2001 | See all classic endings (Leave, Maria, In Water, Rebirth, Dog). |
| Echoes | Witness all glimpses of the past in a single playthrough. |
All Silent Hill 2 Remake Endings
Note: This part of the guide is still under development as we explore all possible unique conclusions for the game. We encourage you to revisit regularly as we continually add more information to it.
Don’t forget to explore our fresh guides and updates on the Silent Hill series right here at GamerTop, including the concise walkthrough for Silent Hill – The Short Message.
We have upgraded our commenting platform! Existing comments will be imported over the next few weeks.
Read More
- PENDLE PREDICTION. PENDLE cryptocurrency
- ACT PREDICTION. ACT cryptocurrency
- Skull and Bones Players Report Nerve-Wracking Bug With Reaper of the Lost
- W PREDICTION. W cryptocurrency
- NBA 2K25 Review: NBA 2K25 review: A small step forward but not a slam dunk
- KEN/USD
- Why has the smartschoolboy9 Reddit been banned?
- Understanding Shinjiro: The Persona 3 Character Debate
- SOLO PREDICTION. SOLO cryptocurrency
- Unlocking Destiny 2: The Hidden Potential of Grand Overture and The Queenbreaker
2024-10-07 19:53