Khazan: The First Berserker offers an extended, thrilling journey packed with all the essentials and extras you’d expect from a game in the soulslike genre, seamlessly infused with elements from other genres that complement it beautifully. This includes numerous corpse runs, challenging boss battles, captivating combat sequences, distinctive abilities, and plenty more, making it an unmissable choice for enthusiasts of this genre.
In the “Trials of the Frozen Mountain” mission, things become more engaging as you unlock all types of weapon classes along with their skill progressions. The climax is a tough yet gratifying boss battle designed to test your freshly acquired abilities!
How To Complete Trials Of The Frozen Mountain
Following a conversation with Quimuk, ascend the series of ladders located behind her and reach the summit of the cliffside where you can trigger the Blade Nexus, thus establishing your initial mission milestone. Given that you have an abundance of Lacrima from defeating Yetuga, remember to redeem them prior to proceeding further.
On your descent from Blade Nexus, you’ll notice a modest trail veering to your right. If you follow this path, you’ll encounter not one, but two wolves and an intriguing object on the ground. Defeat these wolves and search the area to discover not just one, but two Citrus of Cleansing and a total of two stones!
This version maintains the original’s structure while using simpler, more conversational language to make it easier for readers to understand.
Continuing Down The Hillside
Sticking to the primary route may lead to an encounter with four wolves, but they shouldn’t present much of a challenge. Once you’ve handled them, keep progressing until you acquire the skill to throw a javelin, enabling you to attack distant enemies with a projectile.
Approaching, you’ll notice a small group of monkeys situated quite a distance away. Take aim with your just-acquired Javelin and dispatch them. Before venturing further, cast your eyes to the left where you’ll discover a Mysterious Ore hidden behind some wooden scaffolding. Knock it over and grab the x3 Plague Resistance Exirs that lie within.
Exploring The Surrounding Areas
Initially, you’ll find a pack of wolves to your right. Approach them, deal with them, and after that, gather the Small Spirit Ore that lies nearby. Directly opposite the wolves, you’ll spot a pair of monkeys hanging around a tree. Move towards them, dispatch them, and don’t forget to grab the loot they drop – it’s 3 Citrus of Cleansing!
Marching Onward
Once you’ve finished checking out the side regions, proceed along the primary trail until you encounter a surprise attack by four Wolves. Deal with them swiftly, then navigate to the spacious, vacant area located to your right and pick up the two Plague Cleanse Potions scattered on the ground. After that, retrace your steps back onto the main path.
In the far-off area, you’ll spot a Wild Boar. A precise throw of your Javelin at its head will momentarily stun it, giving you an opportunity to approach it closely and deal multiple uncontested blows, making it significantly easier for you to subdue it. Once the Boar is out of the picture, continue forward until you come across a path that branches off to both the left and right!
Creating A Shortcut
To reach a greater number of Wolves and discover a purple object on the ground, opt for the path on your left. Overcome the Wolves and retrieve the item, which will reward you with a Fire Booster. Proceed along the pathway until you come across a decayed tree. Interact with it to knock it down, thereby creating an advantageous shortcut leading back to the Blade Nexus that you previously activated.
Use up the savings you’ve earned in Lacrima, and then return to the spot where multiple trails diverged to continue your journey across the snow-covered mountainside!
Greatsword Trial
By sticking to the correct route, you’ll encounter a dead body lying in the snow, which will provide you with some Lacrima and Soul Tear Powder. Proceed until you arrive at a cemetery where a great sword is embedded in the snow. Move towards the Greatsword to initiate a cutscene.
Once the scene concludes, you’ll find yourself wielding the mighty Greatsword, marking the start of your first challenge. A number of Specters will rise from the tombstones, but don’t worry, they shouldn’t prove overly challenging for you to handle. This is essentially a tutorial designed to help you master this weapon type effectively. Slash through them to successfully complete the trial!
Onto The Next Trial
After you’ve grasped the fundamentals of wielding the Greatsword, you can now head towards the trail to your back left that leads into the next zone. As you journey there, an abandoned plot with a lootable item will be on your left-hand side. Be sure to collect this item to acquire two Vitality Spheres. Carry on moving forward.
Eventually, you’ll arrive at another Blade Nexus, giving you the chance to use your Lacrima and unwind since you’ve discovered a new resting spot or safe zone.
Spear Trial Bound
From now on, the Blade Nexus has been switched on, and you’ll encounter two different routes, one veering left and another heading right. Start by choosing the path on your right-hand side and proceed. You’ll eventually stumble upon a hidden cave nestled within the wall on your right; make your way inside to discover a Yeti residing there. Treat it as you did in our last mission.
After the Yeti is defeated, search for items hidden in the cave to find 2 Fire Cleanse Potions. Exit the cave and walk straight until you reach a dead end on the pathway. There, you’ll find another item – grab it to get 2 Willpower Orbs. Then, make your way back to the Blade Nexus!
Continuing The Critical Path
Take the path to your left and continue along it until you spot a Wild Bear standing by a tree. This battle, similar to your last mission, promises to be quite tough. Try to dodge its attacks and concentrate on its Stamina Meter while staying calm. Rushing headlong into the fight might not bode well for you.
Now that the Bear has been vanquished, you can pick up its remains on the floor in the arena for a substantial amount of Lacrima and Soul Tear Dust. Once you’ve done that, look back towards where you originally entered to spot a pathway off to the left. Follow this path all the way until you encounter another fork in the road!
This version maintains the original meaning while using more natural and conversational language.
Straight Ahead
Keep going straight until multiple monkeys leap from the ceiling, at which point use your spear to take them out. Collect the Concentrated Fire Essence, but beware as another monkey will attack you immediately upon your pickup. Quickly dispatch it and return to the original path!
Back On Track
Advance uphill and stick to the trail until a group of wolves suddenly pounces on you. Deal with them as usual, then carry on your journey. Eventually, you’ll come across a spot where you can choose between turning left or right. Opt for the pathway on the left to discover a cave, then venture inside it.
Stepping into the cave, a cloud of bats surrounds you, so be on your guard to dodge their approach. Proceed ahead until you encounter an Imperial Knight near a body. This battle, as usual, will be tough, but you’ve got what it takes to prevail just like in the past encounters.
Once you’ve defeated the Imperial Knight, look towards the cave’s left side to discover a hidden crevice where a Mysterious Ore is stashed. Break it open, then make your way back onto the main trail again!
Approaching The Trial
As you resume your journey along the critical path, you’ll come across another Wild Boar. Use your Javelin to stun it, then handle it much like the first one. Proceed a little ways until you spot a pair of Monkeys near a tree, quickly dispatch them, and carry on with your journey.
Walk across the bridge, continue along its path, and eventually arrive at a fresh “Nexus Point”. Engage this location, expend your hard-won Lacrima, and breathe a contented sigh as you’ve reached another safe spot.
Spear Trial
From the Blade Nexus, proceed along the way until you come across a deceased body. Absorb this corpse to collect additional Lacrima and Soul Tear Dust. Continue on your journey until you spot a spear embedded in the snow, move closer to trigger another cutscene. After the scene ends, you’ll be equipped with the Spear, prepared to confront the upcoming trial.
Similar to the Greatsword Trial, this serves as a basic guide on how to master the Spear. You’ll be battling some Specters to familiarize yourself with its handling. Upon completion of the Trial, you will unlock its Skill Tree. Now, in The First Berserker: Khazan, you can use all three weapon types!
Preparing For The Next Trial
After mastering the use of the Spear, follow the trail from the Spear Trial all the way until you come across a fork in the road. Go right at the junction to eventually stumble upon a Chest nestled against a cliff edge. Open the Chest to collect a Volk Warrior’s Helmet, a Volk Warrior’s Vest, and the Veteran’s Ring.
If you prefer, feel free to take a break at the Blade Nexus you recently activated prior to the Spear Trial. Later on, follow the primary route until you come across a bridge guarded by several individuals. Use your Javelin to eliminate them, and then cross it safely.
After crossing the bridge, keep going until you find another Blade Nexus. Activating this will give you a new checkpoint, so you can ready yourself for the upcoming challenge!
Completing The Dual Wield Trial
Starting from the Blade Nexus, travel in reverse towards the bridge. When you spot a cave entrance on your right, venture inside and continue until you encounter a Soldier. Take care of the Soldier promptly, then look to your right where an Archer is aiming at you. Use your Javelin to neutralize them. Afterwards, collect the Transmutation Shard that lies on the ground nearby.
Take a glance over the cliff’s edge to spot the solid terrain below and a soldier guarding it. Perform a surprise attack, swiftly eliminating them from your path. Continue moving forward as you’ll come across an orange object lying on the ground. Grab it for yourself and gain a Tear Summon Stone!
Climbing Up To Cliffside
Close to the Tear Summon Stone, you’ll find a ladder. Climb this ladder to reach the platform overhead, where another ladder awaits. Use this ladder to ascend higher up the cliffside. A Soldier will be present; you can approach him stealthily and eliminate him quietly or use your Javelin to eliminate him from afar.
To proceed, exit and glance to your right where you’ll find a deceased individual on the ground. Take note of the area for the valuable Lacrima and Soul Tear Dust, then spin around. On the cliffside to your left, there is a Mysterious Ore. Utilize your Javelin to throw it at the ore, shattering it. This is the last Mysterious Ore in this mission!
Dropping Down
Traverse past the shattered Mysterious Ore, pause to spot a platform below, then descend onto it. Continue along this pathway until you reach solid ground in front of a cavern. Enter the cave promptly as a flock of Bats will rush towards you. Defend yourself against the Bats, then turn around to discover a blue item near the cave’s edge. Grab it for three Assassin’s Elixirs.
Keep navigating through the cave until you exit, where you’ll find two guards and a distinctive purple artifact. You can either take them out using your javelin from a distance or approach the first one stealthily and engage the second soldier directly. Regardless of your approach, once they’re both handled, seize the artifact for an Earth Enhancer!
Scaling The Tower
Keep advancing to locate a timber bridge connecting to a tower, accompanied by several Soldiers. A soldier carrying a sword and shield will approach you first. Handle them beforehand, then employ your spear to eliminate the archer stationed on the tower. Once done, you can confidently traverse the bridge and proceed toward the tower.
First, move over to the opposite side of the tower. There, you’ll find a treasure chest. Open it to obtain the Volk Warrior’s Trousers, Volk Warrior’s Gaiters, and the Necklace of Resilience. With these new items, you can now ascend the tower!
Multiple Pathways
After climbing the tower, you’ll encounter a second ladder that ascends a rocky outcropping. Climb this ladder to discover several routes. One of them veers left and descends, while the others continue upward along the cliffside. For now, proceed along the path going down until you spot two soldiers relaxing by a fire.
Here will be a regular soldier and an Imperial knight. Initially, deal with the soldier first since you can dispose of them swiftly. After that, handle the knight in your usual manner. Once they’re both out of the picture, grab the blue item on the floor for another Soul Tear Dust!
In this version: There will be a regular soldier and an Imperial knight present. First, take care of the soldier because you can easily defeat them, then handle the knight as usual. With both defeated, pick up the blue object lying around to get more Soul Tear Dust!
Heading Up
From here, you can head right and continue along this route, which should lead you to an Imperial Centurion. Just like the first time, he’ll be ready for a fight and you’ll need to work hard to defeat him. Focus on dodging his attacks and countering with swift strikes. Be careful not to press your luck too much, as he can quickly deplete both your Stamina and Health if you’re not careful.
After the Centurion is defeated, keep climbing the cliffside until you find a ladder. Approach it and give it a good kick to create a shortcut to the Blade Nexus you activated earlier. It would be wise to rest there and redeem all the Lacrima rewards you’ve accumulated since then!
Dual Wield Trial
Make your way back up the shortcut ladder and continue along the pathway until you come across the protruding “Dual Wield” embedded in the ground. Approach it just as you did with the others, which will initiate a cutscene, leading you into the “Dual Wield Trial.” In this trial, you’ll face Khazan’s Abyss, another Specter that won’t require excessive effort to conquer.
Once you’ve finished the Dual Wield Trial, keep moving along the primary route. You’ll spot a blue item on your right side. Grab it to collect two Vitality Shards. Then, cross the bridge and venture into the cave to locate another Blade Nexus. Activate this for the final shortcut of the mission!
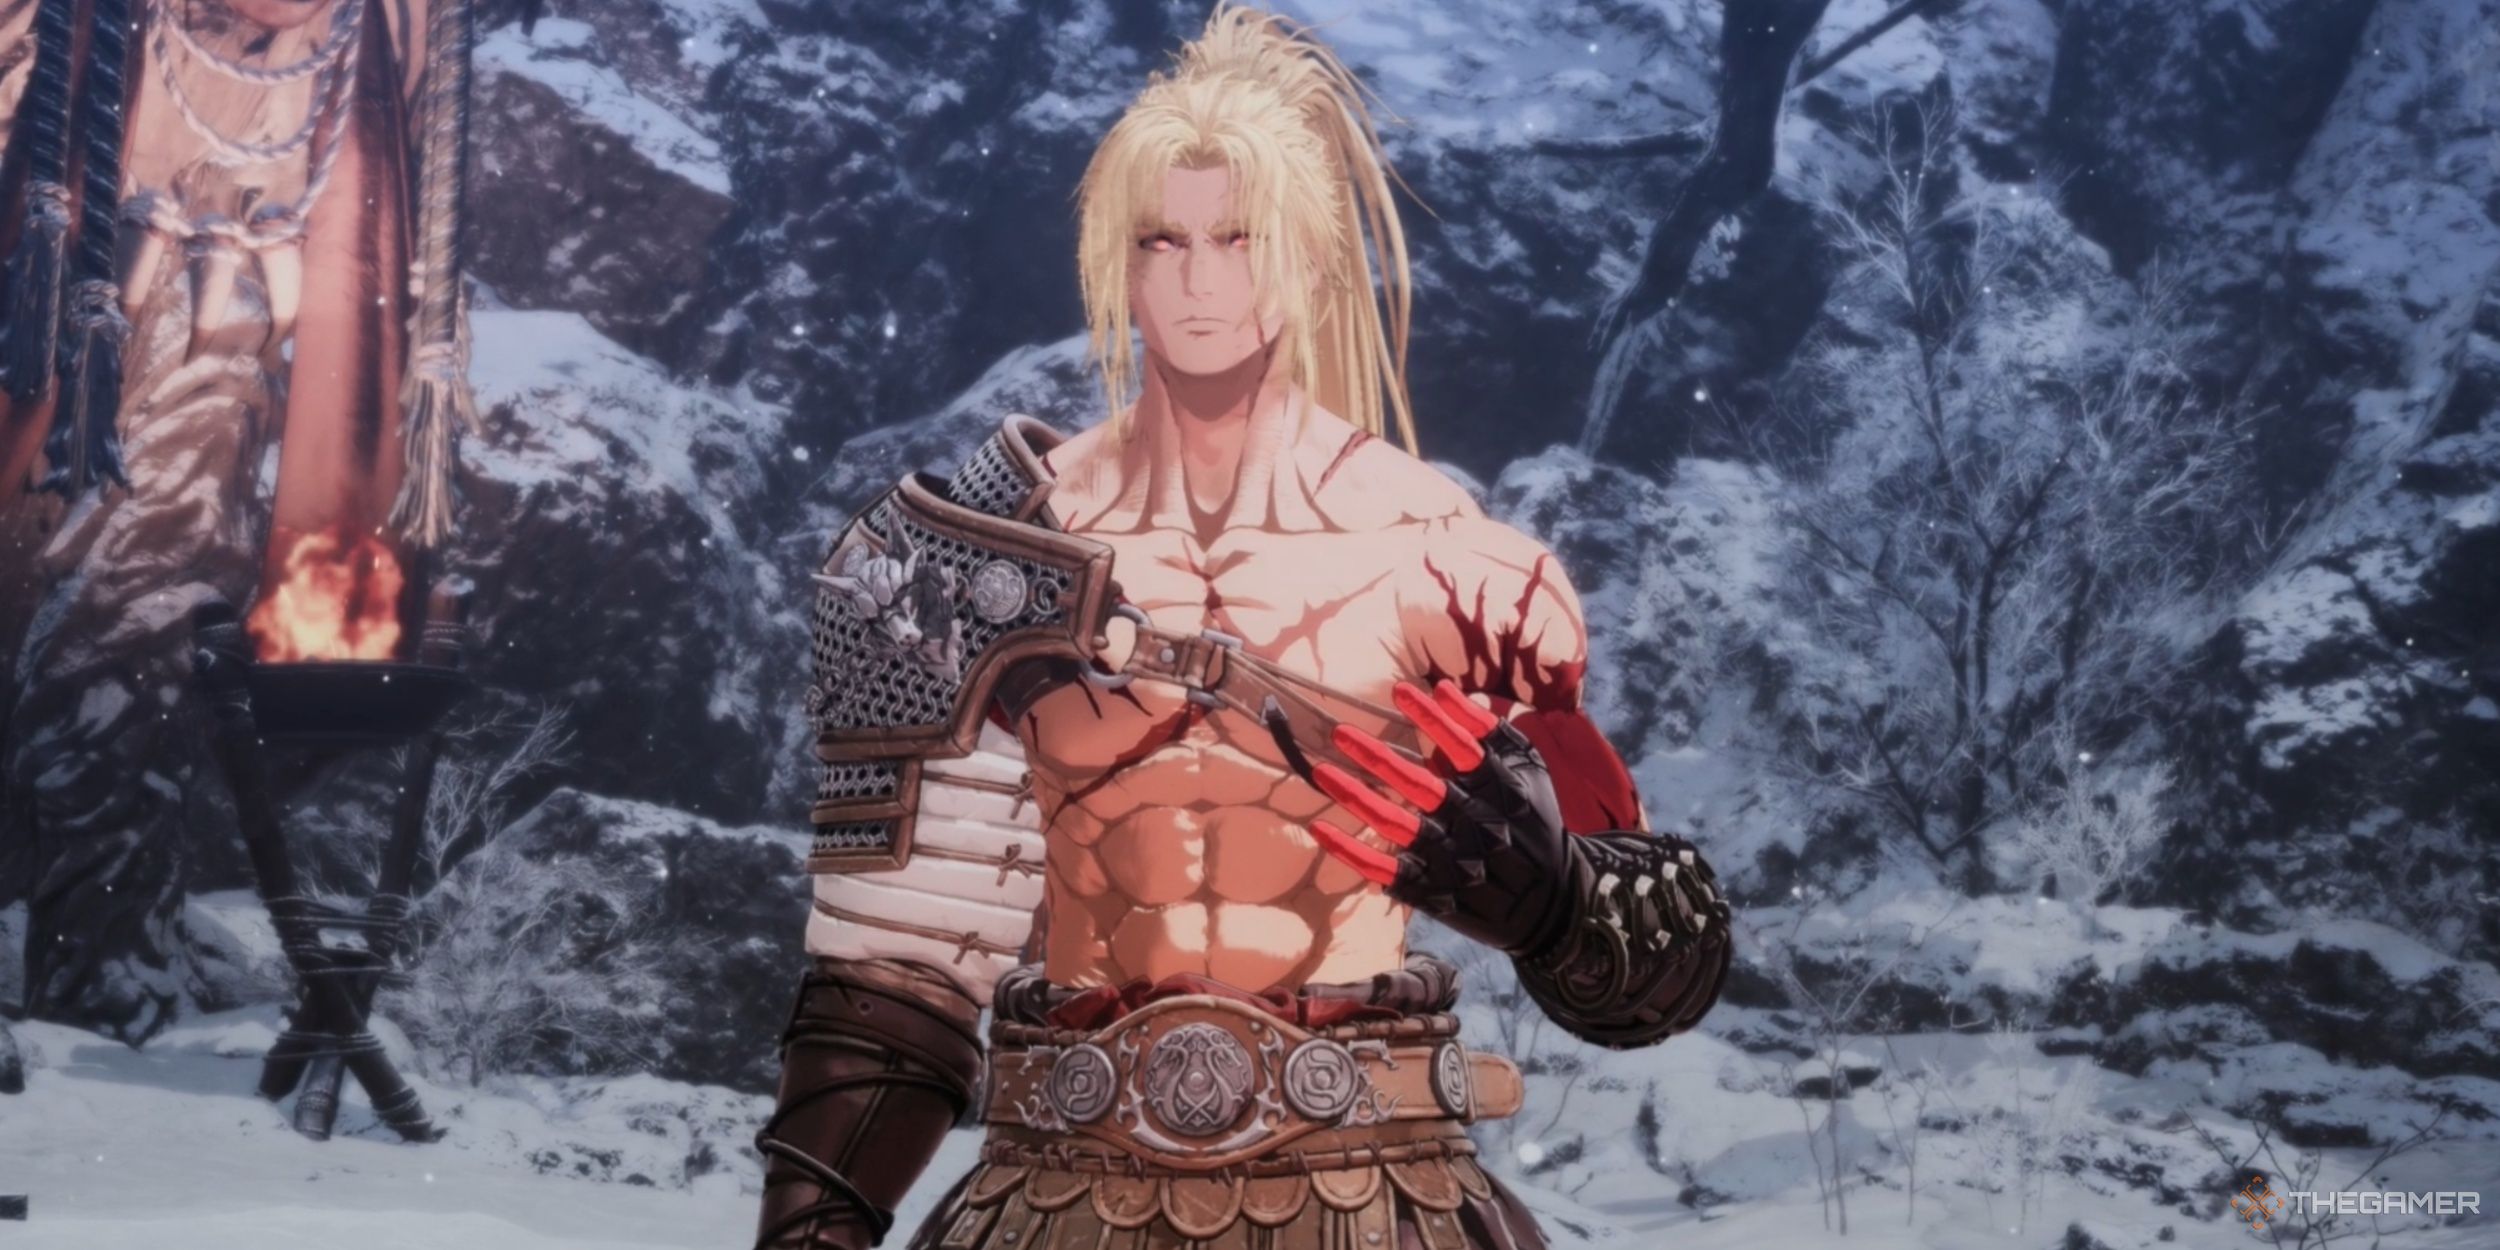
Defeat Blade Phantom
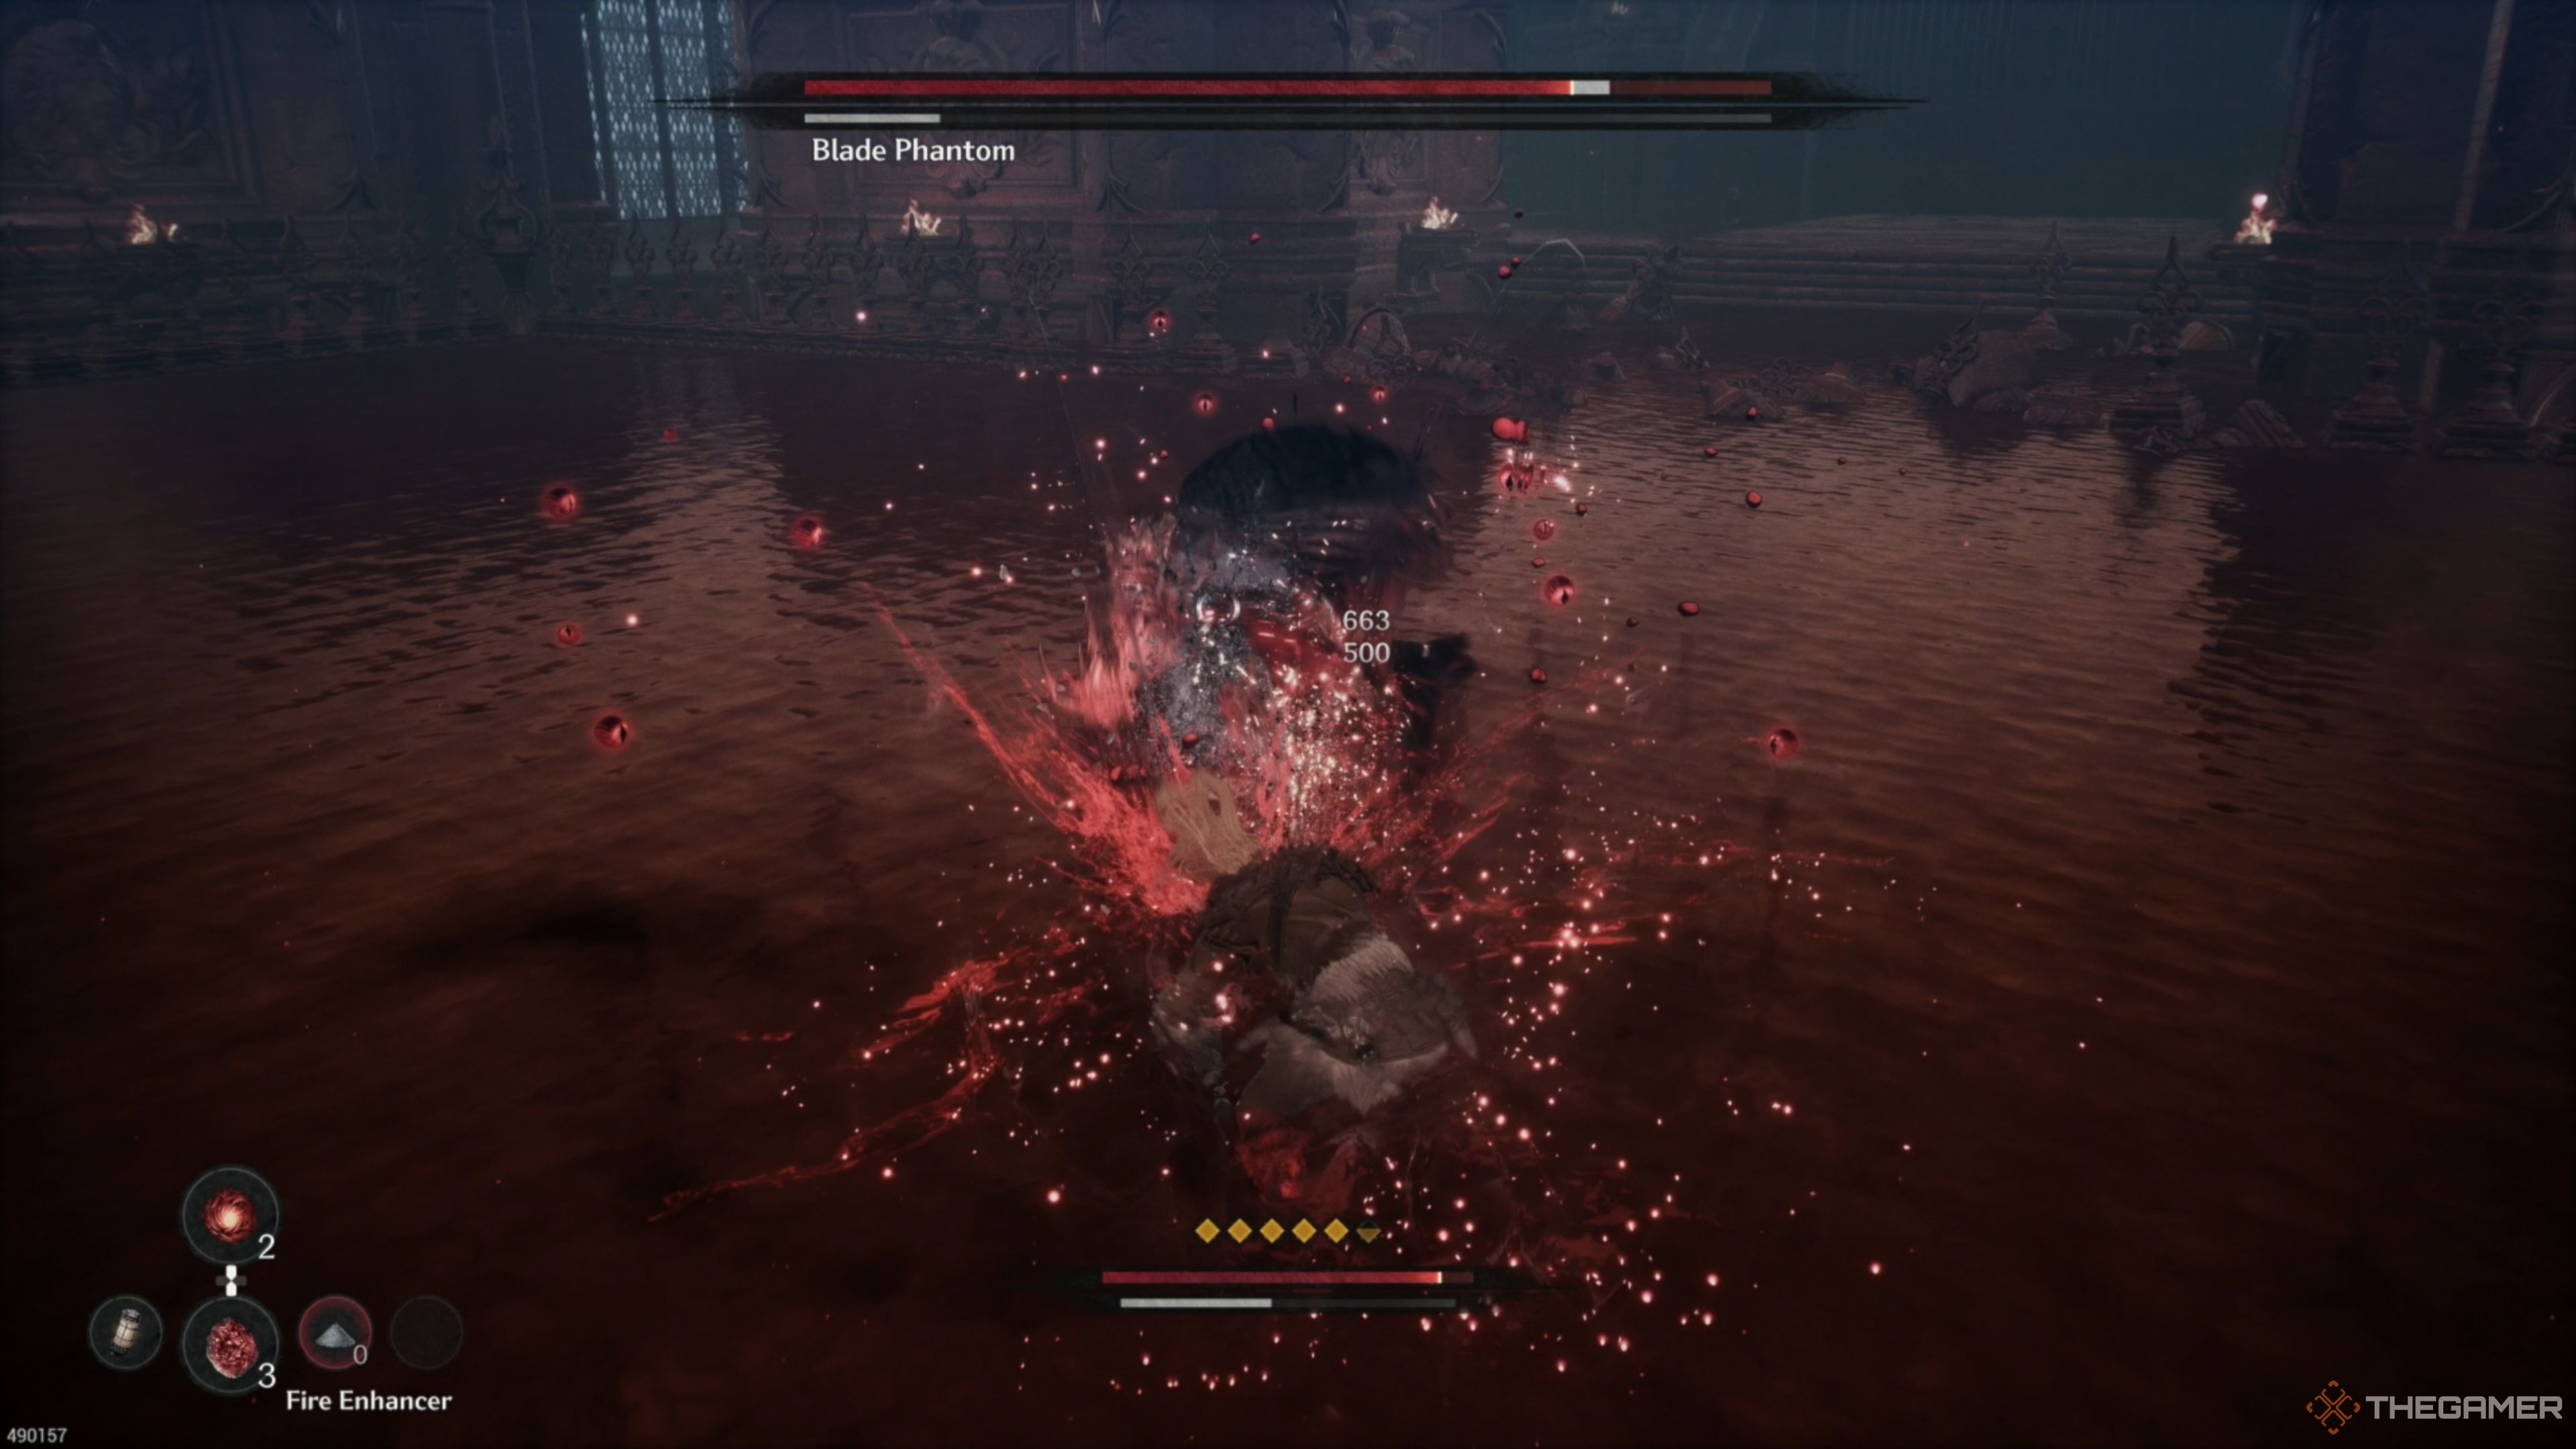
Finally, you’ll find yourself standing before the mission’s superior, known as the Blade Phantom. This is your initial test of skill in The First Berserker: Khazan, so make sure you’re well-prepared before taking him on. This confrontation consists of two stages and will challenge you to your very core, forcing you to apply everything you’ve recently learned to emerge victorious.
Don’t worry if you’re having trouble defeating Blade Phantom – we’ve got your back on this challenge! Mastering this fight can be tough, especially if you’re not fully comfortable with the weapon you prefer. However, with a bit of practice, strategy, and perseverance, he will fall before you in no time!
Read More
- 50 Ankle Break & Score Sound ID Codes for Basketball Zero
- Who Is Harley Wallace? The Heartbreaking Truth Behind Bring Her Back’s Dedication
- 50 Goal Sound ID Codes for Blue Lock Rivals
- Mirren Star Legends Tier List [Global Release] (May 2025)
- How to play Delta Force Black Hawk Down campaign solo. Single player Explained
- KPop Demon Hunters: Real Ages Revealed?!
- Here’s Why Your Nintendo Switch 2 Display Looks So Blurry
- Elden Ring Nightreign Enhanced Boss Arrives in Surprise Update
- 100 Most-Watched TV Series of 2024-25 Across Streaming, Broadcast and Cable: ‘Squid Game’ Leads This Season’s Rankers
- Jeremy Allen White Could Break 6-Year Oscars Streak With Bruce Springsteen Role
2025-03-24 19:45