
Balancing exceptional gameplay in competitive titles with a seamless broadcast is a common hurdle faced by streamers. You want your game to run smoothly for immediate reactions, yet you desire a clear, captivating broadcast for your audience. It can seem like you must compromise one for the other. However, finding that optimal balance isn’t about splurging on the priciest equipment; it’s more about being savvy with your settings. We will guide you on how to configure OBS to harmonize with your hardware, helping you strike a balance between performance and quality for a lag-free stream.
Key Takeaways
- Master the Basics First: Before diving into complex settings, always restart your PC and OBS, check your cables, and run the Auto-Configuration Wizard. These simple steps solve most common streaming issues and provide a stable foundation for your stream.
- Find Your Stream’s Sweet Spot: A smooth 720p stream is always better than a choppy 1080p one. Experiment with lowering your resolution or frame rate (from 60fps to 30fps) to find the perfect balance that your PC and internet can handle without sacrificing gameplay performance.
- Troubleshoot Common Glitches Quickly: Understand the root of frequent problems to fix them on the fly. Dropped frames usually point to a network issue, while a black screen can often be solved by switching your game from Fullscreen to Windowed mode.
Stream Like a Pro: Aydan’s Guide to Fixing OBS
Experiencing a laggy or uneven stream during an exhilarating gaming session can quickly dampen the mood. It’s frustrating when, in the middle of showcasing a memorable victory or a humorous mishap, your OBS software lets you down. Fortunately, most common streaming problems can be resolved, and you don’t need advanced technical skills to troubleshoot them. The key to achieving a seamless, polished stream lies in knowing where to seek solutions.
If you’re encountering dropped frames during streaming, it would be wise to begin by examining your internet connection as it is frequently the source of the problem. A weak or unpredictable connection is often the primary cause. OBS provides a comprehensive guide on troubleshooting stream connections that covers various aspects such as network issues and ensuring your firewall or antivirus isn’t inadvertently obstructing the connection. For an immediate performance evaluation, consider using the built-in Auto-Configuration Wizard within OBS. This tool assesses your hardware and internet speed to propose suitable starting points for your settings, helping you optimize your setup effectively from the outset.
As a gamer, when my connection is stable, I can fine-tune my gameplay quality to provide a smooth experience. Aiming for a crisp 1080p stream at 30 frames per second, setting my Video Bitrate to approximately 4000 Kbps works wonders as a target. If my PC is still underperforming, don’t hesitate to lower the resolution to 720p. A stutter-free 720p stream will always be preferred over a choppy 1080p one. Finding the perfect balance for your unique setup is crucial, and there are plenty of discussions within the gaming community offering tips on optimizing performance settings for various PCs.
Start with These Quick Fixes
Before diving headfirst into rearranging my setup or accusing my internet service provider, let’s go over some fundamentals first, alright? Even the most infuriating streaming issues can sometimes be resolved with the simplest of fixes. Here are two essential actions you should always perform when OBS gives you trouble – they’re quick, easy, and might just save you from a world of tech-related headaches. Think of them as the digital version of ensuring the power cord is securely plugged in. Believe it or not, these simple steps often get me back to smooth streaming without any need for complex tweaks to settings.
Restart Your PC and OBS
Restarting your computer is an old yet effective trick for troubleshooting issues with software like OBS. A complete restart clears temporary files, stops stuck processes, and resolves minor glitches that could be causing lag or crashes. Ensure you close the OBS window properly, not just minimizing it, but fully shutting it down from your system tray or task manager for a full reset. If necessary, restart your entire PC. Upon returning, open OBS again and try recording a short 30-second clip. This simple action can frequently resolve whatever was causing the problem, getting your stream running smoothly once more. This is the first step to take every time you encounter an issue.
Update or Revert Your OBS Version
Software updates for OBS Studio can bring fresh features and security enhancements, but they can also potentially cause problems. After an update, some users may experience issues such as lost frames. In these cases, the new software version might not be harmonizing well with your particular hardware or settings. However, it’s important to note that such troubles could sometimes originate from network complications between your PC and the server. If you suspect the update is causing the problem, don’t hesitate to revert back to a previous, reliable version that functioned seamlessly for you.
Solve Common OBS Streaming Problems
If your live broadcast encounters issues during a gaming session, it’s normal to experience a surge of anxiety. We’ve all found ourselves in such situations. One moment you’re performing well, the next your audience is flooding the chat with messages about a frozen screen or poor audio quality. However, many OBS problems have simple solutions, and you don’t need advanced technical skills to resolve them. Before getting frustrated and stopping the stream, take a moment to relax. We will guide you through some of the most common issues and their fixes, starting with fundamental settings and moving towards more specialized ones. This can serve as your handy troubleshooting checklist for restoring your stream to its smooth operation so that you can concentrate on your gameplay and interacting with your community.
Check Your Display Properties and Hardware
Before we delve into adjusting numerous settings within OBS, let’s first examine your hardware setup. Often, the most straightforward issues are the ones causing trouble. If you encounter dropped frames or frequent disconnections during streaming, it’s likely a network problem. Additionally, your security software such as firewalls and antivirus might be interfering with OBS’s connection to the streaming server. The OBS Project provides an excellent guide on troubleshooting stream connections that could help you identify the issue. And remember, the classic tech support advice: ensure all cables are properly connected and try restarting your router. It may seem too basic, but a simple reboot often resolves many problems.
Adjust OBS Settings for Peak Performance
After ensuring your hardware isn’t causing any issues, it’s time for me, as an enthusiast, to delve into my OBS settings. A fantastic starting point is the Auto-Configuration Wizard, tucked away in the Tools menu. This nifty tool assesses your hardware and internet connection to suggest ideal settings, making the process much less daunting. For more hands-on control, pay attention to your video bitrate. If you’re aiming for a high-quality 1080p stream running at 30fps, a target bitrate of approximately 4000 Kbps is a reliable starting point. You can find more in-depth advice in guides dedicated to the best OBS settings for streaming. Remember, it’s okay to tinker around a bit to discover what works best for your unique setup.
Troubleshoot Your Capture Card
Capture cards play a crucial role in delivering top-notch quality to live game streams; however, they can be quite troublesome when they malfunction, even for renowned streamers such as Aydan. On occasions where your capture card fails to appear in OBS (Open Broadcaster Software), start by examining the physical cables and confirming that it is correctly identified as the video source within OBS. Updating or reinstalling the device drivers from the manufacturer’s website might also resolve issues.
Another frequent problem encountered is input delay, which leads many gamers to opt against screen capture for their main gameplay. A dedicated capture card significantly reduces this lag, enhancing your streaming experience by providing a more fluid gaming session. Should you continue to encounter difficulties, the support communities associated with your specific capture card brand will be your most valuable resource.
Optimize Your Stream for Better Quality
Achieving that polished, professional stream appearance doesn’t necessarily require an expensive setup; rather, it’s about striking the right balance in your settings. A seamless, consistent stream will retain viewers longer than a high-definition one with occasional stutters every few seconds. Think of it as a delicate equilibrium. Strive to maximize quality without overwhelming your PC or internet connection. This challenge is common among both novice and veteran streamers, from beginners experimenting with their setup for a new game to seasoned pros fine-tuning their configurations. The secret lies in comprehending the intricate interplay between resolution, frame rate, and bitrate, and how they influence both your gaming experience and your audience’s viewing pleasure.
When your live stream experiences choppiness or pixelation, it disrupts the viewing experience of your audience. It doesn’t matter if you’re in the heat of a 1v3 battle in Warzone or immersed in a new world in Palworld; you want your viewers fully engaged, not watching a loading circle. Fortunately, you have control over these factors using OBS (Open Broadcaster Software). By making strategic and incremental changes, you can identify problems and optimize for the unique characteristics of your hardware and internet connection. Here’s a step-by-step guide on adjusting three critical settings to achieve an uninterrupted viewing experience for your audience:
1. Bitrate: This setting determines the data rate at which your stream is sent, affecting both video quality and potential lag. A higher bitrate means better quality but requires more bandwidth, while a lower bitrate results in lower quality and less strain on your internet connection. You can experiment with different values to find a balance that works for your specific circumstances.
2. Resolution: The resolution of your stream affects the size of each video frame. Higher resolutions result in higher-quality videos but require more bandwidth, which may cause issues if you have limited resources. Lower resolutions will reduce the quality and strain on your internet connection, making your stream smoother.
3. Frame Rate: This setting determines how many frames are displayed per second in your stream. Higher frame rates result in smoother motion but require more bandwidth, while lower frame rates make your stream less choppy but potentially less fluid. Adjusting this setting can help you achieve a balance between quality and performance.
By fine-tuning these three settings in OBS, you’ll be able to create an engaging and enjoyable viewing experience for your audience. Keep experimenting with different values until you find the perfect combination that works best for you!
Balance Resolution, Frame Rates, and Input Delay
As a gaming enthusiast, my aim is to strike the ideal balance between delivering crisp visuals and ensuring seamless gameplay for my audience, all while avoiding irritating lags. A solid foundation for many setups is running at 720p at 60 frames per second (fps), which provides a sharp appearance and smooth action suited for fast-moving games. If you notice your stream faltering or the game lagging, the first step to take is reducing your frame rate to 30fps. If that doesn’t help, consider lowering the resolution. A consistently smooth 480p stream will always be preferred over a jerky 720p one. The key lies in experimentation to find the optimal performance settings tailored to your specific PC.
Fine-Tune Your Video Bitrate for a Smooth Stream
Consider your video bitrate as the width of the pipeline transporting your stream to the internet. A larger bitrate means more data flow, which leads to superior video quality. For a high-definition 1080p stream at 30 frames per second (fps), a bitrate of approximately 4000 Kbps is an ideal target. However, this value entirely depends on your internet upload speed. Before adjusting this, perform a speed test. A useful tip is to set the bitrate to around 75% of your consistent upload speed to allow for some flexibility and prevent dropped frames. Achieving the optimal bitrate is crucial in fine-tuning the best OBS settings and ensuring your stream offers pristine quality for your viewers.
Choose Between Windowed and Fullscreen Mode
Have you ever found yourself setting up a stream, only to encounter an unwelcome black screen instead of your game? The solution could be as straightforward as altering your display mode. Running games in the Fullscreen mode typically offers it priority access to your computer’s resources, enhancing in-game performance. However, this can occasionally clash with OBS. If you’re facing capture difficulties, consider running your game in either Windowed or Borderless Windowed mode instead. This usually makes it smoother for OBS to integrate with the game. Changing display modes is a simple troubleshooting step that often resolves many common capture issues, particularly when your standard Game Capture source isn’t functioning as anticipated.
Fix Network and Audio Glitches
Technical troubles can swiftly spoil the enjoyable atmosphere of a fantastic live stream. One moment you’re executing an amazing comeback move, and the next, the chat is filled with “stream is lagging” or “can’t hear you.” It’s infuriating, yet most streamers have experienced this. The issues typically originate from two primary sources: network problems or audio settings. An unstable internet connection can cause dropped frames, making your stream appear as a series of still images, while incorrectly configured audio settings can leave your viewers in absolute quietness.
Great news! Most of these issues are easily solvable if you take a bit of time for troubleshooting. You don’t have to be an expert technician to solve them. By methodically examining the stability of your network and scrutinizing your audio sources in OBS, you can iron out those wrinkles and get back to what you love most—playing games and engaging with your community. Let’s go through some of the usual suspects and how to deal with them so that your stream runs smoothly without a hitch.
Identify and Stop Dropped Frames
If you’re experiencing frequent interruptions or disconnections while streaming, it might be due to lost video frames, a common occurrence that usually signifies a network problem between your computer and the streaming service’s servers. It suggests that your internet connection may not be robust enough to maintain the bitrate you’ve set in OBS. To start troubleshooting, perform an internet speed test to understand your current connection capabilities, and consider reducing your bitrate to a more manageable level.
At times, it might not be your internet that’s causing trouble, but rather some software on your computer. Software such as firewalls or antivirus can sometimes disrupt your connection to the streaming server. For a comprehensive look into resolving these types of problems, I recommend checking out the detailed troubleshooting steps for stream connections provided in the official OBS guide.
Resolve Common Audio Problems in OBS
As a gamer myself, let me tell you from experience that audio problems can be just as annoying as laggy videos. If my audience can’t hear my commentary or reactions, they miss out on a big part of the gaming experience. One quick and effective fix for this is to disconnect and reconnect my microphone before I start streaming. This ensures that my system properly recognizes the device and helps prevent any audio issues from arising during the stream.
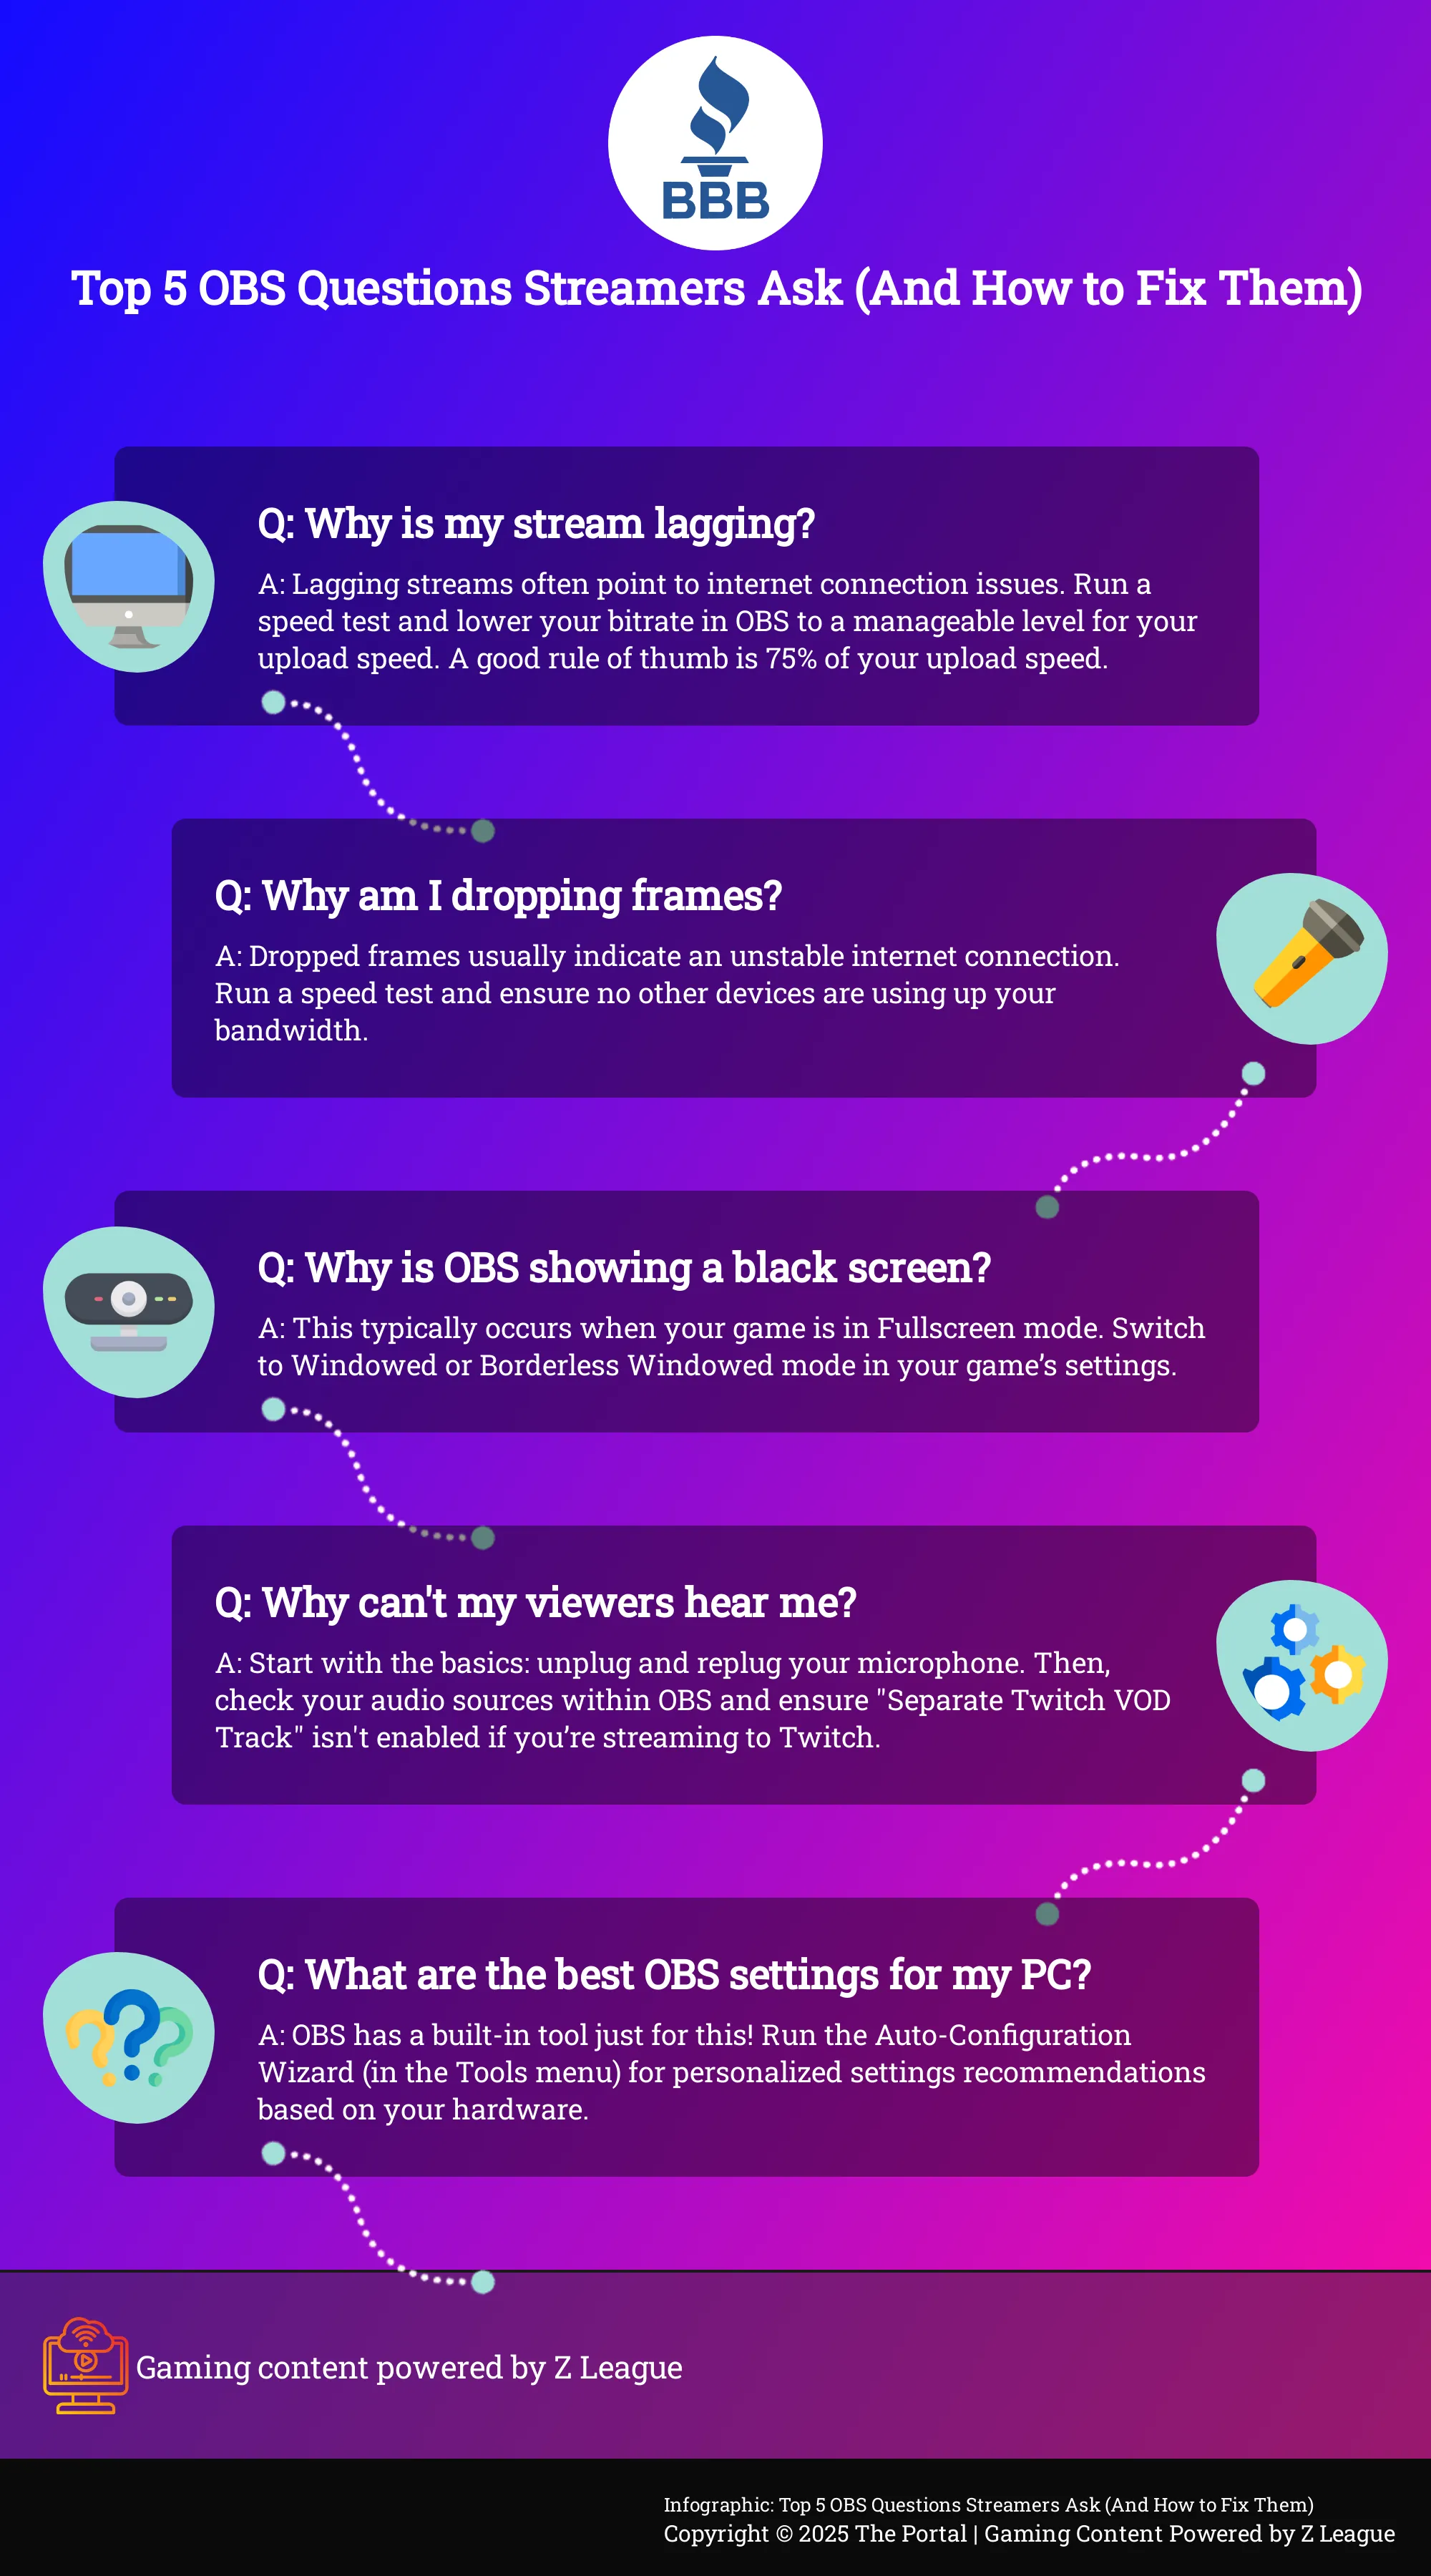
A frequent issue could be a particular setting in OBS. Make sure to examine if the “Separate Twitch VOD Track” feature is turned on, as this might occasionally lead to audio disappearing from your live stream. If you’re still experiencing trouble, going through a comprehensive troubleshooting guide may help you identify less apparent problems. For those who prefer visual learning, watching tutorials that address common OBS Studio issues can offer clear, step-by-step guidance.
Use Advanced OBS Optimization Tricks
After mastering the fundamentals, you can begin enhancing your live broadcast with some effective techniques. Visualize this transition as moving from a novice level to a professional streaming stage. These aren’t overly complex solutions that demand a background in computer science; instead, they are practical, easy-to-understand modifications that could significantly improve the quality and consistency of your stream. Setting these parameters accurately is crucial, particularly when you’re engaged in a high-pressure game. The last thing you would want during a nail-biting Warzone match to secure a win is for your broadcast to experience lag or frame drops. A glitchy broadcast can be the quickest way to lose viewers, regardless of how impressive your gameplay is.
The aim is to collaborate with your hardware rather than conflicting with it. By utilizing some of OBS’s integrated features and comprehending how factors such as bitrate and resolution influence performance, you can generate a seamless, professional-quality stream that captivates your viewers. These enhancements will help you strike the ideal equilibrium between a razor-sharp image and a lag-free viewing experience. This ensures that your gameplay and personality are the stars, not technical glitches. Let’s get your live stream running smoothly enough so that your audience won’t miss even a second of the action, thereby helping you cultivate a dedicated community that keeps returning for more.
Run the Auto-Configuration Wizard
One of the valuable yet underutilized features within OBS is the Auto-Configuration Tool. If you’ve been manually adjusting settings with varying outcomes, this should be your initial step. You can locate it in the “Tools” menu. This tool examines your computer’s hardware, such as CPU and graphics card, along with your internet connection to propose optimal settings tailored to your system. It serves as an excellent method for establishing a robust, dependable foundation. The OBS forum experts often advise running this tool prior to any other actions. Simply run the wizard, implement its suggestions, and you’ll have a strong starting point to expand upon.
Monitor and Improve Your Stream’s Performance
To achieve a flawless stream, it’s crucial to strike an optimal balance between resolution and data rate. Aiming for a high-quality stream, consider setting the video bitrate to 4000 Kbps for Full HD (1080p) running at 30 frames per second (fps). However, not all setups can manage this without some struggle. If you notice your stream is lagging or your game’s performance is deteriorating, start by adjusting the output resolution. Try reducing it to 720p at 60fps initially. If issues persist, further lower it to 720p at 30fps. Finding the ideal OBS settings involves discovering the perfect balance for your PC, ensuring a smooth stream for viewers without making your game inoperable.
Host Engaging Watch Parties and Build Your Community
Streaming isn’t merely about showcasing gameplay; it’s about establishing a platform where people can unite around a common interest. While a flawless stream might technically impress, what truly keeps viewers engaged is the community that you cultivate. Organizing watch parties for significant tournaments, new game launches, or even movie nights is an excellent method to fortify those connections. This transforms your stream from a solo act into a communal experience, offering followers a reason to stay long after the end credits. Consider it as the contemporary equivalent of gathering around a TV with friends to watch a series finale. By crafting such moments, you’re not just amassing an audience—you’re assembling a team that will stand by you through ups and downs. These events demonstrate to your viewers that they are valued not just as spectators, but as individuals you want to spend time with. This approach is potent in fostering loyalty and creating a vibrant, interactive atmosphere that distinguishes your stream from the multitude of others out there. A robust community is also more understanding of occasional technical glitches because they are invested in you and the shared environment we’ve built together.
Set Up and Manage Your Watch Party
Setting up a watch party may seem more complex than it really is. The secret lies in selecting a platform that manages the technical aspects for you, leaving you free to engage with your community. Platforms such as Amazon Prime Video Watch Party are ideal because they synchronize the video for all participants, thereby avoiding the bothersome “Are we on the same part?” discussions. A user-friendly interface is essential since it guarantees a smooth technical experience, allowing everyone to unwind and enjoy the event without any technical hassles. The aim is to make it effortless for people to attend and have fun, and there are comprehensive guides available on how to host a watch party using these tools.
Encourage Community Interaction During Events
A successful watch party relies heavily on its chat interactions. To maintain a lively atmosphere, it’s essential to actively prompt engagement. Consider moving beyond verbal discussions during the video. You can enhance the experience by incorporating graphical elements such as polls, questions, or displaying amusing chat comments on-screen. This not only makes viewers feel acknowledged but also provides them with engaging topics to respond to. By emphasizing crucial moments with on-screen text or humorous graphics, you steer the conversation and keep everyone engaged. It converts passive viewing into an interactive, collective experience where everyone can actively take part.
Connect with Your Audience Beyond the Game
The most authentic communities are those that resemble genuine friendships. To cultivate this bond, approach your watch party as if it were a real-life event. Consider how you can make the experience unforgettable by planning ahead. Use Discord or social media to send out “invites” and generate excitement. You might even assign a theme, such as everyone wearing a specific in-game outfit or contributing their favorite treats for the occasion. The goal is to establish traditions and shared humor that make your space stand out and feel inclusive. By putting in that extra effort, your viewers will feel more like welcomed guests than just casual observers.
Balance Competitive Gaming with Stream Quality
During intense gaming competitions, it’s inconvenient when your stream lags or your game’s frames per second (FPS) drops significantly. For streamers, maintaining both top-notch gameplay and a high-quality broadcast can be a challenging task, particularly in games that require precision, where every frame matters. You want your game to perform seamlessly so you can make accurate shots and respond quickly, yet you also wish to provide your audience with a smooth, uninterrupted visual experience to keep them hooked. It’s an aggravating juggling act that often feels like choosing between one or the other.
As a gamer, I’m always on the hunt for that perfect balance: where my PC hums along smoothly without needing rescue calls, my gameplay feels fluid, and my live streams exude professionalism. This golden ratio comes from knowing how my hardware manages the double duty of gaming and real-time video encoding. It’s not just about splurging on top-tier gear, but rather, being savvy with the resources at hand. By mastering the art of customizing my setup for various game types and swiftly troubleshooting technical glitches as they arise, I can keep my gaming edge sharp while maintaining my stream’s quality.
Adapt Your Setup for Different Types of Games
As a passionate gamer, I’ve learned that not every game requires the same amount of system resources. A high-octane game like Warzone asks more from my PC compared to a visually stunning but slower-paced RPG. Before diving into the action, remember to consider the game you’re playing and tweak your settings accordingly. Striving for 1080p resolution at 60 frames per second is generally ideal, but it can be resource-intensive. If you find that your game’s performance is lagging, don’t hesitate to scale back your stream output to 720p at 60fps. This small adjustment can release a substantial amount of resources for the game without significantly impacting the viewing experience. The OBS Auto-configuration Wizard can provide a suitable recommendation based on your unique hardware and internet speed.
Manage Technical Issues While You’re Live
As a gamer, I’ve learned that technical hiccups are inevitable, but it’s the way we respond to them that truly matters. When my live stream starts to lag, it could be due to dropped frames, which typically indicates an unstable internet connection. Before getting worked up, I always make sure my connection is strong and no other devices are using too much bandwidth.
Another frequent issue I encounter is audio interruptions. Typically, the solution is as simple as disconnecting and reconnecting my microphone. Keeping a stream troubleshooting checklist close by can help me quickly identify and solve problems on the spot, allowing me to get back to gaming with minimal disturbance for my viewers. The most important thing is to remain calm and address the issue systematically.
Build a Resilient Streaming Mindset
Regardless of how flawlessly your streaming setup is fine-tuned, issues can still arise. Internet connection might falter, a fresh game update could cause disruptions, or you might encounter days when performance isn’t up to the mark. The key to maintaining a thriving and enduring streaming career goes beyond technical skills; it involves having the mental strength to cope with the unforeseen. Cultivating a resilient mindset enables you to face difficulties calmly, learn from each session, and avoid burnout, thereby ensuring that you can consistently produce content that makes you proud.
Handle On-Air Technical Difficulties with Grace
The moment every streamer fears arrives: right smack in the middle of an exciting gameplay, your stream begins to lag. Anxiety kicks in. However, seasoned streamers remain composed under pressure. When you notice skipped frames, recall that it’s often a sign of a network problem between you and the server. Identifying the possible cause enables you to troubleshoot systematically rather than panicking. At times, your own security software might conflict with OBS. Instead of quitting in annoyance, take a moment to breathe, engage with your chat, and tackle the issue. Your viewers will admire your calmness and professionalism even more in such situations.
Learn from Mistakes and Adapt Your Strategy
Streamers like Aydan, even the best ones, sometimes make mistakes. For instance, Aydan once shared that a single early-career blunder cost him a big payday. The point isn’t to be afraid of failure, but to view it as a valuable learning experience. If your audio ever cuts out during a stream, diagnose the problem afterward and create a checklist to prevent it next time. If a raid doesn’t go well, consider how you can handle it better in the future. Every technical issue, awkward moment, or failed stream is a chance to improve your approach and bounce back stronger.
Practice Self-Care and Avoid Burnout
Constantly streaming around the clock may appear to be the key to success, but it’s actually a quick route towards exhaustion. For a streamer, self-care begins with adjusting your settings. Avoid pushing your computer to its maximum capacity solely for high-quality streaming. If you experience lag at 720p60fps, consider lowering the settings to 720p30fps instead. A stream that runs smoothly and consistently is more valuable than one that’s laggy but has a higher resolution. Additionally, you can ease your life by using the Auto-Configuration Wizard in the tools menu to establish a strong foundation. Minimizing technical hassles is a form of self-care that frees up mental energy for what truly matters: crafting outstanding content and fostering relationships within your community.
Essential Resources for Every Streamer
Inevitably, even the most experienced live streamers encounter technical glitches. The secret lies in knowing where to search for solutions when problems arise. Having a trusted collection of resources on hand can prevent a great deal of annoyance and quickly return you to what you excel at: producing top-notch content for your audience. Whether you’re seeking a prompt software solution or guidance from fellow artists, these resources will become your indispensable allies.
Helpful Software for Troubleshooting and Optimization
Before diving into extensive online searches, keep in mind that OBS Studio comes with robust internal solutions. A good initial move for any problem is to use the Auto-Configuration Wizard, accessible through the tools menu, and implement its recommendations. This action frequently addresses performance issues instantly. If you’re still experiencing delays, consider adjusting your output settings. Begin with 720p at 60fps; if it remains choppy, lower to 30fps. When you notice dropped frames, this usually indicates a network problem between you and the streaming server. For guidance on troubleshooting stream connections, look for resources directly from the OBS developers.
Find Support in Streaming Communities
You’ll never feel isolated when dealing with streaming issues. The creator community is vast and incredibly helpful, brimming with shared knowledge. Subreddits like r/obs are great forums where you can ask questions and find answers from individuals who have encountered the same problems. Often, you’ll discover a troubleshooting guide that breaks down common issues in an easy-to-follow manner. If you prefer visual learning, YouTube is teeming with tutorials. Locating a video that demonstrates how to resolve common OBS Studio problems can be incredibly beneficial, allowing you to see precisely which buttons to press and settings to adjust.
Frequently Asked Questions
If your live stream starts acting up, the first thing you should attempt is a full system restart. Instead of just closing the OBS window, ensure the program is fully closed. After that, reboot your entire computer. This seemingly basic step often resolves temporary issues and stuck processes which frequently lead to lag or crashes in streaming. While it may seem too simple, it effectively addresses numerous streaming complications.
When your stream mentions that frames are being dropped, this indicates that your internet connection may not be consistently delivering the video data to the streaming platform at a steady rate. This issue usually originates from network problems. To troubleshoot, start by performing an internet speed test to assess your upload speed. Next, adjust the video bitrate in OBS to a number that your connection can handle smoothly. As a general guideline, set it to around 75% of your stable upload speed to account for some flexibility.
As a gamer, I’ve run into an issue where OBS isn’t showing my game but just a black screen instead. A common solution for this problem is to adjust the display mode of my game. To do that, I need to dip into my game’s video settings and switch from Exclusive Fullscreen to either Windowed or Borderless Windowed mode. This minor tweak usually solves the issue, enabling OBS to capture the gameplay smoothly without any glitches.
A great starting point for many broadcasters is streaming at a resolution of 720 pixels with 60 frames per second (fps). This offers an enjoyable and crisp viewing experience for fast-moving games without putting too much strain on your computer. For this setting, aiming for a video bitrate around 4000 Kilobits per second (Kbps) is advisable if your upload internet speed can sustain it. Keep in mind that a smooth 720p stream will always be preferred over a stuttery 1080p one.
Trying to strike the right balance while streaming, you’ve noticed that your game becomes slow or lags? To enhance your in-game performance without compromising the quality of your stream too much, consider adjusting the output settings in OBS (Open Broadcaster Software). By reducing the resolution of your stream from 1080p to 720p, you can significantly improve your game’s performance with only a slight decrease in visual quality for your viewers.
Read More
- 50 Ankle Break & Score Sound ID Codes for Basketball Zero
- Who Is Harley Wallace? The Heartbreaking Truth Behind Bring Her Back’s Dedication
- 50 Goal Sound ID Codes for Blue Lock Rivals
- Mirren Star Legends Tier List [Global Release] (May 2025)
- How to play Delta Force Black Hawk Down campaign solo. Single player Explained
- Elden Ring Nightreign Enhanced Boss Arrives in Surprise Update
- KPop Demon Hunters: Real Ages Revealed?!
- Here’s Why Your Nintendo Switch 2 Display Looks So Blurry
- 100 Most-Watched TV Series of 2024-25 Across Streaming, Broadcast and Cable: ‘Squid Game’ Leads This Season’s Rankers
- Jeremy Allen White Could Break 6-Year Oscars Streak With Bruce Springsteen Role
2025-07-04 14:31