As a seasoned Hogwarts alumnus who’s seen more than a few full moons, I must say this final exam is bringing back some memories! Let’s dive right into it, shall we?
In this article, we delve into the captivating world of the Hogwarts Virtual Escape Room, a digital adventure brimming with intricate Harry Potter-inspired brainteasers. I’ll walk you through each puzzle and its solutions in the comprehensive Hogwarts Escape Room walkthrough.
All Harry Potter Hogwarts Escape Room Answers
Diagon Alley Bricks
Here’s a possible paraphrasing:
Flourish and Blotts Book Shop
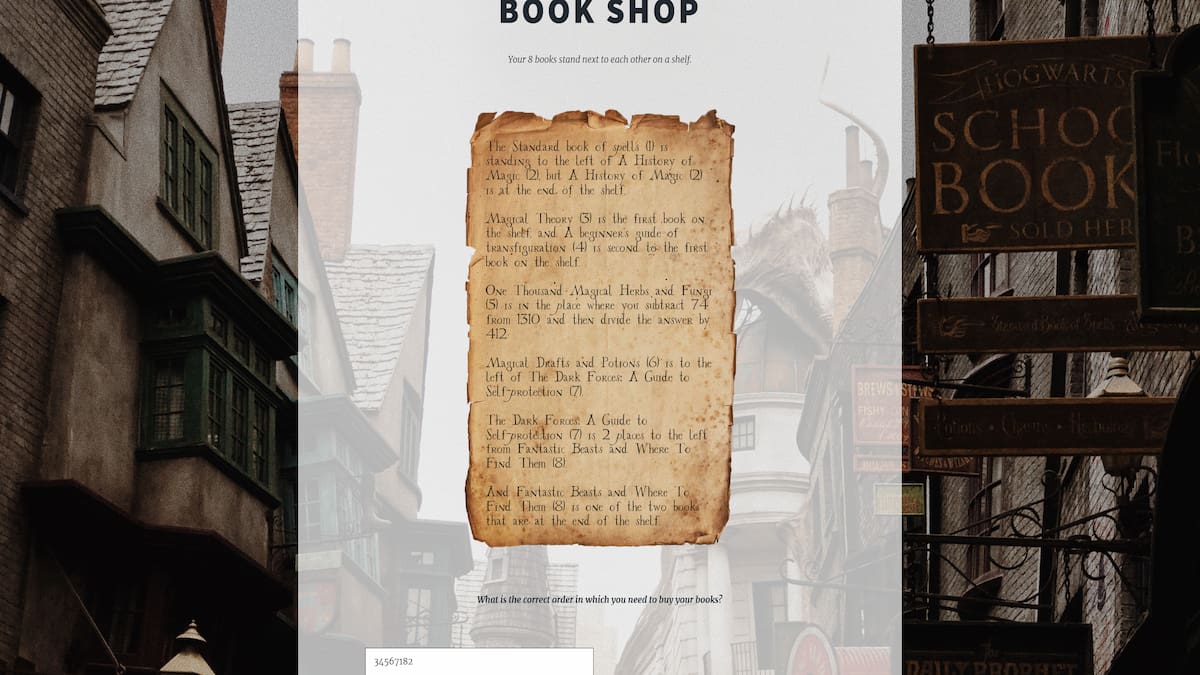
To decipher this puzzle, you should follow these six clues to figure out the sequence of books on the shelf. First, perform the calculation in the third clue, which indicates that “One Thousand Magical Herbs and Fungi” is located in the third position. Then, utilize the second hint to place “Magical Theory” at the very beginning and “A Beginner’s Guide to Transfiguration” in the slot right after it.
Initially, “A History of Magic” should be moved to the very end on the shelf. Proceed to hint number six and locate “Magical Beasts and Where to Find Them”, which belongs in slot number 7. Next, hint five indicates that “The Dark Forces: A Guide to Self-Protection” goes into the fifth position. Hint four instructs us to place “Magical Drafts and Potions” in the fourth spot. Finally, move “The Standard Book of Spells (1)” to number 6 to obtain the answer as “34567182”.
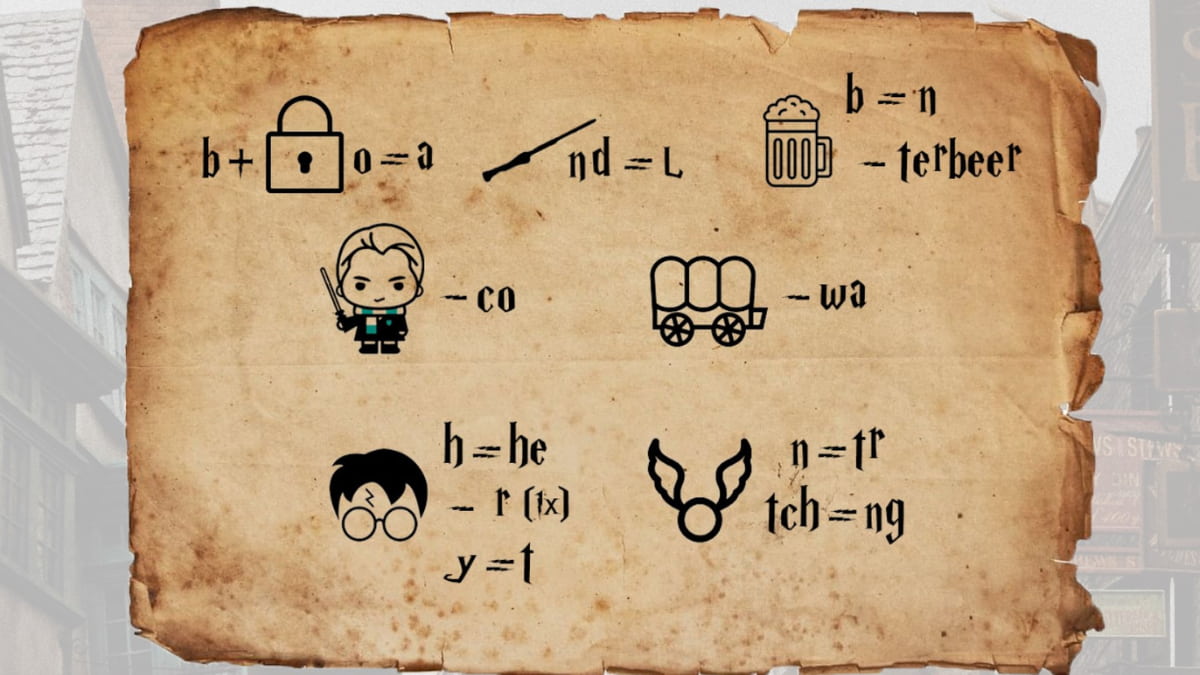
Ollivander’s Wand Shop
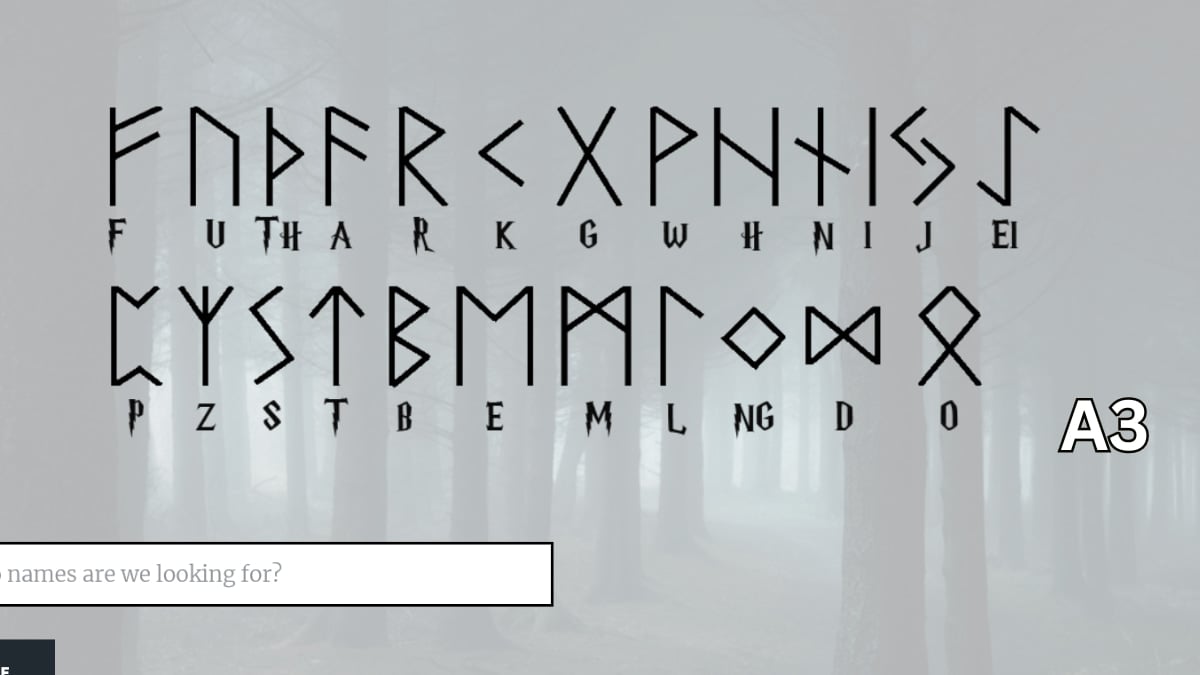
The Ollivander shop functions like a code-breaking game. To crack it, you’ll need to interpret each image into words, apply the modifications indicated nearby to form part of the name of the wand’s wood and cores. For instance, the initial clue illustrates a lock with a b prepended and the letter o set equal to a. Add ‘b’ to the word ‘lock’ to create ‘block’, then replace ‘o’ with ‘a’ to get ‘black’. Repeat this process for all images to reach the solution, black walnut dragon heartstring. Make sure to write it down exactly as shown or you’ll encounter an error.
Bertie Bott’s Every Flavour Beans
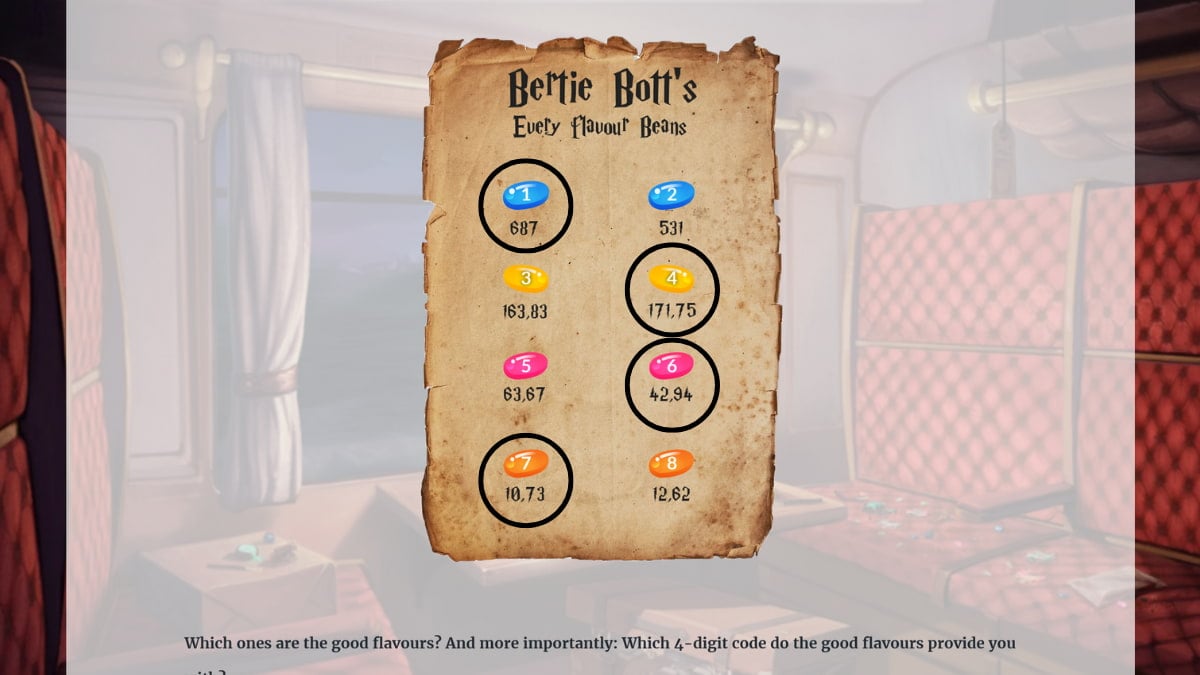
To crack this puzzle, you need to divide each number in the sequence by the quantity of Bertie Botts boxes you bought. Dividing 531 by 4 results in 132.75, but this doesn’t align with the numbers on the yellow jelly beans. However, dividing 687 by 4 gives us 171.75, so we know that the first number in the code is 1 and the second number is 4. Further division of 171.75 by 4 yields 42.94, which when divided again results in 10.73. Using the numbers on the jelly beans for all these calculations gives us the code as 1467.
The Harbour
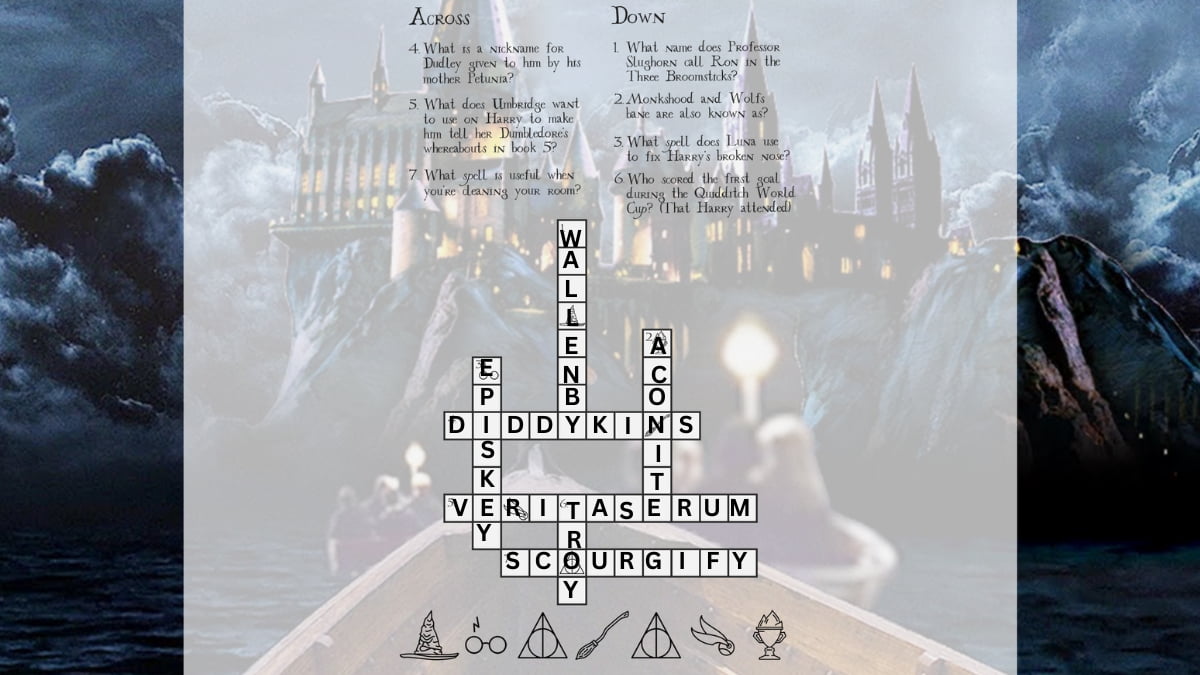
You need to know the following Harry Potter facts to solve this crossword.
- Duddly’s mother calls him Diddykins.
- Umbridge wants to use Veritaserum on Harry.
- Scourgify is a helpful cleaning spell.
- Slughorn calls Ron Wallenby in The Three Broomsticks.
- Monkshood and Wolfsbane are both the Aconite plant.
- Luna uses the Episkey spell on Harry’s nose.
- Troy scored the first goal of the Quidditch Match.
Putting these words into the crossword reveals the girl’s name, Leonora.
Sorting Hat
One delightful aspect of Harry Potter is discovering your house assignment not knowing where you’ll end up. Yet, it’s perfectly alright if you wish to belong to a particular house.
- Choose the answer about keeping secrets to join Slytherin.
- Select making friends to be a Hufflepuff.
- Pick learning new information to enter Ravenclaw.
- Choose getting what you want to become a Gryffindor.
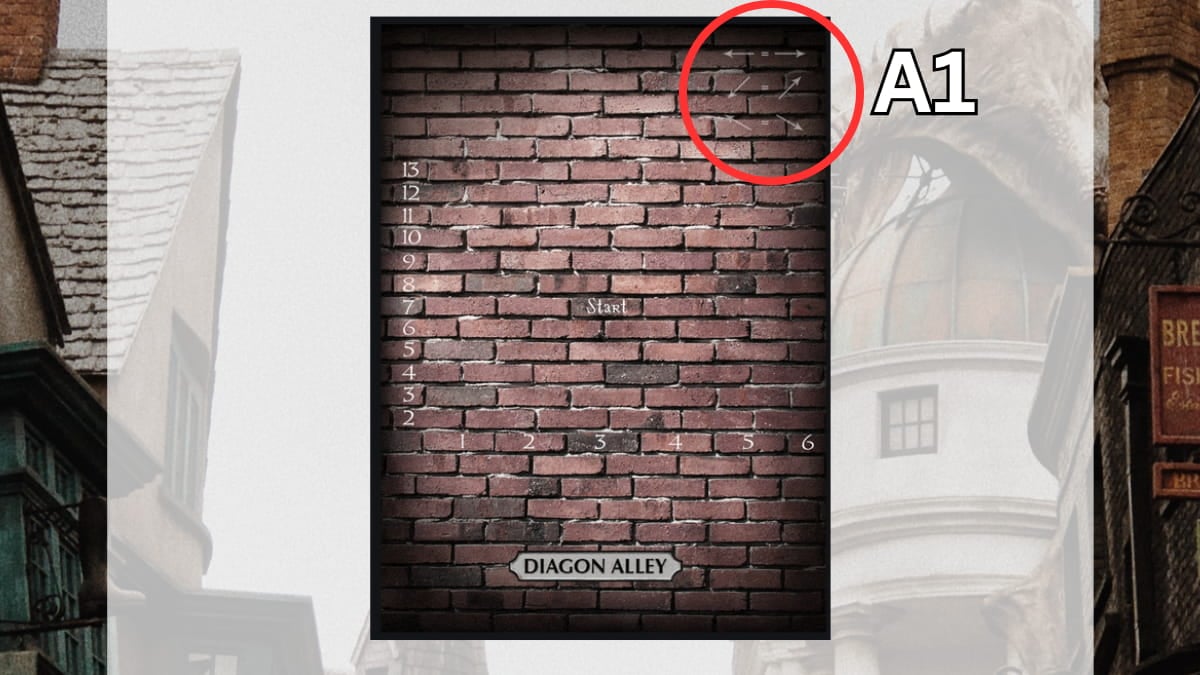
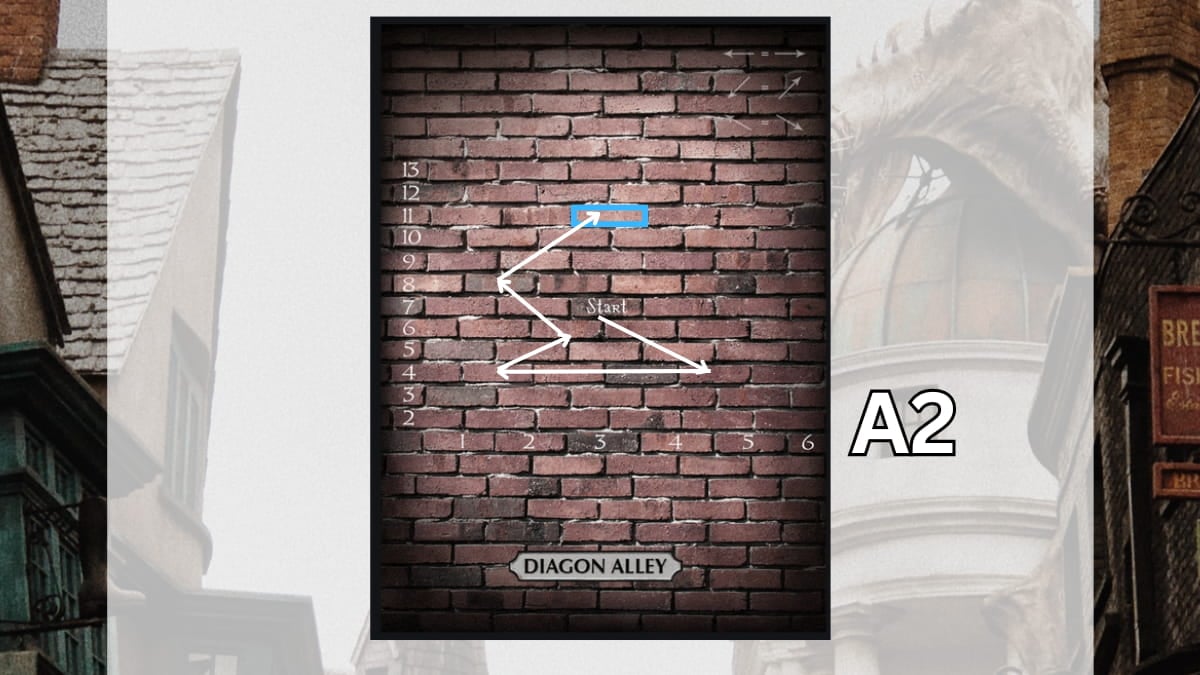
Unlocking the Common Room
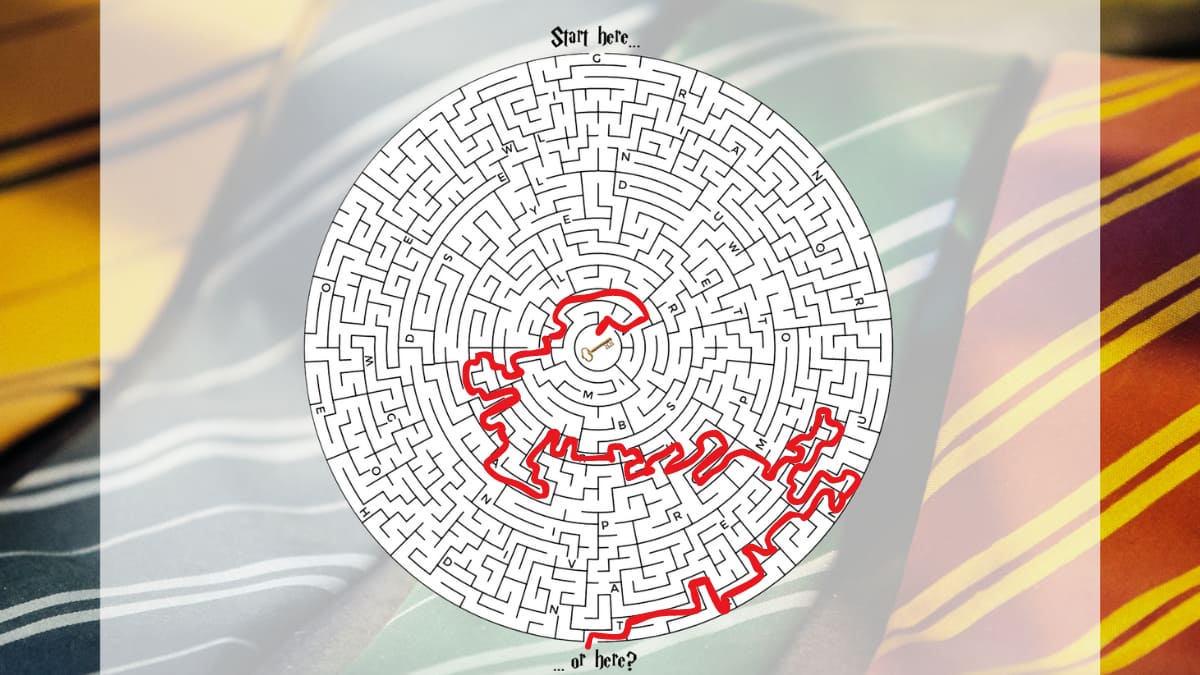
To solve this maze, you should start at its base and navigate towards the middle, following the example given in the picture. The sequence of spaces that forms the correct path will spell out “Transfiguration“, which serves as the key to unlock the door.
The Hallway
The spell to unlock locked doors is Alohomora.
Locked Hallway Door
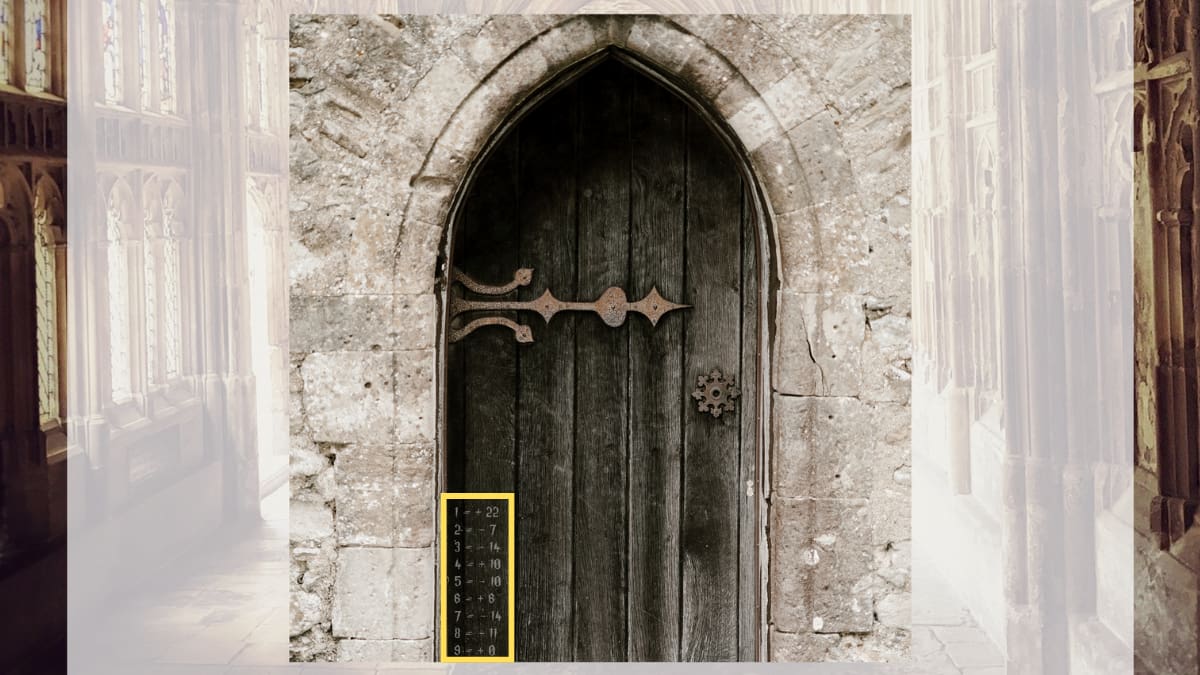
To crack this puzzle, you should transform each letter in “Alohomora” into a number based on its position in the alphabet, then add or subtract the number shown next to it from the corresponding number. The result will be a series of numbers that, when converted back into letters, spell out the solution: “Wearesaga”. The clue is located at the bottom left corner of the door, and it displays the numbers one through nine with certain numbers being adjusted by addition or subtraction.
The Gargoyles
To advance past these gargoyles, you need to figure out which charm to cast on each one. The book of charms provides information about various charms and their purposes. Here is the sequence of charms that solves this puzzle: Incendio, Aguamenti, Silencio, Reducio.
Slytherin Common Room
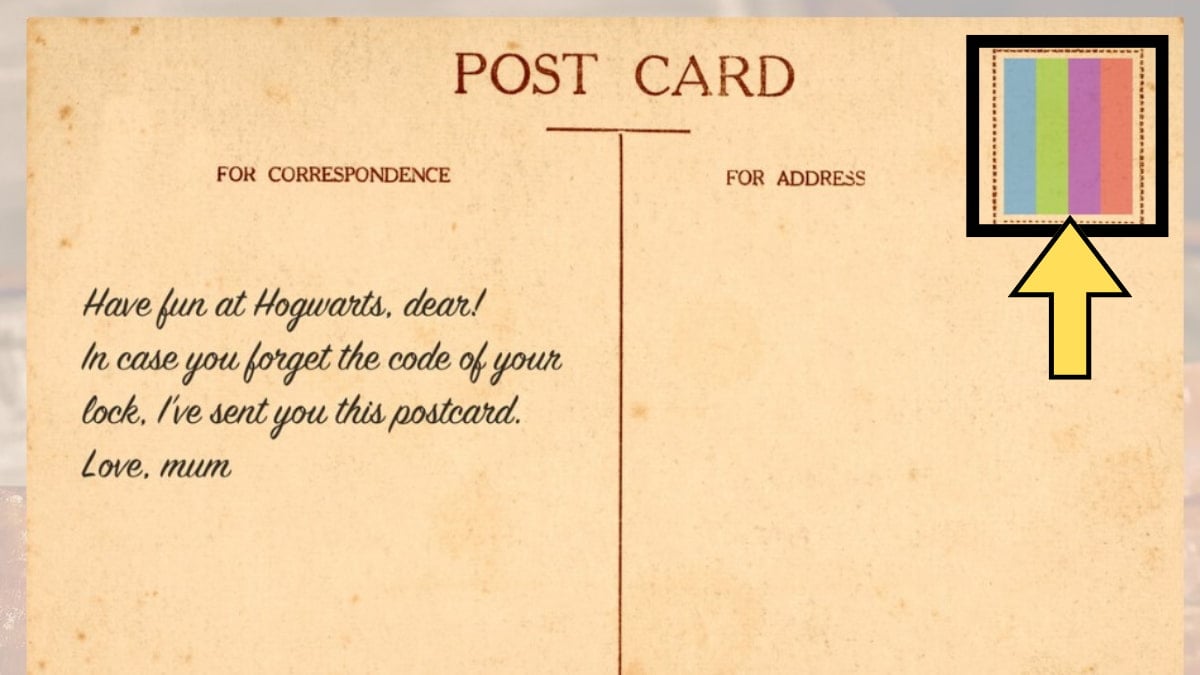
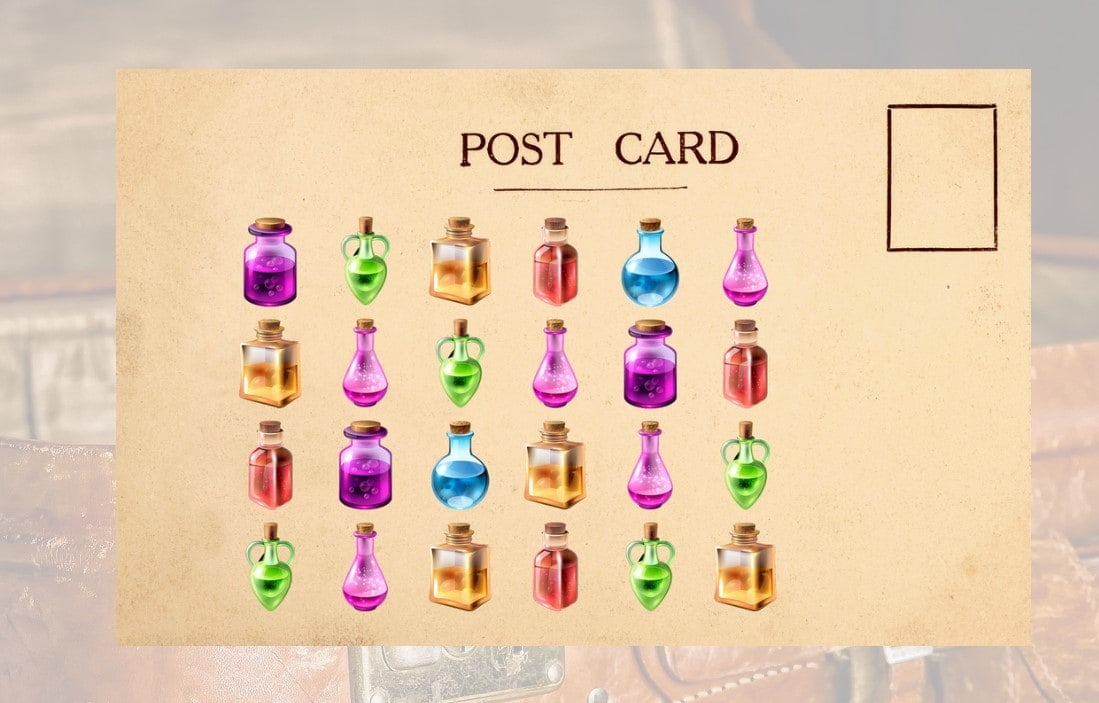
On Lorena’s postcard, a sequence of four colored bars is located at the upper right corner: blue, green, purple, then red. The backside of the postcard features bottles with the same hues. To unlock it, count the number of bottles for each color and organize them in the same order to reveal the code: 2534.
The Threatening Note
This puzzle is actually a play on words. The room with the most stories is always a Library.
Mrs. Norris
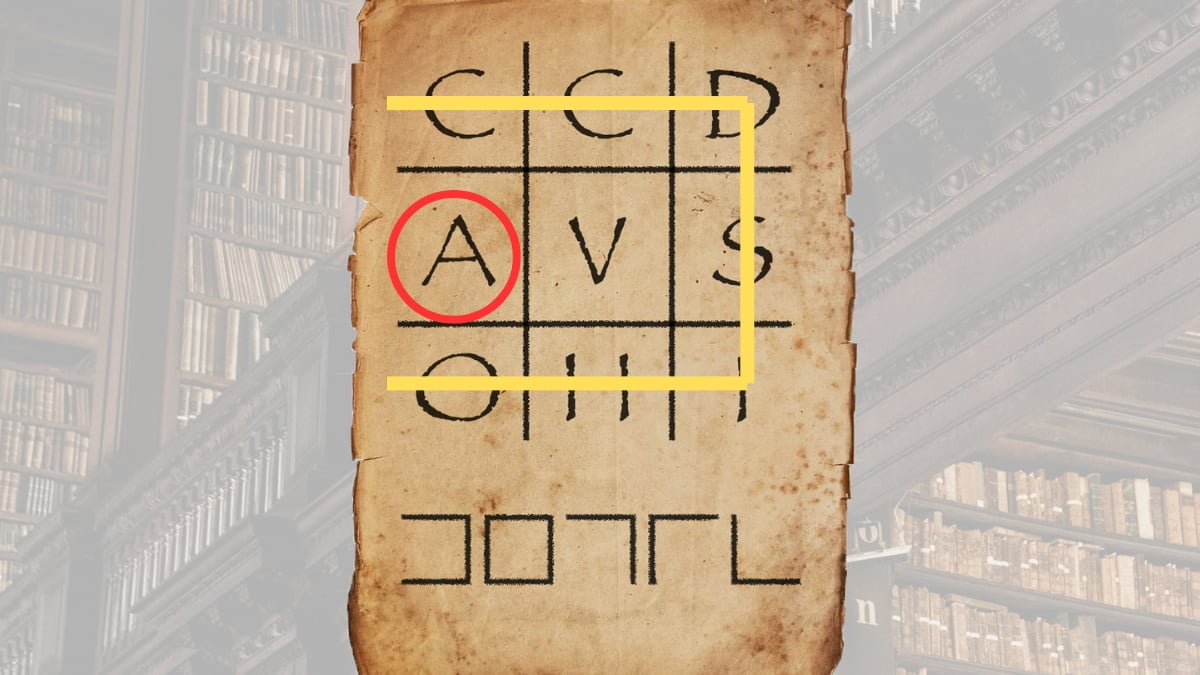
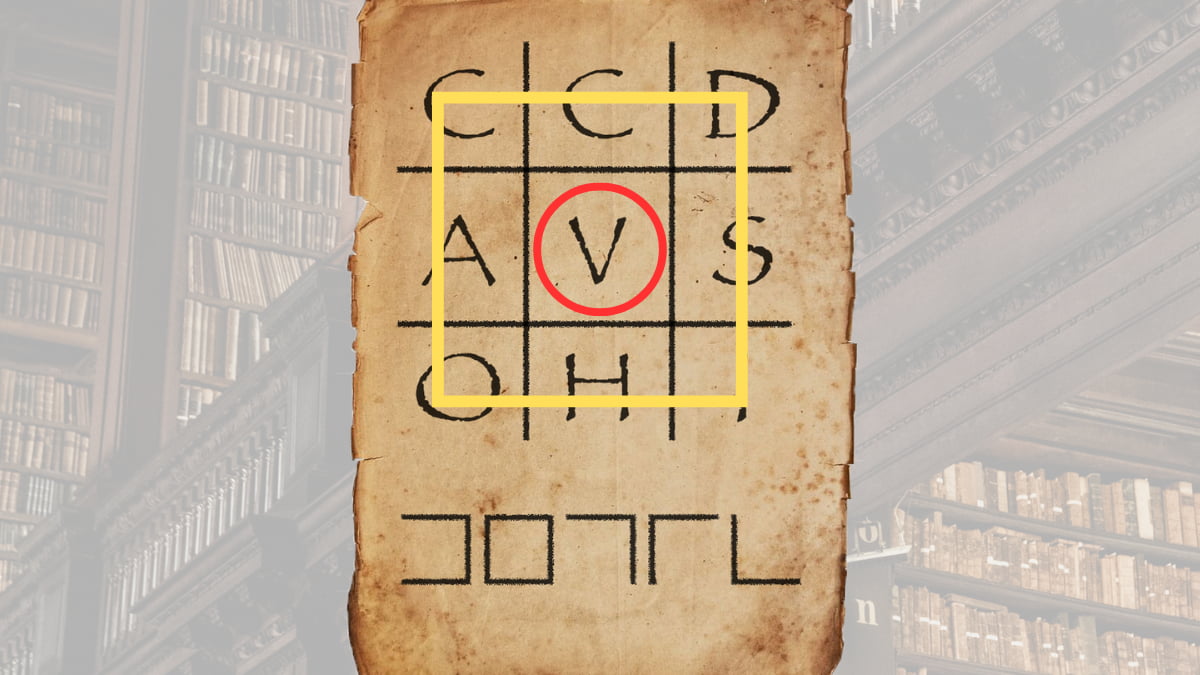

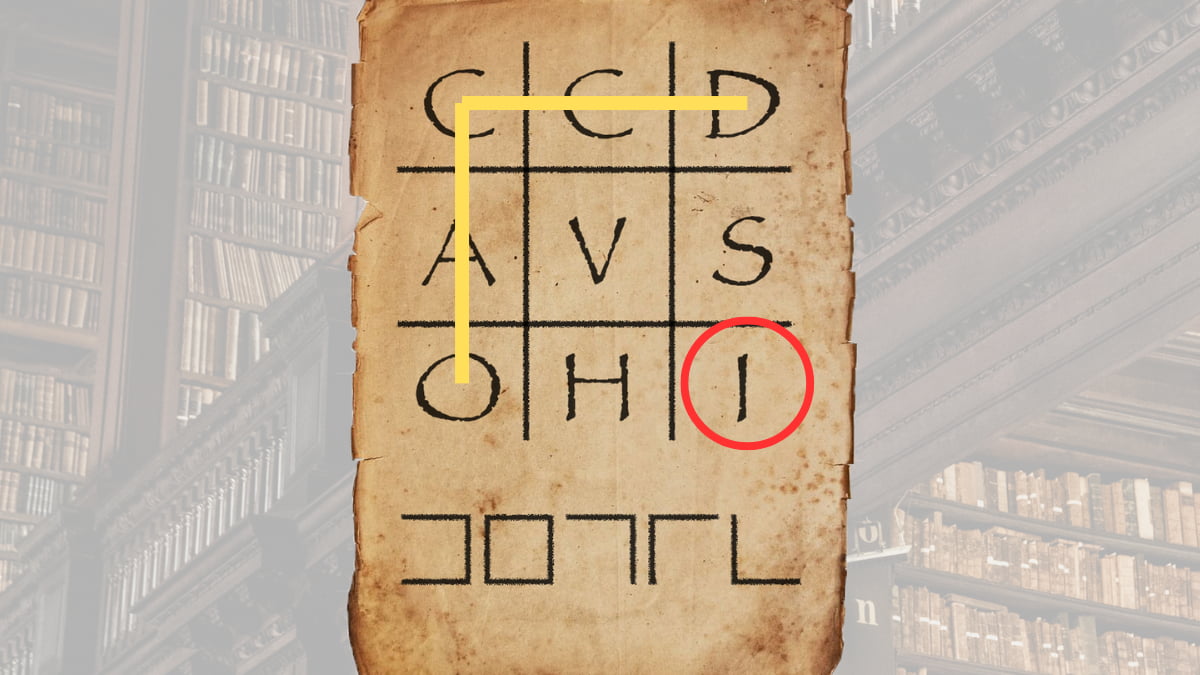
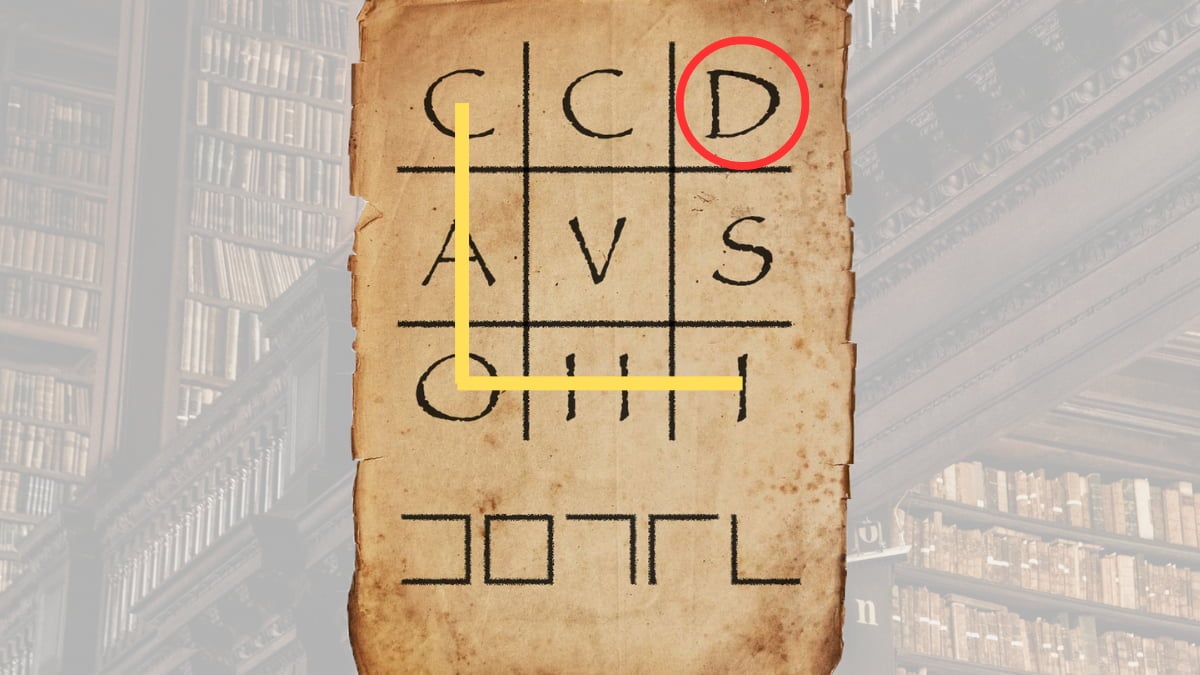
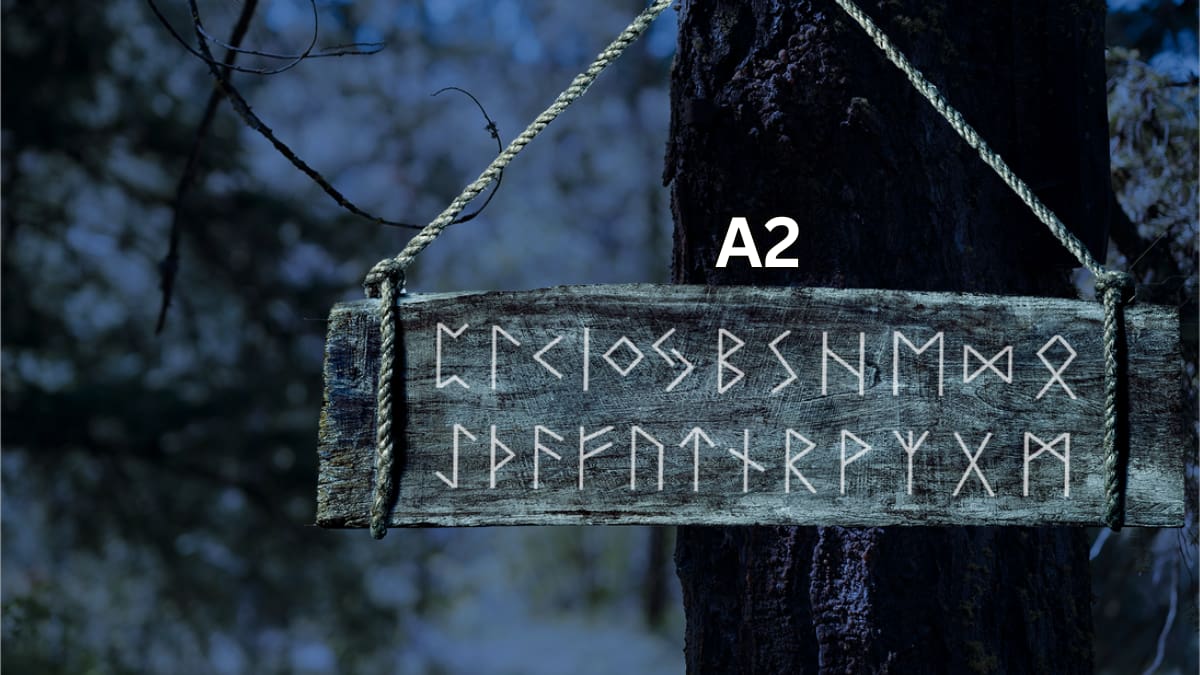
Initially, you’ll encounter a square puzzle featuring letters and below it lies a row of symbols. Place each visible symbol on top of the grid such that they cover letters more distinctly from the lines than other symbols. The letters from these covered spots should spell out “Avoid“.
The Restricted Section
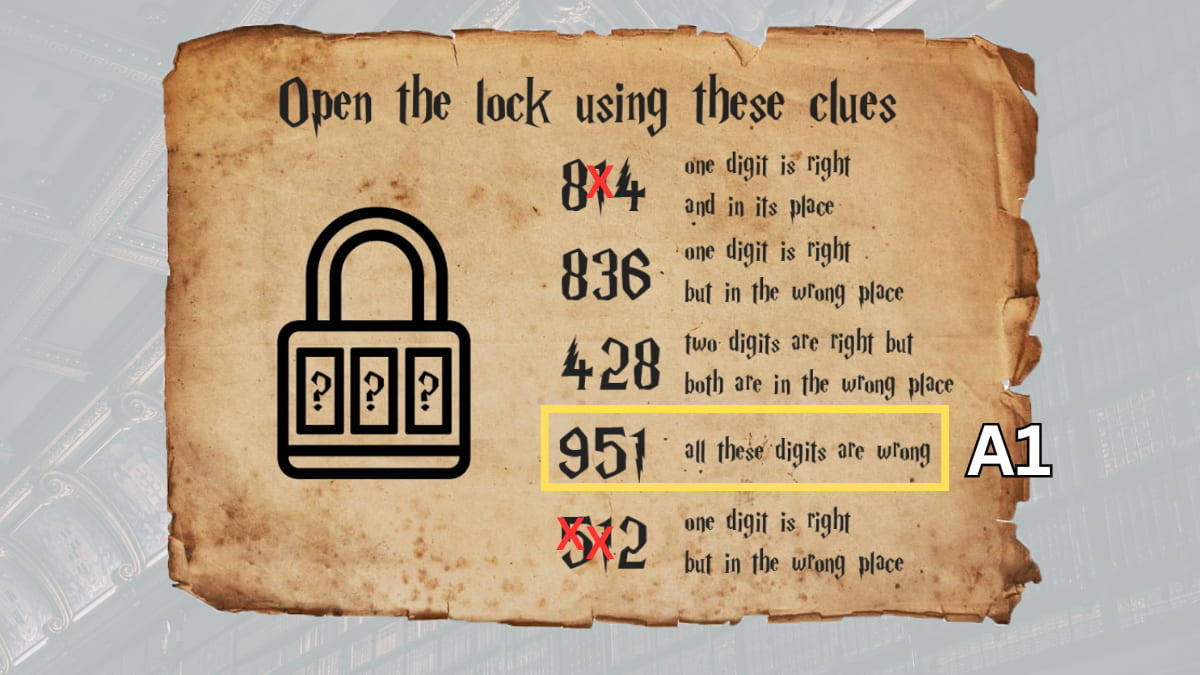
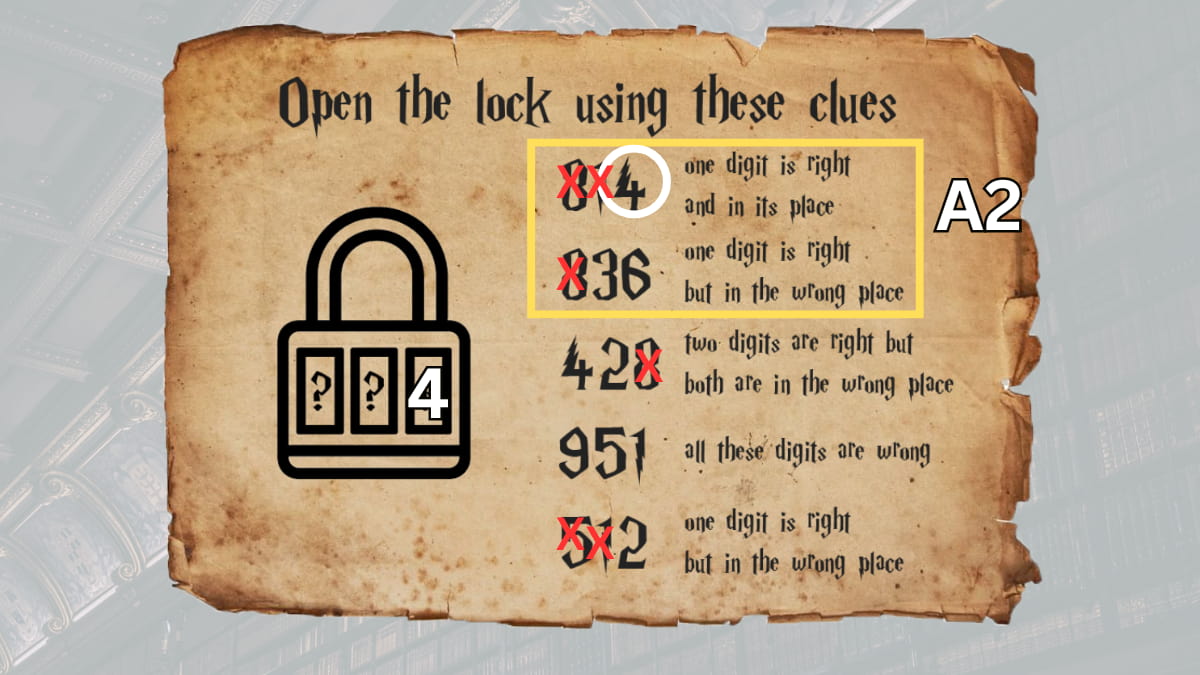
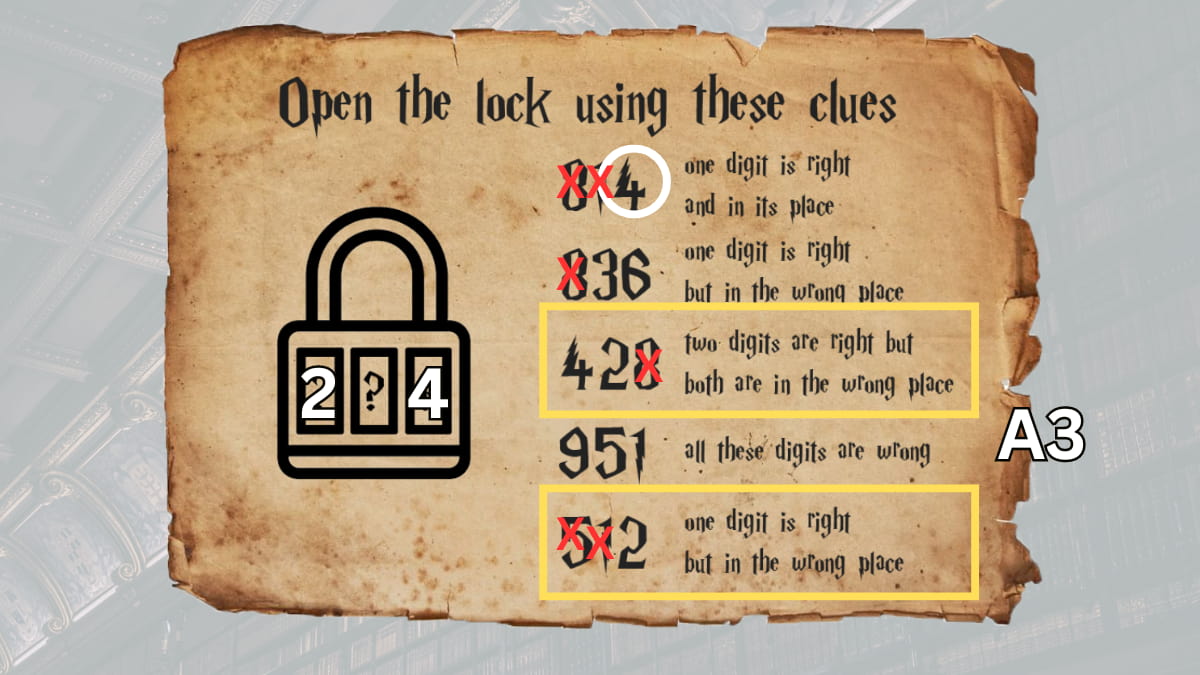
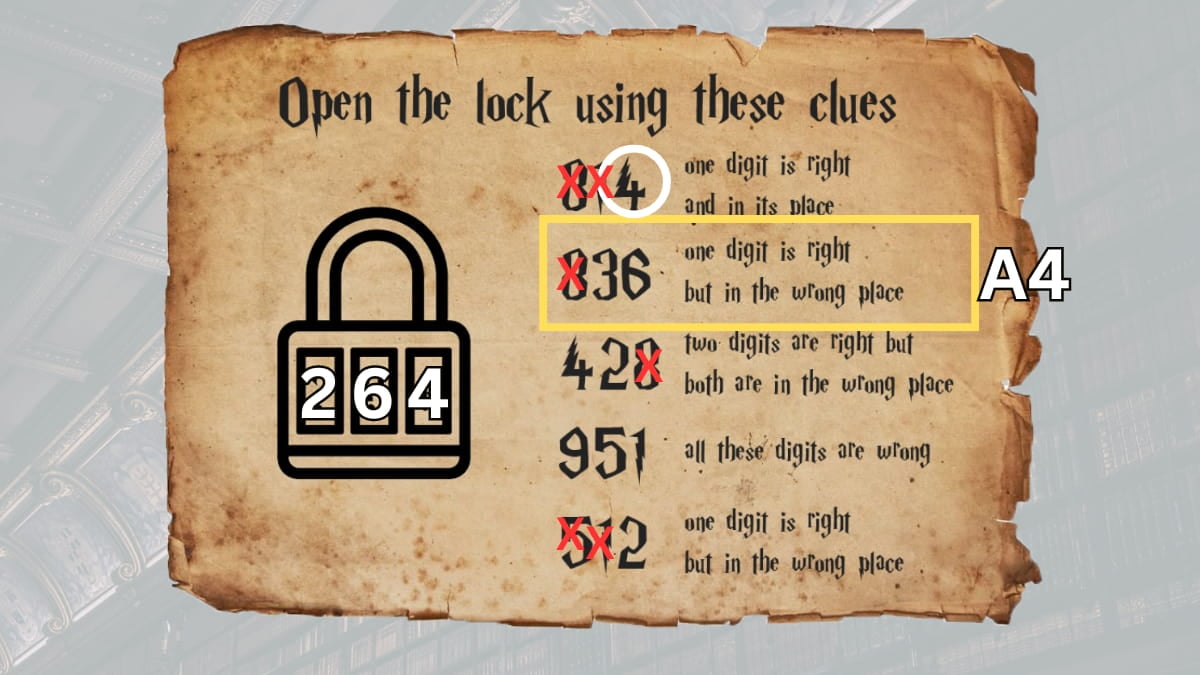
Here’s a new lock puzzle for you! This one requires a three-digit combination, and the code is hidden behind a set of three-digit clues. Each clue contains three numbers; if any of these numbers appear in the correct sequence within the true code, they will be in the right positions.
Saga’s Riddle
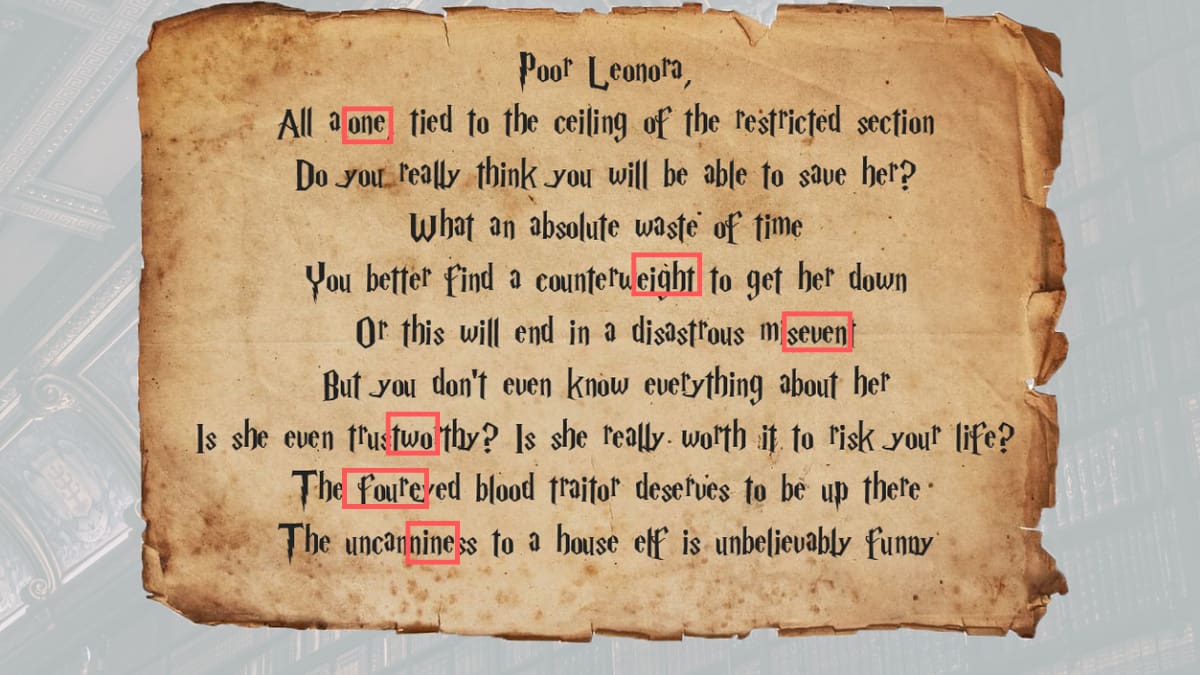
In the letter penned by S.A.G.A, six digits for the lock combination are concealed within the text. These numbers have been cleverly camouflaged as parts of words. The diagram provided indicates where each number is located, resulting in the final code 187249.
Polyjuice Potion
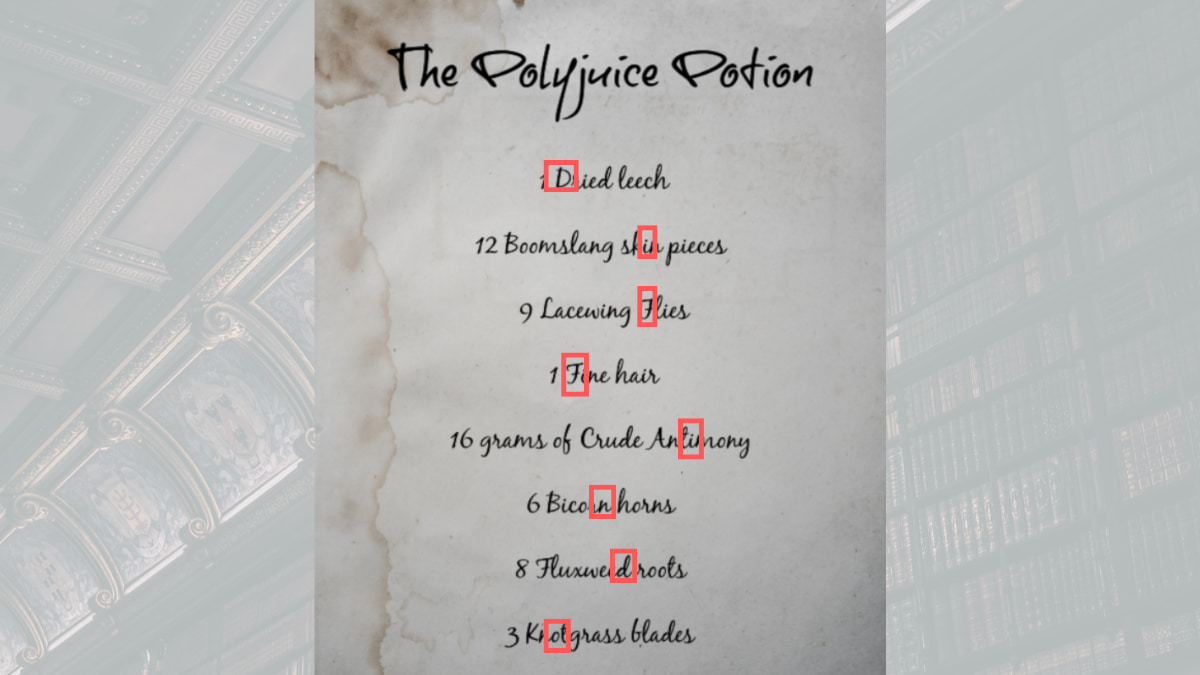
To solve this riddle, you need to know that the Polyjuice Potion recipe has a quantity and name for each ingredient, where the number before each ingredient shows which letter from that ingredient should be combined. Once you’ve gathered all these letters as displayed in the image provided, you will uncover the answer, which is Diffindo.
Potions Class
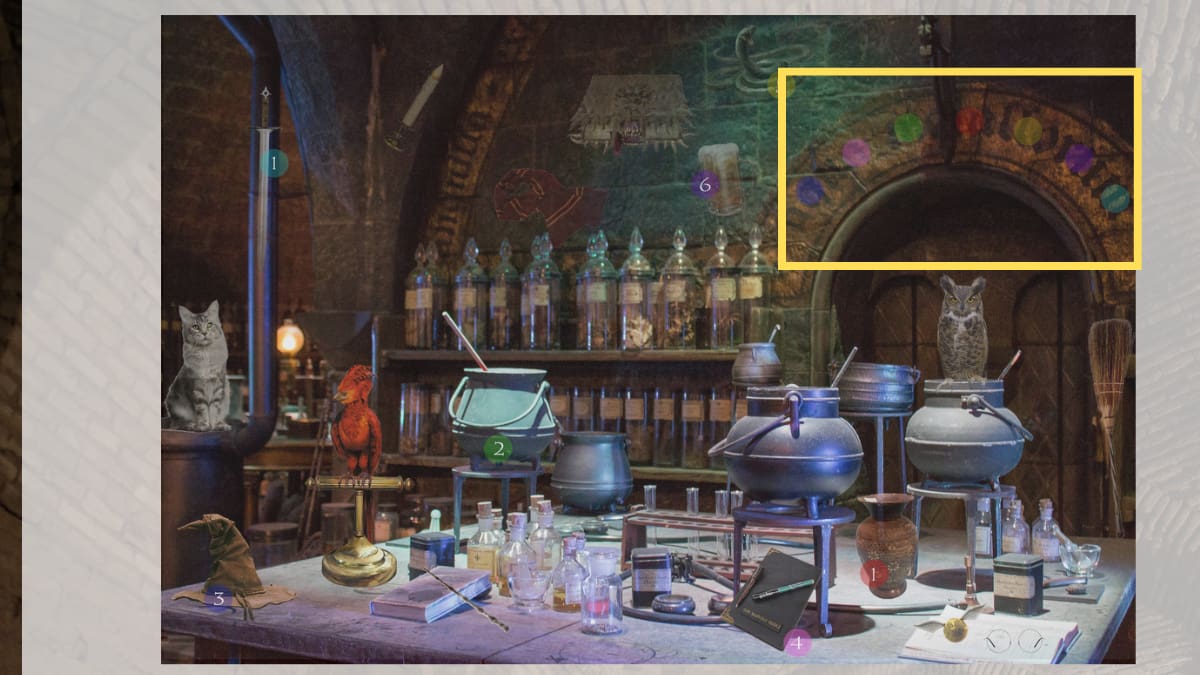
In the classroom door, the sequence of colors signifies the order of the seven colors. Each color corresponds to a specific object and a number. To find out the last name letter of Leonora, look at the colored circles on each object’s image. The number within the circle determines the position of a letter in her last name. For instance, the blue circle on the sword has a ‘1’, which means the final letter of Leonora’s last name is an ‘s’. Using this process, we can deduce that her last name is Travers.
Wizard’s Chess
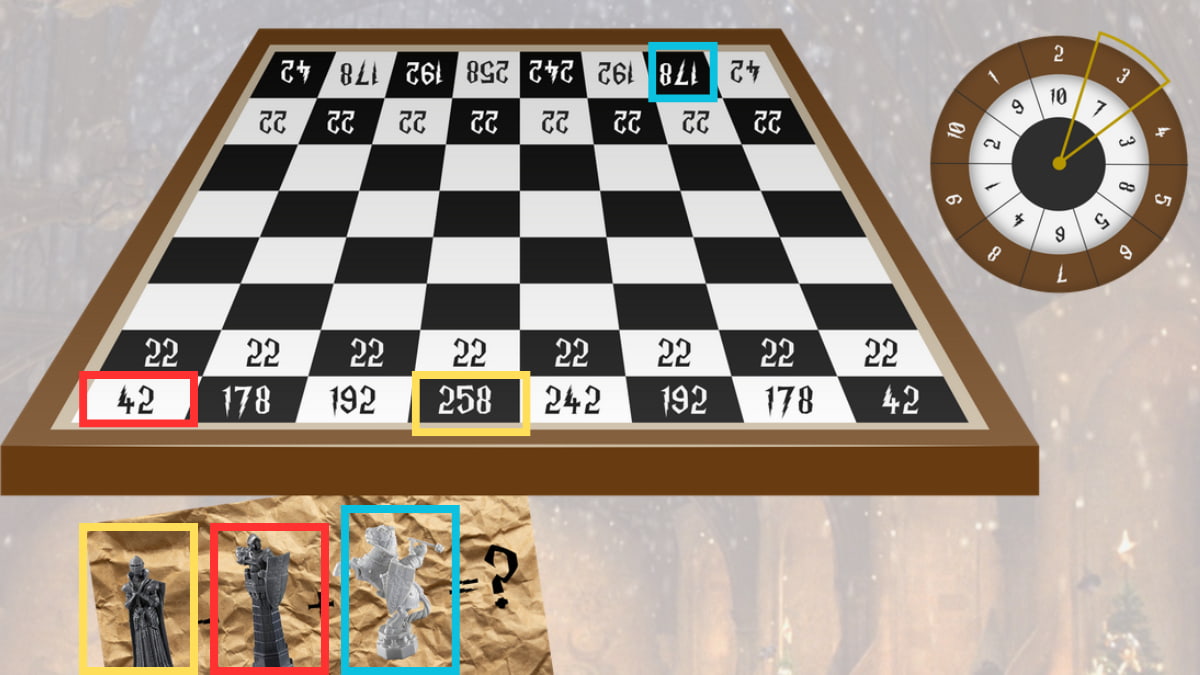
To open Wizard’s chest initially, you need to discover where the items specified in the document are positioned. Arrange the numbers corresponding to these positions into an equation that equals 394. Then, employ the dial next to the board to transform those numbers into the actual solution, which is 713.
Astronomy Tower
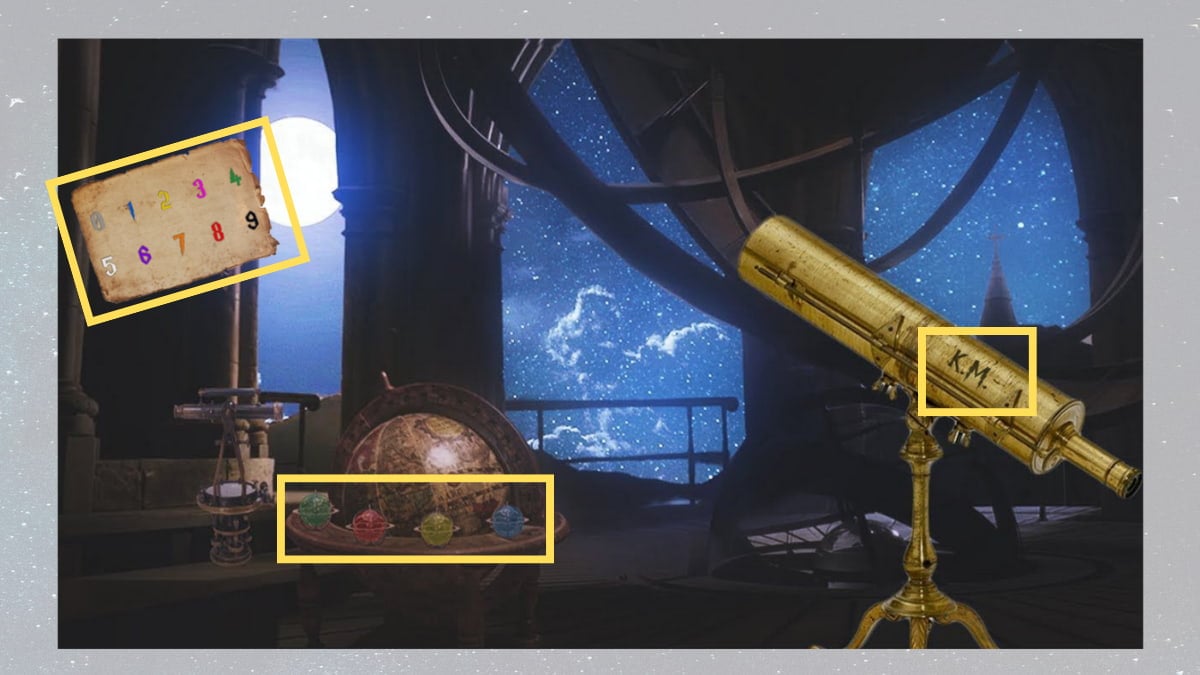
On Earth, the arrangement of four planets follows the color sequence: green, red, yellow, and blue. To find the code, locate signs bearing these colors in the same order and you’ll get the number sequence 1284. This isn’t a moon’s name but rather the diameter (indicated by K.M on the telescope) of that moon, which is Callisto – Jupiter’s moon with this specific measurement.
Moon Phases
To find out what phase the moon is in, you need to count the number of yellow dots (representing different moon phases) and the number of blue dots (representing various moons). You’ve counted 10 yellow dots, which means we can find the answer on page 10. The six blue dots signify the sixth moon phase, specifically, it’s a Waning Gibbous moon.
Forbidden Forest
Here’s a simpler way to explain the puzzle:
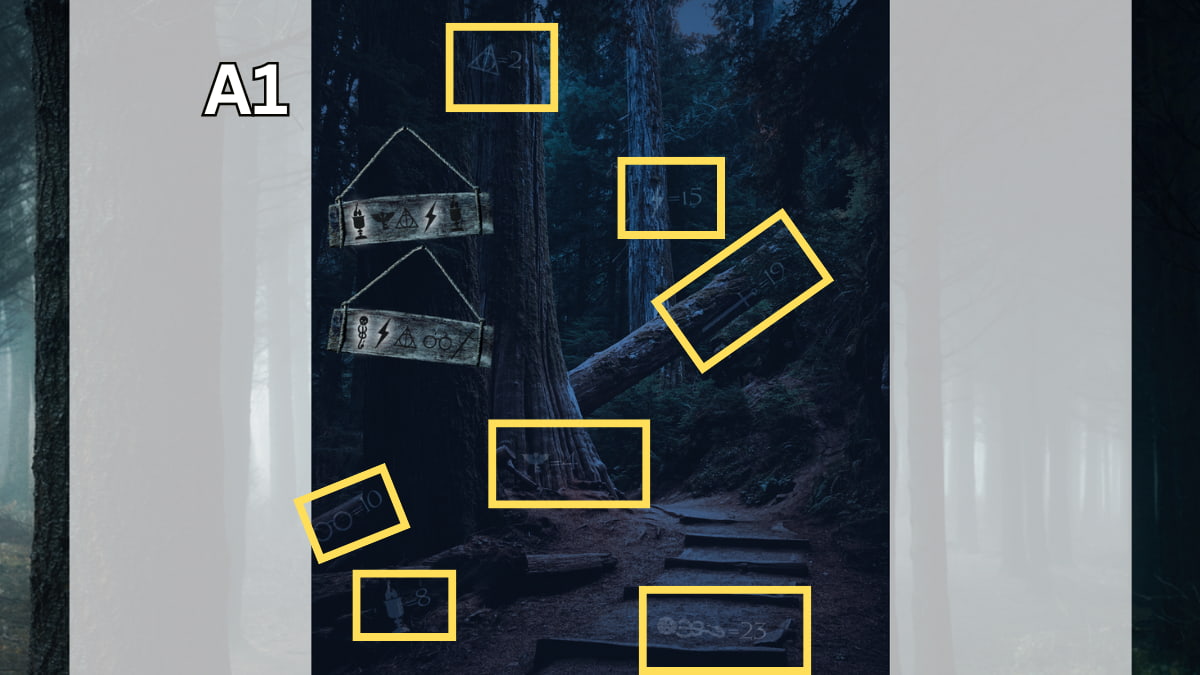
The Midnight Duel part 1
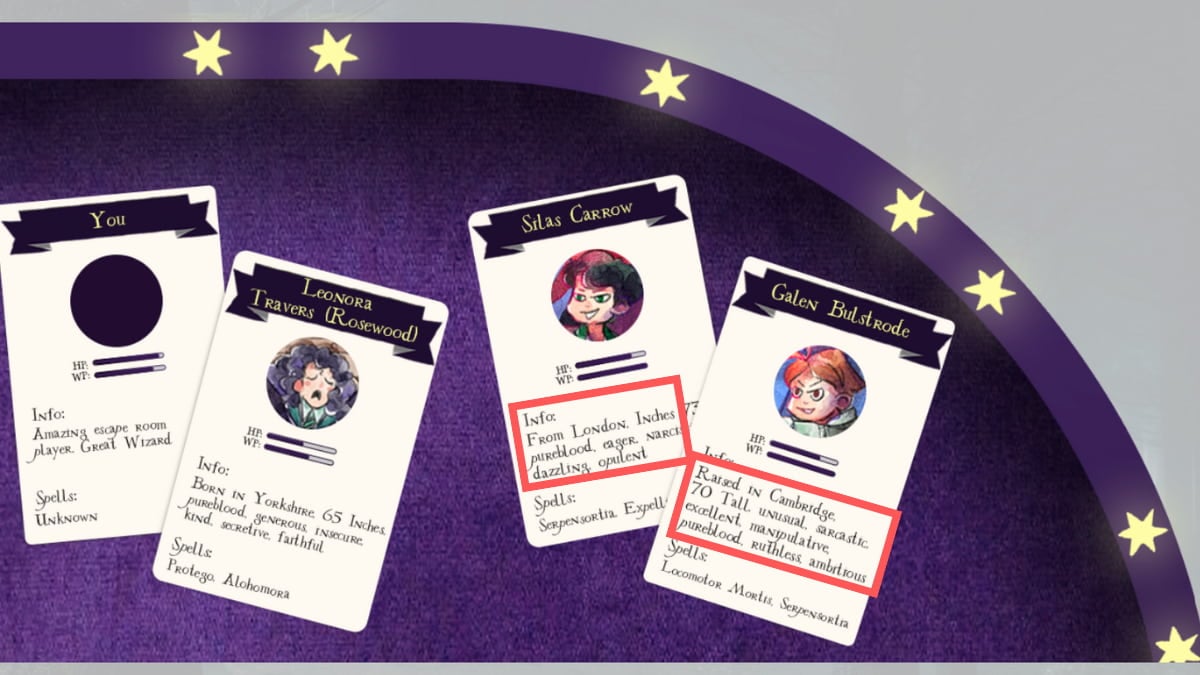
To find the spells required to counteract each boy, combine the first letters from every word in their descriptions. For Silas, this method yields the spell Flipendo, while for Galen, it results in the spell Rictusempra. In summary, these two spells are Flipendo Rictusempra.
The Midnight Duel part 2
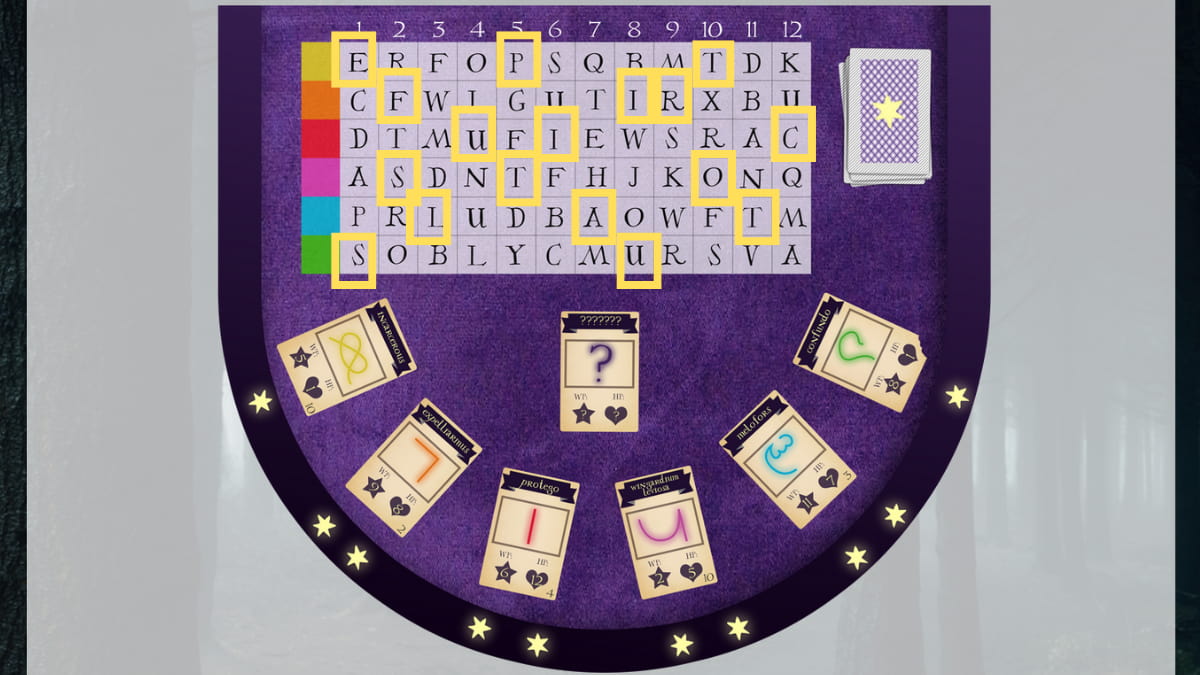
The winning spell is found by finding letters associated with each color using the cards they appear on. Each color has two to three letters associated with it according to the number in the star, the number in the heart, and the number in the lower right corner. Sort the letters of each color from left to right based on their numbers on the card, then sort each color’s letters from left to right on the table. The final spell will be Petrificus Totalus.
Final Exam
- Question 1 – Transfiguration
- Question 2 – Reducio
- Question 3 – Diffindo
- Question 4 – Lethe River Water, Mistletoe Berries, and Valerian Sprigs
- Question 5 – New Moon
- Question 6 – Serpensortia
Read More
- Hades Tier List: Fans Weigh In on the Best Characters and Their Unconventional Love Lives
- Smash or Pass: Analyzing the Hades Character Tier List Fun
- PENDLE PREDICTION. PENDLE cryptocurrency
- Why Final Fantasy Fans Crave the Return of Overworlds: A Dive into Nostalgia
- Sim Racing Setup Showcase: Community Reactions and Insights
- Understanding Movement Speed in Valorant: Knife vs. Abilities
- W PREDICTION. W cryptocurrency
- Why Destiny 2 Players Find the Pale Heart Lost Sectors Unenjoyable: A Deep Dive
- How to Handle Smurfs in Valorant: A Guide from the Community
- FutureNet Co-Founder Roman Ziemian Arrested in Montenegro Over $21M Theft
2024-09-11 10:51