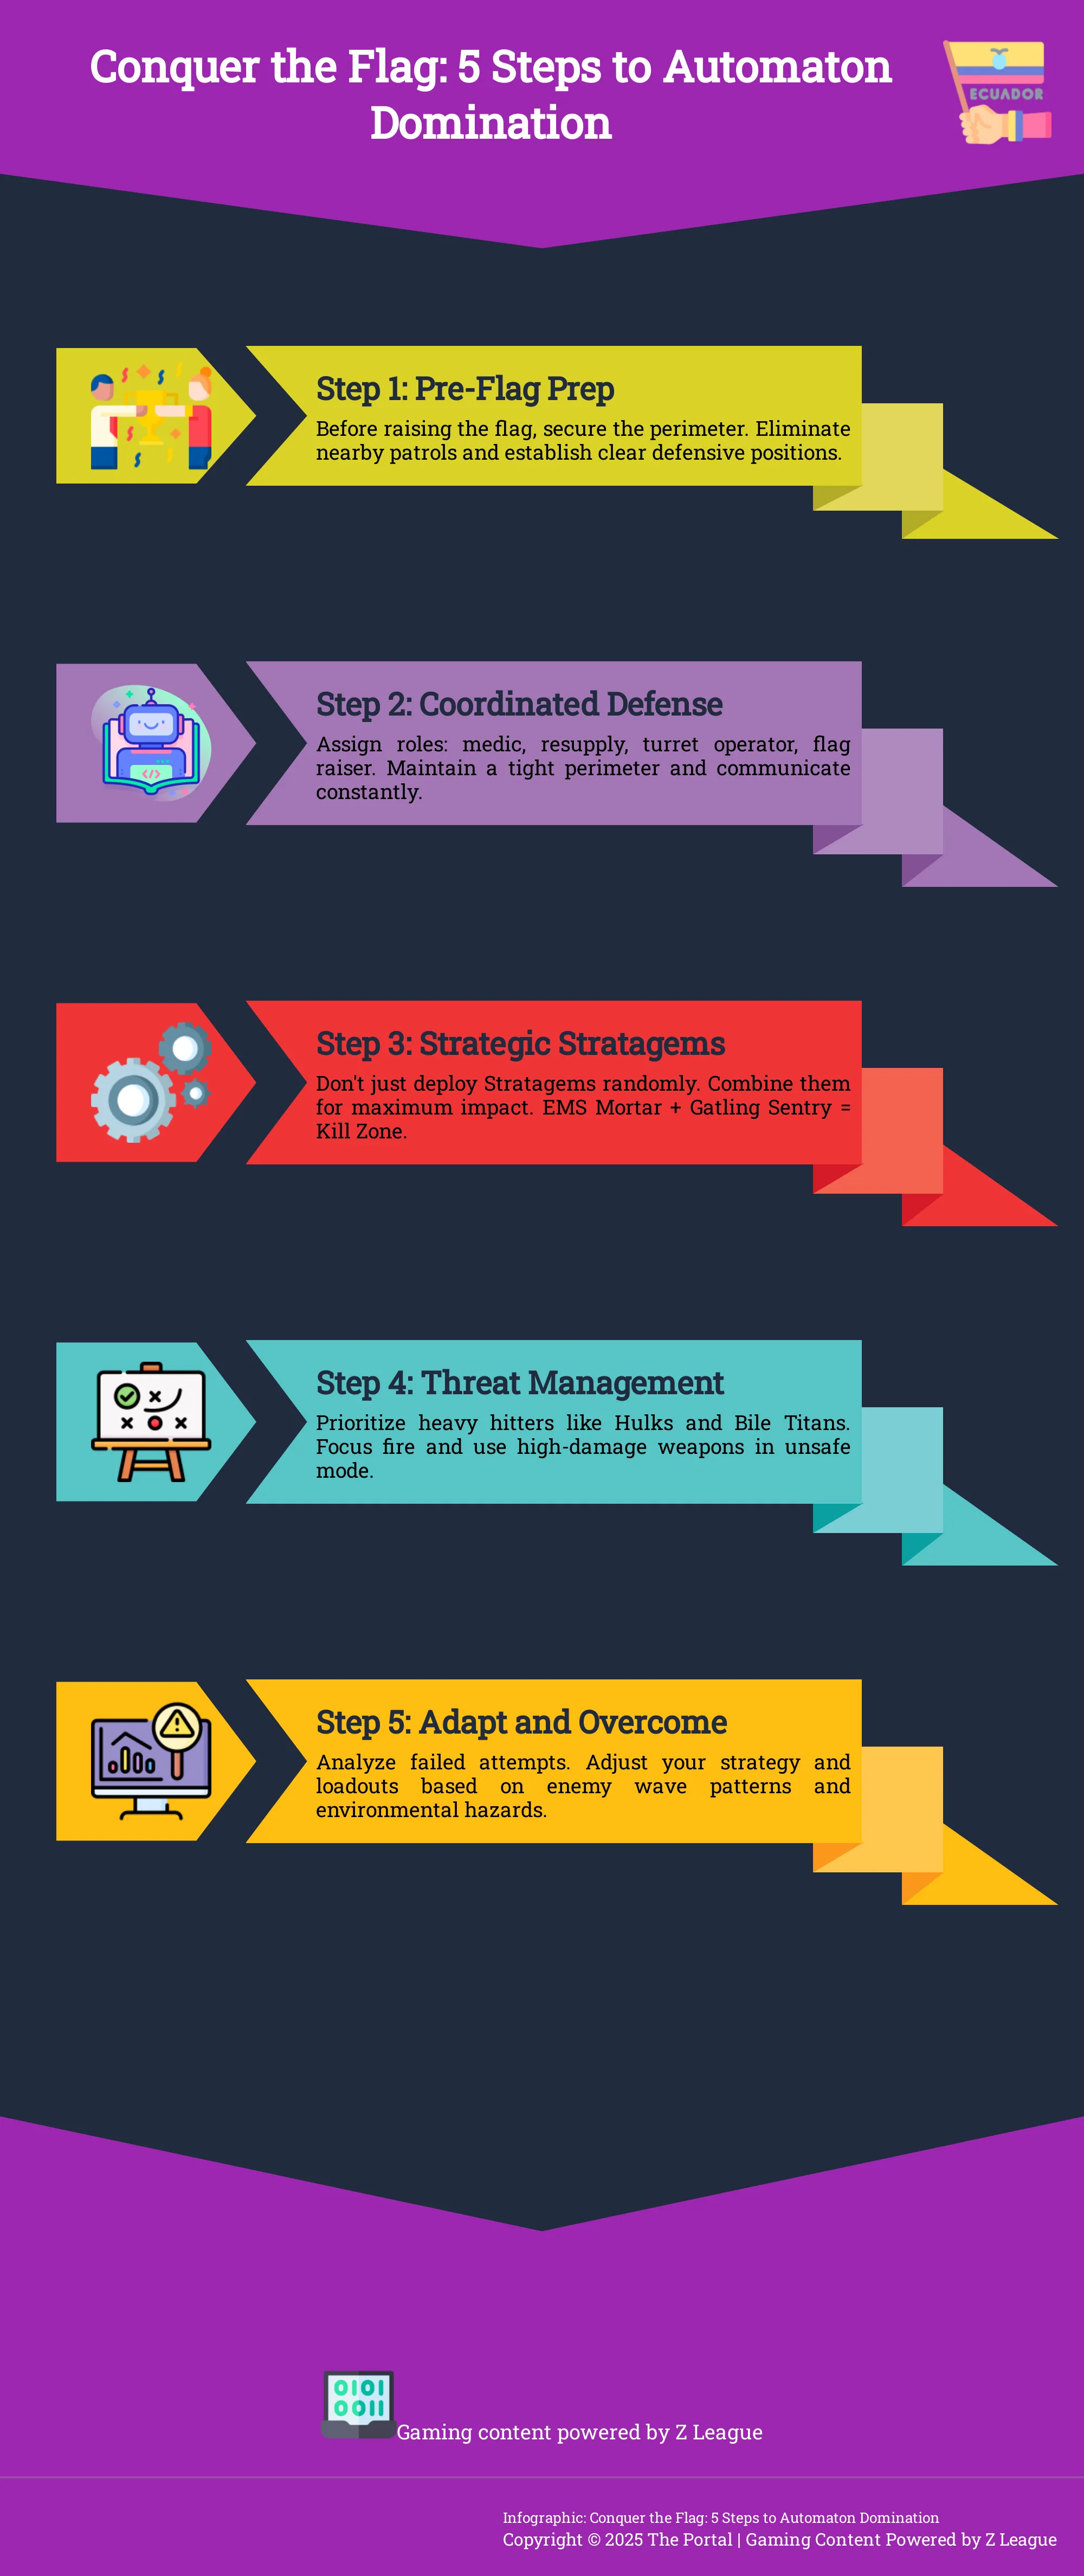
Let me make something clear: Automaton flag-raising missions are designed to push you to your limits. They throw everything they’ve got at you, transforming a straightforward objective into a desperate struggle for survival. But what if we could change the narrative? Instead of merely enduring the onslaught, we can learn to dictate it. This isn’t about surviving the storm; it’s about becoming the storm itself. By mastering our positioning, synchronizing our strategies, and foreseeing the enemy’s every move, we can turn their greatest advantage—numerical superiority—into their most significant disadvantage. It’s high time to stop defending the flagpole and start dominating the battlefield. So, let’s roll up our sleeves and get to work.
Key Takeaways
- Build a Purpose-Driven Squad: Don’t just bring your favorite guns. Assign specific roles like a medic and resupply diver, and equip armor-piercing weapons and defensive Stratagems to withstand the inevitable bot onslaught.
- Fight Smarter, Not Harder: You can’t out-shoot the entire Automaton army. Use high ground, cover, and smart turret placement to create kill zones, forcing the bots into a fight they aren’t built to win.
- Stay Vocal and Stay Together: The mission falls apart when your team scatters. Use clear callouts and pings to maintain a tight defensive perimeter around the flag, ensuring your squad moves and fights as a single, effective unit.
What Are Automaton Flag-Raising Missions?
If you find yourself within the domain of Automatons, chances are you’ve come across the task known as the flag-raising mission. In theory, it appears straightforward: reach the goal, erect the Super Earth flag, and promote a bit of controlled democracy. However, in practice, these missions are some of the most thrilling and turbulent experiences within the game. As soon as that flag begins to rise, prepare for every Automaton in the vicinity to receive an invitation to your gathering.
Achieving success isn’t solely dependent on having superior resources; rather, it entails a rigorous evaluation of your team’s synchronization, tactical acumen, and resilience in holding ground against insurmountable opposition. To excel, you must have a well-thought-out strategy in place even before the initial reinforcement arrives on the horizon.
Face Down the Enemy Drop Ships
As a passionate gamer, I must admit that one of the toughest aspects in these thrilling missions is the overwhelming number of adversaries. To put it simply, as soon as the flag begins to rise, it feels like “a swarm of 15 drop ships are hot on your tail.” This isn’t an overstatement. The game doesn’t hold back; it pours everything it has onto you, transforming the vicinity of the flagpole into a ruthless battleground. You can’t simply blast your way out here; you need a strategy. This is where having a versatile team becomes indispensable. You’ll want individuals with defined roles—someone focusing on keeping the team alive as a medic, while another ensures nobody runs out of ammo or grenades when it counts the most, acting as a resupply diver.
Know Your Mission Objectives
In the heat of battle, it’s simple to lose sight of the ultimate objective. Elevating the flag might seem a small task, but it’s crucial and demands at least one individual to remain close to the flagpole for advancement. The challenge lies in this: if everyone strays too far from the target, the progress towards hoisting the flag will revert, nullifying all efforts and resources invested. You’ll have to restart from scratch. Regular communication is essential to make sure someone is always safeguarding the objective. Your team must strike a balance between guarding the border and focusing on lifting that emblem of freedom to the top of the pole.
Build the Perfect Loadout
Entering an Automaton flag-raising mission without the proper equipment is like going to a shootout with a butter knife instead of a gun. Your chances of success largely depend on the tools you have at your disposal. Unlike routine bug-eradicating missions, these tasks are a stern examination of defensive resilience and tactical firepower. You’ll be holding a fixed post as automated dropships continuously bombard you with waves of mechanical aggression. This is not the time for novelty designs; you need a dependable and potent setup capable of withstanding continuous stress.
Mastering the art of assembling the optimal equipment is a pivotal talent in any team-oriented shooter game, be it battling for Super Earth or landing in Verdansk. The fundamental aspects of an effective Warzone setup—harmony, role performance, and awareness of the situation—are directly applicable here. Your equipment setup should address some crucial queries: How will you tackle heavily fortified adversaries? How will you disperse hordes of smaller drones? And how will you survive when missiles start raining down? Let’s explore the steps to construct the ideal gear for hoisting that flag.
Pick Your Weapons and Stratagems
In terms of defeating robotic enemies, you must strike swiftly and powerfully. As one Helldiver explained, these bots typically rely on massive firepower, making agile tactics your most effective response. This means selecting weapons and strategies that can penetrate armor and enable quick movement. The Autocannon is an excellent all-round choice, capable of taking down Devastators and Striders at a safe distance. For more substantial targets like Hulks, the Railgun or Spear could be crucial to mission success. Don’t overlook area control strategies like the Mortar Sentry or EMS Mortar Sentry to slow the enemy advance and create some space for your team.
Choose Your Defensive Gear
You won’t be able to hoist the flag if you’ve perished. The type of armor you select plays a vital role in enduring the relentless onslaught of laser blasts and explosions. It’s beneficial to have at least one player don Medic armor, as they can concentrate on “increasing the health of their comrades.” For the rest, choosing armor with the Fortified passive is an excellent selection, offering a 50% resistance to explosive damage. This will shield you from the unending rockets and grenades that the Automatons are fond of firing indiscriminately. A Shield Generator Pack is also an exceptional choice, providing you with a personal energy barrier capable of absorbing several crucial hits while you’re resuscitating a teammate or fulfilling the mission objective.
Balance Mobility and Firepower
Balancing the power of potent weapons with the agility to move swiftly is crucial. While a machine gun might annihilate foot soldiers, it could also make you an easy target. You should be able to deal damage and evade incoming fire. Some weapons provide a thrilling yet risky gameplay style that suits this perfectly. For instance, a player mentioned that the Railgun, when operated in unsafe mode, “delivers extremely high damage per shot” but consumes ammo rapidly. This means you must make each shot significant. It’s wise to carry a versatile primary like the Liberator Penetrator and a support weapon you can discard when needed for speed.
Position Your Team for Victory
In battle scenarios when the drop ships lower and the sound of metallic footsteps fills the air, the location where your team positions itself could determine whether you triumph in hoisting the flag or face a hasty retreat due to a failed mission. The Automatons rely on excessive firepower, but by strategically arranging your team, you can counter their raw power. It’s not merely about having the optimal equipment; it’s about leveraging the landscape and your resources to create an unfair advantage for yourself. By setting up a robust defense, utilizing the environment to your benefit, and placing your tactics thoughtfully, you can transform a chaotic objective into a calculated destruction of the enemy.
Create a Strong Defensive Perimeter
In simpler terms, when deploying automatons to hoist flags, situations can escalate rapidly. To withstand the attack, it’s crucial to set up a defensive boundary, not just for a good vantage point to fire from, but also to create an area where you have control over the objective. Before the flag is raised, your team should locate a safe and defendable area. Ensure that you can see incoming enemies and that your support members are safeguarded. As one experienced diver explained, having a dedicated medic and logistics specialist is indispensable. Your defensive line should offer them the cover they need to keep the team healthy and well-supplied, transforming what could be a total loss into a controllable skirmish.
Use High Ground and Cover
As a battlefield enthusiast, I’ve found that the AI opponents primarily rely on overwhelming firepower with bullets and rockets. Direct confrontation isn’t always beneficial, so it’s essential to use cunning strategies reminiscent of classic guerrilla warfare. Utilizing the terrain becomes your most potent weapon in this situation. Always seek out higher ground whenever possible. This vantage point offers a broader view of the battlefield and makes you a more elusive target for ground units. Additionally, leveraging natural cover such as rocks, craters, and buildings can disrupt their line of sight, making it harder for them to locate and attack you. Hiding behind cover to reload or call in reinforcements can be the difference between life and death. By consistently moving from advantageous positions, you force the AI into a fight they’re not equipped for: one that demands strategy instead of sheer firepower.
Place Your Turrets Effectively
Instead of merely thinking of your turrets as additional weapons, consider them as your automated specialists for area denial. Randomly scattering them across the field is ineffective. Instead, strategically place them so they can block off large portions of the map. Arrange them with overlapping lines of sight to create lethal zones where enemies attempt to capture the flag. Position them behind low walls or on ledges, providing some protection while still maintaining a clear line of fire. A tactically positioned Gatling Sentry can swiftly eliminate infantry, while a Mortar Sentry, safely concealed behind a hill, can bombard enemy strongholds with precision. Treat your turrets as valuable team members and position them to maximize their effectiveness.
Master Your Role on the Team
Achieving success in a flag-raising mission is not solely about possessing the largest firepower; it’s all about functioning smoothly as a highly efficient unit. When each member knows their role, your team can withstand the unrelenting attacks of the Automatons. Picture your squad having four main roles: a medic to keep the team healthy, a logistics specialist to provide ammunition, a gunner to secure the area, and a flag-raiser to accomplish the mission. Although everyone will be firing, designating these key tasks prevents confusion when the drop ships arrive. A team that comprehends these roles can transform a chaotic situation into a strategic victory for Super Earth.
The Medic: Keep Everyone Alive
In tight situations where enemies are closing in from all sides, a committed medic is what sets apart a victorious extraction and an unfortunate team wipe. This isn’t a passive role; you serve as the team’s lifeline. Put on Medic armor to enhance your healing abilities and constantly monitor your teammates’ health gauges, with a special focus on the flag bearer. Your main duty is to administer stimulants and boost health to ensure your allies remain combat-ready. An effective medic predicts damage, moving to assist teammates before they’re severely hurt. By doing so, you empower the rest of the squad to concentrate on their tasks, secure in the knowledge that you have their back.
The Resupply Diver: Keep the Ammo Flowing
In any intense combat situation, it’s disheartening to hear the sound of an empty rifle during a gunfight. The role of the resupply diver is to prevent such situations by ensuring everyone has enough ammunition at all times. This player should be equipped with a Supply Pack strategy and take the initiative in keeping the team’s ammo well-stocked. Instead of waiting for your comrades to exhaust their supplies, stay vigilant about who’s using heavy weapons or grenade launchers, and make sure they have enough ammunition to keep up the pressure on the enemy. By maintaining a steady supply of ammunition and grenades, you not only keep your team’s firepower consistent but also lethal.
The Turret Operator: Lock Down the Area
In a battle, turrets function as reliable allies in managing the field and establishing a lethal zone near the flag. As a turret operator, it’s your duty to intelligently position Autocannon, Gatling, or Mortar Sentries as defensive strategies at vital entry points for enemies. Avoid setting them out in exposed areas; instead, find locations where they can see clearly but are also shielded from enemy attacks. Your aim is to establish an automated defense that weakens the enemy forces, giving your teammates the opportunity to focus on more significant threats such as Hulks and Tanks. A strategically placed turret offers crucial protection and grants your team valuable extra time.
The Flag Raiser: Secure the Objective
In this role, you are the key figure out in the open. As the flag-hoister, your task might seem straightforward yet daunting: reach the flagpole and maintain your position until the Super Earth flag waves proudly aloft. From the instant you start, a colossal bullseye appears on you, instigating an onslaught of adversaries that will assault your location. It’s essential to rely on your team for protection. Equip yourself with a Shield Generator Pack for personal defense and concentrate on staying alive. The success of the mission hinges on your survival. Allow your medic, supply provider, and turret operator to carry out their duties while you focus on yours.
Time Your Execution
Achieving success in a flag-raising mission isn’t solely dependent on the resources you have; it’s all about knowing when to make your move. The battlefield is a tumultuous orchestra of explosions and incoming drop ships, and your team needs to be the maestro. Coordinating your strategies, reloads, and actions is what sets a victorious extraction apart from a hasty, unsuccessful one. It’s about finding brief moments of opportunity and seizing them before the enemy overpowers you.
To effectively handle this mission, you must grasp the sequence of events and be ready for the enemy’s impending actions. Coordinate your team’s actions to create a unified and synchronized attack, and know when to advance towards the objective and when to hold your ground and defend. The Automatons rely on sheer power, so your response should be precise and strategic. Many divers have found that the only way to instill democracy within their heartless robotic counterparts is through the use of guerrilla warfare tactics. Mastering this rhythm will transform your team into a highly efficient machine for dismantling these Automatons.
Read the Enemy Wave Patterns
As a gamer, I’ve learned that the assault by those Automatons can be overwhelming, but it isn’t haphazard. Keeping an eye on the rhythm and spots where bots appear will help you foresee where the next significant danger is heading. Be alert for the sound of incoming dropships and keep your gaze skyward. As I delve deeper into each mission, I begin to see patterns in their attack waves. This foresight enables me to adjust my position, reload, and summon backup before getting caught in the heat of battle. As a seasoned player put it, these missions can turn chaotic quickly, making it essential to have a strategy and designated roles at the ready when things heat up. Anticipating the next wave is the key to maintaining control over the fight.
Coordinate Your Team’s Abilities
Four Helldivers operating separately are merely four potential targets. However, when they operate as a unified team, they become an indomitable power fighting for freedom. The secret lies in stacking your abilities for optimal impact. Instead of haphazardly deploying your Strategems, communicate with your team and design strategies. For instance, one player could set up an EMS Mortar Sentry to stun a cluster of Devastators while another summons an Orbital Laser to obliterate them. A tactically timed Smoke Grenade can offer protection for a comrade to reload a Recoilless Rifle and eliminate a Hulk. This coordination transforms your individual Strategems into potent force multipliers, enabling you to dominate the battlefield rather than merely responding to it.
Balance Defense with Flag Progress
Achieving our primary objective involves hoisting that flag, however, it’s impossible if you’re consistently under attack. To succeed, it’s essential to strike a delicate balance between advancing towards the goal and safeguarding your position. This is where strategic defense plans come into play. Numerous players have found turrets indispensable for controlling lanes and eliminating weaker opponents, thus allowing the team to concentrate on more significant threats. Installing a Shield Generator Relay can provide your group with a protective bubble to work within. The player raising the flag is exposed, so the rest of the team must establish a secure boundary that allows them to accomplish their mission unhindered. Essentially, it’s an ongoing struggle, and your responsibility is to ensure we maintain the upper hand in this battle.
Manage the Toughest Enemies
Regardless of how robustly fortified your position might be, it could still crumble if you’re not prepared to face the intense onslaught of powerful Automatons that are sent against you. When colossal bots and relentless drop ships storm in, it’s your team’s capacity to deal with these threats that decides whether you’ll be celebrating a win or summoning an emergency evacuation. This is the juncture where sound strategy collides with utter chaos, and how swiftly you respond will ultimately shape the outcome.
Handle Hulks and Bile Titans
When a monster like the Hulk or Bile Titan appears, your main objective is to eliminate it as swiftly as possible. Certain high-damage weapons become exceptionally powerful when set to their dangerous settings. For instance, one skilled Helldiver’s tactic for Tier 9 difficulty involves using an overclocked Railgun that can shatter a Charger’s leg with just two shots or kill a Bile Titan with five to eight well-placed headshots. This risky strategy offers big rewards, but it takes practice to perfect. Work together with your team to concentrate fire and expose these vulnerabilities before you’re overrun.
Survive Infinite Breaches
In simpler terms, during missions where an automaton is being raised, things can become chaotic and intense towards the end. One player described it as situations spiraling out of control once the flag is hoisted. To survive these prolonged battles with seemingly endless breaches, it’s crucial to be well-prepared and dedicated to your role. You must ensure your team stays supplied and in good health. A veteran Helldivers 2 player offered ten essential tips for bot-divers, stressing the importance of having dedicated medics and resupply personnel. When the bots are constantly dropping, having someone focused on healing and another on ammo distribution can prevent your defensive line from collapsing under pressure.
Adapt to Environmental Hazards
In addition to the Automatons posing a threat to you, the planet itself can be unforgiving with environmental hazards such as dense fog and intense sandstorms making simple tasks challenging. These weather conditions can lead to teams becoming separated during “raise flags” missions, which could potentially reset mission progress if one strays too far. In such adverse situations, it’s crucial for your team to stay close together more than ever. Keep the communication channels active, use your compass, and move as a united front to prevent anyone from getting lost in the confusion. Modifying your formation according to the environment is equally important as choosing the right equipment.
Communicate to Survive
Regardless of how well-equipped you are or strategically positioned, if your team isn’t communicating, you’re heading towards disaster. Coordinated missions can turn into pandemonium in an instant, and open communication is the key to surviving it. The difference between a triumphant standoff and a disheartening wipeout often lies in this: a silent team won’t last long. So, get used to using your communication devices and ensure everyone understands the plan. Strong teamwork begins with talking.
Make Clear and Effective Callouts
In a crisis situation where a dozen robots are descending from above, simply shouting “Help me!” over the microphone won’t suffice. Your calls for help should be swift, precise, and direct. Imagine you’re in the military: determine the threat, its location, and the necessary response. Instead of saying “There’s a large individual,” opt for “Hulk on the northern ridge, we need anti-tank backup!” This provides your team with the critical information they need to respond immediately. Effective communication is the foundation of mission success; it transforms chaos into coordinated defense. Keep your messages concise and concentrate on what’s most important to keep your unit alive and operational.
Use Pings and In-Game Signals
If you don’t have a microphone, it’s perfectly fine! You can still excel at communication within the game using the in-game ping system. Pings serve as a universal language that penetrates through the chaos of combat. Use them to flag heavy enemy units, approaching drop ships, or locations requiring backup. A swift ping on a tank is usually quicker and more accurate than a vocal callout. Consider these signs as crucial non-verbal cues that maintain your team’s synchronization. Frequent pinging of threats and objectives ensures that even without voice chat, the entire team shares the same level of battlefield awareness, allowing them to react as one unified force.
Build Synergy Through Communication
Effective communication in a team setting transcends merely identifying opponents; it fosters unity by enabling team members to align their roles and skills. For instance, when the flag-raiser signals they’re initiating an upload, the gunner understands it’s time to offer protective fire. When someone calls for assistance, the medic can swiftly move to aid a downed comrade. This is how you develop a team where everyone has a specific task, such as a medic or a resupplier. Adhering to these fundamental principles for bot missions establishes a potent rhythm. Share when you’re employing a crucial Stratagem or when you require ammo. This continuous exchange of information turns four independent players into a tightly-knit and unstoppable squad.
Try These Advanced Techniques
After mastering the basics, you can gradually implement intricate tactics for managing the most disorderly flag-raising operations. The secret is to transition from a strictly defensive mentality to one that’s adaptive and aggressive. Instead of merely maintaining a position, you’ll learn to adjust the battlefield, regulate enemy movements, and amplify your team’s effectiveness through strategic cooperation. These advanced methods are what enable teams to tackle the toughest challenges, transforming seemingly insurmountable attacks into manageable, and even victorious, battles.
Consider it as an intricate dance of strategy. You’ll learn to manipulate opponents into favorable positions, strike powerfully at opportune moments, and then swiftly retreat before they can respond effectively. This dance demands exceptional team coordination and trust, as timing is crucial. One player’s diversion creates a chance for another’s attack, while one defensive strategy empowers the entire team to advance. As you begin to harmonize your abilities and anticipate several moves ahead of the robot army, you’ll notice significant improvements in your squad’s efficiency and survivability. It’s time to transition from reacting to the bots, to making them react to you.
Employ Distraction and Mobility Tactics
In this strategy, one player takes the role of a “decoy” or “distraction.” Instead of focusing on killing enemies, their goal is to draw out the most formidable opponents such as Hulks and tanks away from the flag. This gives your team valuable time to capture the flag and handle minor threats. To succeed, this decoy needs to move frequently, seek cover, and always be ready for medical support or ammunition resupply. In a hectic Automaton mission, staying mobile is crucial. It’s not just about safeguarding the flag; it’s about protecting the area surrounding it by keeping the enemy off-balance.
Use Hit-and-Run Approaches
As a fan, I’d say: You won’t be able to outmatch the Automaton army in a straight-up gunfight, but you can outwit them instead. The bots are all about overwhelming force, so your best option is to employ guerrilla tactics. Utilize heavy-hitting strategies like an Orbital Laser or 500KG Bomb to neutralize significant threats or Fabricators, and then swiftly relocate. The aim is to strike quickly and decisively, then move before the bots can pinpoint your location. This hit-and-run approach keeps them off-balance and reduces your exposure to their destructive counterattacks. It’s a strategy that rewards patience and accuracy over raw power, enabling you to gradually dismantle their defenses without getting entangled in a losing battle.
Combine Team Abilities for Powerful Effects
Working individually, four Helldivers lack the same potency as a unified squad, where their strategies harmoniously blend for enhanced results. The potential of your group is maximized when you collaborate by coordinating your tactics for synergistic outcomes. For instance, one player could deploy an EMS Mortar Sentry to slow and stun hordes of bots, while another sets up a Gatling Sentry to tear apart the stationary targets. A Shield Generator Relay can offer vital protection during flag-raising, enabling teammates to safely emerge and fire anti-tank weapons. Recognizing how your equipment enhances your allies’ selections is a key trait of an expert team.
Avoid These Common Mission-Ending Mistakes
In even the most democratic environments among the Helldivers, a handful of errors could lead to total annihilation. These missions are crafted to push your squad to its utmost capabilities, and one misstep might find you back on board your Super Destroyer. Here’s a rundown of the most frequent blunders and how to avoid them.
Don’t Rush or Overextend
The strong desire to hoist the flag immediately can be compelling, but it’s a trap. As a player on Super Hell Dive difficulty explained, “Once the flag starts going up, it feels like 15 drop ships are chasing you.” Jumping in without a strategy is the quickest path to being overrun. Before anyone reaches the flagpole, take a moment to sweep the surrounding area for patrols. Once the flag is hoisted, try to resist the urge to pursue every Automaton that appears. Your role is to safeguard the objective zone, not to cleanse the entire planet. Overextending leaves the flag-raiser exposed and your team stretched too thin.
Maintain Cohesion Under Pressure
During the arrival of drop ships and intense laser battles, teams might get flustered and disperse. This is usually when groups tend to falter. As any seasoned soldier will confirm, unity is essential. In the tumultuous phase of a flag-raising operation, it’s crucial to rely on your teammates to perform their tasks effectively. Your medic must be close enough to provide aid, and your resupply diver should be reachable. If everyone scatters, you lose all cohesion. Establish a secure perimeter and hold it firm. Keep communication open, maintain proximity for support, and operate as a unified, lethal force. A united team can withstand immense stress, whereas a disjointed one becomes mere easy targets.
Learn From Every Failed Attempt
In the course of playing the game, you might encounter a situation where you don’t succeed. Remember, this is just part of the challenge. What truly matters is what you take away from these experiences. One of the most disheartening ways to fail can be when the mission resets because your team moved too far from the objective. Instead of instantly respawning and repeating the same mistake, take a moment to analyze what went wrong. Did your defensive line collapse? Was someone pushed out of position by a Hulk-like force? Did one of your teammates wander off, resetting the flag progress? Each setback is an opportunity to learn. Use it to enhance your defensive plan, modify your equipment, and return with renewed vigor. The path to victory for Super Earth lies in the wisdom gleaned from defeat.
Refine Your Strategy
Achieving the feat of hoisting the banner for Super Earth is an exhilarating experience, yet the true expansion occurs post-launch of Pelican-1. Even the top-tier units can be defeated, but what distinguishes them from trainees is their knack for learning from every setback. Improving your tactics is a recurring process of playing, assessing, and adjusting. If you notice your team repeatedly being overpowered, it might be prudent to reconsider your strategy. In the midst of unpredictable flag-raising operations, having specialized roles such as medics or resupply divers can transform a hectic defense into a manageable triumph. Keep in mind, the Automatons are fueled by excessive firepower. You won’t emerge victorious by firing back bullet for bullet; rather, you triumph through intelligence.
Analyze Your Post-Mission Performance
After completing a mission, it’s hard not to rush back into action immediately, but taking a breather to discuss things with your team is incredibly beneficial. Discuss what worked well and what didn’t. Perhaps your defense was flawless, or maybe one Hulk caused everything to collapse. Look closely at the events that led to a total wipeout of your squad. Did you get trapped by rocket barrages? Were you too tightly grouped when a factory suddenly dropped a horde of Devastators on you? Since bots favor raw power over intricate strategies, your best defense is smart positioning and movement. This is the time to employ guerrilla tactics and outsmart their brute force. By examining your performance, you can pinpoint where your strategy fell apart and devise a plan to counter their numerical superiority in the next mission.
Adapt to Higher Difficulties
The tactic that helped you complete a tough mission will prove challenging in “Helldive.” As you progress through the levels, the number of enemies, their armor, and aggression increase at an extreme rate. It’s not just about holding your ground; you need to be on the move, changing positions, and communicating regularly. On the highest difficulties, you might find yourself running from crowds more than standing to fight. While some players think bot missions are more balanced than bug missions, they can be harsh if your team isn’t well-coordinated. A single error can lead to a major setback. Higher levels require more specialized equipment, closer collaboration among team members, and a keen sense of threat prioritization. Your ability to adjust your strategy to the growing chaos will determine mission success in the end.
Keep Up with Game Changes and Community Tips
In a nutshell, Helldivers 2 is an ever-evolving game. Each update brings adjustments to the balance between weapons, strategies are fine-tuned, and unexpected enemy behaviors may surface. The meta is consistently changing, so yesterday’s winning tactic might not be as effective today. Keeping yourself updated is vital for your long-term plan of spreading managed democracy across the galaxy. The Helldivers community is an invaluable resource. The official Helldivers subreddit is brimming with discussions on the latest updates, novel strategies, and entertaining memes. Players are consistently sharing videos and guides that dissect everything from soloing high-level missions to optimal team compositions for raising flags. Leveraging this collective wisdom will keep you ahead of the game and uncover new ways to battle for Super Earth.
Frequently Asked Questions
If your team members aren’t using microphones or communicating verbally, you can still achieve victory by relying on the ping system as your primary means of communication. Keep pinging to indicate heavy enemies, incoming reinforcements, strategic locations for turrets, and more. A timely ping on a Hulk can be quicker and clearer than a frantic voice call. Additionally, utilize the radial communication wheel to request ammo or support when needed. By consistently providing relevant information through pings, you can foster a surprising level of battlefield awareness among your team without uttering a single word.
As a gamer, I’d say there isn’t a single, all-powerful strategy for this mission, but the EMS Mortar Sentry is nearly unbeatable. Its capability to stun and slow down hordes of bots is game-altering, giving our team invaluable time to recharge, heal, and concentrate on major threats. However, its true strength lies in cooperation. An EMS Mortar by itself just postpones the issue, but when combined with a Gatling Sentry or an Orbital Laser, it creates a destructive zone of elimination. The best strategy, always, is the one that enhances what our team already brings to the battlefield.
What’s the most frequent blunder leading teams to miss this mission? It’s usually the hasty initiation of the flag hoisting sequence before the team is fully prepared. The allure of quickly completing the objective can be strong, but raising that flag acts as a beacon, summoning every Automaton in the vicinity towards your position. Teams often falter because they didn’t spare 30 seconds to set up defensive positions, fortify turrets, and ensure everyone was armed and ready. Consider the flagpole as a final boss trigger rather than an early move.
Overcoming a late-game loss can be challenging, but here’s one strategy: Instead of constantly sending everyone back into the same high-risk area near the flag, designate someone to move slightly away as a safe respawn point and divert enemy attention. Utilize your Hellpod’s temporary invincibility to instantly deploy an essential Stratagem such as a Shield Generator Relay or Smoke Strike, which can provide your team with a momentary reprieve to regroup and re-engage in the fight more effectively.
Is it feasible to accomplish these missions by yourself instead of with a team? Yes, it’s possible, but you need to switch your approach from a defensive strategy to one focused on evasion. You can’t establish and defend a position single-handedly. Solo runs require a hit-and-run tactic where you set the flag, then quickly retreat to draw the enemies away, and return just in time to prevent the progress from being reset. Your equipment should emphasize mobility and self-reliance, using items like the Shield Generator Pack and versatile support weapons. It’s not about a traditional firefight; it’s more like a tense, high-stakes dance.
Read More
- Who Is Harley Wallace? The Heartbreaking Truth Behind Bring Her Back’s Dedication
- 50 Ankle Break & Score Sound ID Codes for Basketball Zero
- 50 Goal Sound ID Codes for Blue Lock Rivals
- Here’s Why Your Nintendo Switch 2 Display Looks So Blurry
- Elden Ring Nightreign Enhanced Boss Arrives in Surprise Update
- How to play Delta Force Black Hawk Down campaign solo. Single player Explained
- 100 Most-Watched TV Series of 2024-25 Across Streaming, Broadcast and Cable: ‘Squid Game’ Leads This Season’s Rankers
- Jeremy Allen White Could Break 6-Year Oscars Streak With Bruce Springsteen Role
- MrBeast removes controversial AI thumbnail tool after wave of backlash
- KPop Demon Hunters: Real Ages Revealed?!
2025-07-03 13:32