What time is Euphoria Season 3 Episode 5 out?

The new season of Euphoria kicked off with a dramatic first episode centered on Rue. It showed her smuggling drugs across the border for Laurie and experiencing what felt like a spiritual awakening.
The new season of Euphoria kicked off with a dramatic first episode centered on Rue. It showed her smuggling drugs across the border for Laurie and experiencing what felt like a spiritual awakening.
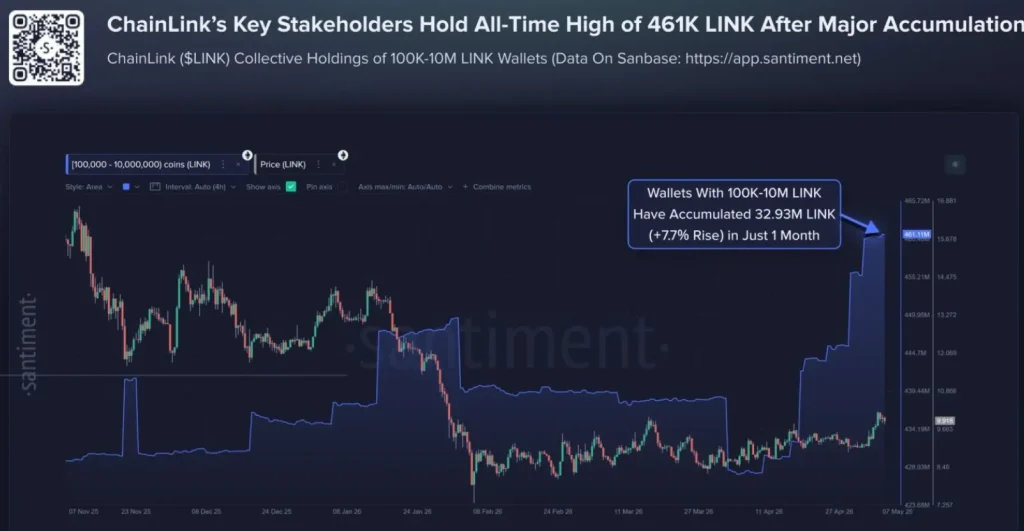
Behind the curtain, on-chain data whispers of whales-those leviathans of the crypto sea-accumulating LINK with the voracity of a man devouring a stale herring at a provincial train station. Over 13.5 million tokens have vanished from exchanges in a mere five weeks, as if swallowed by the void itself. Meanwhile, institutional inflows and treasury expansions lend an air of gravitas to this melodrama, though one wonders if they are but bit players in a larger farce.
Most profitable crypto: B3 (Base) (B3), aura (AURA), Dogs (DOGS), Constellation (DAG), TROLL (TROLL), Test (TST), LAB (LAB), Toncoin (TON), Songbird (SGB), Nillion (NIL).
Cryptocurrencies that are trading close to all time high values iShares Core S&P 500 ETF (Ondo Tokenized ETF) (IVVON/USDT) iShares Core S&P 500 ETF (Ondo Tokenized ETF) rate has changed by 2.07% in the last 7 days. The difference for the last day was 0.36%. Cryptocurrency iShares Core S&P 500 ETF (Ondo Tokenized ETF) ranks … Read more
Sorry, LUNC/USD forecast is not available at the moment. Please try again later. Forecasts that will be relevant tomorrow:

XRP’s perpetual trading volume on Binance, a mere $372 million on May 7, whispers of a historical echo. Compare this to October 25, 2024, when the figure stood at a paltry $242 million – a period so quiet one might have mistaken it for a holiday. The current number, while technically higher, is a Pyrrhic victory, as if the market is playing a game of “higher, but not that higher.” Both readings, like two weary clerks in the same office, sigh in unison: “Another day, another dull spreadsheet.”

A new framework aims to proactively identify and mitigate risks across the rapidly evolving landscape of decentralized finance.

Classic superhero stories about good versus evil will probably always be popular, but viewers are increasingly drawn to stories that offer a fresh take on the genre. This change in preference has helped comic book adaptations like Invincible and The Umbrella Academy find success on television.

The 2006 film Southland Tales surprisingly foreshadowed several things we see today: the influence of comedians and podcasters in politics, the Tesla Cybertruck, and Dwayne ‘The Rock’ Johnson’s continued success as an actor. Director Richard Kelly is amazed by how much the film seems to have predicted. He even points to a character, Baron von Westphalen, as being similar to Elon Musk. Krysta Now believes a storyline from the film even anticipates events in the upcoming season of Euphoria. While Southland Tales features a devastating nuclear attack on America following a conflict in the Strait of Hormuz, Kelly views the film’s apocalyptic ending as ultimately hopeful. He says the film contains both cynicism and anger, but concludes with a ‘metaphysical resurrection’ meant to leave the audience with a sense of emotion. It’s something to hold onto.

Mystery anime can be structured in a couple of ways: some shows present self-contained cases that are resolved each episode, while others tell one big story that unfolds over many episodes or an entire season. Creating a good mystery is challenging, and most series have a few weaker episodes, but the anime listed below consistently deliver strong stories.