As a seasoned pirate and a connoisseur of all things nautical, I can wholeheartedly vouch for Two-Barrel Jim being a valuable addition to any crew. This multi-class specialist is as tough as old saltwood, with the Cook, Bruiser, and Reaver classes under his belt.
In the game “Rogue Waters,” you assume the role of Captain Cutter, resurrected after 14 years. With a vendetta against Blackbone, Cutter needs a strong team for successful raids to carry out his mission. If you’re pondering which crew members to recruit from the tavern in “Rogue Waters” or seeking tips on character building, I’ve compiled all the necessary information for you below.
Guide to building the best crew in Rogue Waters
Initially while playing Rogue Waters, you might notice that you pass away frequently during raids. This occurs due to a couple of factors: firstly, the game allows for death without any repercussions; secondly, your team will primarily consist of standard crew members instead of specialists.
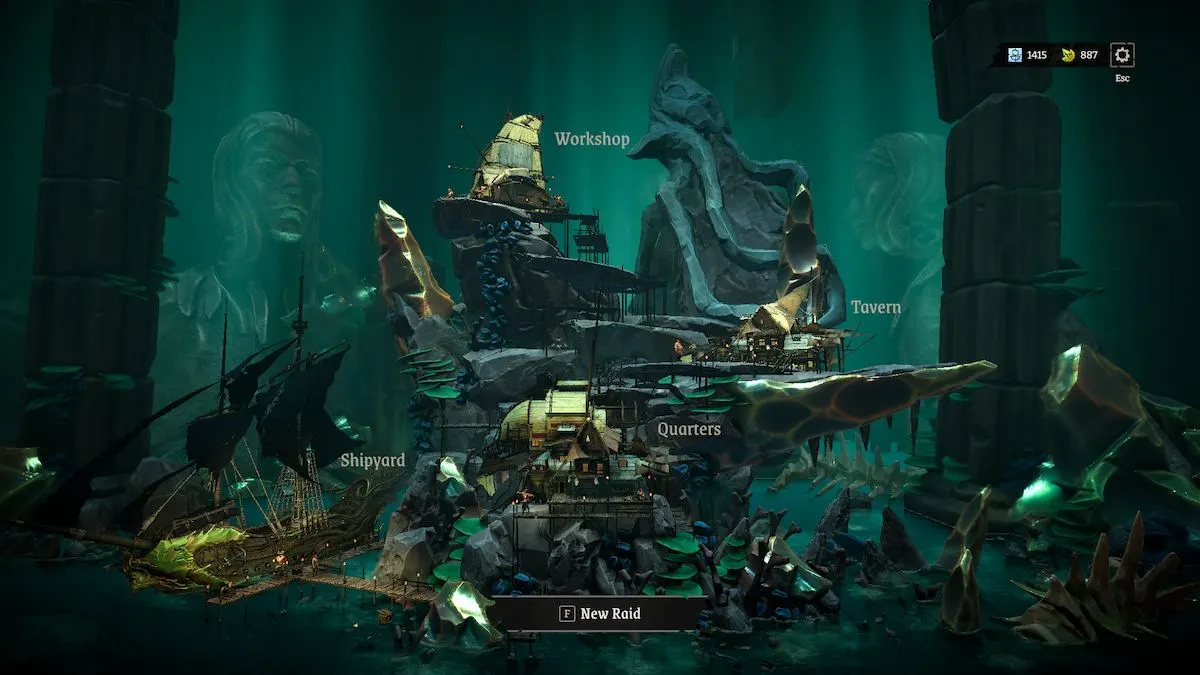
After a raid, you can recruit specialists from the tavern when you return to your ship. These experts are available for hire only after raids, and they initially possess basic skills. As you keep conducting raids in Rogue Waters, your specialists will accumulate experience points and eventually level up. Upon reaching a new level, you’ll have the opportunity to customize their abilities according to your playstyle or requirements.
Before creating character builds, it’s essential to select the top specialists from Rogue Waters to be part of your team first.
Best specialists to hire in Rogue Waters
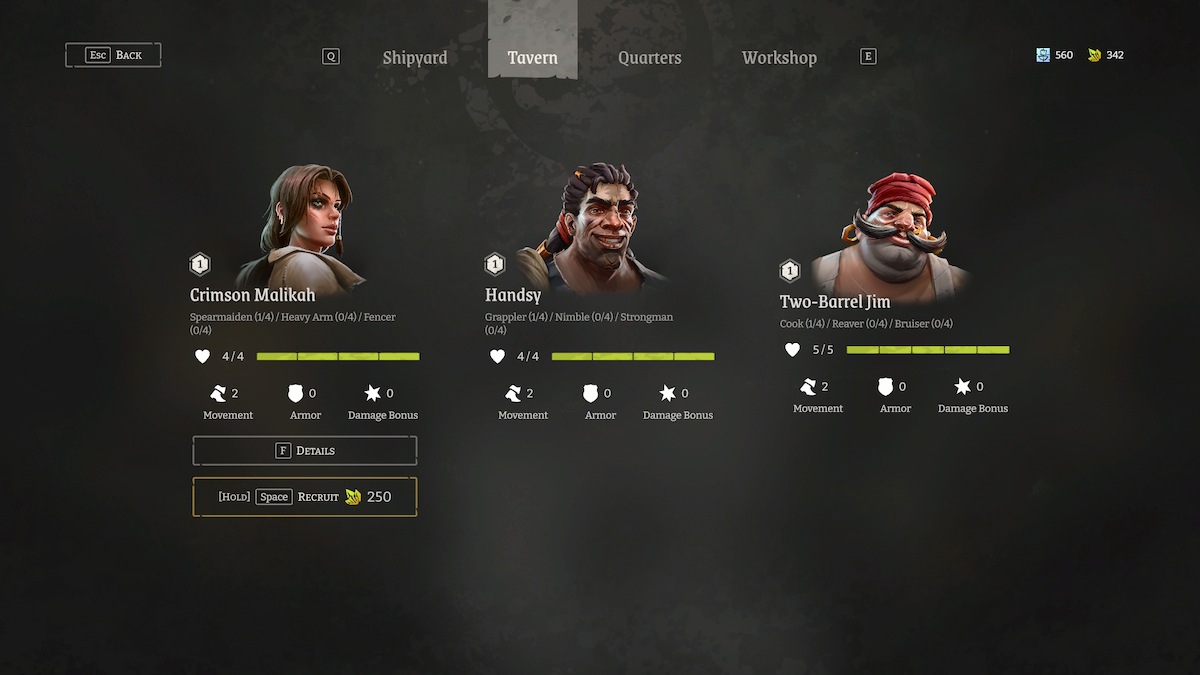
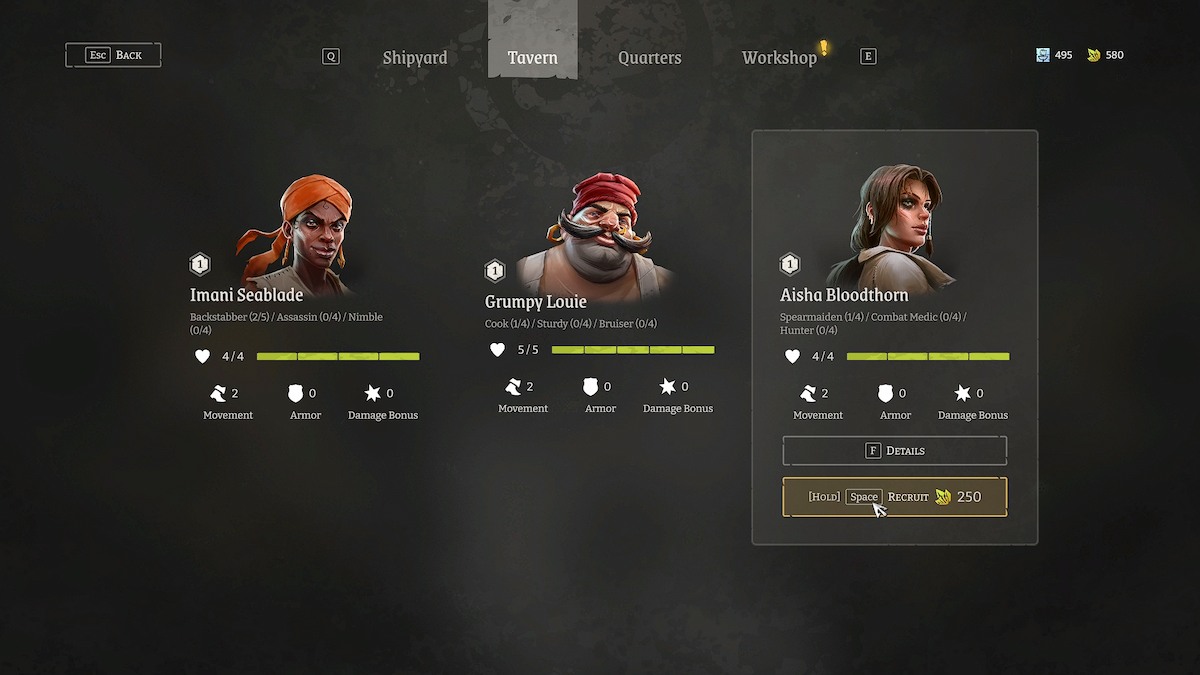
Upon accessing the tavern via your gaming hub, you’ll find yourself welcomed by three experts who rotate after each raid, regardless if you survive the entire encounter or not. Each of these professionals requires 250 units of Glass for their services – a term we use to denote the in-game money that takes the place of gold or other types of coins.
Beneath the specialist’s name, you will notice the categories they belong to, which are broken down into three classes. For instance, Crimson Malikah is classified as a Spearmaiden and also falls under the Heavy Arm and Fencer groups. In-game, these specialists are typically identified by their primary class, so Crimson is recognized as a Spearmaiden, Handsy is known as a Grappler, and Two-Barrel Jim is labeled as a Cook.
Experts in these categories will also be linked to two additional ones – for instance, Heavy Arm and Fencer. It’s crucial to focus on the classes rather than their portraits because all main class types appear identical. This means that although your Cook experts might seem like twins due to their shared primary class, they can have distinct secondary and tertiary classes.
In the game Rogue Waters, your crew members’ names may be altered. This leaves us unsure if the names of specialists are also randomly assigned or not. To ensure clarity and ease in identifying the correct specialist regardless of their name, the table provided encompasses all three possible roles that a specialist can play.
These are the best recruits to hire in Rogue Waters during the early game:
| Name | Main Class | Second and Third Classes | Why Hire |
|---|---|---|---|
| Aisha Bloodthorn | Spearmaiden | Combat Medic & Hunter | Spearmaidens have extra reach with their weapon – they can reach across two squares rather than using a sword that only reaches across one.
Of her second and third classes, the most important one here is Combat Medic. Combat Medics have skills that can heal allies and add HP to their own count. As all characters start with four hit points, adding HP is crucial. Aisha’s Hunter class adds more HP to her stats and more damage to her weapon. |
| Cutbait Kwame | Backstabber | Noble & Fencer | The Backstabber class has the ability to add extra damage to their strikes. If you build your Backstabber with the melee skill (Weakening Strike I), they will attack enemies next to them, but with the downside of a negative damage bonus for one turn.
Specialists with the Noble class are extremely useful to have on a raid with you because they have a hidden pistol that they can pull out and use for even more damage. Then, there’s the Fencer class, which adds HP, Armor, and melee damage. |
| Handsy | Grapper | Study & Cutthroat | The issue with Grapplers is that their first skill doesn’t do any damage. While it’s fun to throw your enemies into other enemies or into parts of the ship to cause damage, it can leave them a little defenseless.
A Cutthroat has a similar skill to the Noble class – but, instead of a gun, they get a hidden dagger. Combined with the added HP from the Study class, Handsy is a well-rounded character. |
| Pete the Plank | Grappler | Strongman & Sturdy | Pete is an alternative Grabbler to Handsy. They both have a skill that adds damage to their attacks – which is something you should look for when building up a Grabbler.
Strongman adds a damage bonus to make Pete’s attacks actually hurt his enemies, and Stury adds more HP to his stats, giving you a chance to strategize a good attack formation that can take advantage of his ability to literally push your enemies around. |
| Sally Brisk | Backstabber | Noble & Assassin | We know enough about the Backstabber and Noble classes from other specialists on this table, so let’s focus on the Assassin aspect of Sally Brisk here.
The Assassin class gives your specialists the ability to kill enemies next to them that have only one or two HP (depending on how far down the skill list you are). They also have a skill that gives them an extra HP – which is, as I’m sure you’ve understood, very important. |
| Two-Barrel Jim | Cook | Reaver & Bruiser | Cooks don’t push enemies back when they hit them, which can help you avoid a few sticky situations. I’ve definitely stepped too close to the railing before and been thrown over after attacking an enemy. With the Cook class, you can strike at your enemies from above, dealing a blow that cause two damage.
To add to this, find yourself a Cook with the Reaver and Bruiser classes. Reavers can heal themselves after biting their enemies, while Bruisers can stun enemies; making them difficult to fight against. |
| Zola Broadsnatch | Spearmaiden | Fencer & Noble | If you want a Spearmaiden who goes down the damage route rather than being a Combat Medic, one with Zola’s classes is perfect. The Fencer class adds extra melee skills to her build, while the Noble class enables her to pull out a hidden gun.
Essentially, she’s a DPS who has three weapons to play with. |
How to create the best raiding party in Rogue Waters – Party composition

As a fellow gaming enthusiast, let me share some insights from my experience: In any raid, having at the very least one healer is non-negotiable. If you haven’t recruited a healer yet and can’t purchase one from the Tavern, don’t worry – Captain Cutter has got you covered with his healing skills. Once your budget allows it, aim to have not just one, but two healers in your team, as I suggested in my analysis of Captain Cutter’s character build.
In addition to a healer, it’s crucial to have a combat expert proficient in close-quarters fighting or melee combat. Assassins make excellent choices for this role as they can swiftly eliminate enemies that are nearly defeated with just one or two hit points remaining. Moreover, I recommend having at least one Noble who is skilled with firearms; having two is even more advantageous once you expand your raiding party and unlock additional specialist slots.
Afterward, you might be interested in having a Spearmaiden. This character has the ability to attack an opponent from two spaces away, and interestingly, if one of your crew members is in the space between your Spearmaiden and the enemy, they won’t hurt your crew member while still managing to harm the enemy.
Let’s consider two roles: Wrestlers (Grapplers) and Chefs (Cooks). Currently, the Wrestlers require some fine-tuning before they become more effective. To be frank, merely shoving enemies doesn’t yield significant results. In fact, it would be advantageous to have a teammate strike an enemy with a sword, causing them to fall against a sturdy part of the ship, rather than just having your Wrestler toss them into the same spot.
In other words, think of a situation where a Grappler is being controlled, and only switch to a Cook character when you’ve accumulated enough experience points on the Grappler to learn a damaging skill. A Cook can inflict damage instantly by attacking from above, and they won’t be trapped in squares of fire because they don’t need to move forward into the spot the enemy once occupied.
Best party compositions in Rogue Waters
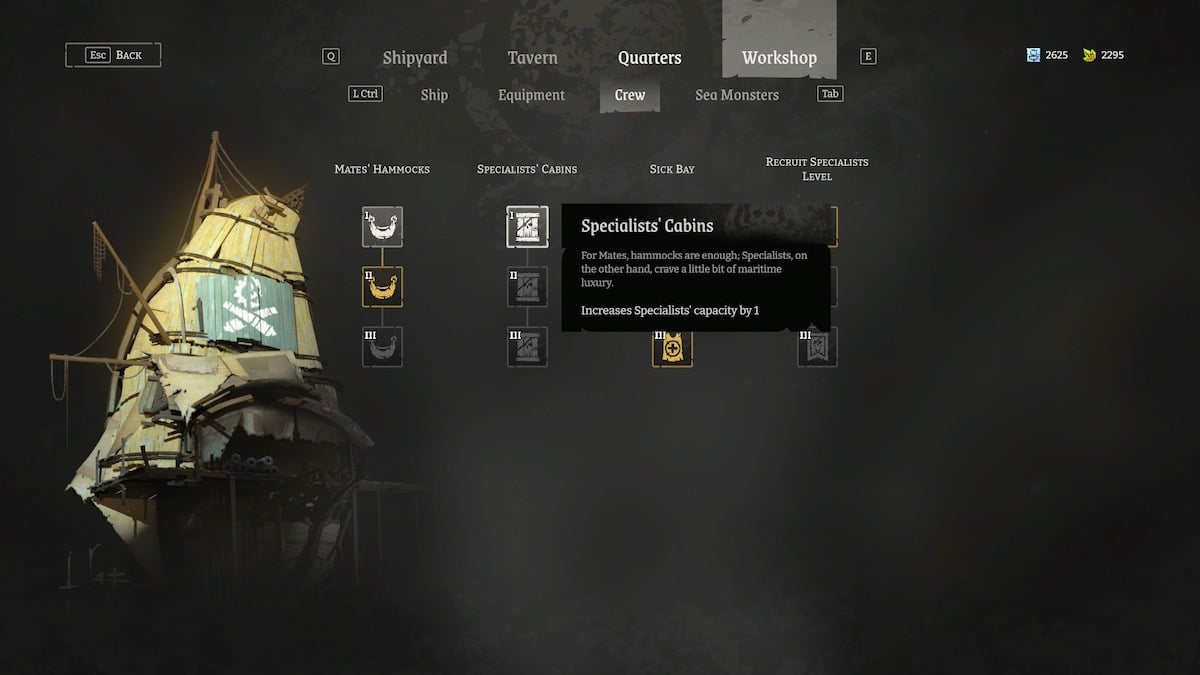
In this game, you have several team setups at your disposal for progressing to higher levels. You can incorporate up to five experts into your raid squad, but each one necessitates a Workshop’s Specialists’ Cabin upgrade. Initially, your team will consist of two specialists.
Two specialist slots:
- Captain Cutter (have Heirloom Pistol I unlocked).
- Sally Brisk or another specialist with the Assassin class (have Assassination I unlocked).
- Aisha Bloodthorn or another specialist with the Combat Medic class (have Cure I unlocked).
Or
- Captain Cutter (have Get Yourself Together I unlocked).
- Sally Brisk or another specialist with the Assassin class (have Assassination I unlocked).
- Zola Broadsnatch or another specialists with the Noble class (have Distracting Shot I unlocked).
Three specialist slots:
- Captain Cutter (have Heirloom Pistol I unlocked).
- Sally Brisk or another specialist with the Assassin class (have Assassination I unlocked).
- Aisha Bloodthorn or another specialist with the Combat Medic class (have Cure I unlocked).
- Two-Barrel Jim or another Cook (unlock the Cook skills asap).
Four specialist slots:
- Captain Cutter (have Heirloom Pistol I and Get Yourself Together I unlocked).
- Sally Brisk or another specialist with the Assassin class (have Assassination I unlocked).
- Aisha Bloodthorn or another specialist with the Combat Medic class (have Cure I unlocked).
- Two-Barrel Jim or another Cook (unlock the Cook skills asap, start unlocking Reaver skills next if you have Jim).
- Pete the Plank or another Grappler with the Strongman class (unlock the Strongman skills asap to make Pete actually do damage).
Five specialist slots:
- Captain Cutter (have Heirloom Pistol I and Get Yourself Together I unlocked).
- Sally Brisk or another specialist with the Assassin class (have Assassination I unlocked).
- Aisha Bloodthorn or another specialist with the Combat Medic class (have Cure I unlocked).
- Two-Barrel Jim or another Cook (unlock the Cook skills and Reaver skills if you have Jim).
- Pete the Plank or another Grappler with the Strongman class (unlock the Strongman skills).
- Zola Broadsnatch or another specialist with the Noble class (have Distracting Shot I unlocked, this is where that second gun I recommended comes in).
After making my way down this roster, I’d find myself boasting a duo of medics, a pair armed to the teeth, a stealthy Assassin, a Grappler dishing out damage, and a self-healing Cook who can retaliate by inflicting harm on others.
A pretty well-rounded team, if I do say so, myself.
Rogue Waters character builds
These character builds follow the recommended crew list from the last section.
Captain Cutter character build (Swashbuckler/Commander/Shepherd)
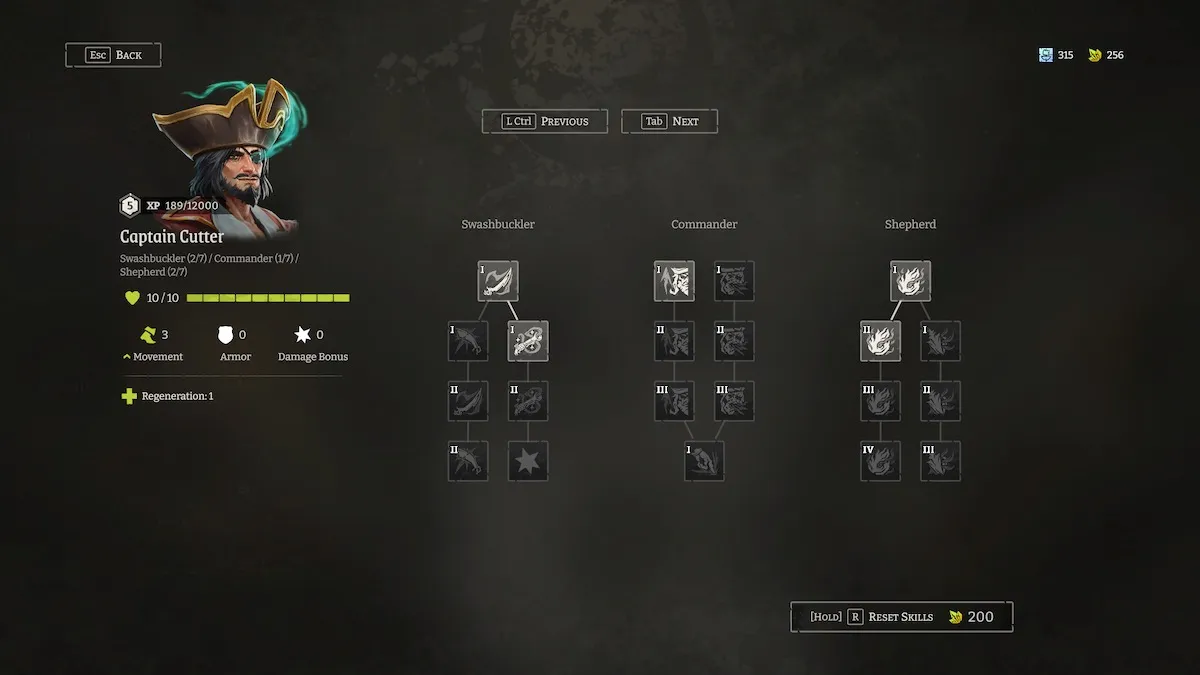
Captain Cutter possesses the roles of Swashbuckler, Commander, and Shepherd. When it comes to developing his character, there are six possible skill progression routes available among these three classes. While you can blend them, I’d advise focusing on maximizing the skills within your preferred class to reach more advanced abilities quicker.
For the Swashbuckler, grab the pistol, and swiftly move towards the Retaliate abilities located on the left side. While pistols are great weapons for your team, the Retaliate skills will enable you to counterattack when under attack by enemies. Initially, you can manage with just the initial pistol skill, returning later to learn more.
Instead of starting with the left side of skills for Commander, I opted for the path that turned Captain Cutter into a healing specialist, as opposed to granting him the capacity to push other crew members farther during their turn. If you’ve already got a dedicated healer on your team, it might be more advantageous to choose the alternative skill set for your crew. Aim to always have at least two dedicated healers in your Quarters, so you can swap them out between raids.
For Shepherd, you have two options: either utilize your enemies’ weaknesses through your right-side skills (offensive abilities), or bolster Captain Cutter with the skills on the left, providing him additional health, armor, mobility, and an increased damage boost. In my case, I opted to focus on the left side of available skills initially. These enhancements improve Captain Cutter’s health, armor, movement speed, and grant him a damage bonus as well.
Here is my full Captain Cutter build for Rogue Waters:
- Swashbuckler – Cutlass Swing I (skill unlocked immediately).
- Commander – Get Yourself Together I.
- Shepherd – Shiv’s Presence I.
- Swashbuckler – Heirloom Pistol I.
- Swashbuckler – Retaliate I.
- Swashbuckler – Cutlass Swing II.
- Swashbuckler – Retaliate II.
- Shepherd – Shiv’s Presence II.
- Commander – Get Yourself Together II.
- Commander – Get Yourself Together III.
- Shepherd – Shiv’s Presence III.
- Shepherd – Shiv’s Presence IV.
- Swashbuckler – Heirloom Pistol II.
- Swashbuckler – Strong I.
- Commander – Hurry Up, Scallywag! I.
- Commander – Hurry Up, Scallywag! II.
- Commander – Hurry Up, Scallywag! III.
- Shepherd – Mermaid Call I.
- Commander – Take That Rat Down I.
- Shepherd – Mermaid Call II.
- Shepherd – Mermaid Call III.
In the following part, I will demonstrate the specialist characters from the team configurations we discussed earlier. This way, you can learn how to construct different specialists, giving you the freedom to create your own builds as you acquire additional specialists and progress deeper into the storyline of Rogue Waters.
Aisha Bloodthorn character build (Spearmaiden/Combat Medic/Hunter)
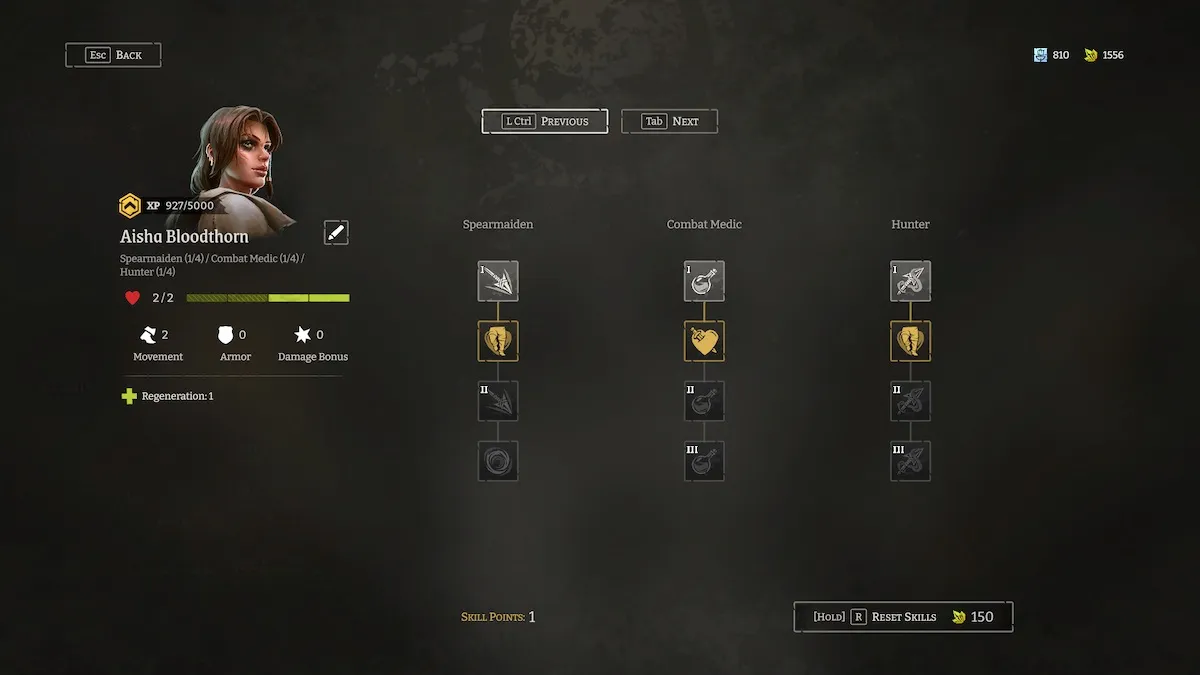
To get the best performance out of Aisha Bloodthorn as a healer in our party, prioritize upgrading her Combat Medic abilities as quickly as you can. These skills (Cure I, Cure II, Cure III) enable her to heal either herself or another ally, while Tough II increases her total Maximum Health. The advanced healing skills also eliminate the effects of Blight and Bleeding, preventing your allies from losing health rapidly.
If you’re not leveraging Aisha for healing purposes, it would be advisable to choose a different Spearmaiden. Aisha excels as a Combat Medic, particularly when combined with her Spearmaiden abilities. The Hunter aspect of her character can be developed later, once you’ve completed unlocking her Combat Medic and Spearmaiden skills first.
One advantage of specialists is their abundance, ensuring you’ll often find one offering the courses you need. Aisha excels as both a Spearmaiden and Combat Medic due to her impressive healing abilities – Cure I alone can mitigate three points of damage! Moreover, she effectively targets adversaries that are within two squares of her position.
After mastering all of Aisha’s Combat Medic and Spearmaiden abilities, you can proceed to unlock her Hunter skills further down the line. With the Blighted Javelin skillset, Aisha can hurl a javelin at an opponent during her turn, causing Blight damage. Remarkably, she can simultaneously throw a Blighted Javelin and employ a Spearmaiden ability in the same turn, making this setup particularly effective when she isn’t healing. I refer to these skills as later ones because I construct Aisha’s character development with that sequence in mind.
- Spearmaiden – Thrust I (skill unlocked at purchase).
- Combat Medic – Cure I.
- Combat Medic – Tough II.
- Hunter – Blighted Javelin I.
- Combat Medic – Cure II.
- Combat Medic – Cute III.
- Spearmaiden – Quick and Sturdy.
- Spearmaiden – Thrust II.
- Spearmaiden – Focus.
- Hunter – Quick and Sturdy.
- Hunter – Blighted Javelin II.
- Hunter – Blighted Javelin III.
Constructing Aisha’s role in this manner allows for her to function as an offensive Combat Medic, capable not only of healing but also defending herself and attacking her adversaries.
Pete the Plank character build (Grappler/Strongman/Sturdy)
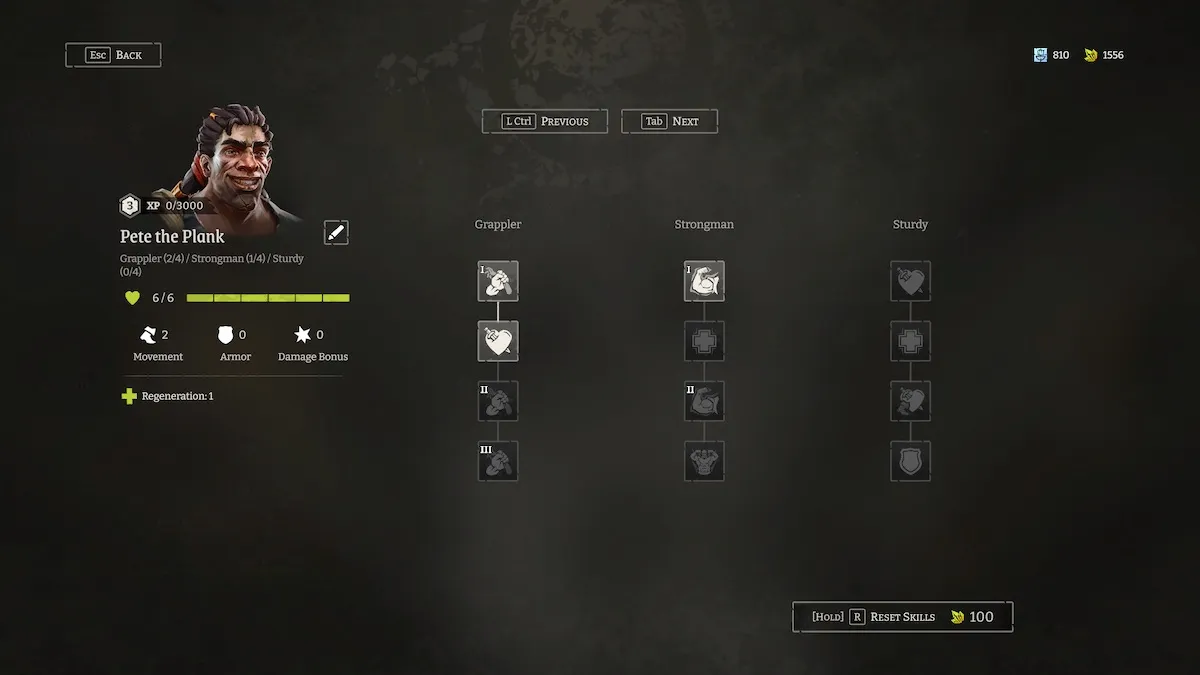
I prefer using Pete the Plank as my Grappler since it’s possible to customize him for dealing more damage than simply hurling opponents around the ship, a limitation that arises when only Wrestle I (the initial Grappler ability) has been unlocked.
Unlocking the Grappler and Strongman skills should be your priority with Pete, though it wouldn’t hurt to unlock the first Sturdy skill for an extra two Max HP.
Pete can use Grappler abilities to shove opponents onto a ship’s deck and potentially inflict up to two points of damage from later skills. On top of that, Strongman enhances the amount of damage he deals. However, the ultimate Strongman skill counteracts one such enhancement – Sturdy and Weak provides a +4 boost to maximum health, but reduces the damage bonus by 1.
Instead of learning that last Strongman skill, consider shifting to the Toughness class skills to boost Pete’s health points. Of course, you might want to evaluate the trade-off between the additional HP and losing a single damage bonus point, but it appears unnecessary to me to acquire a skill that cancels out the effect of the previous one (Flex II – adds a +1 damage bonus).
As such, I recommend building Pete the Plank like this:
- Grappler – Wrestle I (skill unlocked at purchase).
- Grappler – Tough II.
- Strongman – Flex I.
- Grappler – Wrestle II.
- Grappler – Wrestle III.
- Strongman – Resilient I.
- Strongman – Flex II.
- Sturdy – Tough II.
- Sturdy – Resilient II.
- Sturdy – Bulky and Slow.
- Sturdy – Reinforced I.
- Strongman – Bulky and Weak.
If you aim to avoid upgrading Pete with skills that have unfavorable impacts, such as being bulky and slow or bulky and weak, you might consider skipping the last three abilities on the list instead.
Sally Brisk character build (Backstabber/Noble/Assassin)
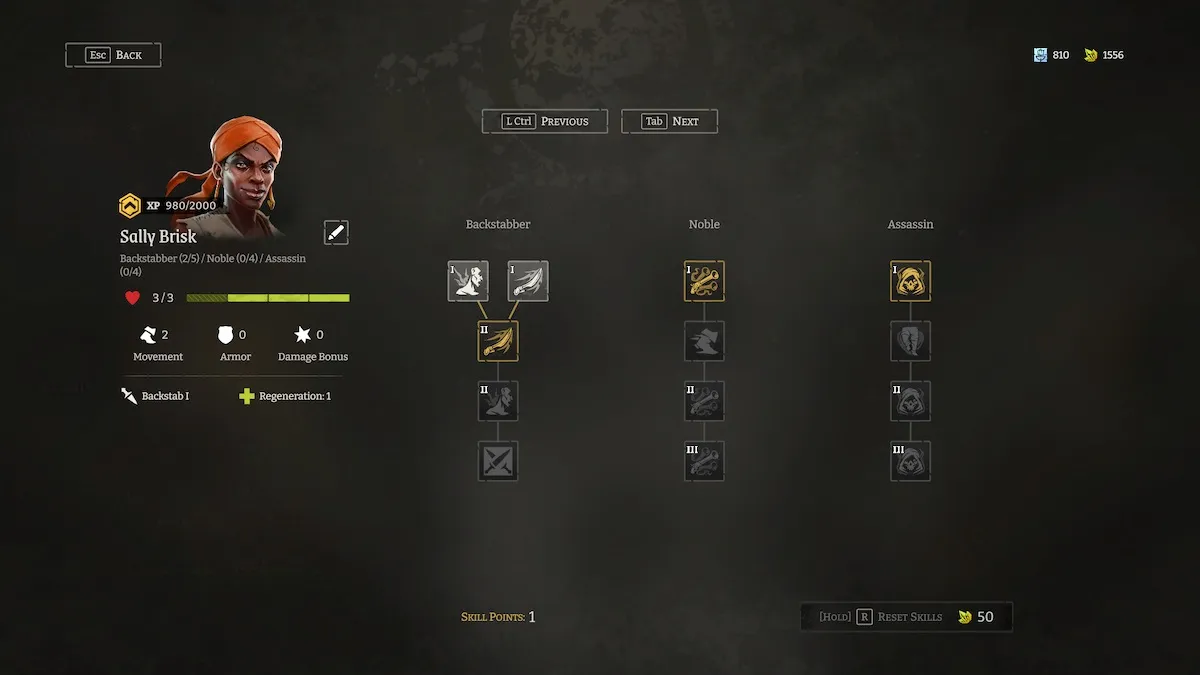
Sally Brisk boasts an array of entertaining abilities that you can select from. She’s a cunning force and is among my preferred experts in Rogue Waters. Upon acquisition, she already has two skills activated – Backstab Level 1 and Weakening Strike Level 1.
Other individuals may specialize in backstabbing, but Sally stands out as both a Noble and an Assassin. The Noble equips her with a firearm, while the Assassin provides her with close-combat skills that allow her to swiftly eliminate an adversary who is on the verge of defeat, provided their health is minimal (the effectiveness depending on her level of Assassin abilities).
In sea battles, I usually focus on eliminating opponents who carry guns since they can be problematic during boarding operations. After all, encountering heavily armed enemies is something you want to avoid at all costs.
With so many great skills, building Sally can be a bit overwhelming. Try this:
- Backstabber – Backstab I and Weakening Strike I (skills unlocked at purchase).
- Noble – Distracting Shot I.
- Assassin – Assassination I.
- Assassin – Quick and Study.
- Assassin – Assassination II.
- Noble – Extra Mobility I.
- Noble – Distracting Shot II.
- Noble – Distracting Shot III.
- Backstabber – Weakening Strike II.
- Backstabber – Backstab II.
- Assassin – Assassination III.
- Backstabber – Disengage.
Two-Barrel Jim character build (Cook/Reaver/Bruiser)
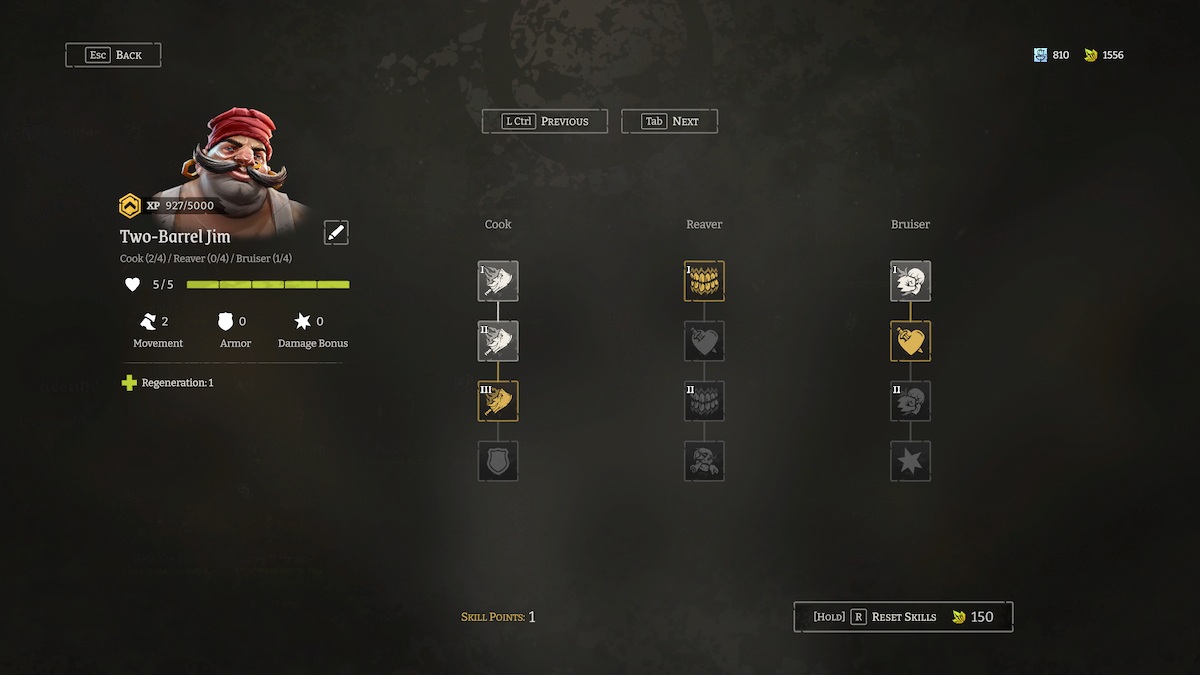
Two-Barrel Jim is quite the valuable addition to any team as a skilled cook. With the introduction of both Reaver and Bruiser classes, he becomes a formidable force, resembling a tank in combat. Notably, the Cook class possesses abilities that enable him to attack enemies without advancing, which is a highly beneficial trait, particularly on a ship with multiple fire zones.
The Bruiser class boasts impressive abilities that can keep opponents engaged. Instead of just letting them linger, you can unleash the powerful moves from Jim’s Cooking techniques on them. It’s strategically beneficial to switch between the three classes while constructing Two-Barrel Jim, instead of solely mastering one set of skills from a single class.
Including the Reaver class in a team alongside a Cook and Bruiser character is an ideal enhancement for a specialist. The unique ability of Reavers is to bite their adversaries, which amazingly restores their own health – a kind of reverse feeding mechanism, if you will. Although it has a touch of vampirism, it’s an incredibly useful skill to possess.
Try unlocking Jim’s skills in this order:
- Cook – Chop I (skill unlocked at purchase).
- Bruiser – Bash I.
- Reaver – Bite I.
- Cook – Chop II.
- Bruiser – Tough II.
- Cook – Chop III.
- Bruiser – Bash II.
- Bruiser – Strong I.
- Reaver – Tough I.
- Reaver – Bite II.
- Cook – Reinforced I.
- Reaver – Flesh Eater.
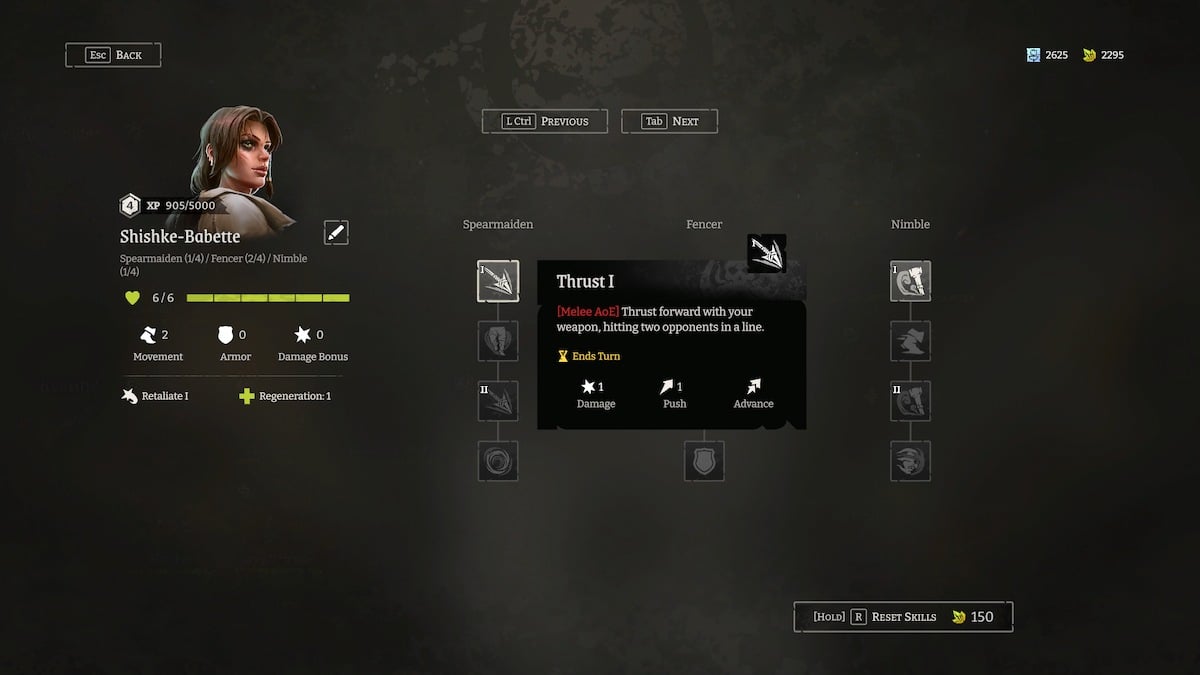
Zola Broadsnatch character build (Spearmaiden/Fencer/Noble)
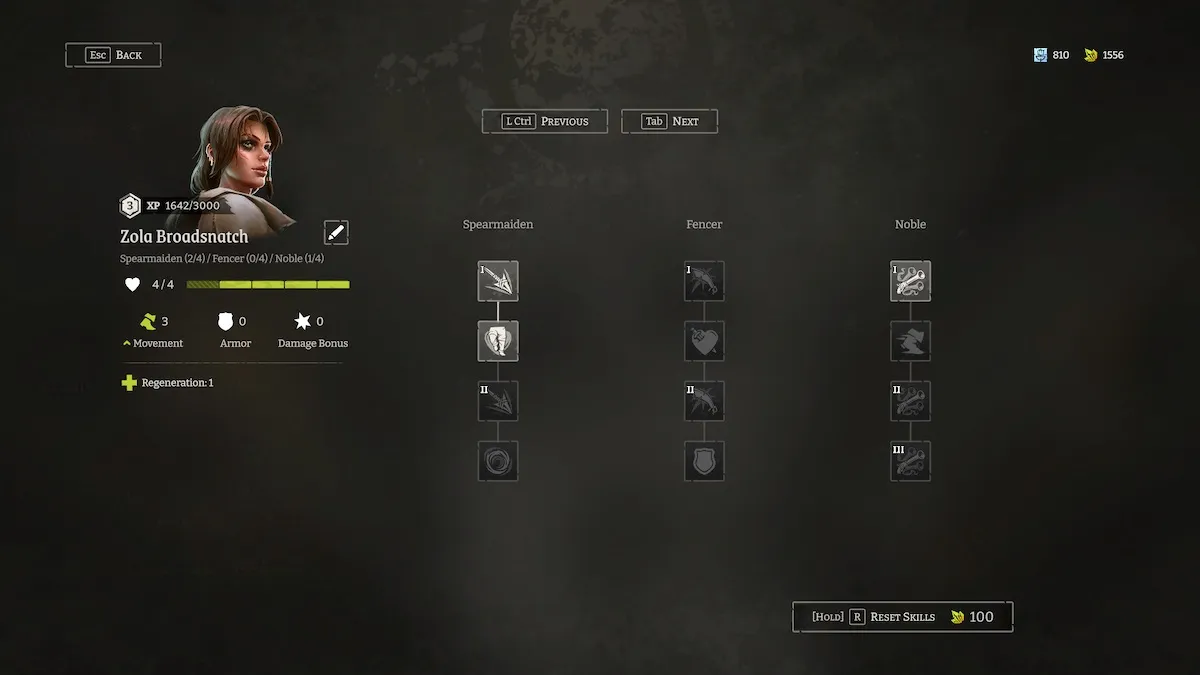
I prefer having two Spearmaidens with distinct skills on my squad, so my ultimate choice is Zola Broadsnatch. She’s equipped with the Noble class, allowing her to fire at enemies within her range with a gun. With three unique weapons distributed among her classes, Zola makes an excellent DPS-style character for your team.
As Aisha, your healing-centric Spearmaiden, takes care of recovery during attacks, assign Zola exclusively to offensive roles. Now, let’s delve into the Fencer class next. The Spearmaiden and Noble classes have been previously explained in this segment.
Skilled fencers possess the ability to counterattack when struck by their opponents, making this talent particularly impressive since it operates automatically without any conscious effort. In a combat scenario, Zola will instinctively respond by attacking whoever hits her, as long as they are in close proximity on the ship’s deck.
With that in mind, here is my skill unlock sequence for Zola:
- Spearmaiden – Thrust I (skill unlocked at purchase).
- Spearmaiden – Quick and Sturdy.
- Noble – Distracting Shot I.
- Fencer – Retaliate I.
- Fencer – Tough II.
- Fencer – Retaliate II.
- Spearmaiden – Thrust II.
- Noble – Extra Mobility I.
- Noble – Distracting Shot II.
- Noble – Distracting Shot III.
- Fencer – Reinforced I.
- Spearmaiden – Focus.
We have upgraded our commenting platform! Existing comments will be imported over the next few weeks.
Read More
- SUI PREDICTION. SUI cryptocurrency
- COW PREDICTION. COW cryptocurrency
- WLD PREDICTION. WLD cryptocurrency
- KSM PREDICTION. KSM cryptocurrency
- W PREDICTION. W cryptocurrency
- Clash Royale: Is It Really ‘Literally Unplayable’?
- EUR IDR PREDICTION
- Clash Royale Deck Help: Users Seek Tips To Level Up
- Exploring the Humor and Community Spirit in Deep Rock Galactic: A Reddit Analysis
- Best Strinova Sensitivity Settings
2024-09-30 16:22