
As a seasoned explorer who’s seen my fair share of winters that never seemed to end, I can empathize with your current predicament. The city’s chill is as relentless as an Arctic gale, and it’s high time we got that Generator humming again!
In simple terms, Frostpunk 2 is a tough city-building game where you must develop and control New London, one of the last remaining human settlements. If you’re curious about how to begin your role as the Steward, here’s our helpful guide to assist you on your journey.
Frostpunk 2 Guide – 10 Tips and Tricks
As Frostpunk 2 doesn’t come with an instruction manual, we’ve compiled essential strategies to guide your initial steps. With these tips, you can revitalize New London and thrive in your role as the city’s Steward.
Obtaining and using Prefabs
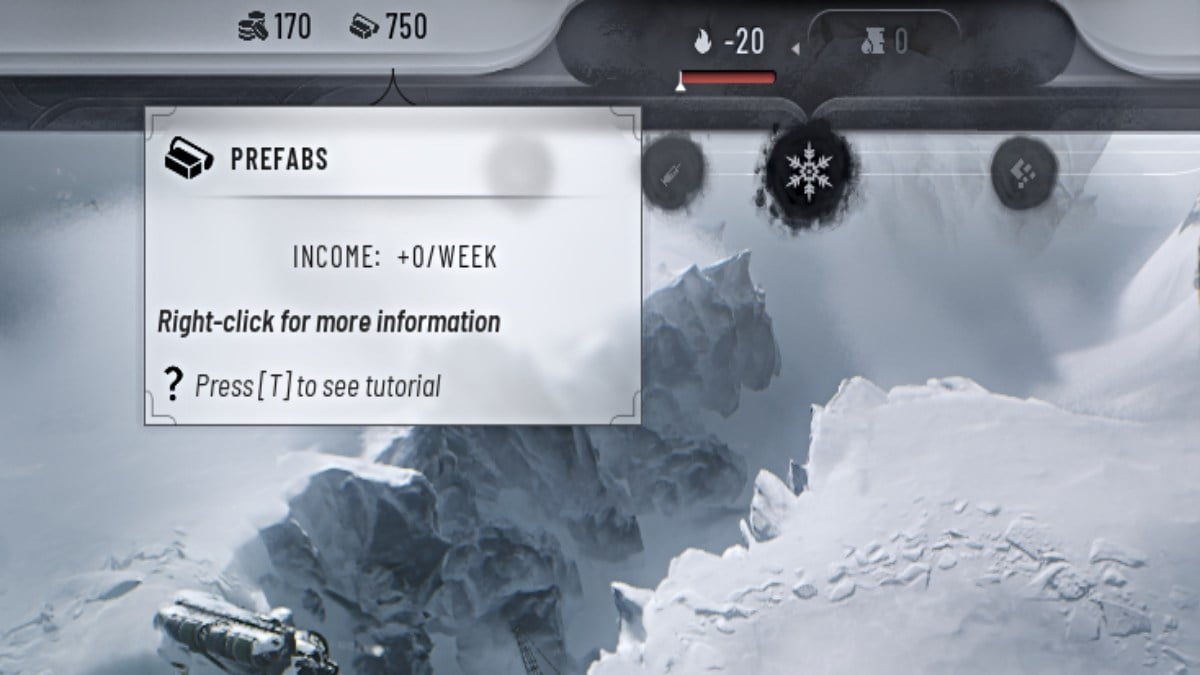
In Frostpunk 2, one of the initial assets at your disposal is a collection of blueprints, or Prefabs as they’re called. These blueprints serve as the foundation for the growth of New London, enabling you to construct different areas, or Districts, within which you can erect specialized Buildings. The maintenance of these districts, including repairs when necessary, is managed through these blueprints as well.
Pre-constructed buildings (Prefabs) serve multiple purposes, including aiding in exploration expeditions over the Frostlands, constructing paths and airborne networks (Trails and Skyways), and setting up outposts, additional communities, as well as collecting recently found resources.
Maintaining a steady supply of Prefabs is essential for preserving the structural soundness of New London and similar settlements. You can produce more Prefabs by establishing Industrial Districts and utilizing their resources to manufacture Prefabs rather than goods as an alternative. Alternatively, you could explore regions in the Frostlands that suggest Prefab availability. Be aware that some of these sources may come with conditions, so exercise caution in your decisions.
Obtaining and using Heatstamps
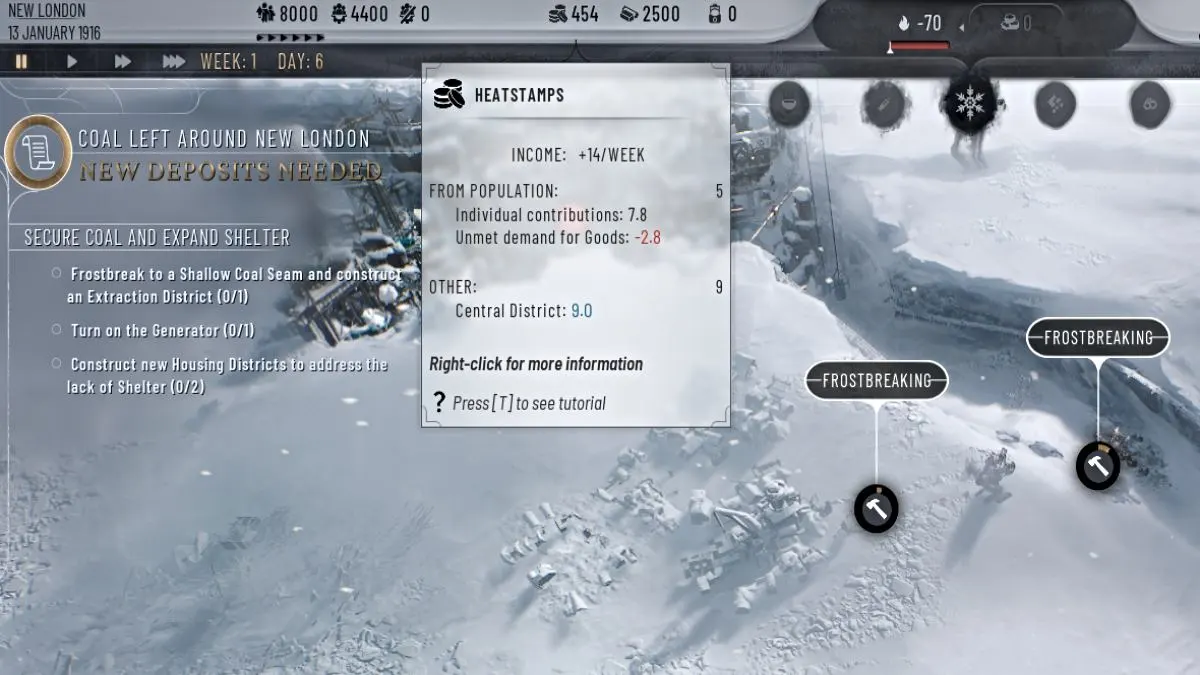
As an enthusiast, I can’t stress enough the importance of Heatstamps, or “Scraps” as they were initially introduced in the prologue, in my journey to develop and sustain New London. These versatile resources function as a form of universal income, essential for all construction activities, Frostbreaking, exploration of Frostland territories, research initiatives, and even financial support for various factions.
So long as New London remains active, your stockpile of Heatstamps will continuously refill weekly, with more Heatstamps being added as the city gathers them from each community. As your population increases, you’ll receive a larger amount of Heatstamps every week. The amount you earn can also be affected by meeting the current Goods Demand of your city, building specific Buildings, and enacting certain Laws.
Additionally, consider asking for additional Heatstamps from specific factions that seem to support you more. However, be cautious as this action could unwittingly stir up unnecessary conflict.
Unlocking the Idea Tree
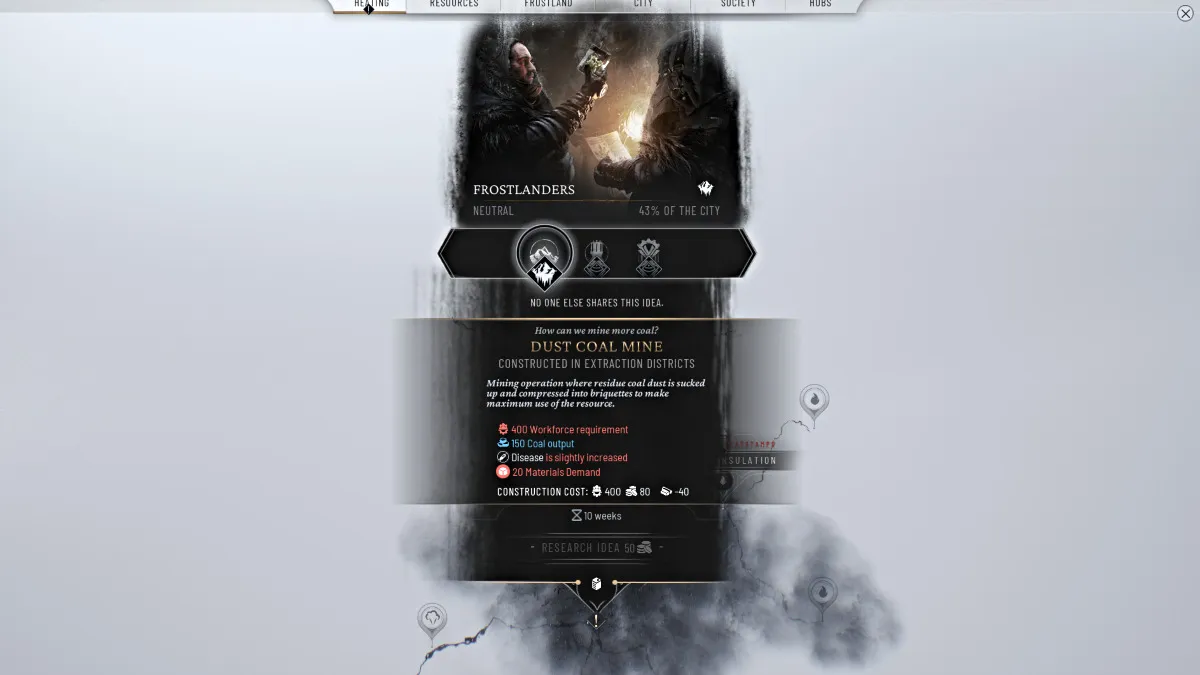
The method for significantly enhancing New London’s technological capabilities lies in cultivating the Idea Tree. This can be achieved by constructing at least one Research Institute within an existing residential area, or housing district. Once this is accomplished, you’ll gain access to the Idea Tree and its various branches, prompting you to start exploring research ideas immediately.
Remember that investigating each concept will require at least 50 Heatstamps or more. You can monitor the progress of an investigated concept using the ticker located on the bottom right corner of your HUD. Once it reaches 100%, you’ll get a notification that a fresh idea is prepared for implementation.
In the city’s Council Chamber, certain groups may propose ideas that align with their beliefs during law negotiations. Should you accept one or more of these proposals, prompt research into them becomes necessary since there is a deadline attached. Failing to meet this deadline could damage your rapport with that group due to an unfulfilled promise.
To expedite your research process, you could consider establishing additional Research Centers in other residential areas (recommended), or explore the uncharted territories within the Frostlands. Establishing teams in the Frostlands will markedly enhance your research speed, yet it may come at the cost of fewer available teams for other tasks.
Unlocking the Council Hall
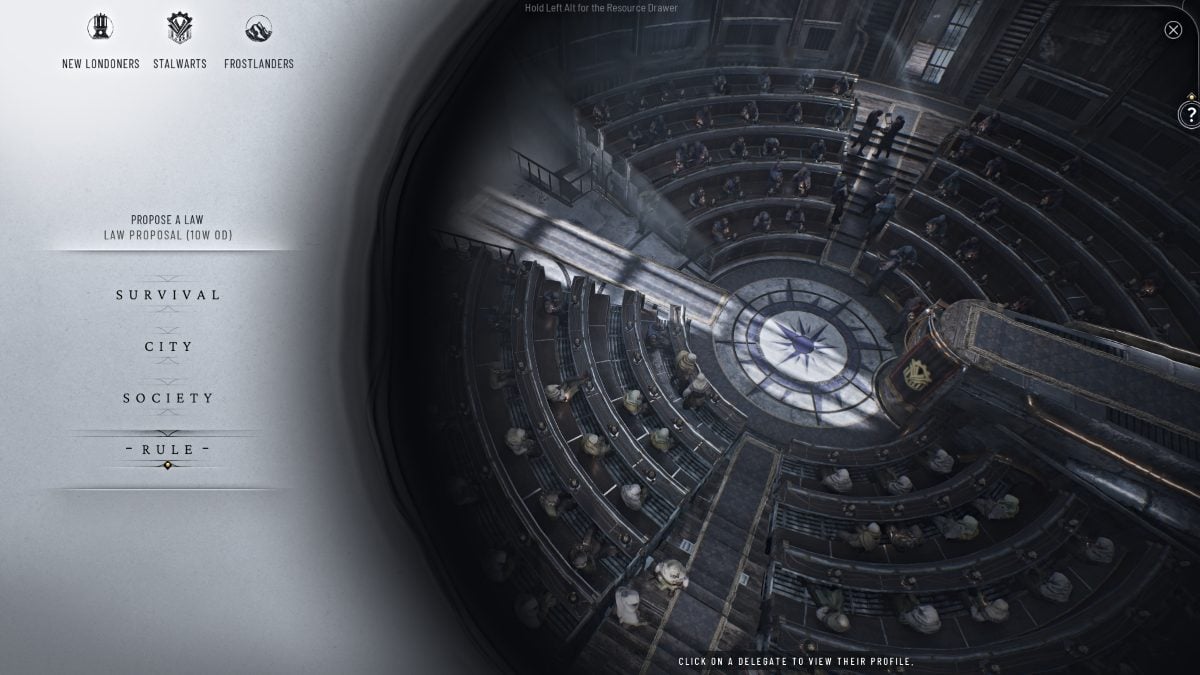
In New London’s Central district, you can access an early-unlock building known as the Town Hall. This structure enables you to arrange meetings with the city’s various communities and cast votes on proposed laws that will influence the course New London will take in the future.
During Council meetings, you can find the appropriate button for your current choices on the bottom-left corner of your Heads-Up Display (HUD). These options are divided into four categories and will appear once the delegates call for a vote regarding them.
When you decide on a law to approve or reject, consider using the word ‘Propose’ to present it for a vote in the council. This action will also influence your Trust level, so make your decision wisely. Prior to this, there is an option called ‘Negotiate’, which allows you to persuade a specific group to either vote for or against the law by agreeing to one of three possible conditions. These conditions vary from researching their preferred ideas, letting them choose the next law up for voting, to offering them Heatstamp funds (in essence, bribing them).
Managing politics in Frostpunk 2 is a tough and intricate part of the game, since maintaining harmony among the city’s factions can be quite difficult. Frequently, you’ll encounter disagreements with one or more groups, as it’s rare for everyone to agree on an issue.
Choose your conflicts wisely, and strive to prevent any groups from turning against you. Once they do, they may coordinate demonstrations capable of disrupting areas within your city, and if they gain enough backing from the people, they can, indeed, orchestrate your downfall.
Scouting the Frostlands

When venturing into the tundra surrounding New London, it’s crucial to prioritize creating a frost-free path to one of the three Old Waystations situated around the city outskirts at the earliest opportunity. One is positioned south of New London, another lies on its western side, and the third can be found in the northeastern region, close to the Shallow Iron Vein deposit.
After finishing up, I’ll rebuild a Logistics District atop the old Waystation to get it back online. This action will grant me the ability to explore the areas surrounding New London with my Frostlander teams. It’s crucial for getting ready for various objectives in each chapter, like locating Oil, prepping for the Whiteout, unearthing the ruins of Winterhome, and so on.
As a passionate explorer, I can’t help but share the excitement that awaits you! There’s a world of possibilities out there, brimming with new resource deposits – Prefabs, Materials, Coal, Food, and even Workers! But remember, my friend, your Frostlander teams are limited in number. Some expeditions might require a greater investment of these valuable resources.
Enhancing your connections particularly with the Frostlanders and Pilgrims could yield a beneficial outcome for you, as they might offer additional Frostlander workforces. Establishing Logistics Districts in every one of the three Old Waystations near New London would achieve the same result.
Expanding New London (frostbreaking, districts, buildings)
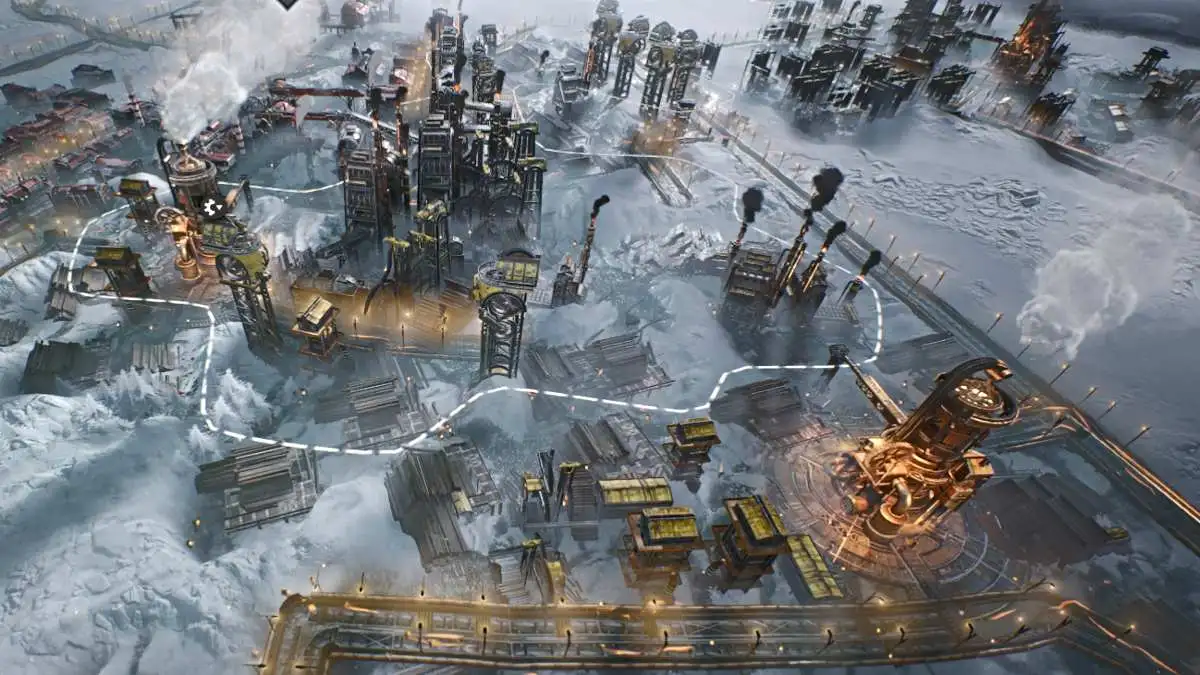
In the opening phase of Frostpunk 2, the focus lies on strengthening and fortifying New London, ensuring it can endure extreme weather conditions such as Whiteout storms, and meeting the escalating requirements of your continually expanding community, providing them with essential resources.
Once you begin Chapter 1, you’ll find yourself eager to promptly explore the essential regions around the city through frostbreaking. These significant spots encompass the Shallow Coal Seams situated southeast of the urban core for energy, the Frozen Forests in the southern central region for resources, and the Fertile Soil deposits on either the southwestern or northwestern outskirts. Remember to exercise caution while frostbreaking; overdoing it may quickly deplete your Heatstamp supplies.
It’s wise to establish your primary Resource Extraction districts for Coal, Materials, and Food first. These foundational areas will facilitate the construction of Industrial Districts that manufacture Goods and Prefabs later on. Don’t forget to include at least one or two Residential Districts as well, to reduce the number of inhabitants exposed to the cold.
Eagerly, let’s construct my initial Logistics District at one of the ancient Rest Stops without delay, to swiftly dispatch exploration teams along the roads.
Repairing and upgrading the Generator
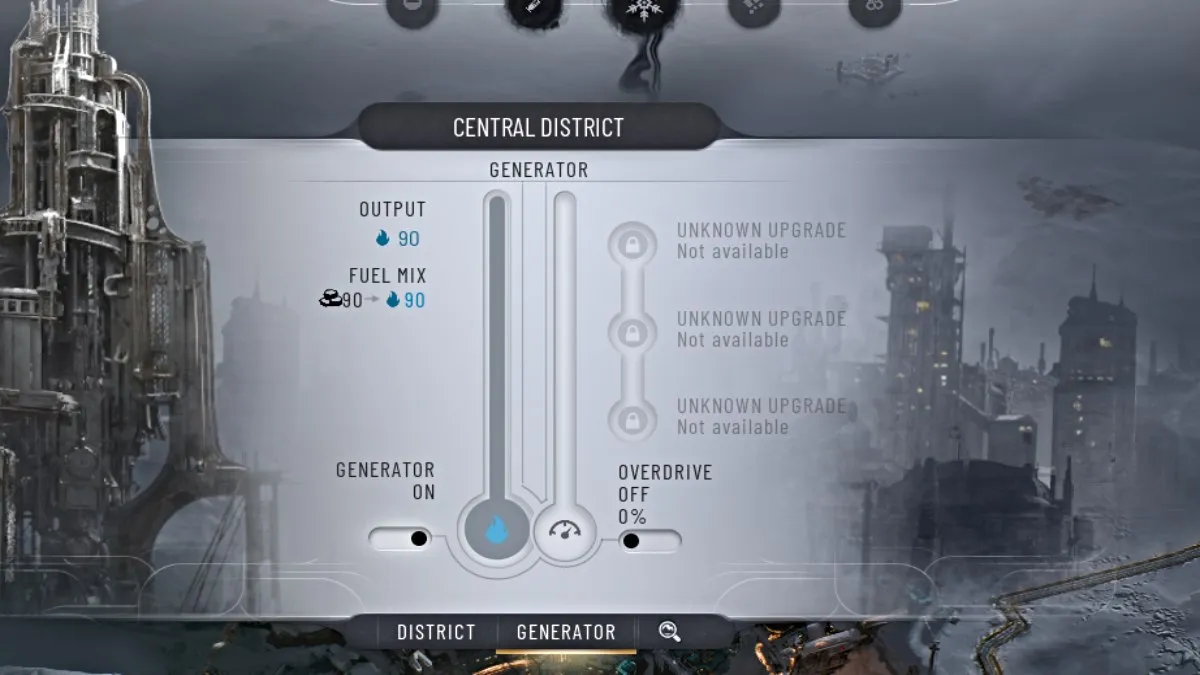
The primary goal in modernizing New London urgently requires fixing its malfunctioning power source, the Generator, that acts as the city’s main heating center. Given how vital heating is during our prolonged winters, it’s crucial to tackle this matter promptly, ensuring warmth for the entire city.
At first, the Generator is depicted by a vibrant red symbol, signifying it’s not functioning. To initiate the initial repair on the Generator, navigate through the frozen terrain towards the close-by Shallow Coal Seams and construct an Extraction Zone over them. This will begin generating enough fuel. Then, click on the Generator located in the city center to open its menu.
Currently, you can activate the Generator by pressing the switch located on the bottom left. This action initiates heat production for the city and reduces overall energy requirements. In due time, though, it’s essential to enhance the capabilities of the Generator, allowing it to manage increased demand, utilize various fuel sources, and so forth.
As a gamer, I found out that enhancing my generator requires me to unveil the ‘Idea Tree’ first and then delve into every tier of concepts related to ‘Generator Upgrade’ within the ‘Heat’ category. Concepts like ‘Surplus Injectors’ are part of this process. The more I fortify my generator, providing it with ample fuel, the more capable it becomes to endure harsh temperatures and ensure my citizens stay cozy and healthy during extreme weather conditions.
Finding and securing a source of Oil
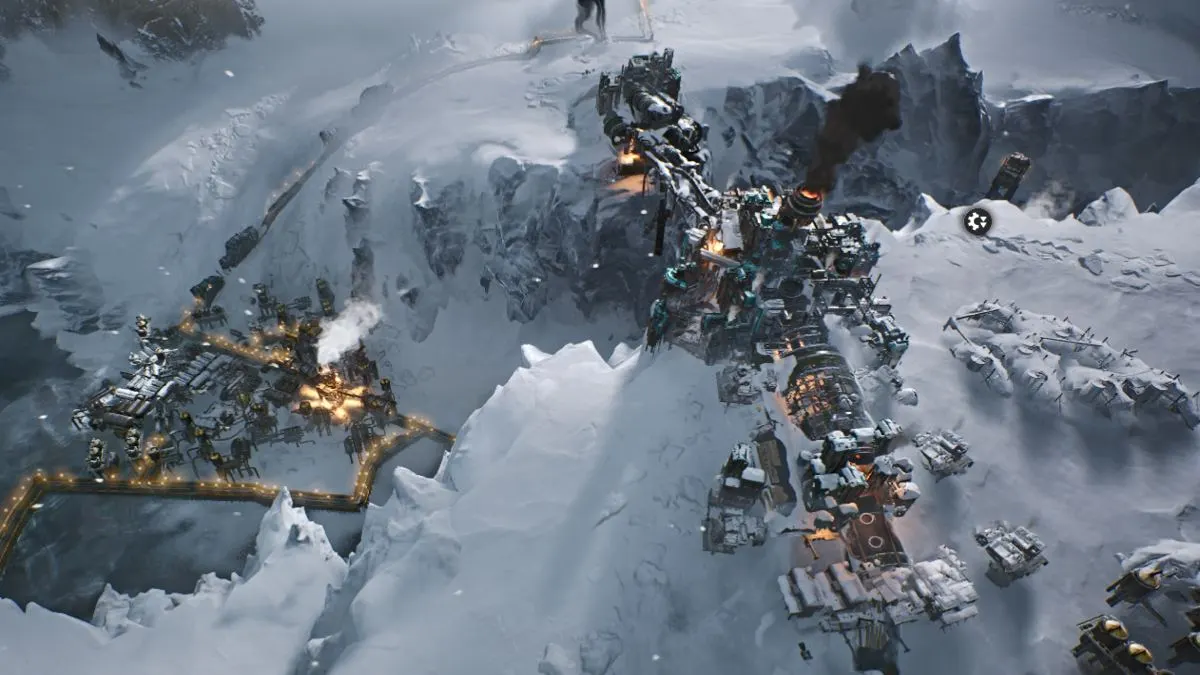
Once you’ve effectively fixed the Generator, it won’t be long before the city realizes their nearby Coal reserves are dwindling. At that point, you might be asked to locate a dependable, permanent fuel source in the Frostlands. This new supply could potentially replace Coal, or if necessary, you could consider making Charcoal as an alternative solution.
You should deploy your available Frostland teams towards the Desolate Coast, which is where you’ll initially find Oil and set up a settlement known as Old Dreadnought. Once we have enough Extraction zones in place, we can start transporting oil back to New London for use as its latest dependable fuel source.
Making difficult choices and sacrifices
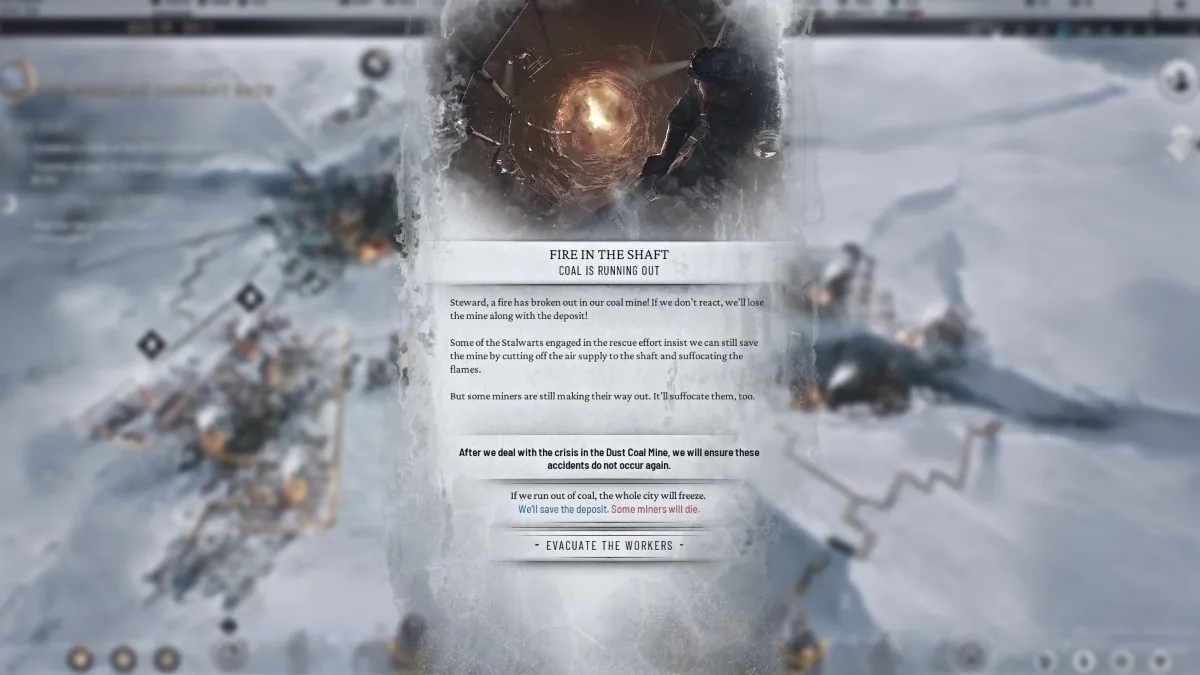
One of the toughest elements in Frostpunk 2 is constantly facing a series of tough decisions that pop up on your screen. These decisions are affected by multiple variables, including how you develop New London, ensuring essentials like food and warmth, the technology you focus on, the laws you enact, and the factions you either appease or resist repeatedly.
As a gamer diving into Frostpunk 2, here’s a heads-up: This game is mercilessly tough, both in terms of morals and ethics. The survival of New London is your primary objective, no matter the cost. That could mean pushing adults and children to their limits at work, using dubious farming techniques, deploying law enforcement to quell dissent, and so on. To endure a frozen wasteland, you’ve got to be ready to make tough choices, even if it means the strong survive at the expense of the weak.
Additional Guides for Frostpunk 2
- Best Factions to earn trust with in Frostpunk 2
- How to get more workforce in Frostpunk 2
- All Core Locations in Frostpunk 2
We have upgraded our commenting platform! Existing comments will be imported over the next few weeks.
Read More
- CKB PREDICTION. CKB cryptocurrency
- EUR INR PREDICTION
- PBX PREDICTION. PBX cryptocurrency
- IMX PREDICTION. IMX cryptocurrency
- PENDLE PREDICTION. PENDLE cryptocurrency
- O3 PREDICTION. O3 cryptocurrency
- USD VND PREDICTION
- TANK PREDICTION. TANK cryptocurrency
- USD DKK PREDICTION
- ICP PREDICTION. ICP cryptocurrency
2024-09-19 15:53