As a seasoned gamer with over two decades of gaming under my belt, let me tell you that the achievements in Myst are a true testament to the game’s intricate puzzle design and immersive storytelling. I remember spending countless hours trying to figure out each puzzle, exploring every nook and cranny of these beautifully crafted worlds.
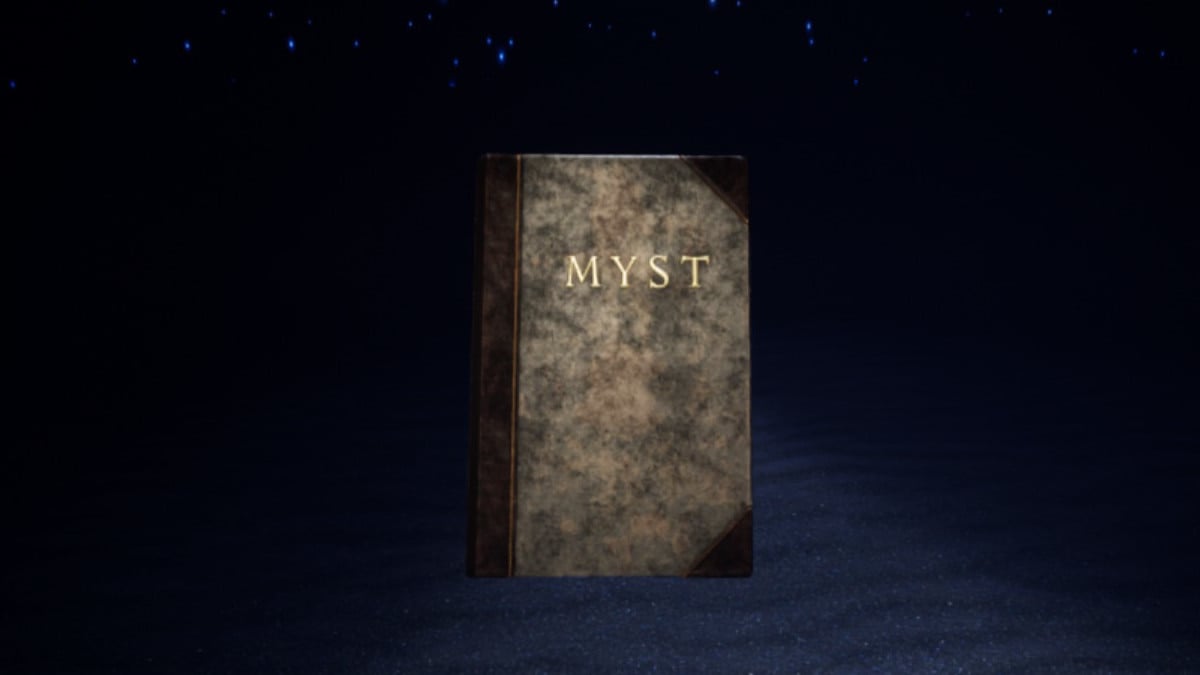
In the ’90s, Myst was a hugely popular video game, so it wasn’t surprising that Cyan would choose to rework this iconic game. Previously remastered and remade, Cyan unveiled yet another updated version in 2021. This comprehensive guide covers the 2021 remake of Myst entirely, including all Steam achievements and endings.
Myst 2021 100% Walkthrough – All Puzzles Solved
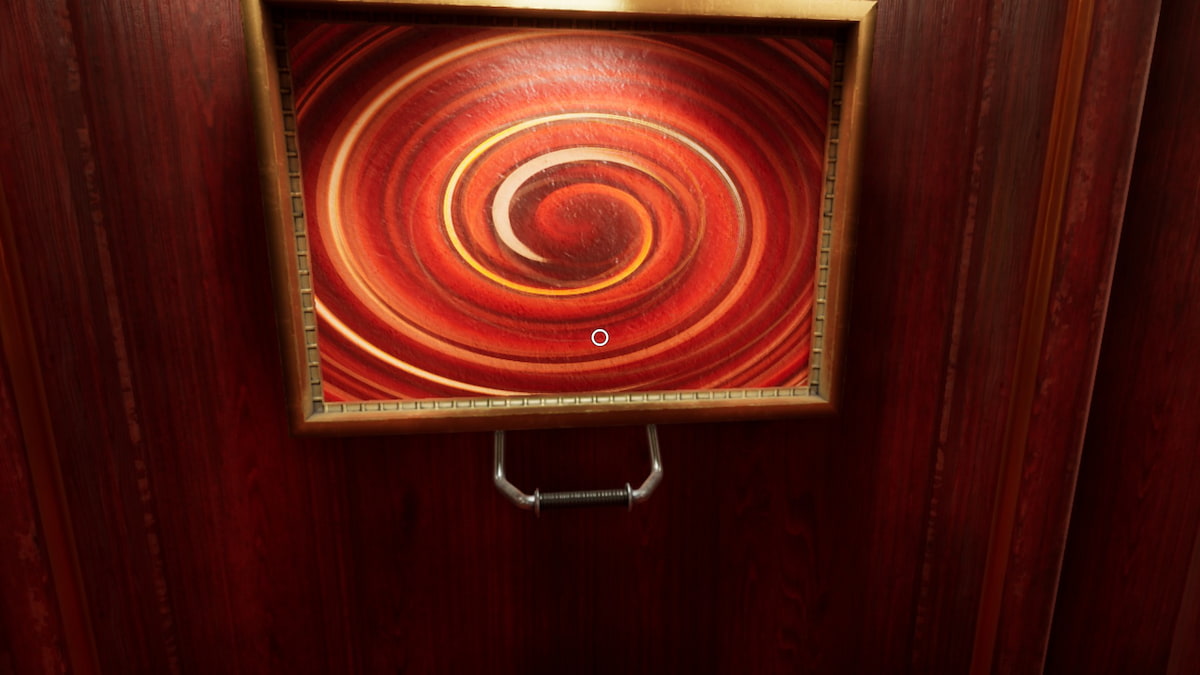
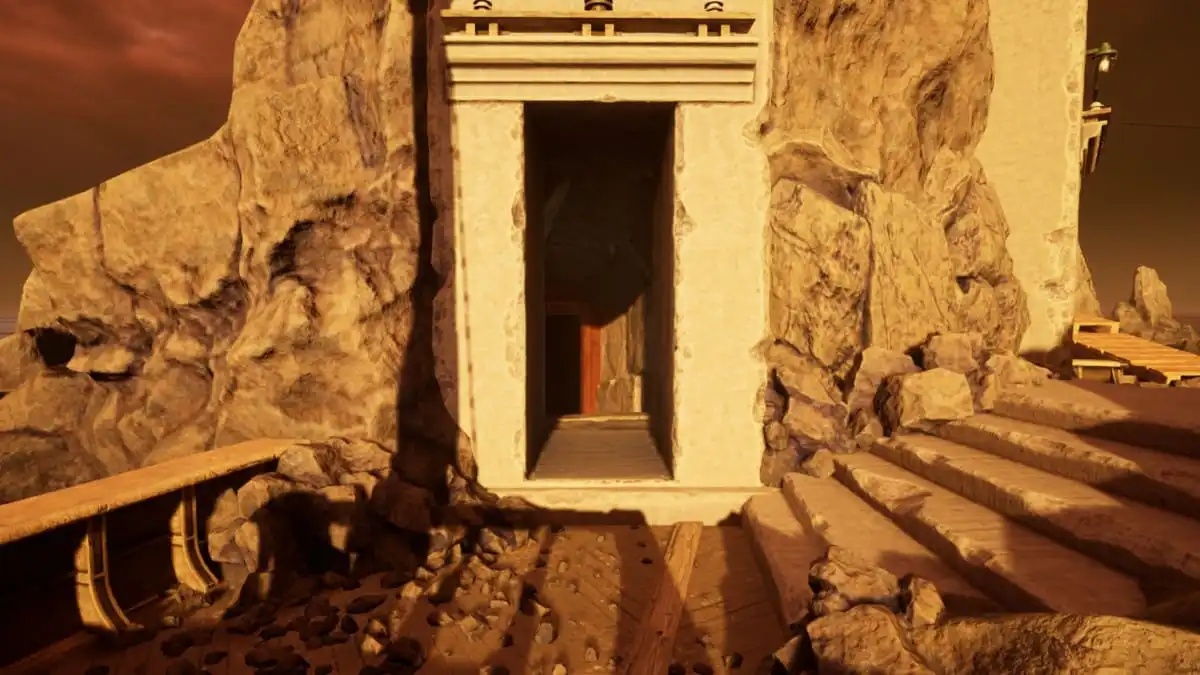
The story of Atrus and the Age of Myst commences as you find yourself in a chasm that cuts through this world. You catch glimpses of another being and listen to a voiceover, but the situation remains unclear. Suddenly, a book materializes on the sand, whisking you away to another realm. This sets the stage for your intriguing journey.
Choosing a game mode

In Myst, the initial action requested is selecting a game style. You’ve got two options: opt for the traditional Myst game or go for a shuffled experience. Feel free to pick the one that suits you best! This tutorial will inform you if a puzzle has been randomized in the unpredictable mode, offering different solutions. However, it will also provide answers for the original choice. If you select the unpredictable option, your responses might vary, but the path to the solution remains consistent. Anything that’s randomized in Myst will be tagged as “Randomized.”
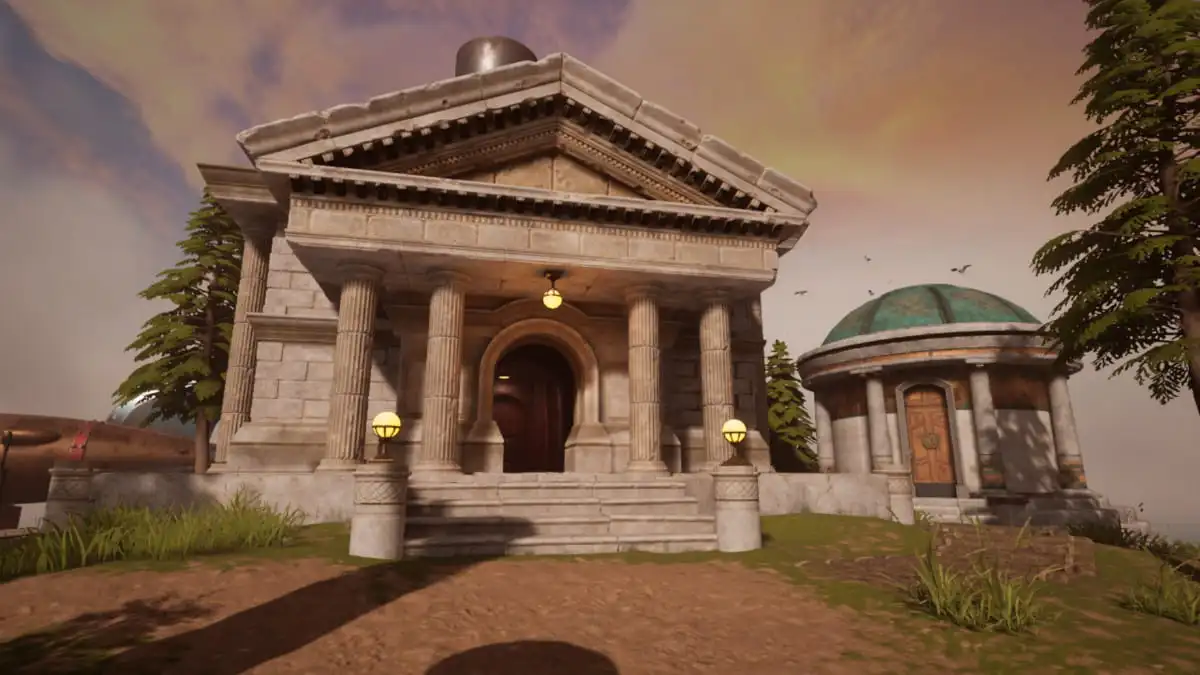
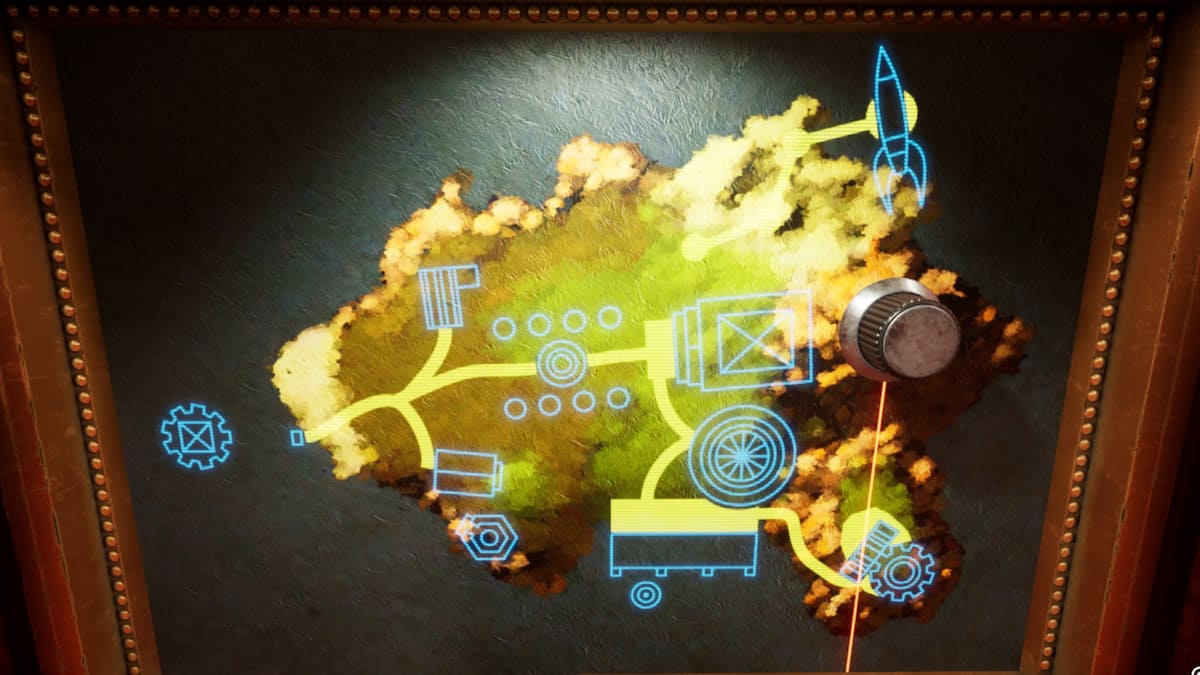
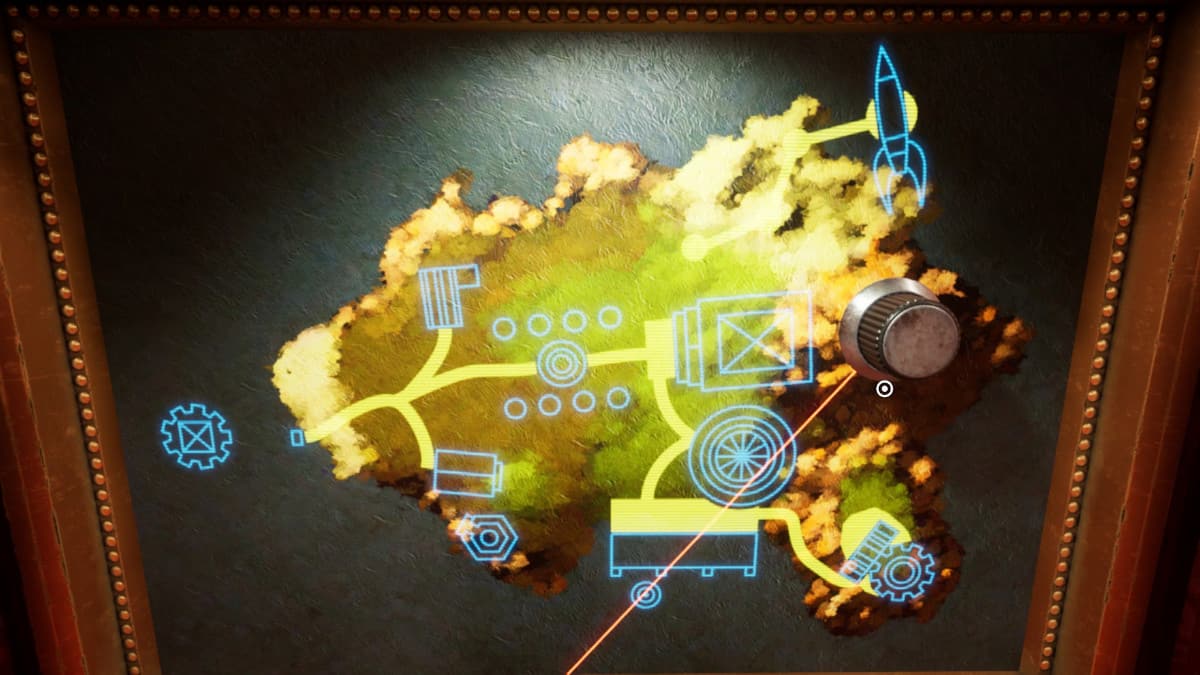
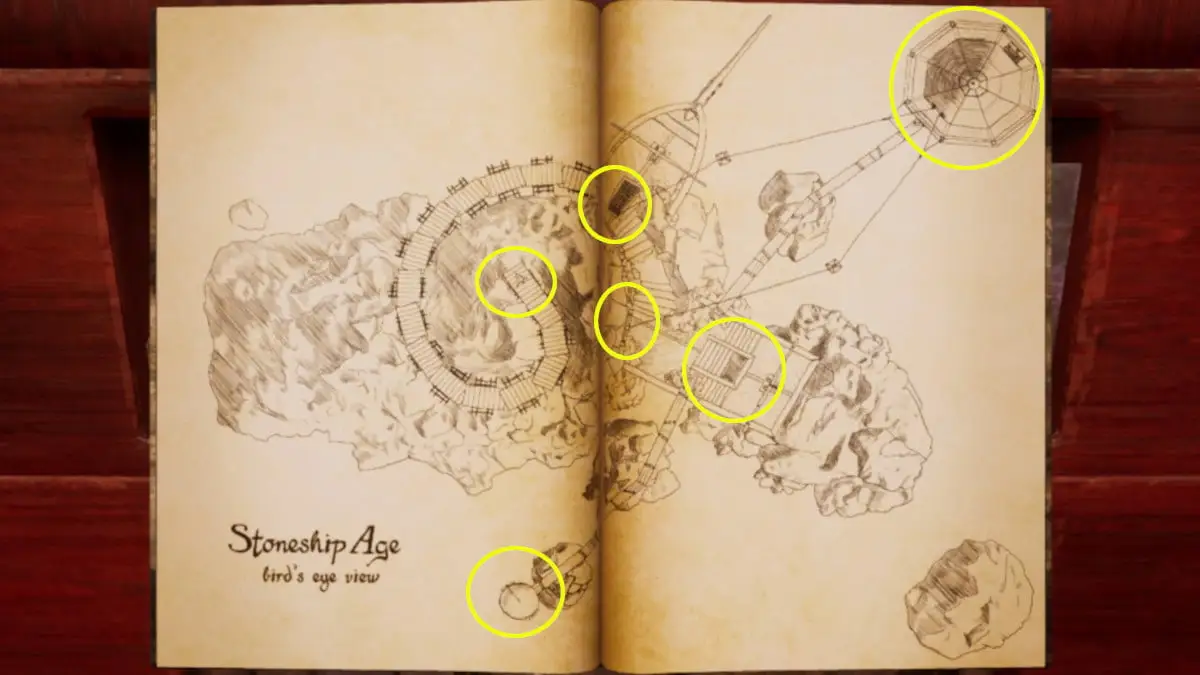
The map and Marker Switches on Myst Island
As a captivated explorer in this radiant world, I find myself starting my journey on a quaint island dock bathed in sunshine. To my left stands an entrance; venturing inside unveils the enigma of a marker switch. Scattered across the island are seven such mysteries; each encounter will prompt me to activate them by lifting them upward into the ‘on’ position. One remains elusive for now, reachable only in future stages of my adventure.
As you activate these Marker Switches, they’ll illuminate corresponding spots on the map located within the library. To locate the map, simply enter the library, then rotate, and it will be situated on the right-hand side of the entrance. After flipping on all accessible Marker Switches, Myst Island’s beautiful structures will materialize. Here’s a snapshot in the gallery below that depicts what the map should resemble.
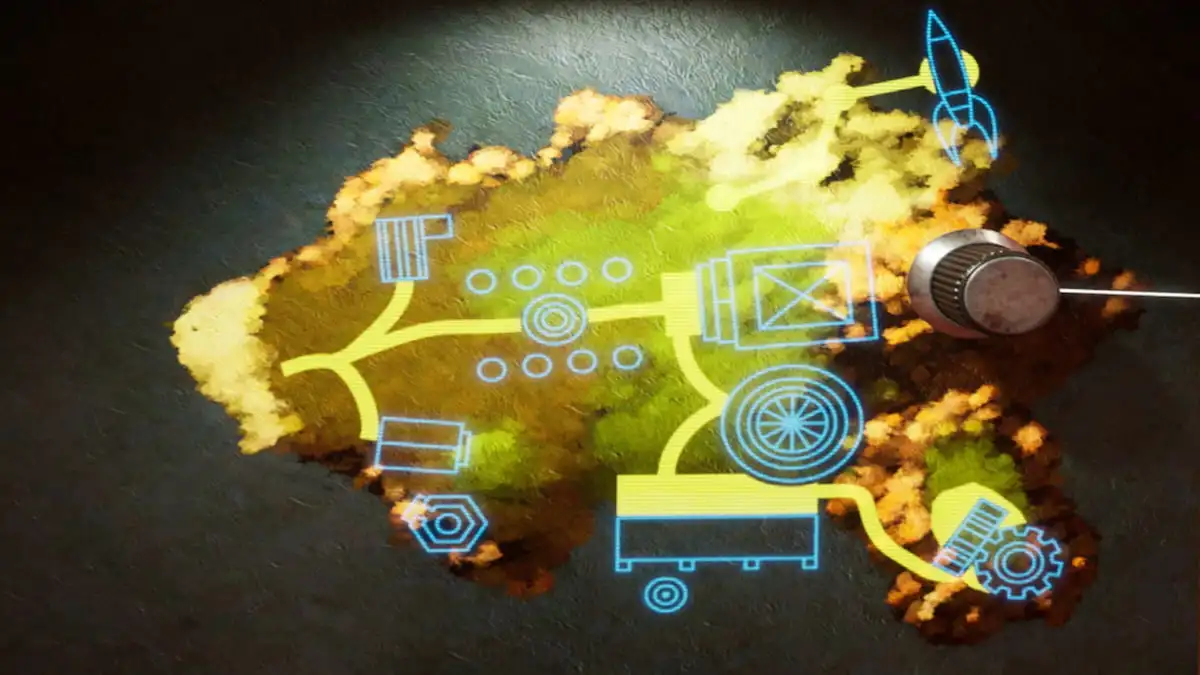
How to get to the four linking books on Myst Island
As a keen gamer exploring this mystical island, I’ve stumbled upon four secretive tomes hidden within its grand library. To uncover them all, I must solve a series of diverse brain-teasers scattered across the island. These elusive books are cleverly concealed where the library map exhibits an orange trail – each location aligning with an enigmatic puzzle that demands a cryptic passcode to unlock its secret.
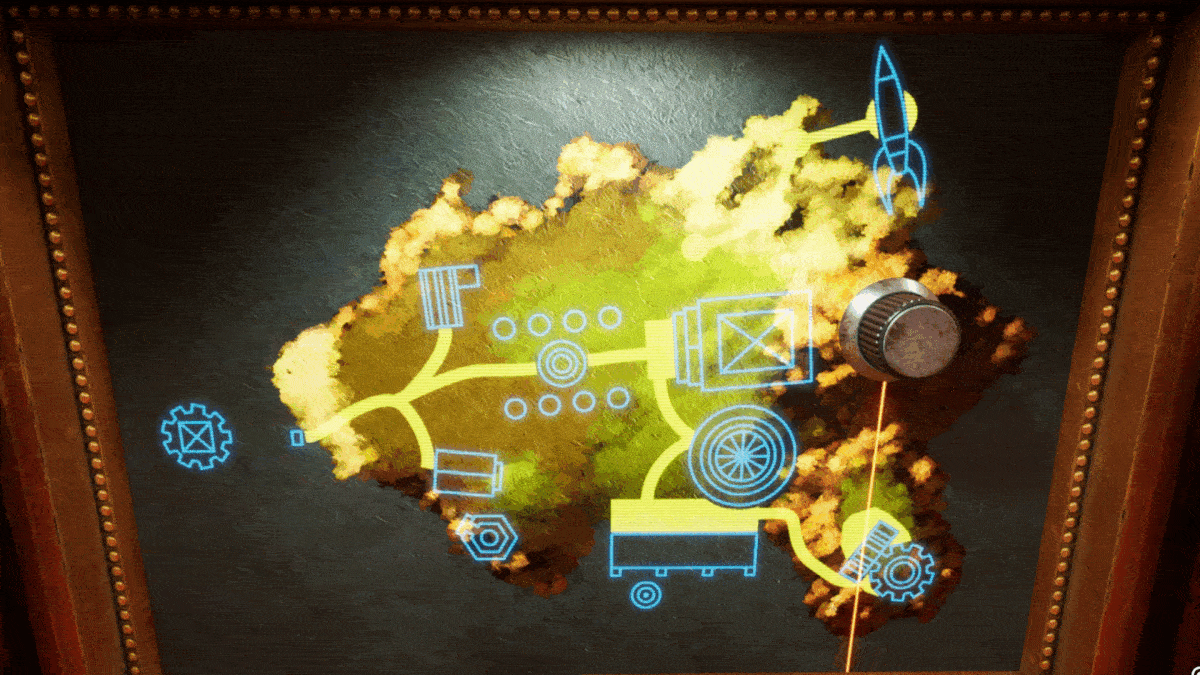
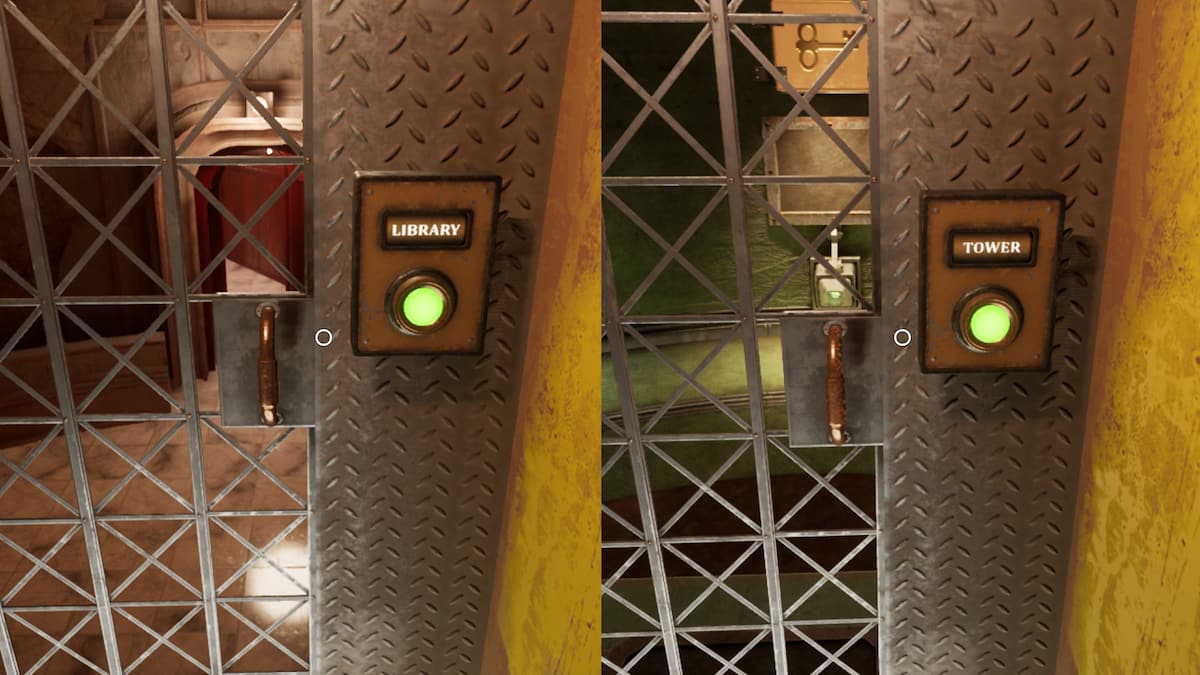
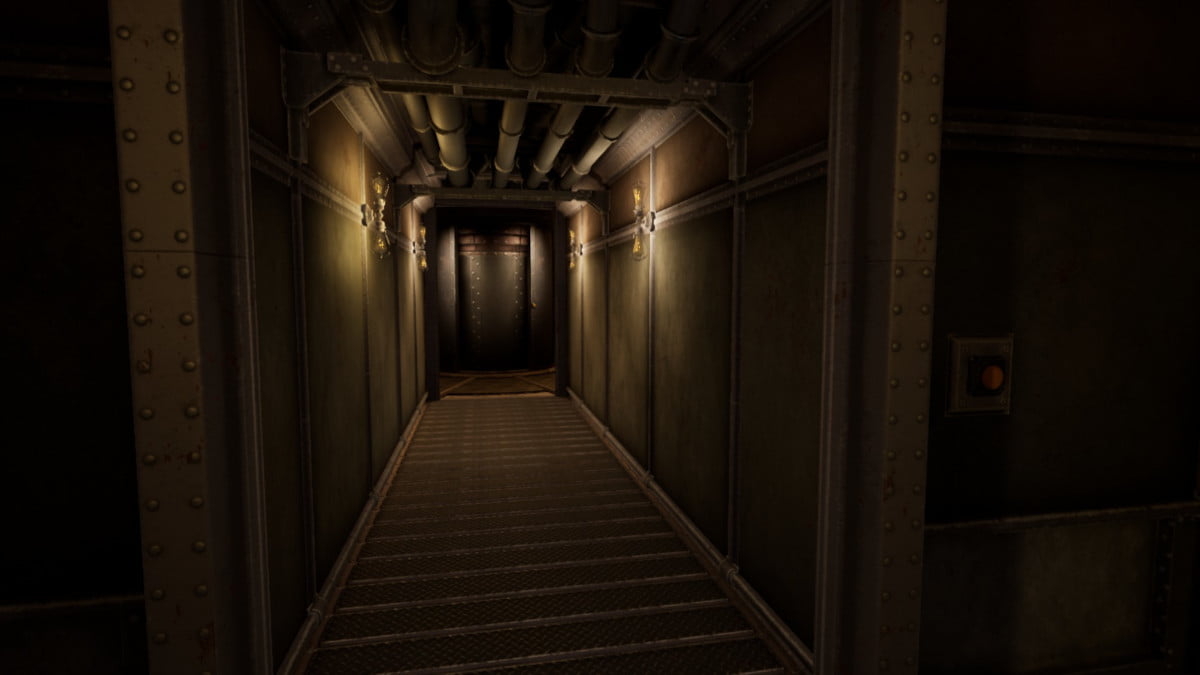
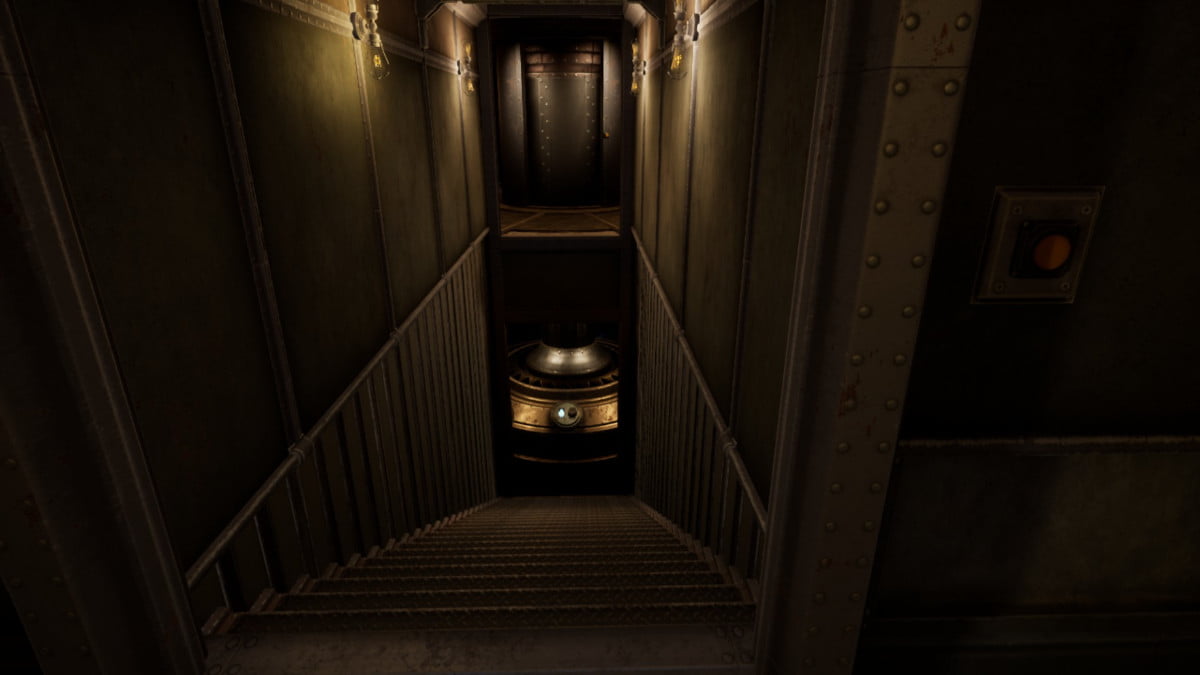
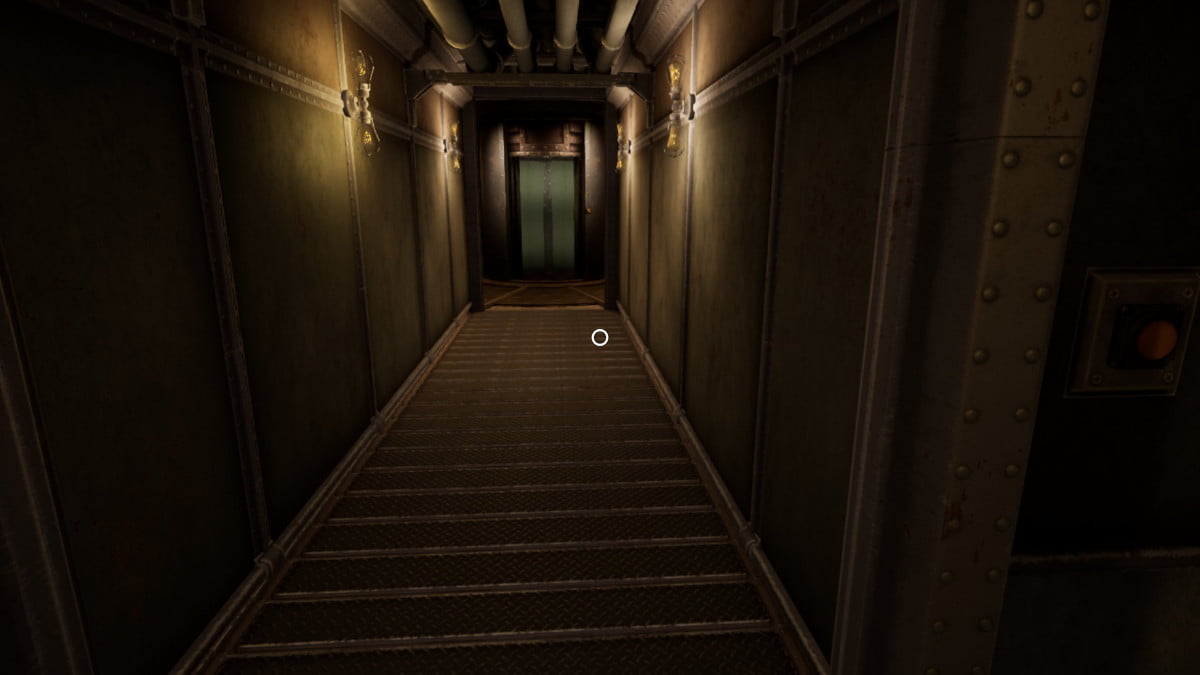
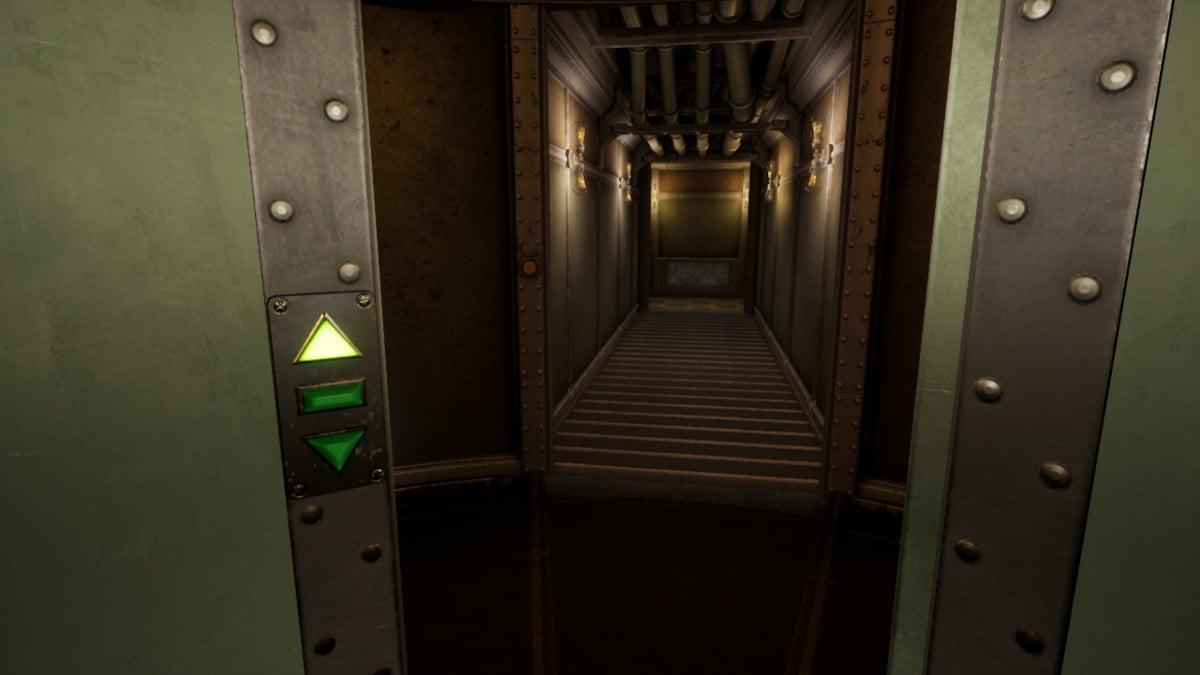
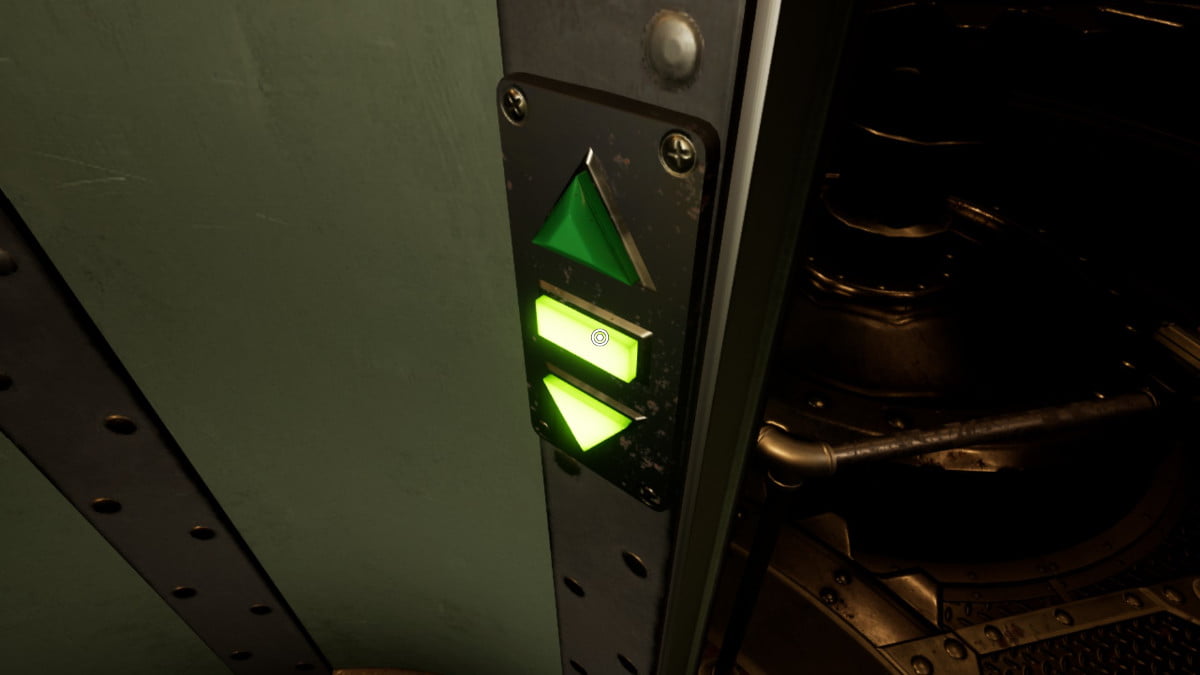
After choosing a puzzle, align the dial so it shows an orange line, and exit the map. Stand facing the bookshelves of library books and find the lever beneath the painting depicting an open door. Pull this lever to shut the outside door and open the tower door. Proceed further into the library where you’ll discover an elevator. Enter the elevator, make sure to close the door after entering, and press the green button to ascend into the tower. If you forget to close the door, the elevator won’t function correctly.
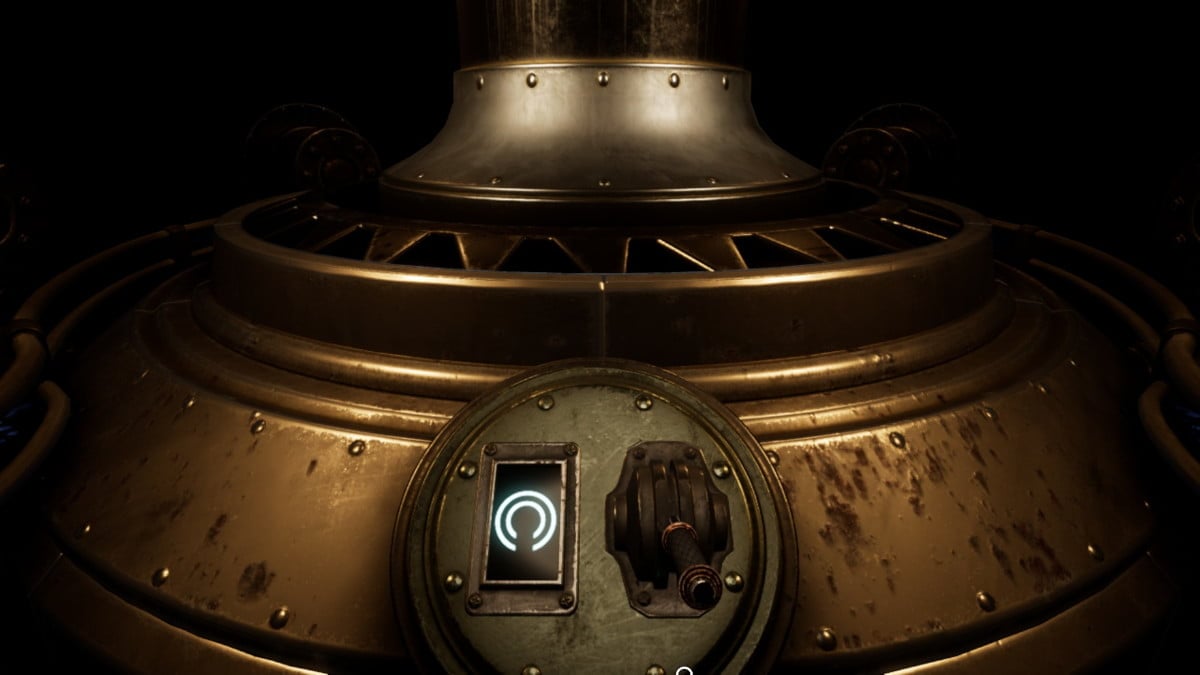
After reaching the tower, take a moment to scan the tower walls for a golden emblem or plaque. This symbol should provide you with the solutions to the puzzle connected to the spot indicated by the orange line on your map.
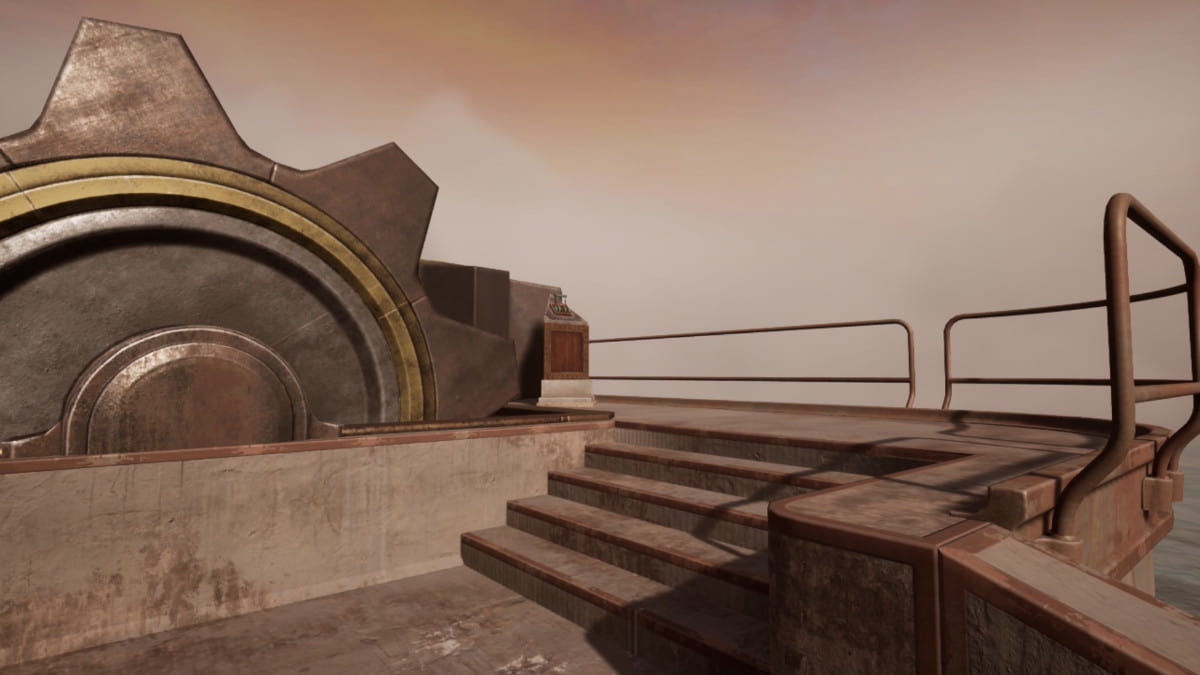
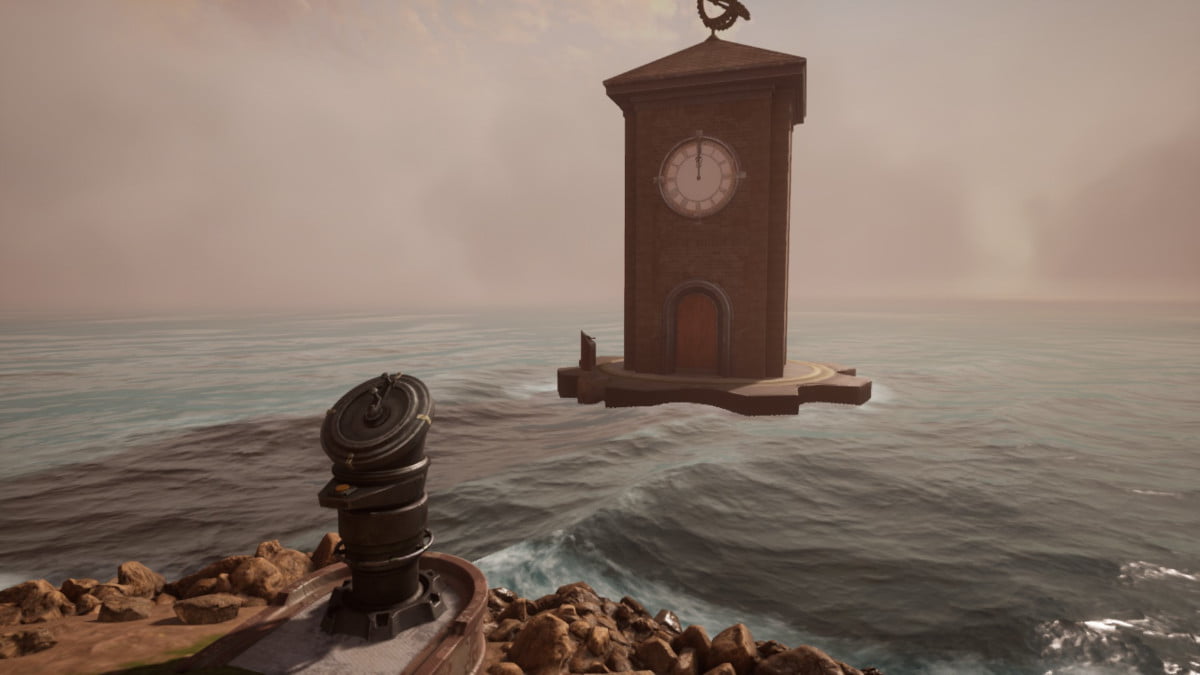
- If the orange line is pointing to the giant gear on the dock, the answers will be to the time needed to get across to the clock and Marker Switch out on the water, as well as the code needed for the puzzle inside the clock.
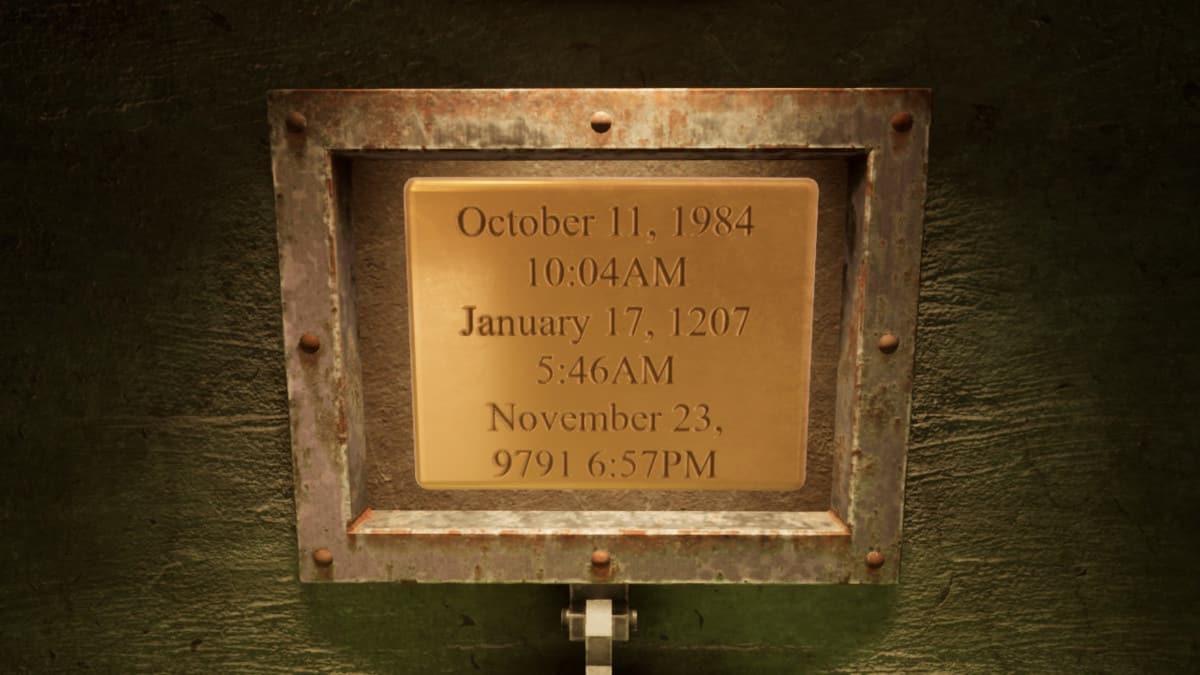
- If the orange line is pointed to the sunken ship, the plaque inside the tower will have three dates and times to input into the round building next to the library that has a golden carving on the door and a weird chair inside it. Once you have the answers, you need to line them up with the items around the mini sunken ship in the middle of the island.
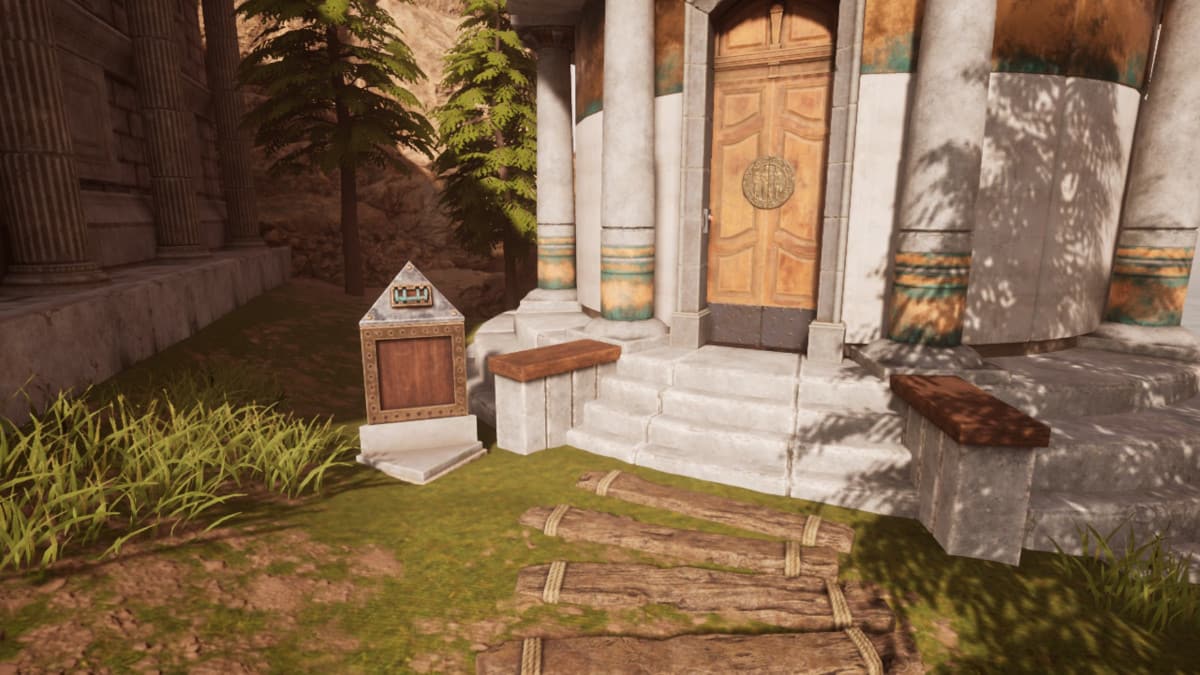
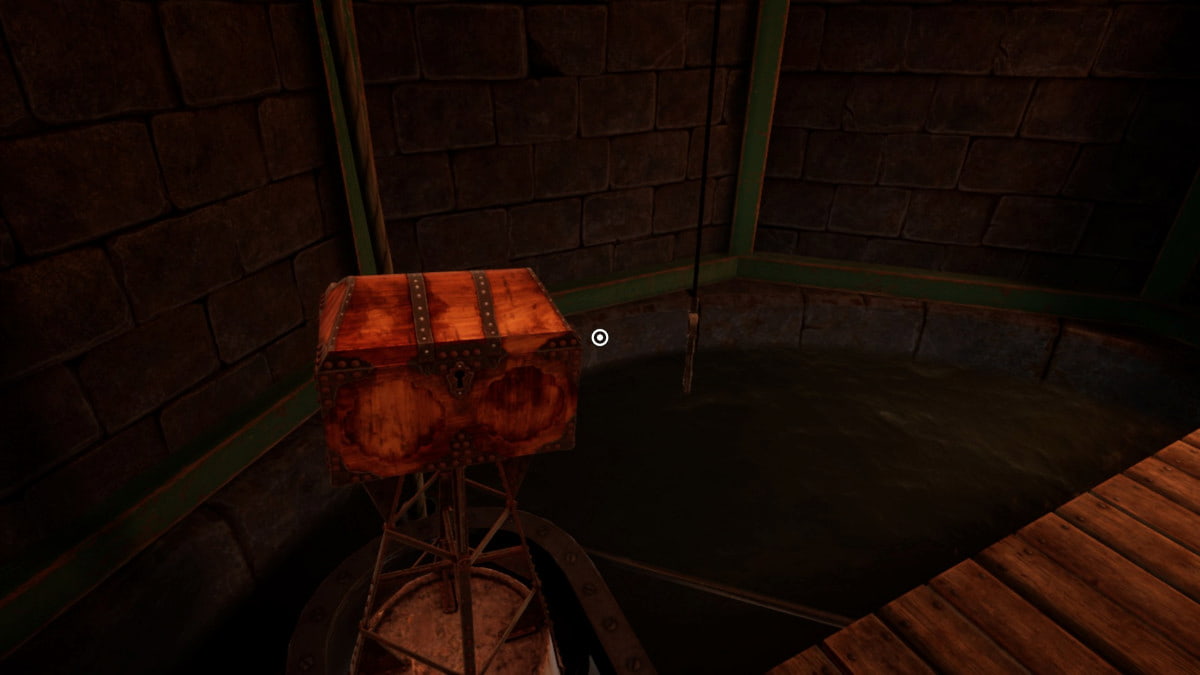
- If the orange line is pointing to the wooden hut by the trees, you will get the three-digit code for the locker inside the hut.
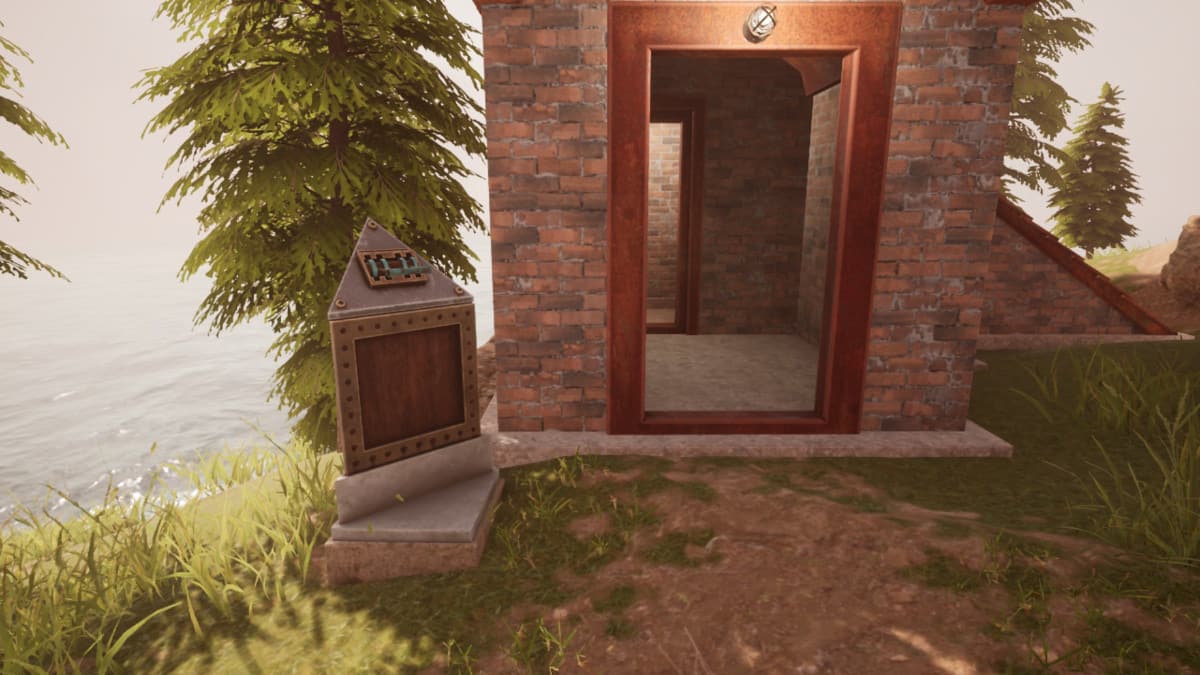
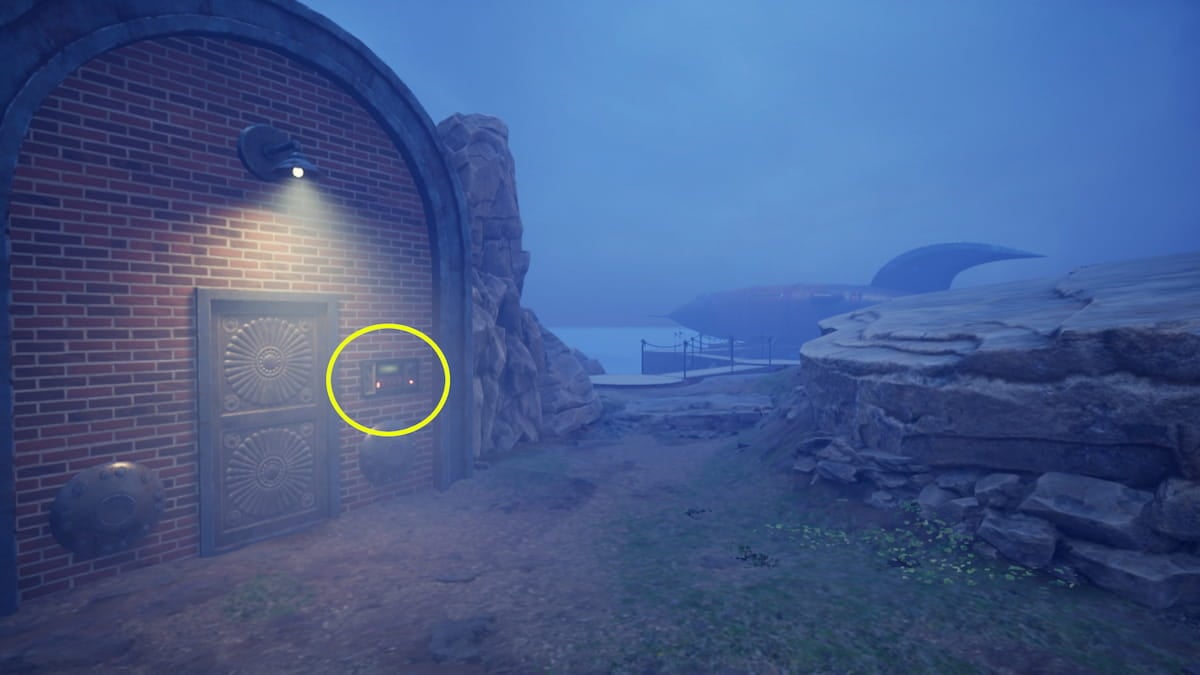
- If the orange line is pointing to the rocket ship on the far side of the library, it will give a number in volts for the puzzle underground. You can reach this puzzle by heading down into the small brick building near the wooden hut.
Before heading into an Age
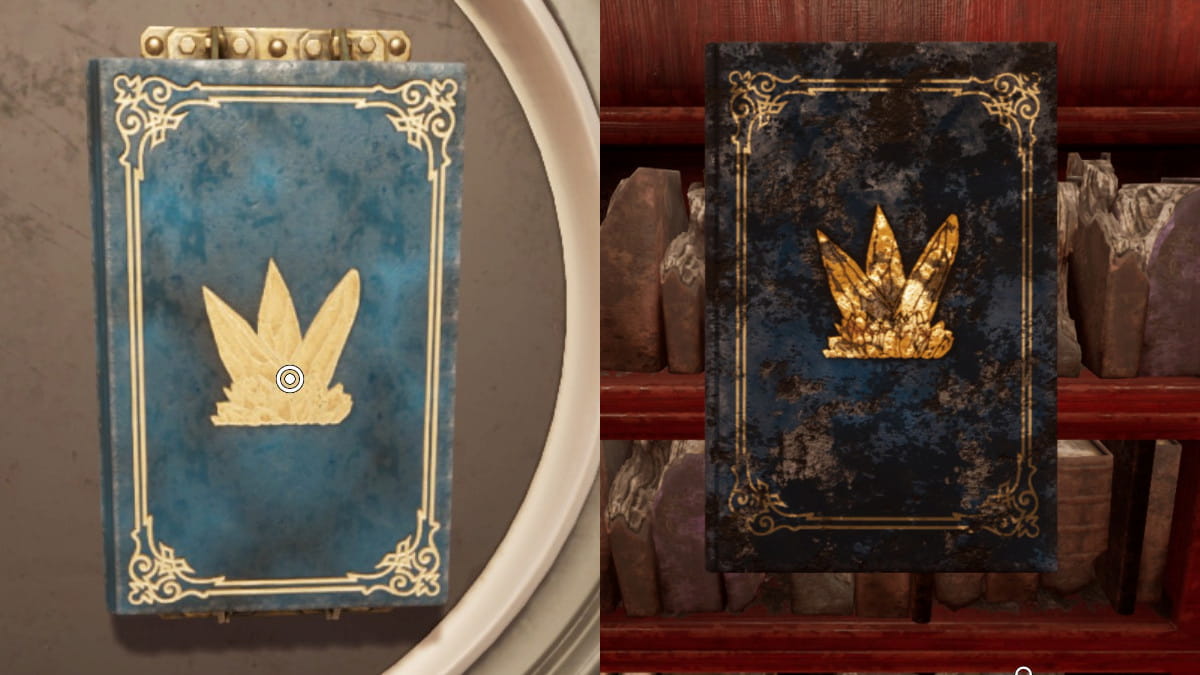
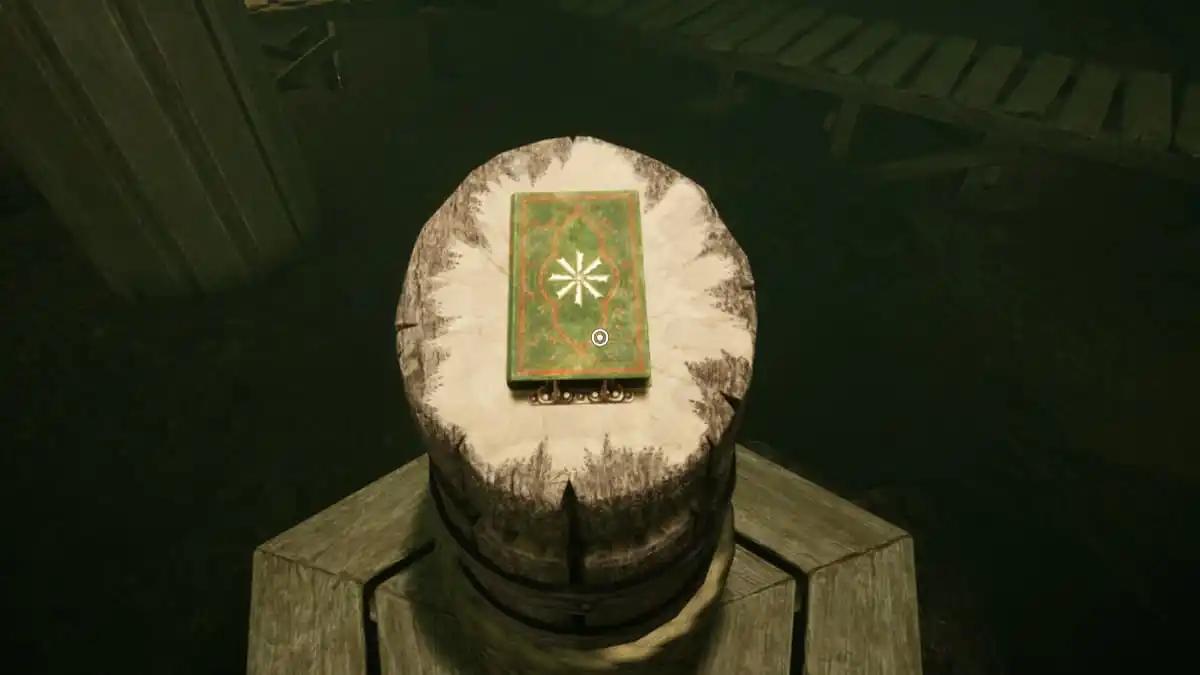
Before you step into an Age-linked book and venture within, I strongly advise taking a peek at the notebook corresponding to the Age inside the library first. If you scan all the undamaged books, each has a symbol on its cover. These symbols are also found on the Age’s linking book around Myst Island. For instance, the linking book for the Selenitic Age, situated within the rocket ship, bears a crystal symbol on its front. In the library’s shelves, you’ll find a book with a crystal symbol that offers some accounts of Atrus’ adventures in that age. While the journal doesn’t contain essential information, it typically includes a map and some tips to guide you through the puzzles you’ll encounter within that Age.
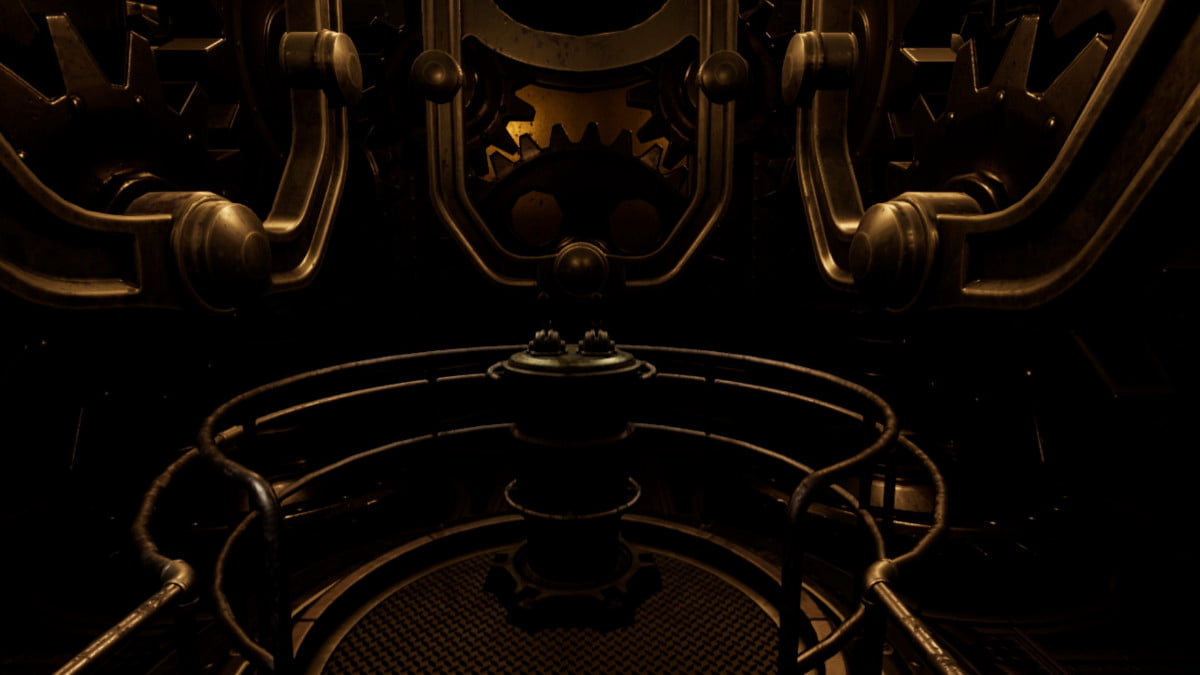
The Mechanical Age (inside the giant cog)
You’re free to explore the ages sequentially in any manner you find suitable, but it’s recommended to begin with the Mechanical Age for a smoother experience. Its puzzles are the least challenging and serve as an introduction to the variety of problems you might encounter throughout your journey.
How to solve the clock puzzles to go to the Mechanical Age
To reach this particular Age, follow these steps: Rotate the orange marker on the library map towards the large gear situated at the dock. After ascending the tower, you’ll receive both a time value and a three-digit sequence. Enter the time into the clock mechanism, followed by entering the three-digit code into the device located within the clock structure.
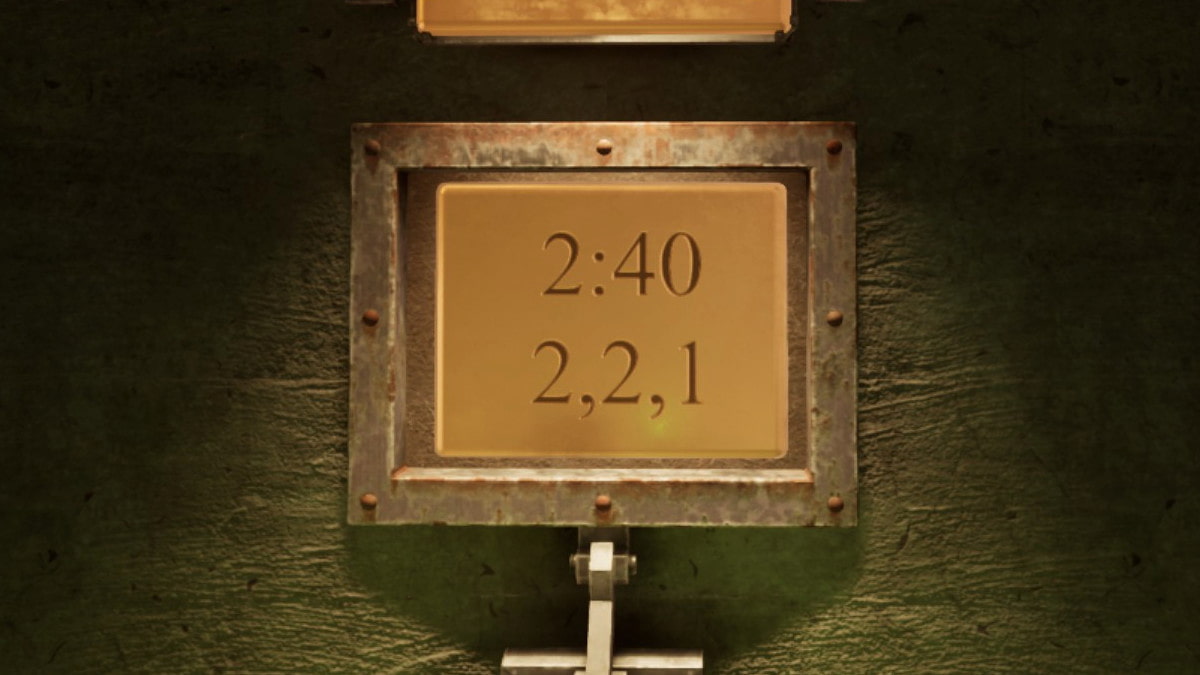

In the game Myst, you’ll want to set the clock display to read exactly 2:40 (this can be randomized). The code for the clock mechanism is 2-2-1 (also randomizable). To get the mechanism to show 2-2-1, you need to press and hold down the levers. The lever on the left controls the middle and bottom numbers, while the one on the right manipulates the middle and top. Here’s how to do it: First, pull the left lever just once, then press and hold the right lever for three seconds, followed by another single pull of the right lever. This sequence should result in 2-2-1 appearing on the mechanism and unlocking the giant gear located at the docks.
Achievement: Can Opener
Open the giant gear on Myst Island with the clock puzzle.
Into the Mechanical Age linking book
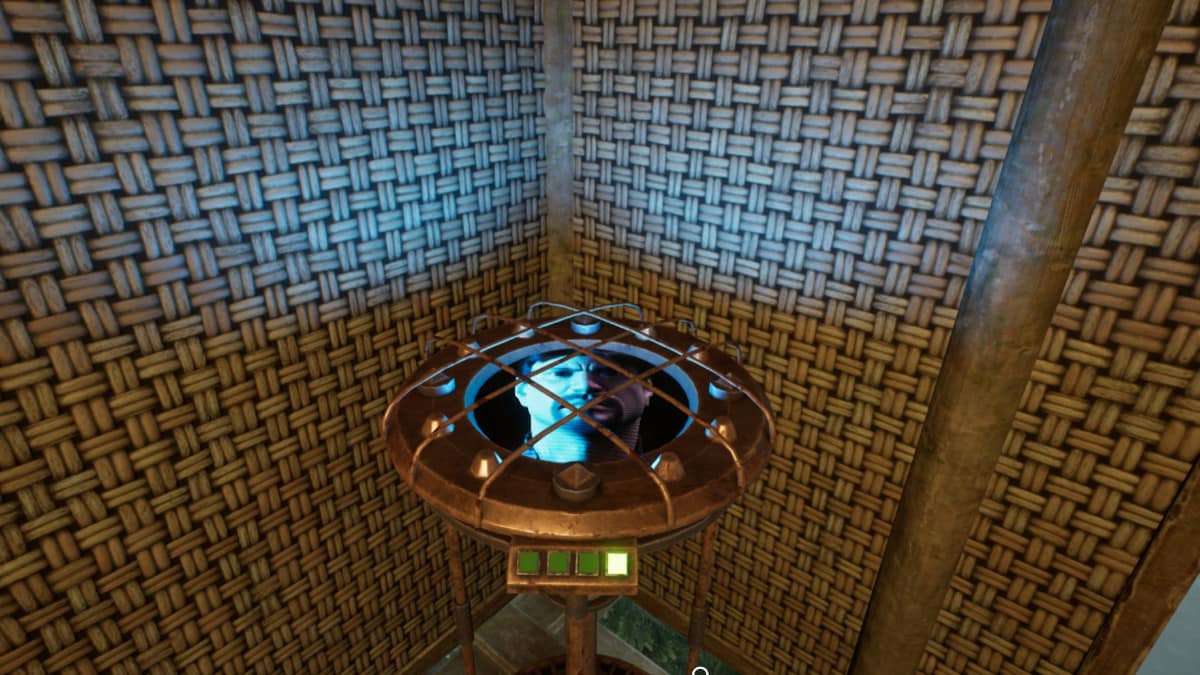
Navigate to the book within the large cog, then tap the image found inside. Prepare for a journey into an entirely different realm. The landscape here is rather compact; there’s a structure resembling a gear, a small puzzle station on your left, and another island out of reach, visible off to your right on the screen. Make your way towards the gear-shaped building. If you opt for the path to your left within the edifice, you’ll discover Sirrus’ Chamber, while taking the route to your right will lead you to Achenar’s Room.
If you’ve explored extensively throughout Myst Island, chances are you’ve run into both the red and blue books in the library. Each book holds a character; the red one houses Atrus’ son Sirrus, while the blue one contains Atrus’ other son Achenar. Both narratives convey a tragic tale of how the other brother is perceived as evil and has imprisoned them. You’ll need to choose which brother to aid by retrieving all their missing pages and returning them to the library. There’s a secret blue page hidden in each Age, as well as a secret red page. Unlike the original Myst, you can now carry multiple pages at once, allowing you to gather both and make your decision about whom to save at a later time.
The Blue Page in Achenar’s room
1. Push the luminescent, blue button that’s on the chair with the blade embedded within its cushion, and a hidden doorway will swing open. The illuminated sheet of paper can be found on the racks to your left side, adjacent to the doorway.
The Red Page in Sirrus’ Room
In Sirrus’ private chamber, locate his throne where a chessboard resides. Activate the hidden mechanism by pressing the button within. This action will reveal a concealed doorway to the side of the throne, whereupon you’ll discover a red document on a wine rack within that secret room. If the building is oriented such that no island is accessible, you may peer through the telescope and catch a glimpse of Bob the Skeleton.
Discovery: Lo and Behold! It appears to be Robert (Bob) we have found!
How to solve the Mechanical Age Puzzle and return to Myst Island
To return the connecting book to Myst Island, rotate the entire island multiple times while searching for the correct combination on the locked pillar where your journey began. Here’s how you can proceed:
- Click the red button on the right side of the entranceway to the center of the building.
- A stairway will open up underneath the hallway.
- Go down the stairs and interact with the lever at the bottom.
- Make the opening of the two lit up C’s line up. It will blink red when you have it lined up right.
- Go back up the stairs, then press the red button in the hallway to make the stairs turn back into the hallway’s floor.
- Go to the green elevator and ride it up.
- Before exiting the elevator, press the middle button.
- Leave the elevator; it will go down, allowing you to step on top of the elevator.
- Up on top of the elevator are two levers.
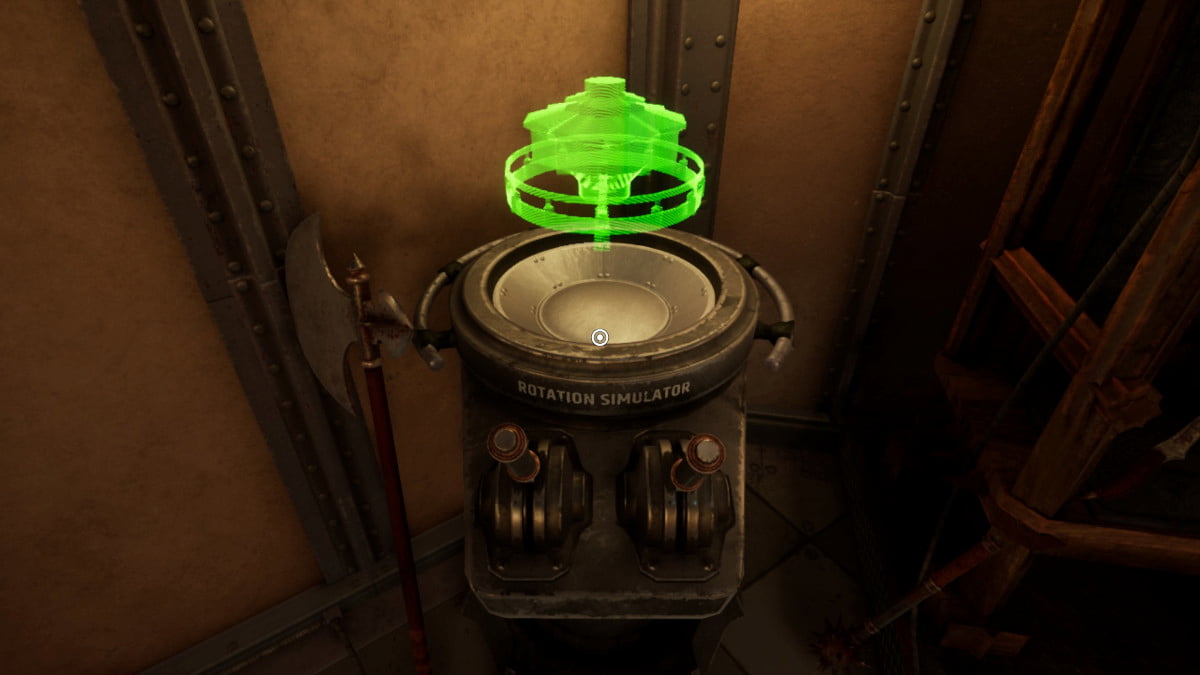
- If you used the Rotation Simulator in Achenar’s room, you will know how to use it.
- Put the left lever down, then hold the right lever for a few seconds.
- Release the right lever, then push the left lever up. This should have turned the island.
- Go out through the hallways; you should be facing a new island.
- Take note of the markings (Randomized) on the pillar on the new island.
- Return and rotate the island 90 degrees again.
- Walk out onto the new island, and get the other half of the code (Randomized).
- Return the island to its original position by turning it twice or 180 degrees.
- Punch in the code found on the two pillars into the original location.
- Take the stairs down, and interact with the Myst linking book at the bottom.
Achievement: Mechanical
Found a way back from the Mechanical Age.
The Channelwood Age
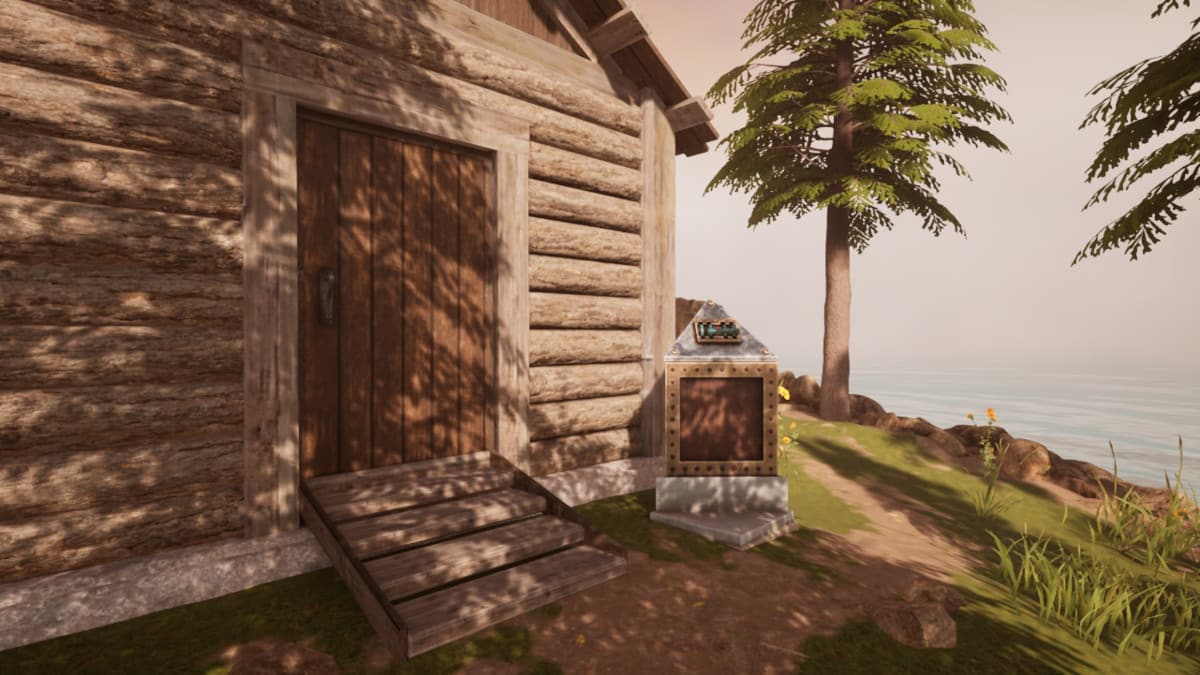
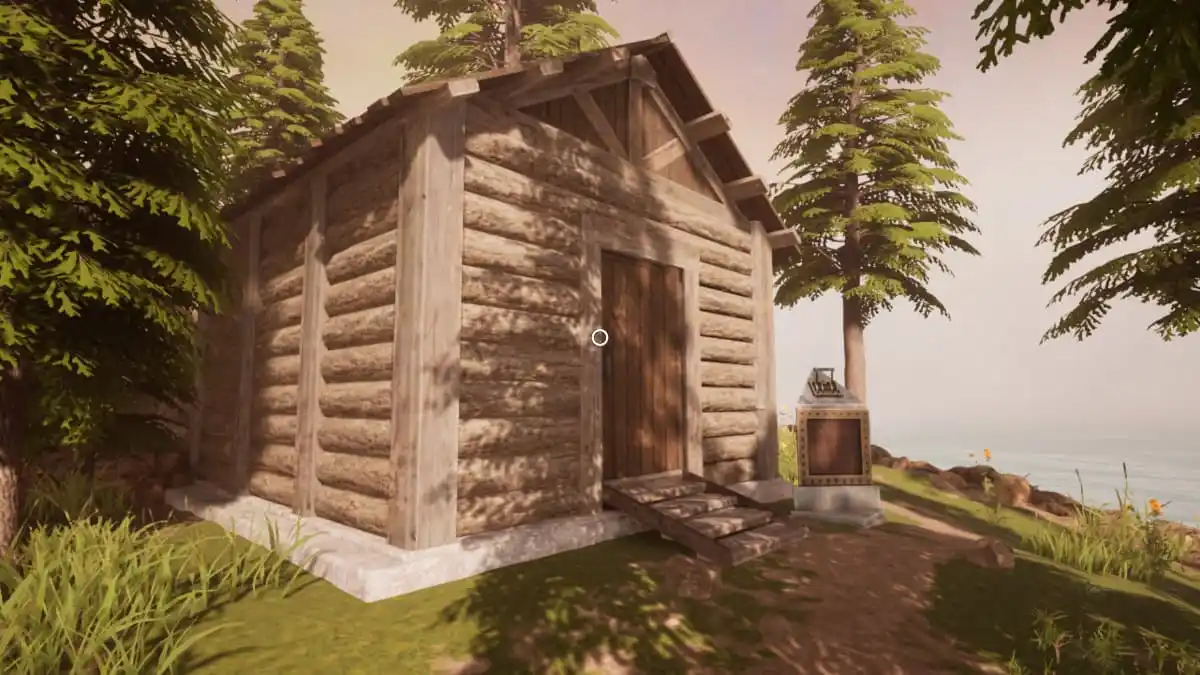
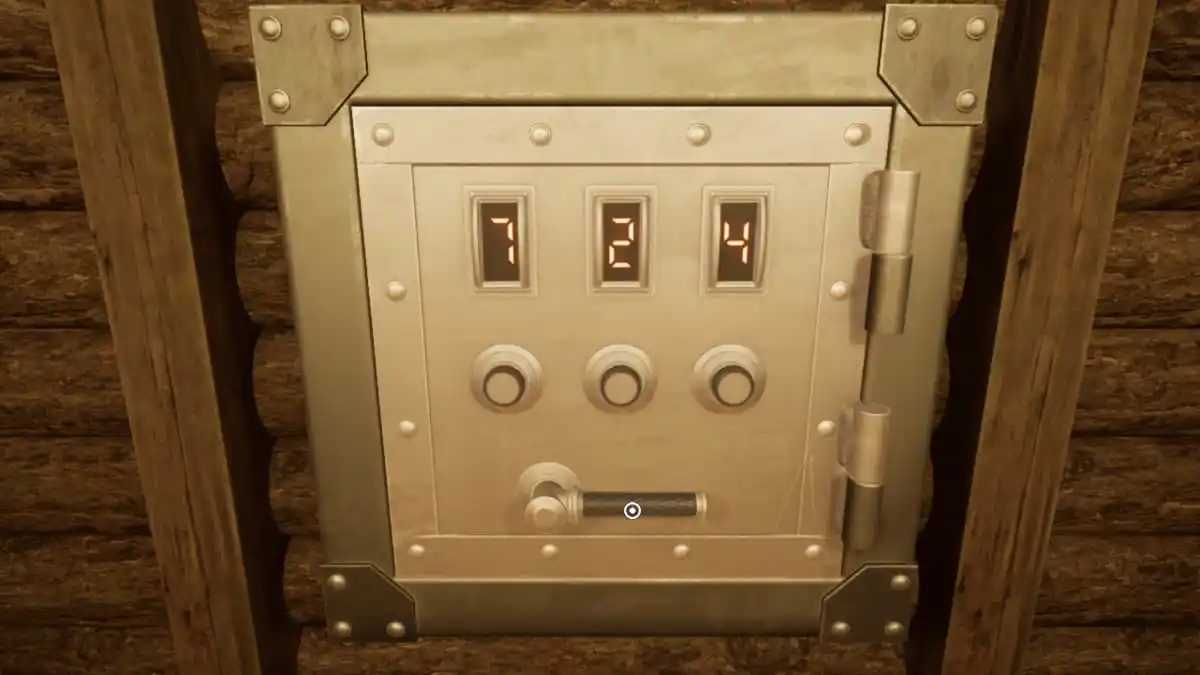
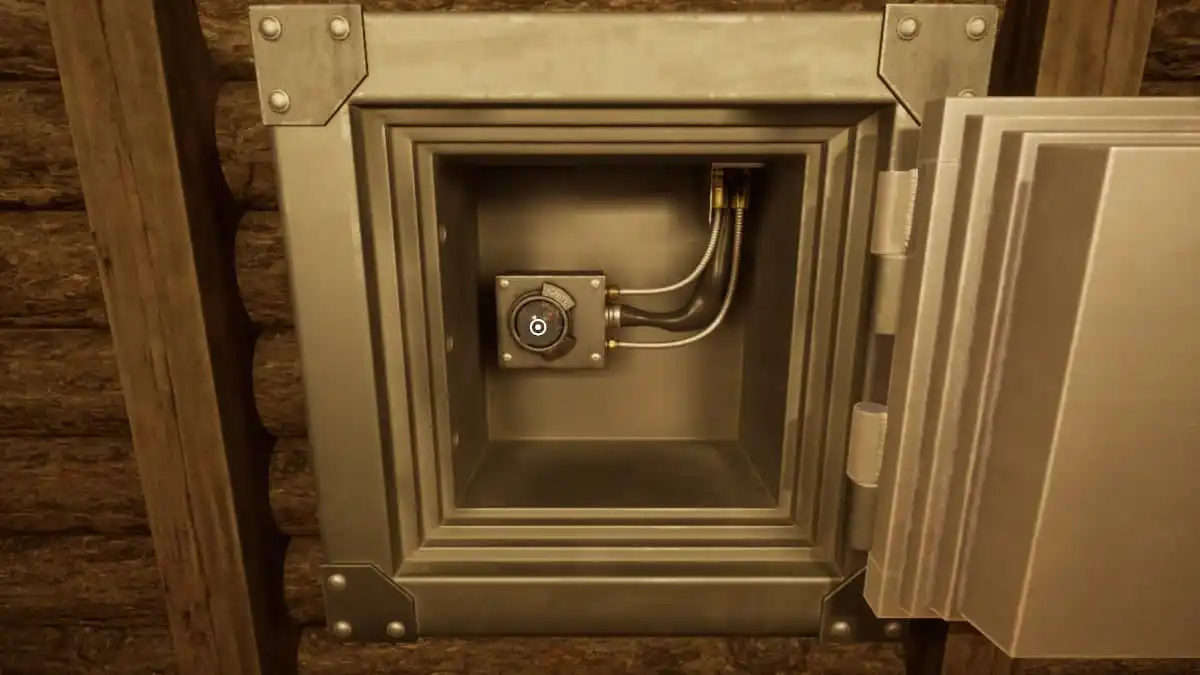
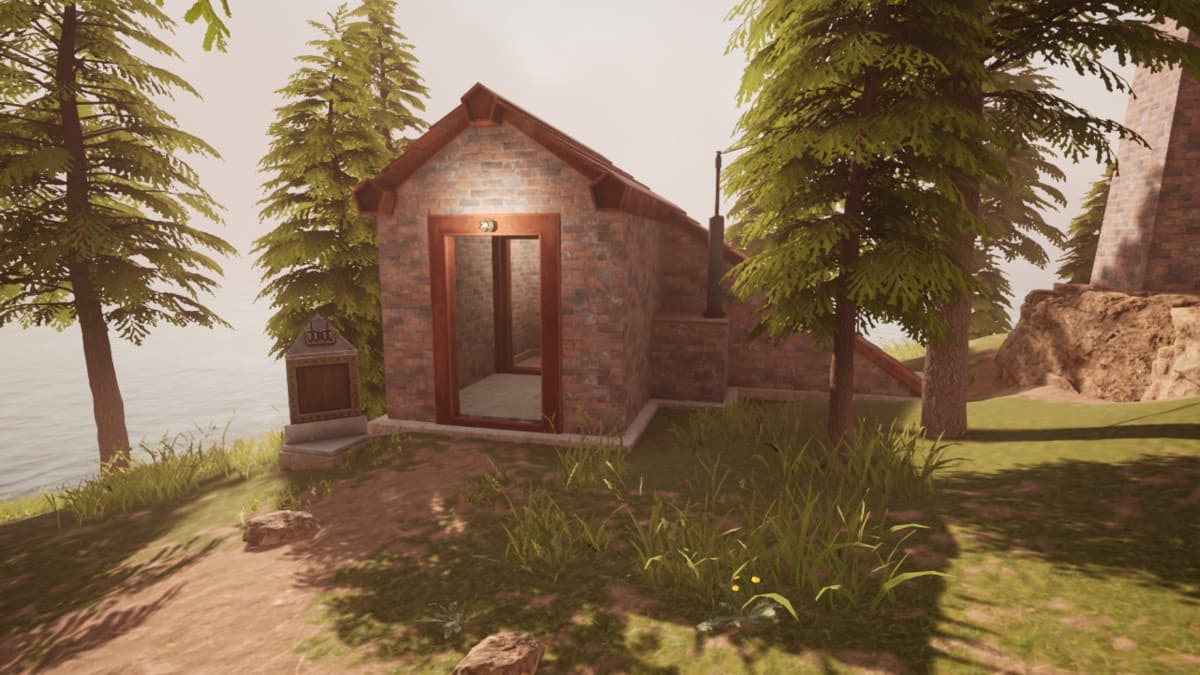
After completing the Mechanical Era, it’s time for a new adventure! You might want to explore either the Stoneship Era or the Channelwood Era next. The Channelwood Era can be found in the wooden hut on Myst Island, and you’ll need a three-digit code to unlock the safe inside.
How to solve the tree puzzle to go to the Channelwood Age
To reach Channelwood, you should first tackle the tree riddle in the library. On your map, the orange line indicates the tree enclosed by a brick border. After that, ascend the tower and discover the three-digit combination (originally 745). In the main game, this will be 7, 4, 5. Proceed to the wooden shack, input the code on the safe located on the left wall. This action will spark the boiler inside the hut.

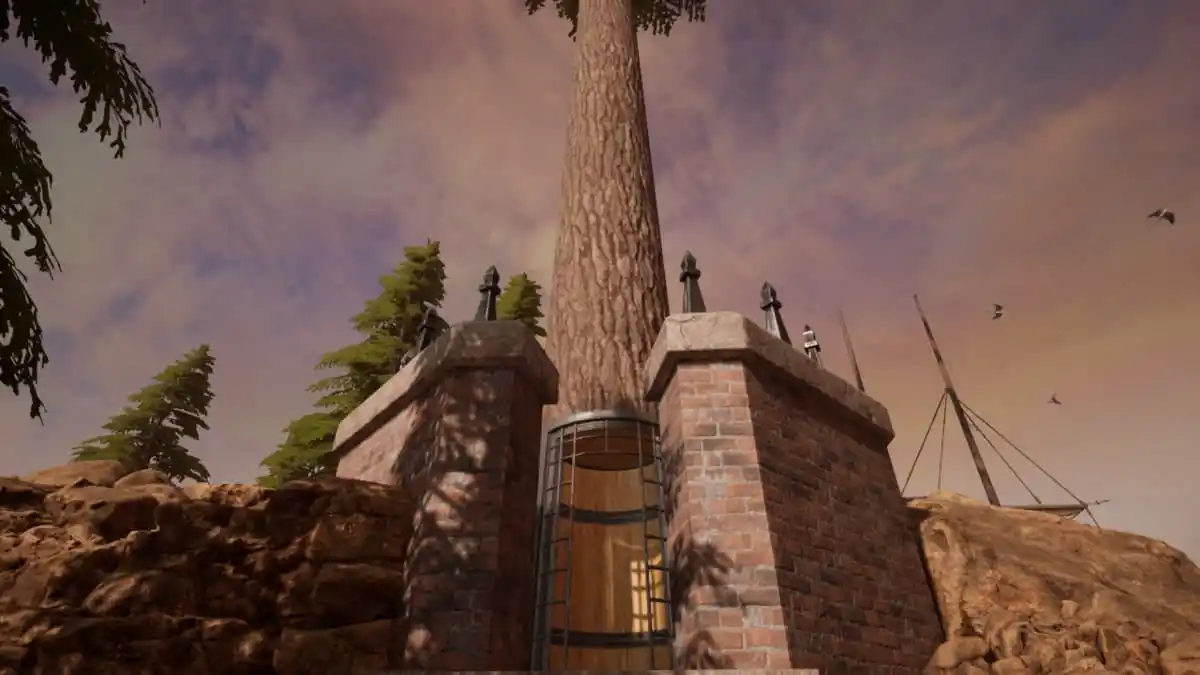
As a seasoned adventurer who has traversed many treacherous terrains and scaled towering heights, I must say that the instructions you’ve given sound quite intriguing. If I were to follow your directions, I would first locate the red valve next to the boiler, ensuring I don’t accidentally switch on the wrong lever. Then, stepping outside into the brisk air, I would seek out the tree surrounded by bricks – a sight that would pique my curiosity and stir my sense of adventure. Once found, I would step inside this peculiar tree and brace myself for an exhilarating ride to its peak. The thrill of reaching the top and unlocking the achievement would be the icing on the cake, adding another notch to my belt of life experiences. However, being a cautious explorer, I’d make sure to check for any hidden dangers before embarking on this unique journey.
Achievement: Top of the World
Ride the tree elevator on Myst Island all the way to the top.
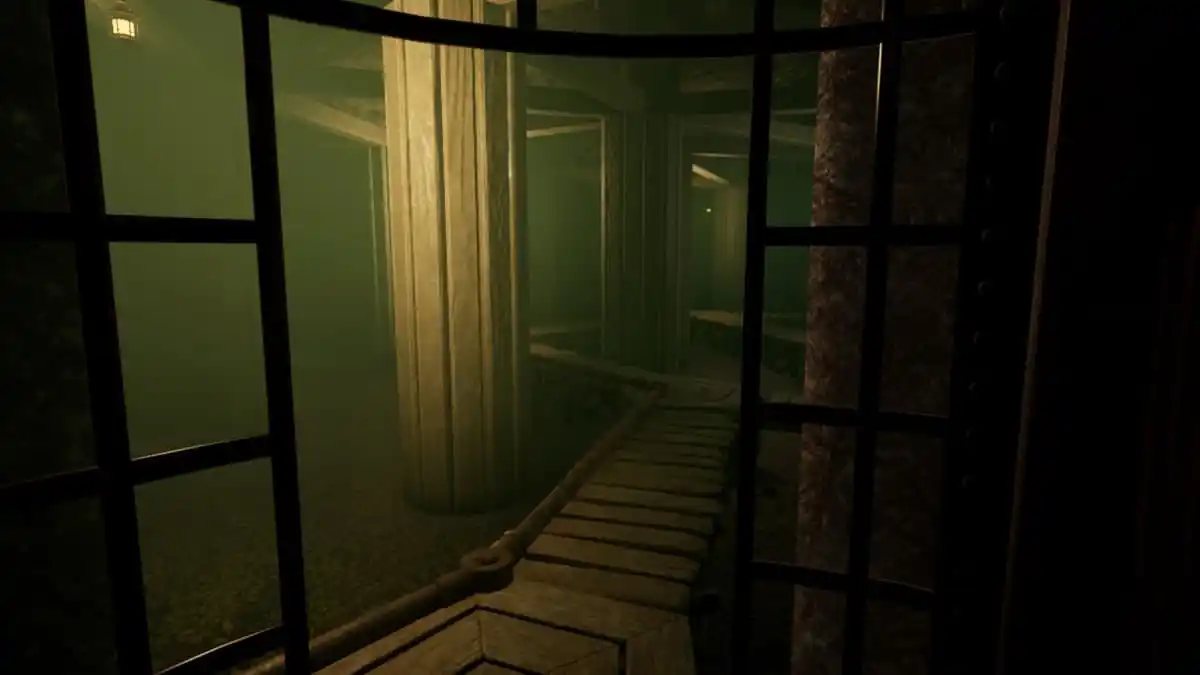
After hoisting the tree elevator above ground, I suggest turning off that red valve, allowing it to gradually descend back into the earth. Once it’s at ground level, hop aboard and let it carry you into the subterranean cavern – that’s where you’ll find the linking book to Channelwood. Before venturing inside this book, take a peek at the Channelwood diary from the library; it contains a map of Channelwood, as well as some intriguing history that could prove useful for your journey ahead.
Achievement: Safecracker
Open the safe in the hut on Myst Island.
Into the Channelwood Age linking book
Upon clicking the book hidden beneath Myst Island, you’ll be transported to an underwater jungle. You’ll notice dwellings among the trees, yet the land seems deserted except for some frogs. Both Achenar and Sirrus also have rooms here, and there are pages colored red and blue to discover within them.
To reach Achenar and Sirrus’ rooms, which are located high up in the trees, your journey begins at the Windmill. Simply start walking from Channelwood, and as you progress, the Windmill will come into view in the distance. Enter the building where the Windmill stands, then rotate the red valve to let water flow through the pipes. Since everything in Channelwood is run by water, you’ll need to adjust the water flow to operate whatever mechanism you choose.
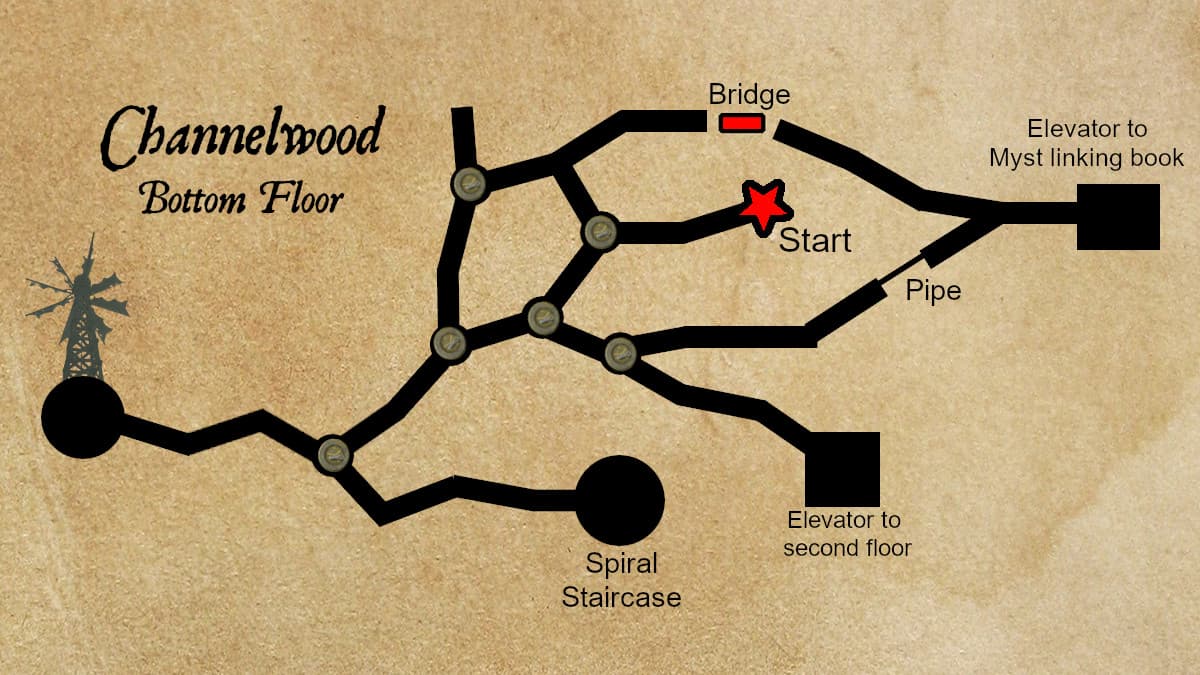
Following the activation of the Windmill’s water supply, please step onto the platforms. Your goal is to guide the water towards the Elevator on the second floor as shown in the map provided. To do this, ensure that the first lever you encounter is on your left side. The second one should also be on your left; navigate to the left and turn the lever here to the right. This action will raise the bridge with the marked bridge mechanism, which is highlighted on the provided map. Cross the raised bridge, then make your way to the spot marked “Pipe” in the map above to connect the two sections of the pipe using the mechanism available there. You’ll need this setup later on.
1. Afterwards, direct the water flow towards the lift that leads up to the second floor. At the initial fork following the Windmill, make sure the water takes a left turn, then three rights in succession. Once inside the lift, take it to the second floor; this particular lift won’t function unless water is entering through the pipes while the door remains shut.

After reaching the second floor, proceed by crossing the suspension bridges towards the lever on your right side. Since you’ll be circling the entire area, start by moving forward once, then turning right four times in a row, and finally going straight. Once you pull this lever, it will unlock a door atop the winding staircase. Descend these stairs and open the door at their foot to return to the ground floor. Instead, direct yourself towards the elevator on the first floor by adjusting the switch closest to the Windmill to the right instead of left. Then, climb back up the spiral stairs and take the elevator ride to reach the third floor.
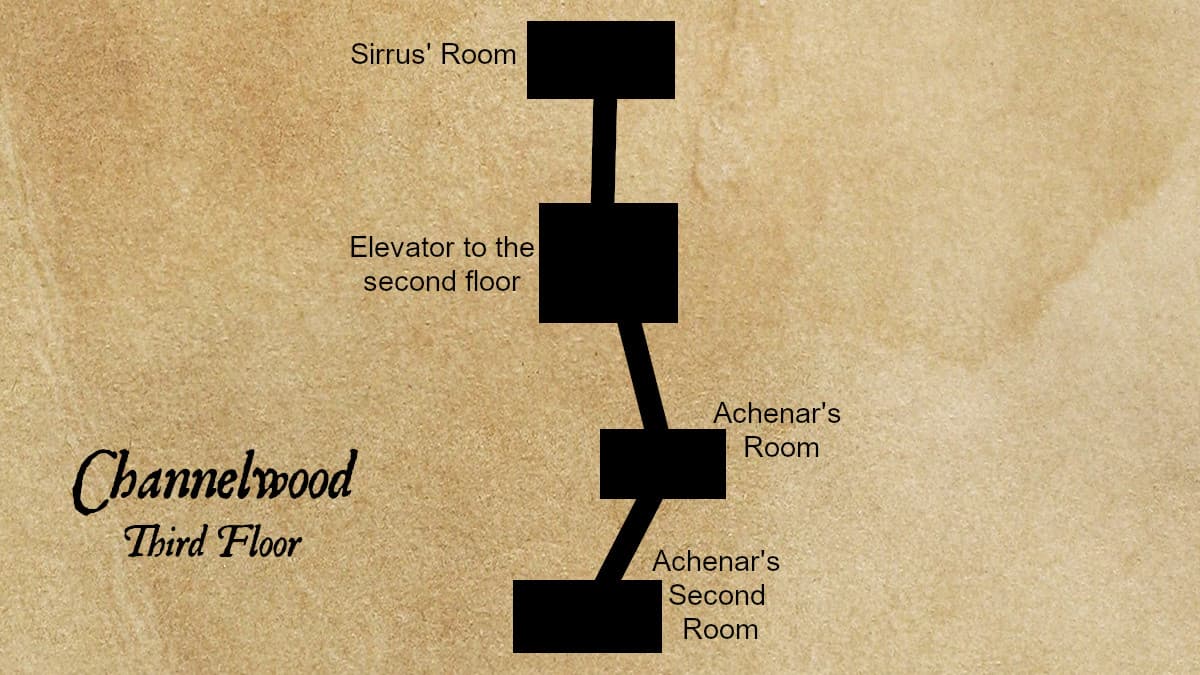
The Blue Page in Achenar’s room
As a seasoned explorer with years of adventures under my belt, I can confidently guide you through this intriguing puzzle. The elusive blue page you seek is nestled within Achenar’s second chamber, positioned at the map’s farthest bottom edge. Keep your eyes peeled, for it lies out in the open upon a battered bed frame, waiting to be discovered.
Achievement: He is Preparing
Find Sirrus’ Message to Achenar in Achenar’s rooms in Channelwood.
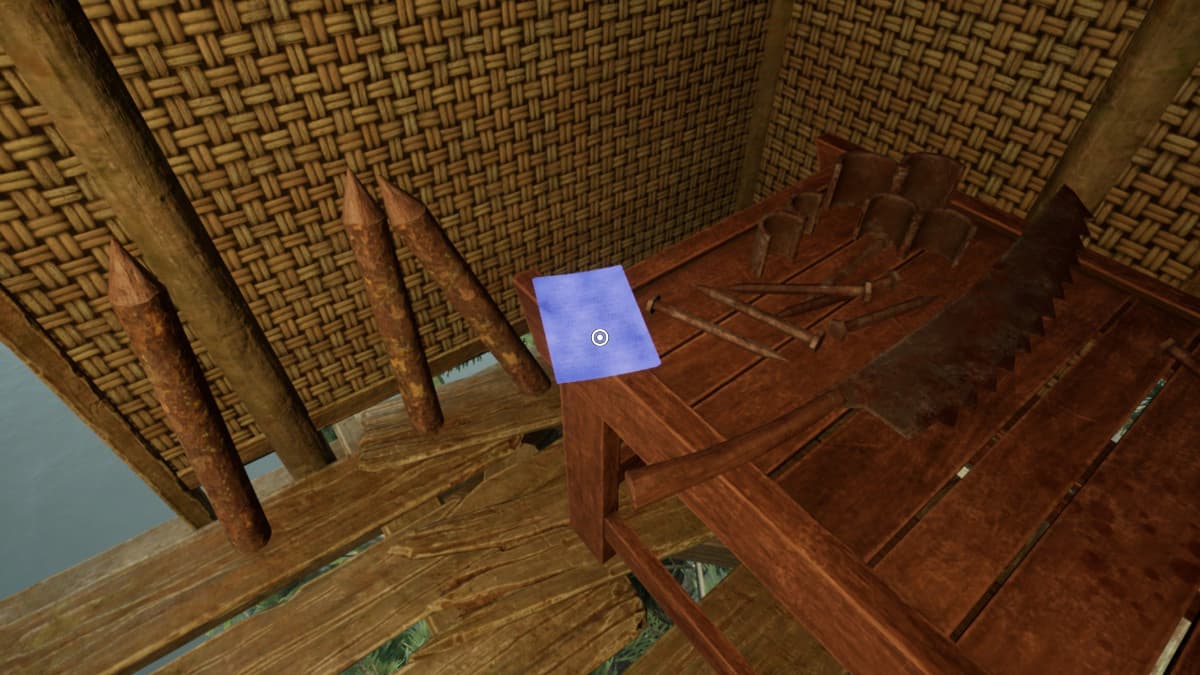
The Red Page in Sirrus’ Room

In Sirrus’ room, there are two crucial items you should note down for your gameplay. Firstly, you’ll find a red page inside the drawer of the nightstand close to the bed. Secondly, there’s a note attached to the bedframe that is worth checking. Remember, these details might prove vital later in your game, so don’t forget to snap a screenshot of this paper before moving on.
How to solve the Channelwood Age Puzzle and return to Myst Island
Once you’ve constructed the bridge and linked the pipe as detailed earlier, your task is simple: divert the water supply towards the elevator leading to Myst Island’s first-floor connecting guidebook. After that, just ride the elevator up. Inside a small, detached structure there, you will find a book that can transport you back to the library.
Achievement: Channelwood
Found a way back from Channelwood
The Stoneship Age
In my view, the Stoneship Age is one of the most challenging periods in Myst, as it requires considerable exploration – walking around extensively and examining the ship and its surroundings meticulously. To successfully collect the pages and ensure your own safety, you’ll need to ponder over the intricacies of the world mechanics and apply the knowledge you’ve gathered about the Ages up until this point.
How to solve the ship puzzle to go to the Stoneship Age
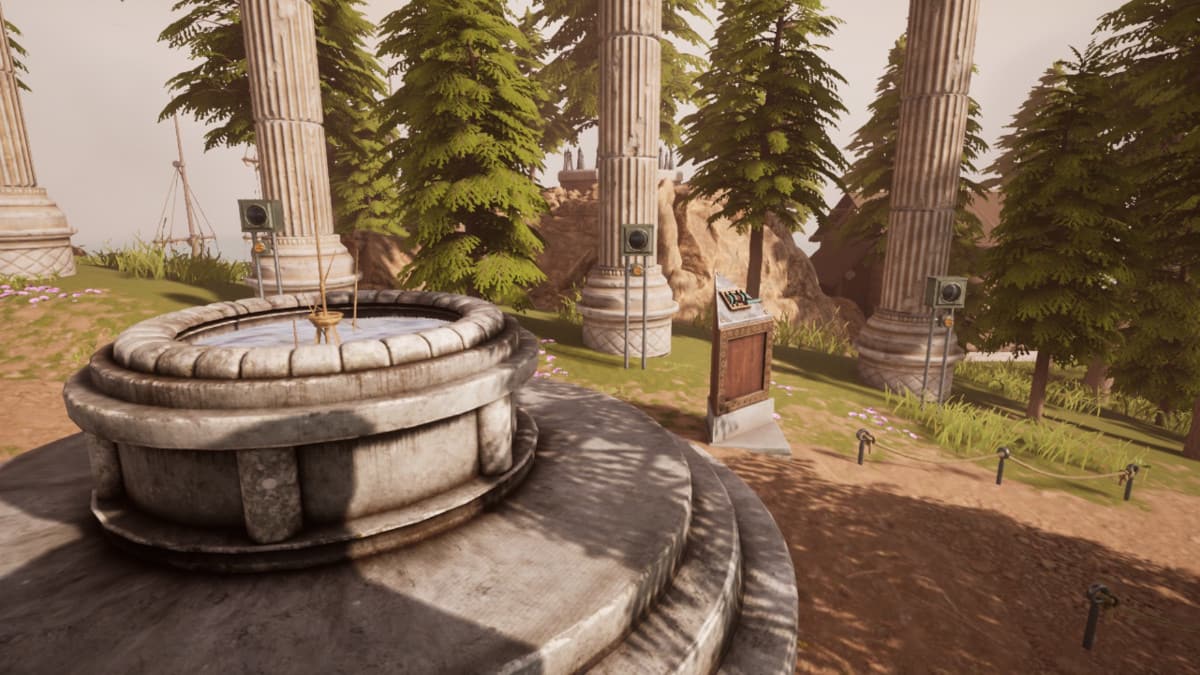
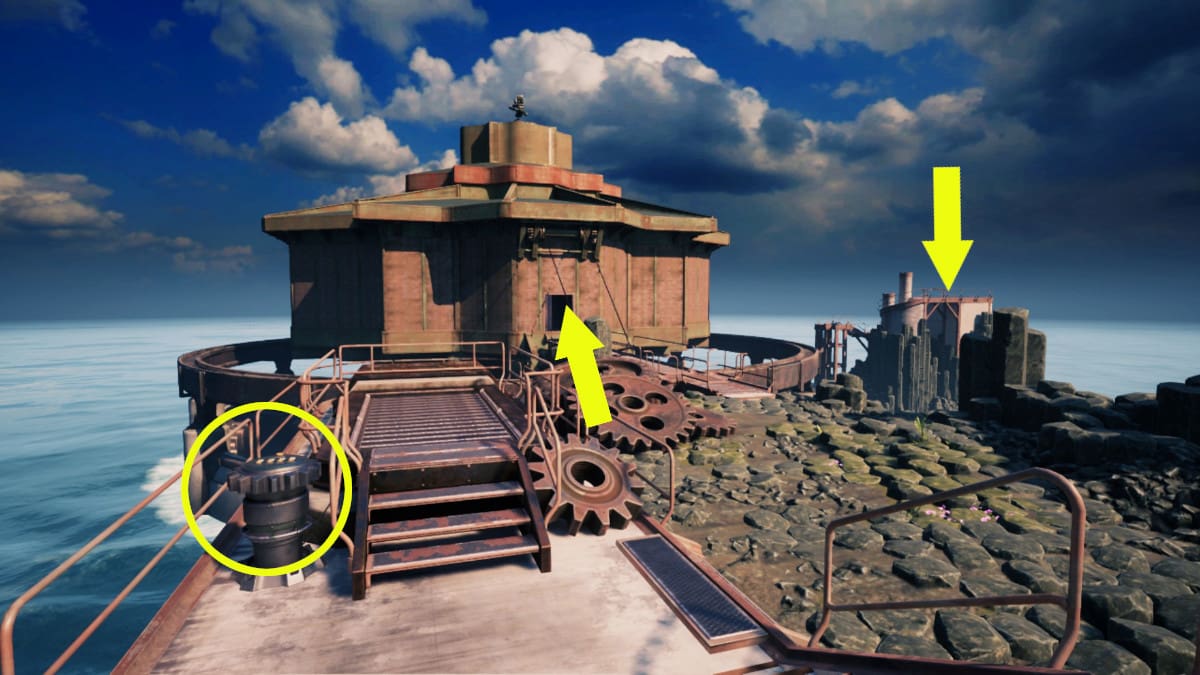
To access the Stone Age on Myst Island, you’ll first need to bring up the sunken ship located near the dock. Here’s how:
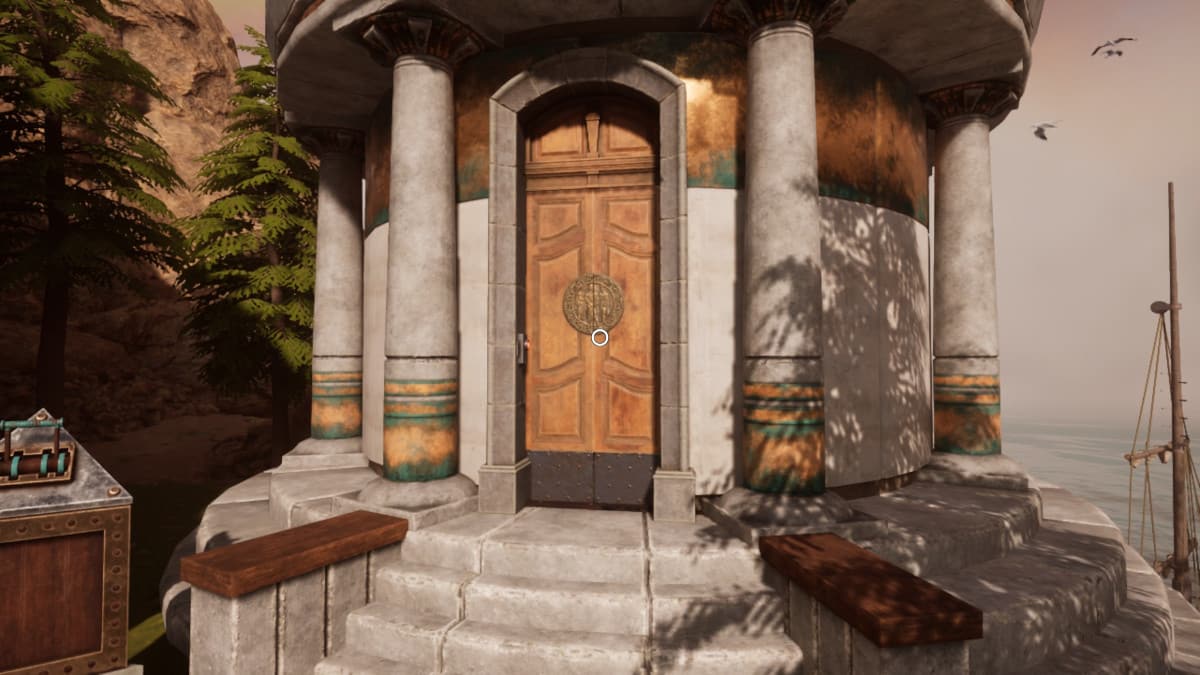
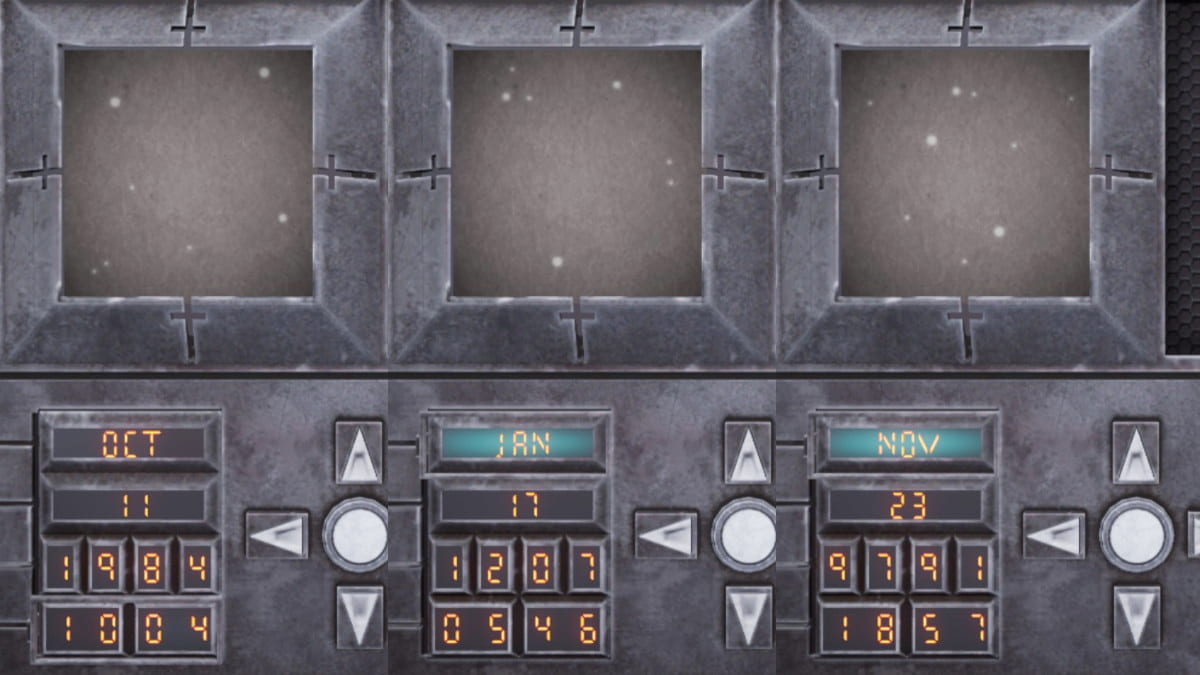
After exiting the library, head towards the structure adjacent to it, which bears a golden emblem on its door. The emblem features three men intricately carved into it. Within this building, you’ll find a device where you can enter those three specific dates: October 11, 1984 10:04 (10:04 PM converted to 22:04 in military time), January 17, 1207 05:46 (5:46 AM as is), and November 23, 9791 18:37 (converted to 18:37 in military time). Input these dates into the machine, and it will generate constellations for you.
Achievement: Stargazer
Viewed some dated constellations on Myst Island.
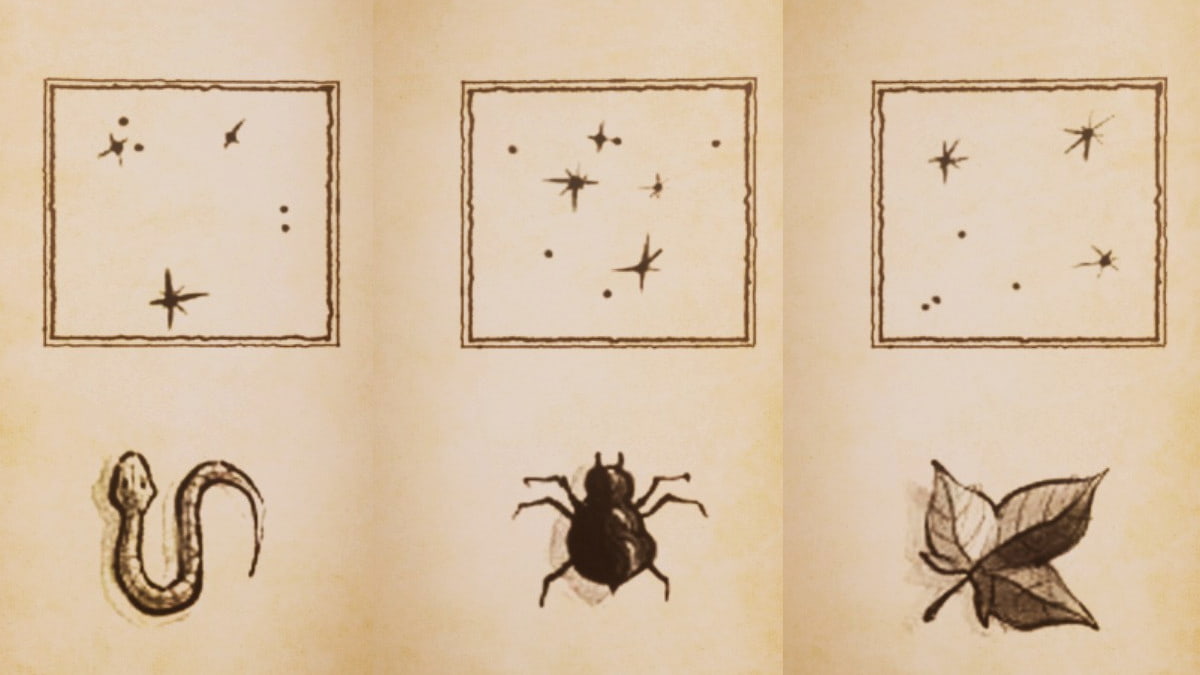

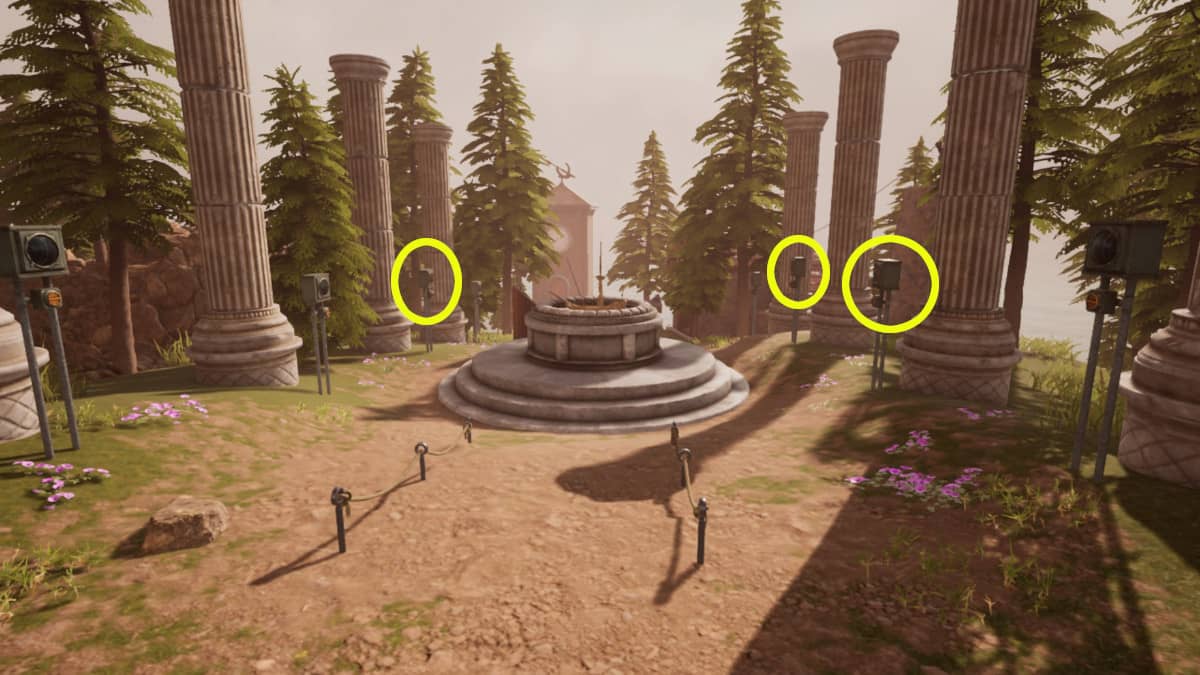
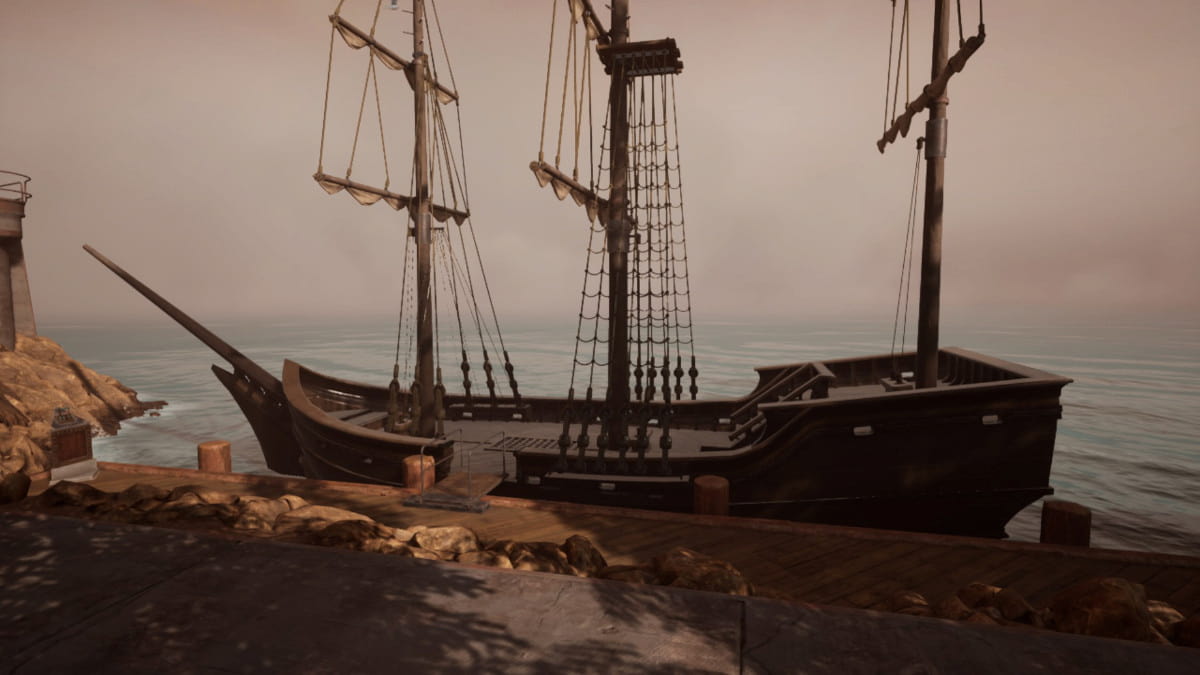
In the Stoneship Era journal, celestial bodies are depicted as various animal illustrations. The dates you see correspond to the Snake, Bug, and Leaf symbols. Activate the third left column near the small pool outside the library and the central ones on the right side. This action will cause both boats – one in the island’s center and the other at the docks – to rise from the water. On the floating boat, you’ll find a connecting book.
Achievement: Salvager
Raise the sunken ship on Myst Island.
Into the Stoneship Age linking book
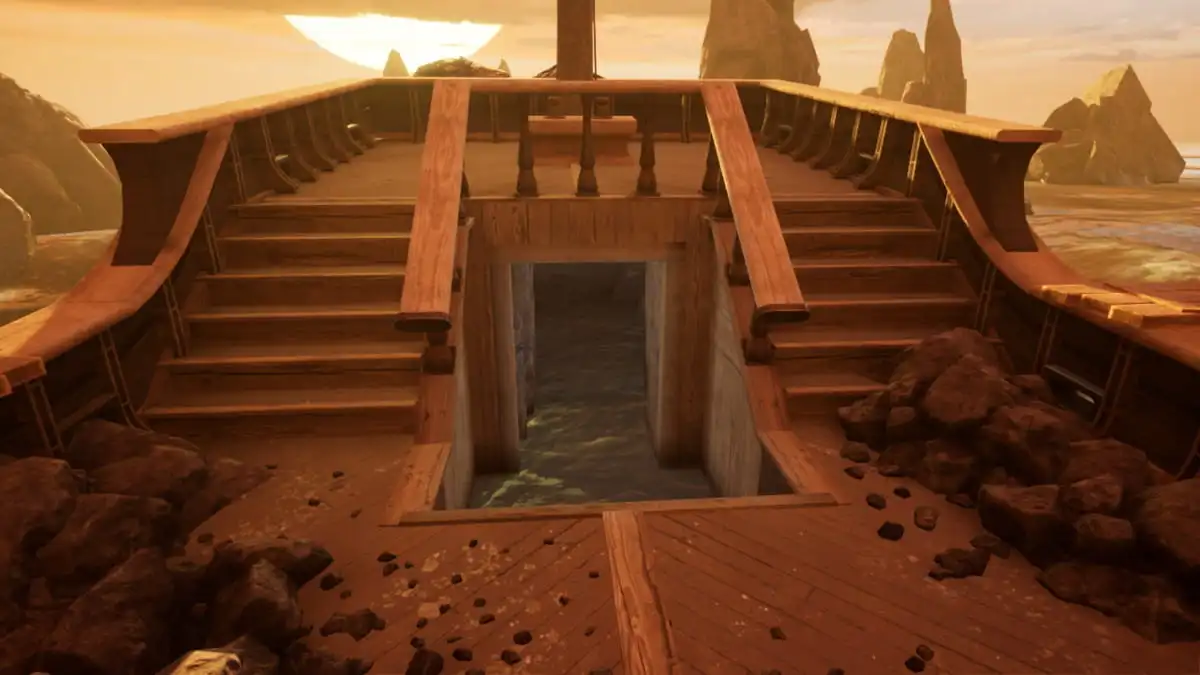
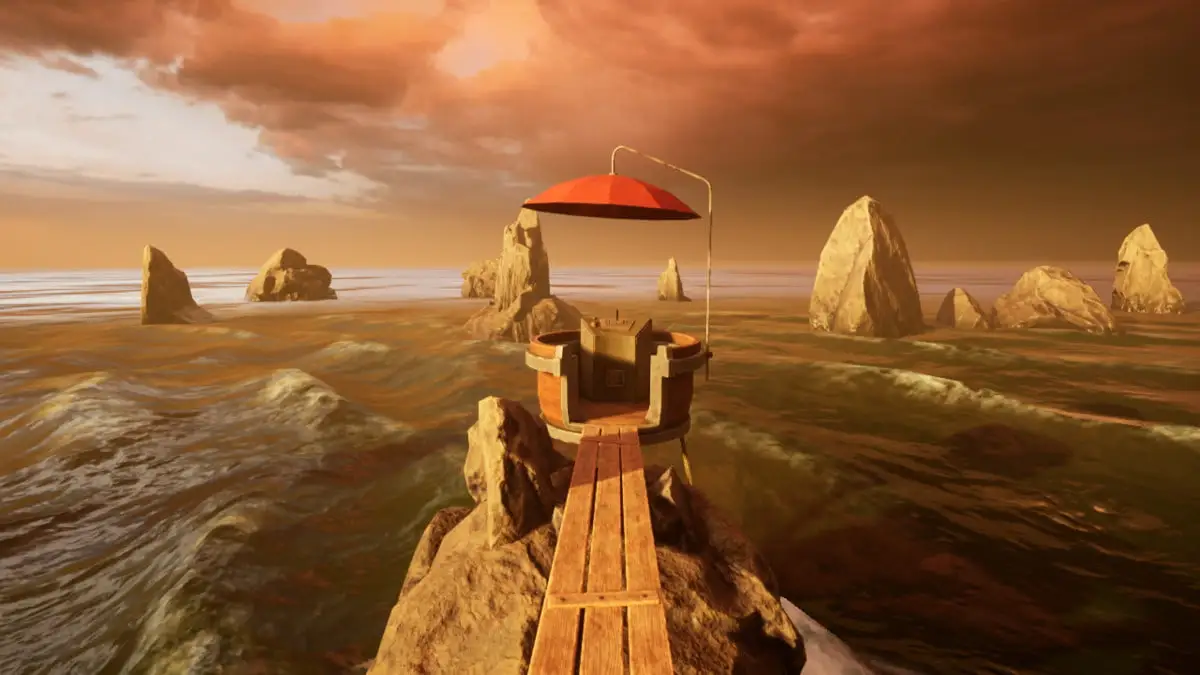
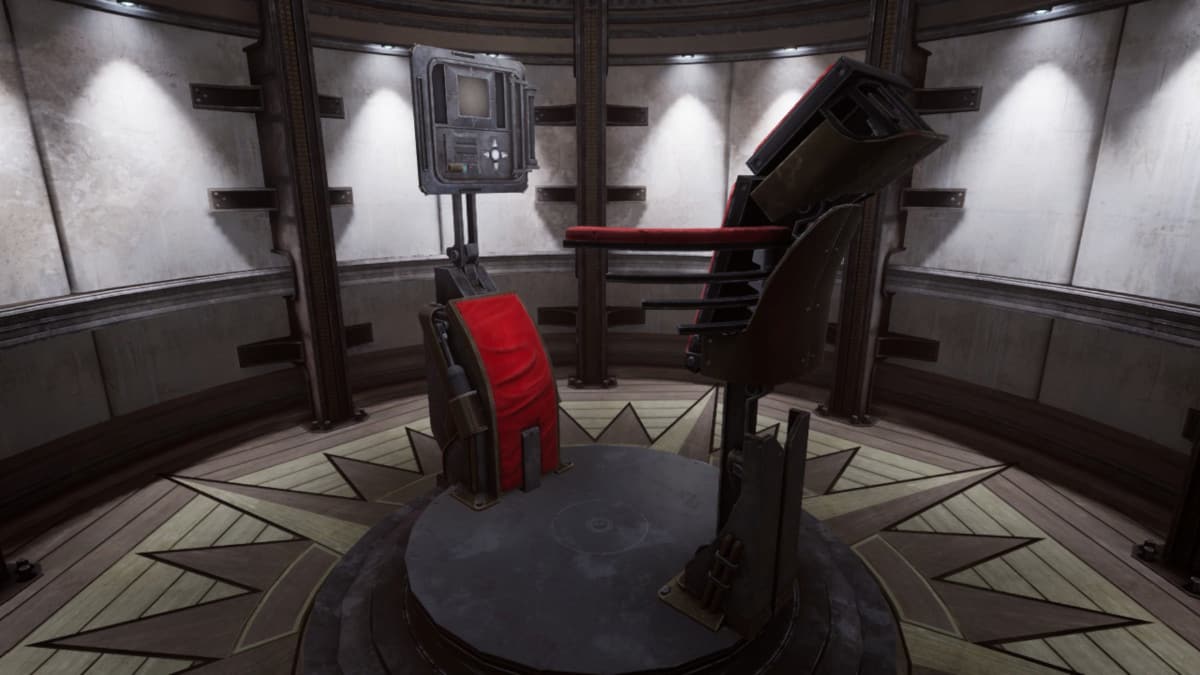
During the Stone Age, there are several intriguing locations to explore. Among them are three submerged doorways, a lighthouse, the highest point on the island, and a control station sheltered by an umbrella. The first task at hand is to head for the control station, lower the lever into the middle position, and then press the button on the left side. This action will drain water from both rooms of the brothers, allowing you to search for pages hidden within each one.
The Blue Page in Achenar’s room

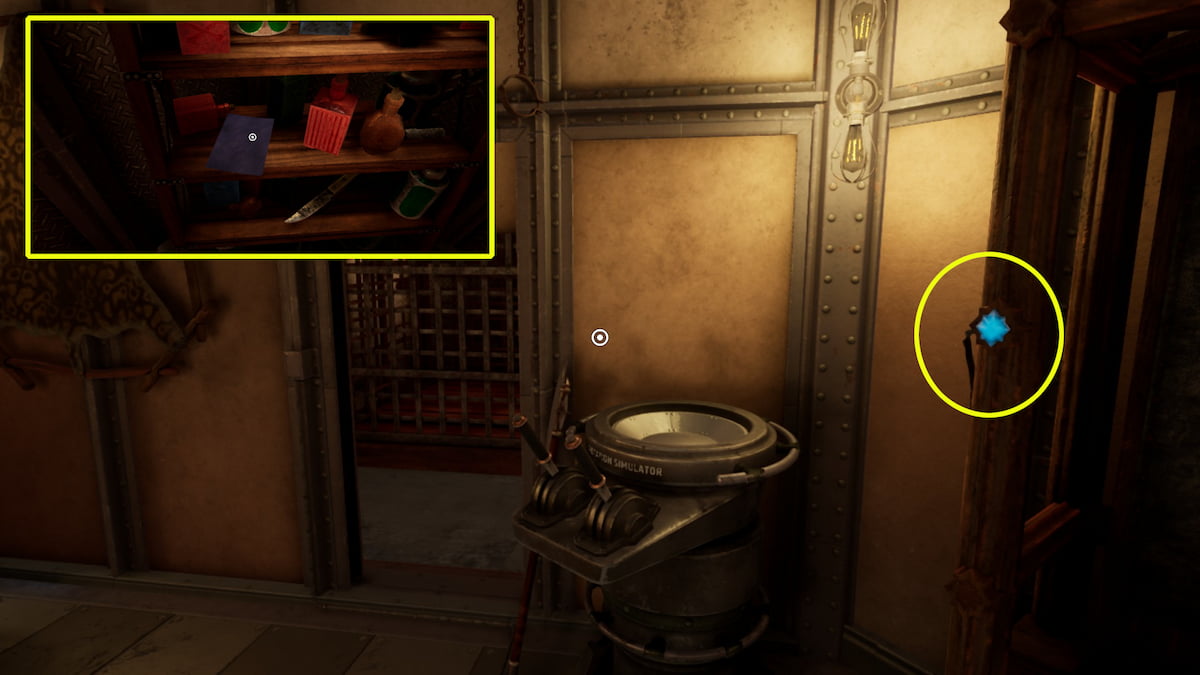
Stepping into Achenar’s chamber for the first time, I’m struck by a gruesome lamp fashioned from what appears to be a human ribcage. To my left lies a bed, while a desk stands ominously to my right. This desk sports an intriguing arrangement of six drawers, three on each side. The clue I seek – the other half of the hidden note – resides in the bottom right drawer. For the blue page, I must look no further than the top right drawer.
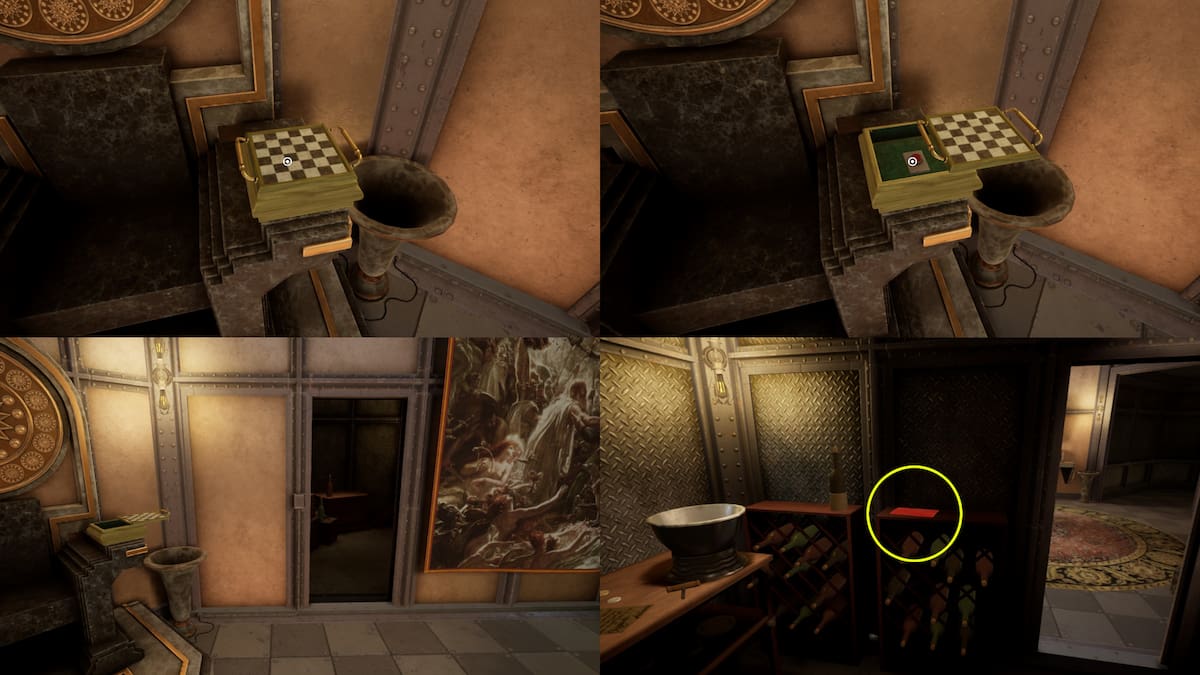
The Red Page in Sirrus’ Room
Sirrus’ desktop, found to your right upon entering his room, is where you’ll find his page. It sits atop the desk for easy visibility.
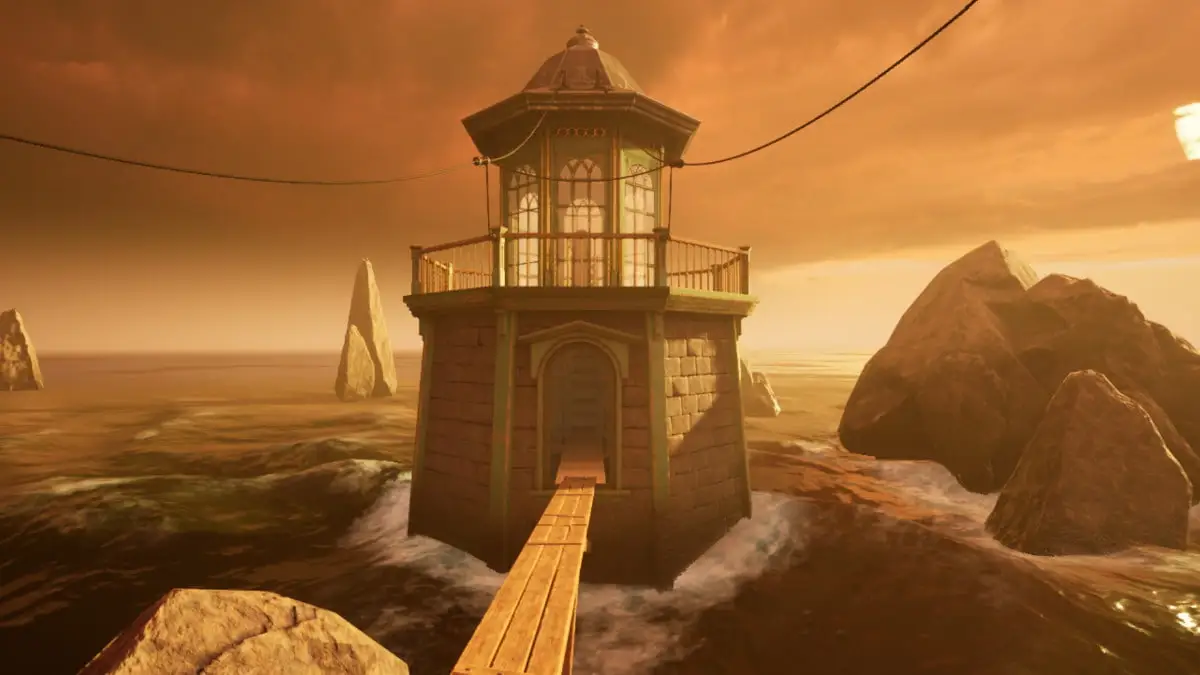
How to solve the Stoneship Age Puzzle and return to Myst Island
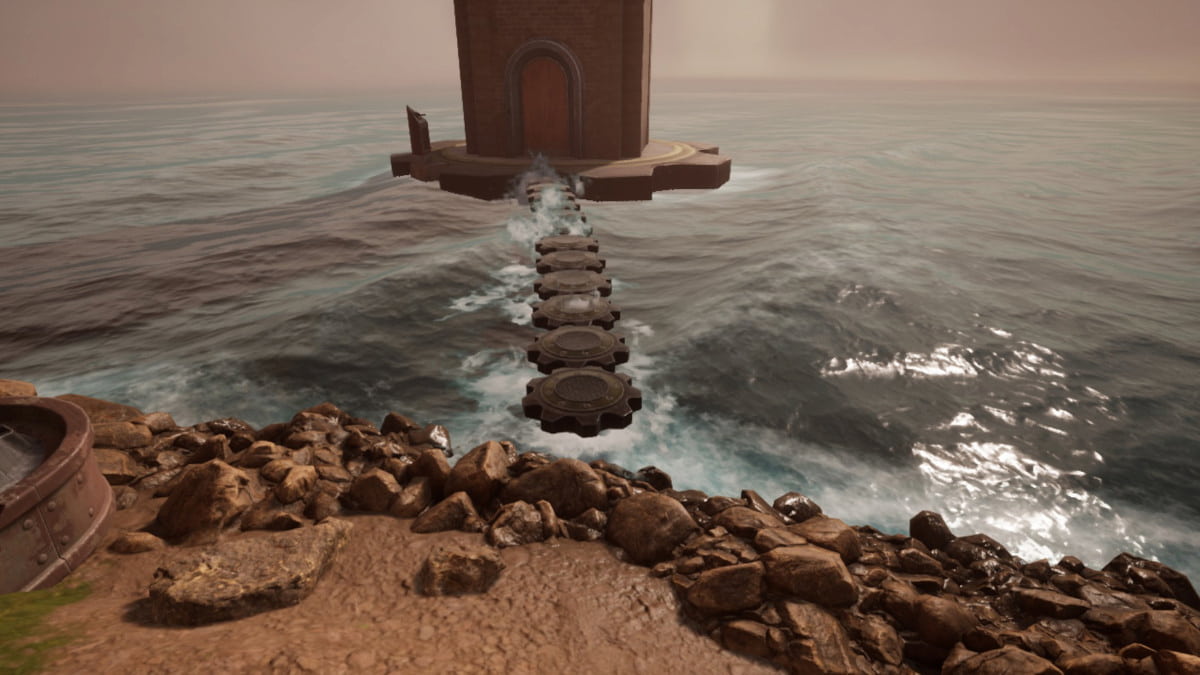
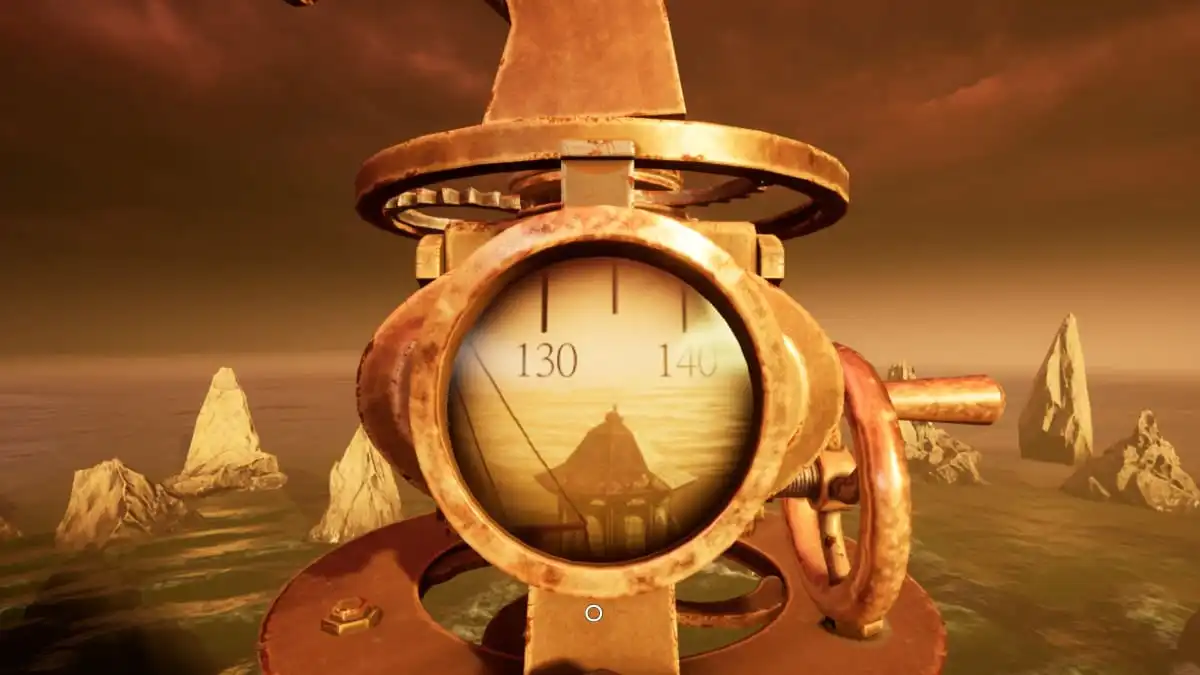
To return to Myst Island with your complete set of pages, you’ll need to climb up to the top of the lighthouse. First, head towards the highest point on the island and use the telescope to locate the lighthouse. The lighthouse will be at an angle of approximately 135 degrees (for simplicity, let’s call it ‘angle A’); remember this angle. Make your way back to the control panel, turn the lever to the right and press the button to drain the water from the lighthouse. Enter the lighthouse, then go down the stairs inside. At the base of the stairs, you’ll find a barrel with a valve; open the valve to release the water, then close it again to make the barrel air tight. This will enable the barrel to float when you fill the room back up with water using angle A as your guide.
Afterwards, return to the control panel and adjust the lever to the center position, causing the lighthouse to refill with water while simultaneously draining the brothers’ rooms. This action will cause the barrel containing the box to float upward, providing access to the box that has a key dangling from the ceiling. Retrieve the key by opening the box and then extracting it from within. Use this key to unlock the ladder leading to the top of the lighthouse.
As a gamer, I make my way up to the lighthouse’s peak and find a wheel at the summit. I give it a spin to ignite the power source, but be quick about it – the power won’t last long if the wheel isn’t turned frequently. After securing the power, I venture down the corridor towards one of the brothers’ rooms. Just before reaching the door, there’s a branch in the pathway that catches my eye. This detour leads me to the puzzle room where I encounter a compass challenge.
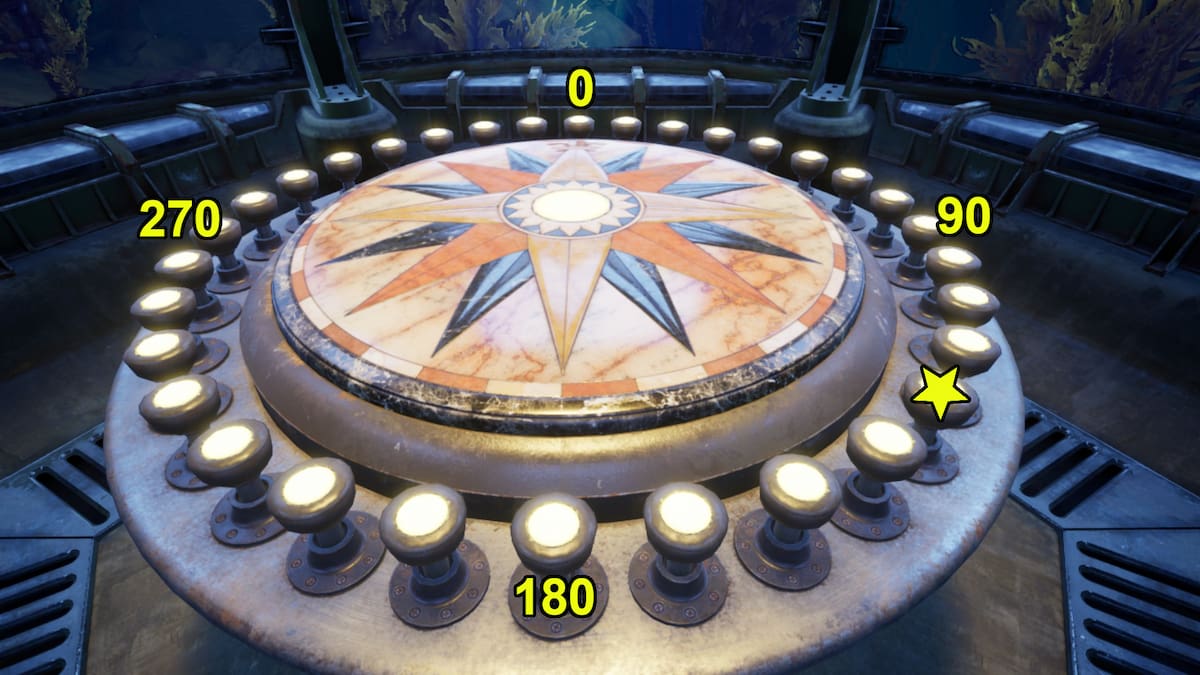
To find the solution, locate the position of the lighthouse in your game (it’s 135 in classic mode). Then, on your compass that has a decorative Fleur-de-lis symbol indicating North, count the buttons. Remember, each button represents approximately 11.25 degrees, so you would press the 12th button from the North/0 degrees button before the power goes out.
Achievement: Beacon
Solved the compass puzzle in the Stoneship Age.

After solving the compass riddle, return to the control panel. Shift the lever to the left, click the button, and make your way through the door that doesn’t lead to either brother’s room. This path will take you to a spacious study with an aquarium-like atmosphere. At the base of the stairs, you’ll find a desk. Press the button on this desk to discover the Myst linking book.
Achievement: Stoneship
Found a way back from the Stoneship Age.
The Selenitic Age
In my view, the Selenitic Age is undeniably the toughest among all the Ages. Being completely tone deaf, I find the sound-related puzzles particularly demanding compared to others. Fortunately, certain improvements have been incorporated, allowing you to tackle this section just once. The distinct audio cues are relatively easy to discern from each other, though they lack the audio subtitles found in the Riven remake. For those with hearing difficulties, I’ve provided a comprehensive guide on how to finish these sections without relying on sound. I strongly recommend playing this world with headphones whenever possible.
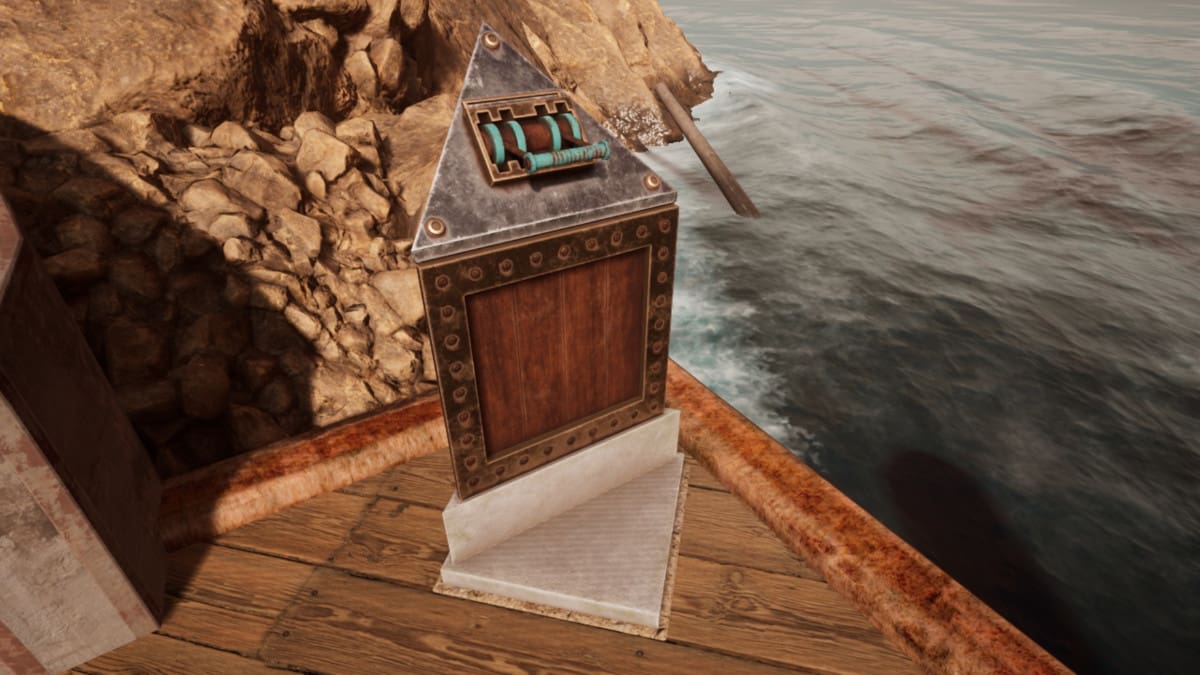
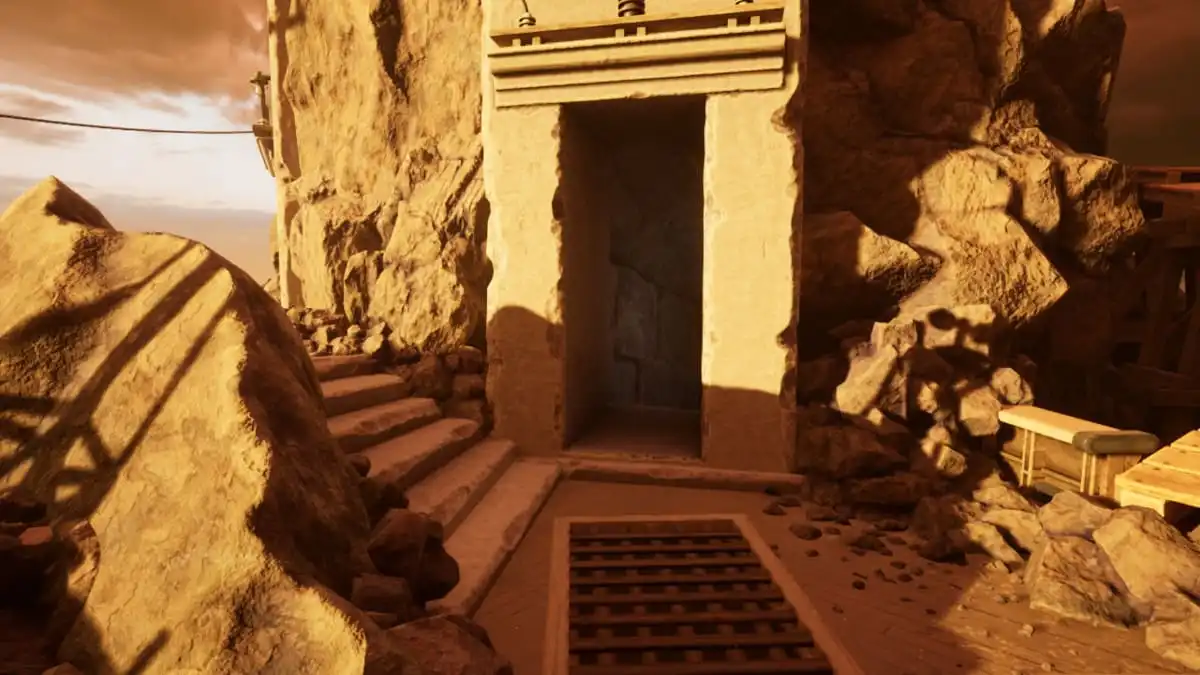
How to solve the rocket ship puzzle to go to the Selenitic Age
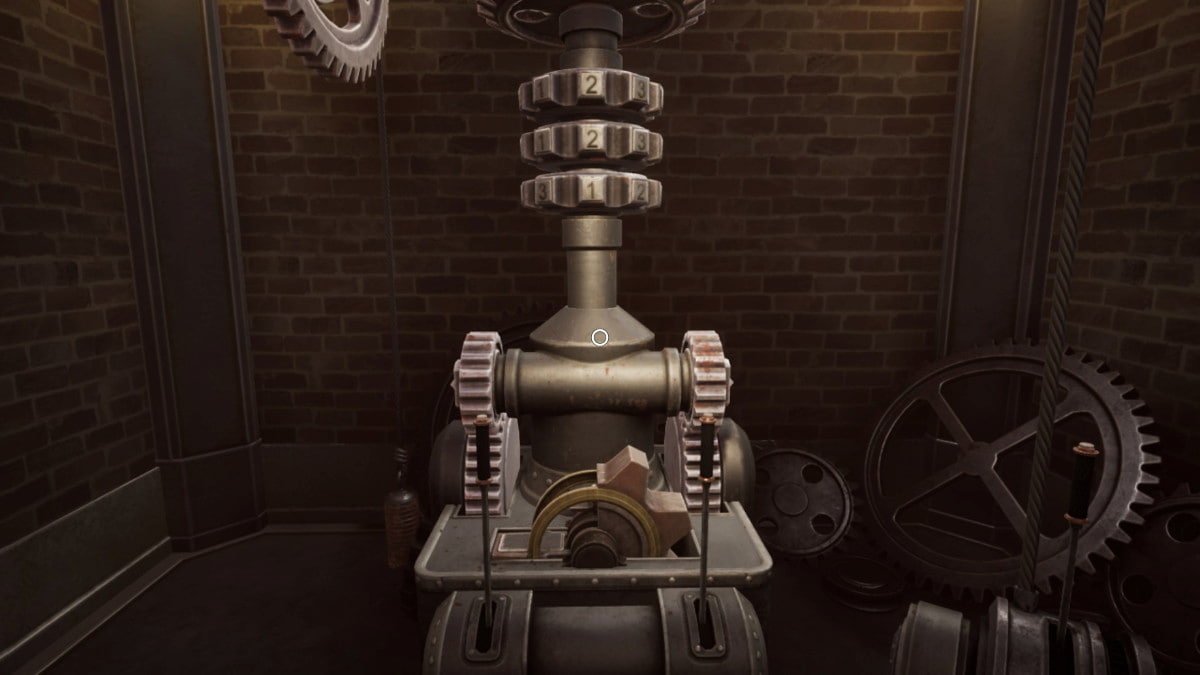
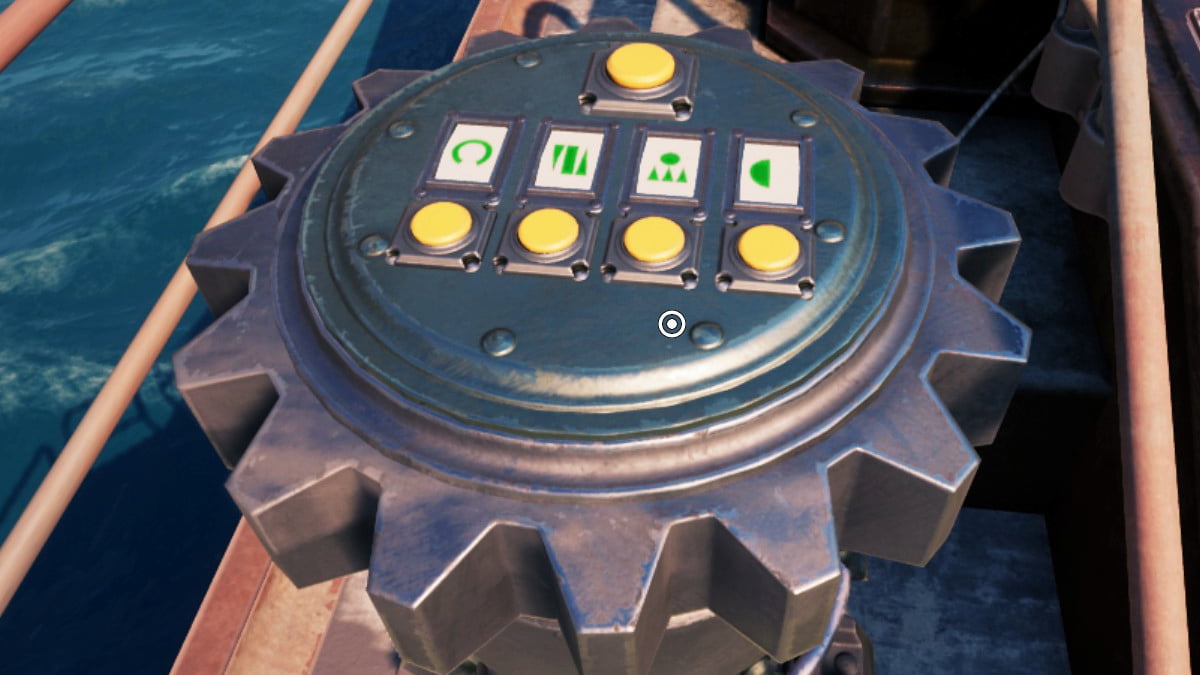
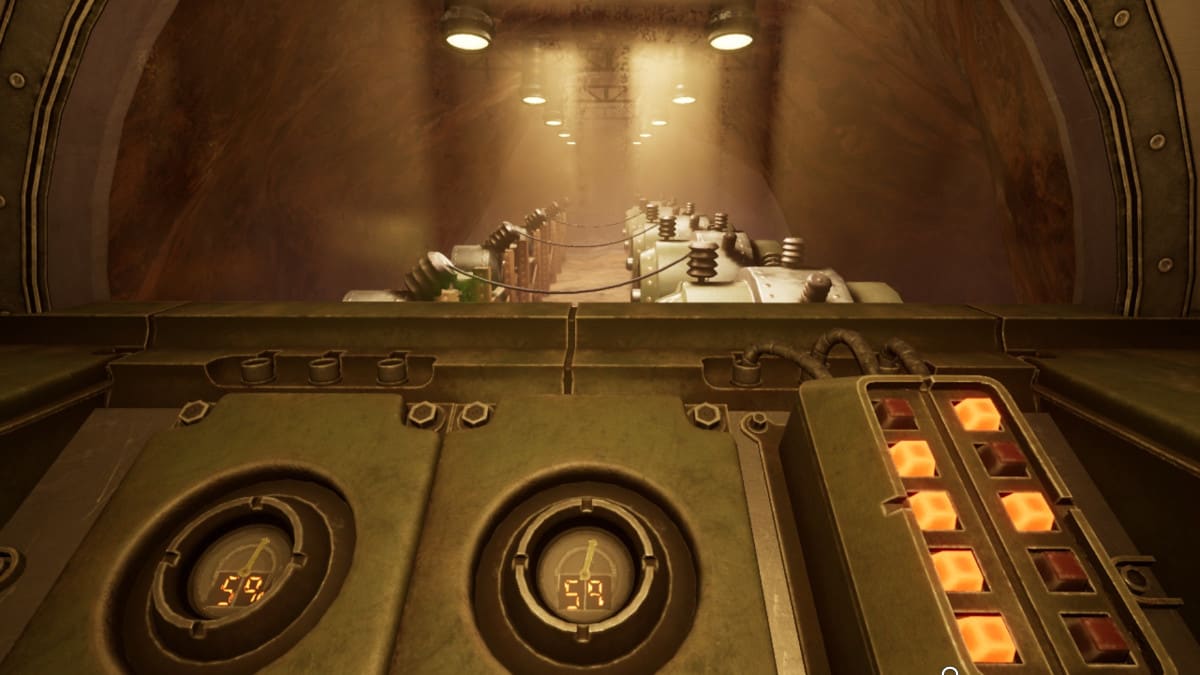
To find the solution for this puzzle, first, adjust the knob on the library map so it points towards the rocket ship. Then, head into the tower where a unique number will be displayed – let’s say it’s 59 (Randomized). To complete the puzzle, input this number as voltage into the machine located underground, making sure not to exceed that value.
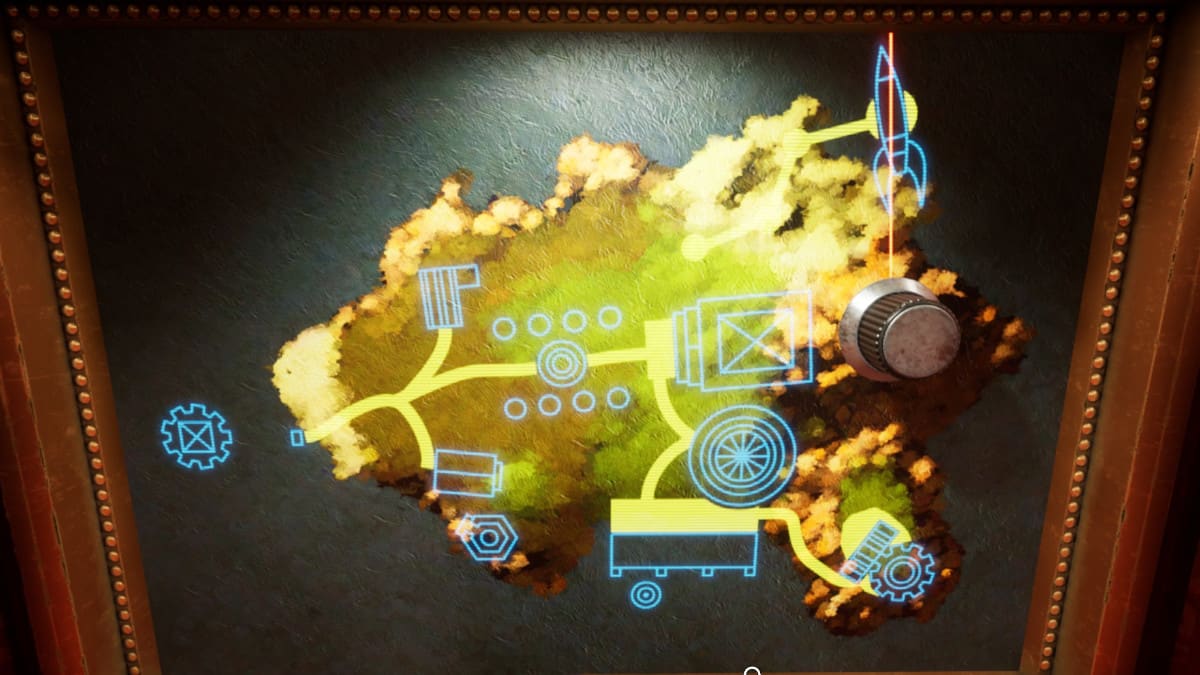

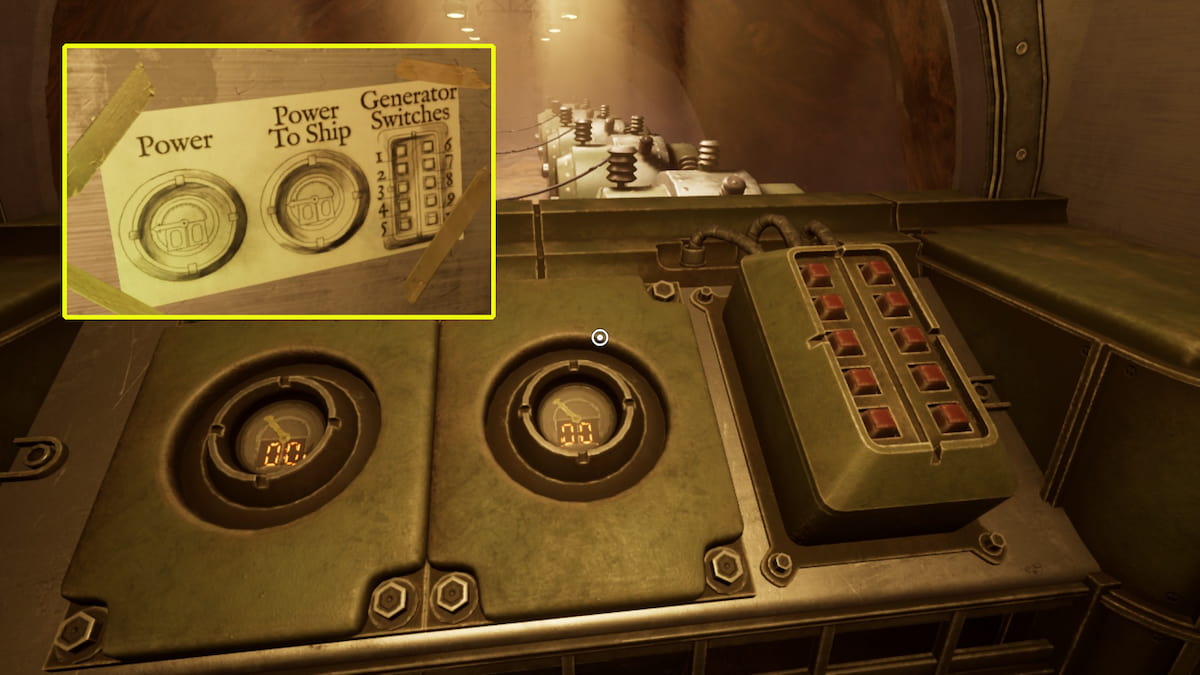
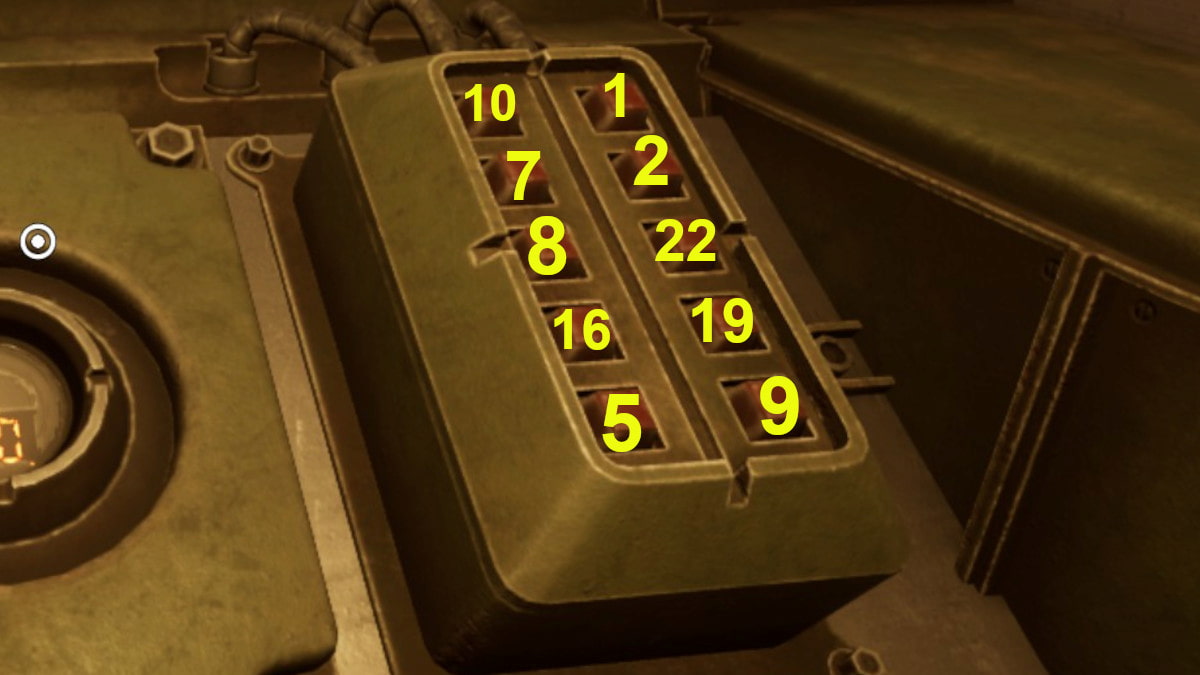
Descend into the brick structure with steps. At the foot of these steps, you’ll find a closed door; press the green button beside it to unlock it. Once you enter, you’ll notice a control panel with two dials and ten buttons. When you click each of these buttons, the figures within the dials will increase by a certain value. You can find the specific values for each button in the last image in the gallery above. Press the buttons to reach the number of volts indicated on the plaque inside the tower. If you exceed this number, the “Power to Ship” dial will remain fixed at zero, regardless of what buttons you press.
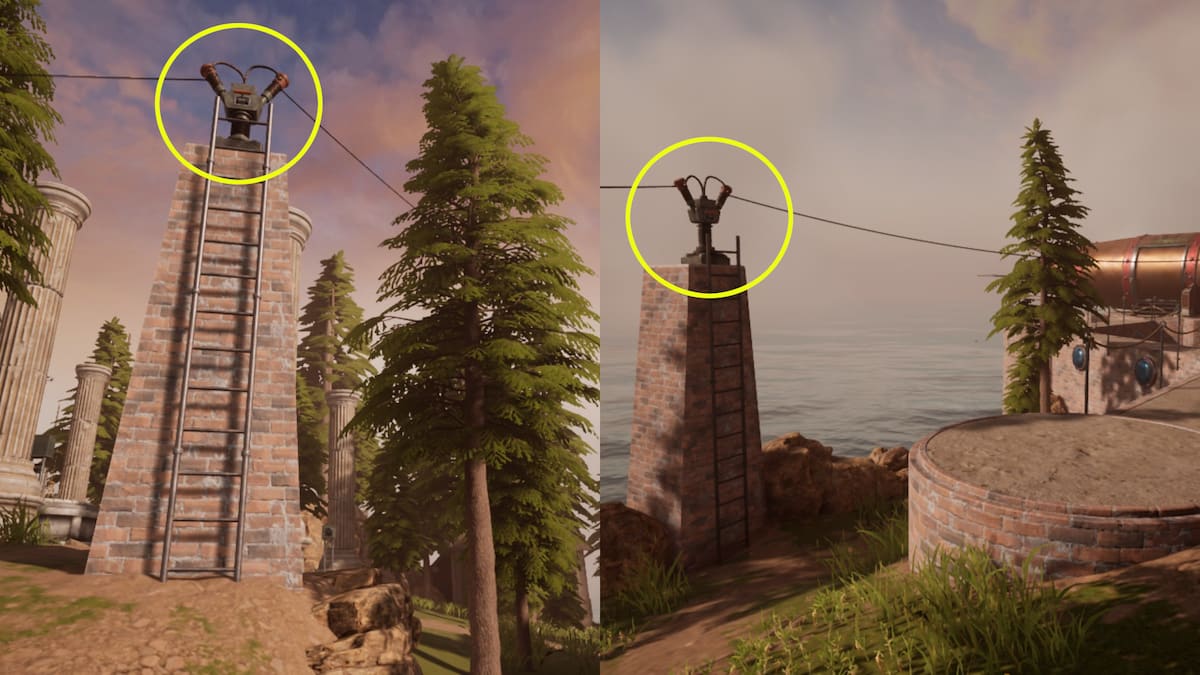
1. If the power goes out, you’ll need to venture outside to reset the fuses. Look for the switches located atop ladders next to brick pillars; give each switch a single pull to restore everything back to functioning order. To obtain precisely 59 volts using the buttons at your disposal, press buttons numbered 2, 3, 4, 5, 6, and 8.
Achievement: Journeyman Electrician
Solved the generator power puzzle on Myst Island.
Having spent countless hours poring over dusty old books and solving intricate puzzles as a child, I am more than excited to embark on this new adventure! The rocket ship on Myst Island, nestled next to the library, promises an enigma waiting to be unraveled. The piano puzzle within the vessel, I can only imagine, will test my wits and patience, much like the chess problems that kept me awake during long winter nights.
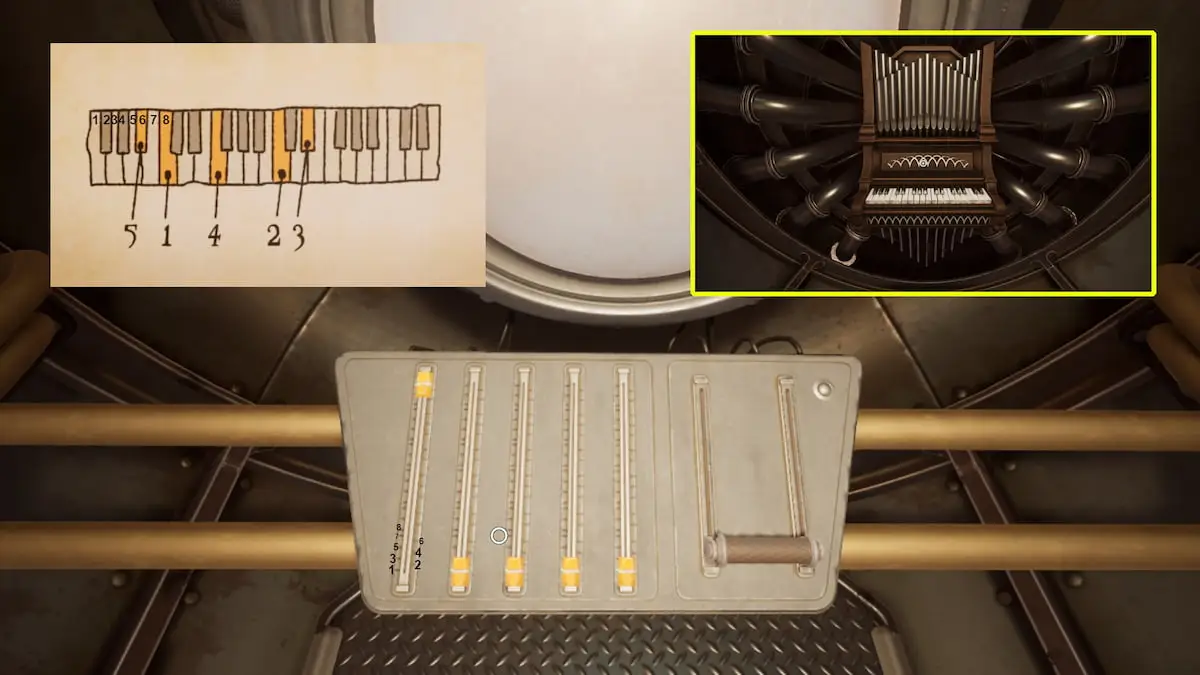
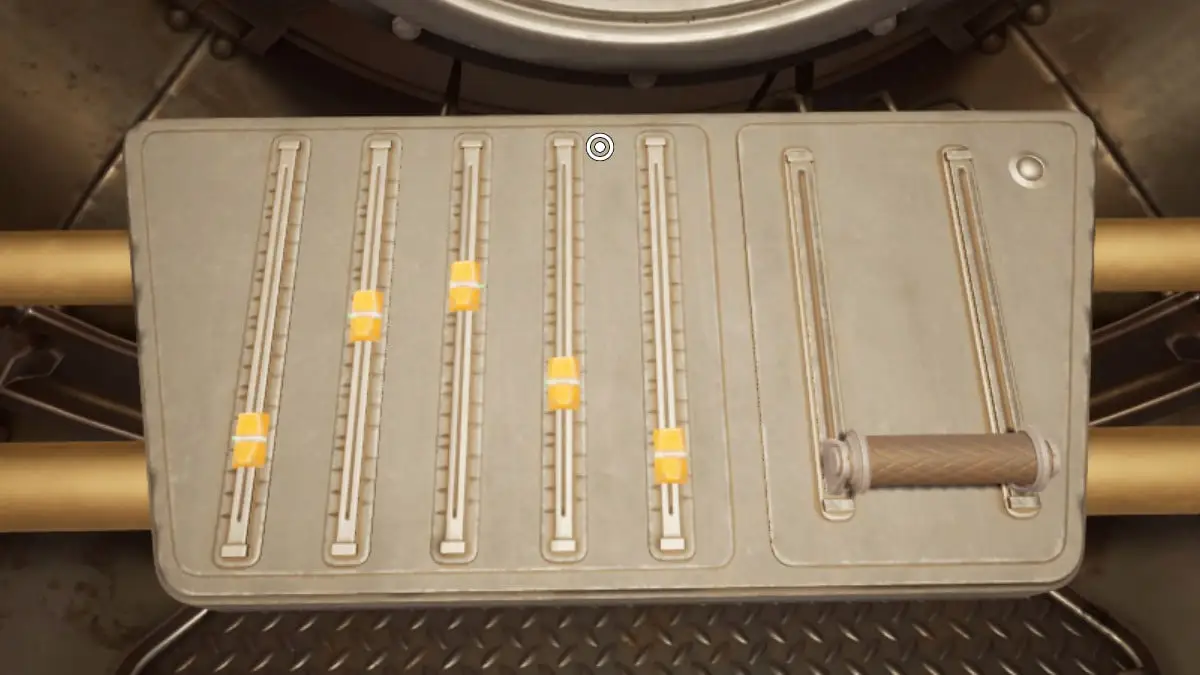
In simple terms, since I’m tone deaf, I can only solve this puzzle by counting the lines on the sliders and the keys. The classic solution requires starting the first key eight notes below the bottom, the second 20 notes below, and so forth. This simplifies the puzzle significantly. If you solve it correctly on your first try, you’ll earn an achievement. Once completed, a link to the Selenitic book will become accessible.
Achievement: Perfect Pitch
Solved the piano puzzle in one try on Myst Island.
Into the Selenitic Age linking book
Once within the Selenitic Age, start by collecting the pages belonging to the two brothers. Since there are no rooms here, they’ll be out in the open. By exploring and pressing the lit buttons next to each radar sign, you can locate them easily.
The Blue Page for Achenar
1) You’ll find the blue page situated by the area with the watery sounds. Start from the rocket location, take a left turn as soon as possible, then climb the steps. Keep an eye out for the bench close to the radar tower.
The Red Page for Sirrus
To find the red document, start at the launchpad, then continue moving forward until you’ve traversed the entire island. After that, turn right and head towards the crystals. The red page should be located near the crystal switch.
How to solve the Selenitic Age Surface Puzzle
Alright, this task can be quite complex as it involves connecting sounds with visuals. First, you need to activate all the buttons at each sound source. This action will cause the signs in front of them to illuminate and also turn on the radars above each sound location. Then, your goal is to locate the area where the geyser sound radar is positioned, and there, you’ll find a ladder leading down. At the bottom of the ladder, there will be a light switch. Use this switch to navigate through the underground caves; when I first played this version of Myst, I was startled by some bats that appeared after turning on the switch. After traversing the caves, climb up the ladder on the other side.
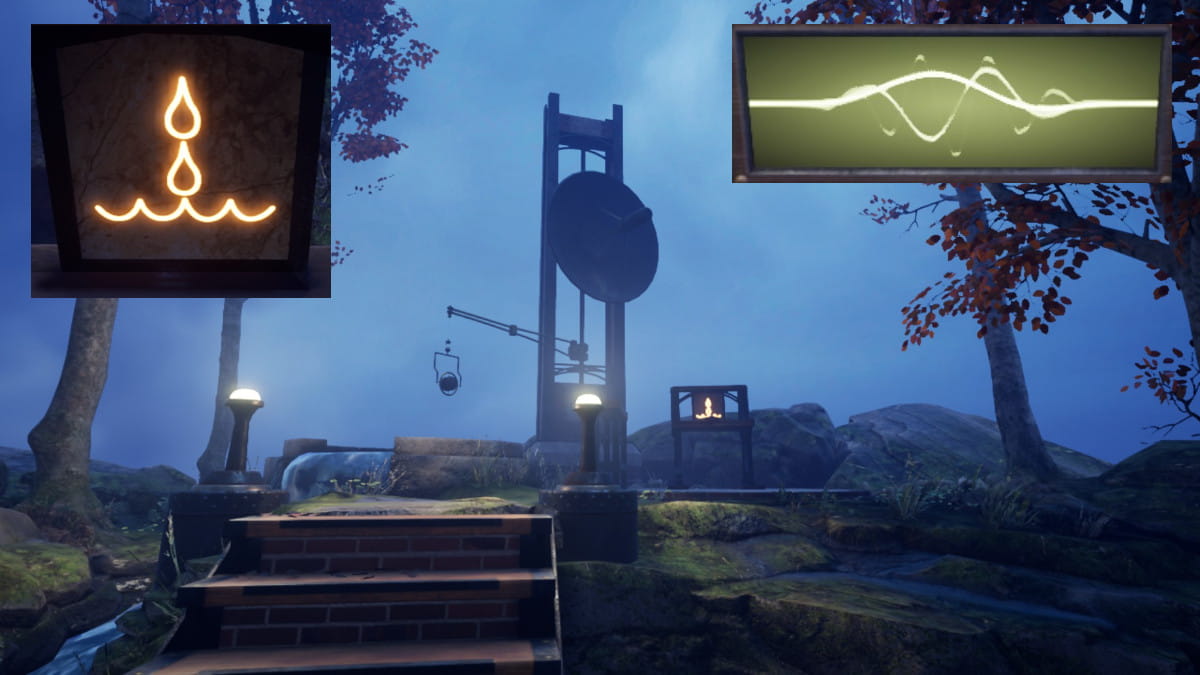
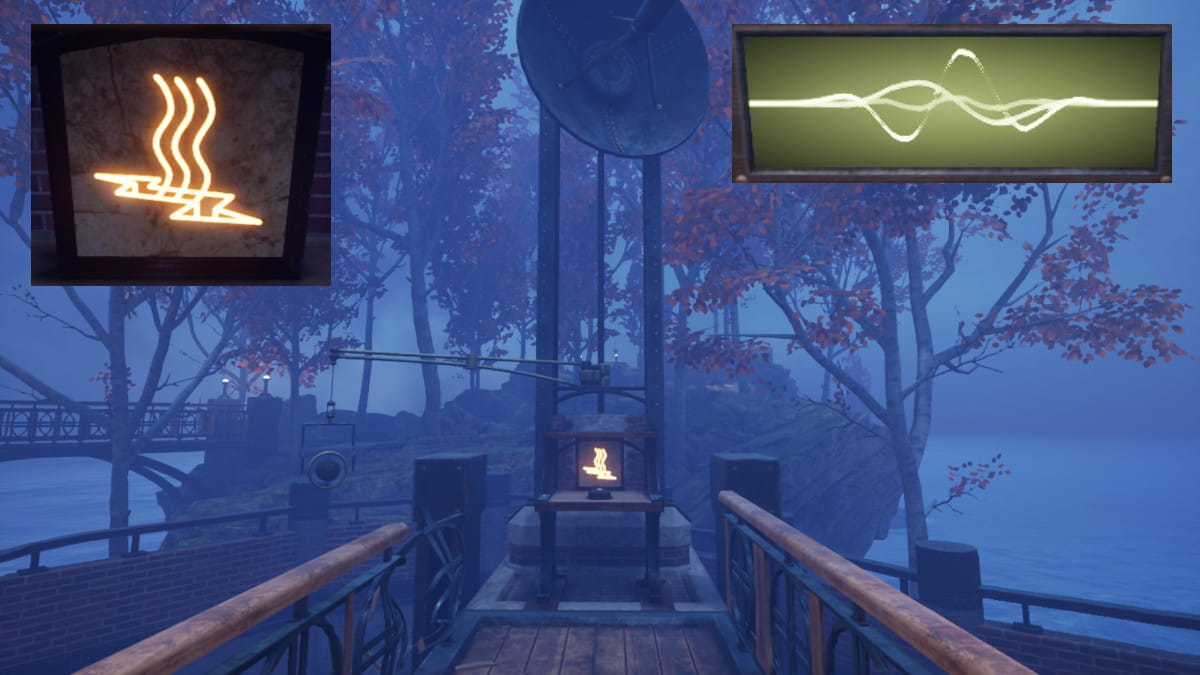

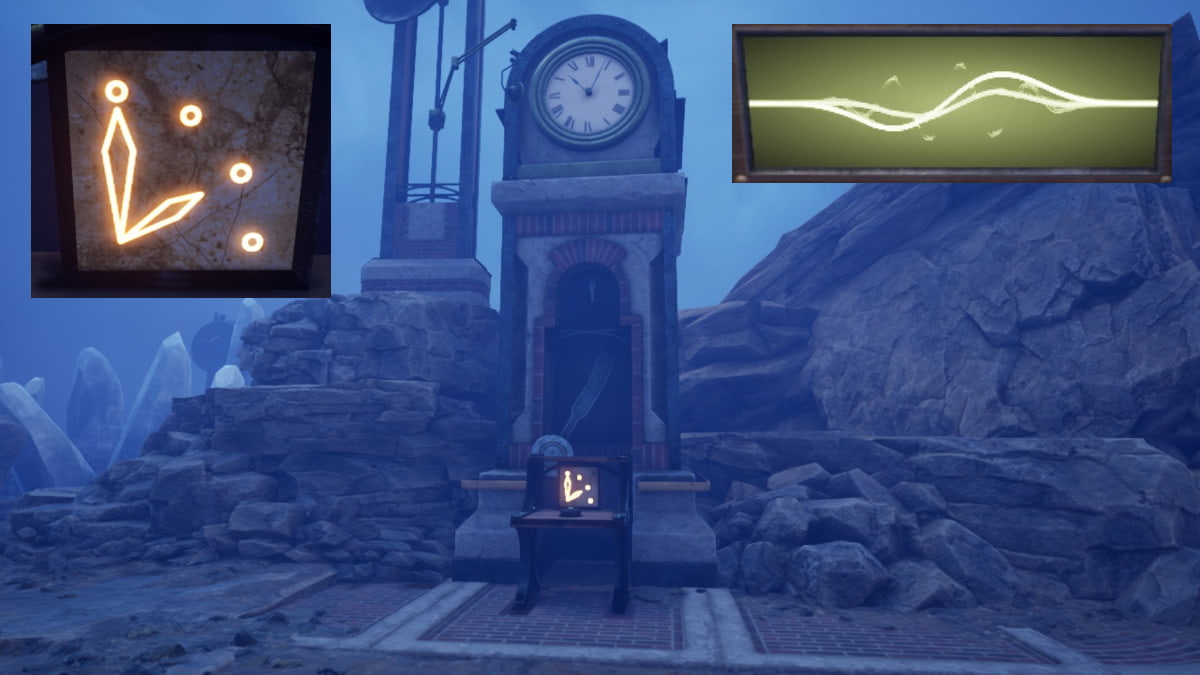
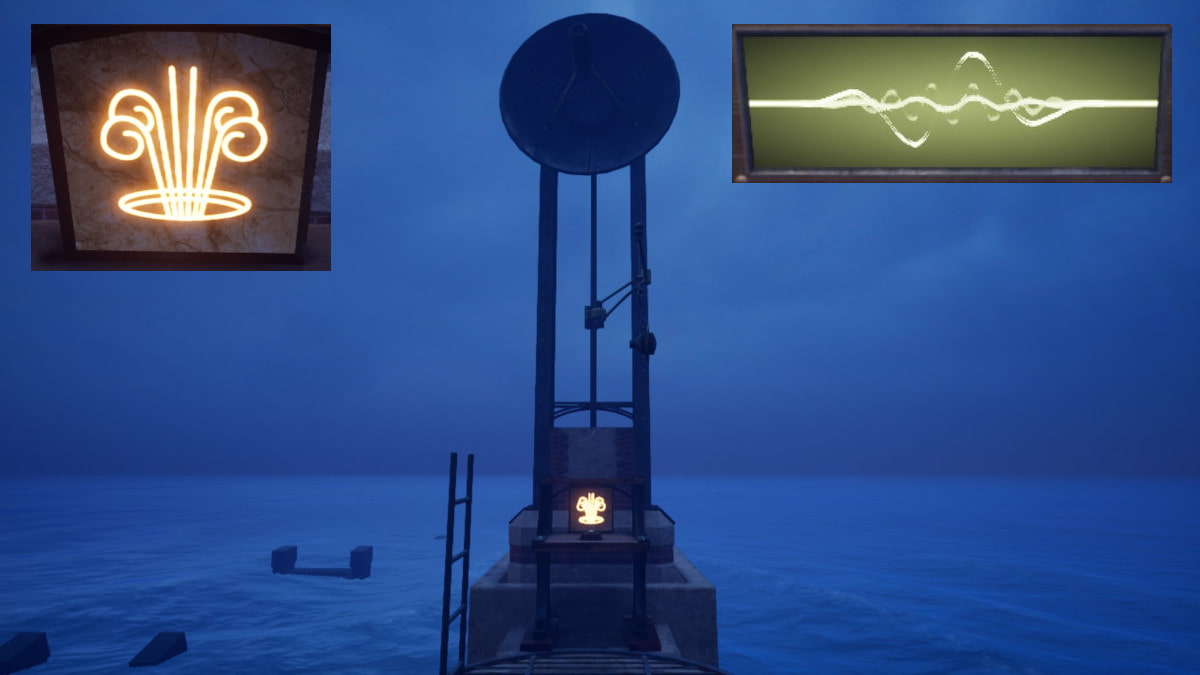
1. Ascend this ladder, and afterwards, inspect the device situated on this island. There are numerous antennas protruding, and a switchable panel at its base that adjusts the direction each antenna faces. Lift the panel and examine the buttons. Touch the initial button to illuminate the water symbol, then manipulate the arrow buttons left or right until the sound of water aligns with the radar positioned above the water sound. As you approach, you’ll notice the sound pattern filling in; remember that this function won’t operate unless you’ve activated the button next to the water radar to turn on the water radar sign.
After arranging all the sounds correctly onto their designated buttons, find the prominent “E”-shaped button positioned at the center bottom of the console. Pressing this button will randomly play a set of sounds. If you’ve successfully placed the five sounds on the corresponding radar towers, they will illuminate sequentially, as demonstrated in the video at 1:40. This is the answer to the puzzle, and these specific sounds must be inserted into the rocket ship door in the following order: Crystal, Water, Geyser, Lava, Clock.
As a seasoned explorer with years of adventure under my belt, I’ve encountered all sorts of strange and mysterious devices. But this one here, it’s got me intrigued. First things first, I press the button on the left, then I twist the knob until I hear that distinctive Crystal sound, akin to the echoes of ancient caves in my past expeditions. Next, I press the second button and turn the knob again, this time waiting for the soothing Water sound, reminiscent of the rivers and waterfalls I’ve crossed on my journeys. I continue this pattern, filling each sound, until at last, I reach the red circular button on the bottom right corner. If I’ve got the sequence right, all the sounds play in harmony, like a symphony of my life experiences, and the door to the next section swings open, revealing another mystery waiting to be solved. This is what makes every adventure worthwhile, isn’t it? The unknown, the challenge, the thrill of discovery. Let’s see where this leads us.
How to solve the Selenitic Age maze puzzle and return to Myst Island
With you now under ground, make your way into the vehicle ahead, then hit the ‘forward’ button. This will lower you onto the tracks, marking the start of the puzzle. Initially, the only path available is northward. Upon standing with your back towards the north, push the left lever forward. As you advance, a sound will be heard.
- North sounds like a bell ringing.
- The sound for south sounds like a hollow metallic bang sound, like someone hitting an empty tin can with a drumstick.
- The sound for west sounds a lot like a squirrel chittering.
- East is a sound like air being pushed out of a pressurized tube very quickly.
- Secondary directions will play two noises at the same time; for example, northwest would sound like a bell overlaid with a squirrel chitter.
If you’re finding it difficult to solve this puzzle, even with the provided assistance, I’ve got a well-known solution for you (This is a strategy often used in solving puzzles)).
- North
- West
- North
- East
- East
- South
- South
- West
- Southwest
- West
- North
- Northeast
- North
- Southeast
Achievement: Never Lost
Made it through the maze in the Selenitic Age without backtracking once.
After navigating the labyrinth successfully, step out of your vehicle and ascend the staircase. You’ll find the portal back to Myst Island waiting for you at the summit of those steps.
Achievement: Selenitic
Found a way back from the Selenitic Age.
Getting to the End
After gathering all the necessary pages for your chosen brother, make your way back to Myst Island’s library. Place the final page in either the red or blue book, which will prompt your brother to provide you with one final set of instructions. Inside the library, locate a book containing all the puzzle solutions and find solution number 158. Input this number into the panel situated within the fireplace in the library.
Achievement: Firecracker
Solved the fireplace puzzle on Myst Island.
All Endings for Myst Remake
Much like in past Myst games, there are only four conclusions to discover. You can acquire the unfavorable conclusion with Atrus, the unfavorable outcome with Sirrus, the unfavorable ending with Achenar, or the favorable ending. Here’s a guide on how to obtain each of these endings to collect all achievements and view every possible outcome.
The bad ending with Sirrus
As a seasoned adventurer with countless journeys under my belt, I can tell you that to reach the desired conclusion, it’s essential to gather all the crimson pages scattered about, even the one hidden in the fireplace on the enigmatic Myst Island. Once retrieved, carefully return these pages to the volume known as “Sirrus’ Book.” After ensuring all pages are accounted for, the magical transformation will occur, and you’ll find yourself trapped within Sirrus’ tome, just like I once was in my own escapades.
Achievement: You Fool!
Achieve the bad ending with Sirrus
The bad ending with Achenar
Much like how Sirrus was left with the blue documents for Achenar, thus liberating him, your action would result in returning all those blue pages to Achenar. In turn, you’d find yourself trapped within his ‘trap book’, doomed to hear the continuous drone of emptiness until your end arrives.
Achievement: I’m Free!
Get the bad ending with Achenar
The bad ending with Atrus
If you retrieve the green D’ni book but fail to include the final white page from Myst Island before entering it, neither you nor Atrus will have a way to return to Myst Island. Essentially, you’ll be trapped there indefinitely with no means of escape. Furthermore, if Atrus doesn’t possess both the book he’s writing for Riven and additional linking books from the library, the events leading to Riven might not occur, as Atrus needs those resources to rescue Catherine from her imprisonment.
Achievement: Roommates
Get the bad ending with Atrus.
The good ending
To achieve this conclusion, follow these steps: Retrieve the white page from Myst Island, proceed to the green book, where Atrus will welcome you and request the return of the white page for his linking book completion. Obtain the white page by activating all Marker Switches on Myst Island, then deactivating the one on the dock (Randomized). Once this is accomplished, feel free to explore D’ni, Myst Island, and the other linked ages until the start of Riven: The Sequel to Myst.
Achievement: Inside
Found the white page.
Achievement: Everything in its Place
Get the best possible ending.
All Achievements in Myst
In the guide provided, several accomplishments are detailed, but some require extra effort to unlock. Here’s a comprehensive list of all 26 achievements and their completion methods. First, here are the achievements that were discussed earlier as they are significant in the gameplay.
- Can Opener: Solved the gear puzzle inside the clock tower on Myst Island.
- It’s Bob! Found the skeleton in the Mechanical Age. Note: This achievement didn’t work for me, and it seems like it didn’t work for some others on Reddit.
- Mechanical: Found a way back from the Mechanical Age.
- Safecracker: Open the safe in the hut on Myst Island.
- Top of the World: Rode the tree elevator all the way to the top on Myst Island.
- He is Preparing: Found Sirrus’ Message to Achenar on Channelwood.
- Channelwood: Found a way back from Channelwood.
- Stargazer: Viewed some dated constellations on Myst Island.
- Salvager: Raise the sunken ship on Myst Island.
- Beacon: Solved the compass puzzle in the Stoneship Age.
- Stoneship: Found a way back from the Stoneship Age.
- Journeyman Electrician: Solved the generator power puzzle on Myst Island.
- Perfect Pitch Solved the piano puzzle in one try on Myst Island.
- Never Lost: Made it through the maze in the Selenitic Age without backtracking once.
- Selenitic: Found a way back from the Selenitic Age.
- Firecracker: Solved the fireplace puzzle on Myst Island.
- You Fool! Get the bad Sirrus ending.
- I’m Free! Get the bad ending with Achenar.
- Roommates: Get the bad ending with Atrus.
- Inside: Found the white page to get the good ending.
- Everything in its place: Achieved the good ending.
These unique accomplishments weren’t detailed in the guide earlier as they require a specific action to unlock, which didn’t align with the content presented there. Below, you’ll find these trophies along with explanations on how to earn each one. Enjoy!
- Stack Overflow: On Myst Island, put all the red pages or the blue pages on the shelf without putting any of them into their respective books.
- Speedy: Achieve the good ending within two minutes. Note: This achievement didn’t work for me, and it seems like it didn’t work for some others on Reddit.
- D’ni: Returned to Myst Island from D’ni after the good ending is over.
- Know-It-All: Achieved the good ending without inserting a single red or blue page into the red or blue books.
- After All of That Effort: Achieve one of the bad brothers’ endings while doing a randomized playthrough.
To get solutions for puzzle games, take a look at the Mystery Detective Adventure Walkthrough – Case 1 available on GamerTop instead.
Read More
- CKB PREDICTION. CKB cryptocurrency
- EUR INR PREDICTION
- PENDLE PREDICTION. PENDLE cryptocurrency
- PBX PREDICTION. PBX cryptocurrency
- ICP PREDICTION. ICP cryptocurrency
- USD DKK PREDICTION
- USD VND PREDICTION
- GEAR PREDICTION. GEAR cryptocurrency
- IMX PREDICTION. IMX cryptocurrency
- CSIX PREDICTION. CSIX cryptocurrency
2024-08-08 15:24