As an old-time Fire Emblem player, I must say that the Legend of the Sacred Stones has been quite the rollercoaster ride! The board game puzzle was a nice touch and reminded me of my days spent solving riddles in ancient temples.
Title “Legend of the Sacred Stones” is a well-liked choice within the “Adventure Escape Mysteries” collection. For those aiming to rescue Tempus’ citizens from the enigmatic spreading illness, here’s a complete walkthrough and puzzle solution overview.
As an ardent admirer, I’d say that the AE Mysteries game series is a collection of captivating point-and-click journeys. In these games, you embark on a quest where you need to discover and assemble objects, solve intricate puzzles, and conquer mini-games to progress the storyline.
How to beat AE Mysteries Legend of the Sacred Stones – Full walkthrough
Your journey kicks off at Tempus Island, a place where four venerable temples have lain dormant for centuries. Hidden within each temple lies a powerful artifact, the sacred stones, to prevent any individual from acquiring all four and amassing tremendous power. In this game, you’ll assume the role of Alia, working diligently to thwart Milo as he attempts to breach these temples.
To enjoy the latest editions of the game on Steam, all you need is to download the gratis Adventure Escape Mysteries app and install it. Once installed, opt for Legend of the Sacred Stones. The game consists of eight chapters; if you require guidance on a specific part, consult the table of contents provided. You can complete the entire game without charge, but keep in mind that new chapter keys will be accessible every two hours.
Legend of the Sacred Stones Chapter 1 walkthrough
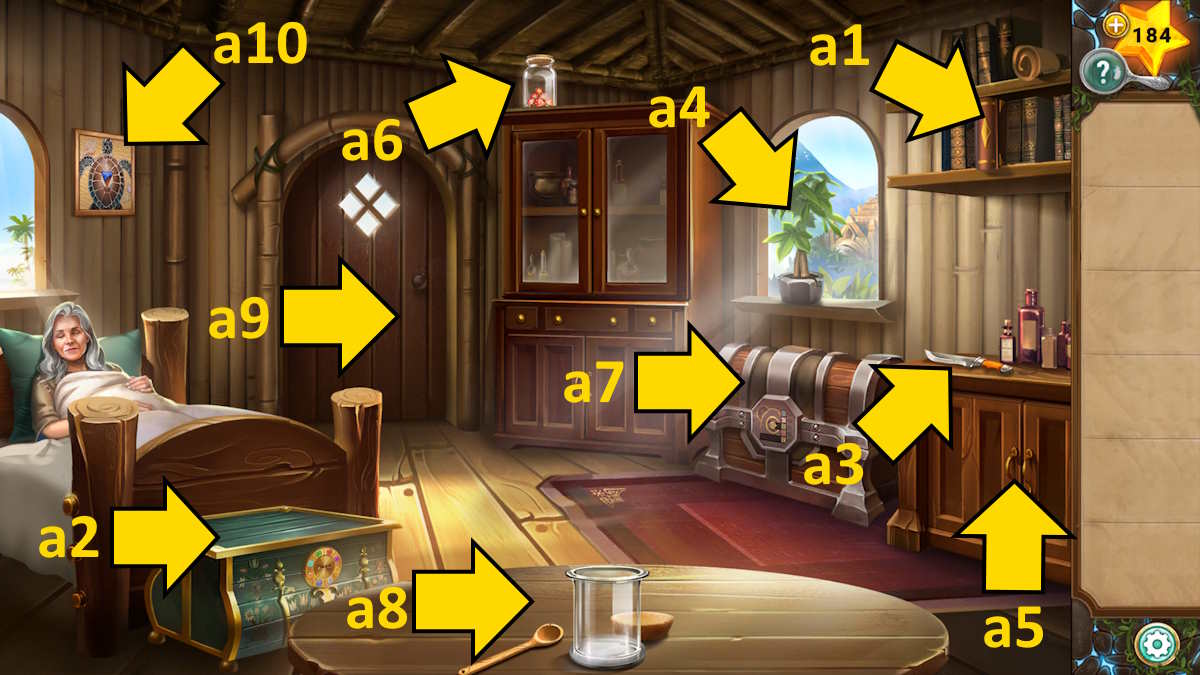
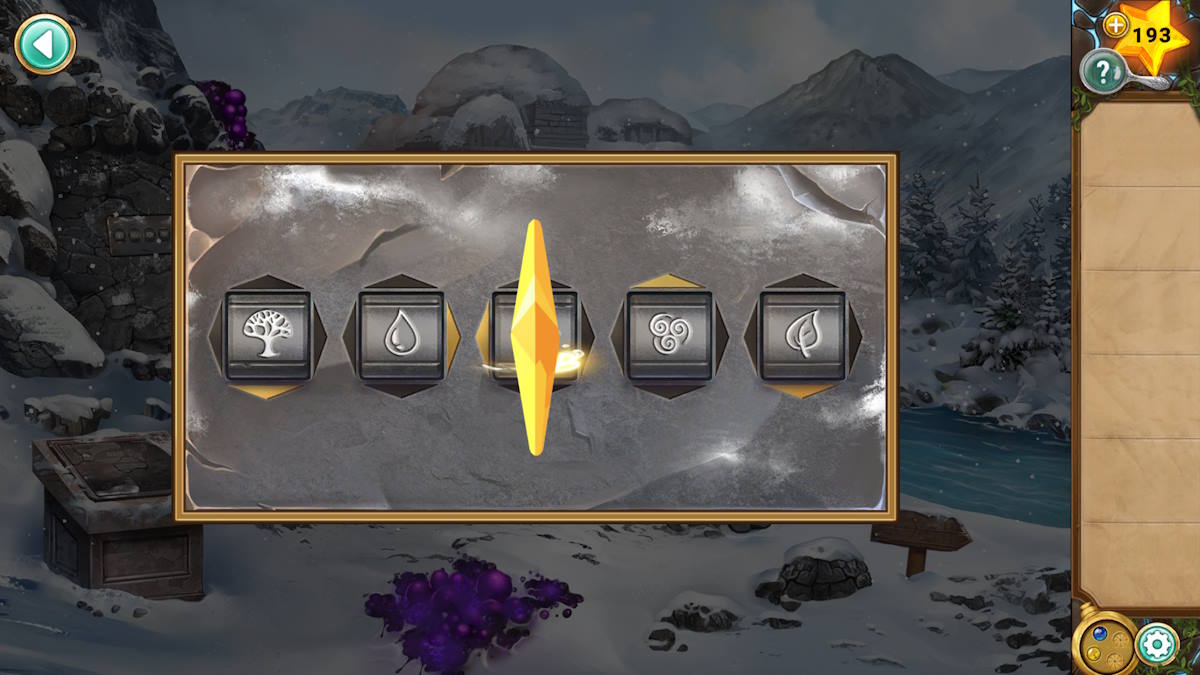
Once Arthur departs with the intention of halting Milo, it falls upon you to prepare a restorative concoction for your mother. To obtain a clearer view, click on the book on the shelf (a1). Upon clicking again, it will open and reveal information about the stones. Remember that the sequence of elements in this book follows wind, water, earth, and fire.
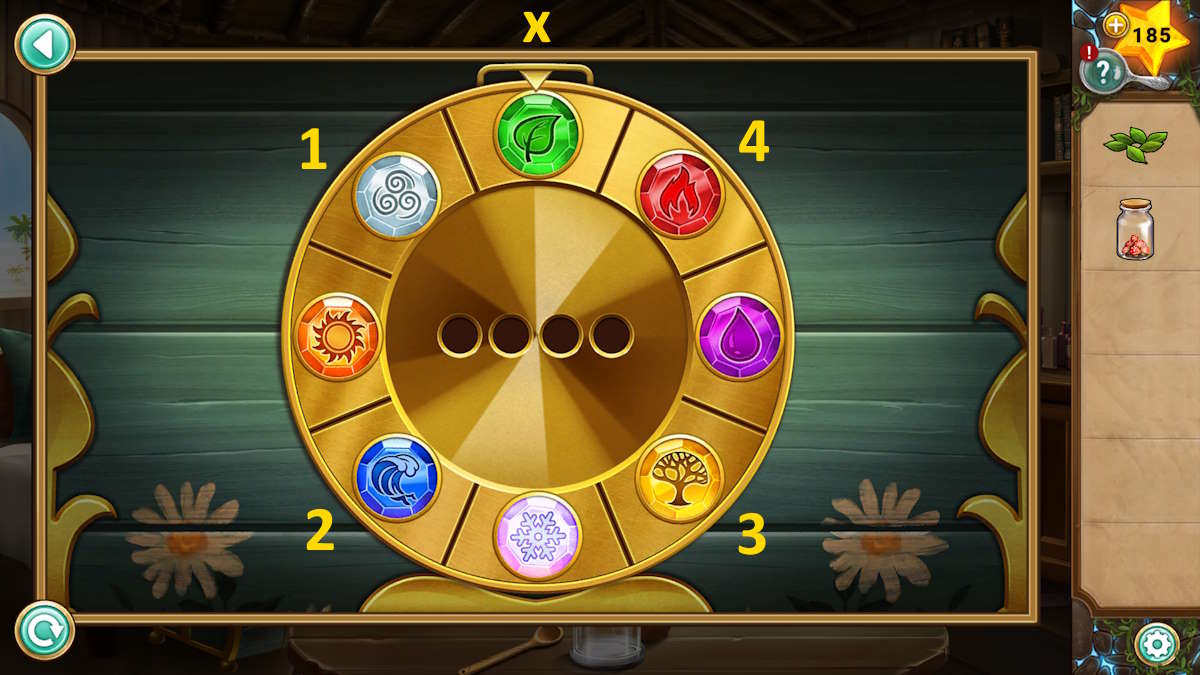
Choose the chest located at the foot of the bed (alternative 2), then employ the code for it to unlock it. The sequence is as shown, starting with the top symbol and moving all the way to position ‘x’. Retrieve the Rune Block and Spell Book hidden within.
1. Grab the knife located in the cabinet (action 3) and employ it from your supplies to clip some leaves off the plant on the windowsill (action 4). Proceed to open the cabinet (action 5), then take the step ladder, and use that to harvest some toadstools (action 6).
How to complete the hut chest puzzles
Next, pick up the chest located beneath the window (a7), and place the rune block there to initiate another puzzle. Each block should be correctly aligned within its column for the puzzle to be solved. To do this, you’ll need to utilize the central slot and the sliding area at the bottom of the chest. When moving a block into the mechanism, it will transfer it to the other axis, either from side to bottom or vice versa. However, this can only happen if there is an empty space where it would be placed.

In this place, there’s no chance of failure. It’s all about trying different approaches, and eventually, you’ll obtain the coveted Moon Elixir. But if you’re seeking a comprehensive guide, here it is:
- Use the center to move red to the bottom row and into the far left corner
- Move yellow below the central mechanism and move white, green, and blue down into the corner.
- This allows you to use the mechanism in the middle to flip yellow into the right column and move it into its correct top spot.
- You can now move red in the same way as you did yellow, into its correct spot below yellow.
- Do the same with white, and you’re done.
Pick up the table labeled as ‘a8’. Arrange the spell book, leaves, moon elixir, and toadstools on this table. To replicate the five recipe lines from the book, use the code provided (located on the left page). The symbols represent the following:

- Moon elixir
- Leaf, leaf, toadstool
- Spoon (liquid turns green)
- Moon elixir, toadstool, leaf, toadstool, moon elixir
- Spoon (liquid turns red)
- Leaf, toadstool, moon elixir, toadstool, leaf, toadstool (note this will leave one leaf on the table)
- Spoon (liquid turns purple)
After completing the task, you’ll get the “Rejuvenating Elixir”. Take it to Selma, inform her that Arthur has gone to the Temple of Spring, and she will hand over the “Terra Talisman” to you. Then, click on door ‘a9’ to step outside.
Digging outside the hut
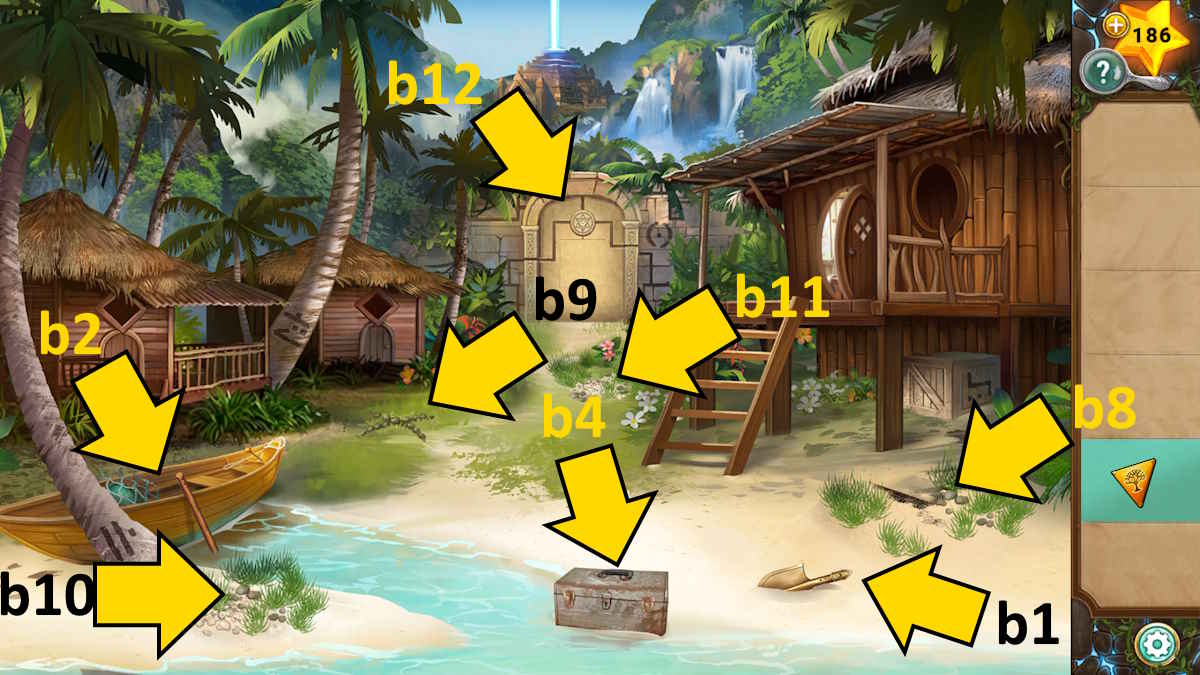
Take the Shovel Blade (b1) and then click the boat (b2) for a close-up.
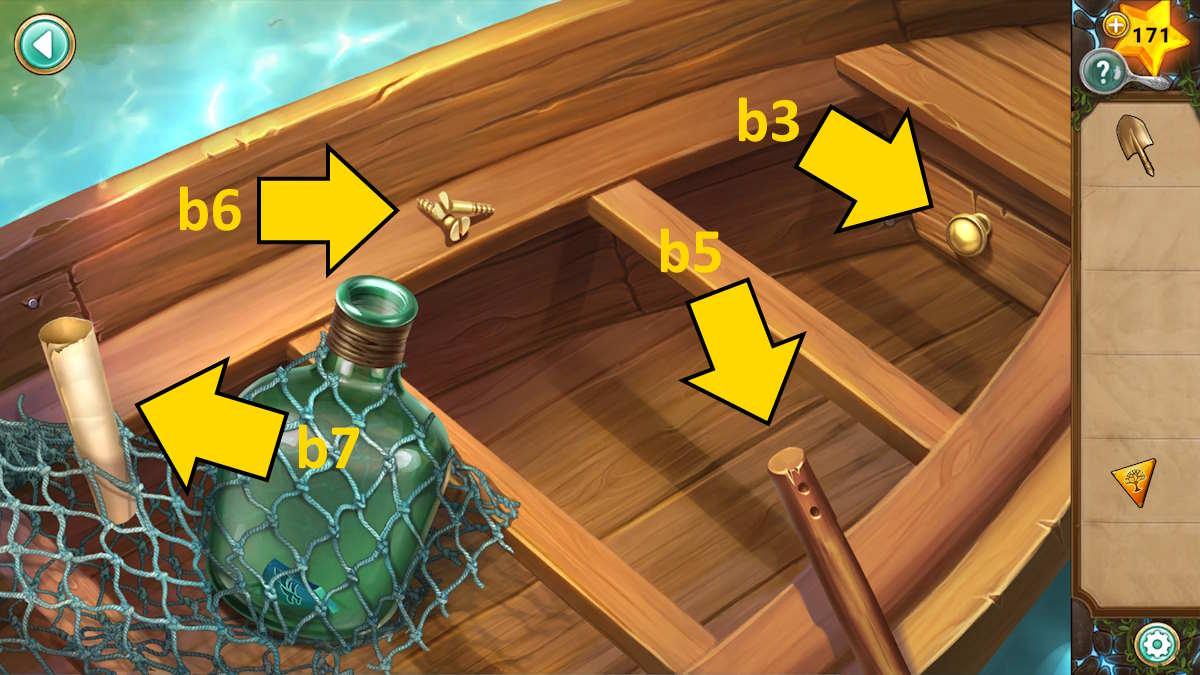
To open the drawer labeled ‘b3’, click on it and grab the ‘Key’ inside. Use this key to unlock box ‘b4’ where you’ll discover a ‘Screwdriver’. Attach the shovel blade to the ‘handle’ (located in the boat close-up) and then select the ‘Screws’ (from ‘b6’) to add them to the shovel. Use the screwdriver on the shovel to be able to lift the ‘Shovel’. Lastly, read the note found at ‘b7’ which is from Milo, indicating his intention to attempt stealing the stones.
Dig up the hidden wooden box in the sandy area, only to discover some parts are missing upon opening it. Then, Ollie informs you that Milo is working on a cure for the sickness affecting everyone. Next, dig at the spot marked X to uncover a bucket, and use it by the sea to obtain a bucket filled with water.
Use the bucket located by the boat near position b7 to drain out and collect the Water Pendant Half. Then return inside the house and place this half onto the turtle image on the wall at location a10, earning you the Water Pendant.
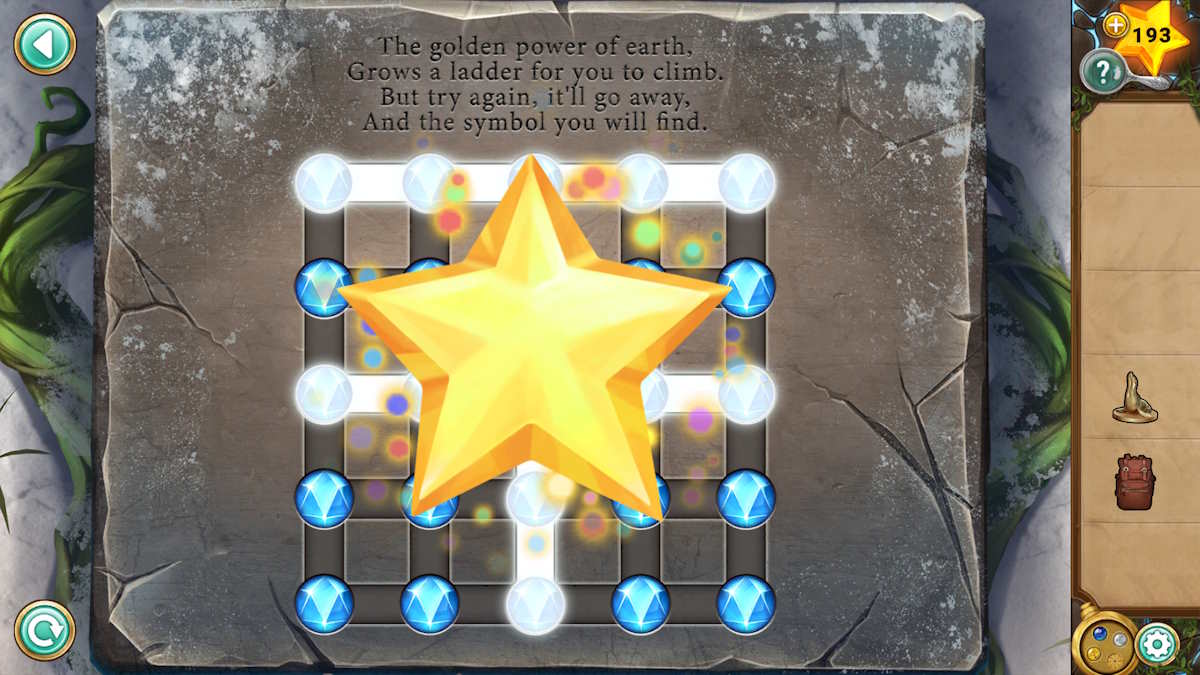
First, dig with the shovel in the area on the left that contains sand (b10), to unearth a Wind Charm. Next, move to the central back region (b11) and uncover a locked chest. The sequence in which you should press the four buttons is determined by locating the four distinct images within the primary picture.
- Bottom left: The tree by the boat
- Top left: The tree between the left huts
- Top right: On the wall to the right of the door
- Bottom right: On the box underneath your hut
Keep clicking the buttons on the box until the symbols align with their corresponding positions in the image. When they’re correctly arranged, the box will unlock, giving you access to grab the Fire Pendant.
How to complete the four-pendant puzzle
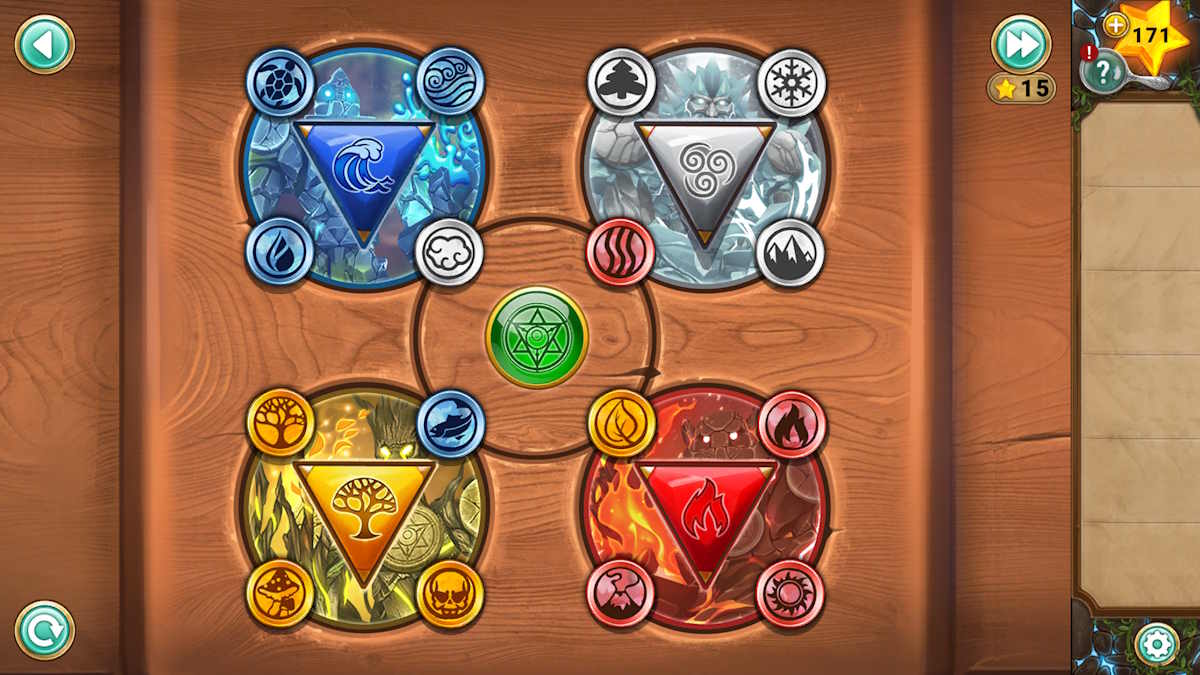
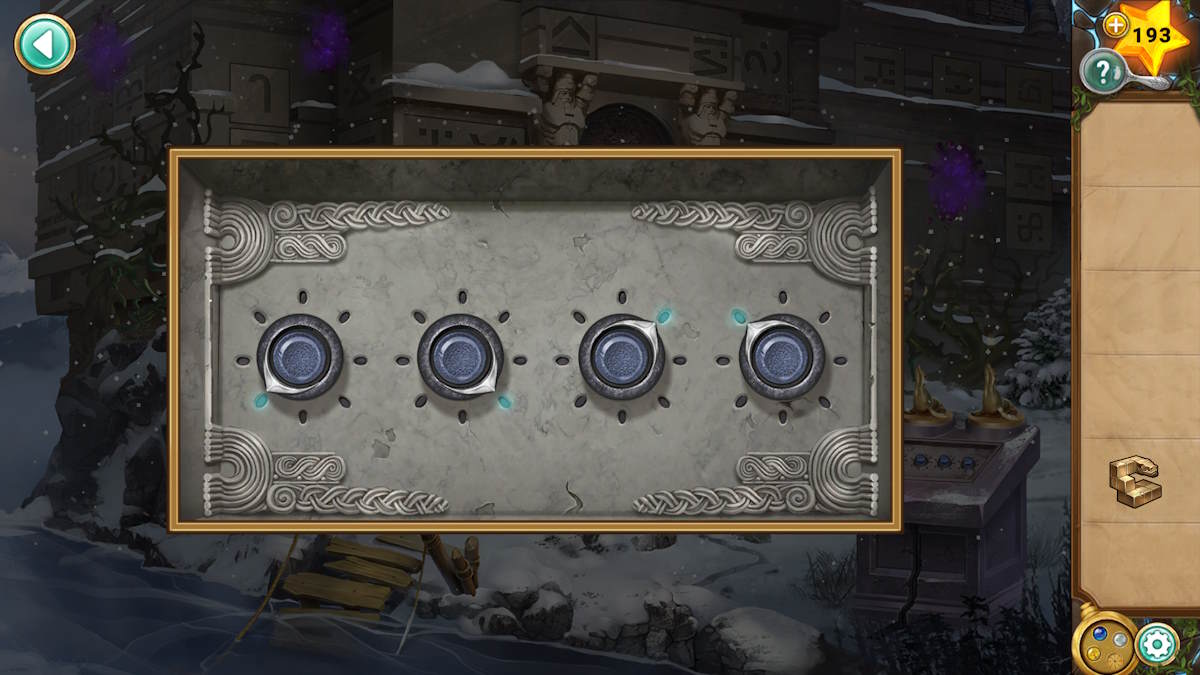
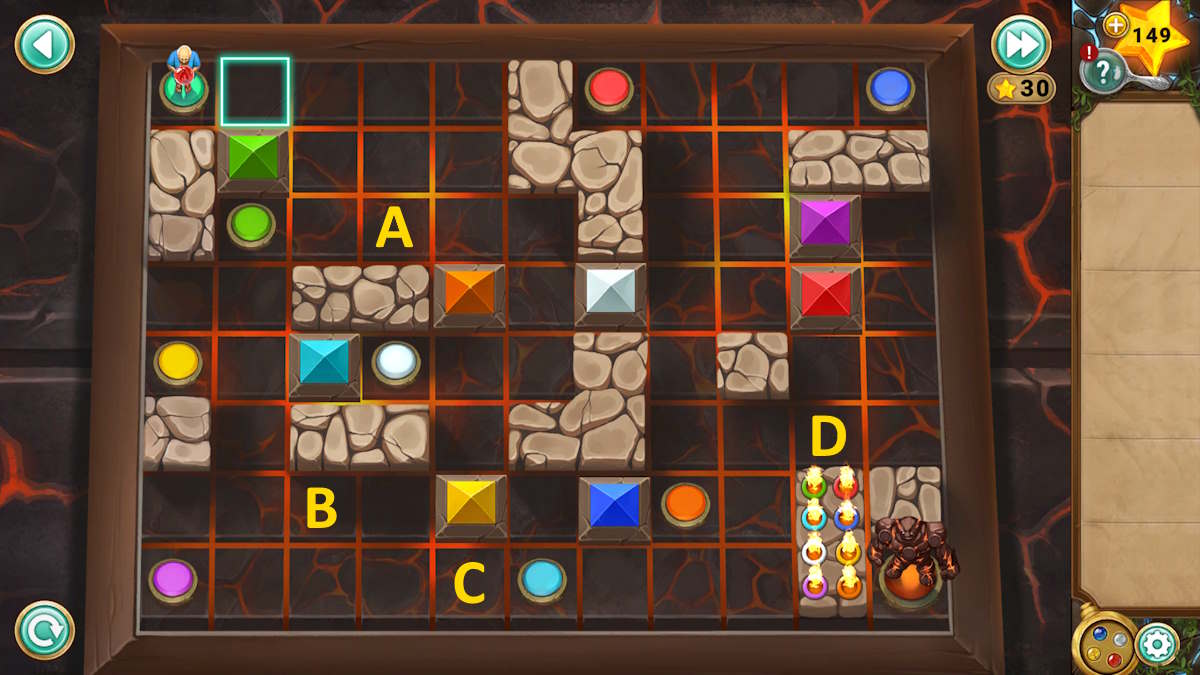
As a gamer, now that I’ve gathered all four pendants, it’s time to place them in the box (b8) to kickstart a symbol rearrangement challenge. Once each pendant is encircled by four stones of its matching color, I can unlock the treasure chest within and retrieve the Locket.
As someone who has spent countless hours solving puzzles, I can confidently say that this one may seem tricky at first, but fear not! All you have to do is keep clicking the green button in the center to move the four central stones onto their corresponding outer discs. If you’re looking for a fresh start, simply click on the bottom right symbol to reset the puzzle and rotate the following discs:
- Red once (then green button three times)
- Red twice, white once, yellow once, blue once (green button twice)
- Blue twice, white twice, red once, yellow twice (green once)
Return to your humble abode, hand the locket over to your mother, and she’ll disclose the mystery of your past. She’ll then return the locket to you, which is now visible at the lower right corner of your screen, in your inventory.
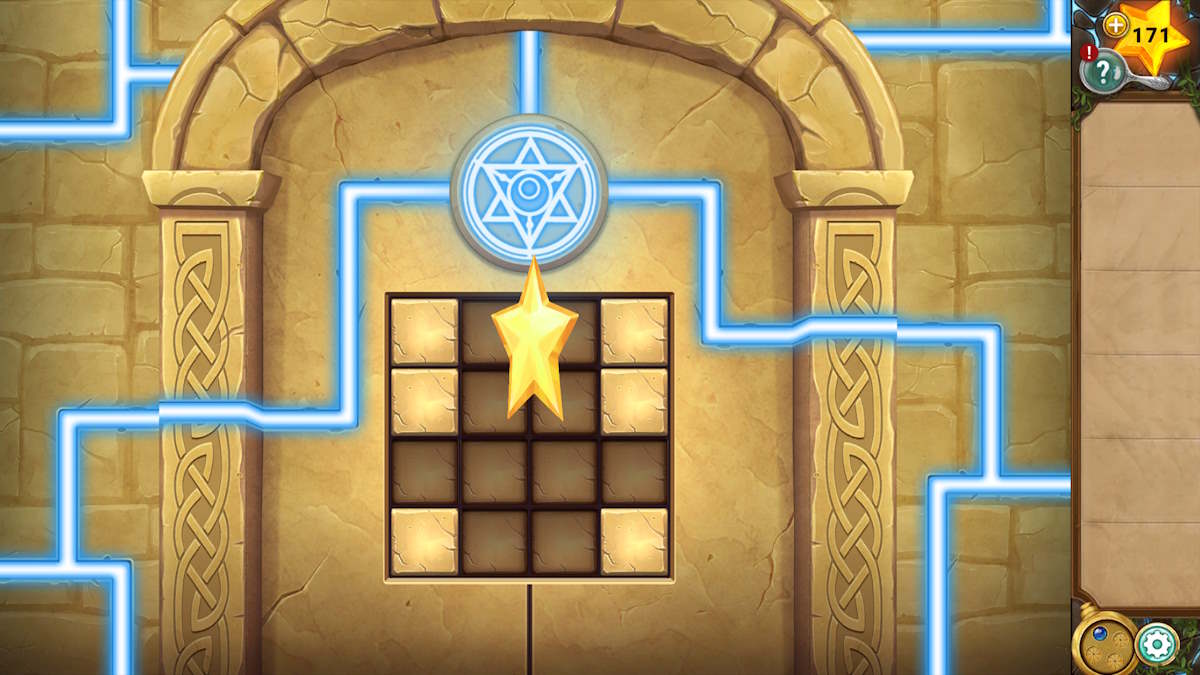
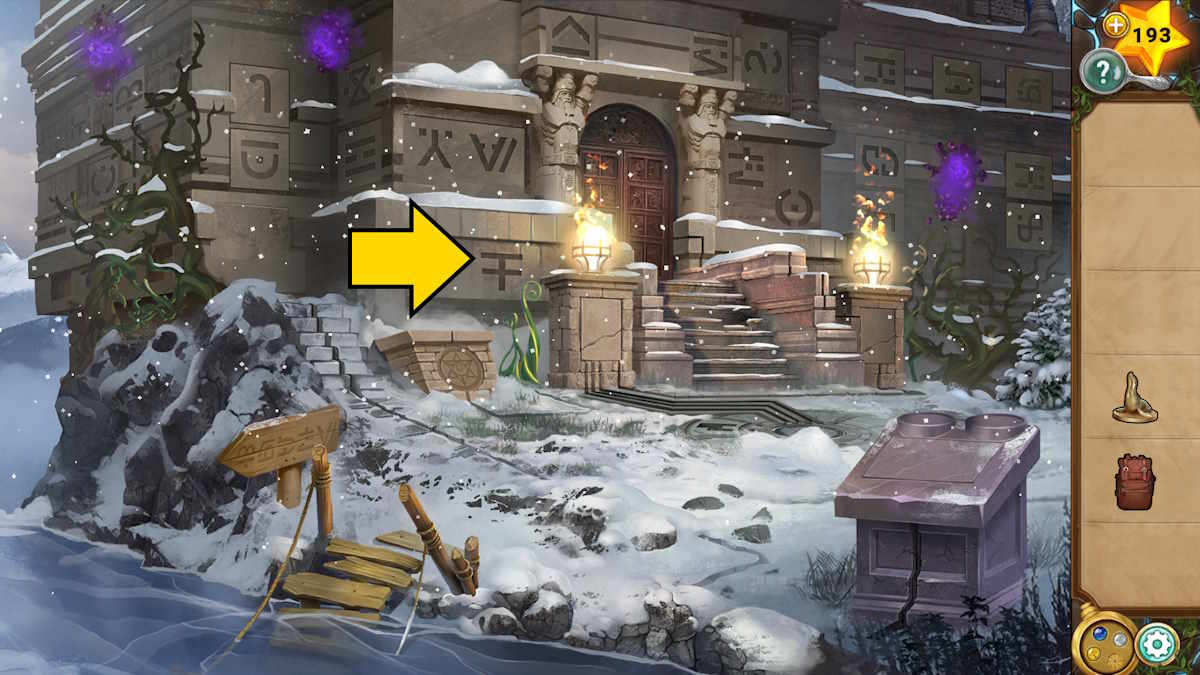
Go back outside and the temple will trigger the locket, so click the door to the temple (b12) and then click the locket in the close-up to trigger a puzzle. This is simply a case of copying the pattern on the front of the book you originally looked at in the hut (see above). Click the same squares to copy the pattern and the door will open, allowing you to go through the door and complete Chapter 1.
Legend of the Sacred Stones Chapter 2 walkthrough
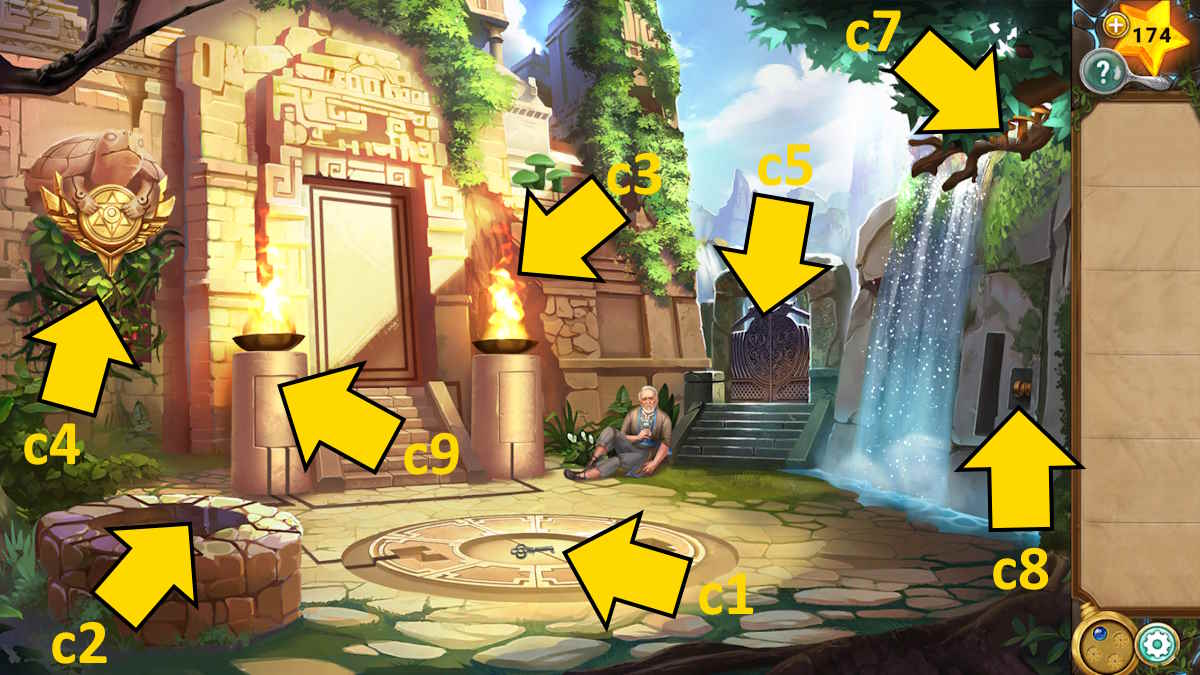
Upon discovering your father wounded outside the temple, he reveals that Milo has allegedly swiped the Book of Tempus, enabling him entrance into every sanctuary. Retrieve the Gate Key from the central floor design (c1), and then opt for a detailed view of the nearby well (c2). Spot the blue mushroom within, then press its pendant symbol followed by yours to flood the well with water and secure the Torch.
As an enthusiast, I’ll guide you through this fascinating quest! First, light up a torch by placing it in the brazier (c3). Then, use this lit torch to ignite the vines beneath the turtle statue (c4). Once the vines are ablaze, click on the pendant symbol found within the turtle’s paws. Next, select the pendant from your inventory and click again to activate a waterfall that douses the fire. Voilà! The vines will disappear, revealing a hidden Wheel in their place (c5).
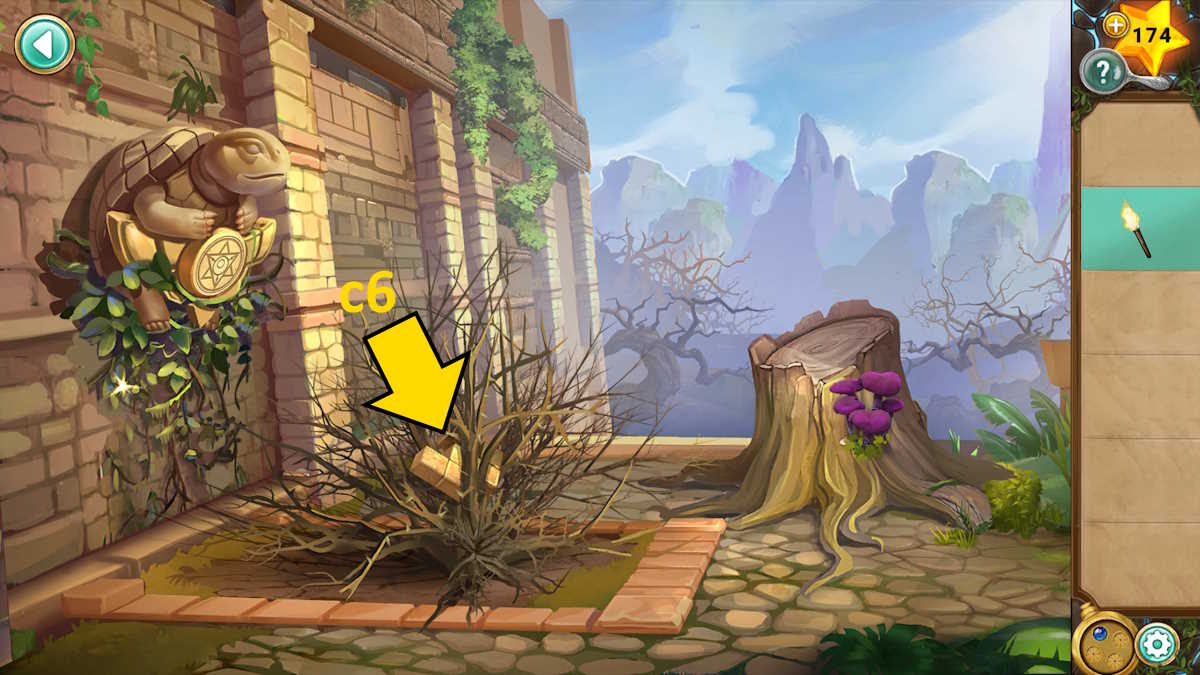
Choose gate (c5), apply the key to unlock it, then proceed. Perform a similar action with the glowing torch, ignite the twigs (c6) and extinguish the flame using the pendant with the turtle statue located to its left. Once done, pick up the Stone Key. Afterward, return to your father and click on the tree branches at the top-right corner of the scene (c7) to find four orange mushrooms.
How to open the color-coded chest
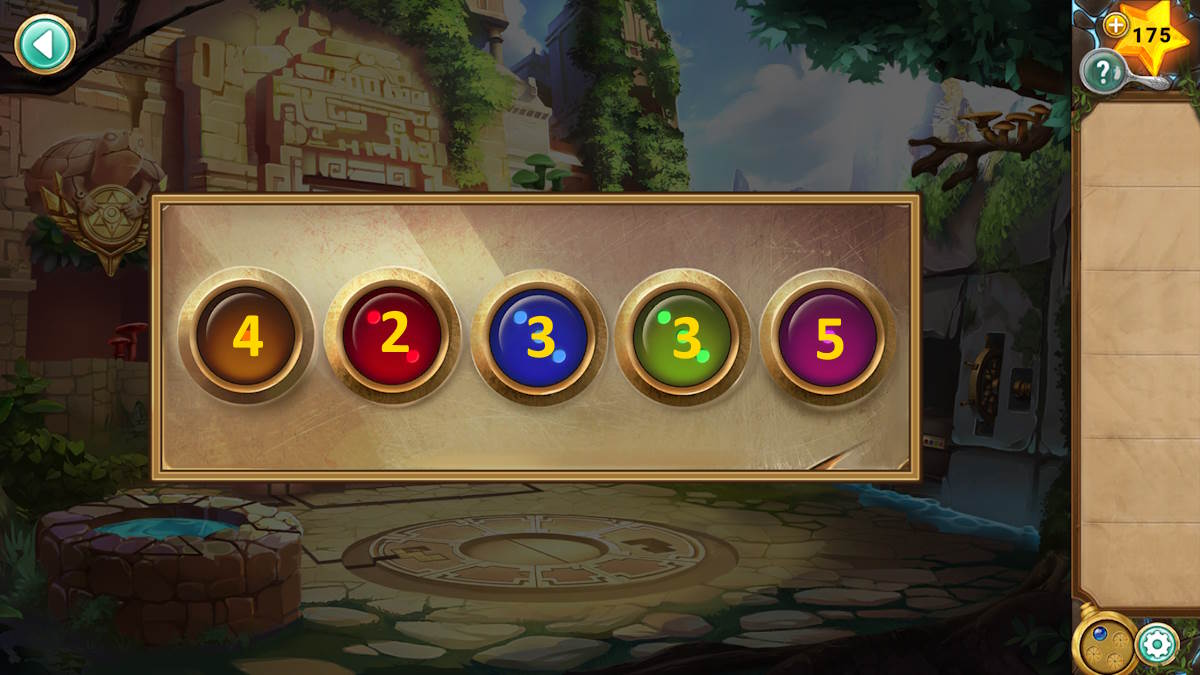
Place the wheel near the waterfall (location c8) and rotate it to halt the water’s flow, uncovering a chest in the process. Take a moment to observe the surroundings, particularly the main scene where you will discover that the combination on the chest lock corresponds to the colors of the mushrooms scattered around this area. The distinct mushroom colors are:
- 2 red mushrooms (below the turtle)
- 3 blue mushrooms (in the well)
- 3 green mushrooms (above the right brazier)
- 4 orange mushrooms (on top of the wall)
- 5 purple mushrooms (on the treestump through the gate)
Press the buttons on the chest to make the number of dots (pips) of each color correspond with these numbers. Once they match, the chest will pop open, granting you access to the second Stone Key. Insert both keys into the designated floor pattern (c1) to expose another pendant symbol. Click this symbol, followed by your own pendant, to activate the mechanism hidden beneath the left brazier (c9). Remember, for this process to function correctly, the well should be filled.
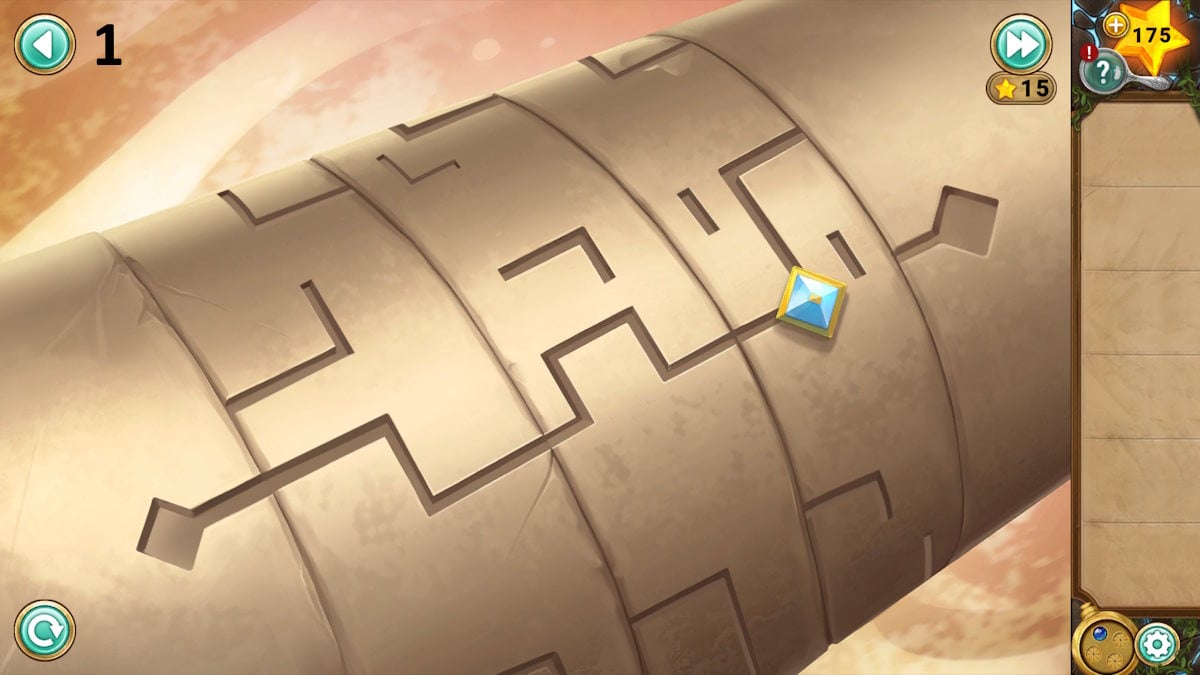
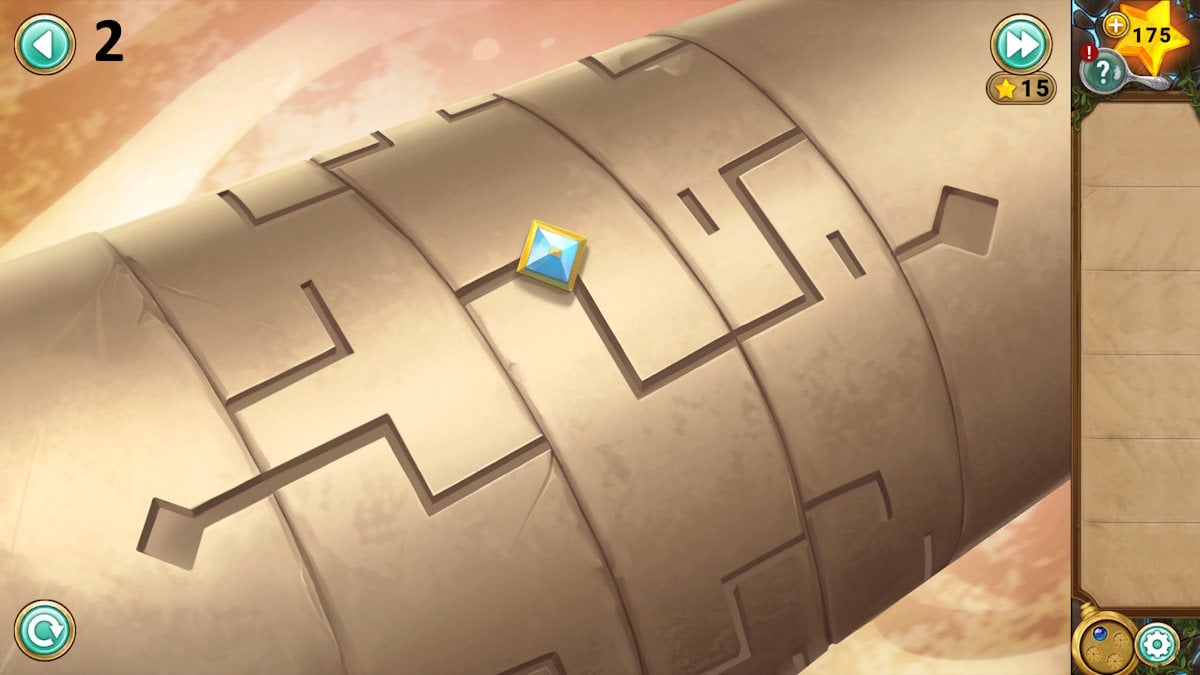
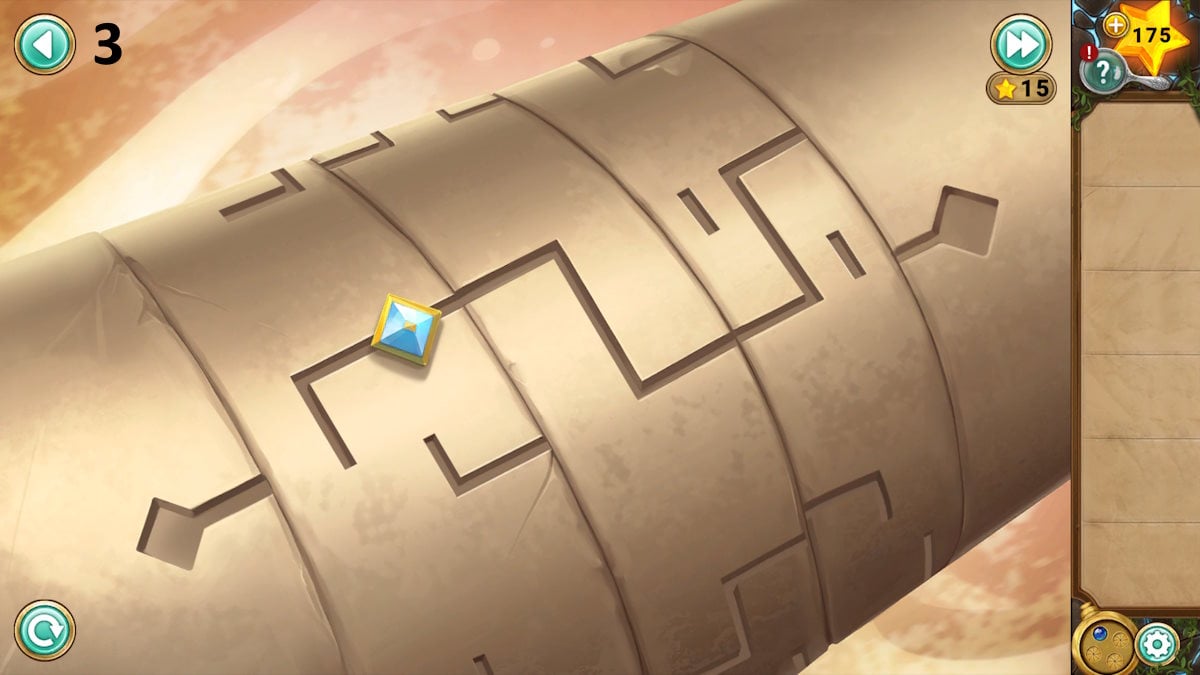
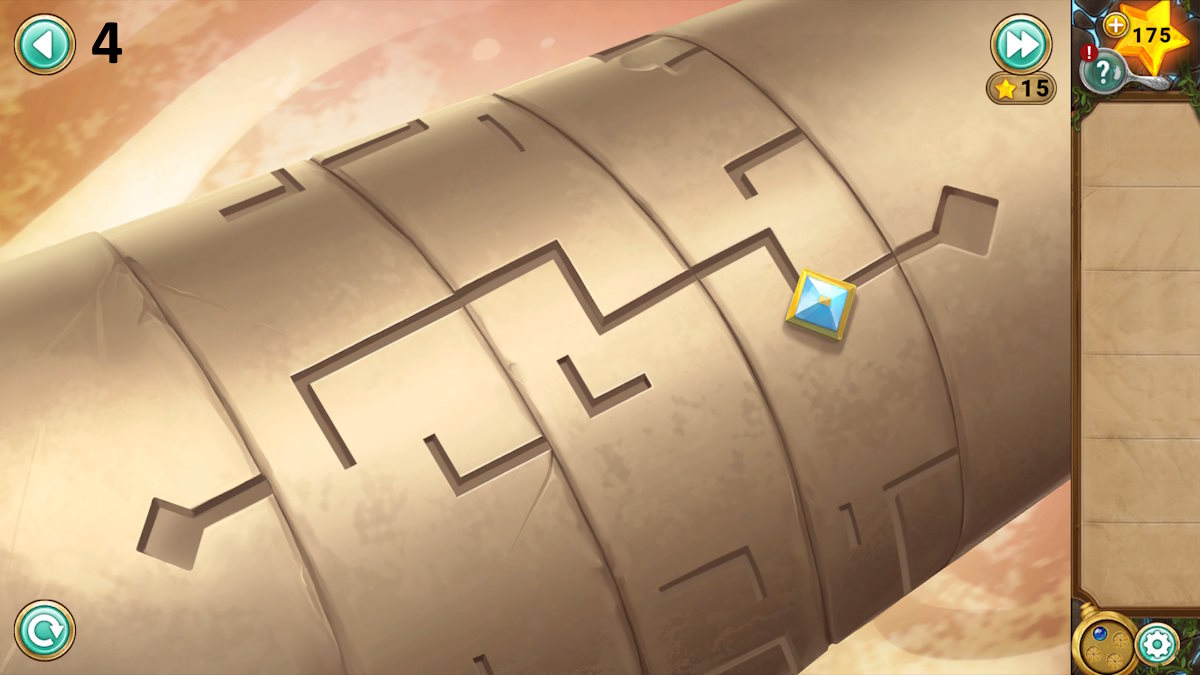
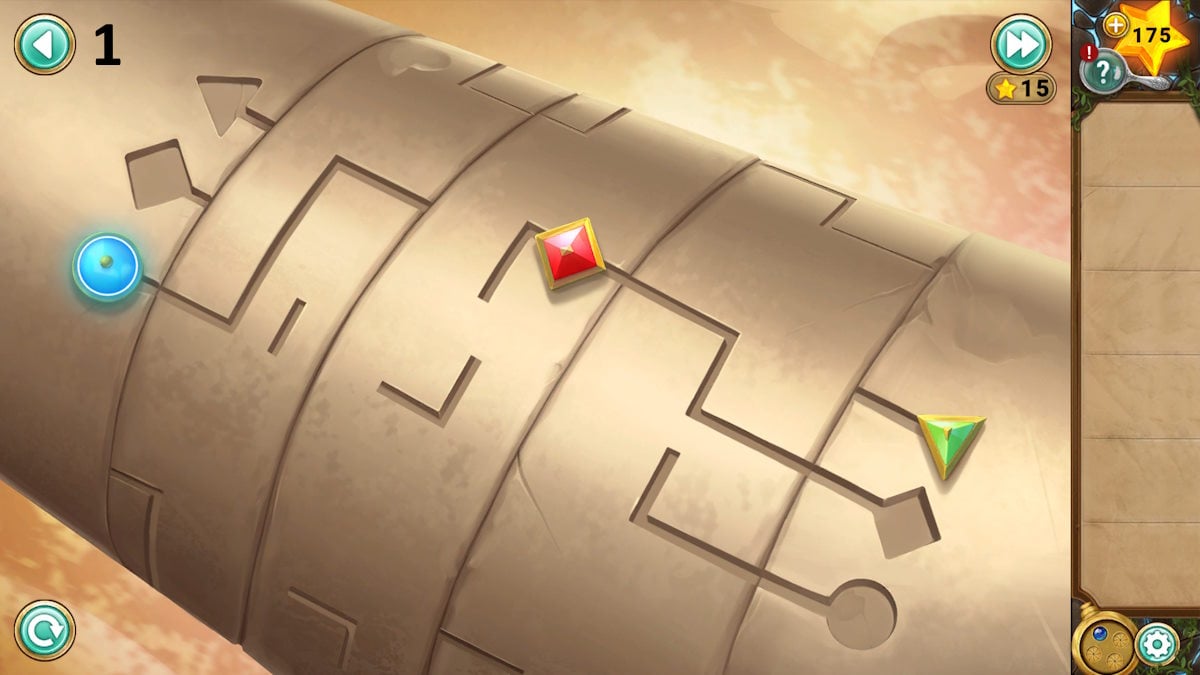
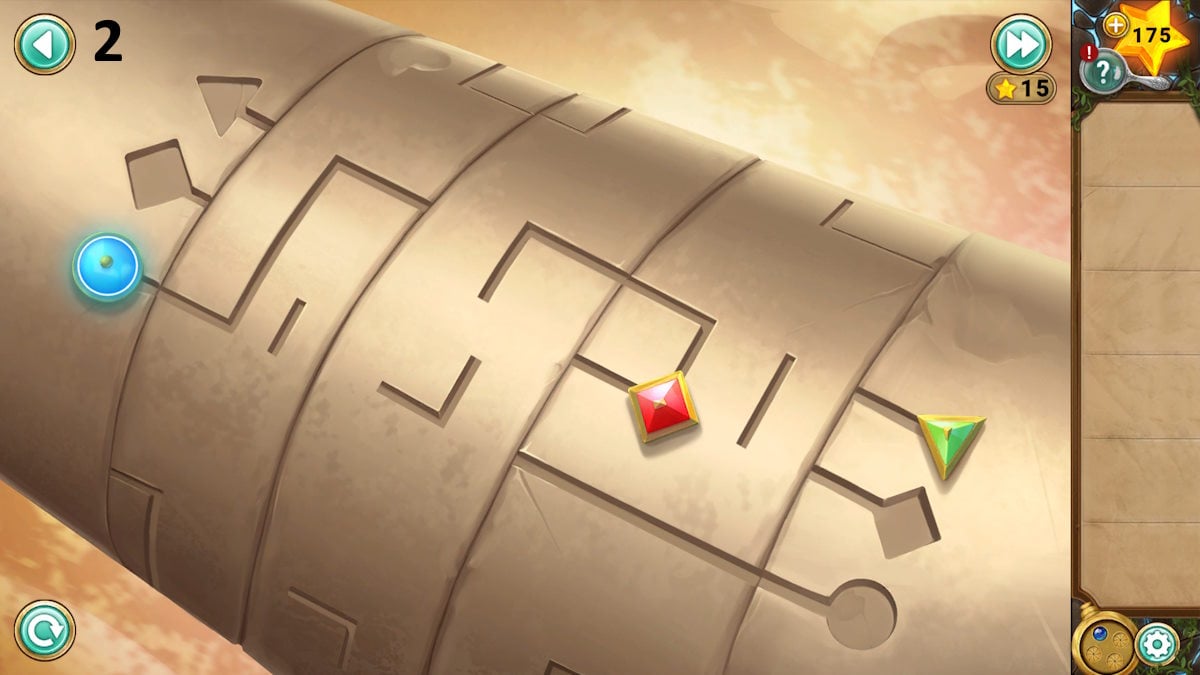
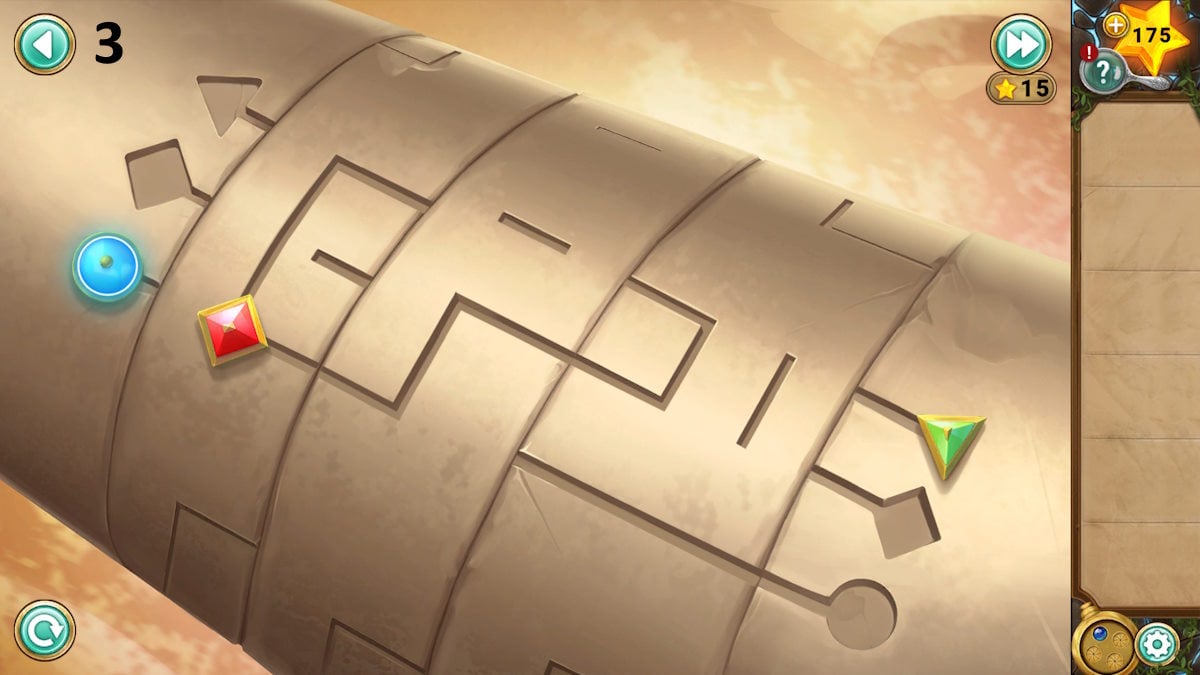
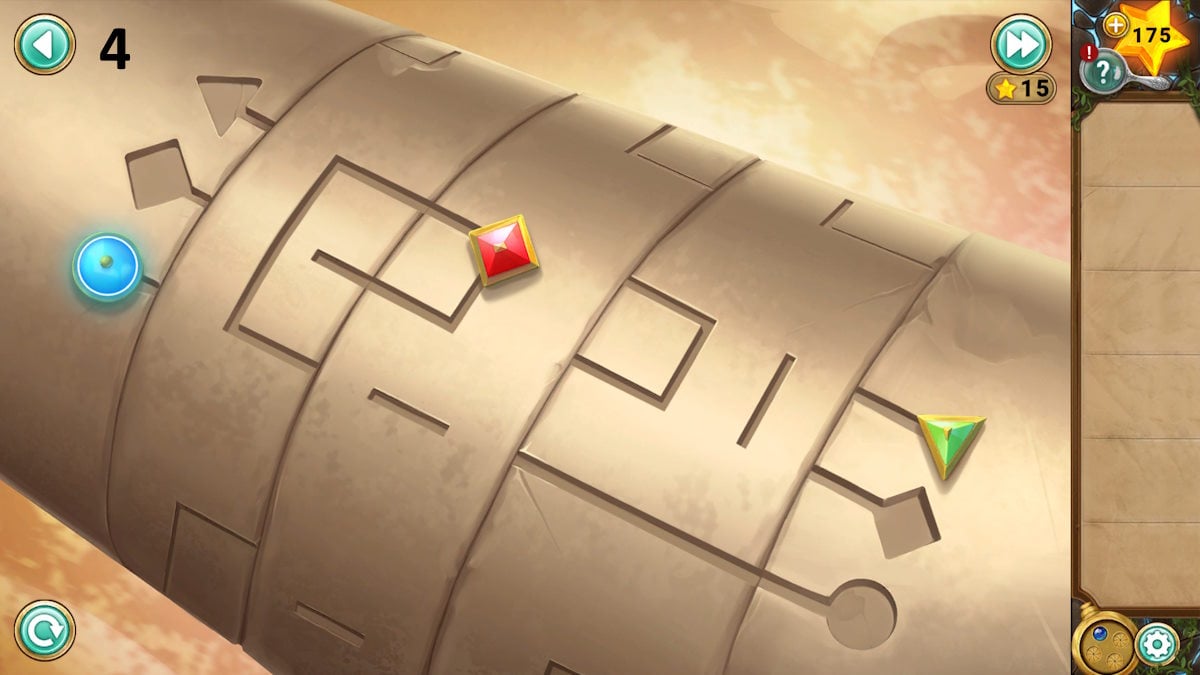
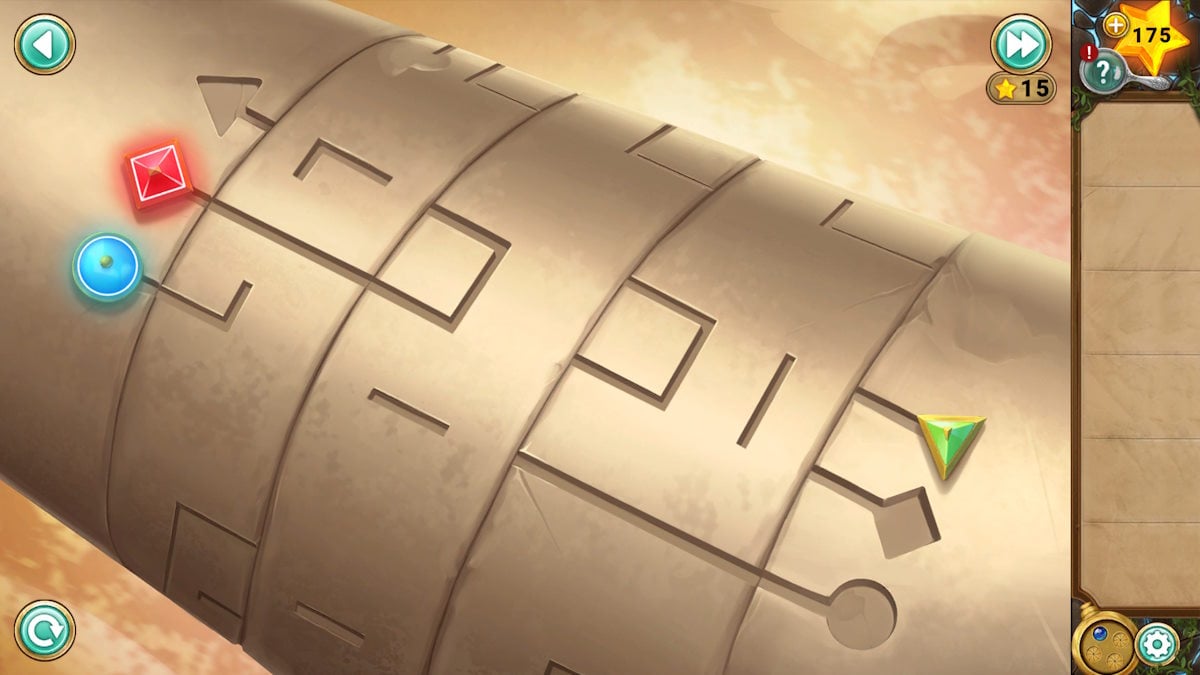
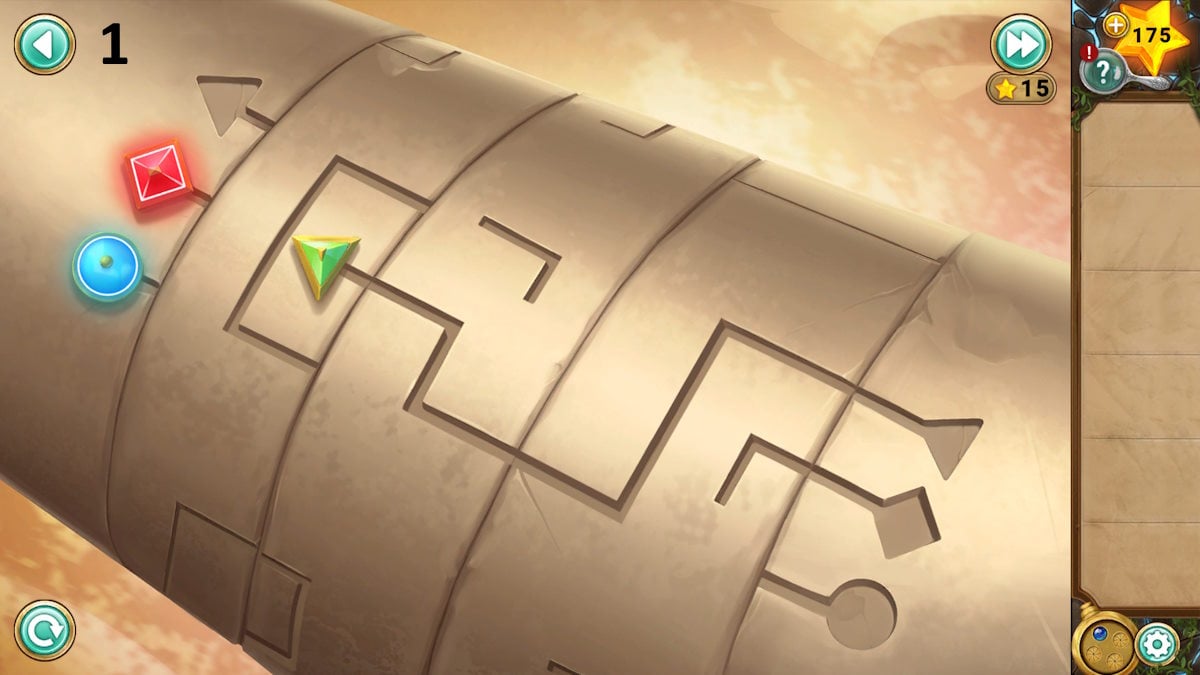
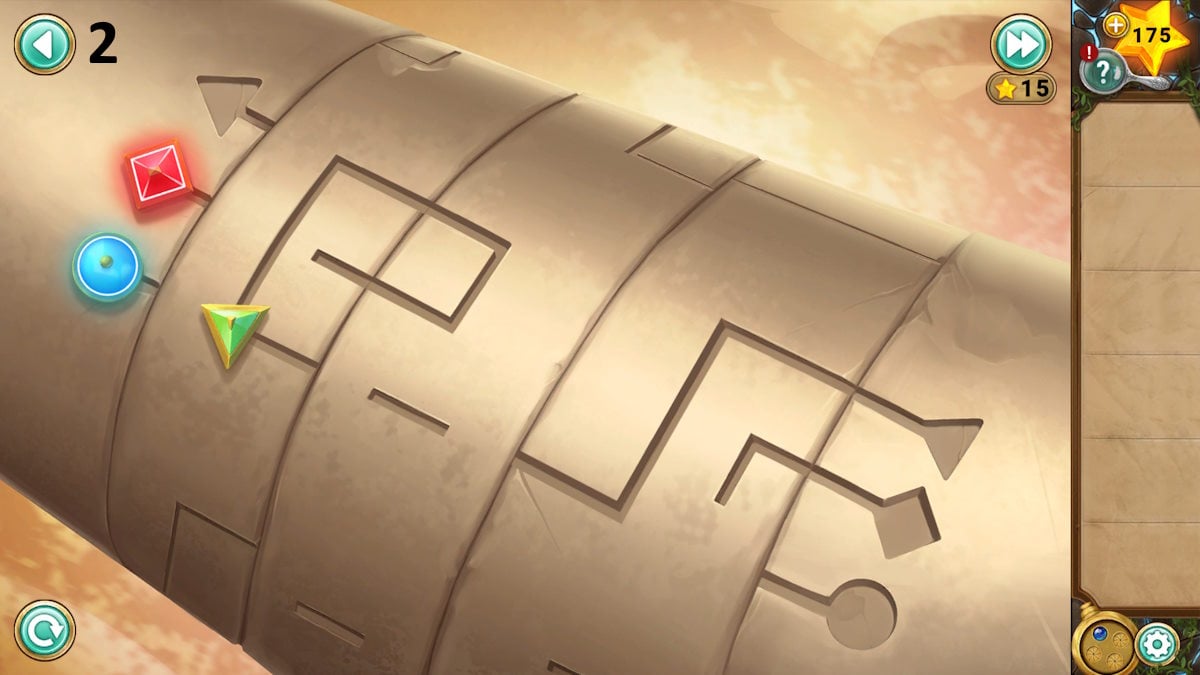
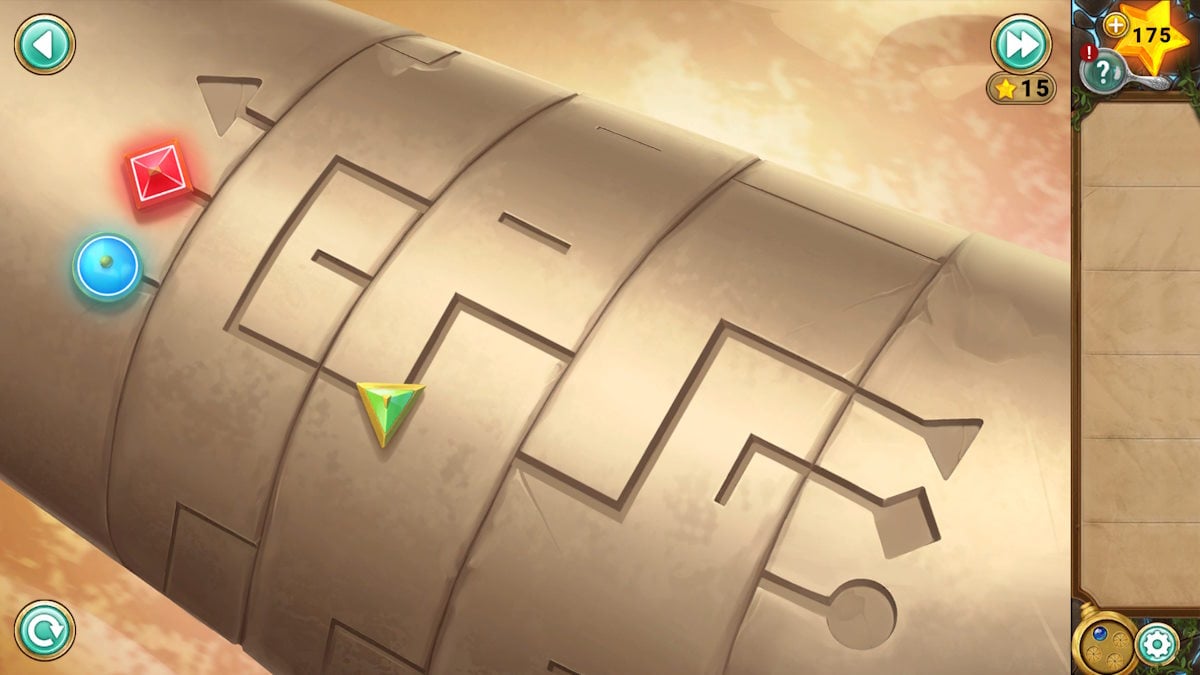
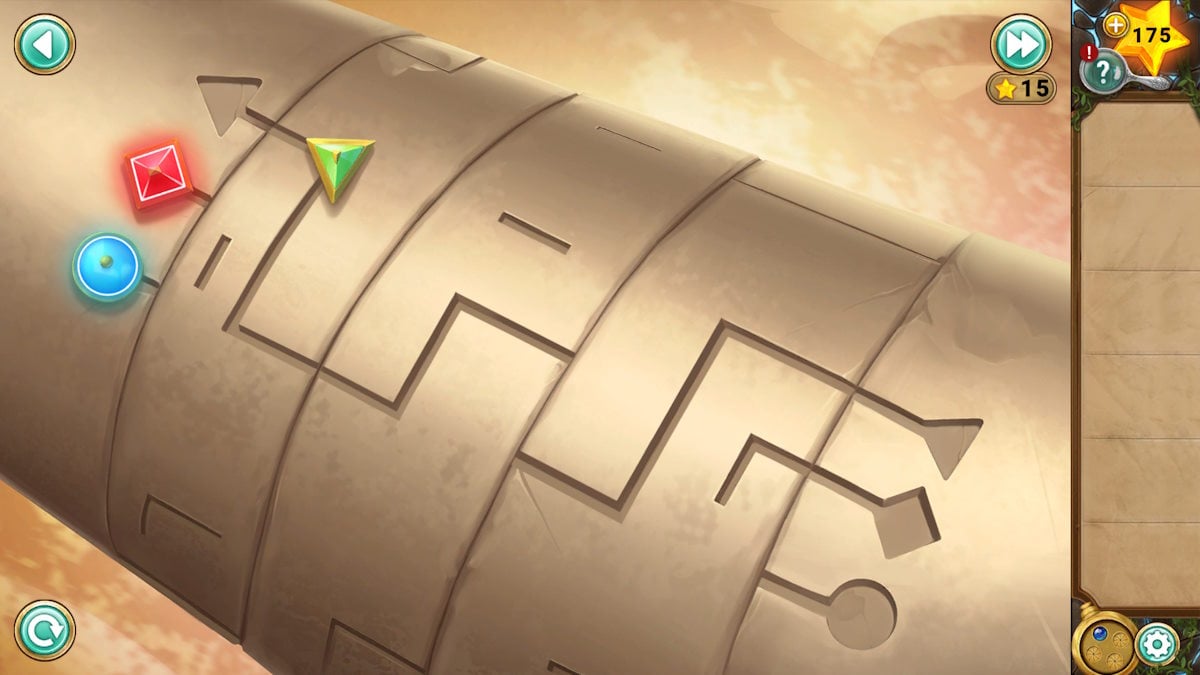
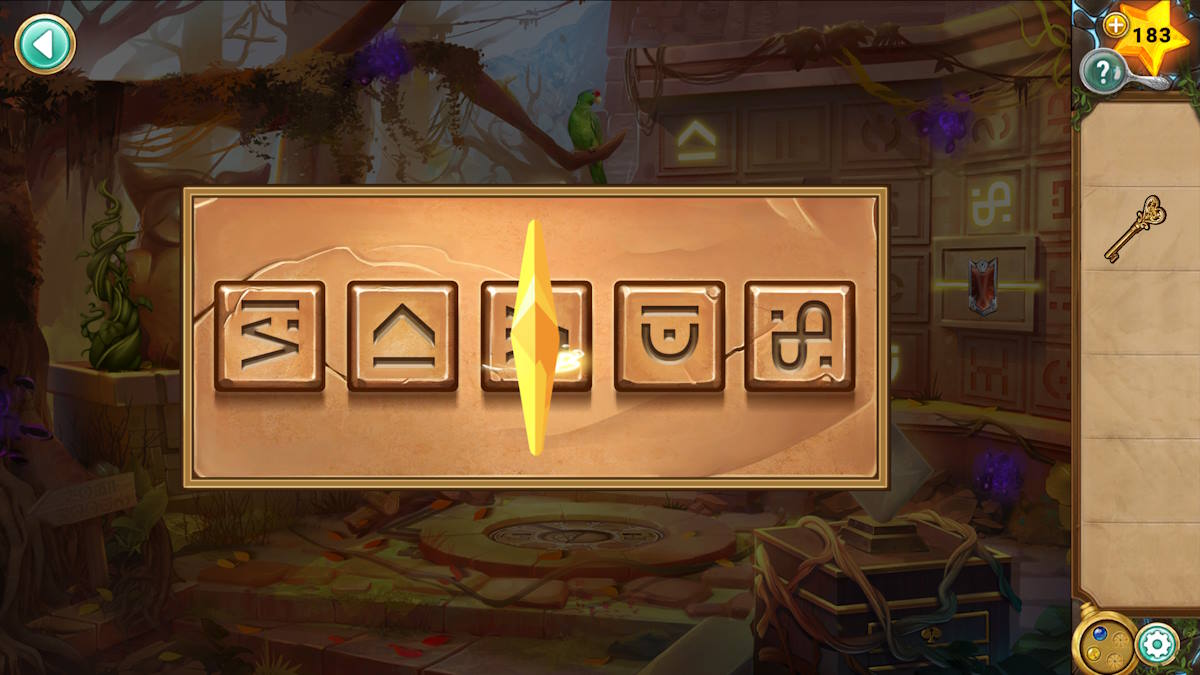
As a seasoned puzzle solver, having tackled countless riddles and enigmas throughout my life, I find your latest challenge intriguing. Let me walk you through the steps, dear reader. First, click the image for a closer look at the ancient pillar that stands before us. Then, with a deft twist of our fingers, we’ll rotate the sections of this mysterious artifact, enabling us to slide the captivating blue jewel from one side to the other. It may seem straightforward, but don’t be fooled; you’ll need to move back and forth to complete this puzzle. I’ve conveniently provided the steps in the gallery above, where each maneuver is clearly numbered in the top-left corner. Let the game begin!

Upon finishing, the second pillar shaped like a brazier will swing open, disclosing another puzzle with three gems that need shifting. Remember, each gem should be placed in the corresponding spot on the opposite side based on its unique shape, but don’t worry, you can move them one at a time, making it less challenging than it seems initially. If you find yourself struggling, simply refer to the gallery above for guidance. Now, the door stands open, so click it to enter.
Inside the temple
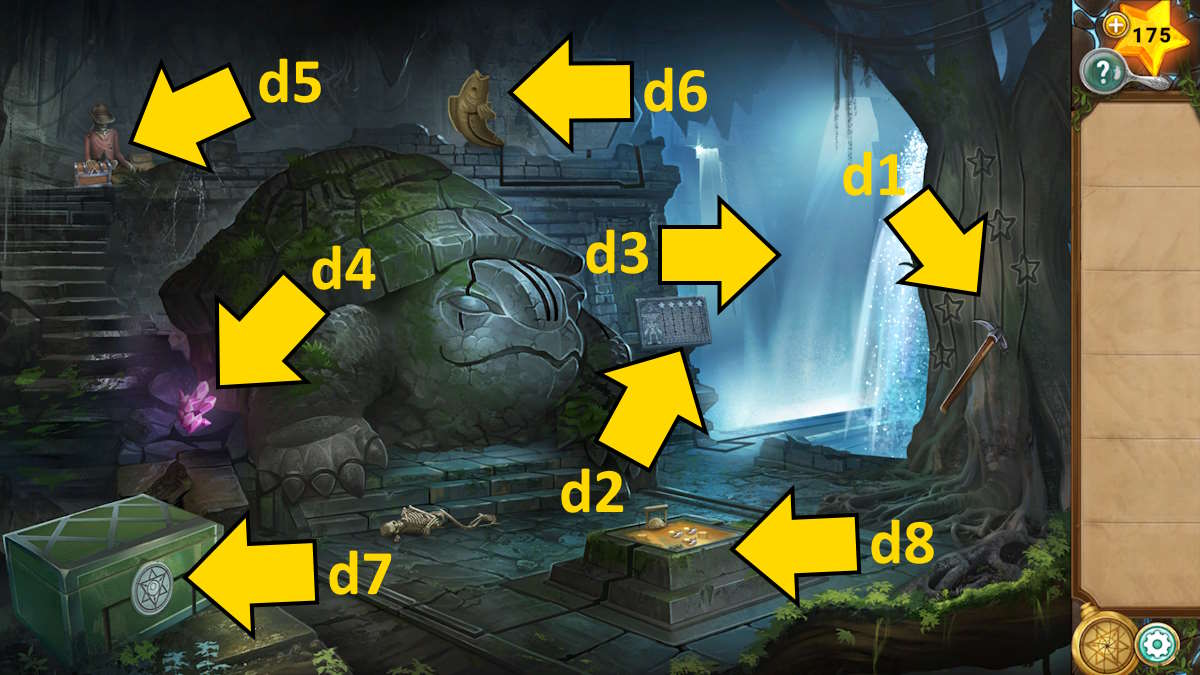
1. Grab the pickaxe from tree (location 1), observing the arrangement (particularly the star heights) engraved on its trunk. Then, apply this pattern to the plaque near the stone turtle (location 1), and you’ll unlock the door on the right (location 3).
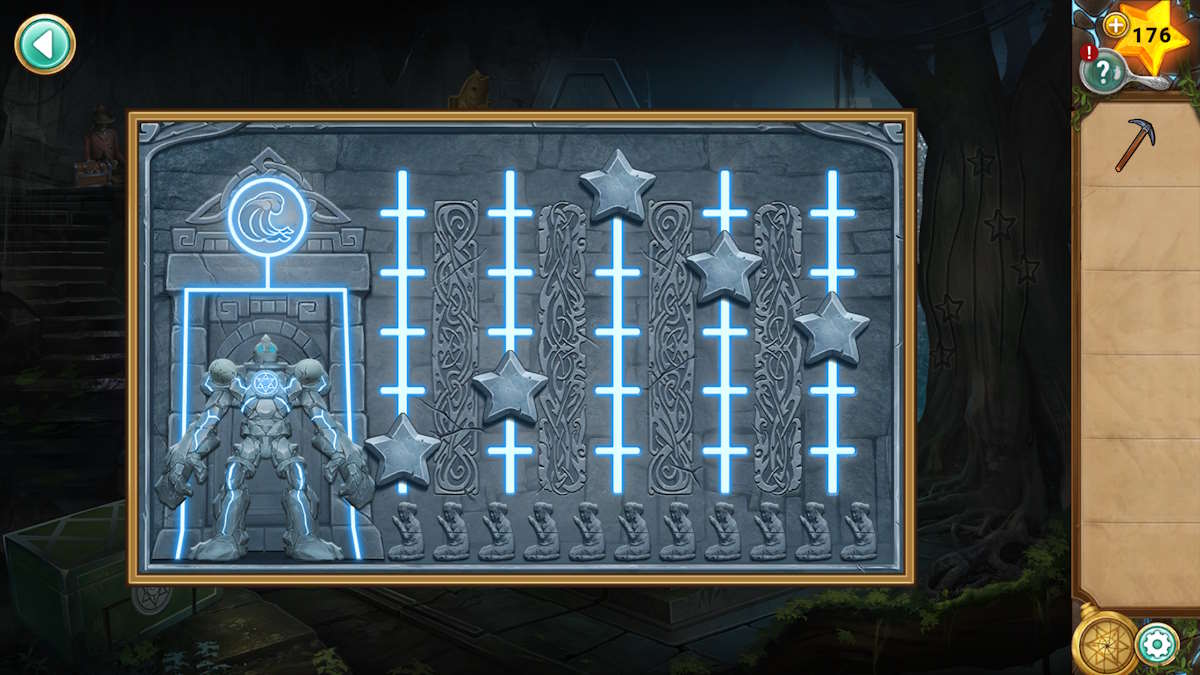
1. Employ the pickaxe to gather some Pink Crystals (d4), followed by a detailed shot of the skeleton (d5) to retrieve the Lantern kept in its pack. Next, choose the door you previously opened (d3) and proceed through it.
1. Acquire some Orange Crystal (e1) by mining it with your pickaxe, then zoom in on a wall with a missing brick (e2). Click on the protruding brick, which will slide into place and cause another to pop out. Continue clicking the protruding bricks until you can retrieve the Pyramid from the hole in the wall.
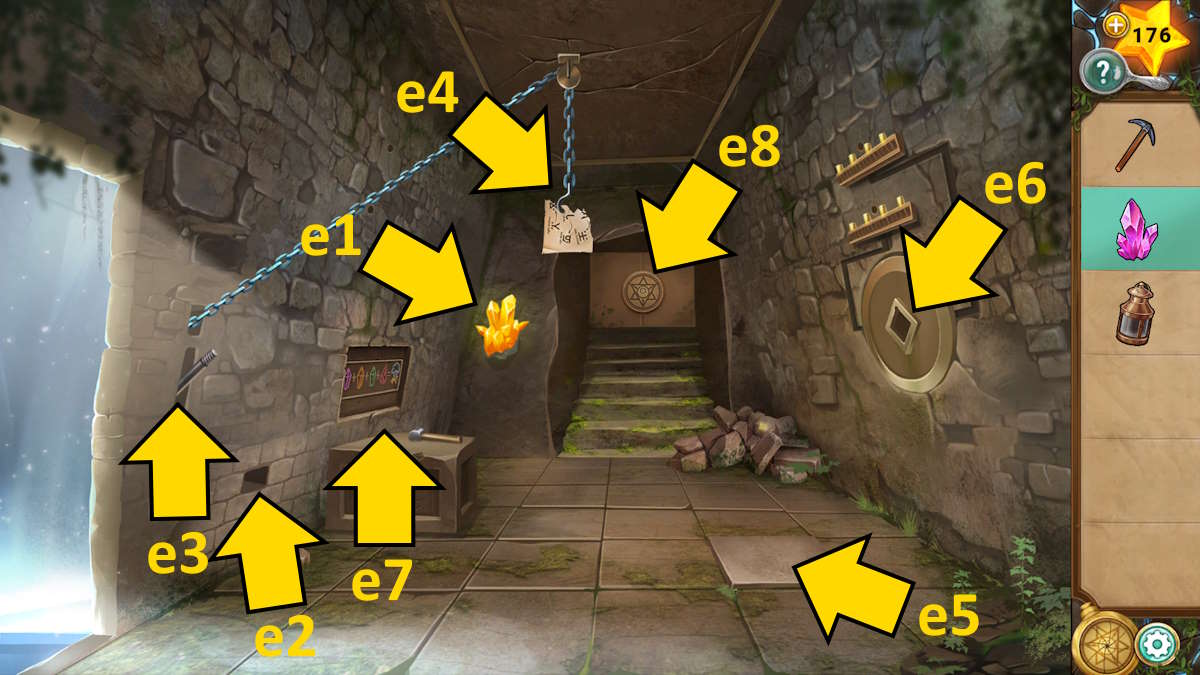
As a gamer, I navigate back to the bone-shaped structure (d5) and employ the pyramid to unlock the box it’s holding. Inside, I grab the Puzzle Block and Lever Handle. Back in the room, I attach the handle to the lever (e3), then give it a good yank to snag the Torn Page from the hook (e4). Now, I fasten the Puzzle Block onto the chain where the page was hanging. Another pull of the lever raises the puzzle box, and with one more click, I activate the floor stone (e5), causing arrows to shoot from the walls, illuminating the block. Lowering it again allows me to grab the now glowing block.
Place the radiant brick into the wall’s cavity marked (e6). This action will illuminate the candles overhead, uncovering a Green Crystal that your pickaxe can mine. Then, put the three crystals, together with the lamp, onto the table where a hammer is already situated (e7). Arrange the crystals according to the colors on the wall (pink first, followed by orange, and finally green), place them into the lantern in this sequence, and you’ll receive an Explosive.
Place the charged explosive onto the winch (e4) and pull it up again using the lever. Later, utilize the floor plate (e5) to shoot arrows at the explosives. After the blast, your locket will function once more! Locate the pendant icon on the wall’s rear side (e8), employ the pendant to unlock the door, and then press the displayed scene for a detailed view.
How to complete the board game
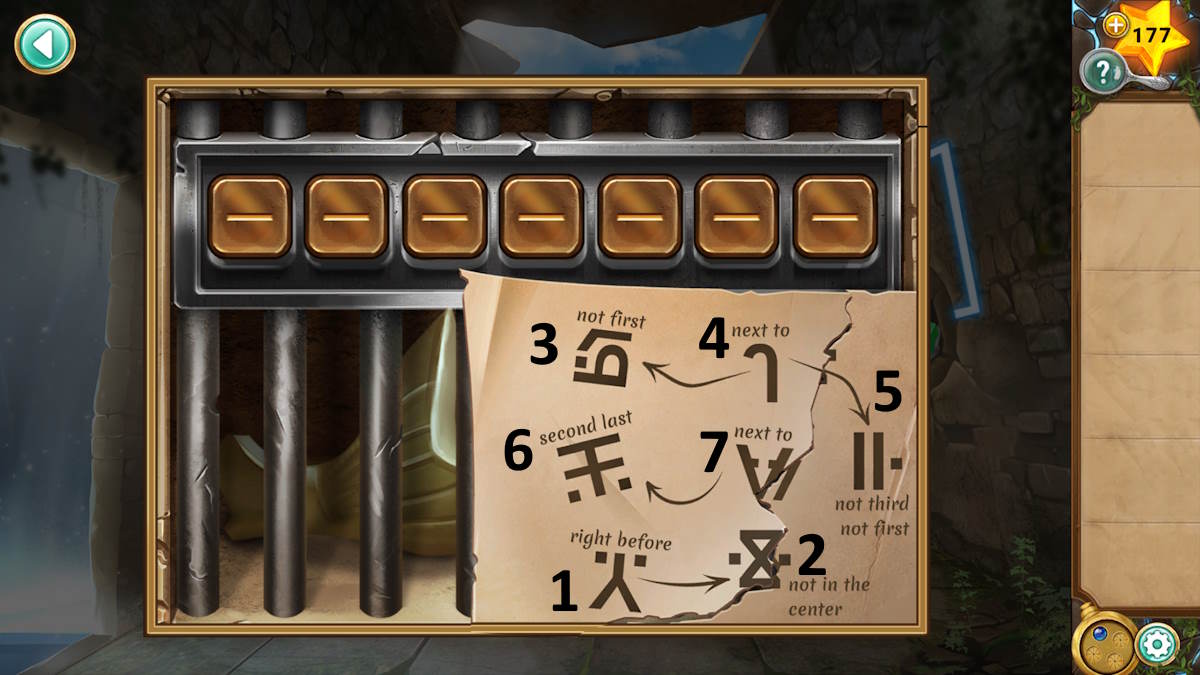
As a gamer, “I found a tattered note that seems to hold a secret code for solving this puzzle. It looks like there are seven symbols on the page, each one numbered from left to right in the image above. If I can arrange them in the correct order, I should be able to unlock the Fish Tail and the Villager Figurine.”
1. Return to the central location, place the fishtail piece on your fish (roll a d6), and the panel above it will swing open, admitting sunlight. Feel free to utilize your pendant in this spot as well! Use your pendant to unlock the green container (roll a d7), retrieve the Aquarius Figurine, and then position both figurines onto the game board (d8) to initiate another challenge.
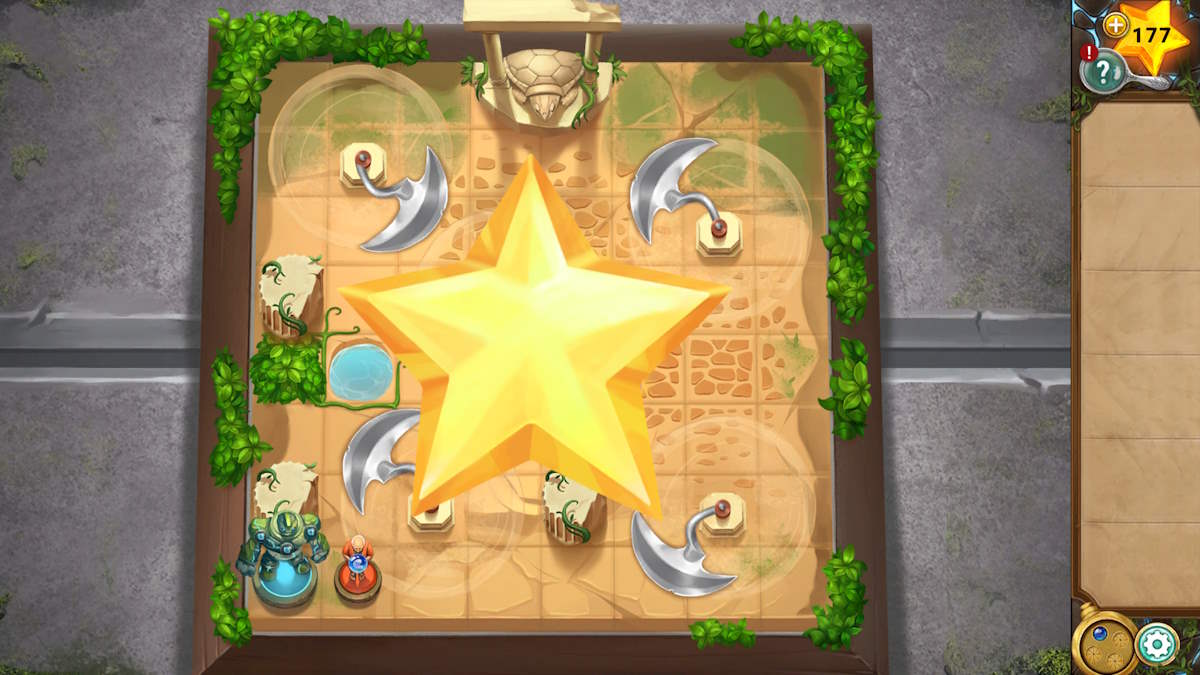
To get the villager from the upper right corner (where it currently is) to Aquarius in the bottom left, you’ll need to click on squares along the way. However, be careful as the blades will also move with each step you take. This means you have to plan your path carefully and time your clicks just right to avoid running into them. If you find yourself stuck, a solution is provided below.
- Left, left, right, left, down, down, down, down, down
- Left, left, left, down, down
As a seasoned adventurer with countless hours spent delving into mysterious dungeons and solving intricate puzzles, I’ve come to recognize the telltale signs of hidden treasures and secret passages. This game board, with its enigmatic pendant design at its base, clearly hints at a hidden mechanism waiting to be unlocked. Using my trusty amulet, I carefully align it with the design, triggering a soft glow from the turtle figure. To my delight, the turtle’s mouth opens, revealing a door within. With a swift click, I pass through and find myself face-to-face with none other than Milo, a character I’ve encountered in my travels before. He seems to have taken on a new role here, as I can see him preparing to activate the golem standing nearby.
Defeating the golem
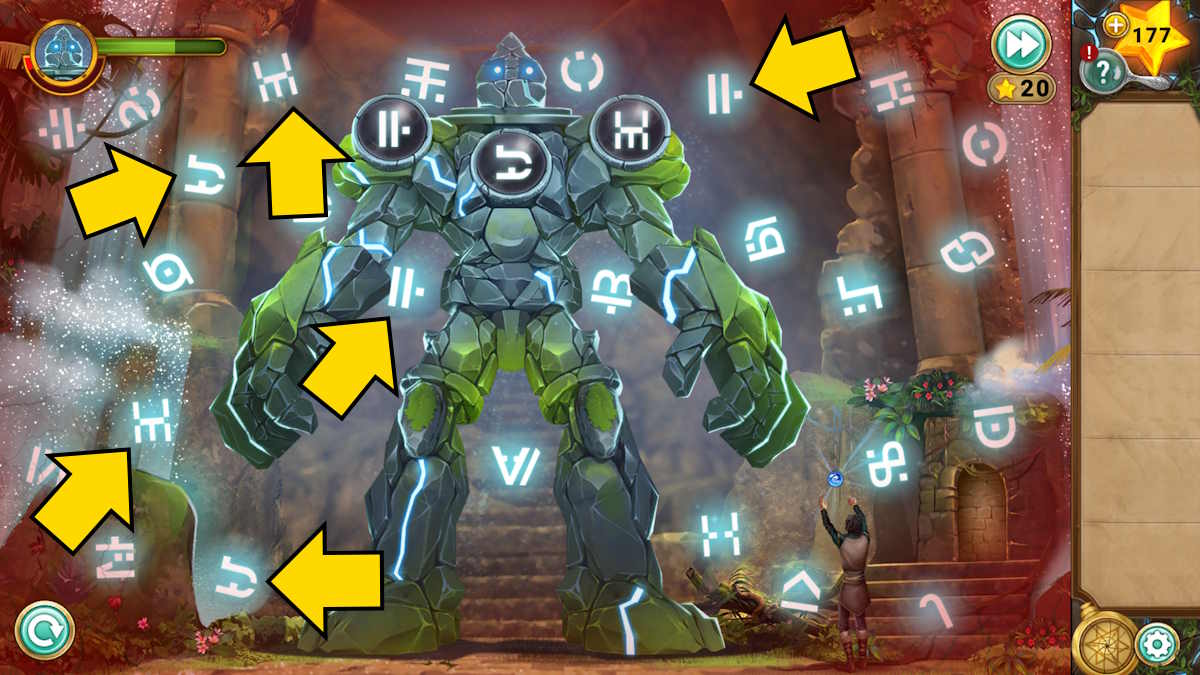
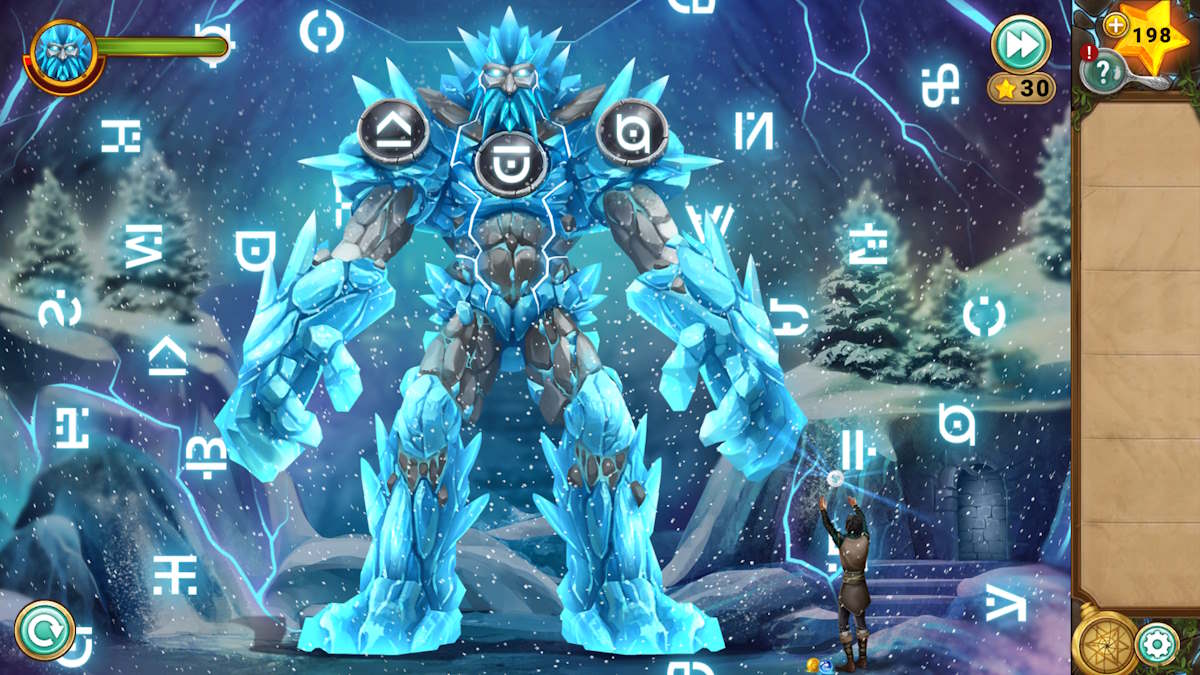
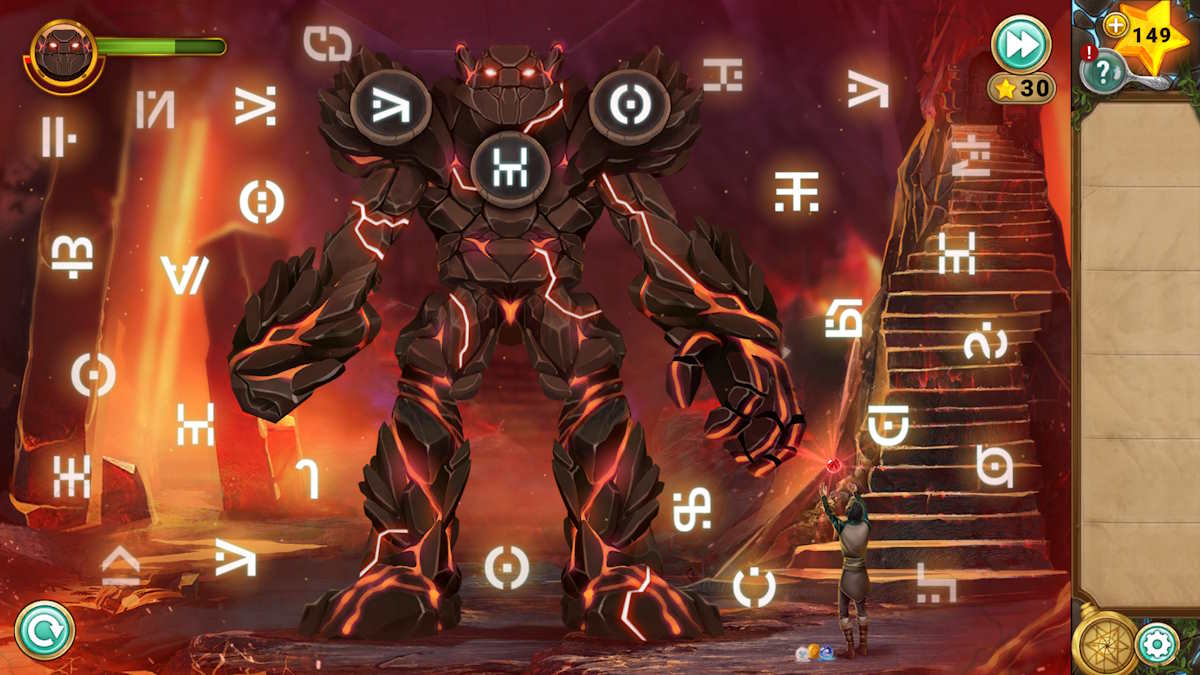
In this challenge, you’re required to locate pairs of two distinct symbols among the three displayed on the golem’s chest. You must perform this task thrice, resulting in a total of 18 unique symbols. Once accomplished, the golem will be vanquished. Misclicking a symbol or taking too long could provoke it to attack you, and if it attacks you thrice, you’ll need to restart the entire process from scratch. I’ve provided an illustration of the six symbols needed to complete one level as an example.
Keep in mind that the timing aspect becomes active once your screen is filled with symbols for you to decipher. This allows you ample time to relax between levels. The symbols displayed are randomly generated and tend to move when damage is taken, making it impossible for me to provide a solution. However, should you find yourself struggling, don’t forget that you can utilize your stars located at the top-right corner to bypass the puzzle if you have sufficient stars available.
Once you’ve defeated the golem, Milo will escape and you’ll have completed Chapter 2.
Legend of the Sacred Stones Chapter 3 walkthrough
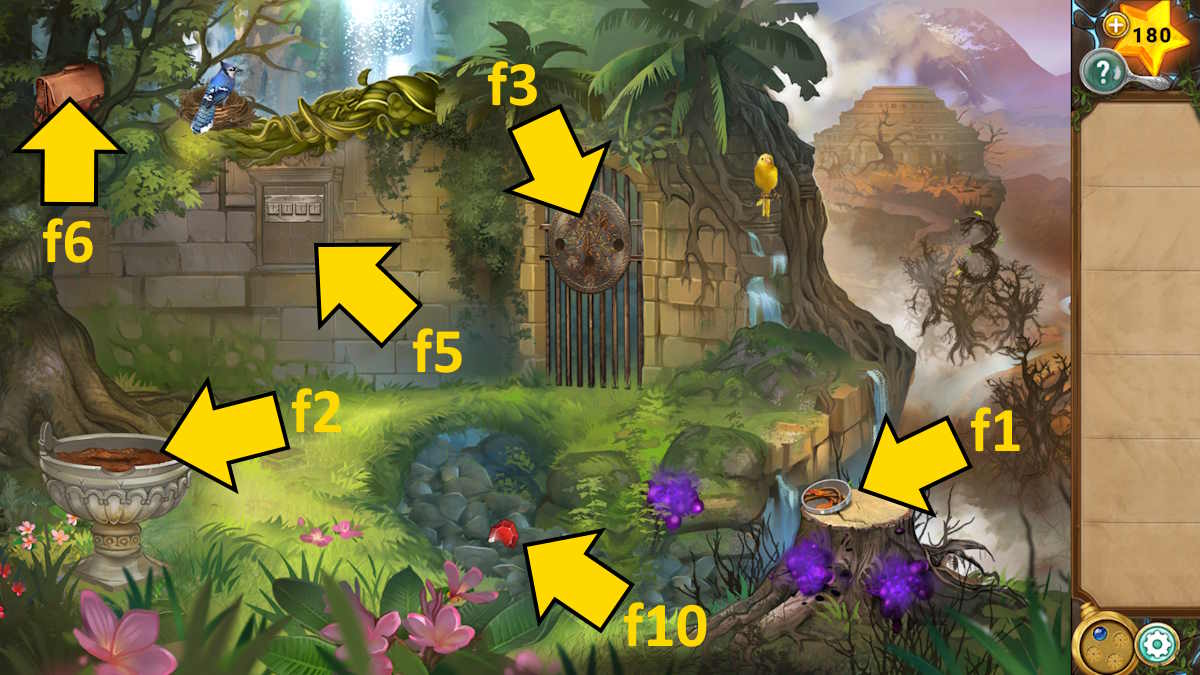
After exiting the Fall Temple with your father, wait until he departs. Then, grab the Gate Piece labeled as f1 near where you stand, and another Gate Piece (f2) from the nearby plant pot. Combine these pieces with the gate (f3) to initiate a puzzle sequence.
To solve this puzzle, just move the puzzle pieces around until they’re all correctly placed. You won’t be able to make a mistake and I’ve provided the finished image as a reference. Once you’ve arranged them properly, the gate (f3) will automatically open, so go ahead and pass through it.

Observe the bird on the left taking flight with a double wing-flap, contrasted by another bird on the right tapping exactly five times. Additionally, notice that the limbs on the trees to the left form a distinctive shape resembling the numbers 2 and 8.
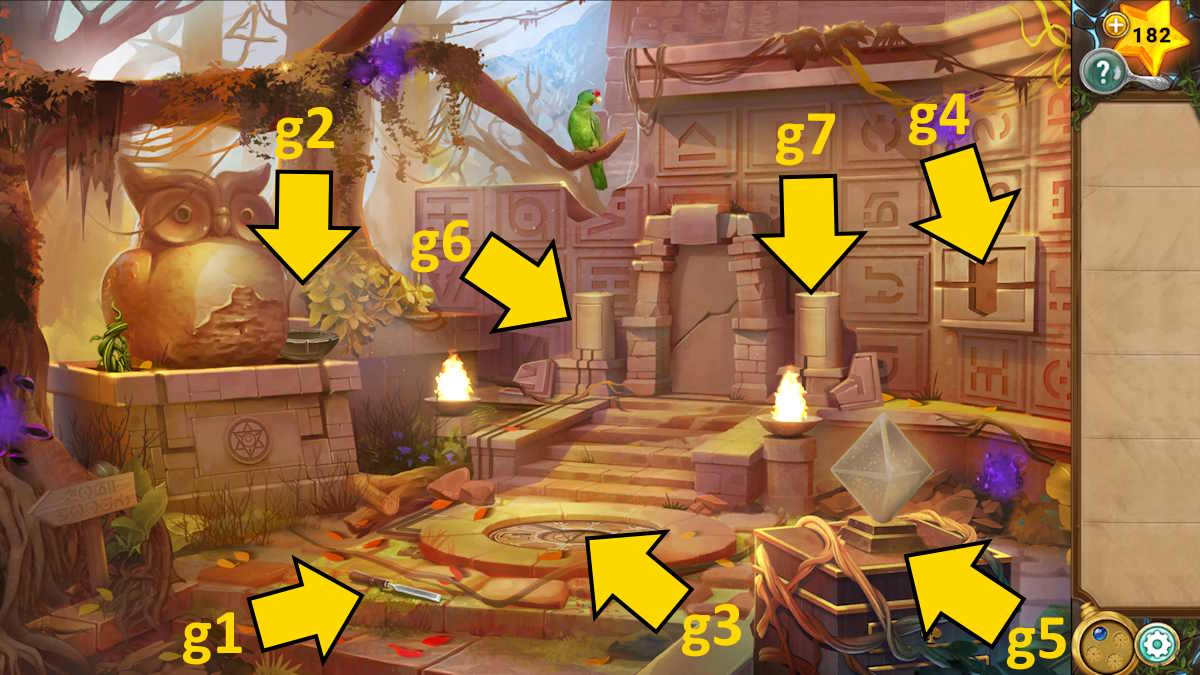
To reach Milo again, follow the indicated path on your right. After a quick chat, he vanishes into the temple. Grab the Chisel (g1), pay attention to the number 4 etched in the branches, utilize your pendant to trigger the fountain next to the owl (g2), and notice the green parrot chirps twice. Lastly, collect a Red Gem from the floor pattern (g3).
In this scenario, revisit the prior location and apply the chisel onto the wall (action f4) to disclose a design reminiscent of a pendant. Then, move back to the initial setting, observe the number 3 on the branches positioned to your right, and input the combined branches code (number 3284) to activate the hidden door in the wall (action f5). This triggers the temple’s illumination, incorporating an earth symbol into your pendant. Utilize the yellow pendant’s power on the wall you just exposed behind the code (action f5), and multiple waterfalls will flow out.
Gaining the earth pendant power

Return to the spot where you previously used the chisel (marked as f4) and energize the pendant with the yellow power. This will cause the vines to grow through, enabling you to collect a Seedling. Insert the seedling into the plant pot (f2) and click it again to cover it in soil, which will then expose two silver discs. Click both of these discs, and another pendant image will appear as shown above. Utilize the blue pendant power on this new image to fill a bowl with water, followed by the yellow power to grow vines from the pot. You can now use these vines to retrieve the Satchel (f6). Inside you’ll discover a Shield Emblem and a Heart Key.
Once more, I’ll summon the yellow power from the pendant adorning the wall to halt the relentless flow of water. As I proceed, my eyes are drawn to the Red Gem (f10) now nestled near the quiver (f7), apparently carried there by the floodwaters. I’ll retrieve it and place both red gems within the hawk eyes (f8). This action will mysteriously unveil a puzzle, subtly concealed at the statue’s base.
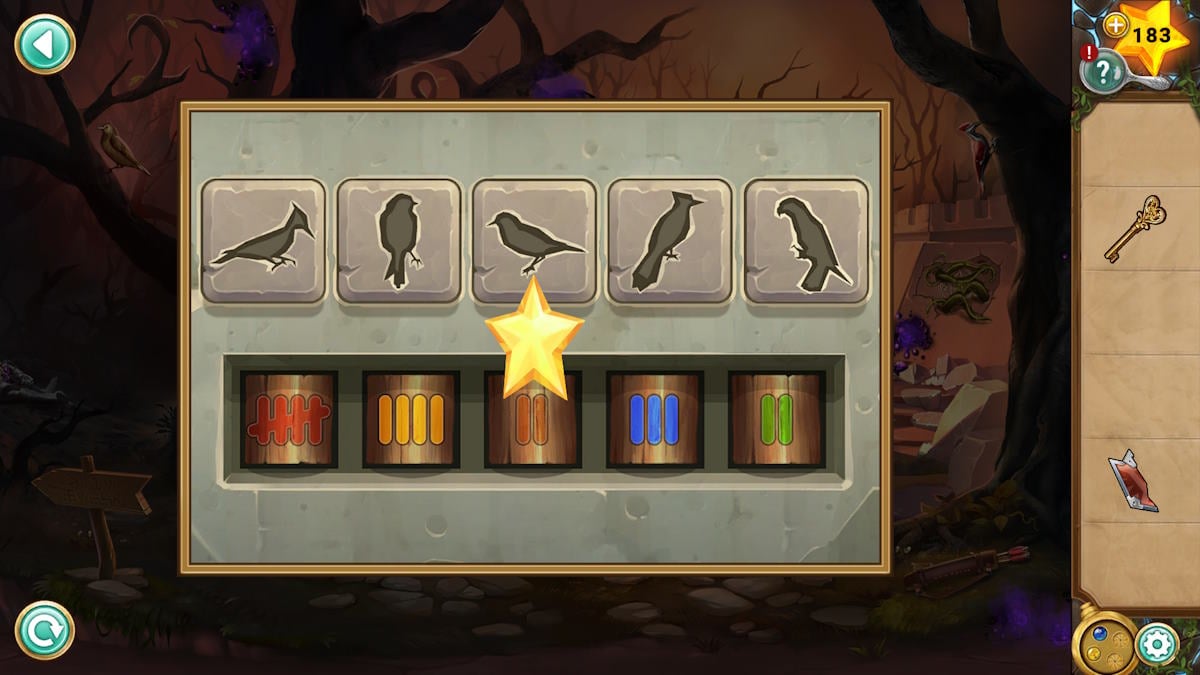
To solve this task, you should identify the birds in the images based on their appearance, listen for the sounds they make and match those with numbers, and also consider their colors. From left to right, the solution is 54232. After completion, click the quiver (f7) for a closer look, add the bow, then pick it up by clicking again. This will give you the Bow and Arrow. Use this equipment on the Shield Emblem (f9) to dislodge it from the tree, and finally pick it up.
Opening the draws and finding the pendants
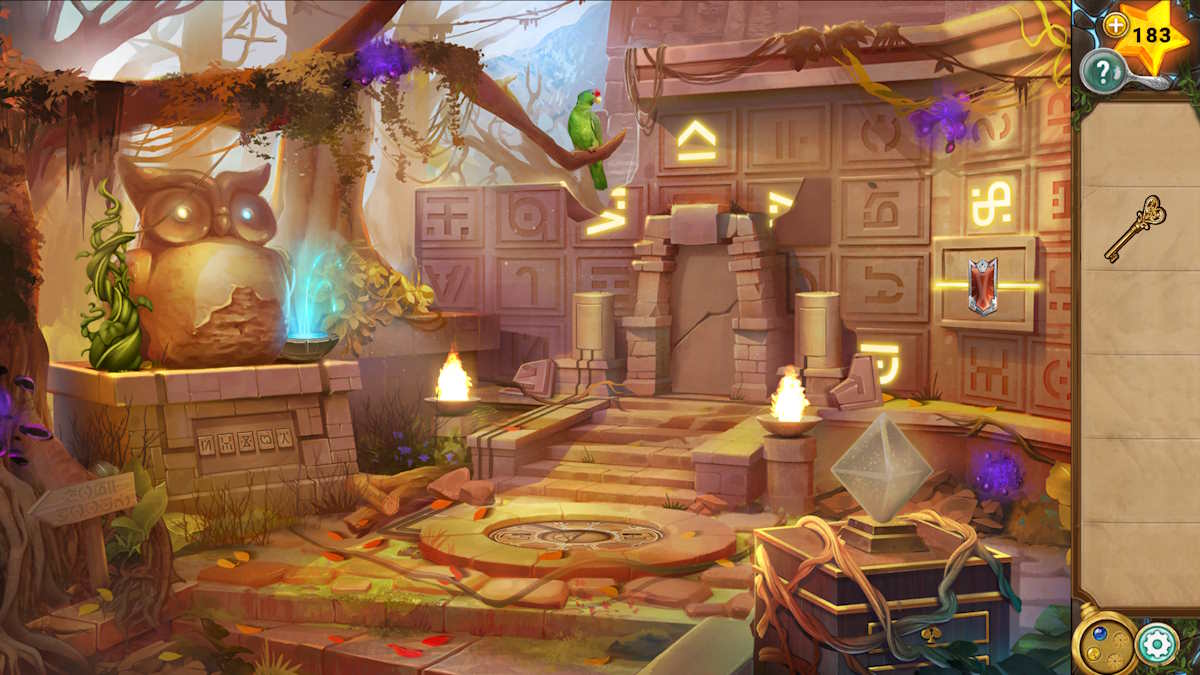
You’re now able to proceed and activate the yellow power of the pendant near the owl (g2), which in turn unlocks a puzzle sequence. Then, place the two shield emblem pieces on the wall (g4), causing five symbols to illuminate. Later, use this code beneath the owl and the vines adorning the pedestal (g5) will vanish.
Currently, you’re able to utilize the provided key to unlock the heart-shaped drawer and retrieve the Club Pendant. Employ this key on the lower drawer’s box to unlock it and uncover the Diamond Key within.
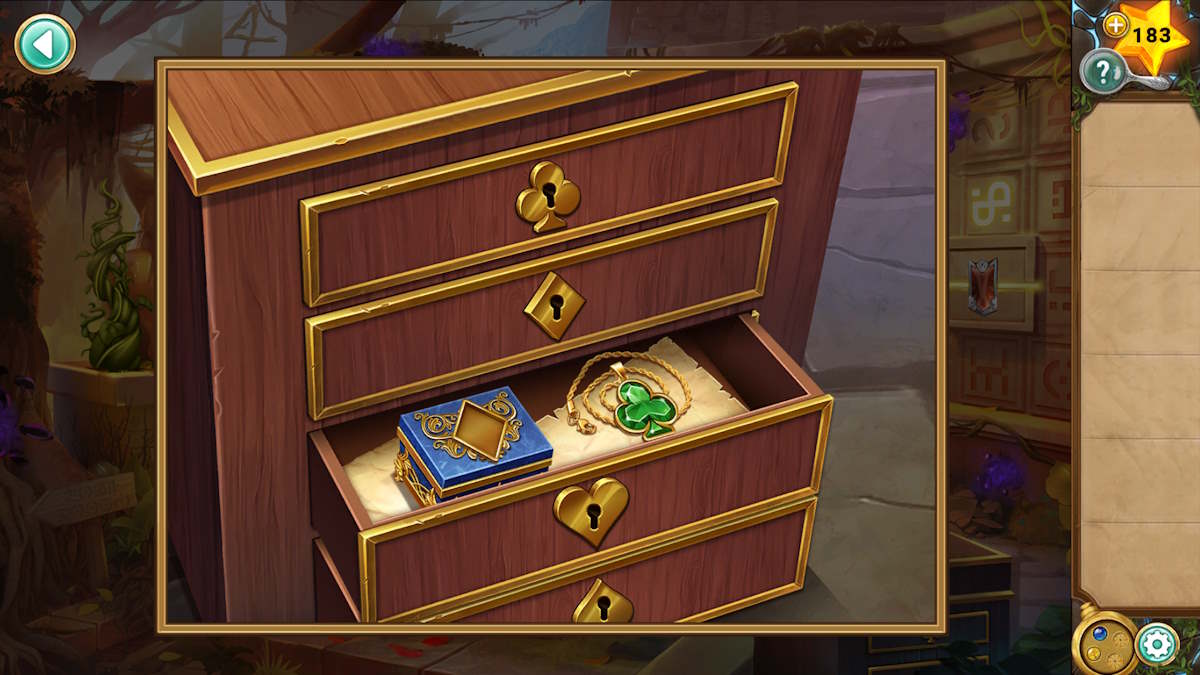
To locate the Spade Pendant on the floor, first, ensure all drawers are closed. You’ll need the diamond key to unlock the drawer containing diamonds, and once opened, you can find the spade pendant inside. This spade pendant will help you open a box within, which will provide you with the Club Key.
The door puzzles

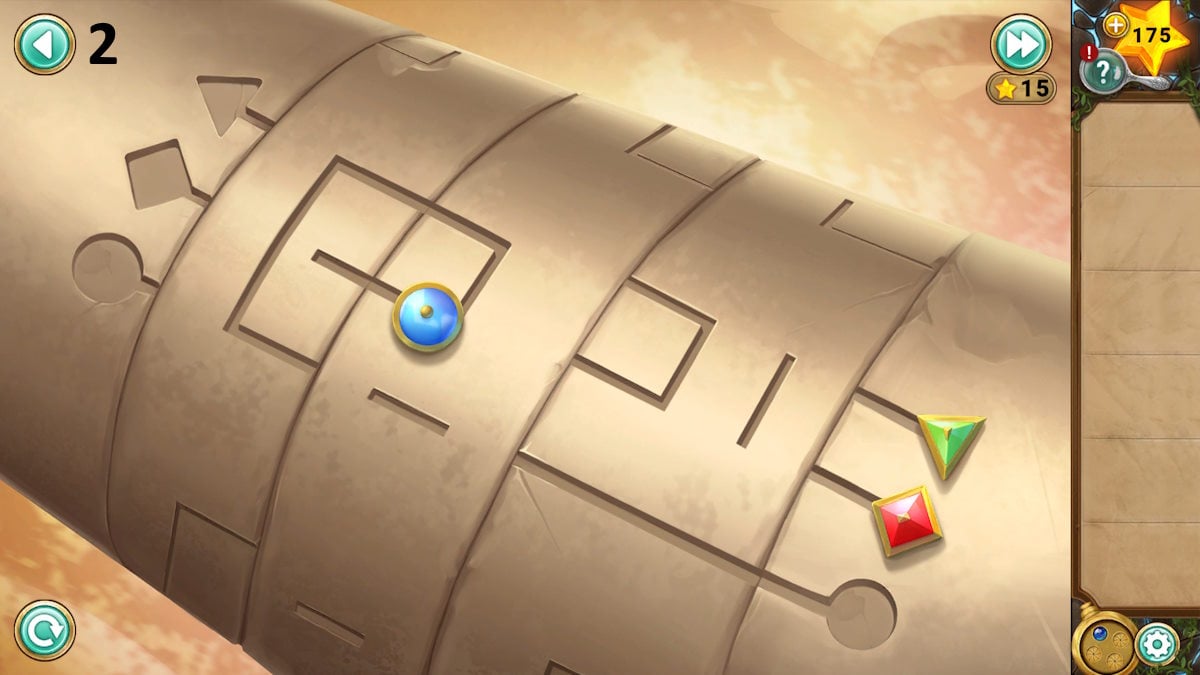
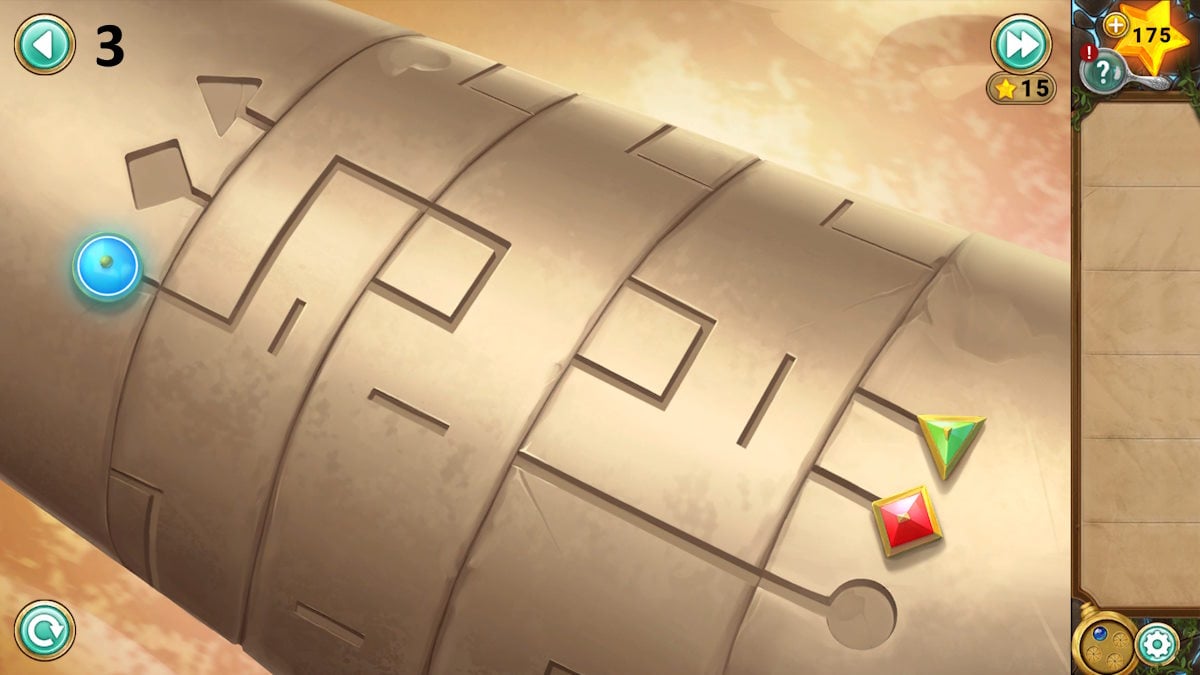
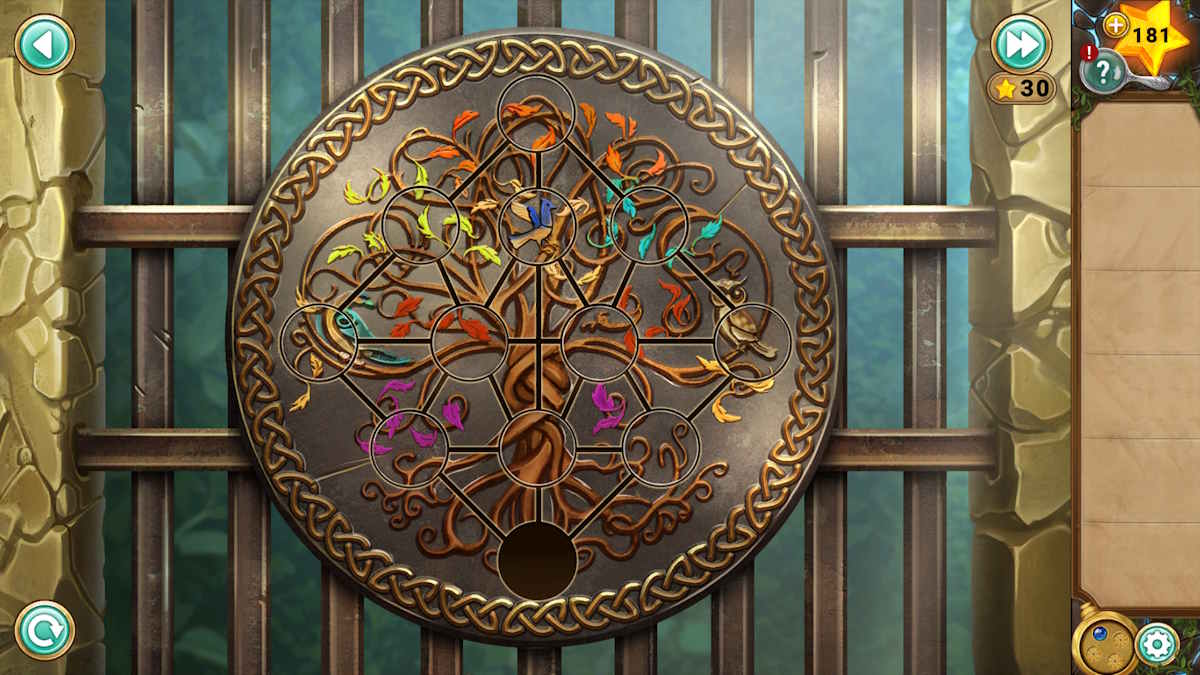
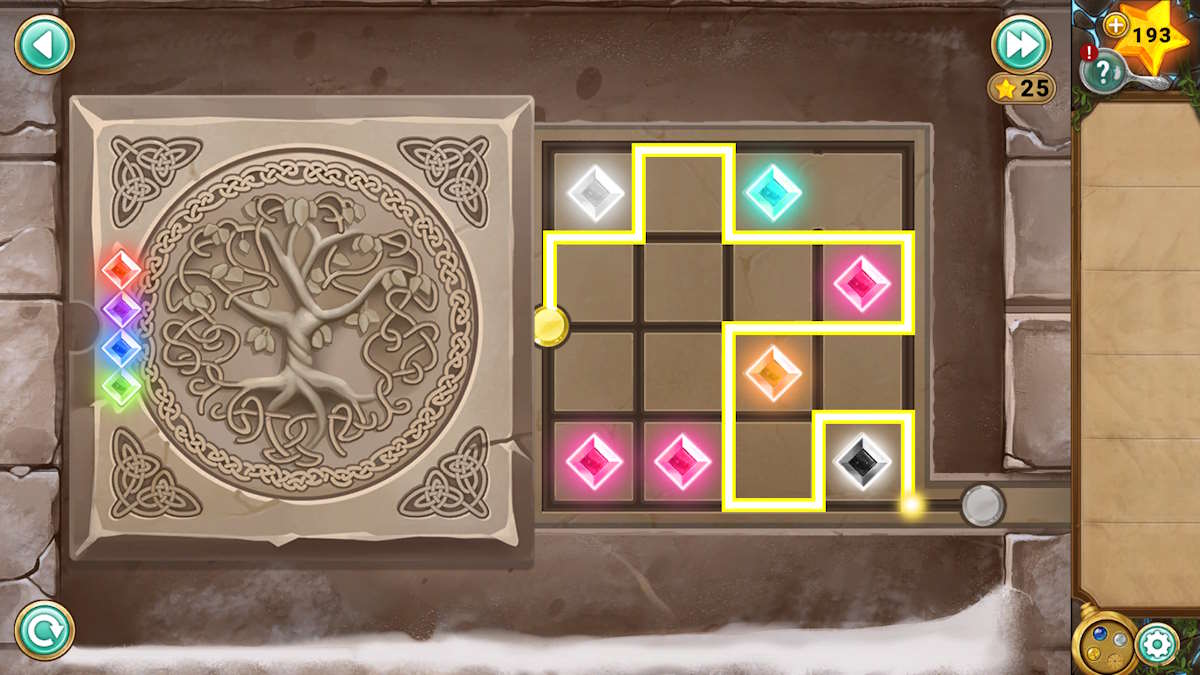
Place the stone slab onto your floor layout (location 3), next use the combined abilities of both the yellow and blue pendants to unlock the mystery hidden within the pillar on the left side near the entrance (position 6). Interact with the puzzle once it’s activated, then guide the ball from left to right and ensure it passes through the opening on the opposite side. The secret lies in the fact that as you navigate, the circles within the pattern will rotate. To solve this puzzle:
- Right, up, left, down, right through two circles (to 1)
- Up (to the top), left but then down (to the bottom, marked 2) before you hit the next circle
- Left, and then up through just one circle (to 3)
- Right to the end, down, right, and up to the top right corner (4)
- Left, down, first right, down, and first right to escape
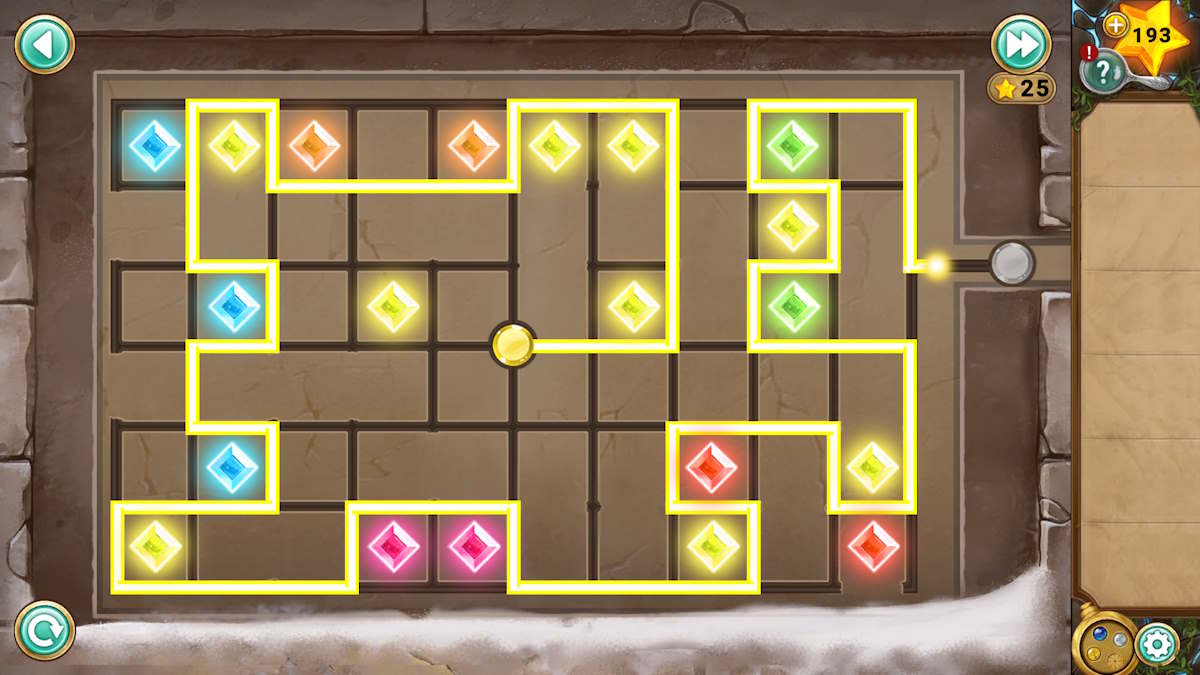
This opens the right-side pillar (g7) for a similar puzzle:
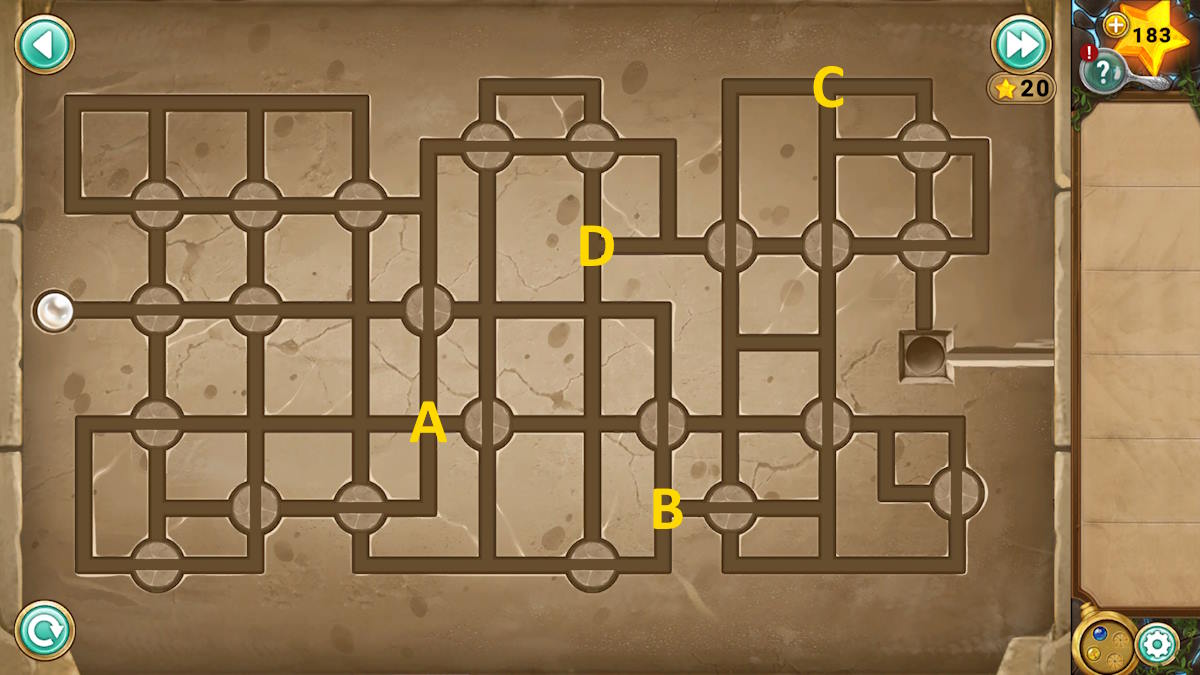
- Right through two circles, then down, and right before you go through a circle (to A)
- Up to the top, right through two circles, down, left, down, right, down, and stop just before the bottom (at B)
- Right, up through one circle, left, up through one circle, and then right (to point C)
- Down to between the two circles, left, down, left through the circle, then up to D
- Right to the end, up, left, up, right, down, and done.
The temple door will now be open, allowing you to enter and complete Chapter 3.
Legend of the Sacred Stones Chapter 4 walkthrough
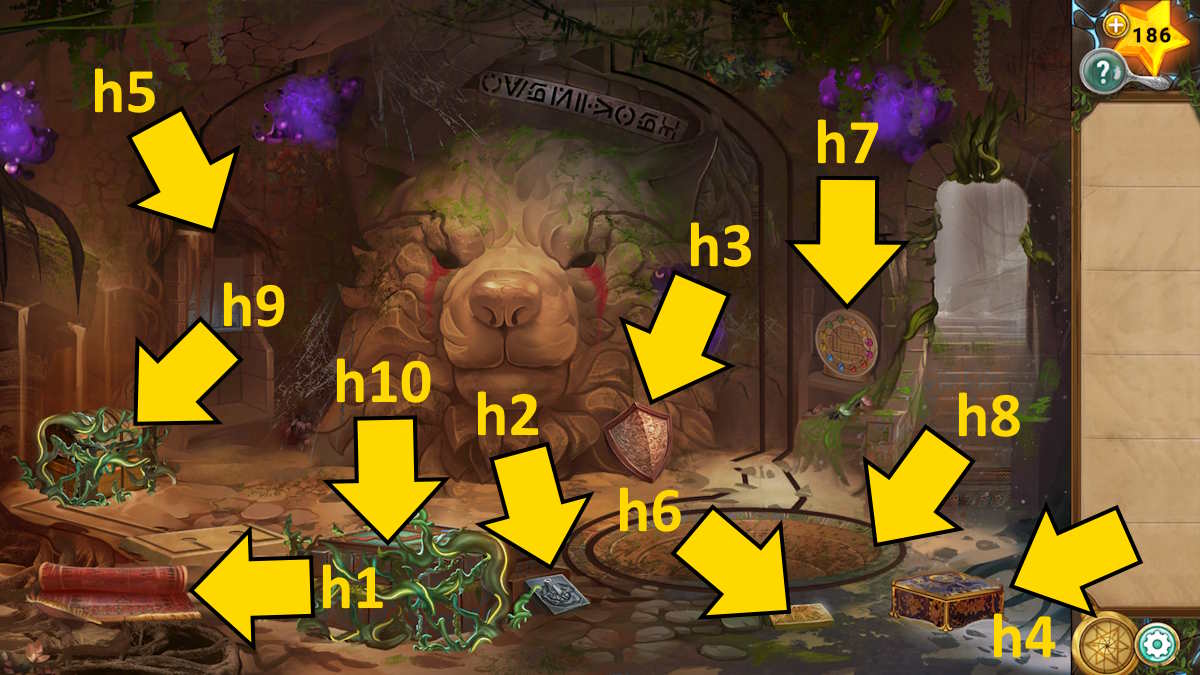
1. Upon entering the temple, lift the rug (Step 1) to discover an Owl Symbol, pick up a Stone Sculpture (Step 2) and a Shield (Step 3), and open the chest (Step 4) to obtain a Square Key. Attach the stone sculpture to the wall at the rear of the room (Step 5), then proceed through the door on the right-hand side (you’ll need to locate three more doors to complete it).
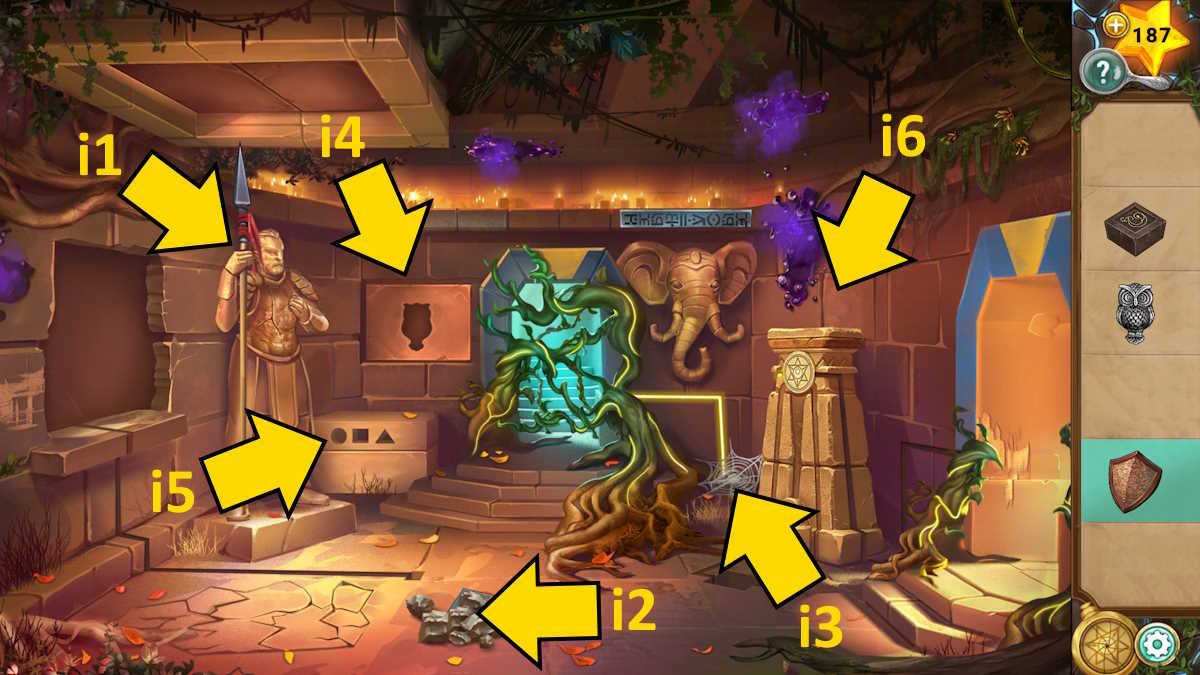
1. Place the shield on the warrior statue, and it will drop its spear for you to pick up. Shift the debris to uncover a second stone carving, while brushing away cobwebs to find a triangle key. Lastly, put the owl figurine in the space on the back wall, which will open a hatch needing a four-digit code (to be addressed later), each digit represented by colored leaves.
As a fan, I’d say: “Go back to the last room and push the spear under the golden floor tile (h6). This reveals the Circle Key! Exit again and insert the keys into the box (i5). Once they’re all in, it opens up. Inside, grab the third Stone Carving and a Book Page. Back in the starting room, place the Book Page on the round item near the stairs (h7) to initiate a puzzle.”
Completing the mural

The goal here is to adjust the gems until they correspond with the layout shown on the page. I’ve already solved the puzzle and presented it earlier. This will grant you the final Stone Carving. Place all of them in the mural (h5). Once completed, this action will open a window in another room, enabling you to utilize your locket there (by clicking the pedestal at i6).
As a captivated admirer, I’d recommend making your way towards that spot and unleashing the magical power of the blue locket before descending further downstairs. You’ll notice, upon closer inspection, that the pool (you might remember it as h8) is now brimming with water, offering you an opportunity to retrieve the Autumus Figure.
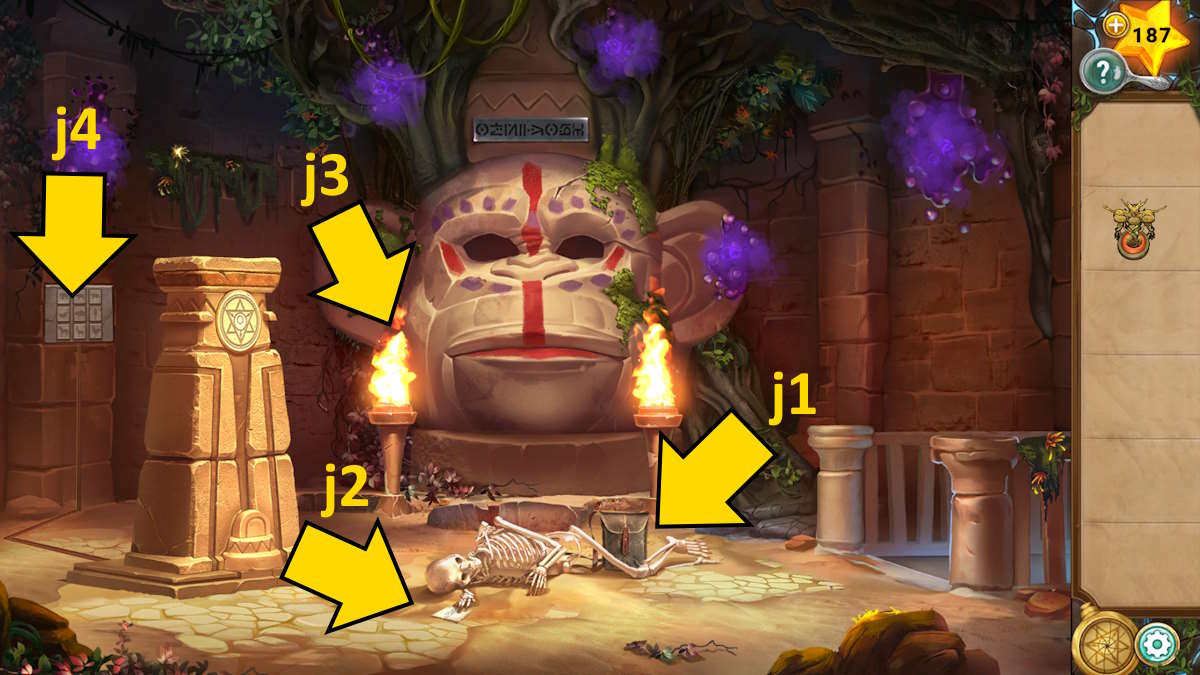
In this scenario, you’ll notice a spacious room housing a grand monkey figurine. Retrieve the vacant canteen from your bag (j1), then examine the note clutched in the skeleton’s hand (j2). The text on the note is accentuated in orange, providing you with the colors: yellow, green, orange, and red.
Solving the animal wall puzzle
Use the yellow locket power so you can head back downstairs an use the canteen in the pool to get a Canteen of Water. Now go right back to the top and use the full canteen to put out the torches in front of the monkey statue (j3). Its mouth will open, revealing a jigsaw-style puzzle. It’s quite straightforward, as you can’t rotate the pieces (but they do re-angle once you pick them up). In the image above, I only have one piece left to add. Once complete, you can take the Pillar Block.
Go ahead and click on the ‘Animal Wall Puzzle’ next (j4). Remember, each statue in every room displays a sign indicating the animal’s eating habits.
- Top floor: Monkey (Omnivore)
- Middle floor: Elephant (Herbivore)
- Bottom floor: Dog (Carnivore)
You now need to order these animals so that the corect diet matches these levels. So one solution would be (in any order):
- Top: Person, ape, bear
- Middle: Horse, cow, rabbit
- Bottom: Shark, crocodile, lion
After lowering it completely, the pillar will come to rest on the ground floor, right in front of the rug (h1). Place the pillar block and then employ both the yellow and blue lantern abilities. This action will clear the vines blocking the chest (h9), enabling you to grab the Rope.
Place the figures up above where they belong, hook the rope into the fresh opening you’ve made in the ground. This action enables the activation of your yellow lantern, paving the path to the monkey room while keeping access to the lower level intact. Afterward, descend using the rope and notice that the vines are now absent from the game setup (h10). Start a puzzle by positioning those two pieces.
Defeating the yellow golem
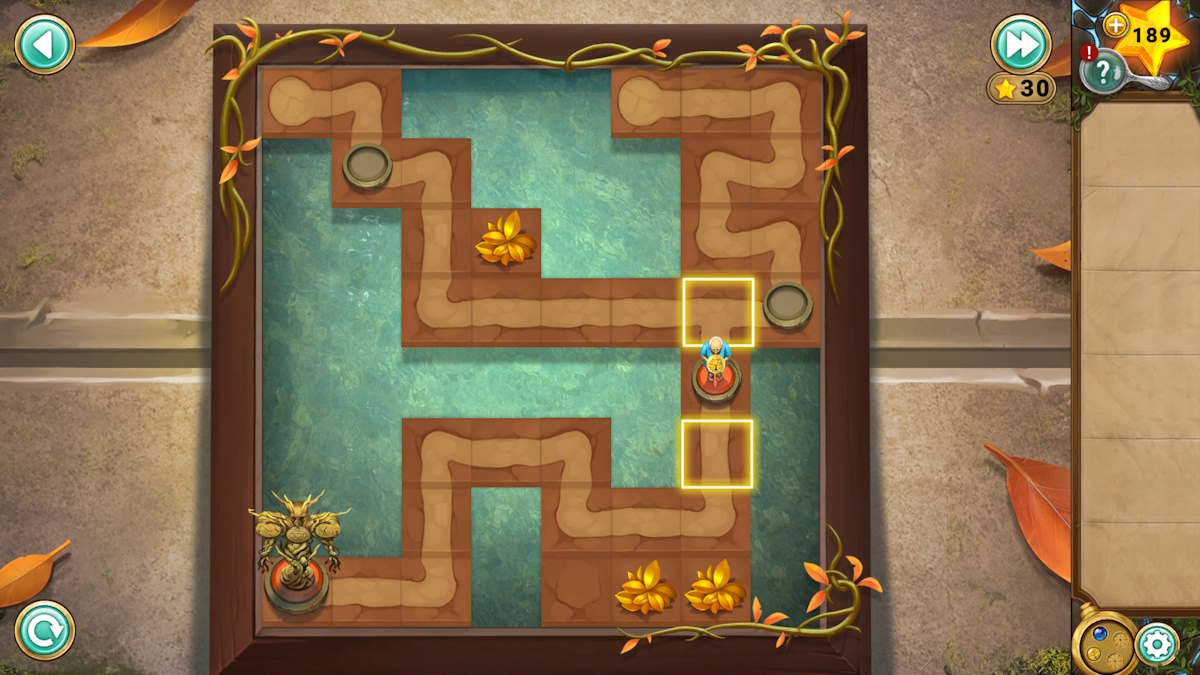
As a seasoned puzzle solver with years of experience under my belt, I can confidently say that this task ahead is right up my alley! The objective here is to guide the villager to the god, but not without rearranging the floor pieces first to create a clear path. It’s important to remember that moving one tile affects all the colored tiles in its row or column – a quirky yet manageable mechanic.
After completing your task, choose the symbol located beneath the game board, then utilize the yellow key’s power, and finally, click the dog’s now-open jaw to proceed. Unfortunately, it seems you arrived a bit too late, as Milo has already made it there.
The game this time around is somewhat more challenging than before, as the symbols you’re looking for now rotate, making them a bit harder to spot. However, the underlying concept remains the same. You can either tackle the random matching game (with an unlimited number of attempts) or employ your stars to bypass it and move on to Chapter 4.
Legend of the Sacred Stones Chapter 5 walkthrough
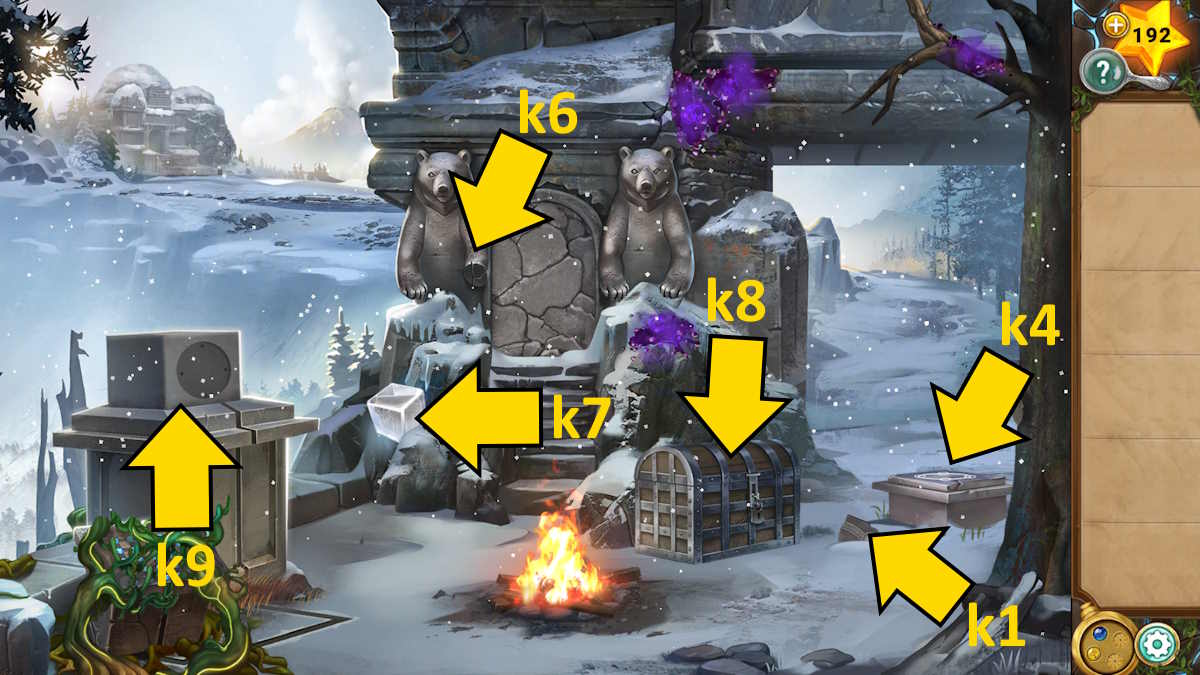
Following a chat with Siegfried, grab the Stone Tablet (k1), then proceed by clicking the arch to advance and rejoin him.
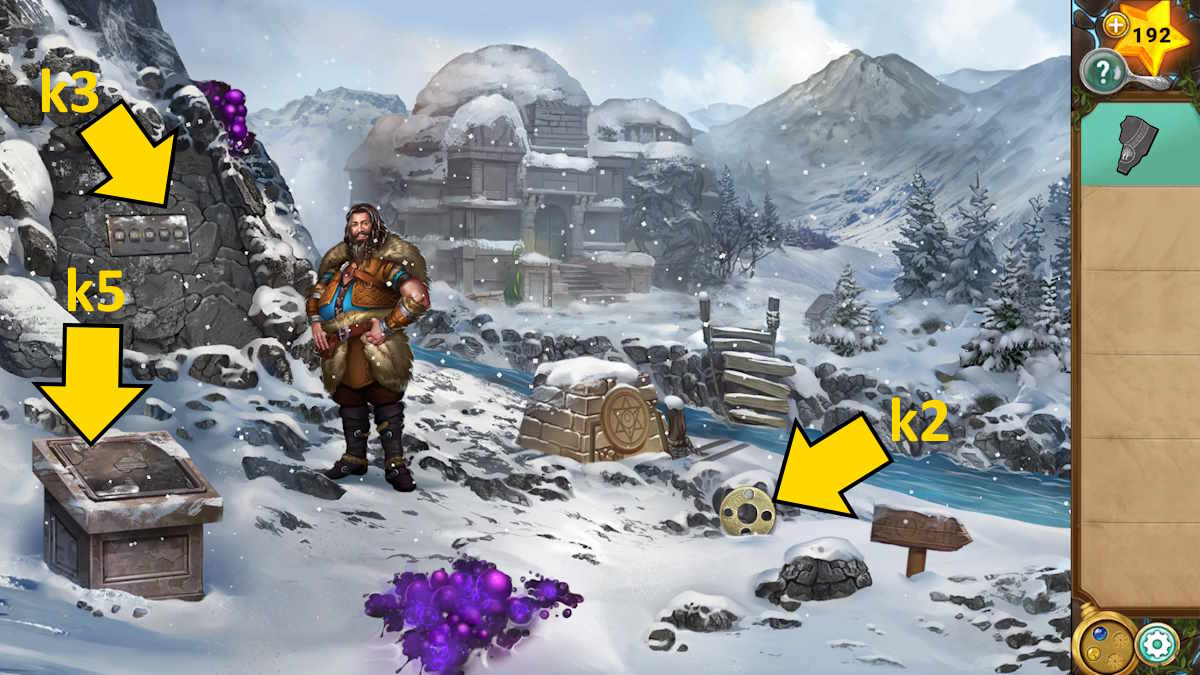
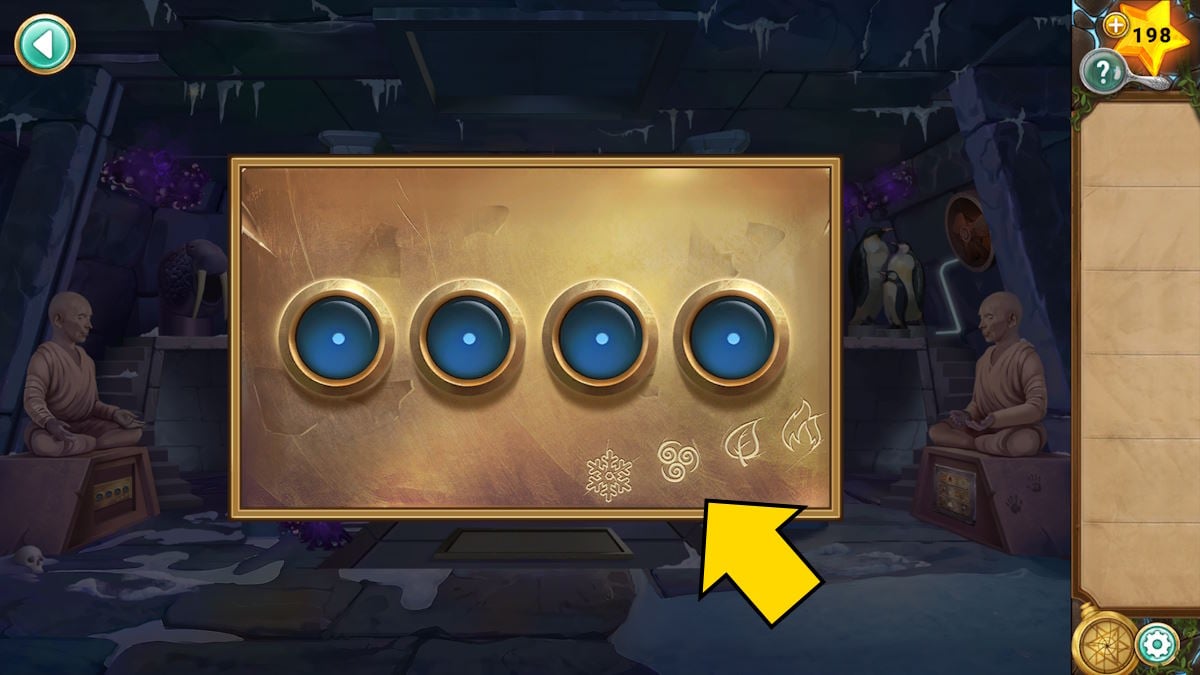
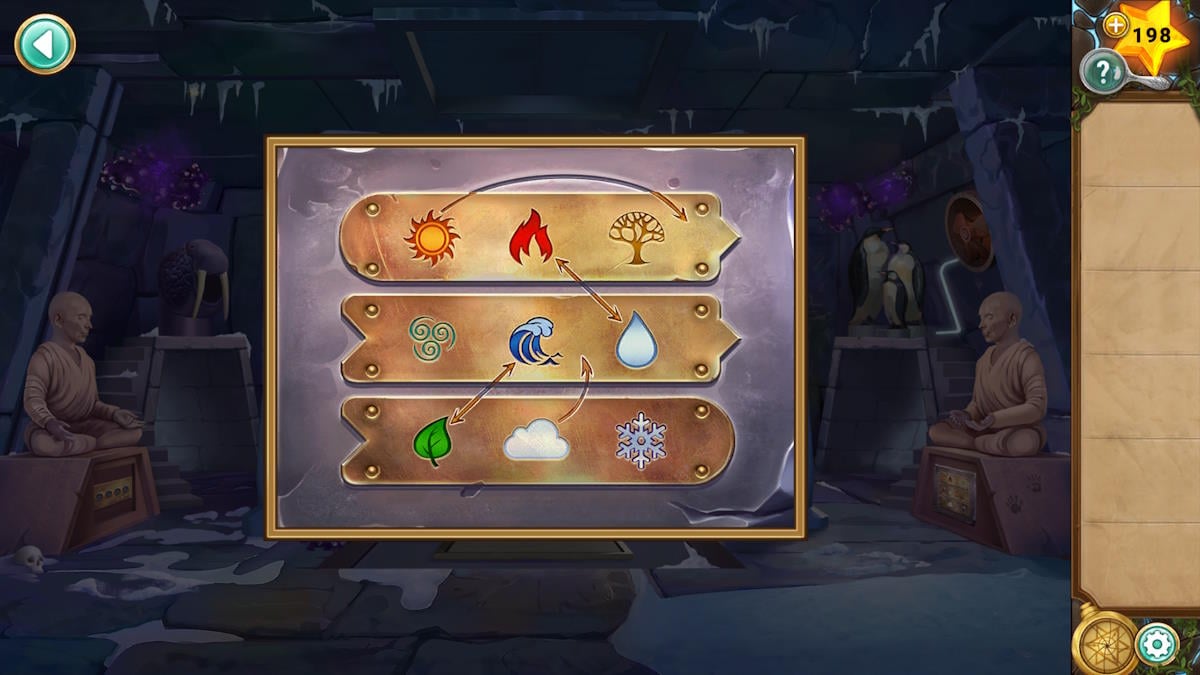
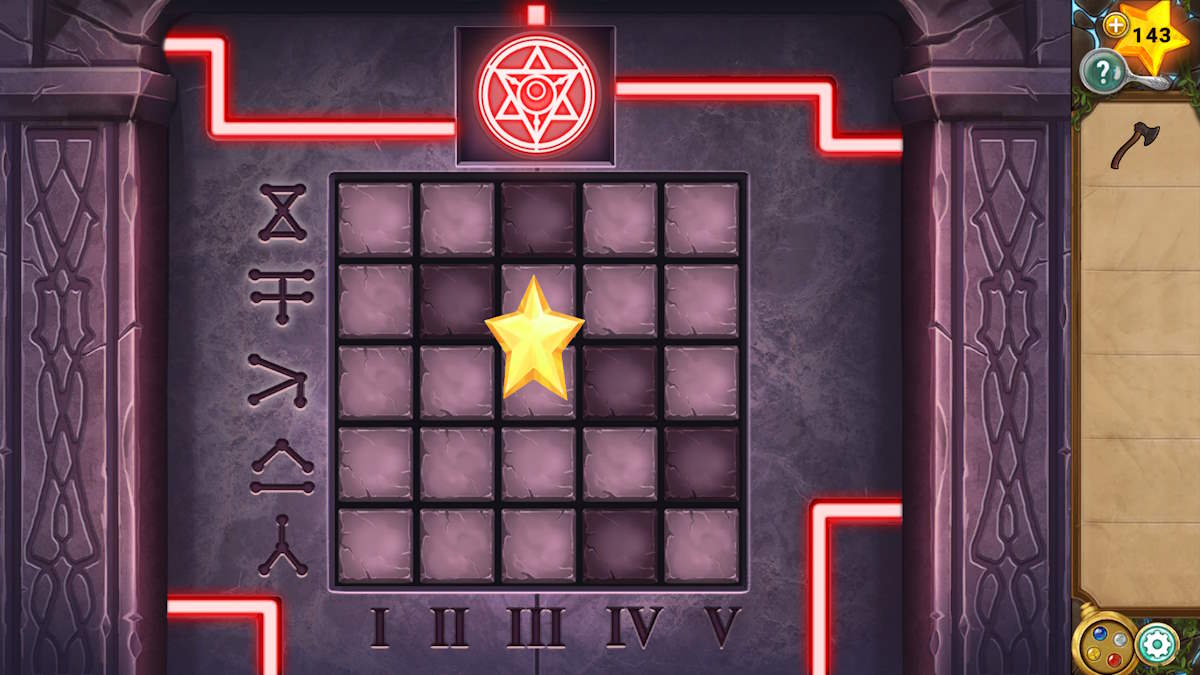
1. With the Moon Disc (k2) in hand, activate the blue locket to elevate the river’s level. Then, move towards the wall-mounted code lock (k3). Keep in mind that each of the five spaces you encounter will have one of its directional arrows illuminated (as indicated below).
Revisit the initial scene and position the moon disk on the lower pedestal (k4). Then, starting from the left side and following the Roman numerals indicated on the pillar’s image, determine which weather condition aligns with the direction marked on the lock. For instance, placing the disc’s lower hole on the ‘I’ gives us a tree. The final answer (from left to right) is:
- Tree, water, sun, wind, leaf
Once you’ve finished, the panel will swing open, giving you access to pick up the second Stone Plate and a Bear Paw. Place these two stone plates on the plaque here (location k5), but remember there are more needed. Retrace your steps back to the initial scene and put the paw in the bear statue (location k6). This action triggers another puzzle.
Solving the color rows puzzle
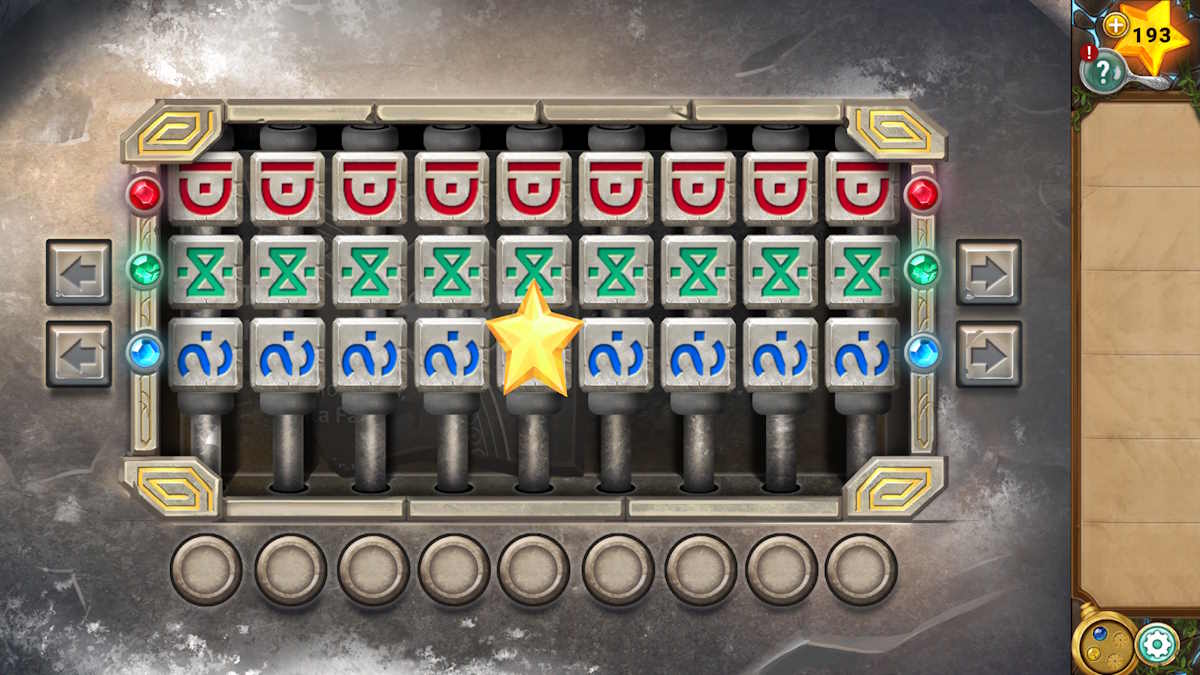
In this task, arrange the color-coded rows as follows: Red at the top, Green in the middle, and Blue at the bottom. You can rearrange the rows by moving them up or down using the buttons below each column, keeping the first and last ones secure. Moving the rows sideways is possible with the arrows provided on either side. Once you’ve sorted them correctly, grab another Stone Plate. And here’s a bonus: The wind (white) compartment in your locket has now been activated!
As I tread towards the bridge again, I discover that poor Sigfried is entombed by a landslide. Here, using my white locket’s power, I can freeze the flowing river, enabling me to advance steadily towards the temple.
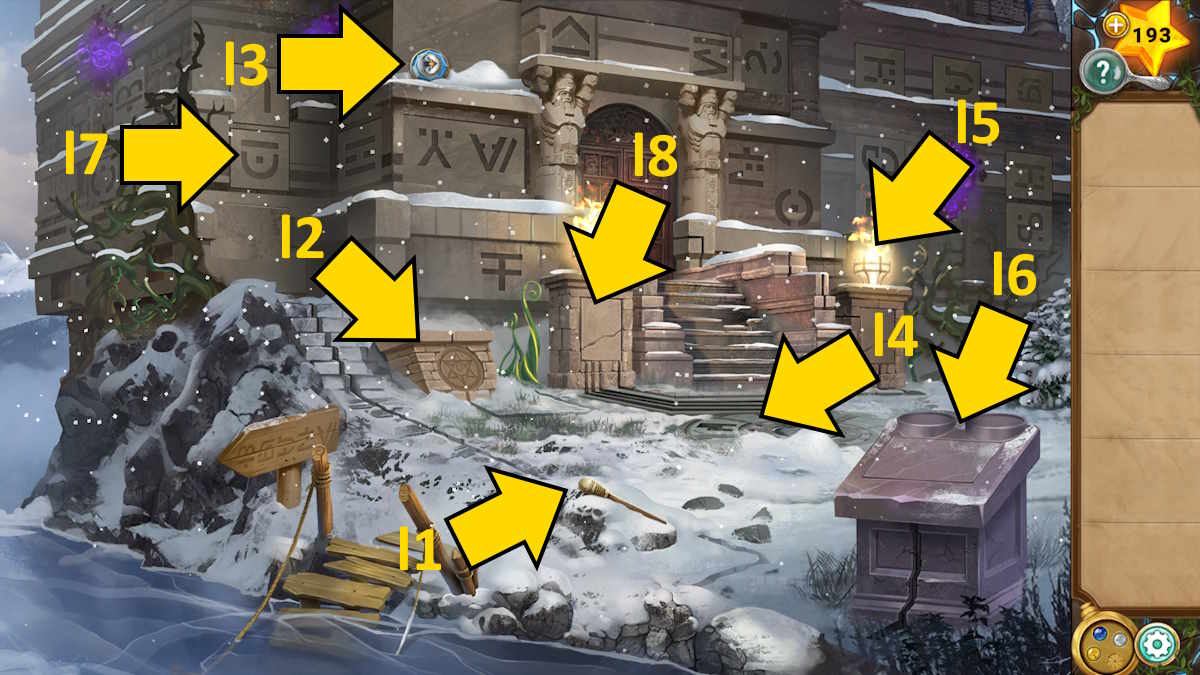
1st: Use the yellow locket power (step 2) to raise the vine, enabling you to gather the Penguin Gem (step 3). Next, pick up another Stone Plate (step 4) from the temple’s floor layout, light your torch in the nearby braziers (step 5) to make it a Lit Torch, and then return to Siegfried.
Saving Siegfried
Use the torch to melt the ice that has accumulated on him, following which he’ll hand you a key. Go back to the initial setting and use the torch to melt the ice cube (equivalent to key7) that yields another Stone Plate. Use the key (key8) to open the chest and discover a Seal Figurine and a Backpack. Now place the penguin on the pedestal (k9) to uncover a locket symbol. Utilizing the yellow locket power in this location will clear the vines from the block adjacent to the pedestal, disclosing a puzzle with lines.
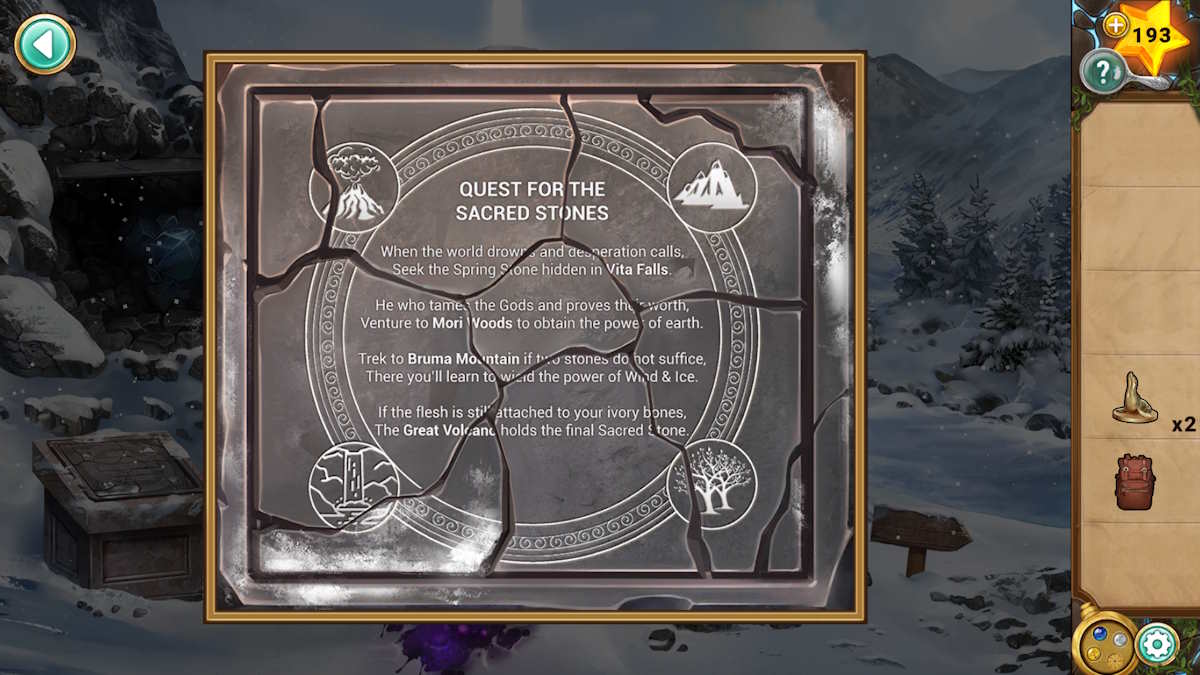
Move ahead and attach any leftover stone slabs to finish the plaque, if you will. The unveiled poem, “Quest for the Sacred Stones”, contains four prominent locations marked. Remember the orientation of the depicted locations in relation to the written words. For instance, the waterfall is located southwest of Vita Falls, providing you with these compass bearings:
- SW, SE, NE, NW
If you glance at the inscription over the riddle, it might trigger memories of climbing the vine to discover penguin Gem. Go back there and utilize the yellow locket’s power again to clear away the vines. In their place, you will notice a new symbol. Return to the light puzzle, arrange this symbol in the lights, and you’ll uncover a second Seal Figurine.
As you’re present here, kindly hand over the backpack to Siegfried. In exchange, he’ll provide you with a Stone Key. After that, proceed towards the temple and place the two statues on the pedestal marked as l6. Adjust the visible dials to match the compass directions (both above and as shown below).
Revealing a stone bowl brimming with earth (at line 17), harness the power of your yellow locket to plant a vine; employ the blue for watering it; use the white to freeze it; and lastly, activate the yellow once more to get rid of the vines, thereby acquiring the Ice Key.
Solving the temple pillar puzzles
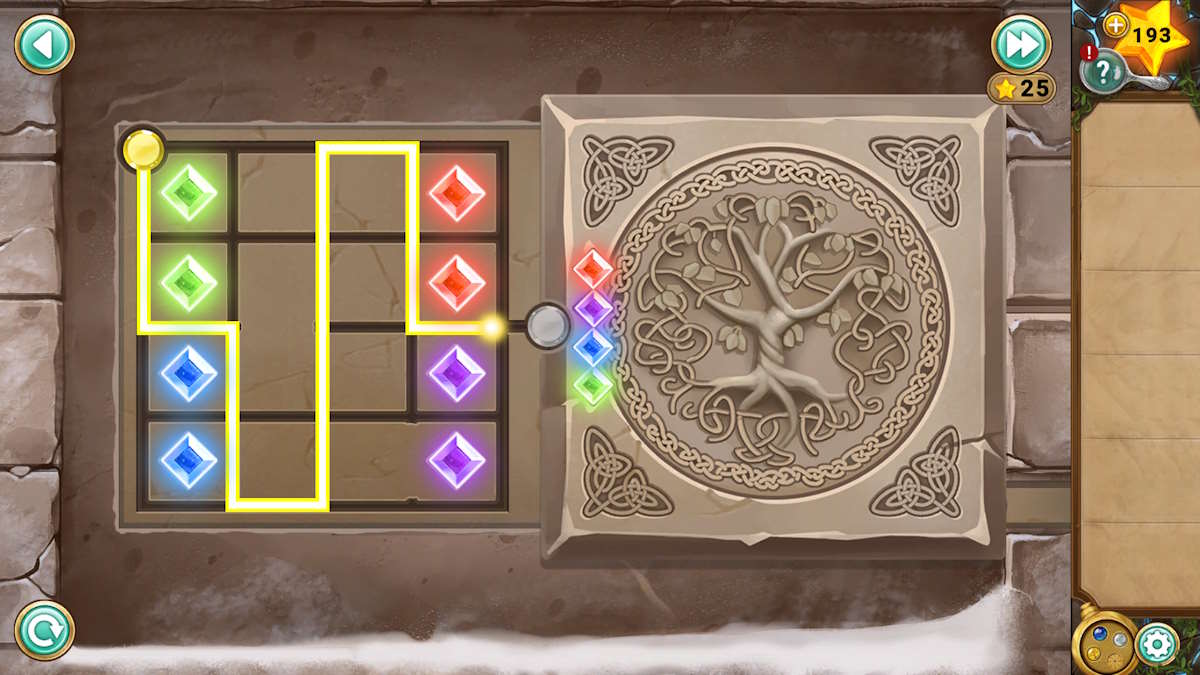
As a seasoned gamer, I need to follow these steps: First, I’ll add the two keys to the pattern on the floor at location (l4). Next, I should activate all three locket powers, in any order that suits me. Once done, I’ll encounter a puzzle similar to one I’ve seen before, a left door pillar puzzle (l8). In this challenge, I’ll use the yellow gem to draw lines connecting each set of colored gems, effectively separating them.
The slightly trickier right side is revealed when the left side is done.
After finishing this task, the mystery of the right pillar will unfold. The concept remains the same, but due to a larger game board, it becomes more challenging. Upon completion, clicking on the temple door will allow you to move forward and wrap up Chapter 5.
Legend of the Sacred Stones Chapter 6 walkthrough
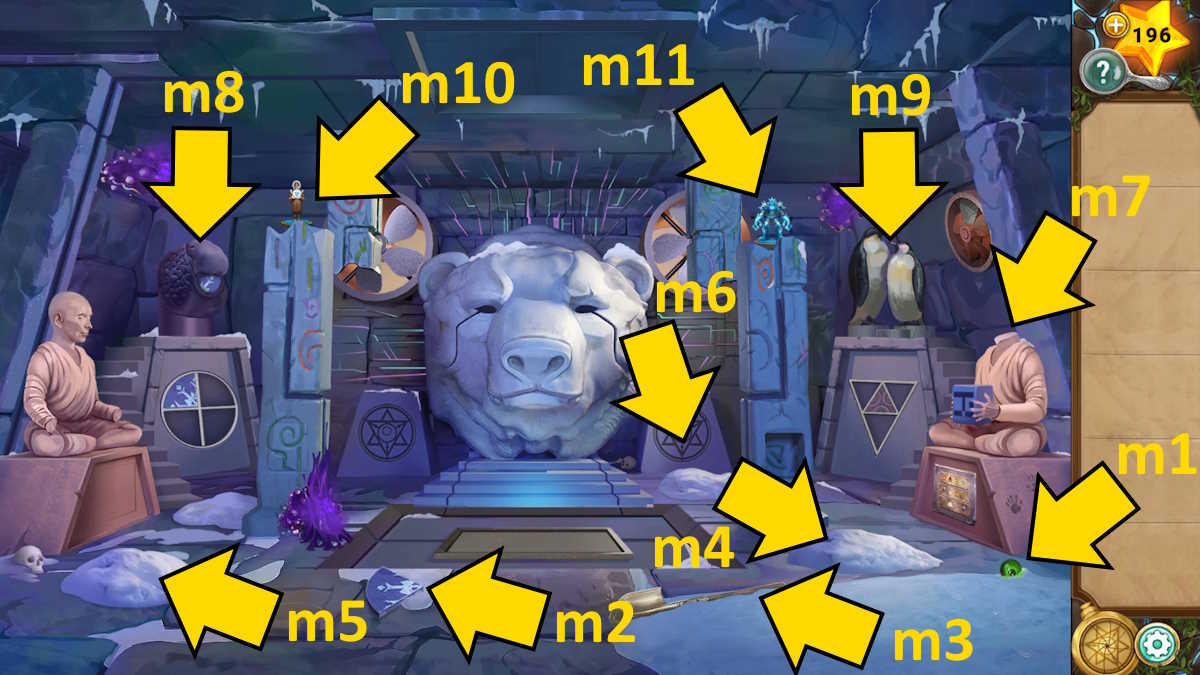
1. Grab the Emerald Eye, Ice Emblem, and Shovel as indicated by points m1, m2, and m3 respectively.
As a gamer, I added the statue’s head on the right side (m7) to grab the Rune Block, noticing the hint on the plaque beneath it, displayed above. I placed this block on the pillar above m4, which then opened a slot on the left pillar, enabling me to pick up another Tusk. Now, I placed both tusks in the walrus head (m8), causing it to drop a third Ice Emblem. I added these emblems to the design beneath the walrus, revealing a hidden door. Time to step through it!
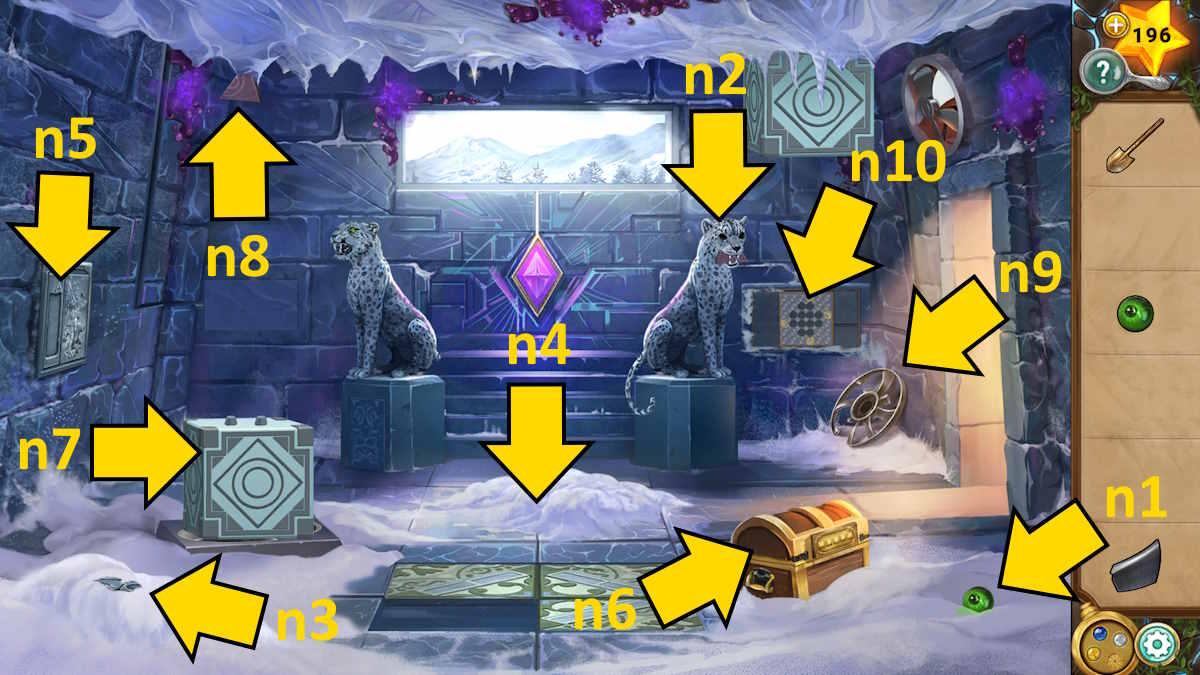
1. Obtain a second Emerald Eye (n1). Place it with the right leopard statue (n2), causing it to release a Wind Emblem. Then, use the shovel located on the left (n3) to uncover a Mural Brick, and approach the center (n4) to acquire a Tile.
Finding the code in the mural
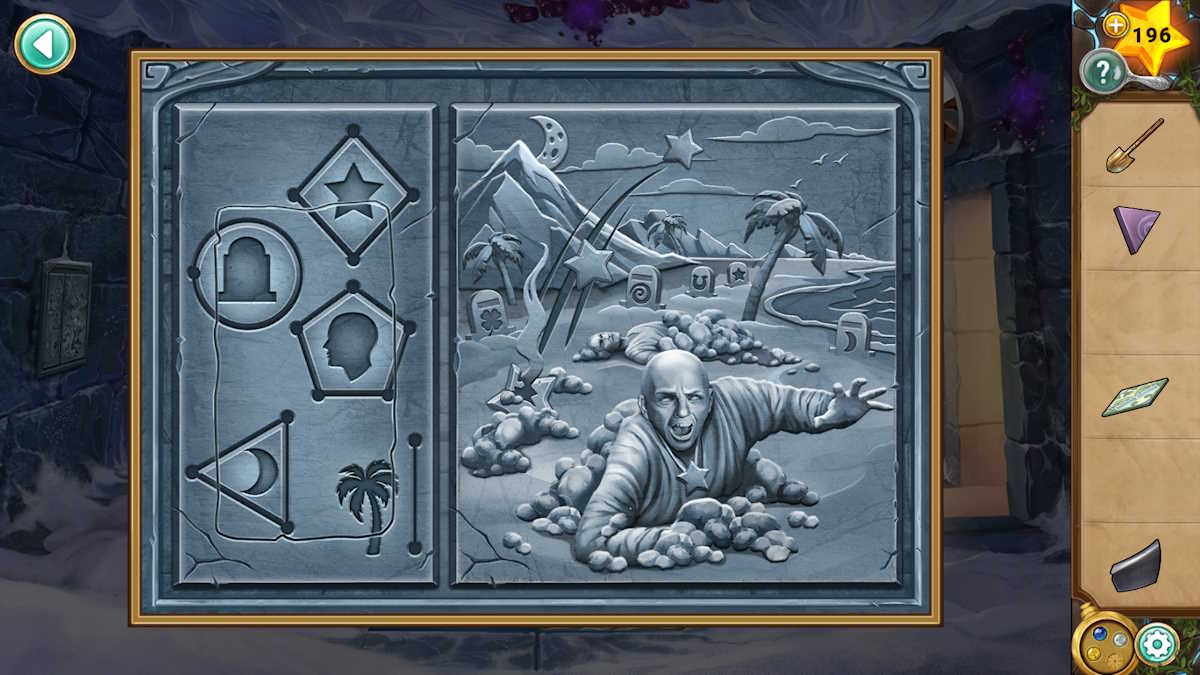
As a gamer, I navigated to the mural in the game, spotted the mysterious brick among the artwork. Upon adding it, I marveled at the hidden image that appeared above. The image was filled with items like graves, trees, moons, stars, and people, each labeled with points on their surrounding or adjacent areas.
1. Finish the floor tile arrangement by placing the remaining tiles on the floor. Elevate the plinth located on the left side next. Use the white locket’s power to hoist it upward, causing a third Wind Emblem (n8) to fall for your collection. Return to the initial room, deposit the wind emblems near the penguins at the door’s base, and proceed through.
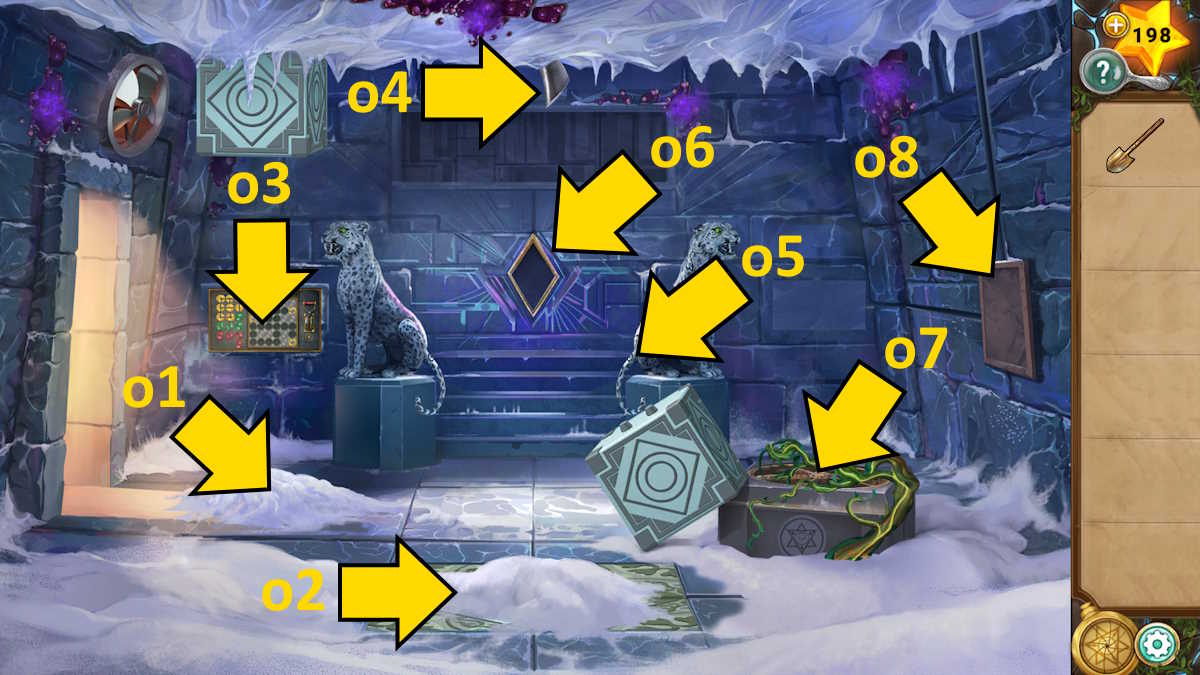
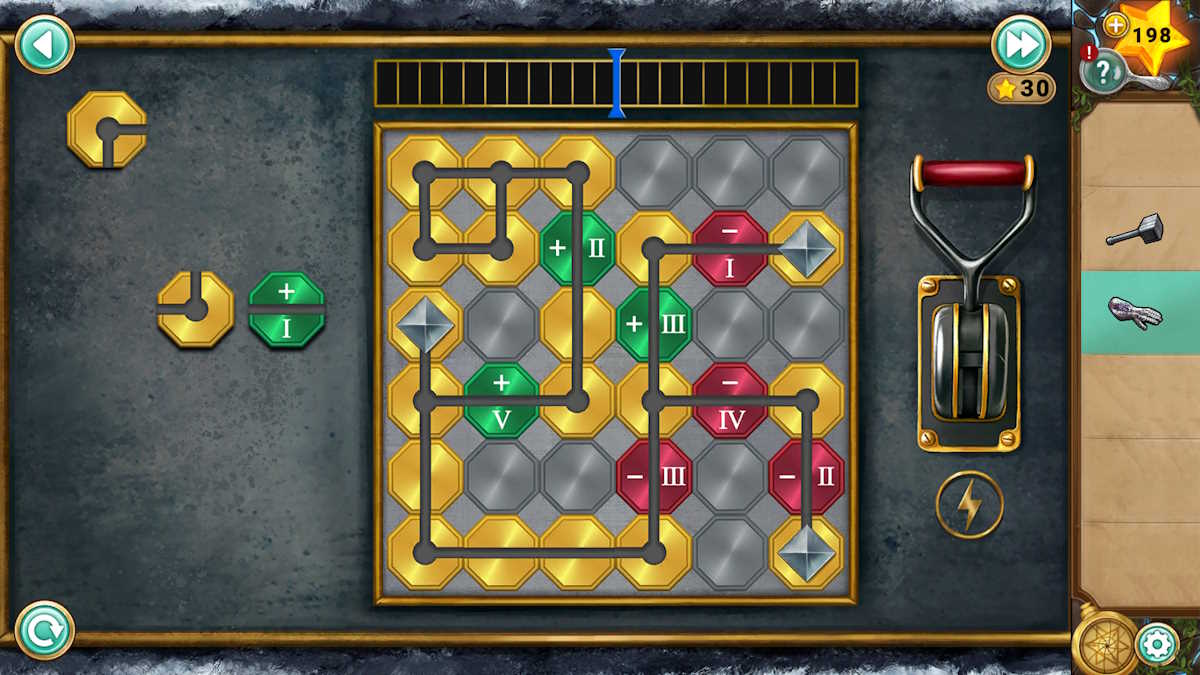
Utilize the shovel to uncover a Gauntlet to your left (o1), and a Mallet in the center (o2) within the room. Subsequently, locate the fusebox on the wall (o3) to initiate a power meter puzzle. The objective is to add tiles, then activate the switch on the right to check if you’ve correctly filled the meter up to the blue line. Once accomplished (as shown below), the cube on the ceiling will shift to the right, causing a Fan Blade (o4) to fall for your collection.
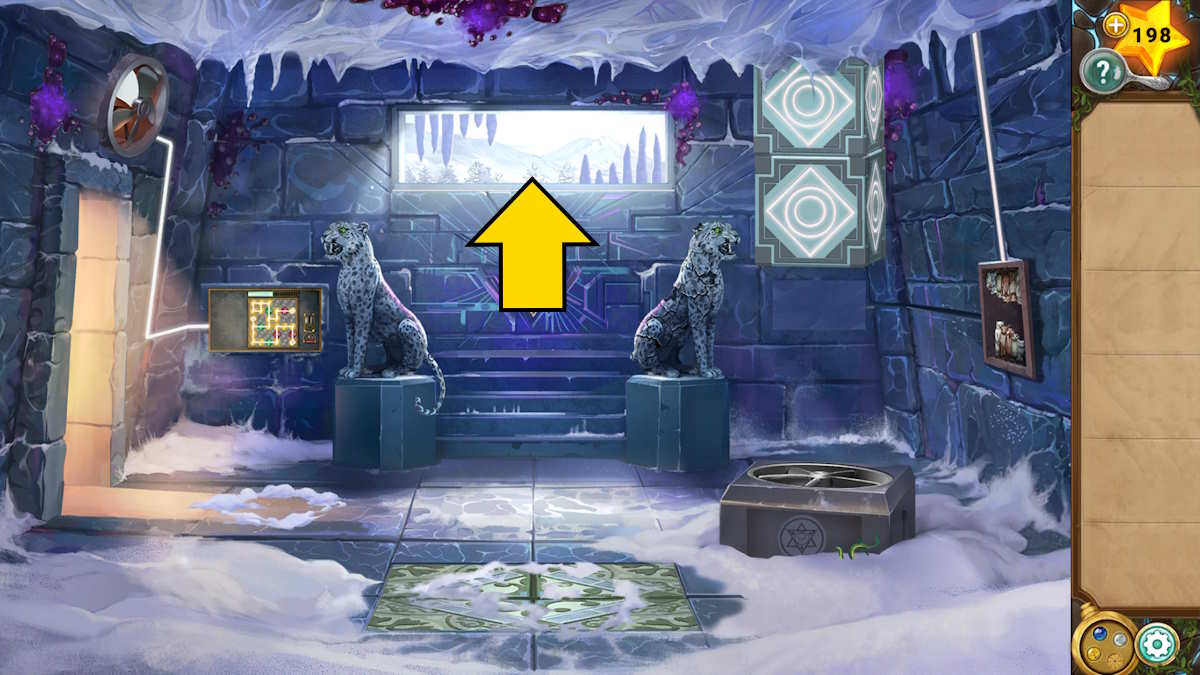
By striking the right-side leopard statue (o5), you’ll acquire a Leopard Tail. Navigate to the room on the left and attach this tail to the leopard sculpture there, which will trigger an opening beneath it, allowing you to pick up a Diamond. Bring this diamond to the room on the right, place it on the back wall (o6), and a window will open, making it possible for you to utilize the locket. The yellow power can clear away the vines (o7), followed by the blue locket power causing a Penguin Statue to emerge from the water inside the fan.
Return to the main chamber, put the penguin next to the ones above the door (m9). This should activate the fan overhead for a brief period, allowing you to drop a third Fan Blade. Don’t forget to use the gauntlet on the purple-hued curse near the left pillar to obtain a Sticky Curse. Apply this Sticky Curse to the three blades and place them in the fan cornering the room on your left (n9). Use the Sticky Curse again to secure the blades in place, then grab the Repaired Fan.
Solving the animal heights puzzle
As a gamer, I’ll head back to the room on the right and fix the fan that’s been sitting broken on the floor. Once fixed, I’ll swap it out with the one that’s currently operational. Next, I’ll click the block next to the fan and position it atop the now-functioning fan. Using my locket’s unique ability, I ignite the block, which in turn activates a hatch to my right. Inside this hatch, there are an array of animal figurines. The puzzle here lies in the icicles hanging from the window in this room. To solve it, I need to examine the figurines from left to right and remember their heights relative to the icicles outside.
- Top row: Deer, walrus, bear, wolf, penguin, seal
- Bottom row: Seal, penguin, wolf, walrus, bear, deer
After placing all animals in their proper locations, proceed to the ancient circuit. Guide it into the room on your left and attach it to the wall (n10). This action will cause the block on the ceiling to return to its initial position. Activate the white locket to lift the lower block up to the upper one, unveiling a panel where you can collect a Stone Hand. Next, utilize the blue locket’s power to channel water through the fan, allowing you to obtain another Stone Hand when it reaches the top level.
Initially, in the main chamber, you will find that placing the two statues’ hands on the left one uncovers a mystery object – a combination lock. Observe that the symbols displayed on it from left to right are symbols for snow, wind, earth, and fire.
As a gamer, I’d say: Alrighty, let’s take a peek at the panel beneath the right statue. It seems to be providing some clues to crack this puzzle. Snow is in slot number 9, wind is in slot 4. If you follow the arrow, earth should go in slot 5. Fire, however, doesn’t stay in its original position 7. Instead, it switches places with water, but then gets pushed forward one more by wind. So, the code to enter below the left statue is 9, 4, 5, 7. Let’s see if that does the trick!
Entering the temple
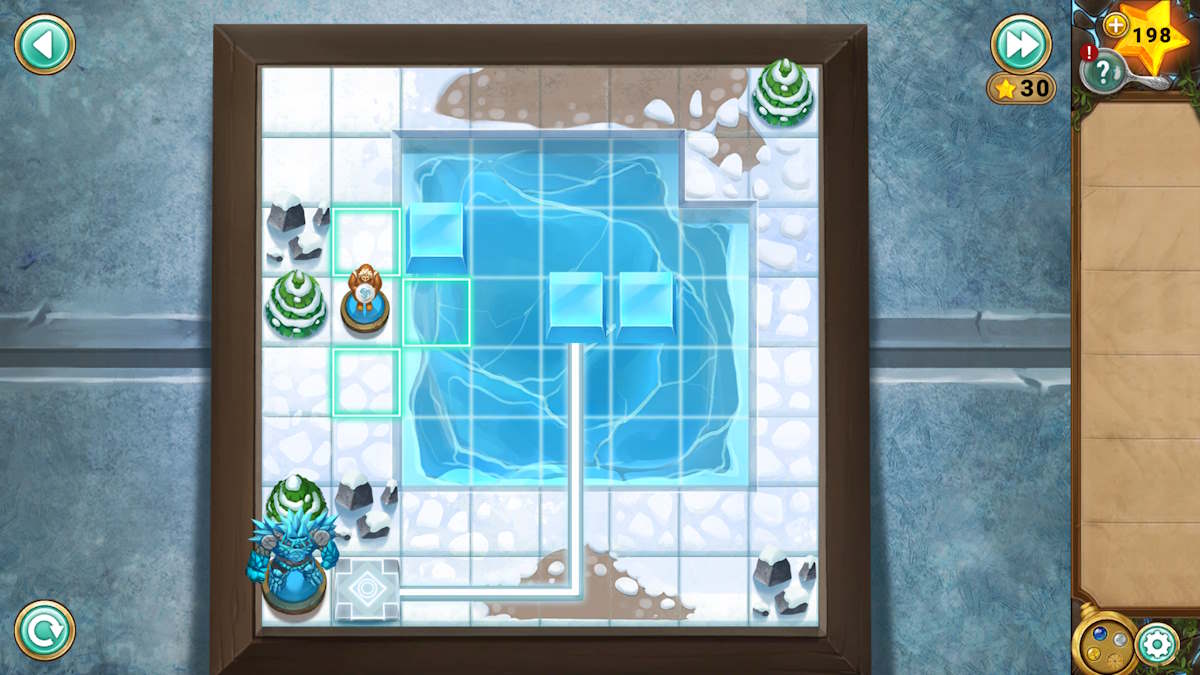
As a seasoned adventurer with years of temple exploration under my belt, I can confidently say that I’ve stumbled upon many intriguing puzzles hidden within ancient sanctuaries. Today, I find myself before a central room in this temple, and I see a locket within my reach. With a keen eye for detail, I notice that it’s white and has the power to knock down objects on both sides.
- Move the middle ice block to the bottom, then to the right, and then to the top-right
- Move the other two blocks to the bottom
- Of those two, move the one on the right to underneath the first block you moved (so there are two in the top-right corner on top of one another)
- Move the top-right block to the left, and then the bottom-left block up underneath it
- Now knock that block right, so it is next to the block on the right
- Knock the far right block down, left, up, and then right onto the red dot.
With that, you can transfer the villager to Gladius and conclude the game. Activate the white locket’s power, and the door will swing open, providing access to the golem and, of course, Milo. This time, the puzzle is similar but with a touch more challenge, as the symbols you need to find are now moving around. Once you’ve solved it, you’ll have finished Chapter 6, even after fainting!
Legend of the Sacred Stones Chapter 7 walkthrough
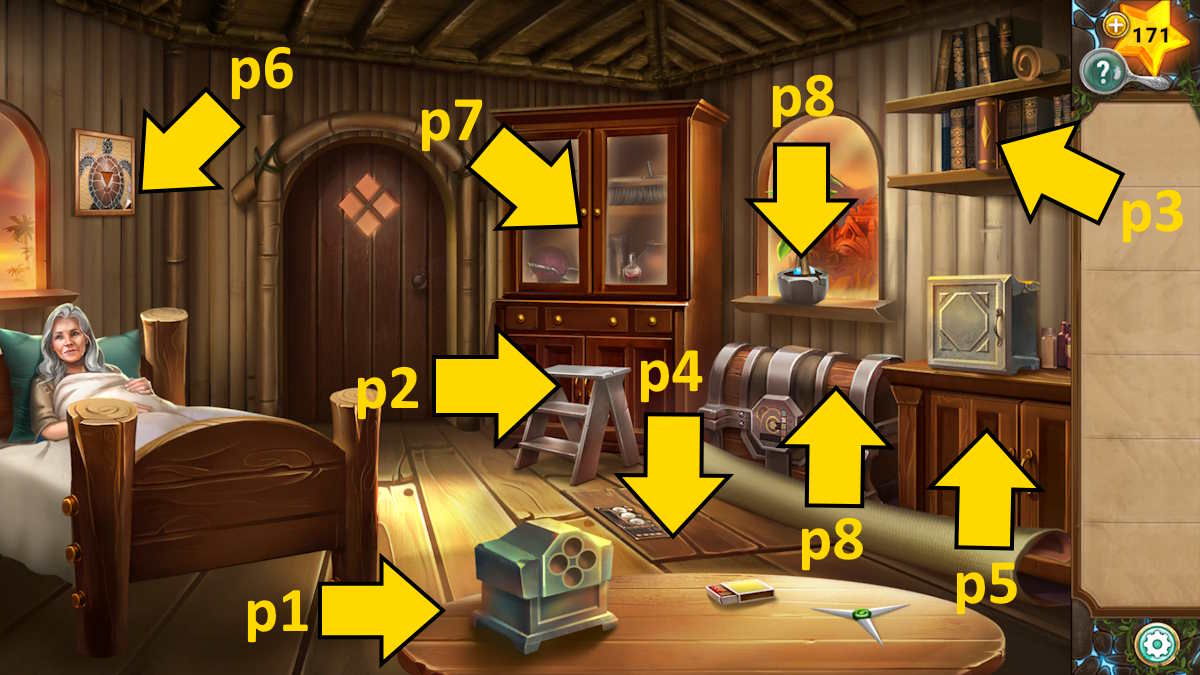
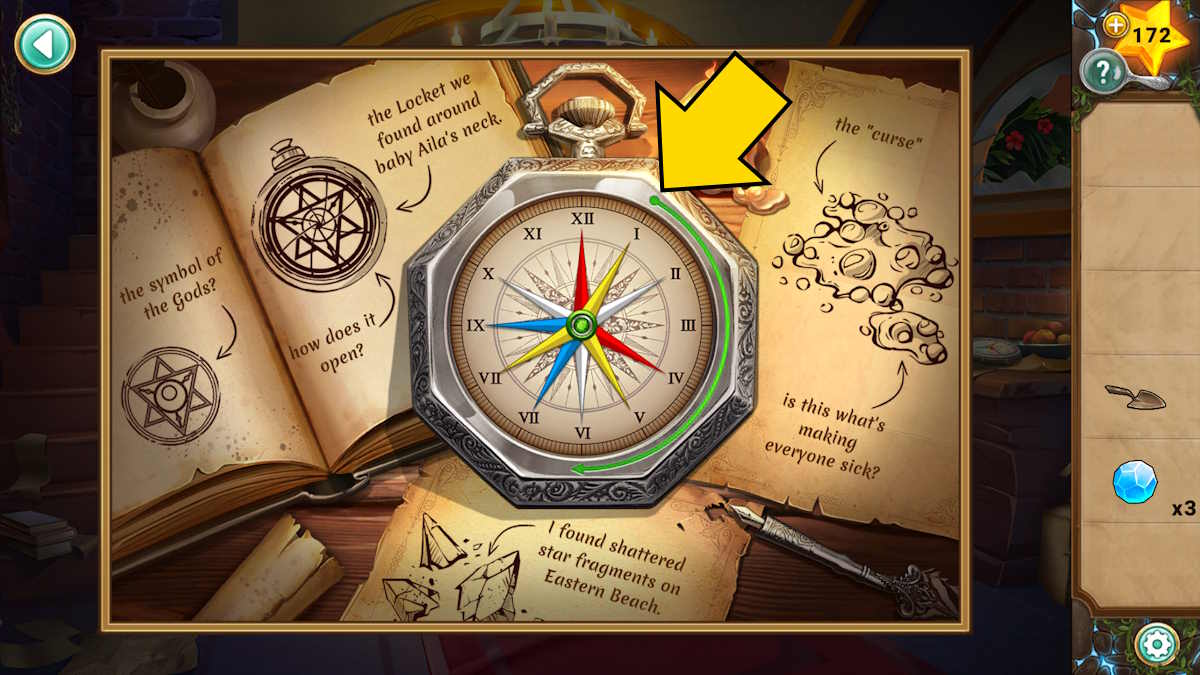
As I regain consciousness, I discover myself once more in my childhood home surrounded by the familiarity of my parents. A heartfelt conversation with mom ensues, leading me to lift up the area rug, unveiling a hidden trapdoor. I seize the ‘Compass Hand’ and ‘Matches’, left on the table (page 1), grab the ‘Step Ladder’ from its place (page 2), and open up the book I had previously examined (page 3) to find another ‘Compass Hand’.
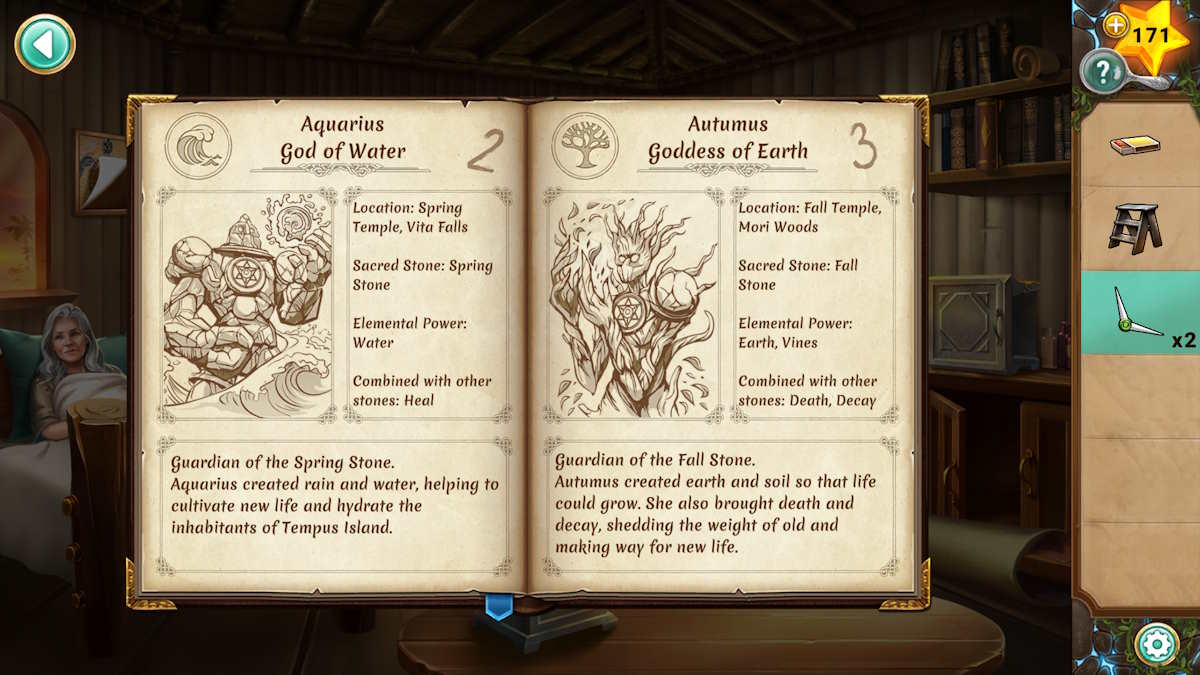
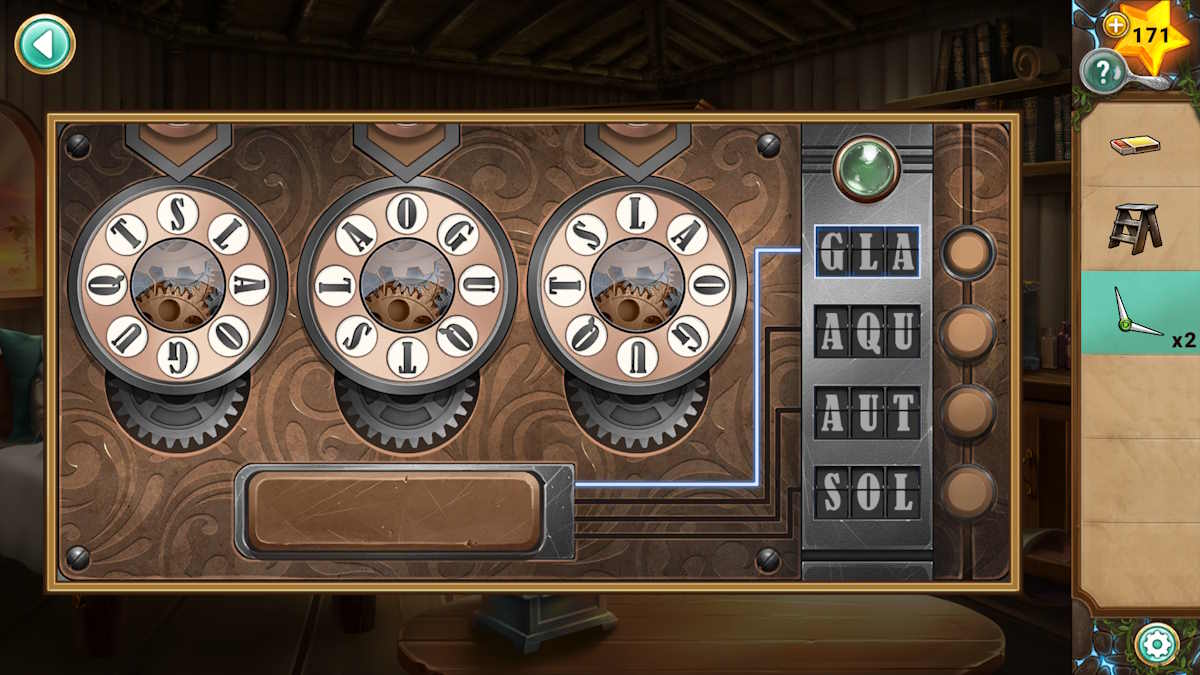
As a seasoned adventurer with countless treasures under my belt, I’ve learned to trust my instincts when it comes to deciphering ancient riddles and puzzles. So here goes: I’ll open the book and jot down the first three letters of each god mentioned in its pages – Glacius (GLA), Aquarius (AQU), Autumus (AUT), and Solaris (SOL). Next, I’ll navigate to page 4 and locate the trapdoor lock. Using my keen eye, I’ll enter these three-digit codes into the lock with a practiced hand, hoping it will open the way to the basement and reveal yet another hidden mystery waiting to be unraveled.
Before grading down, take the Pry Bar from the cupboard (p5) and use it to open the box above it, taking the Tweezers and a Gemstone from inside. Use the tweezers to pull back the edge of the turtle painting (p6) to find a second Gemstone. You can add them to the remaining item on the table (p1), but you still need to find two more.
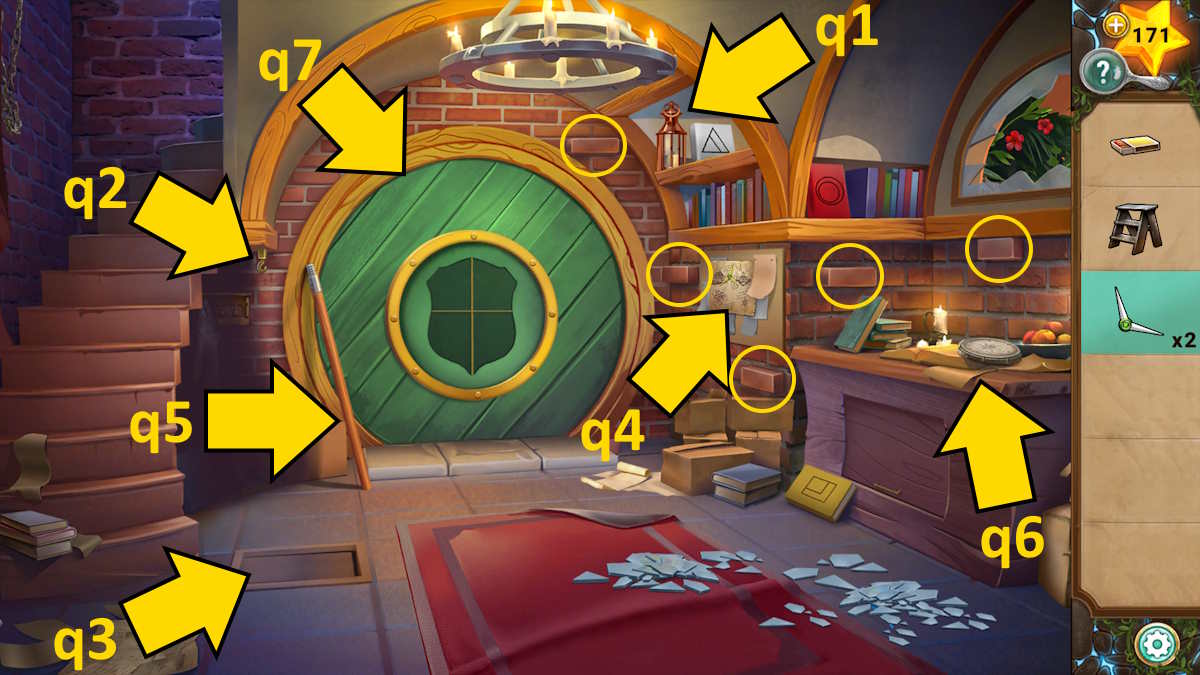
1. Descend into the basement and retrieve the lantern using the provided stepladder. Hang the lantern in the dimly lit corner, then ignite it with matches. With the light now illuminating the area, locate both the Family Crest and Journal that have become visible. Additionally, you’ll notice five bricks slightly protruding from the wall (as indicated by marks above). Push each of these bricks back in, which will cause a panel on the floor to open (q3), providing access to a third Gemstone.
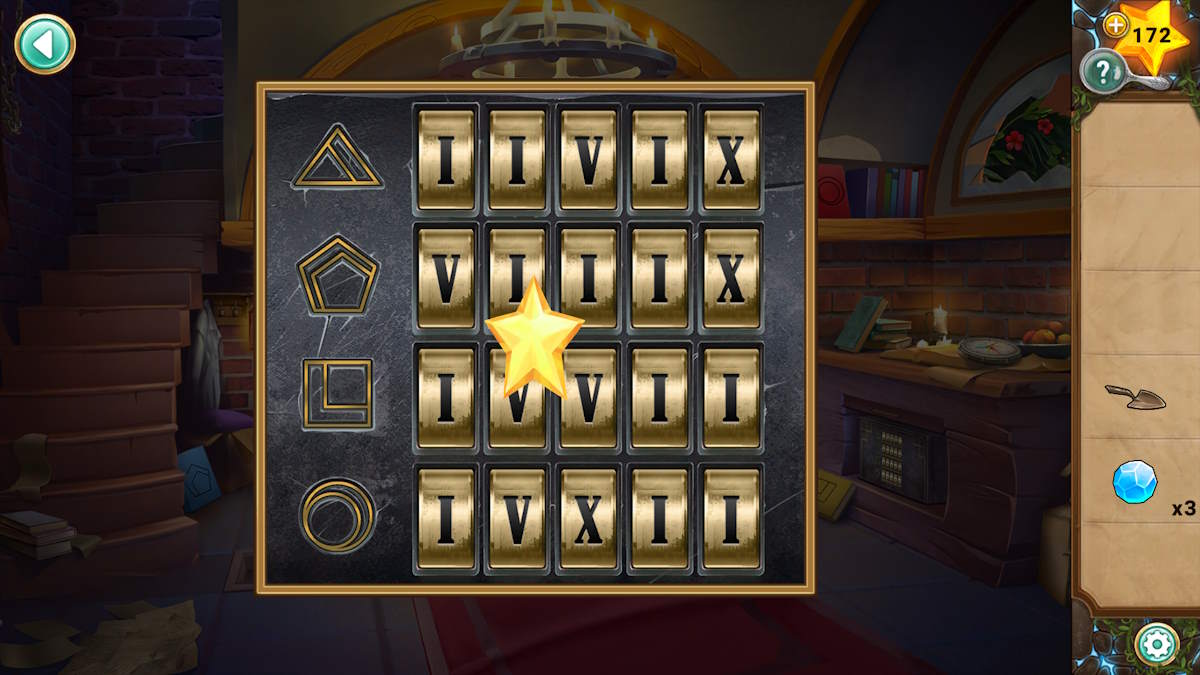
As a fan, I’d move towards the noticeboard next, revealing a mysterious third Compass Hand. Upon closer inspection and reading the note affixed to it, I discover some intriguing details. And now, as the room is brightly illuminated, I spot an array of four colorful books adorned with various shapes: blue hexagons, white triangles, red circles, and yellow squares.
1. Make your way back up to where your mother is, hand her the journal. Following an extended scene, your father will pass you the Cabinet Key. Utilize this key to unlock the cabinet on page 7 and grab the Trowel and a Brush. Use the trowel on the pot plant (page 8) to uncover a fourth Gemstone, then add all of them to the small chest on the table (page 1) to discover a second Family Crest hidden within.
Solving the compass puzzle
Place the paintbrush next to the leaning door post (q5), and grab the broom now. Use it to sweep away the clutter on the red carpet, uncovering a previously hidden Compass Hand (the fourth one) and your third Family Crest. Then, move these new discoveries to the compass on the desk (q6). This action will cause the door beneath the desk to open, disclosing a combination lock.
Pay attention as the symbols correspond to the books in the room, and the possible number combinations are I, V, and X. Take a look at the finished compass (referenced above) on the table, then align the hand colors with the book colors. Your starting point will be the green mark encircling the compass. Therefore, for the upper line, choose the white hands (as they correspond to a white book). Beginning near the green line and moving clockwise, the white hands are pointing to II, VI, and X. This results in the sequence IIVIX for the top line. The remaining sequences are:
- Hexagon: VIIIX
- Square: IVVII
- Circle: IVXII
After finishing, you’ll find the last and conclusive Family Crest. Place it on this location (q7) to unveil your next challenge involving a puzzle. The balls, each with their unique color, should end up in spaces matching their own hue. You can move them sideways using the empty space on the central dial, which you control by pressing the green button at its center. Once arranged correctly, the door will unlock, providing access to the hidden passage.
The way to the temple
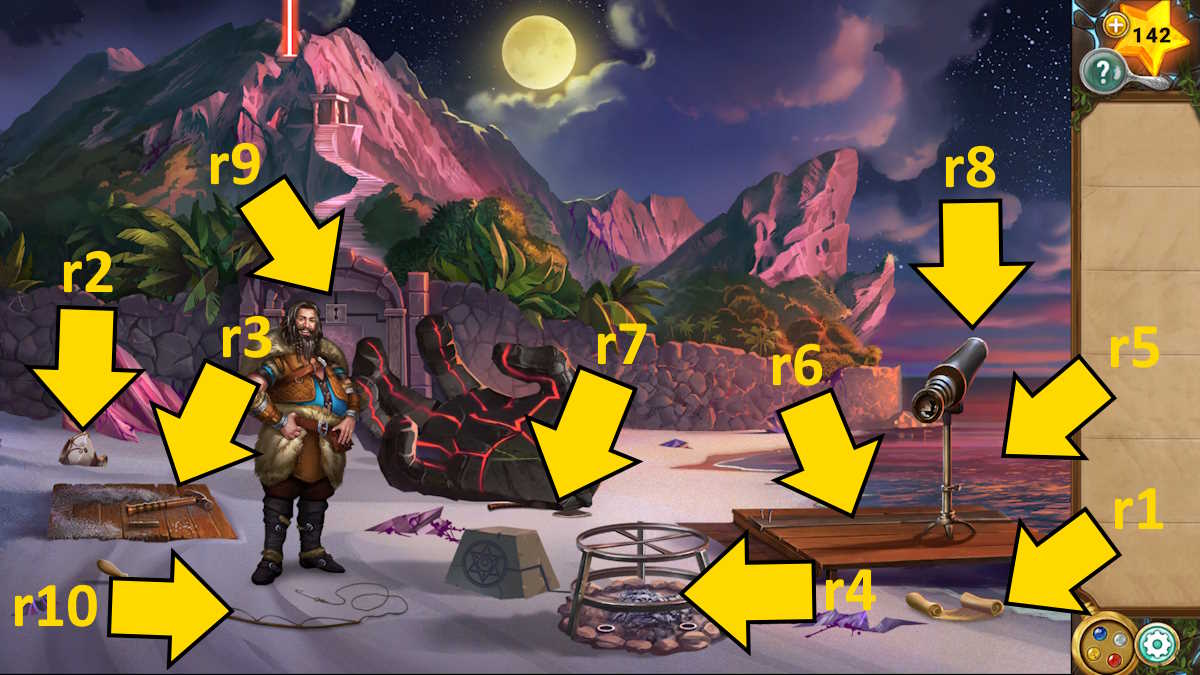
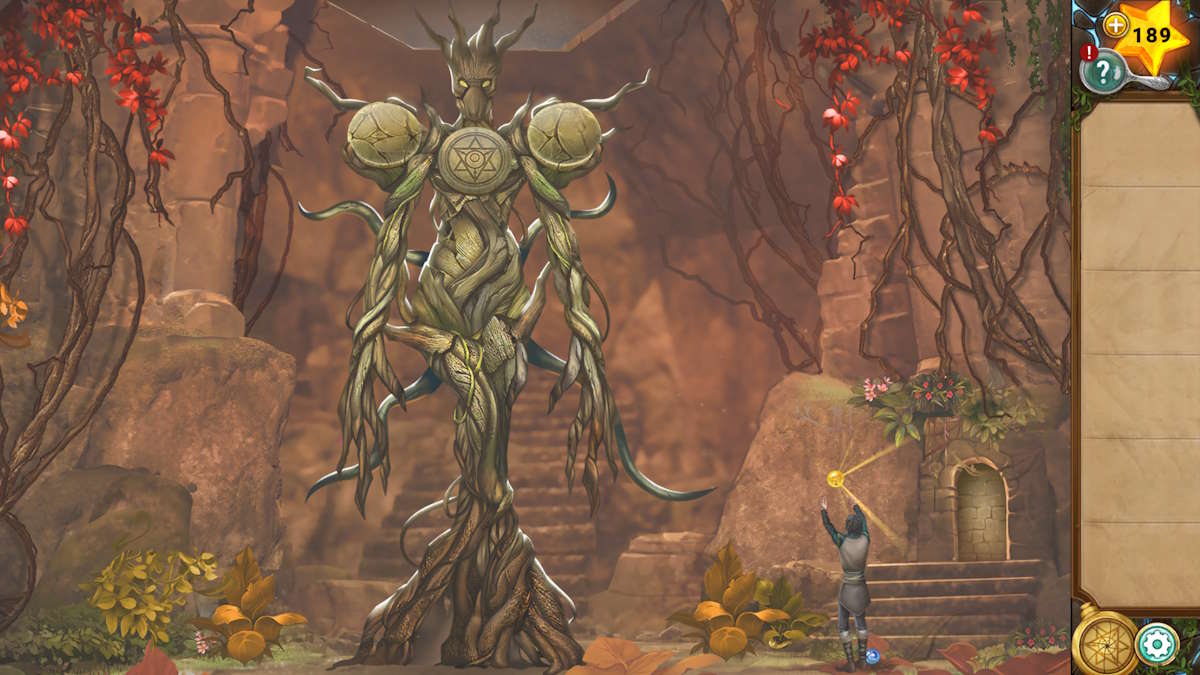
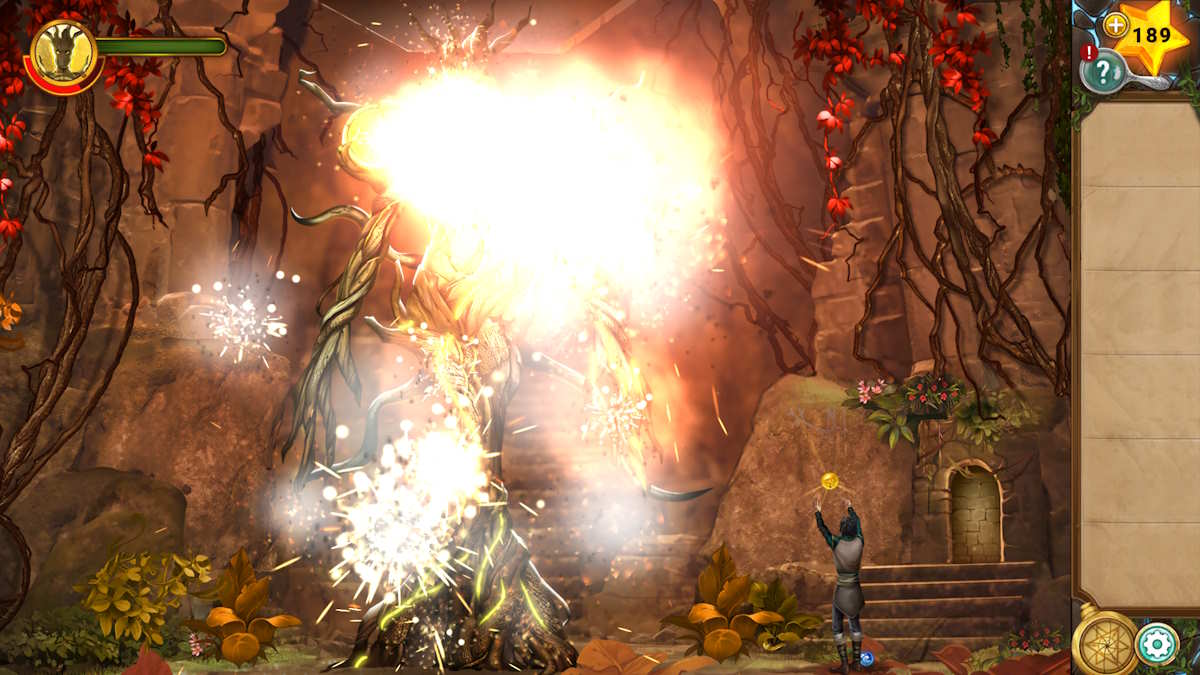
As a fan, once Siegfried returns my locket, I’ll be able to unlock its ultimate ability, which is represented by the color red. Here are some steps to follow: Firstly, take a look at the provided scroll (r1) for reference. Secondly, grab the Crystal Bowl (r2), then the Hammer (r3). After that, use the yellow power followed by the red to ignite a fire (r4).
Pour seawater into the bowl and set it above the fire. Once the water transforms color, employ your blue power to extinguish the flames and acquire the Water Bowl as your prize.
Employ the hammer to dislodge the wooden plank (referred to as Plank), position it under the giant hand’s edge (referred to as Edge), prompt Siegfried to fetch the Axe hidden beneath it. With the Axe, break open the hatch (referred to as Hatch) to retrieve the Sun Key and a Lens. Insert the lens into the telescope (referred to as Telescope) and initiate a magnification challenge using the telescope’s focused image (see the image below for guidance).
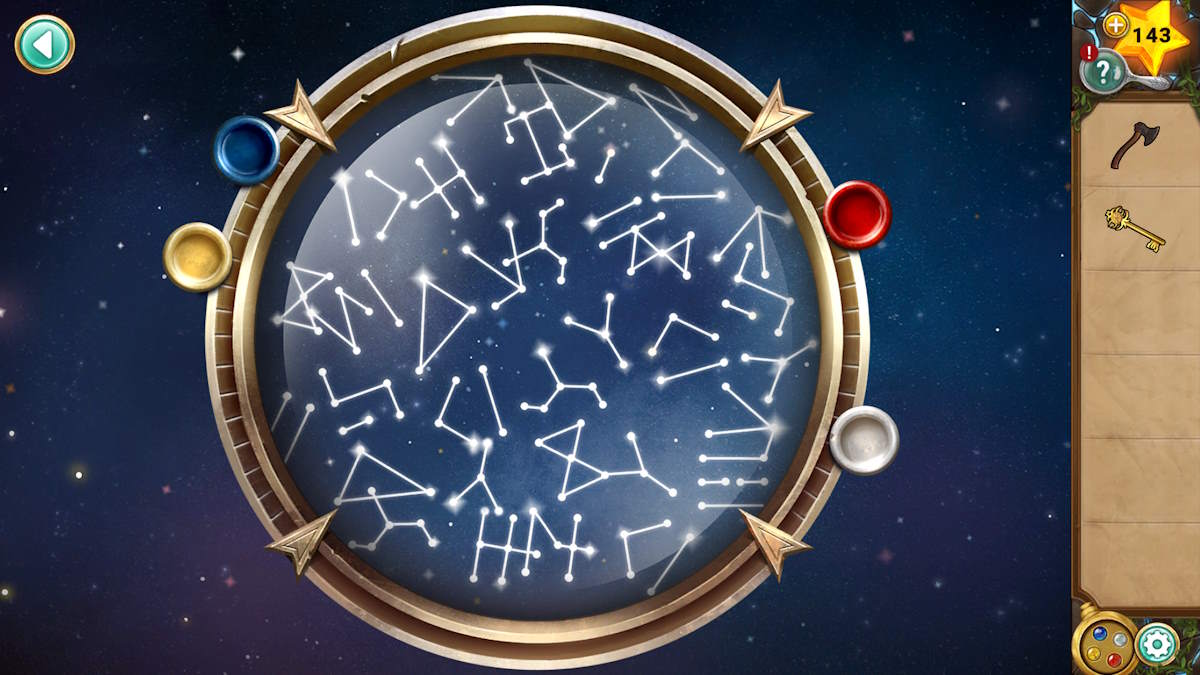
First, focus the camera on the temple door (r9) for a detailed view. Then, use the sun key on this door to uncover a locket symbol, and employ your red locket ability to activate it. Now, you can finish the scroll you previously saw by identifying those constellations using the telescope. Simply count the number of times each star pattern becomes visible.
You’ll find it is 32454, so click that button (left to right, see above) on each line to complete the puzzle. Click the doorway to head through.
The temple entrance offerings
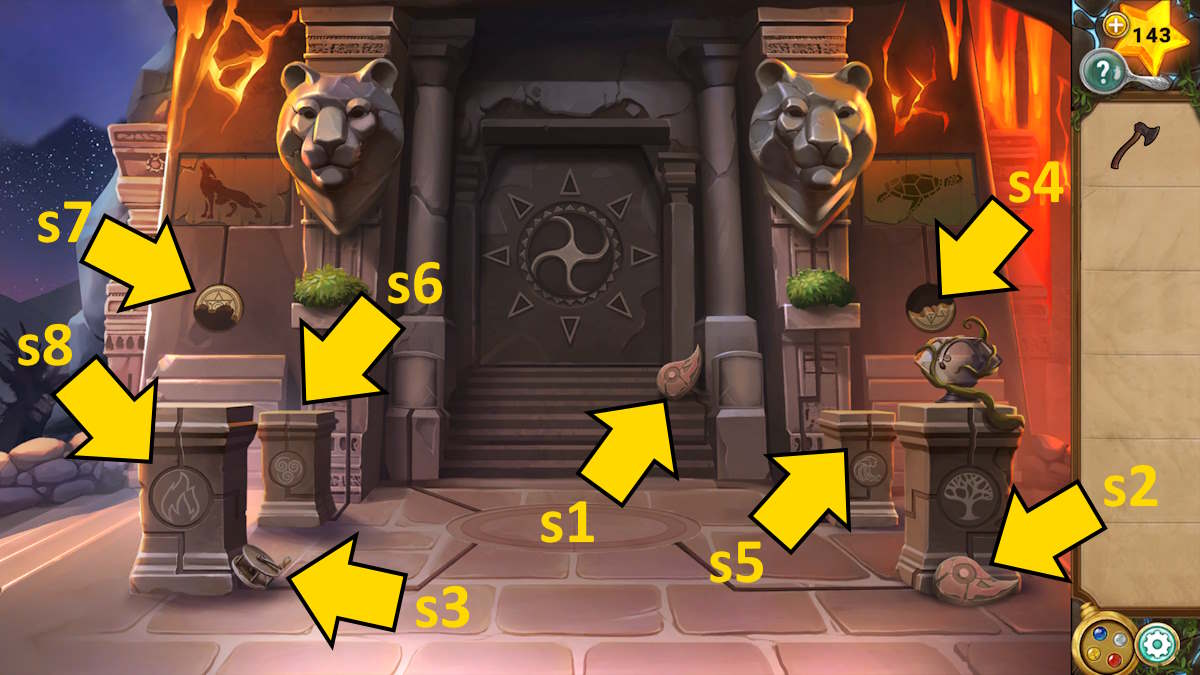
1. Grab the two Summer Charms, labeled s1 and s2, as well as the Fishing Reel (s3), before making your way back to the beach. Attach the reel to the fishing rod (r10) to retrieve a Fishing Rod, then use it in the sea (r5) to snag a Stone Plaque. After returning upstairs, affix the plaque on the right side (s4). Subsequently, utilize the locket’s blue power to unlock the turtle image above it and discover a third Summer Charm.
As a dedicated enthusiast, when you come across the third pendant’s location and click on it, you’re instructed to provide pure water, untouched by ocean minerals. Position a clean water bowl on the water stand (s5) to set off the right lion’s head. This action will enable you to retrieve another Crystal Bowl, which was hidden beneath the bush that was once near where the lion’s head previously stood.
As a seasoned adventurer with years of experience under my belt, I’ve encountered my fair share of peculiar puzzles and enigmatic artifacts. But this one had me intrigued – a trick with a bowl, fire, and powers of some sort. I decided to give it a try, starting by repeating the trick with the bowl but this time adding white power after putting out the fire with blue power. Instead of the regular bowl, I used an Ice Bowl as instructed, placing it on the wind pedestal (s6). To my surprise, the left lion lit up, and lo and behold, a third Crystal Bowl was within my grasp! The thrill of the chase, the satisfaction of solving the puzzle, and the newfound treasure in hand – these are moments I live for as an adventurer.
The next time you visit the beach, Ollie will be there to welcome you. After exchanging a few words, he hands you a Stone Slab. With this stone slab in hand, you can now fill in the image on the left side of the temple doors (s7). Once completed, use the power of your yellow locket to open it and retrieve a pair of Gloves. The latest message instructs us to gather ashes from the tree of life. To do this, use your bowl on the urn nearby to get a Bowl of Ashes.
Position the ash container near the beach bonfire and wait until the flames persist. With your protective gloves on, retrieve the “Fire Bowl” from its location. Carry it to the temple entrance, setting it atop the fire stand (s8), which will then unveil a gap in the path beneath it.
Solving the pilar puzzles

Place the fourth Summer Amulet (t1) and use an axe to cut through the inner part of the root to obtain a Sacred Root. The inscription here indicates that the root should be offered as a sacrifice, so place it inside the offering bowl (t2) to fulfill the ritual.
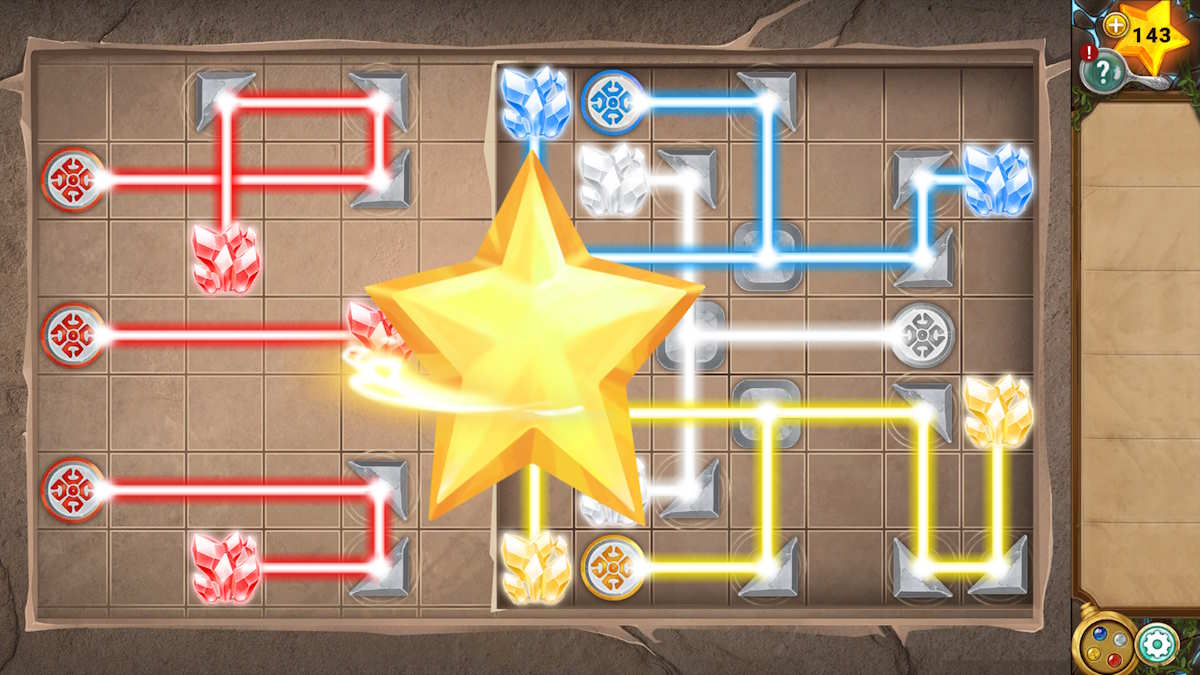
You’re now able to attach the four pendant ornaments to the door (t3), followed by activating the fire power on the central emblem to unlock, as expected, the left pillar (t4). This is a light beam challenge, requiring you to adjust each item to illuminate all the crystals. Once you’ve completed the red, white, blue, and yellow beams will become accessible for use.
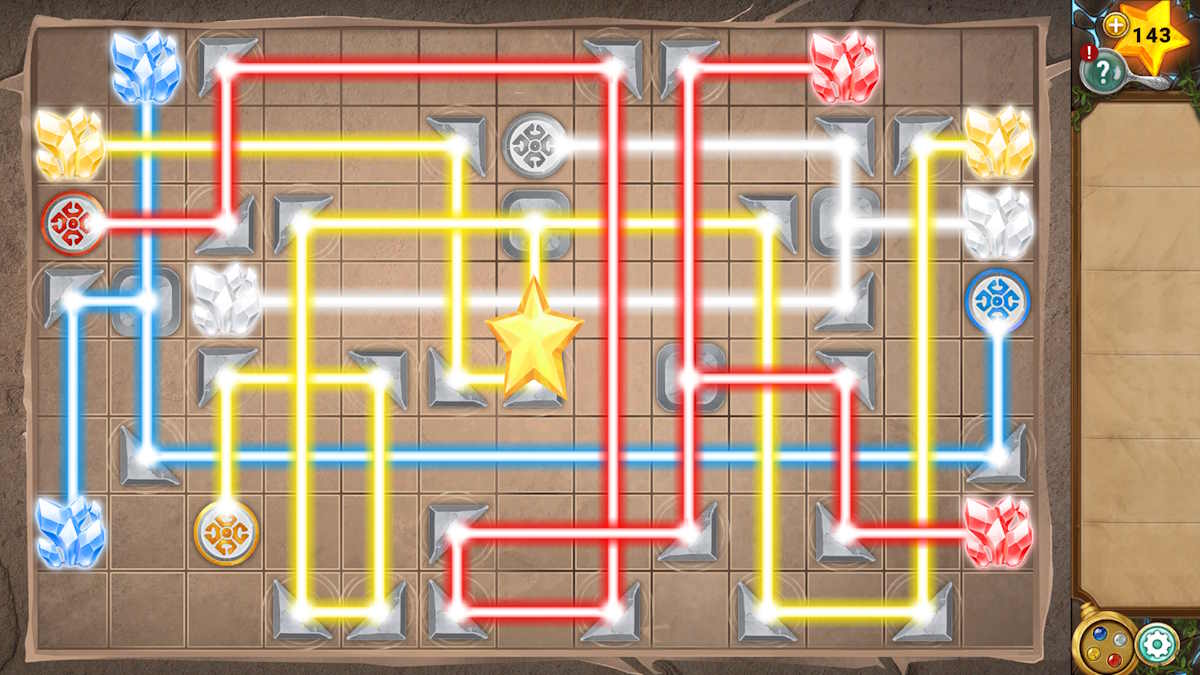
After wrapping up with those tasks, the riddle embedded within the right pillar presents a more intricate version of a similar conundrum. Don’t let it intimidate you; focus on one color at a time and you’ll find yourself solving it in no time. If you hit a roadblock, you’ll find the solution down below. As a fan, I’ve found this to be an engaging challenge!
After completing your task, your father will deliver a closing encouragement just before you enter the last temple, moving forward to conclude Chapter 7.
Legend of the Sacred Stones Chapter 8 walkthrough
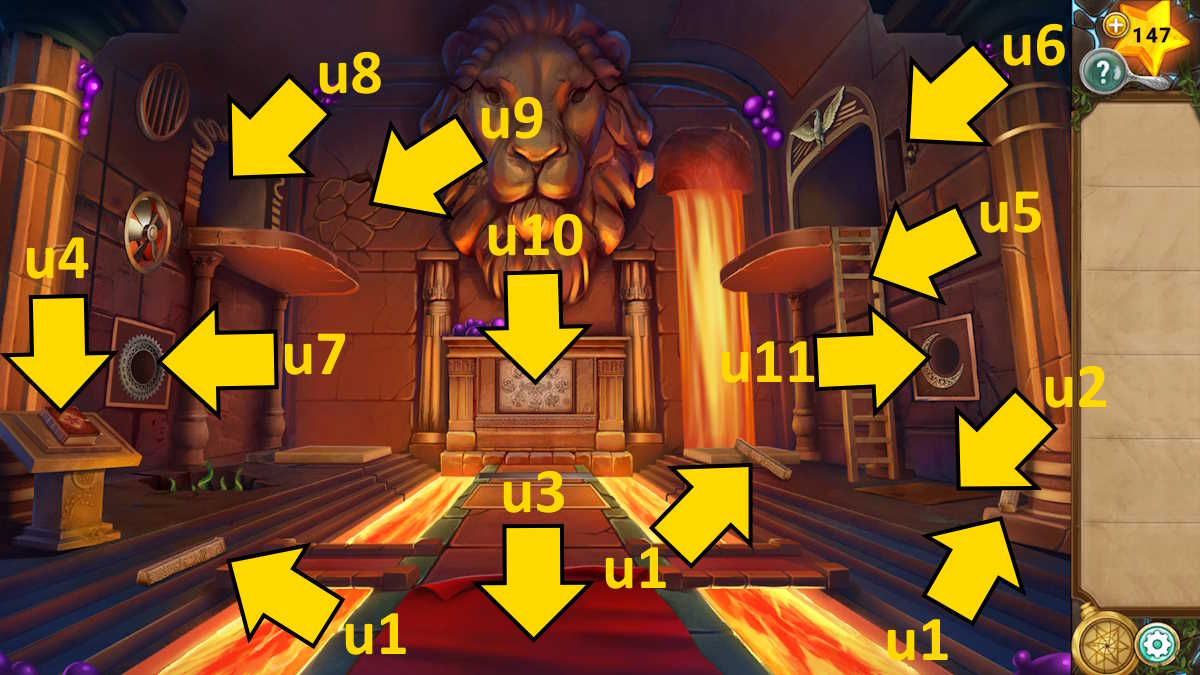
After Milo goes into the temple, grab the three “Ladder Rungs” (u1) and lift the cover (u2) to uncover a “Star Fragment”. Push back the carpet (u3) to find another “Ladder Rung”, get the “Phoenix Key” from the book (u4), then place the rungs on the ladder (u5) and ascend to the room above.
As an avid adventurer, I’ll start by getting the Stone Scale (version 1) and pulling out a Star Shard from my backpack. Next, I’ll pick up the Wheel and use the key to unlock a chest to find a Sun Stone. After that, I’ll descend the stairs, place the wheel on the right wall (position 6) to open the ceiling, and then insert the Sun Stone into the hole in the left wall (position 7). This action will unveil a locket design. Now, with the yellow locket power at hand, I can stimulate root growth upward toward the left balcony (position 8), providing me access to another room, offering new possibilities for exploration!
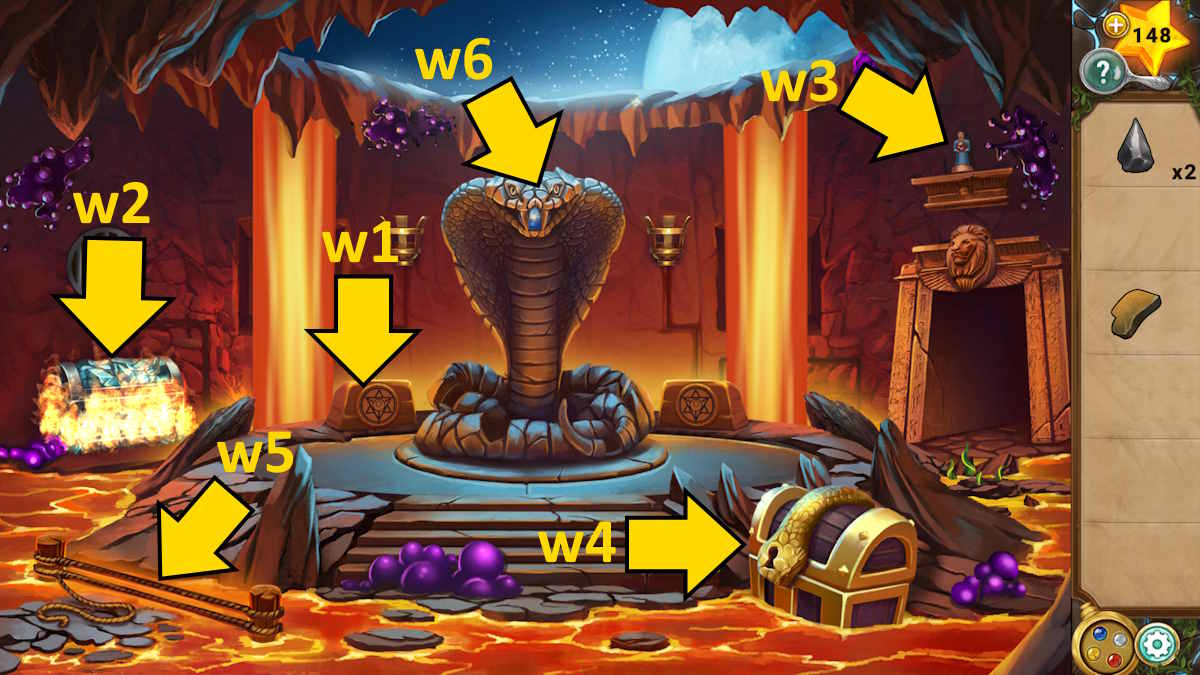
Traverse the climbing vines towards the snake-infested chamber. Activate the power within the blue locket using your left hand trigger (w1) to extinguish the flames, enabling you to retrieve the Phoenix Head from the chest (w2). Apply the earth power at the right symbol, causing a vine to flourish above the door and grab the Villager Figurine (w3). Utilize the red ability on both sides, halting the lava flow and obtaining a third Star Shard and a second Stone Scale from the unveiled niches. To exit, you’ll have to activate the yellow ability once more to eliminate the vine growth.
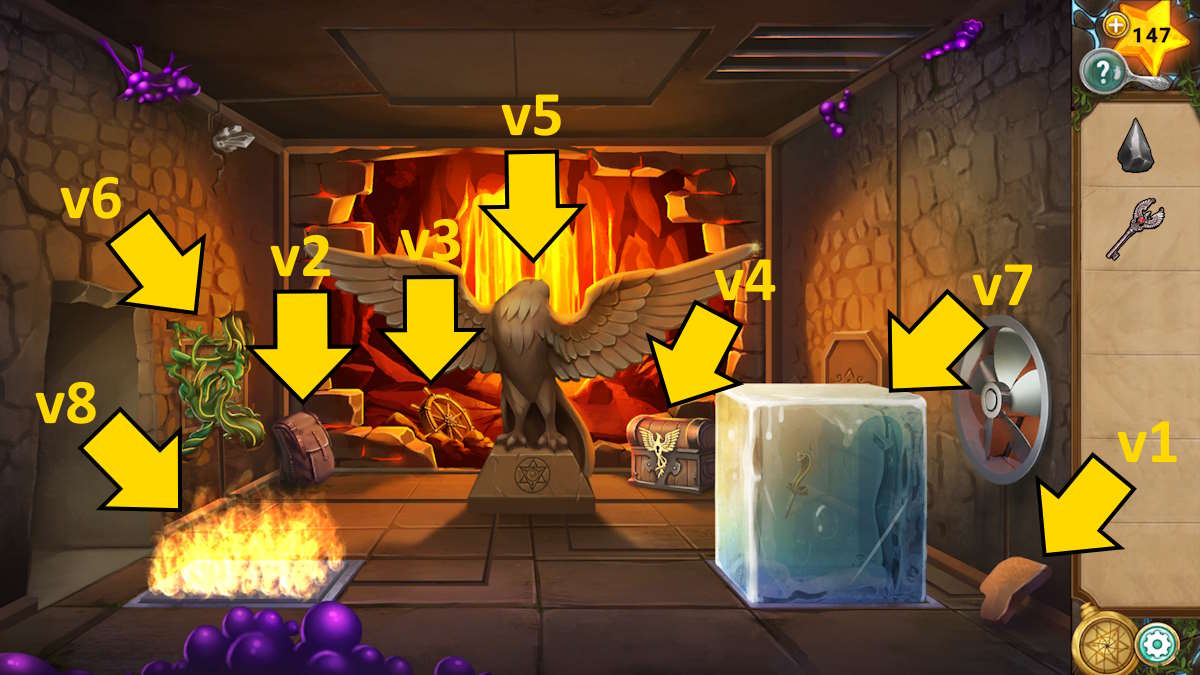
Head back to the room on the right, specifically the phoenix room, and attach the head to the statue there. Simultaneously, open the ceiling in this area for access to the locket. Next, apply your yellow power to eliminate the vines from the wall (v6), unveiling a puzzle. Subsequently, employ your white ability to propel an ice cube (v7) across to the flames (v8), causing it to melt. Now, use your red ability to douse the fire near the door (v7), disclosing a solid plate beneath, which you can then pick up to retrieve the Snake Key.
How to use the sun lens
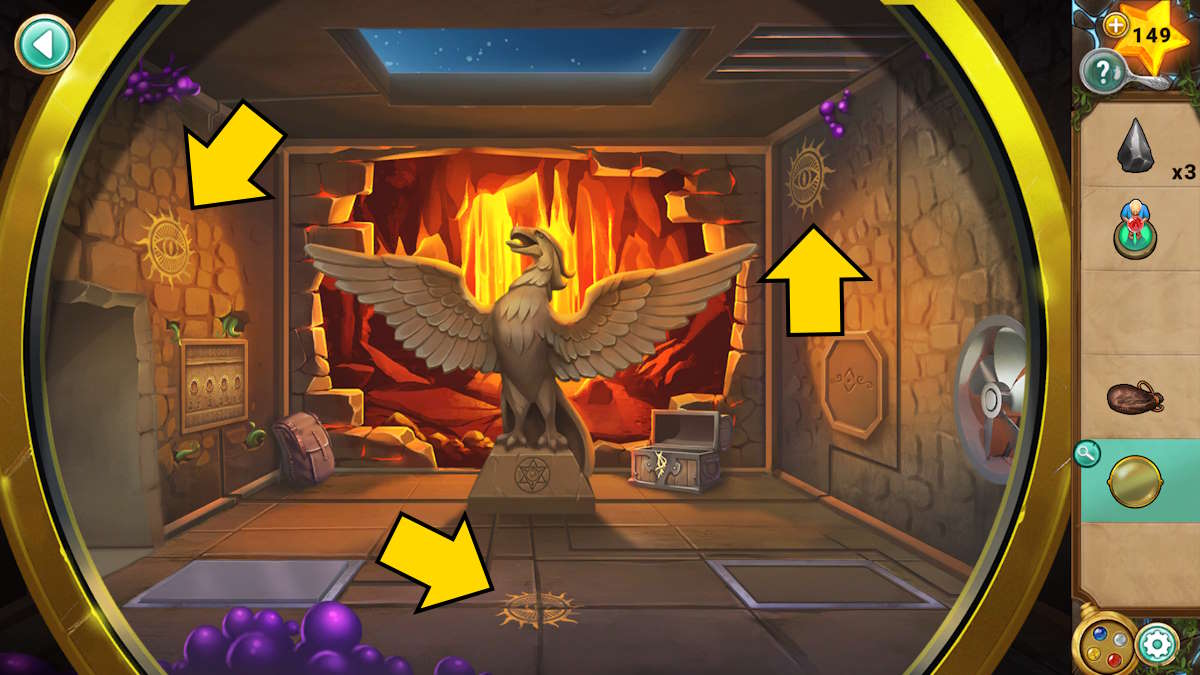
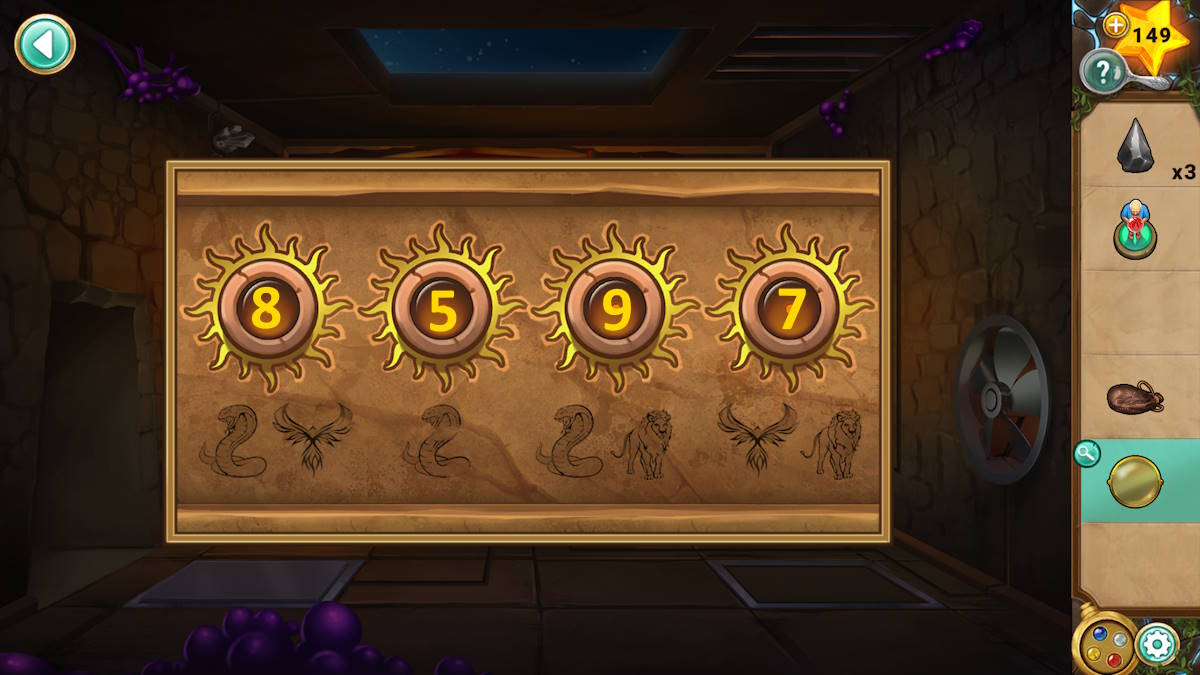
Enter the reptile enclosure, locate the key, and open the serpentine chest with it to acquire the Sun Lens and some Gunpowder. Inspect your inventory to discover that previously unseen rays of light appear. Descend into the lion chamber, examine the lens once more, and observe that four suns now manifest. Repeat this action in the phoenix area where you’ll find three suns (referring to the example provided).
Locate the panel on this puzzle’s wall (version 6), observe the images beneath each circle. Sum up the number of sun symbols for each animal to obtain the code 8597. Once you see the hatch, tug at it. A box will appear in the place where the ice cube previously was. Use the locket one more time now.
- Use the blue power: Fill the box with water
- Use the white power: Fill the box with ice
- Pull the lever again to remove the box, leaving a new ice cube
- Make sure there’s no fire on the left panel
- Use the white power to blow the ice cube across, which this time triggers the floor panel.
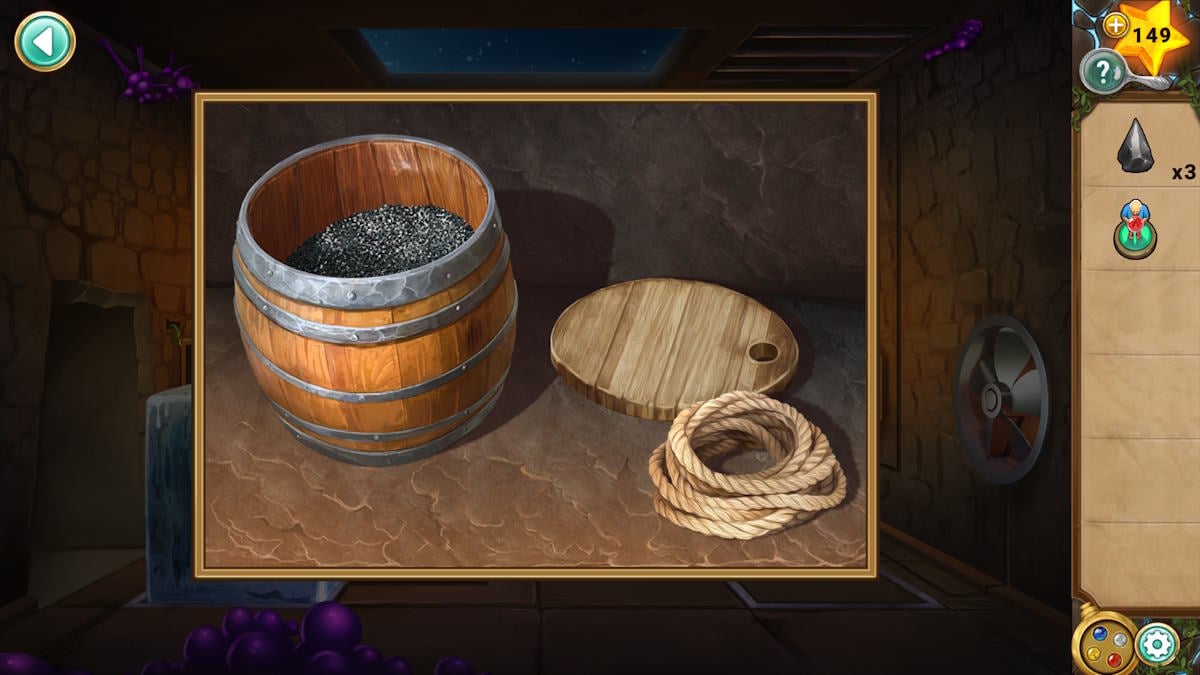
In this scenario, you first find a hatch on the right wall (v7), which lets you grab some shears. You also have the option to click the nearby barrel and stock it with your explosives, but for now, you’re lacking some necessary components. Head back to the snake room, and use the shears to slice through the rope (w5). Return again and combine the cut rope and gunpowder in the barrel; tap the gunpowder once more to deposit it inside the barrel, then place the lid on top. Finally, attach the rope to create an explosive device.
Place the explosive on the left balcony of the lion room, next to the weak wall (u9), and then activate the red locket ability to burn the vine and blow a hole in the wall. You’ll then need to activate the blue ability to put out the fire and grow a new vine with the yellow ability before you can collect the Pickaxe and the Star Pendant.
Utilize the star-shaped pendant to unveil the tome, and within its pages, discover a Divine Tile. Moreover, keep in mind that this book contains positional information about the gods’ actions, which may serve as a helpful clue later on (handily, you can now carry the Book along with you).

Place the divine image tile under the lion’s face sculpture (location u10) and organize the god tiles according to the hints provided in the book (refer to clues above). After arranging them correctly, retrieve the fourth Star Fragment and the last Stone Scale hidden behind the mural.
Completing the star shard puzzle
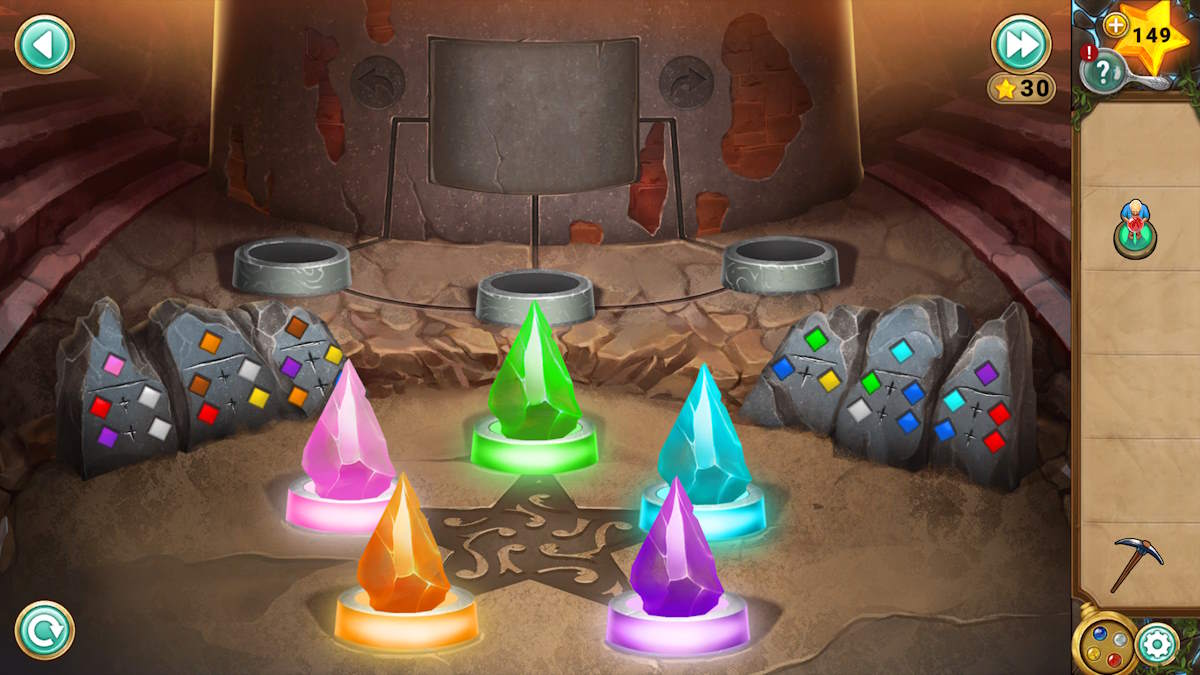
Place the stone-like snake scales, and a moat will encompass it. Click on the moat to unveil another puzzle, and place the five star fragments into it to start. To unlock the panel and reveal a locket design, you’ll need to move two or three of the fragments into the containers at the rear. Once revealed, use the locket to alter the shards’ colors, aiming to match the colors they currently reside in (orange, pink, green, light blue, and purple)).
The stones surrounding the perimeter demonstrate how to achieve each color by indicating the necessary shard color and the locket power that should be combined for the resulting top color. If a shard is its initial gray, it will transform into the color of the power applied. Thus, if you position both a grey and blue shard together and activate the white locket’s ability, you’ll obtain a white shard (from the grey) and a lighter shade of blue shard (from the blue one).
As someone who has always enjoyed solving puzzles, I found this one to be quite intriguing, albeit a bit tricky at times. But fear not, for I have devised a straightforward solution that should help you navigate through the shards numbered 1-5 from bottom left, moving clockwise towards the bottom right corner. Good luck!
- Shards 1,4 and 5: blue ability
- Shards 2,3, and 5: red ability (five complete as purple)
- Shards 2 and 4: yellow ability (this makes orange and green, so place them back on 1 and 3 to complete them)
- Shards 1 and 3 (which were red and blue): white ability
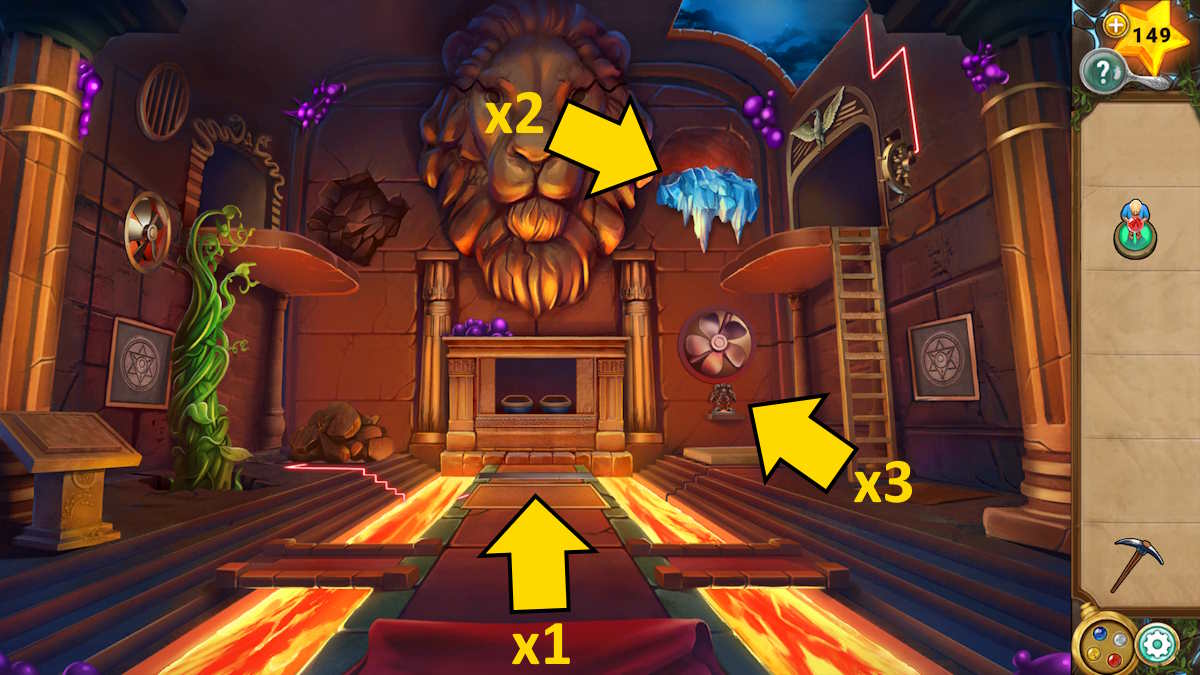
After finishing the process, the statue of the snake will release the Moon Stone. Position this item on the right-hand wall within the lion room (u11), and then activate the locket trigger that follows to employ your white ability. This action freezes the lava, enabling you to gather the Solaris Figure (x1). Subsequently, use the pickaxe on the newly frozen ice (x2) to knock it loose, which sets off the floor pad below, exposing the final board game (at x3).
Completing the Solaris board game
Begin the game by placing the Solaris and villager figures on the board. Your goal this time is to move the color-coded blocks onto their corresponding buttons in order to establish a route from the villager to Solaris. This round, pushed blocks will only advance one space, so be mindful not to trap yourself or leave a block against a wall where you can’t push it sideways. If you encounter difficulties, follow these guidelines:
- Move the orange block to point A
- Move the yellow block to point B
- Push the red block onto its button
- Push the purple block onto its button
- Push the light blue block to point C
- Push the yellow block onto its button
- Push the white block to point D
- Push the dark blue block onto its button
- Push the light blue block onto its button
- Push the white block onto its button (through its initial start point)
- Push the orange block onto its button
- Push the green block onto its button
Activate the red key feature under the board game, and the lion’s jaw will unfasten, leading you to the climactic battle against Milo! Unfortunately, he seems unyielding to argument, so you’ll need to face Solaris. I found this encounter a bit simpler than the last one. The emblems flicker on and off, but at least they don’t scramble about!
Despite appearing to yield quickly, Milo remains determined! After conversing with Solris, the fight transitions outdoors where timing becomes crucial yet again. However, this round won’t commence until you grab the highlighted book.
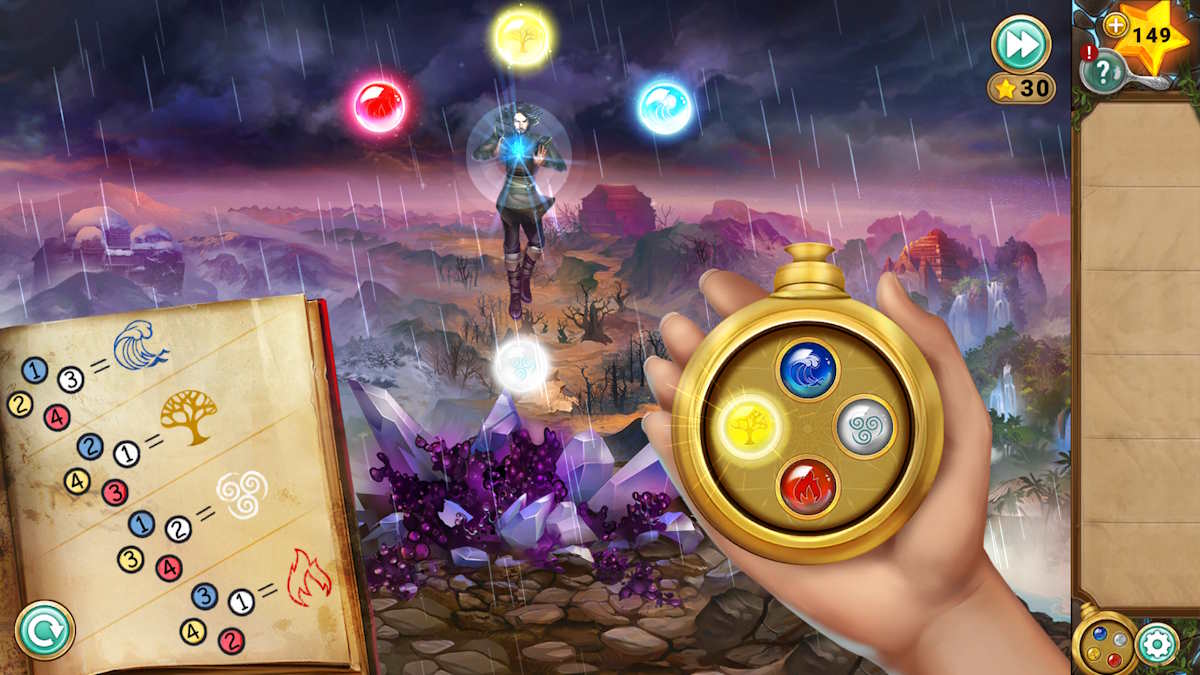
To successfully combat him, you should observe his spell pattern in the book and choose the appropriate counter-spell. If you manage this correctly five times, you’ll emerge victorious. However, if you take too much time deliberating, he may inflict damage upon you. As usual, you can attempt to defeat him repeatedly or use stars to bypass the battle altogether.
It appears that Milo’s attack consistently repeats a specific sequence, similar to colors on a palette: first blue, followed by red, then yellow, moving on to white, and ending with another round of yellow (water, fire, earth, wind, and earth again).
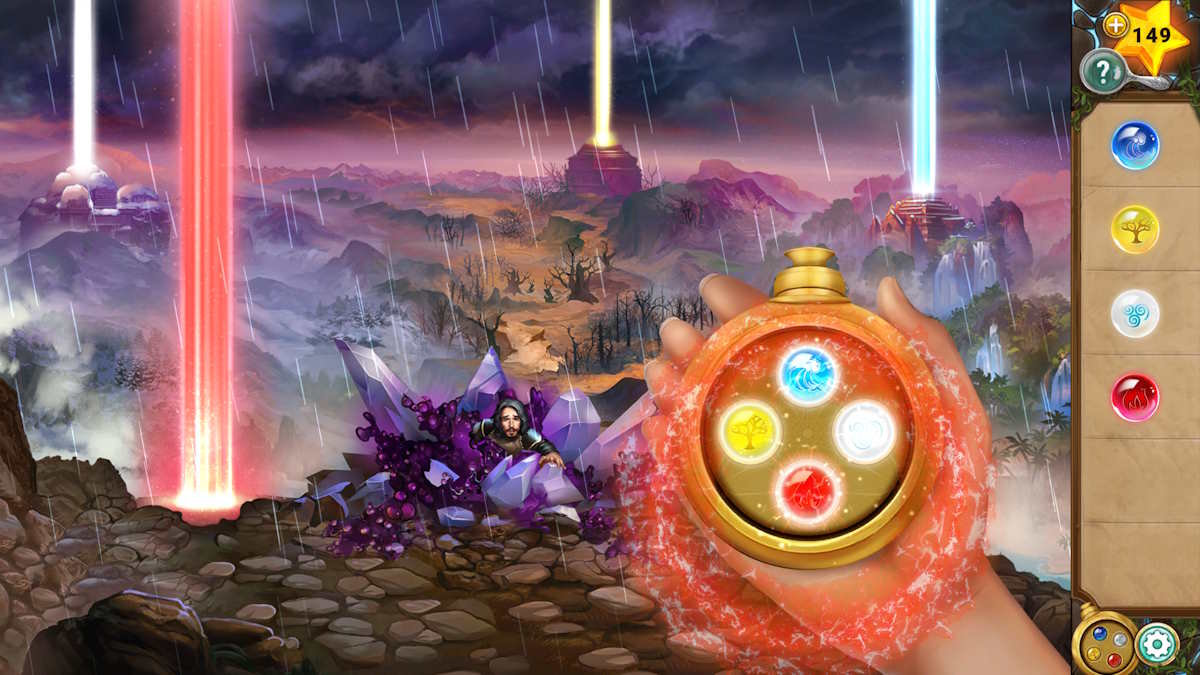
Following the conflict, touch every stone as they start glowing. When the artifact materializes in your grasp, tap each color and the spell will be broken! With that, my hearty congratulations! You’ve successfully conquered The Tale of the Sacred Stones.
Read More
- Hades Tier List: Fans Weigh In on the Best Characters and Their Unconventional Love Lives
- Smash or Pass: Analyzing the Hades Character Tier List Fun
- PENDLE PREDICTION. PENDLE cryptocurrency
- Sim Racing Setup Showcase: Community Reactions and Insights
- Why Destiny 2 Players Find the Pale Heart Lost Sectors Unenjoyable: A Deep Dive
- W PREDICTION. W cryptocurrency
- FutureNet Co-Founder Roman Ziemian Arrested in Montenegro Over $21M Theft
- Why Final Fantasy Fans Crave the Return of Overworlds: A Dive into Nostalgia
- Understanding Movement Speed in Valorant: Knife vs. Abilities
- Honkai: Star Rail’s Comeback: The Cactus Returns and Fans Rejoice
2024-08-07 00:26