As a seasoned gamer with over two decades of experience under my belt, I’ve seen it all – from the most groundbreaking AAA titles to the quirkiest indie games that grace the digital shelves. And let me tell you, Mystery Detective: Adventure Series Case 2 has left an indelible mark on my gaming memories.
In simpler terms, a “Mystery Detective Adventure” is an engaging puzzle game that offers intriguing mysteries to solve, complete with difficult riddles. Should you find yourself stuck, here’s our comprehensive solution for Case 2.
If you’re looking for the rest of the game, we’ve got you covered here (Case 3 will be added soon):
- Mystery Detective Adventure Case 1 Walkthrough
Mystery Detective Adventure Walkthrough – Case 2 Improbable suicide
In an upcoming situation, we aim to assist a grieving mother who owns a brothel. Her son passed away recently, and the authorities have classified it as a suicide. However, the mother harbors doubts and holds suspicion towards a local businessman. To validate her claims, evidence is required.
In the heart of the city, your journey begins with a conversation with a woman. She’ll provide you with the location of the crime scene for investigation. Before heading there, observe these significant spots in the downtown area:
Downtown Square
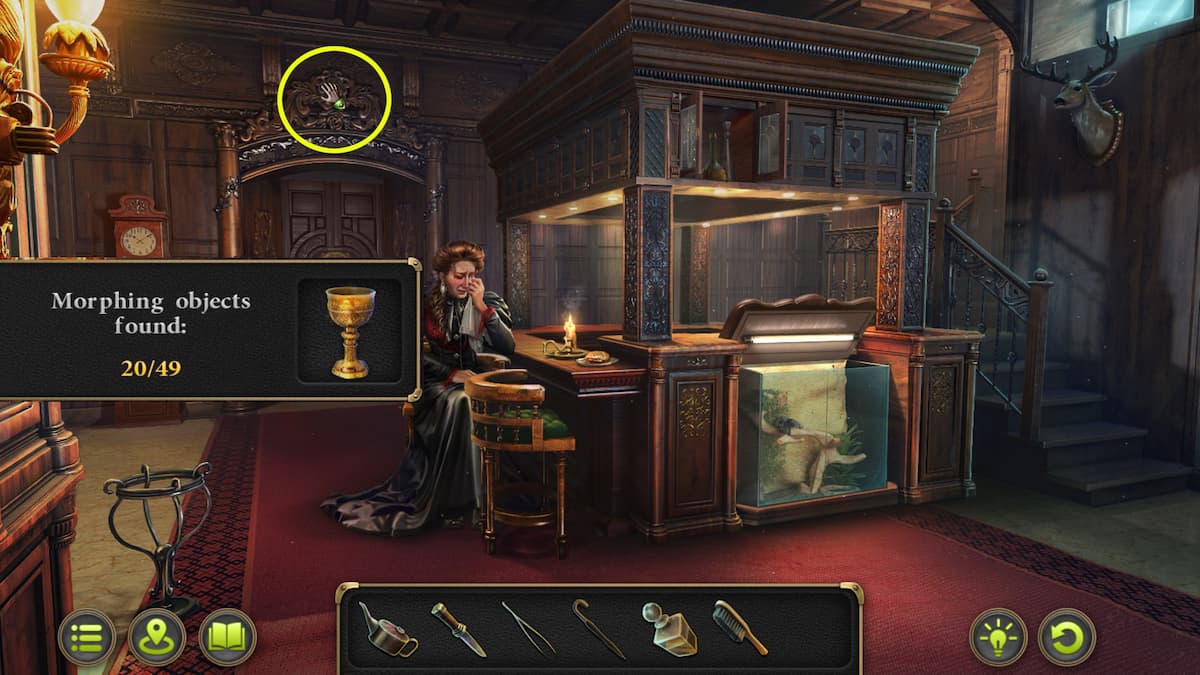
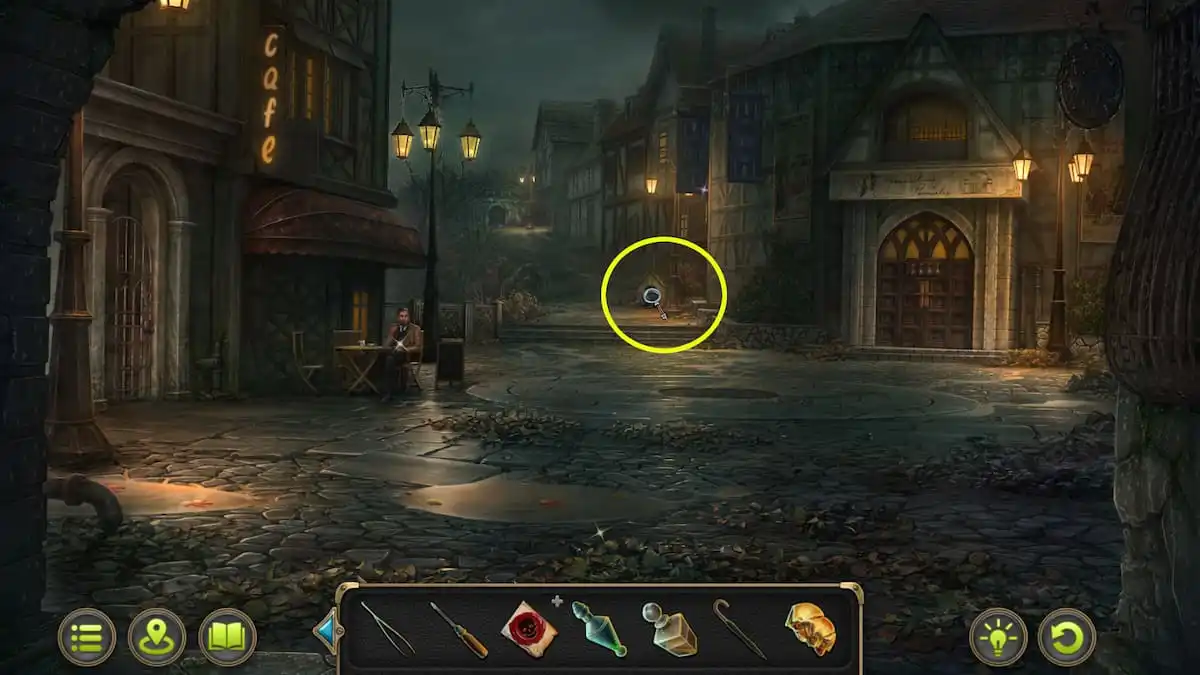
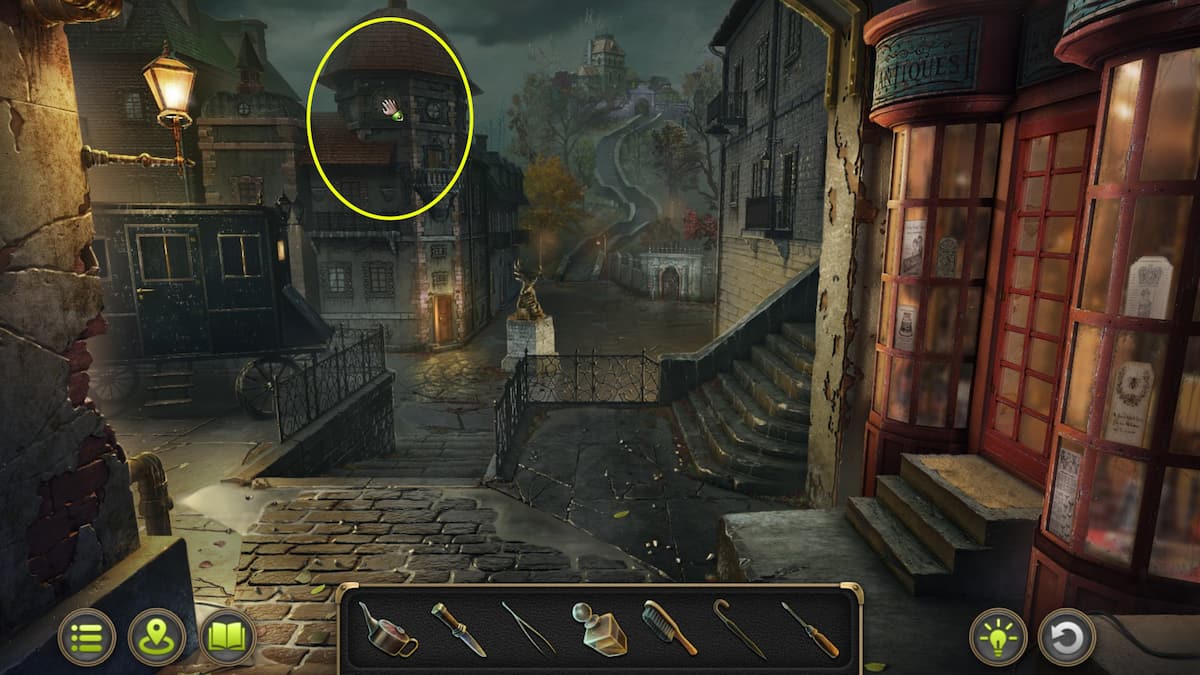
At the initial spot, which is the Downtown Square, you’ll find a unique item above the brothel’s door. This item alternates between the appearance of a clock face and an ornamental stone. Don’t forget to grab it before you begin your task.

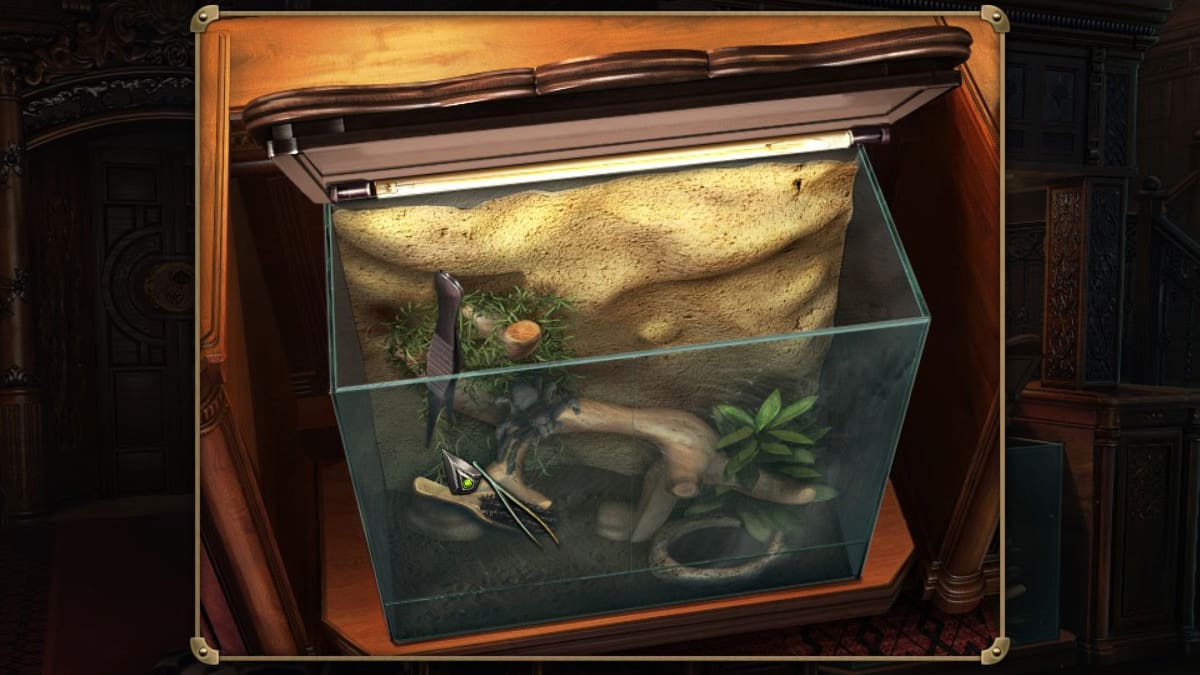
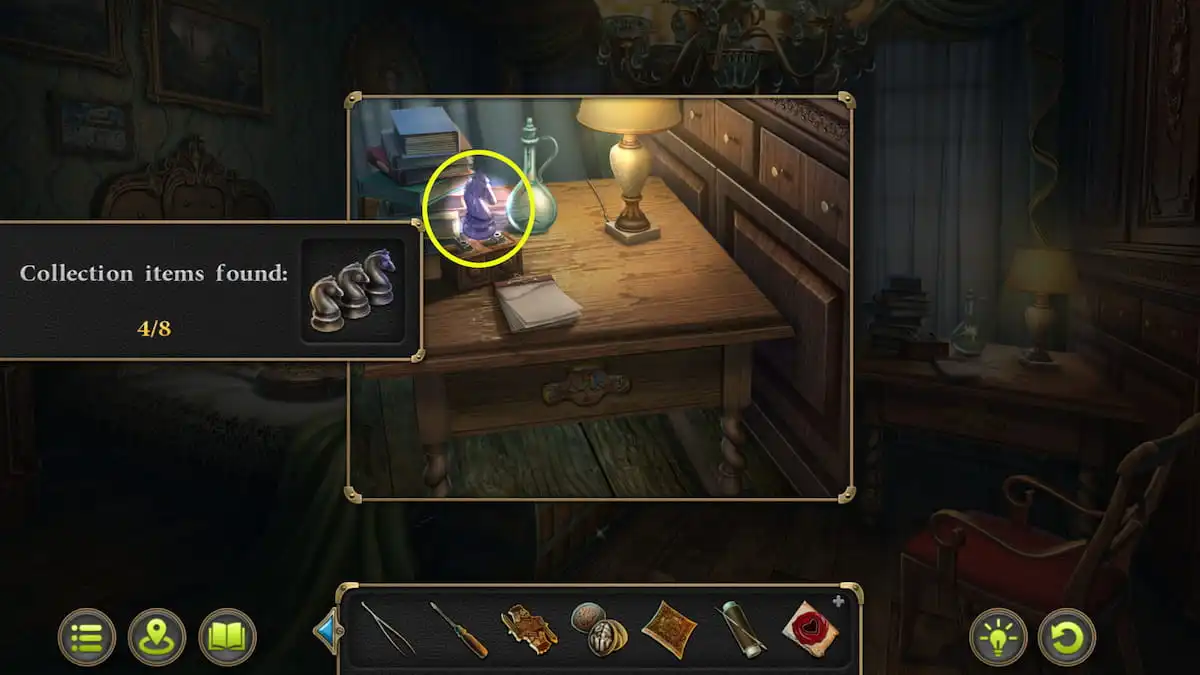
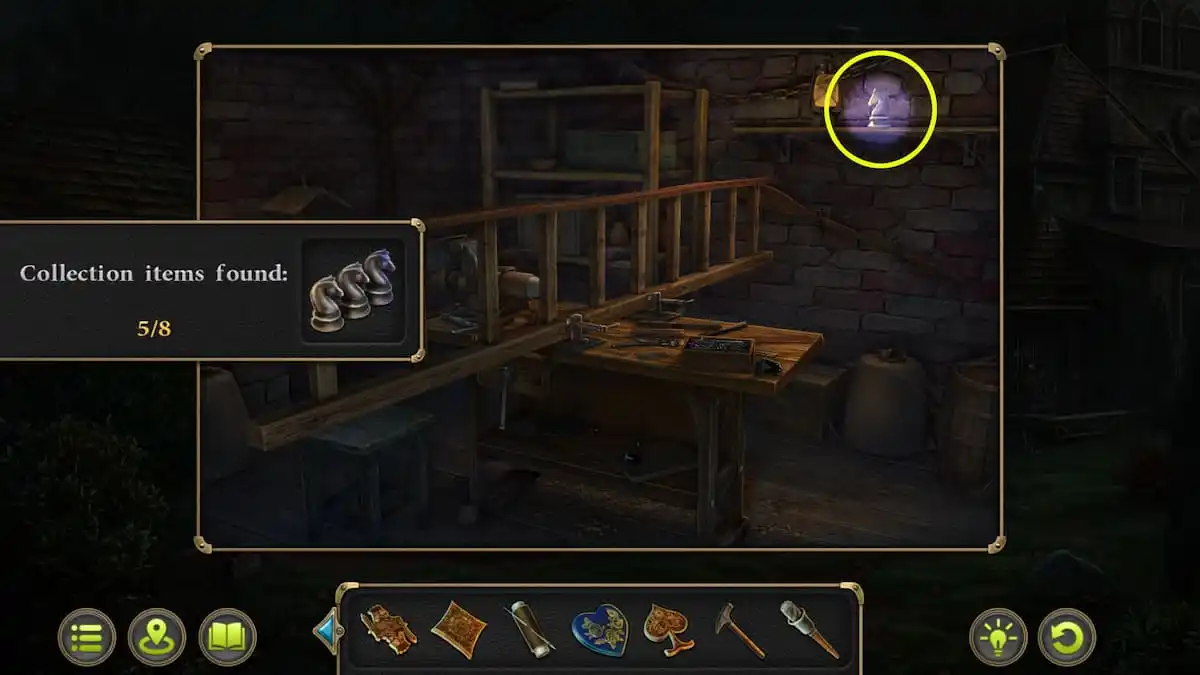
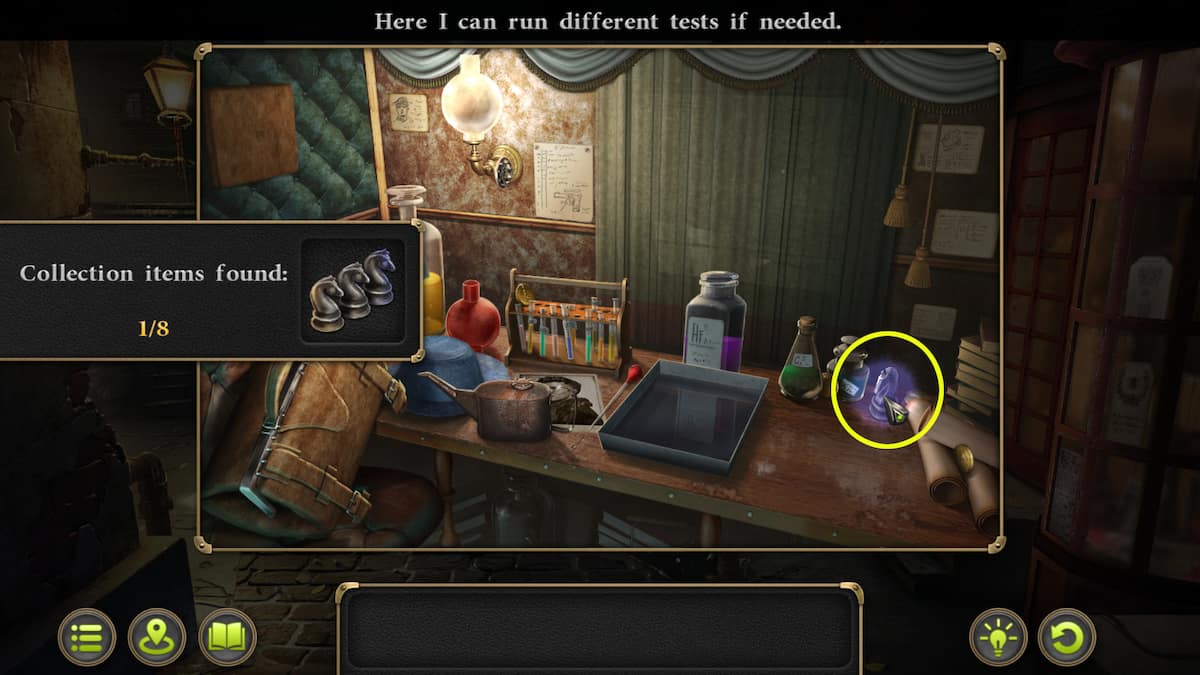
Using the given key, unlock the carriage. Inside, find the portable experiment station with containers for testing samples. To your left, there’s a sack that can be opened, revealing tweezers and a knife. Don’t forget to grab the oiler from the table as well. Now, pick up Chess Collectible 1/8 on the right side of the screen. With these items in hand, exit the carriage and proceed towards the brown door. This door leads to the brothel, which will take you into its lobby.
Brothel – Lobby
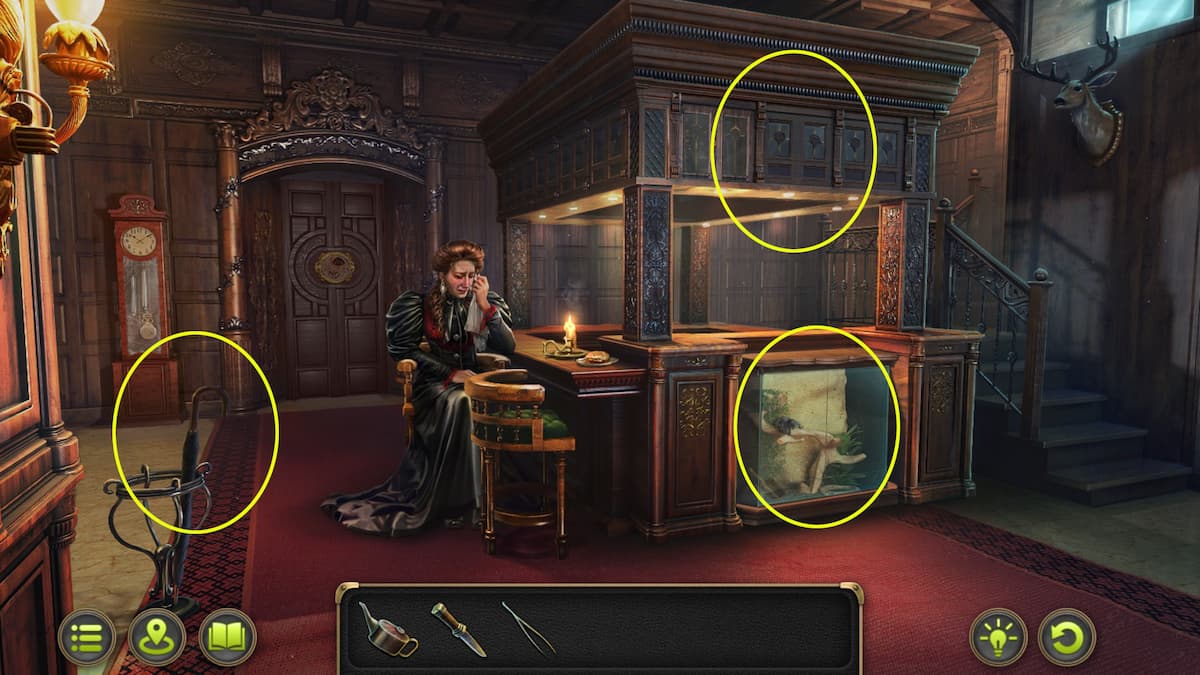
In the lobby now, you’ll find various interactive elements. To your left and right are two locked doors, as well as a grandfather clock and some additional items. At present, you’re able to engage with just a few things:
- The Spider cage has a Brush inside. If you open up the cage, you can use the Tweezers to pull the brush out.
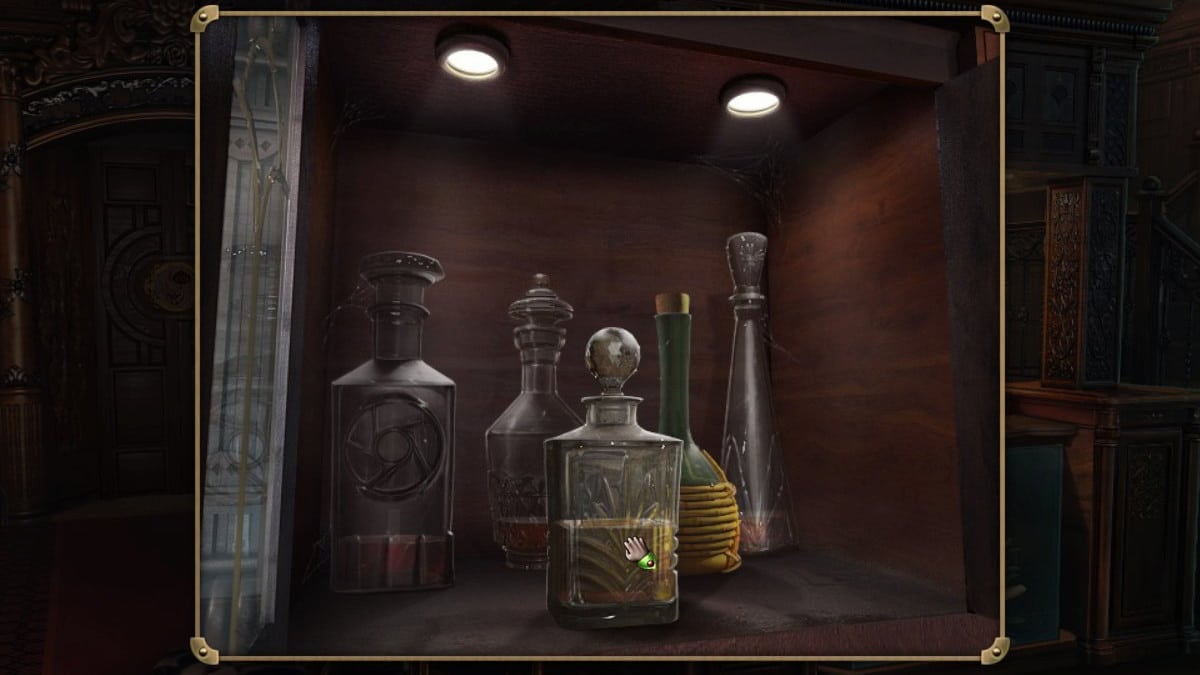
- There is an alcohol cabinet above the spider’s cage toward the top of the screen; inside is a bottle of alcohol you should pick up.
- To the left of the screen is an umbrella stand; take the Umbrella out.
- There is a Morphing Object above the doorway to the billiards room. It’s a rose carving above the door on the left side of the screen.
Central Square
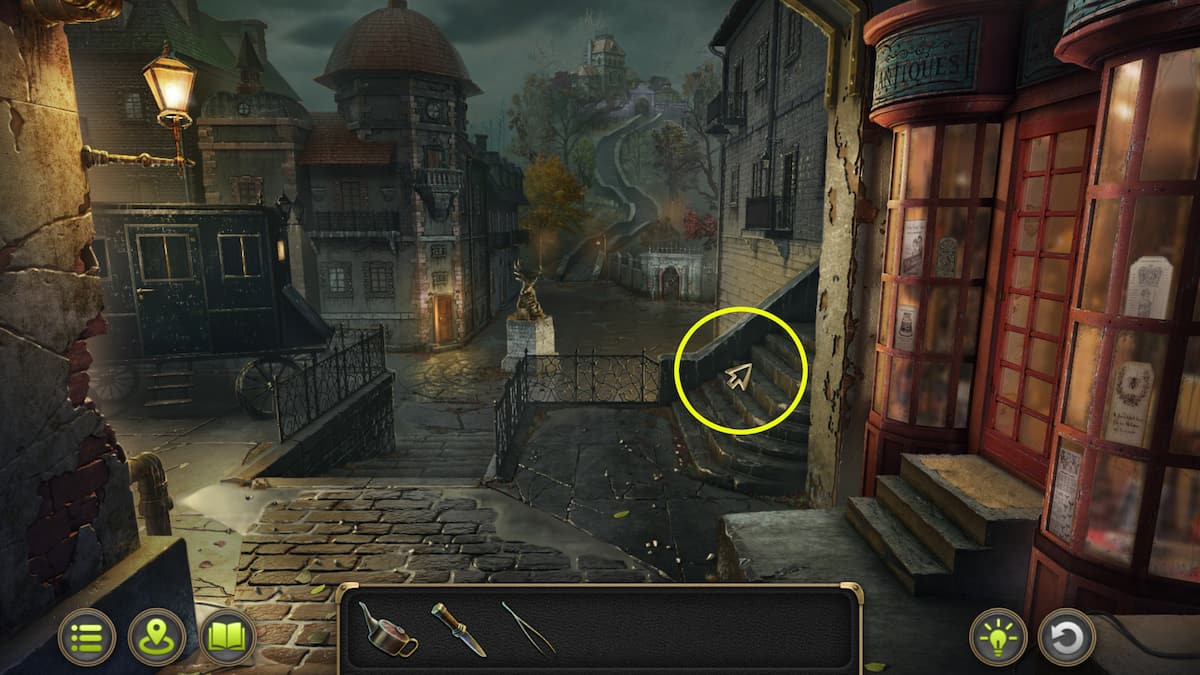
Once you’ve collected everything in the Brothel’s Lobby, exit and find the stairway next to the Antiques Shop. Climb these stairs to reach the Central Square. Keep an eye out for various items to gather or mark down, as there are several noteworthy spots:
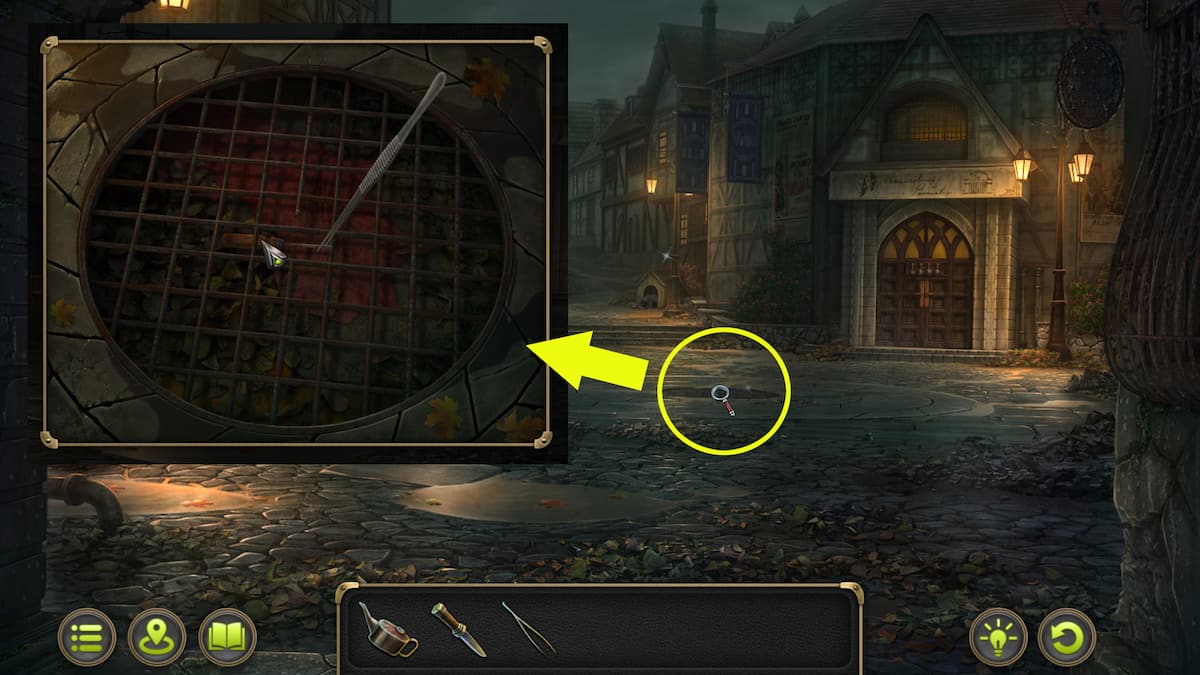

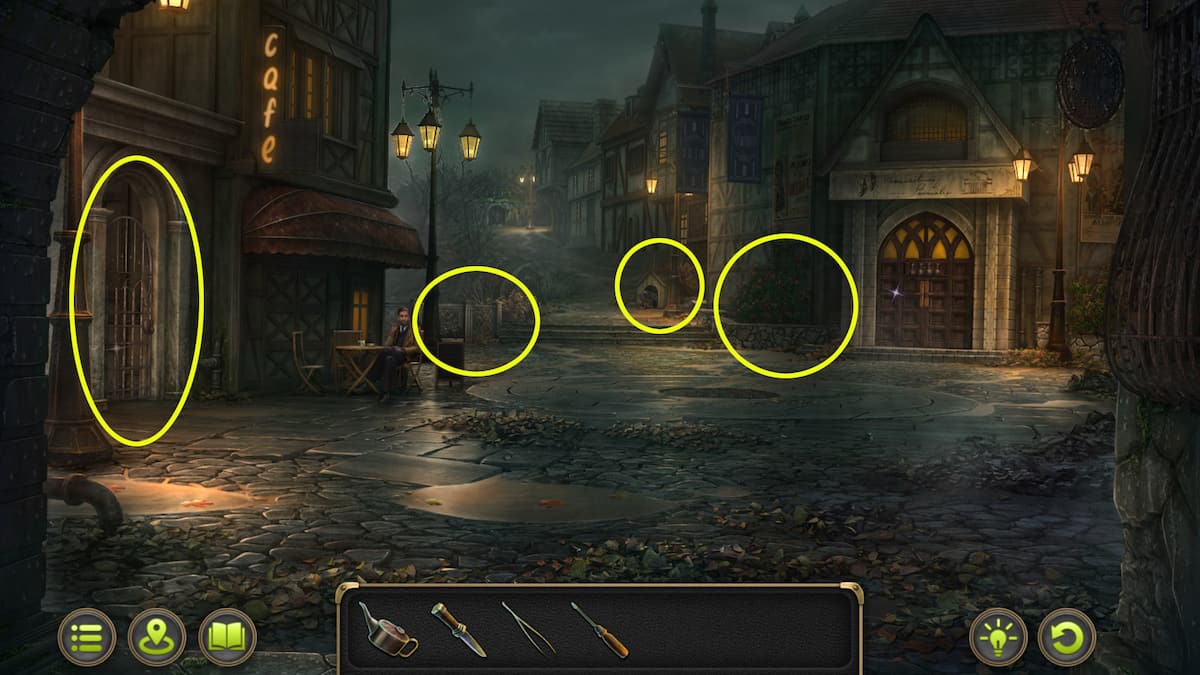
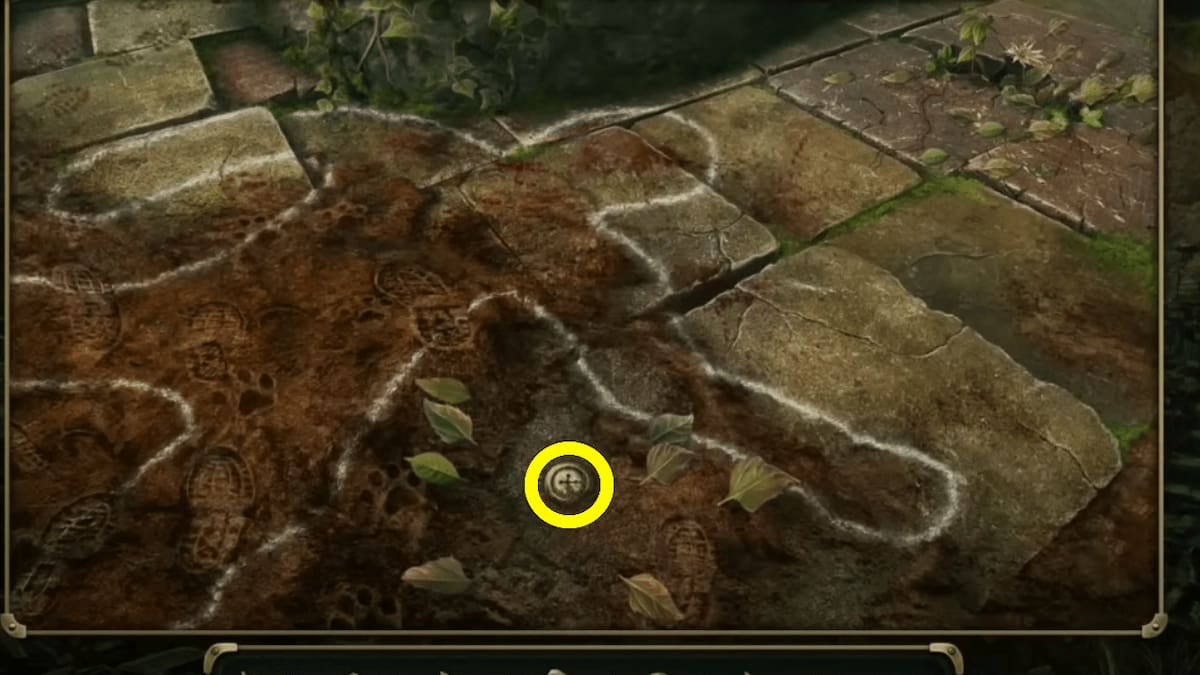
- Drain grate – On the ground in the center of the square; there is a Screwdriver under the grate. Use the tweezers to pull them out.
- Flower bed – To the left of the wooden door.
- Metal gate – On the front left side under the Cafe sign.
- Pond – Past the cafe on the left side.
- Path to the Gazebo – In the distance on the left side.
- Doghouse – On the far left side.
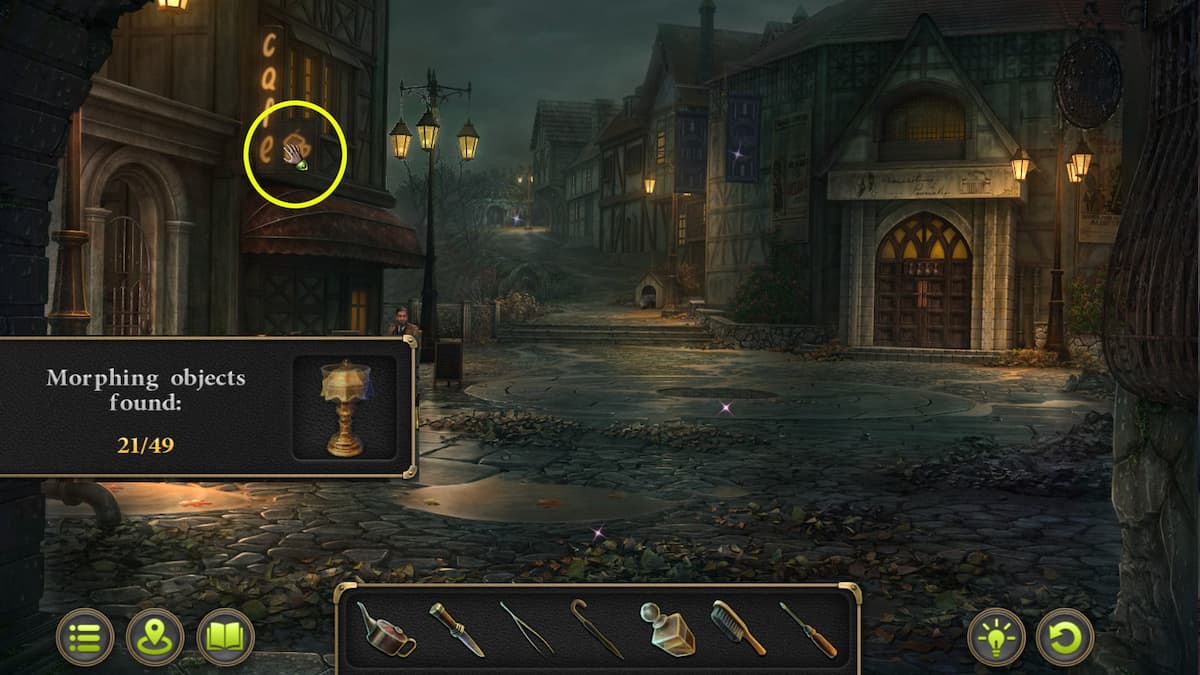
- Morphing Object – The beer mug on the Cafe sign is a morphing object.
Initially, peek into the sewer grate located on the ground and utilize tweezers to fetch a screwdriver hidden there. This tool will come in handy later. Regrettably, you won’t be able to engage much with Central Square at present. Instead, opt for the trail to your left as you head towards the gazebo.
Gazebo
At this location, which functions as a crime scene, it’s essential that you conduct a meticulous examination and gather as much proof as possible for a comprehensive investigation.
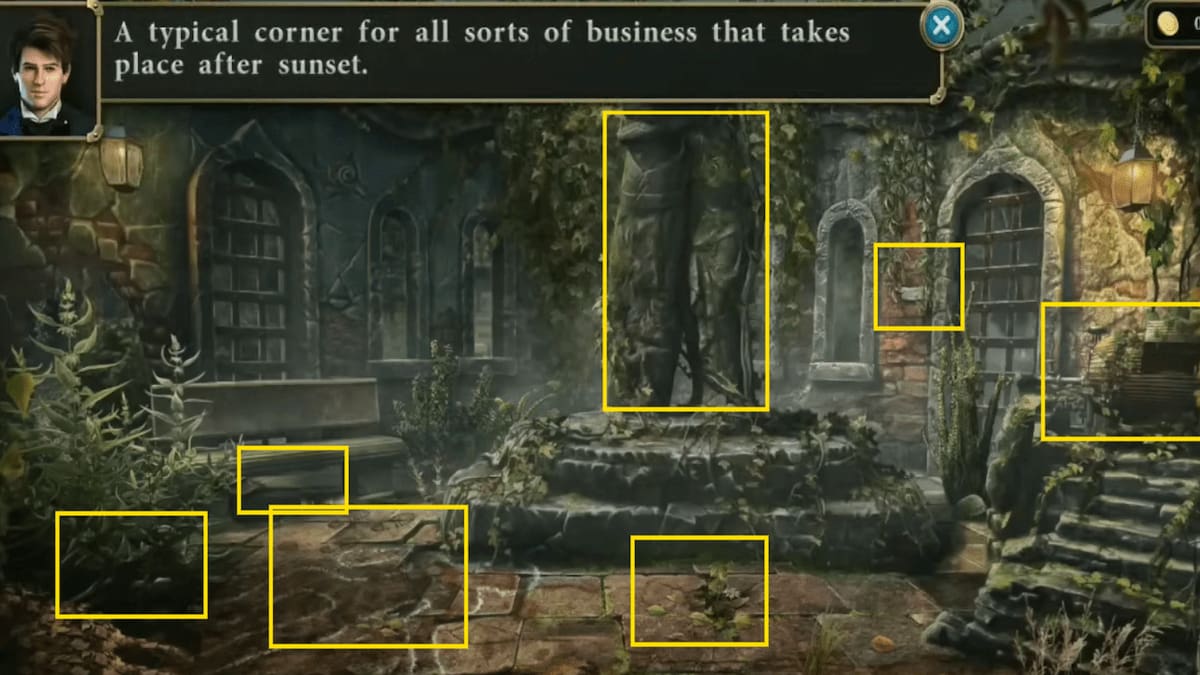

- Body outline – On the ground on the left side (Evidence 1/5 – Torn button; you’ll need to brush some leaves out of the way).
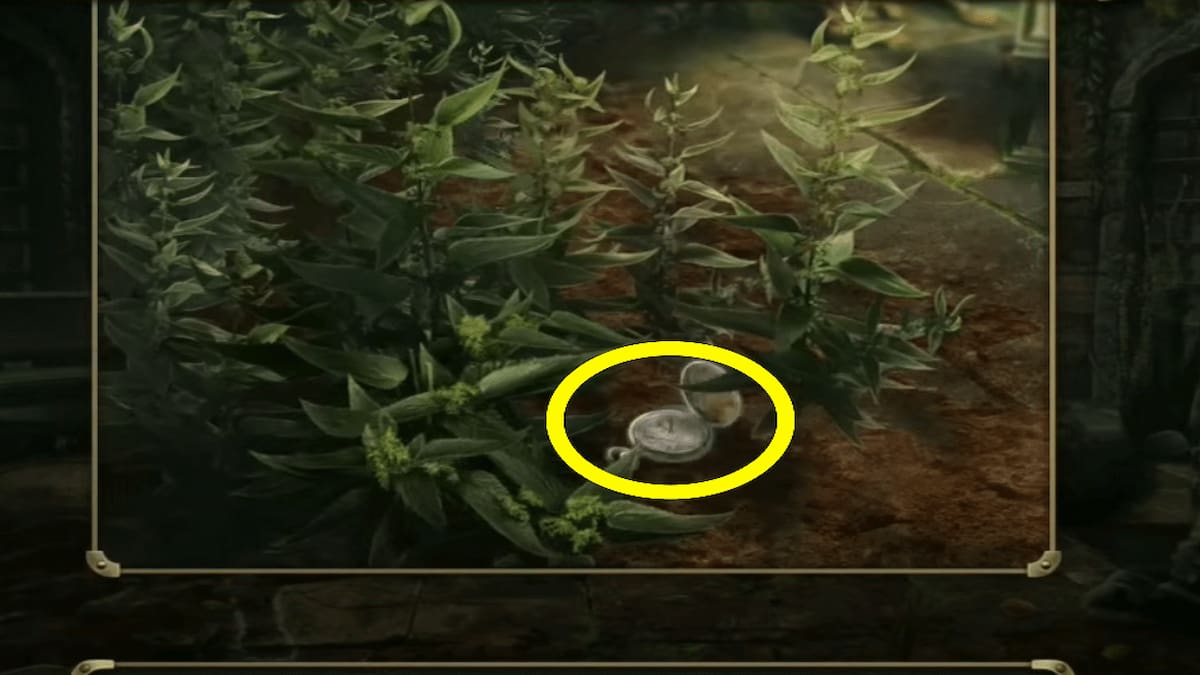
- Weeds – On the left side beside the body outline (Evidence 2/5 – The deceased’s watch, use the knife to cut some weeds out of the way).
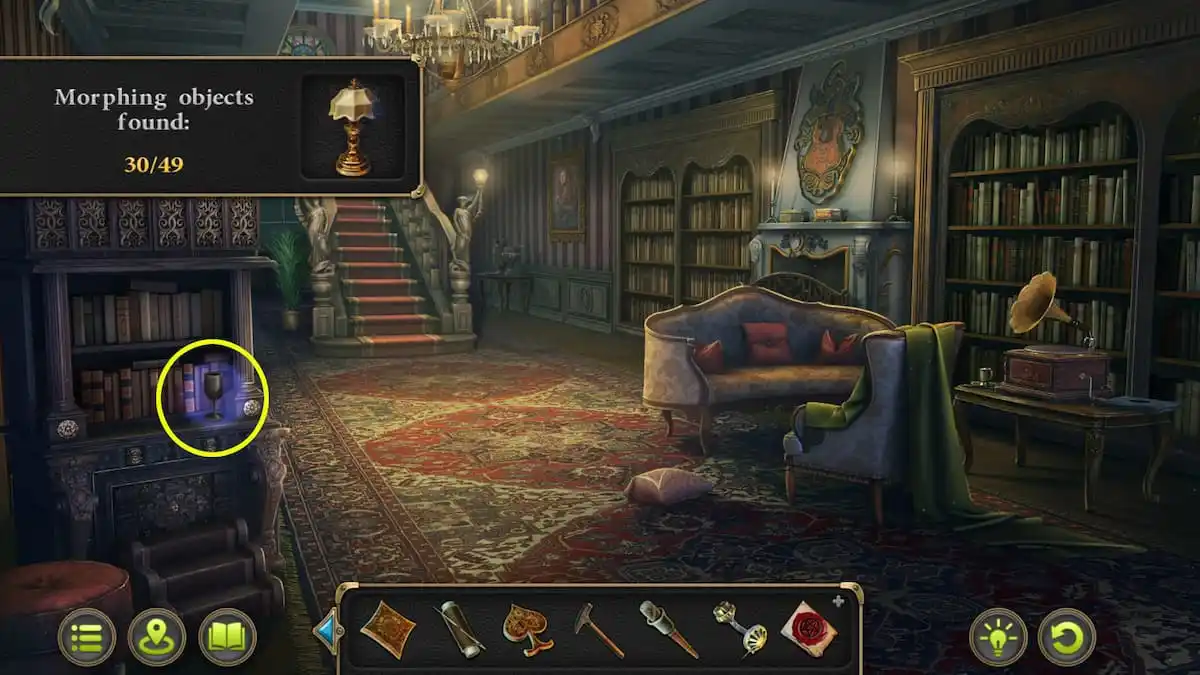
- Bench – On the left side against the stone wall (Goblet)
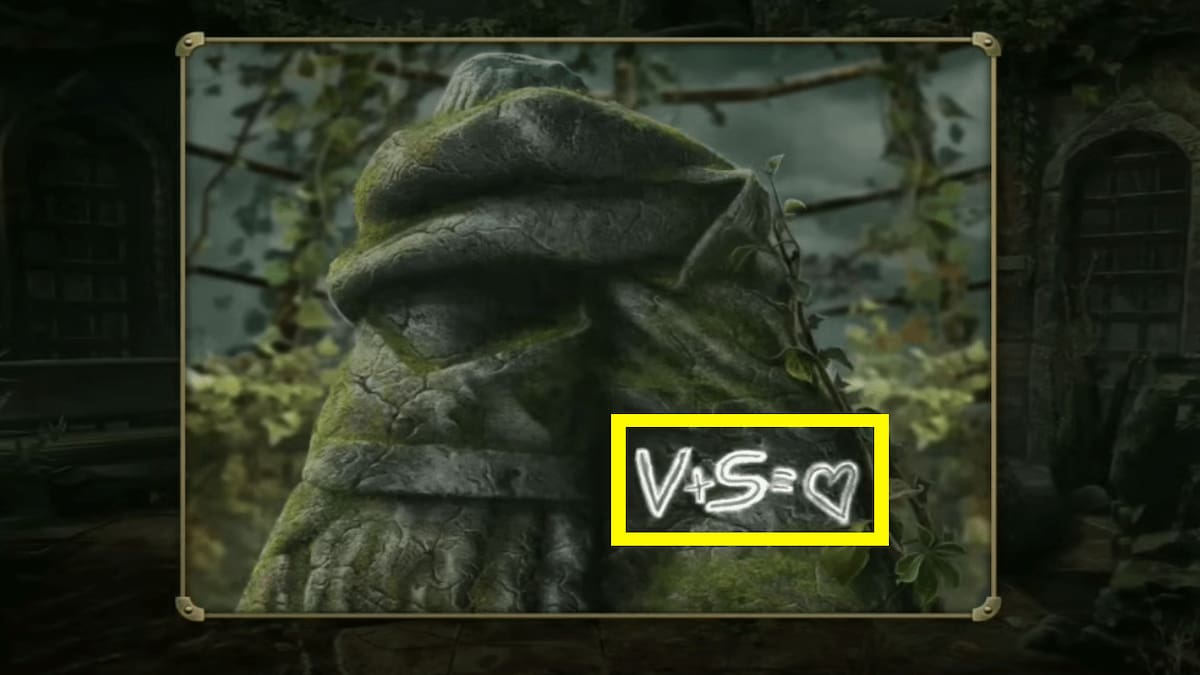
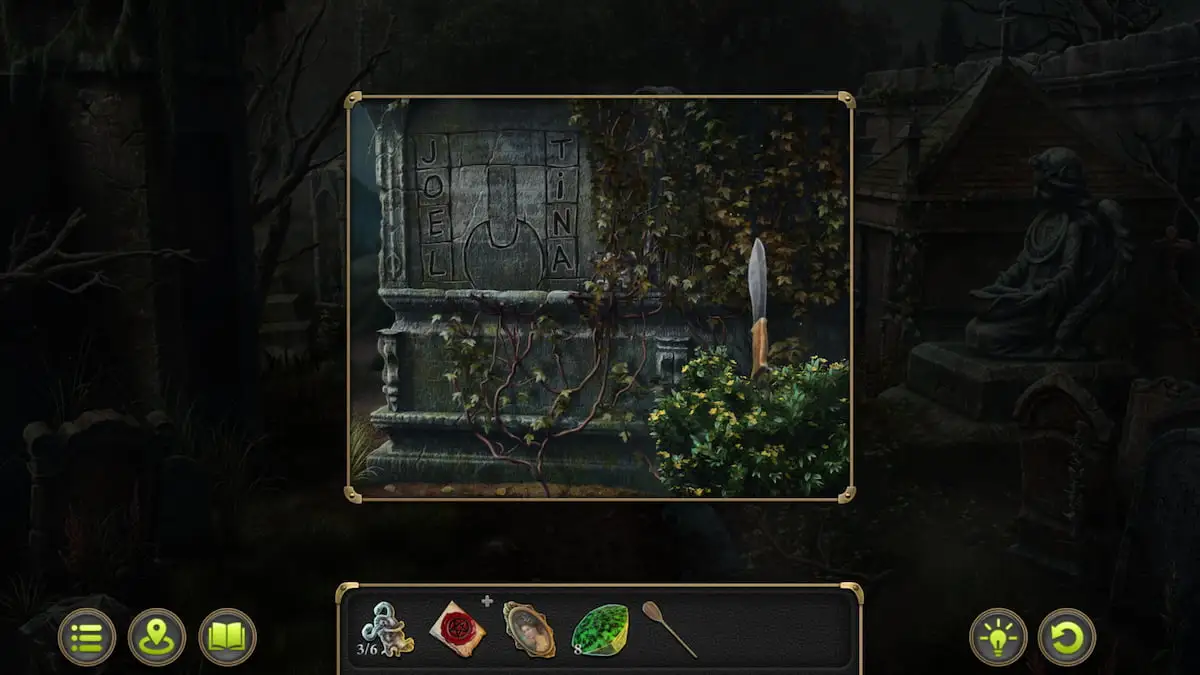
- Statue – In the center of the gazebo (Evidence 3/5 – Scratched initials, use the brush from the spider tank in the brothel to clean the moss off of them).
- Loose brick – On the right side of the statue near the window.
- Mechanism – On the far right side up the stone steps.
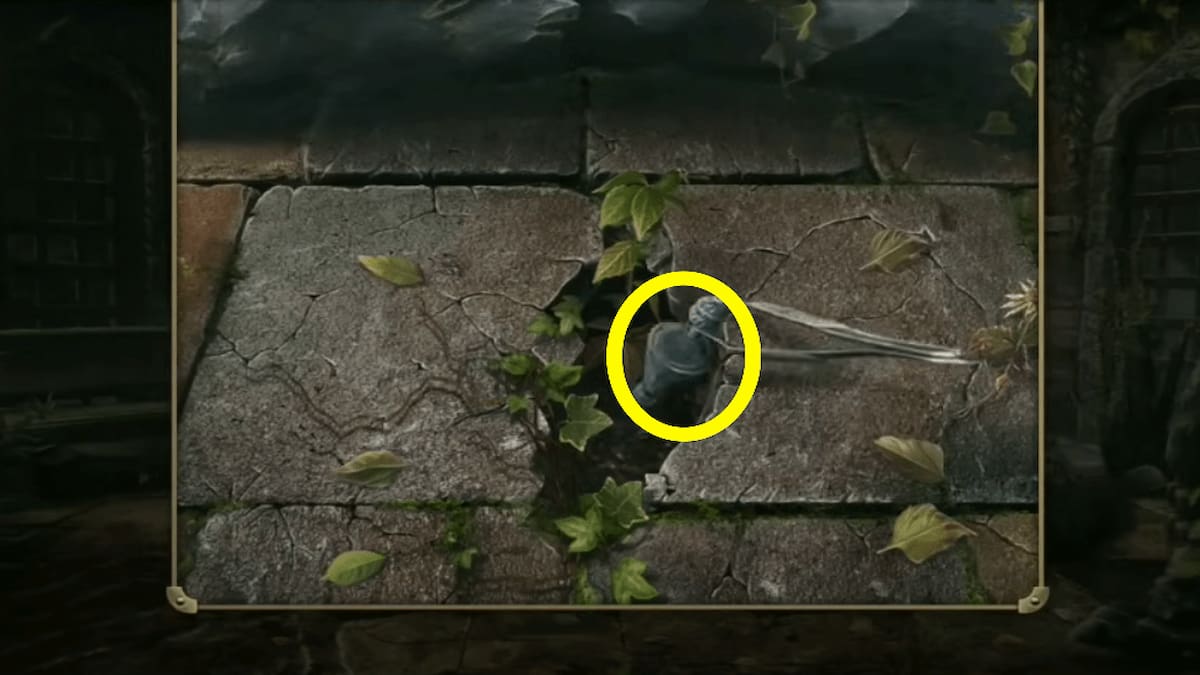
- Crack in the stone – On the ground in front of the statue (Bottle – clear out the weeds and then use the tweezers to grab the bottle).
- Bush next to the bench – There is a rose underneath.
- Lamp in the upper left part of the screen – You can interact with it but it doesn’t do anything.
- Morphing Object – There is a bat in the upper center part of the wall that changes; click on it to pick it up.
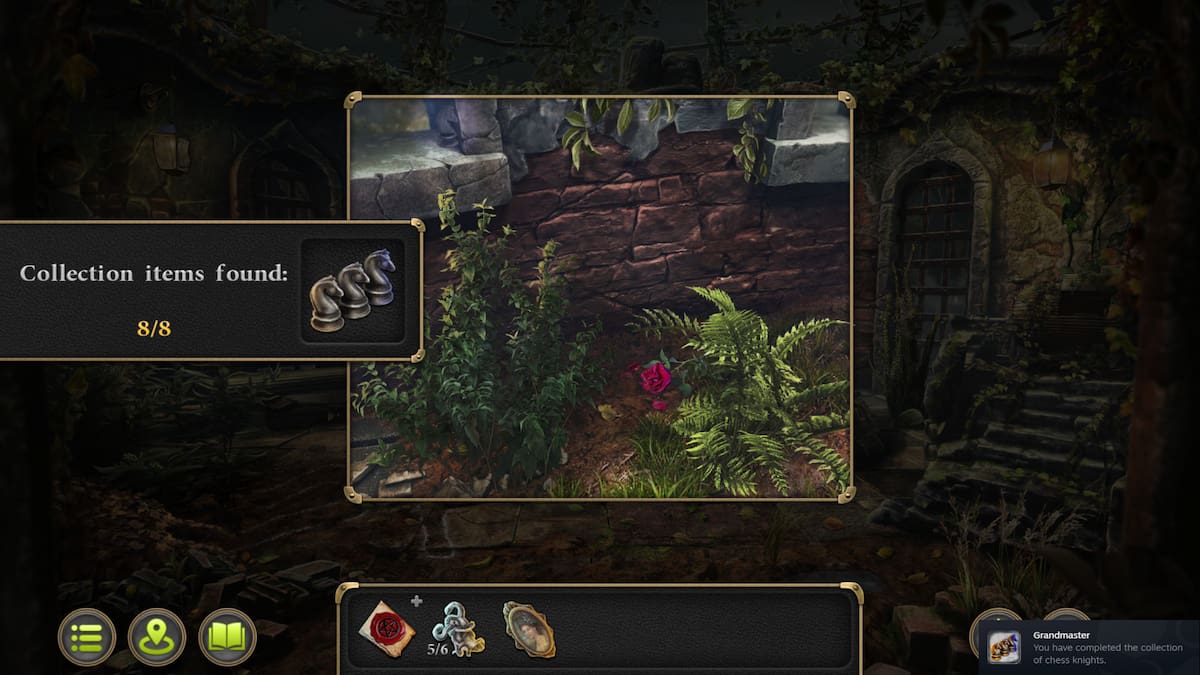
- Chess collectible – Zoom into the bush on the immediate right of the bench with the goblet underneath. There are a couple of plants with a rose underneath. In one of the windowsills is a well-hidden chess collectible.
In this area, you’ll find various pieces of evidence. Start by examining the ground where you’ll notice a body outline. Beneath the leaves near it, discover a torn button. Next, examine the weeds beside the outline and slice some away with your knife to reveal a hidden watch. Move on to the statue in the gazebo’s center and use the brush found nearby to uncover carved initials (disregard the absence of an interact icon). Lastly, inspect the crack in the stones in front of the statue. By brushing aside some leaves, you can retrieve a small bottle using tweezers.
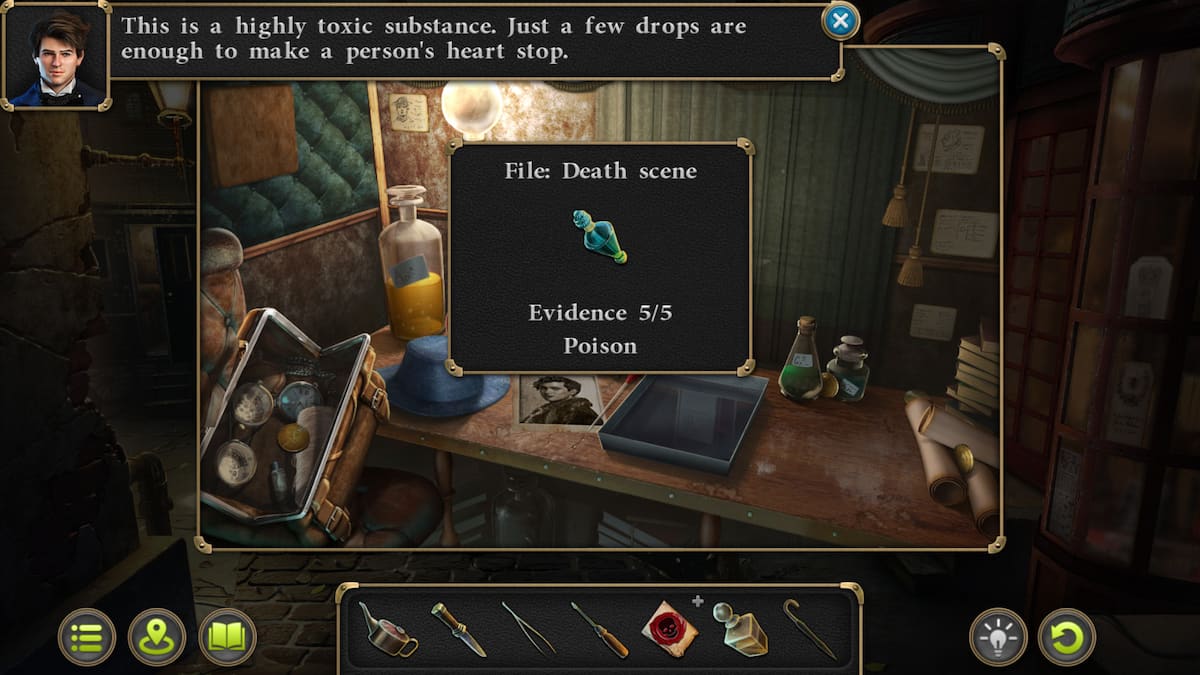
It’s possible that this bottle contains poison, which could have led to the son’s passing. Let’s check it out in our lab carriage for confirmation. Before making the long journey back, take a detour to Central Square and examine the doghouse instead.
How to take the goblet from the doghouse
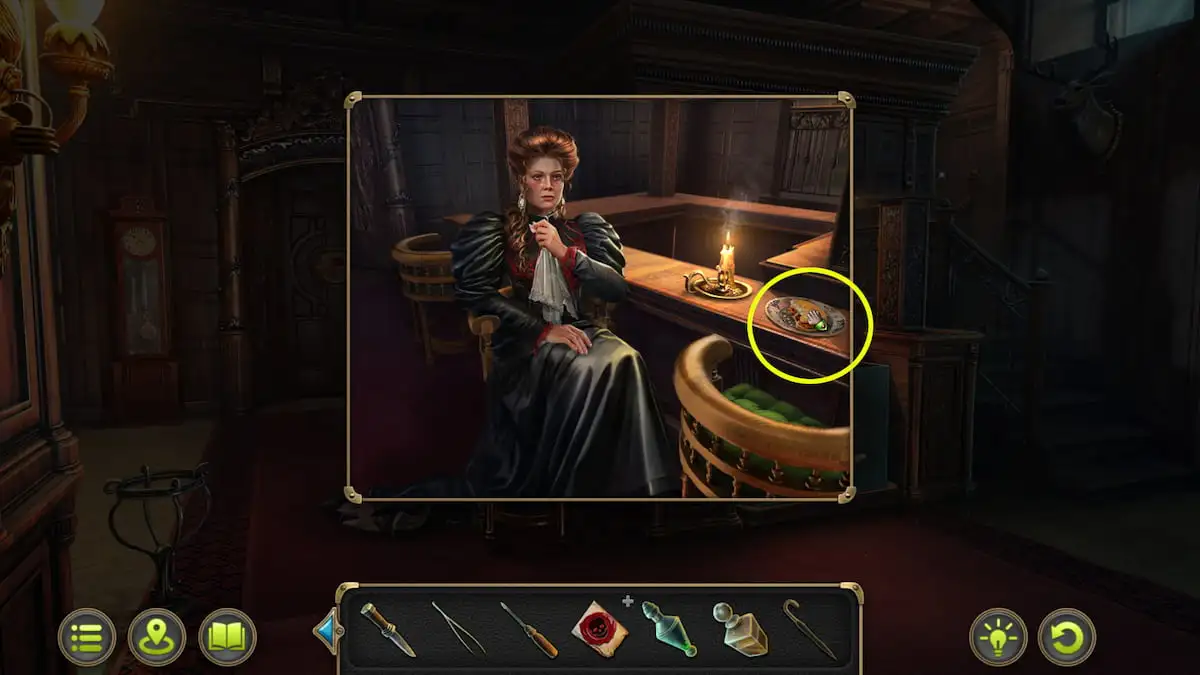
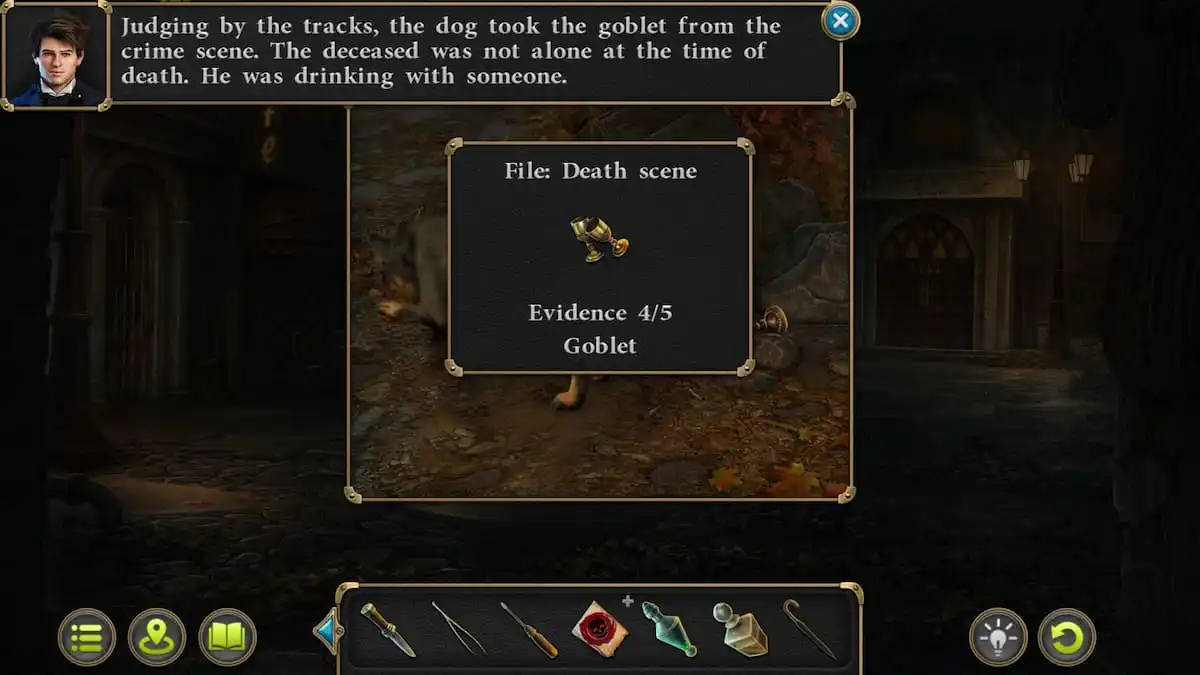
At the Doghouse, there’s a goblet that corresponds to the one situated beneath the bench in the gazebo. But, you can’t examine it without offering something in return to the dog. To acquire an item for bartering, go back to the downtown area and enter the brothel. On the counter near Diana, there’s a sandwich that you can help yourself to. Return with this sandwich to the dog and, in return, you will receive Evidence 4/5 – Goblet. Afterward, we can proceed back to the carriage to analyze the poison.
How to test the bottle of poison (Evidence 5/5)
Instead of “Bring the vial you discovered hidden beneath the floorboards at the crime scene to your carriage,” try this:
Back to the Brothel
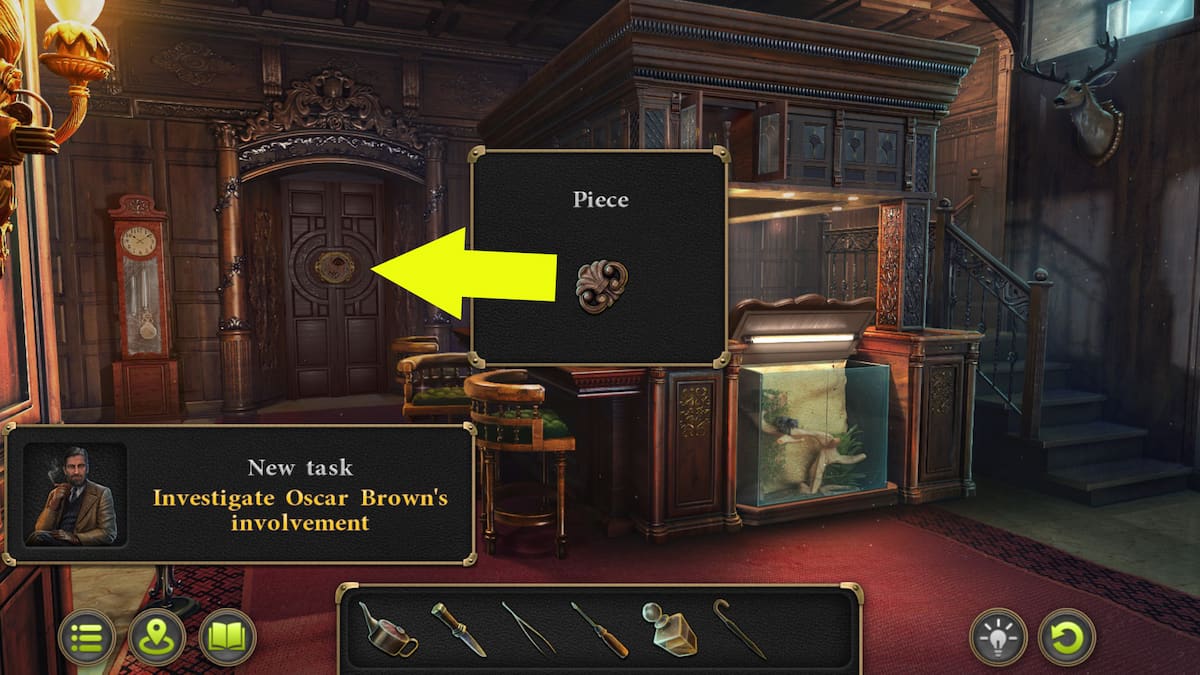
Following your conversation with Diana, you’ll have the strong inclination to check out her son’s quarters. Unfortunately, the essential key to that room seems to have gone missing. Diana suggests approaching Oscar Brown, a man she suspects of having committed the crime, who can be found outside the café in the heart of the town. Additionally, Diana provides you with a fragment of a puzzle door to aid your entry into the pool hall.
How to solve the brothel billiards door flower puzzle
The objective of this challenge is to accurately place each flower into its designated colored slot. Yet, moving a flower to a new slot causes all slots to rotate clockwise. Consequently, arranging them in the proper sequence is necessary for them to end up at their correct positions. Despite the puzzle’s unpredictability, here’s an illustration of how it can be solved:
Instead of focusing on placing the flowers in their designated slots directly, try organizing them so that your next action will result in all pieces being in the right spots. After successfully completing this arrangement, unlock the door and proceed into the billiard room.
Brothel – Billiard Room
There are more objects we can collect and things to look at here.
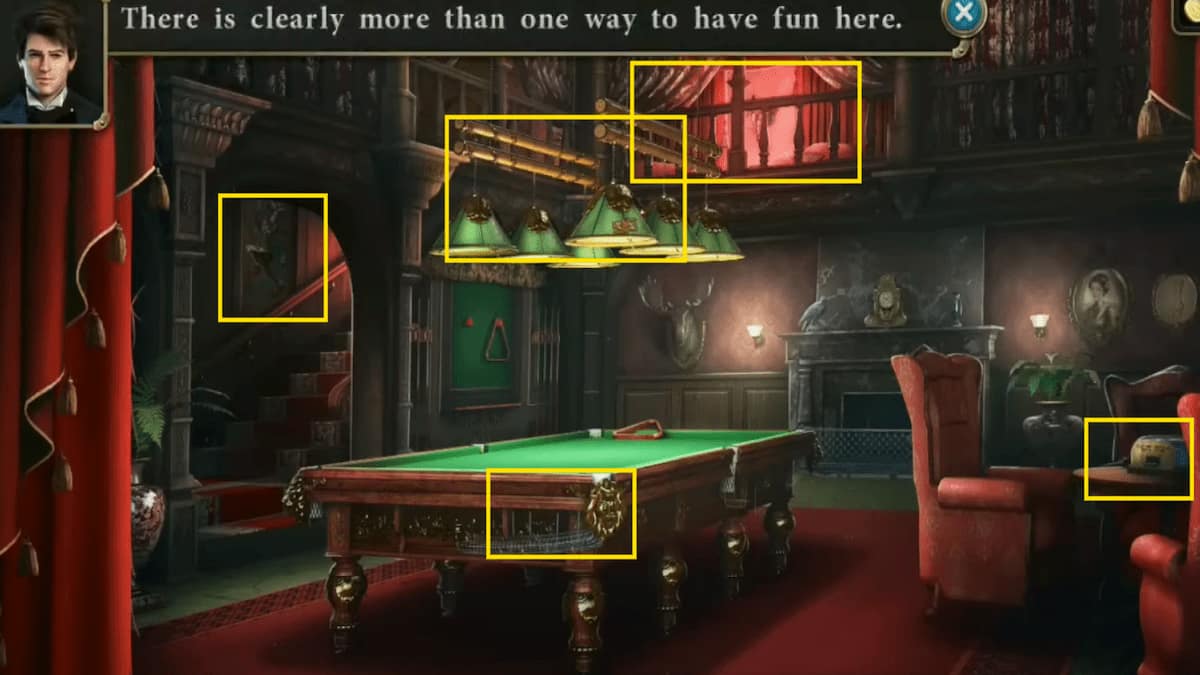

- Billiard Table – In the center of the room; there is an object caught in the netting that you can’t get yet.
- Card Table – On the right side of the room. You can’t interact with anything here just yet.
- Lights – Over top of the billiard table (Part of box – Use the umbrella to knock it down).
- Jester painting – On the far left side near the staircase.
- Cushions – On the balcony above the billiard table (Powder, Jester box, Torn Tapestry, Collectible)
Upon stepping into the billiard room, start by examining the table-top billiard table initially. You’ll discover a small detail there, attached to the mesh. Next, cast your gaze upward towards the lights’ fixtures. There, you’ll notice something perched atop the lampshade – an object that is usually out of reach. However, fortunately, you can retrieve the umbrella from the lobby and employ it to knock the item down. In the room’s balcony region, search for the powder resting on the right-hand cushion and take note of any other surrounding items.
Oscar Brown and his apartment
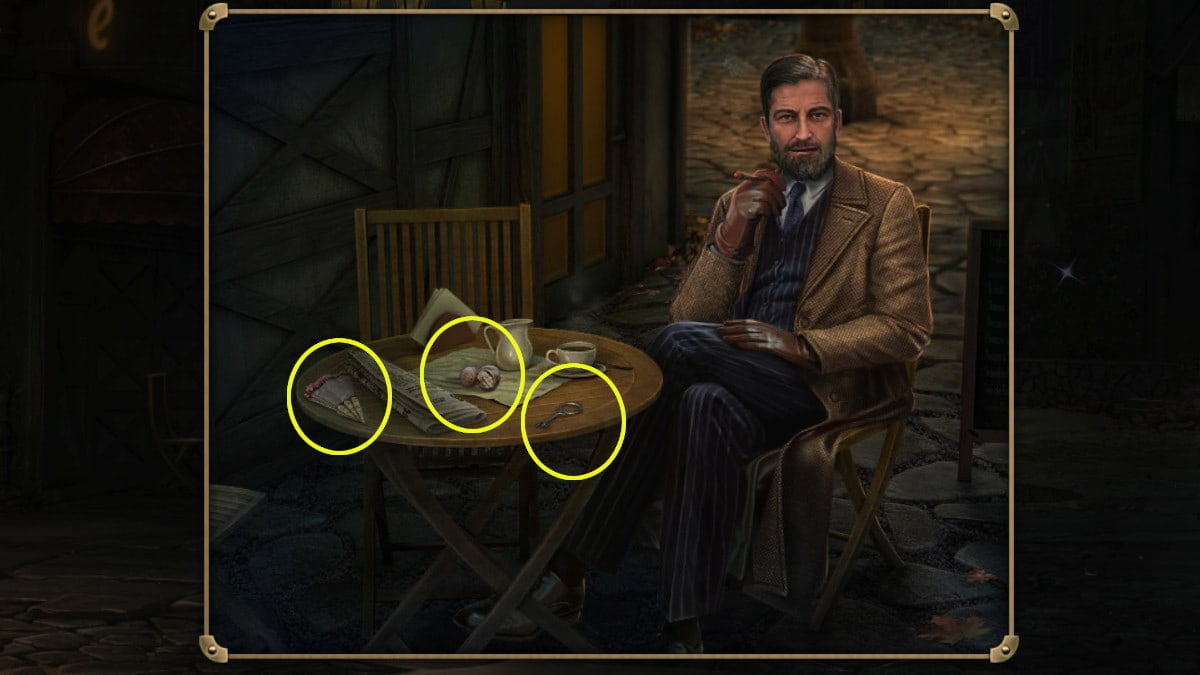
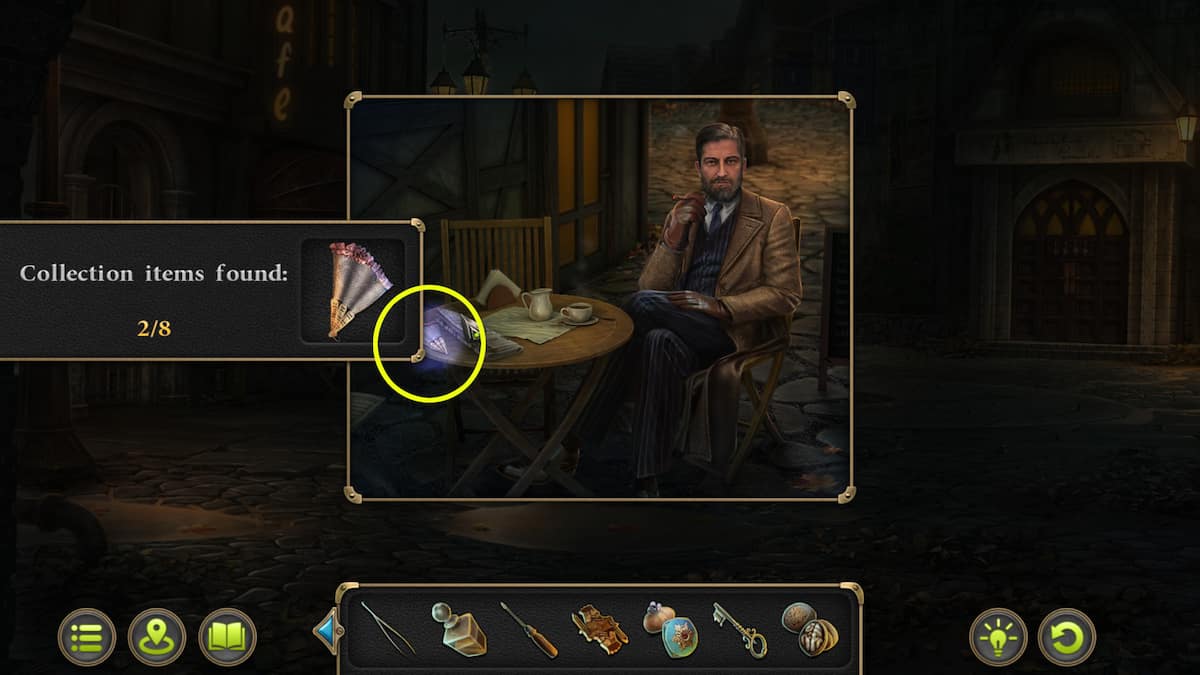
Go to the heart of the town and have a conversation with Mr. Brown at the café near the square, where you previously retrieved the goblet from the canine. Following this interaction, pick up both the Key and Nuts, as well as a collectible item from the table. Use the Key you obtained from the café table to unlock the gate situated to the left of the café, which will grant you access to Oscar’s residence.
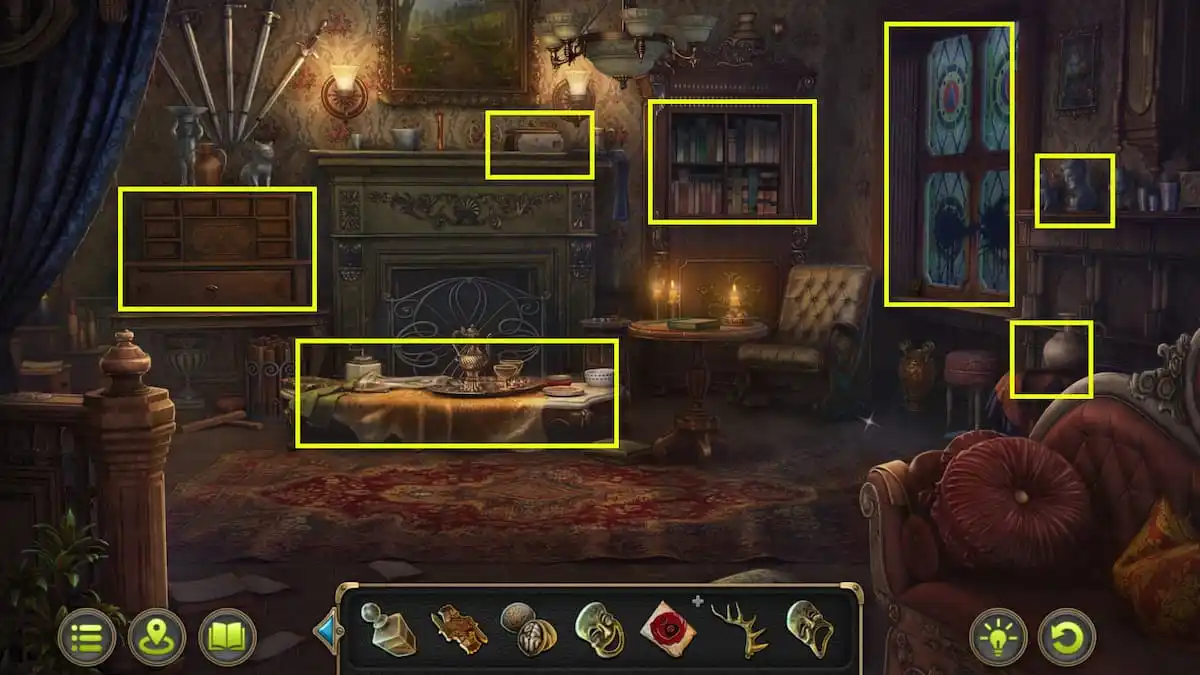

- Large table – Poster (Evidence 1/4) and Comedy mask.
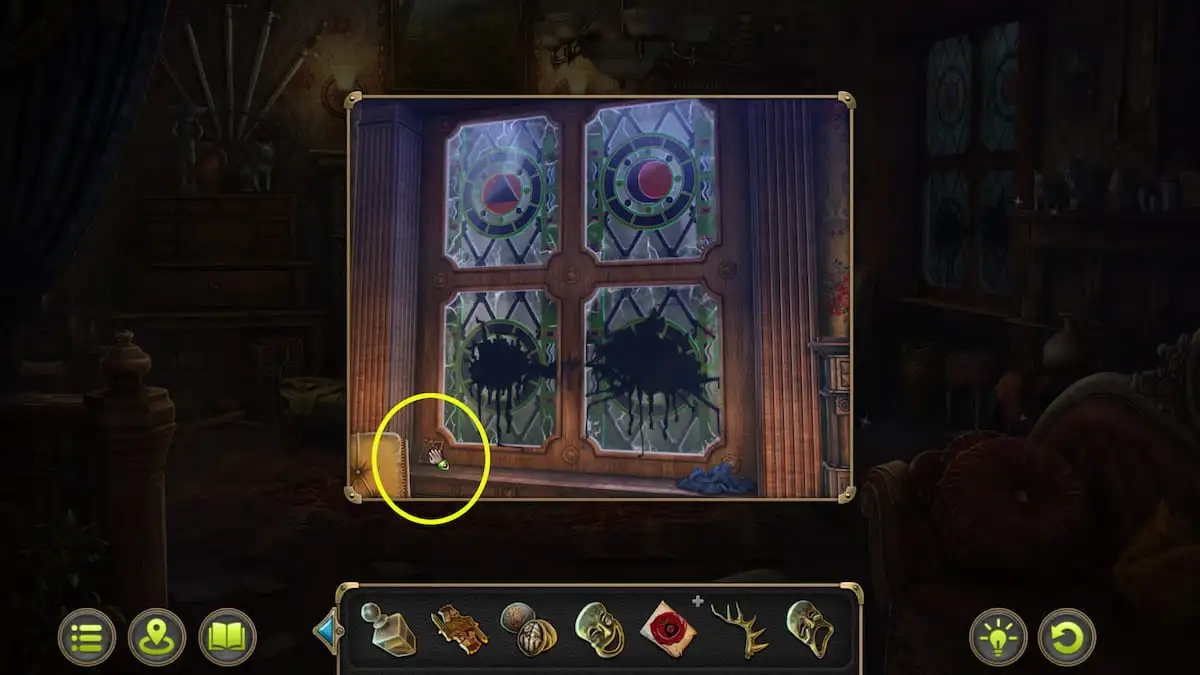
- Window – Use Alcohol on this to remove the stains and reveal a pattern. Take Part of box from the bottom left corner of the window.
- Bookshelf – Examine this on the right side of the room and input the pattern you saw on the window (going from top left > top right > bottom left > bottom right). Doing so will reveal a safe which we’ll open later.
- Drawers – Use Powder on them to reveal handprints and click three with either the most or least handprints to open the large drawer below. Take Antler and acquire the Medicine for the liver (Evidence 2/4).
- Painting – Businessman’s personalized tickets (Evidence 3/4) and Tragedy mask (next to the evidence)
- Chess Collectible – Can be found on the right side next to the window.
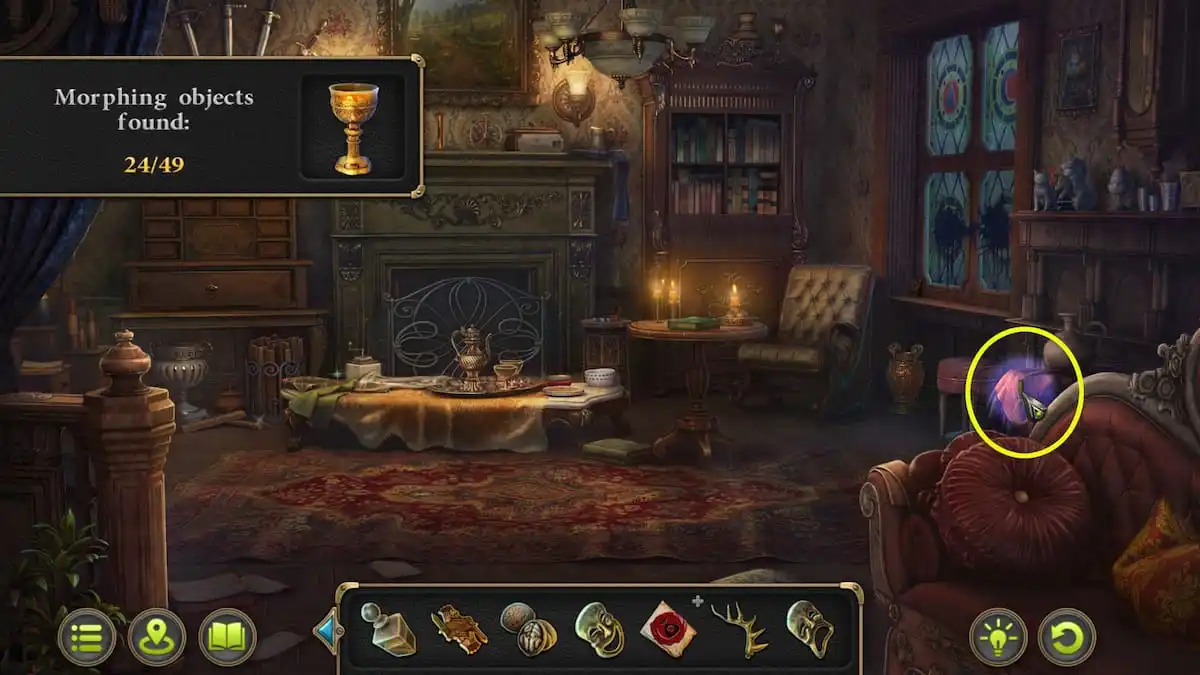
- Morphing Object – Just below the Chess collectible.
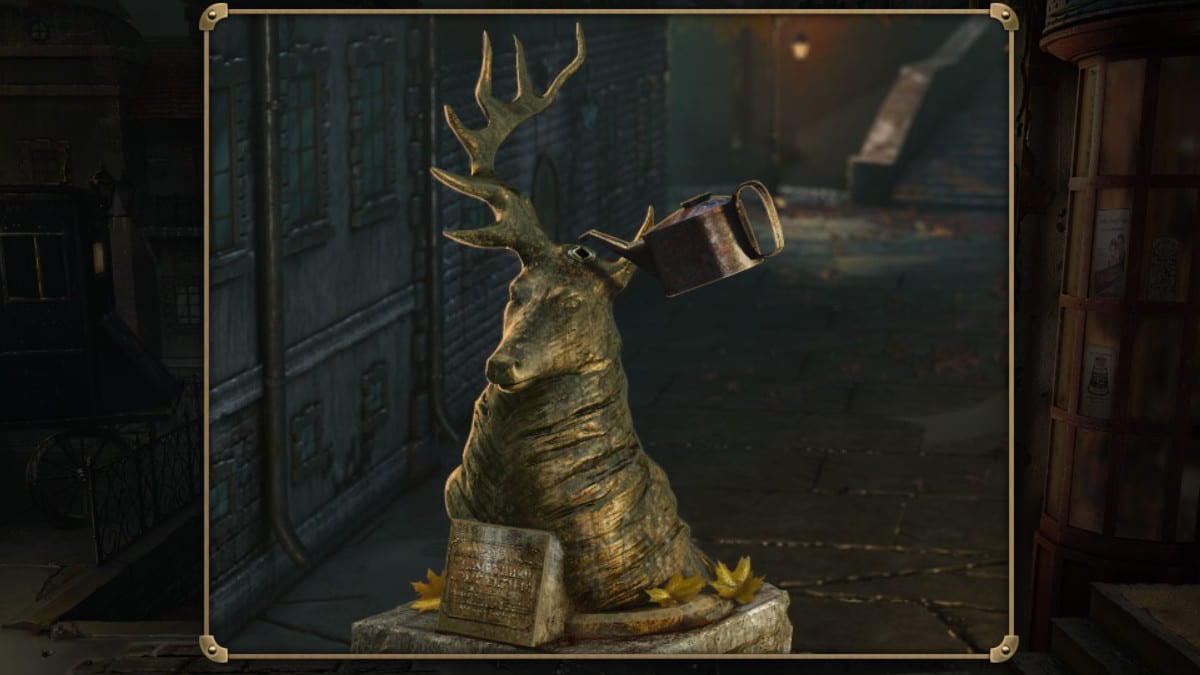
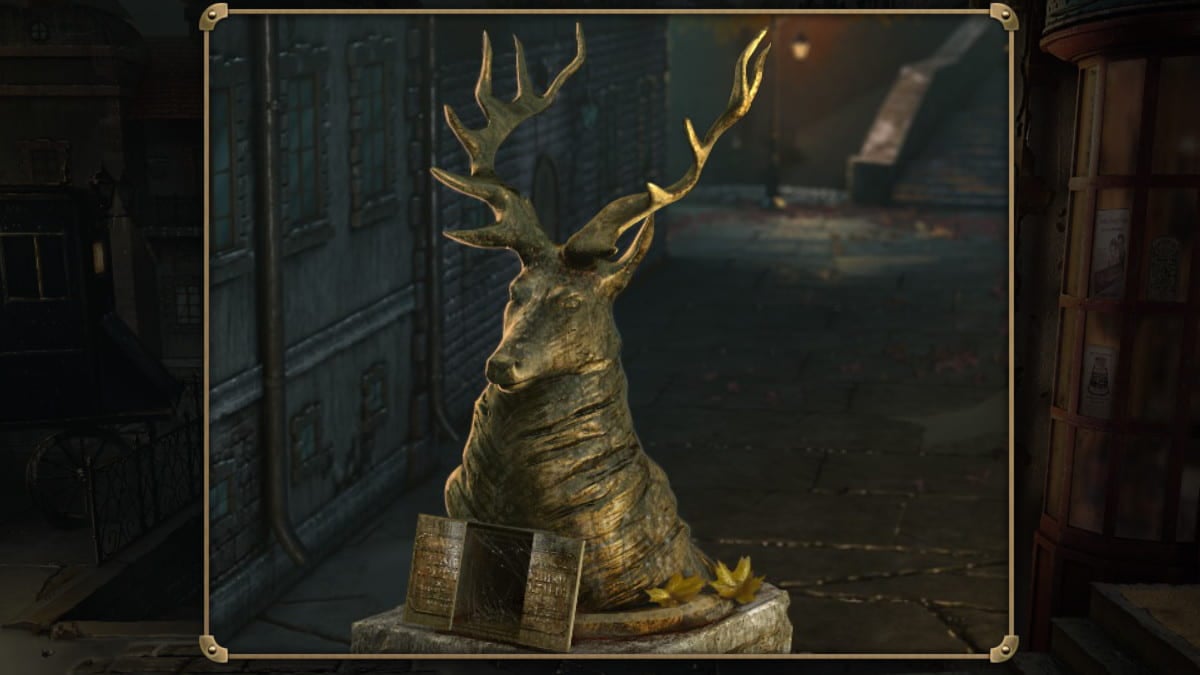
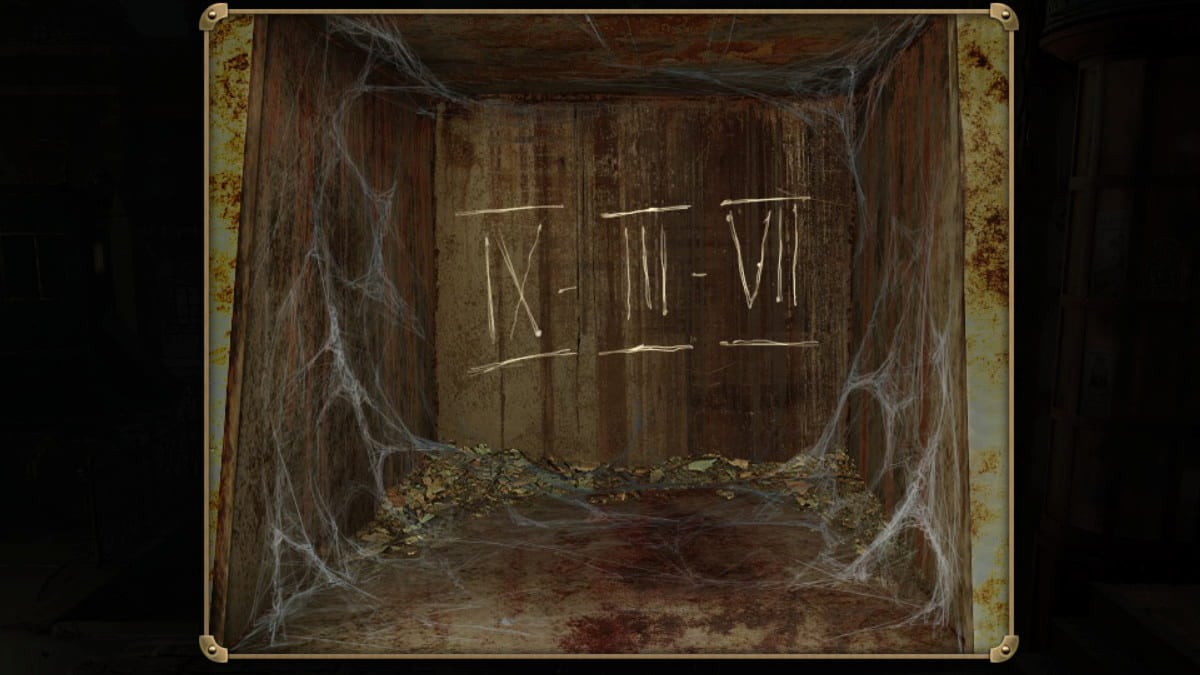
Go back to the street and make an effort to attach the antler to the deer’s head, but discover that the connector is corroded. Apply some Oil to the head and try again. At the door, push the object in front of it to uncover three numbers: IX – III – VII. Head back to the apartment and input the code (9 left, 3 right, 7 left) into the safe. Retrieve the Director’s cash receipt (Evidence 4/4) from the opened safe. Re-examine the safe and obtain The Case. Attach the Comedy mask and Tragedy mask to the case, and open it up to get Binoculars.
Theater
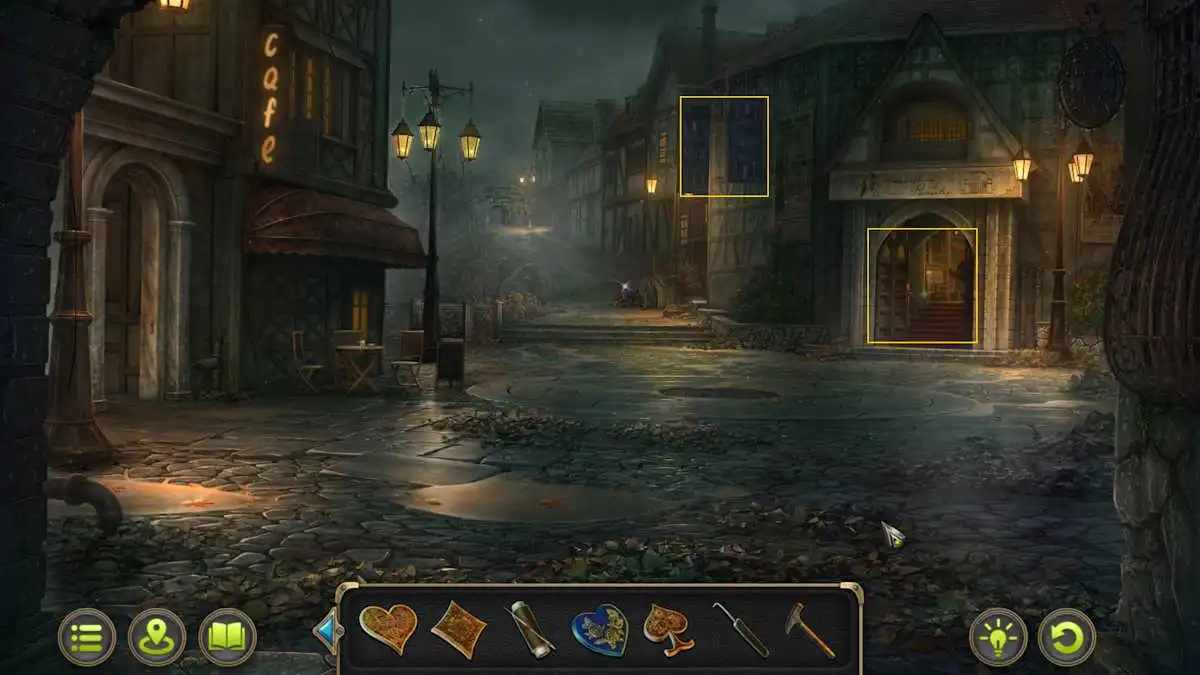
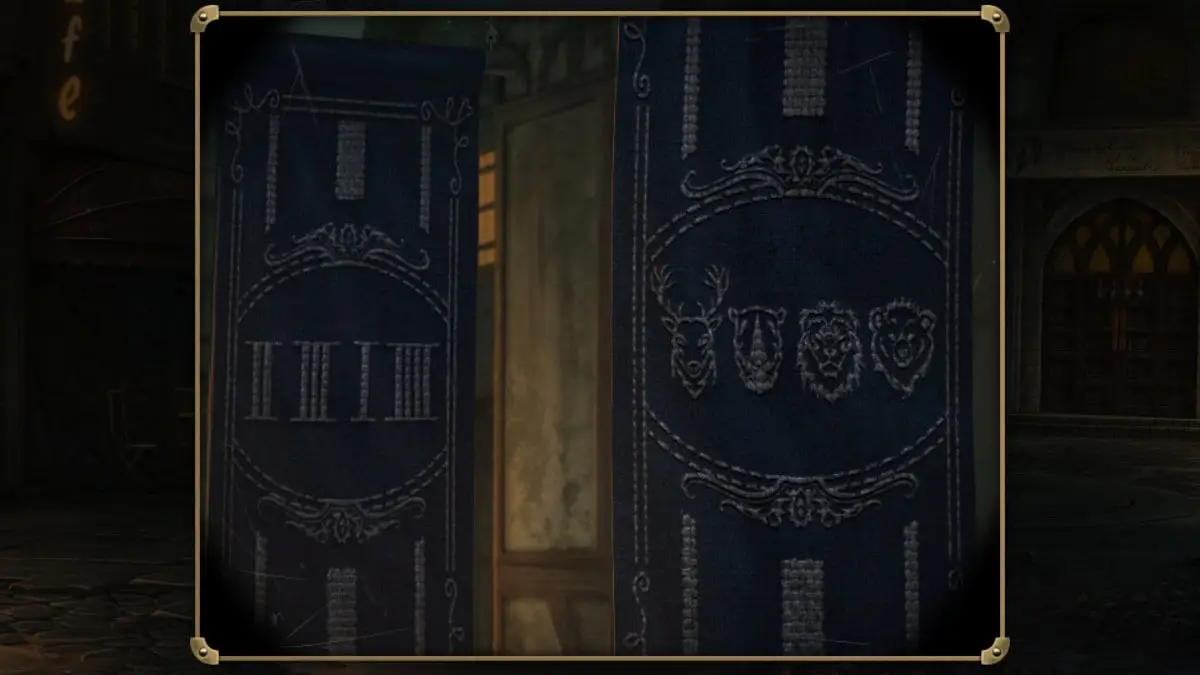
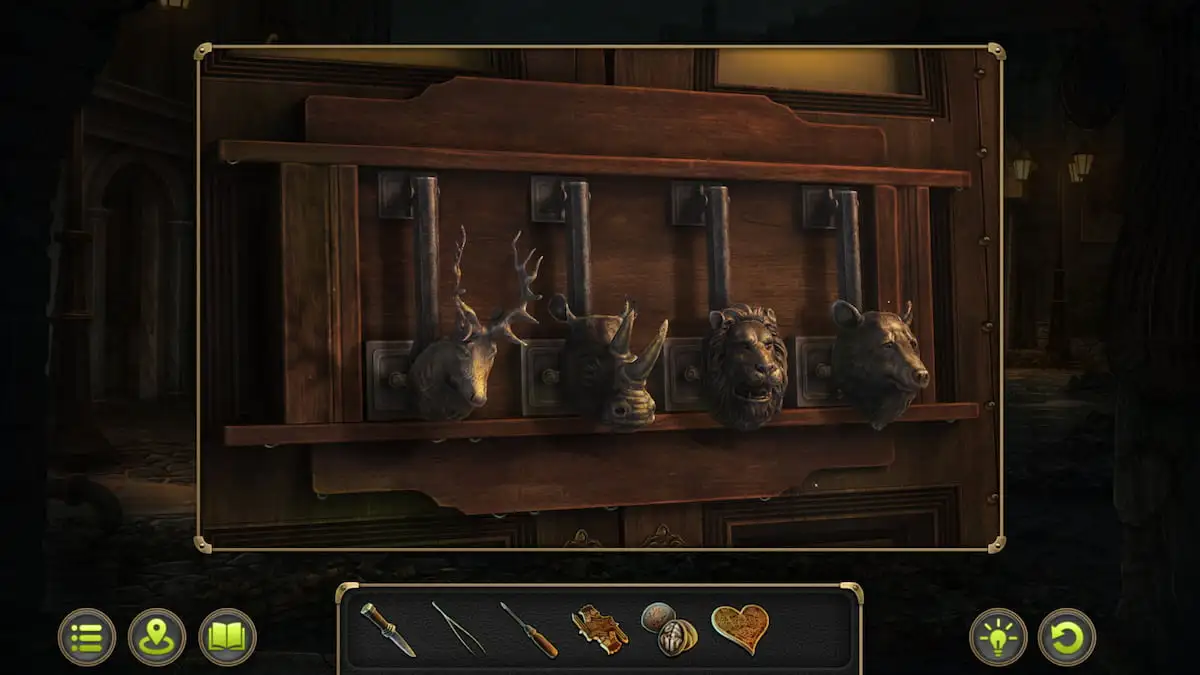
As a gamer, I’d say: “Head back to Square and take a good look at the blue flags to the upper left of the big brown theater door using my binoculars. I notice an intriguing pattern of numbers and animals there. After scrutinizing the theater door, I click on the following animals in this order: Lion, Deer, Rhino, then Bear.”
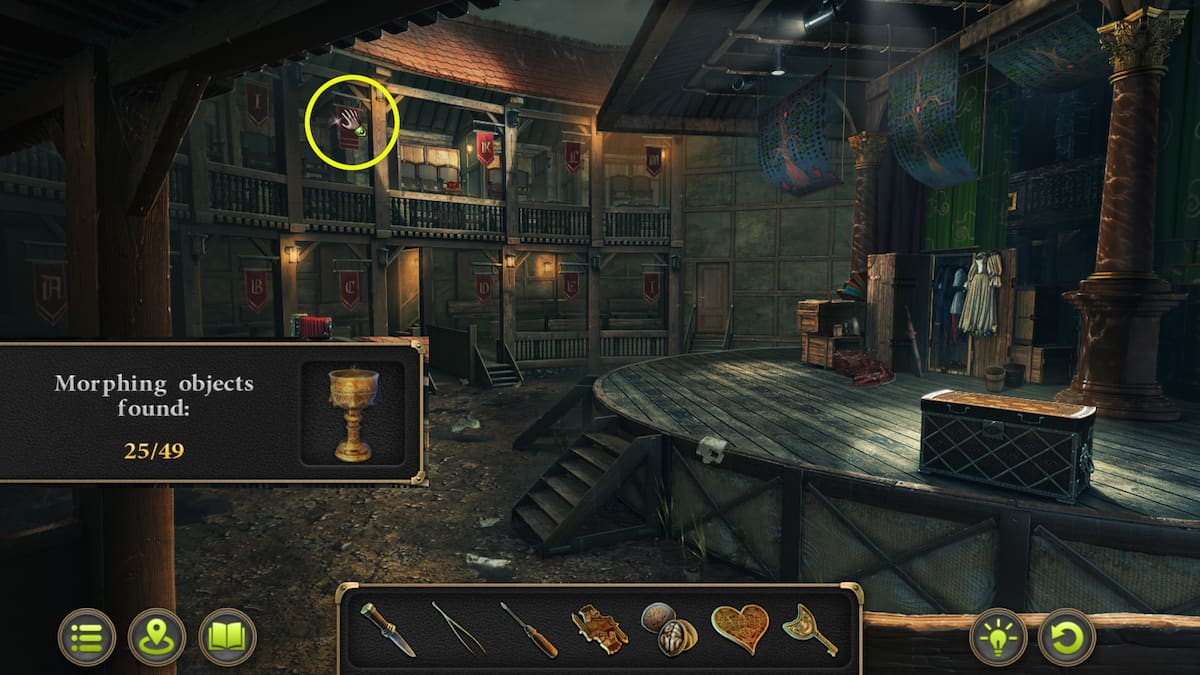
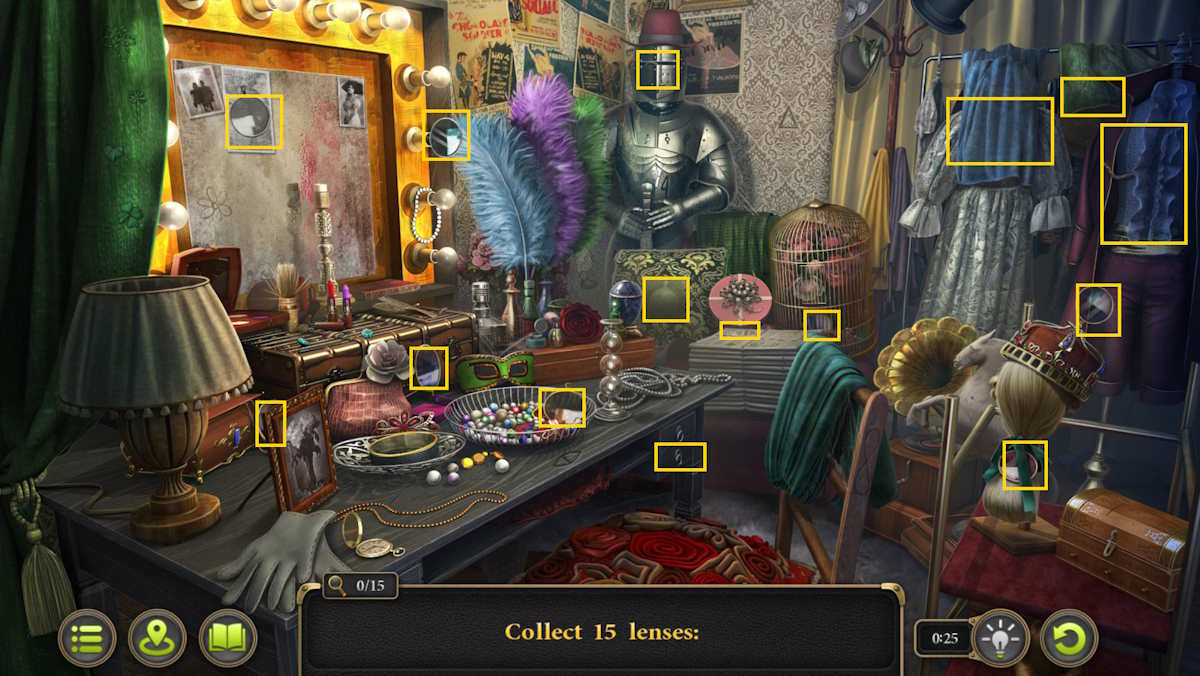
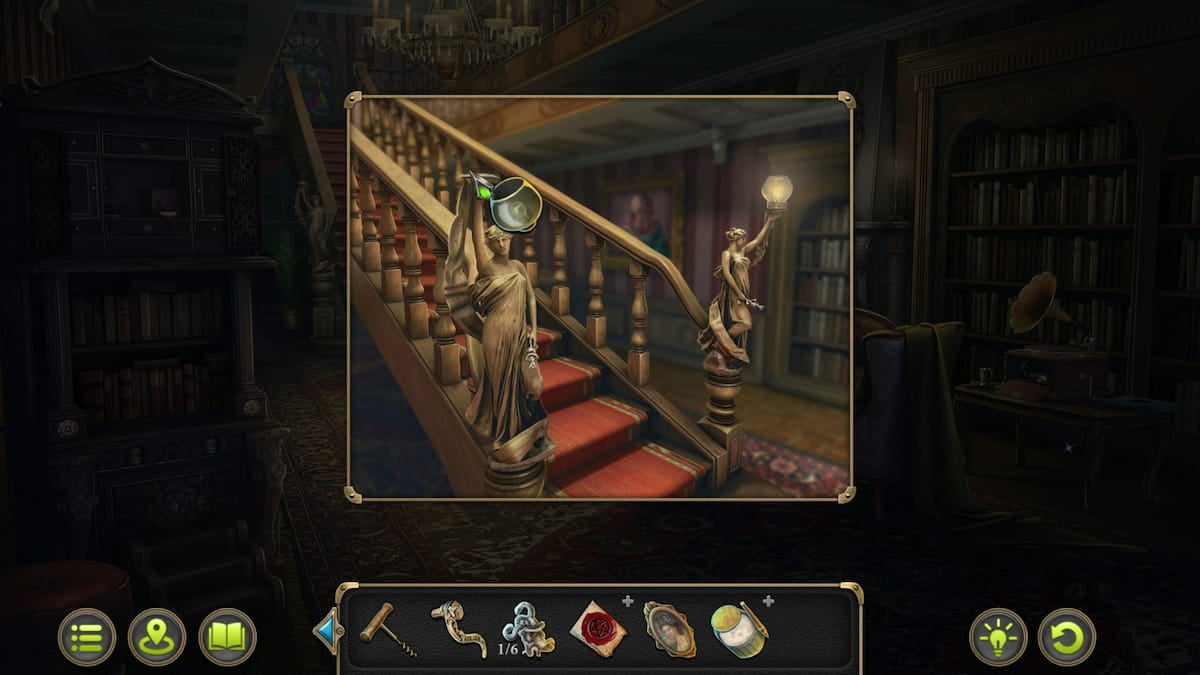
In the building’s interior, find Scott Roth for a conversation and obtain a Key. Before unlocking any doors with the key, first pick up the Shape-shifting Item located on the flag as depicted in the snapshot provided. Subsequently, apply the Key to the back right door and ascend the ensuing staircase. Here, your objective involves locating fifteen Lenses. Once completed, return to the theater where you can employ these lenses on the box situated on the right side to initiate a fresh puzzle.
How to solve the theater box puzzle
The objective of this game is to leave only one red piece on the board. To achieve this, you may jump one red piece over another red piece, but without diagonal movements. Strategically plan your moves a step or two ahead and keep red pieces close together for greater flexibility in your next moves and to guarantee having a move available (if they get too far apart, you’ll need to start over).
Once you’ve finished the puzzle, retrieve both the “Needle and Thread” and the “Case” from the box. Next, investigate the camera on the left by opening it with a “Screwdriver.” Afterward, utilize the “Case” to obtain some “Film.” Make your way back to your location and switch out the “white light” for the “red one.” Then, place the “Film” on the table and engage with it to insert the photo into the tray. Finally, examine the newly added photo to uncover Evidence 1/5.
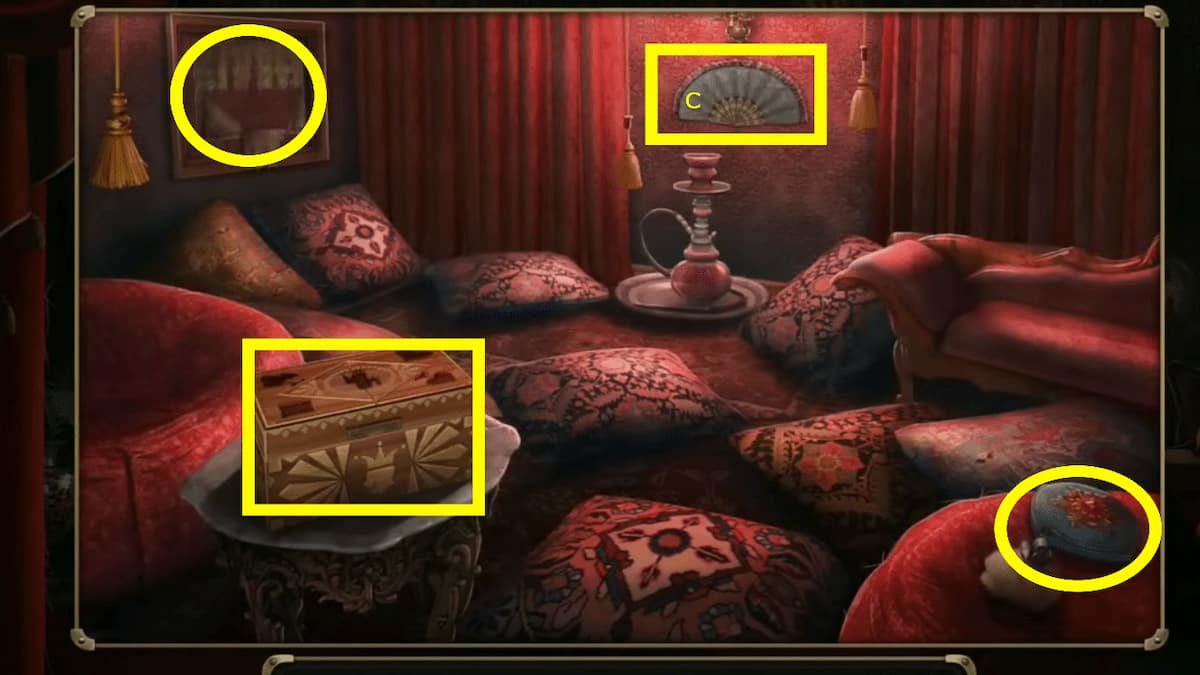
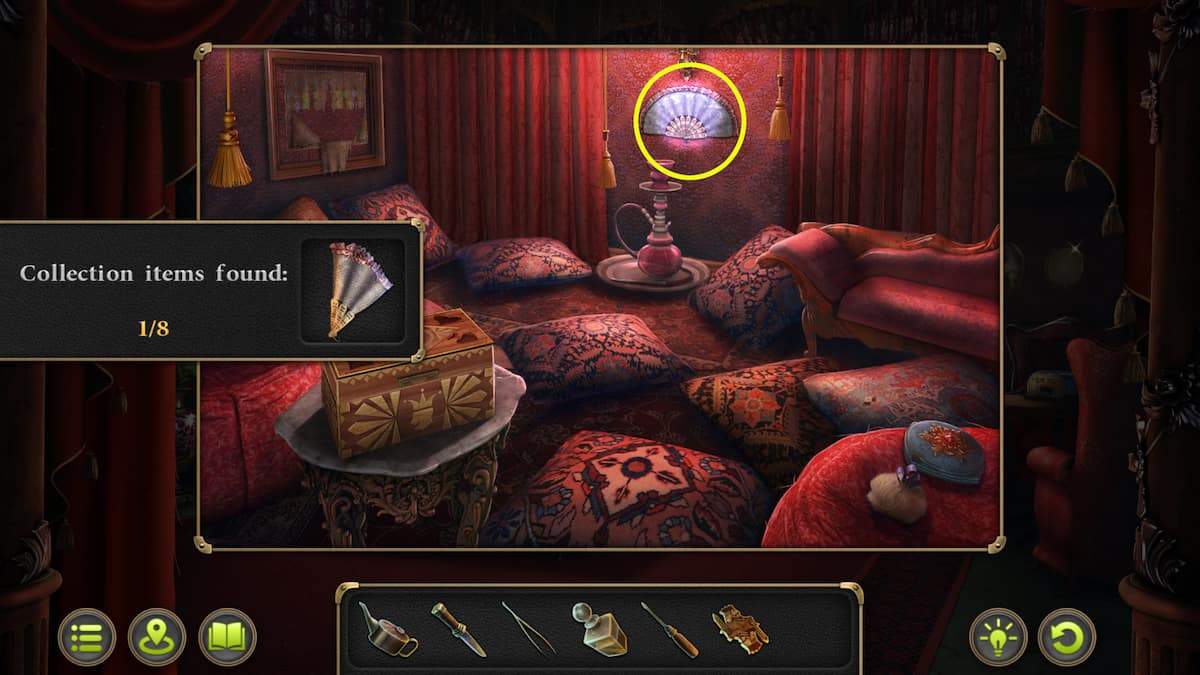
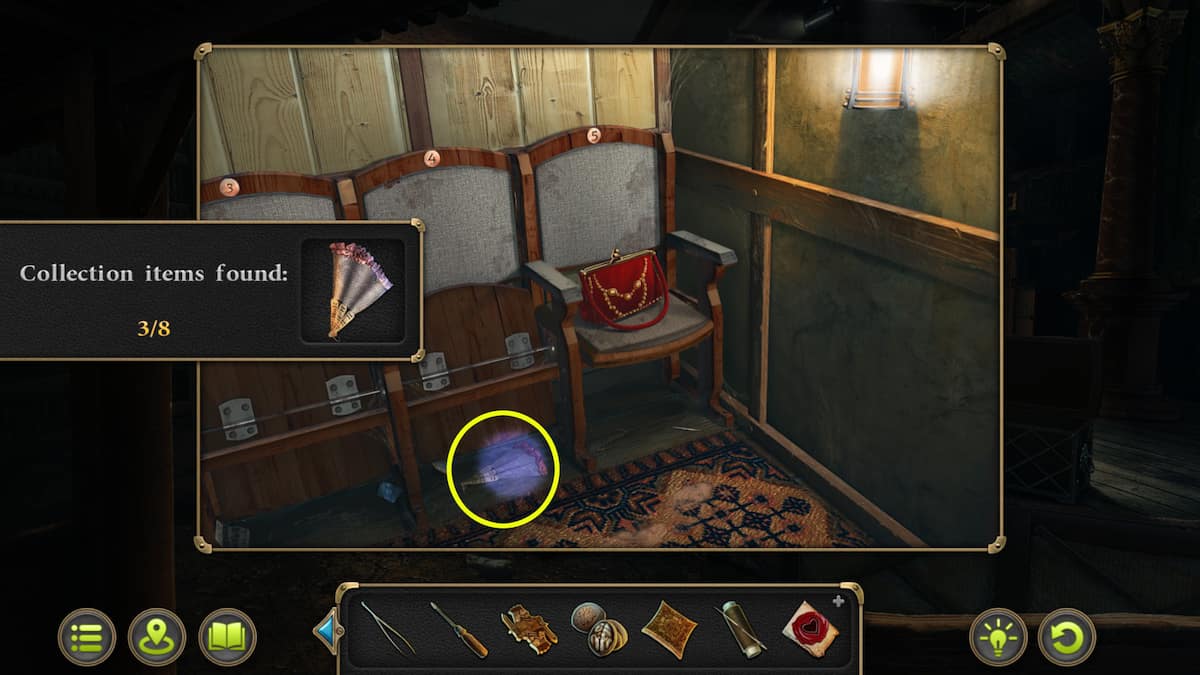
Go back to the theater and look for the director’s photo, which will guide you to the theater hall. Once there, check out the balcony above. Next, retrieve a Fan Collectible located under the center seat. Afterward, examine a red purse to find Women’s clutch (Evidence 2/5). Inside this clutch, discover personalized tickets for one additional person (Evidence 3/5). An additional Fan Collectible can be found beneath the seat.

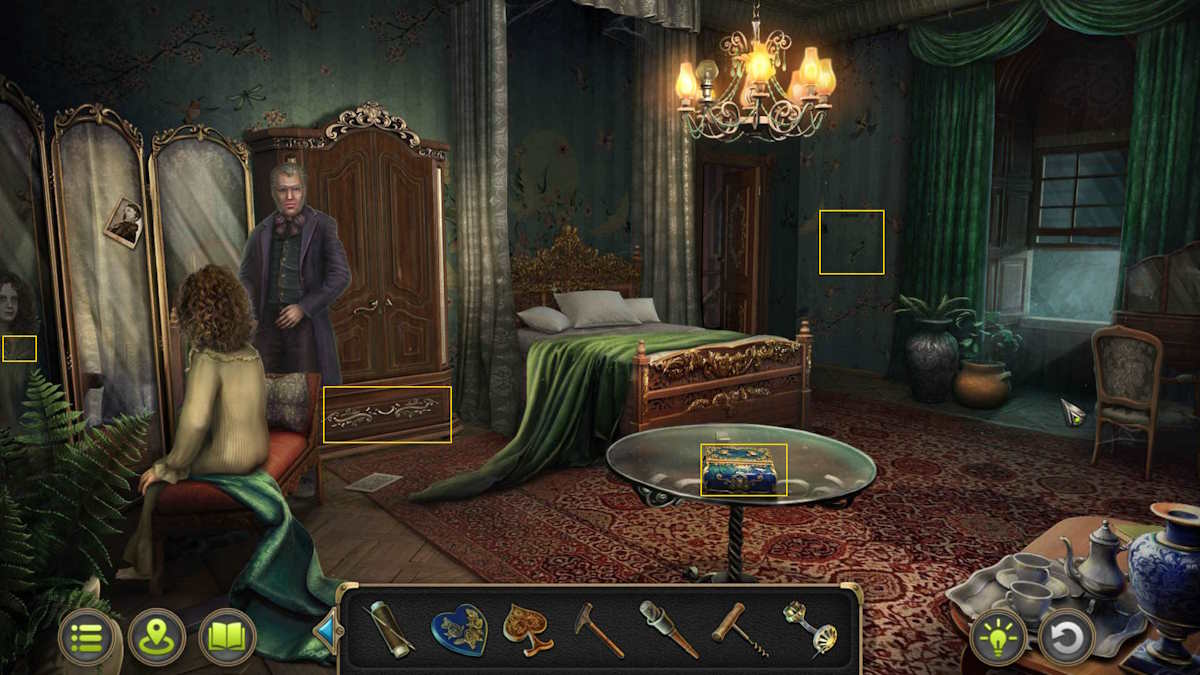
Deceased’s room
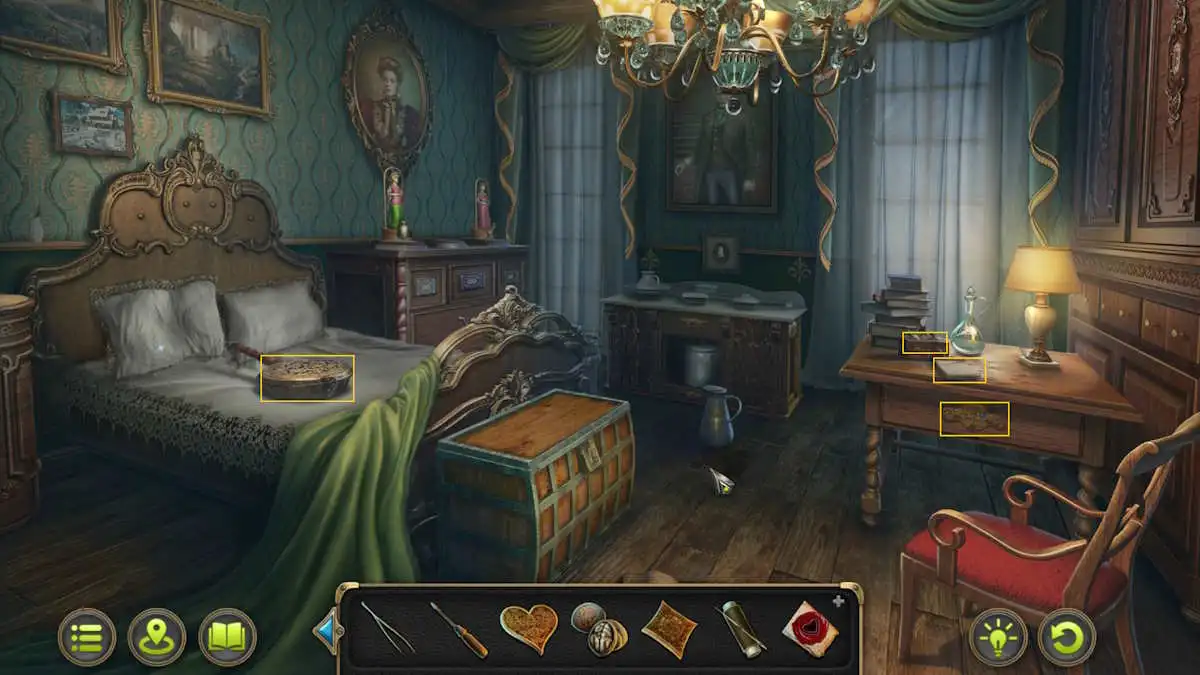
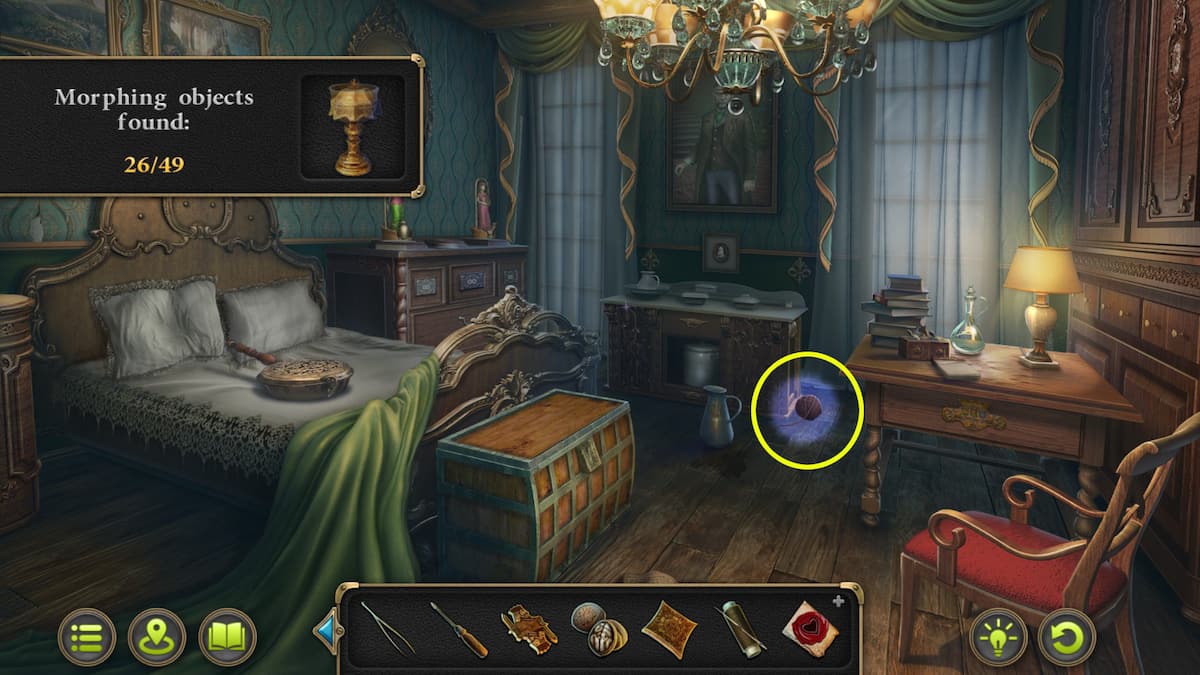
As a gamer, I’d say: Head back to Brothel Hall to chat with Mama Diana about getting a key. Once obtained, make a beeline for the door on the right, close to the deer head decor. Grab the notebook sitting on the desk over there and the warming pan from the bed. Heat up the pan to obtain some charcoal, then use it to scribble on the notebook, revealing a valuable clue.
Check the symbol on the handle of the right drawer in the desk and choose the “Clue” option to place it against the puzzle. The aim is to align the symbols according to the Clue’s arrangement. To accomplish this, utilize the gray “k” symbols as a guide for the symbols to travel along, leading them towards the rectangular openings for storage. It’s important to remove the middle and bottom parts first for proper placement. After solving the puzzle, read the Love Letters (Evidence 4/5) and pick up the Token. This room holds a Morphing Object and a Chess Collectible as well.
Go back to the Game or Billiard Room and find the token next to the machine with three drinks and a pipe. Utilize that token to obtain the Joker. Then, turn your gaze to the left and ascend the stairs. Employ the Joker on the painting you’ll find on the wall up there.
Joker puzzle
As a gamer, I’m on a mission to identify the twelve distinct elements that set the Joker card apart from the painting.
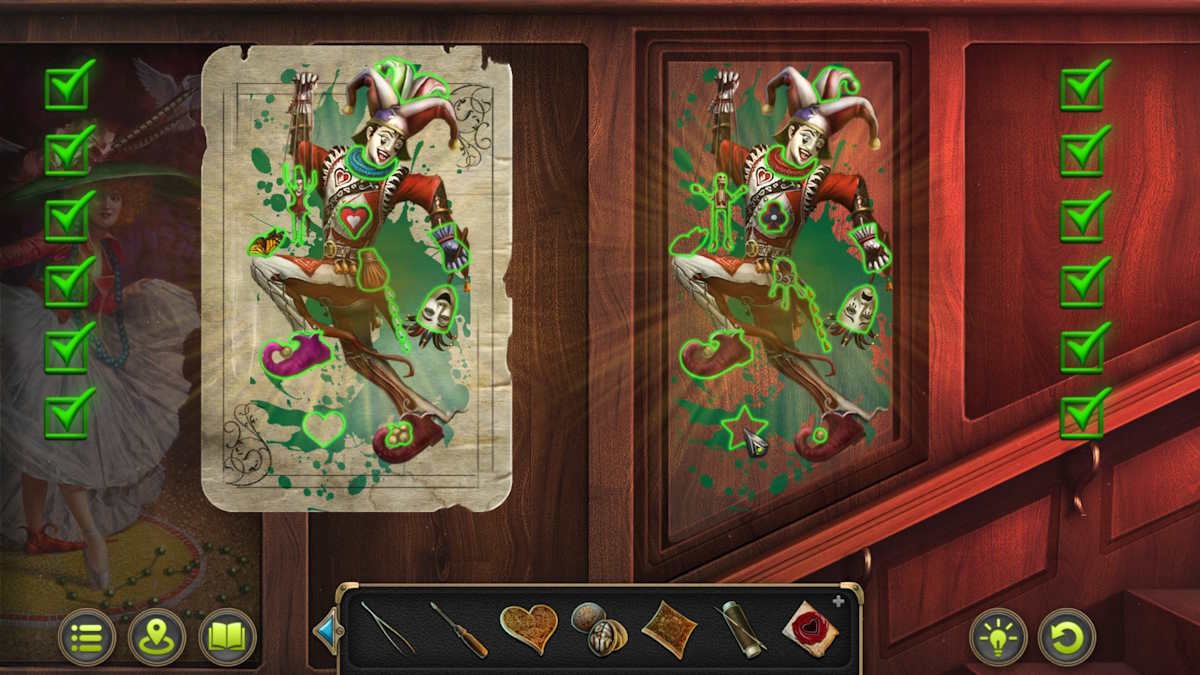
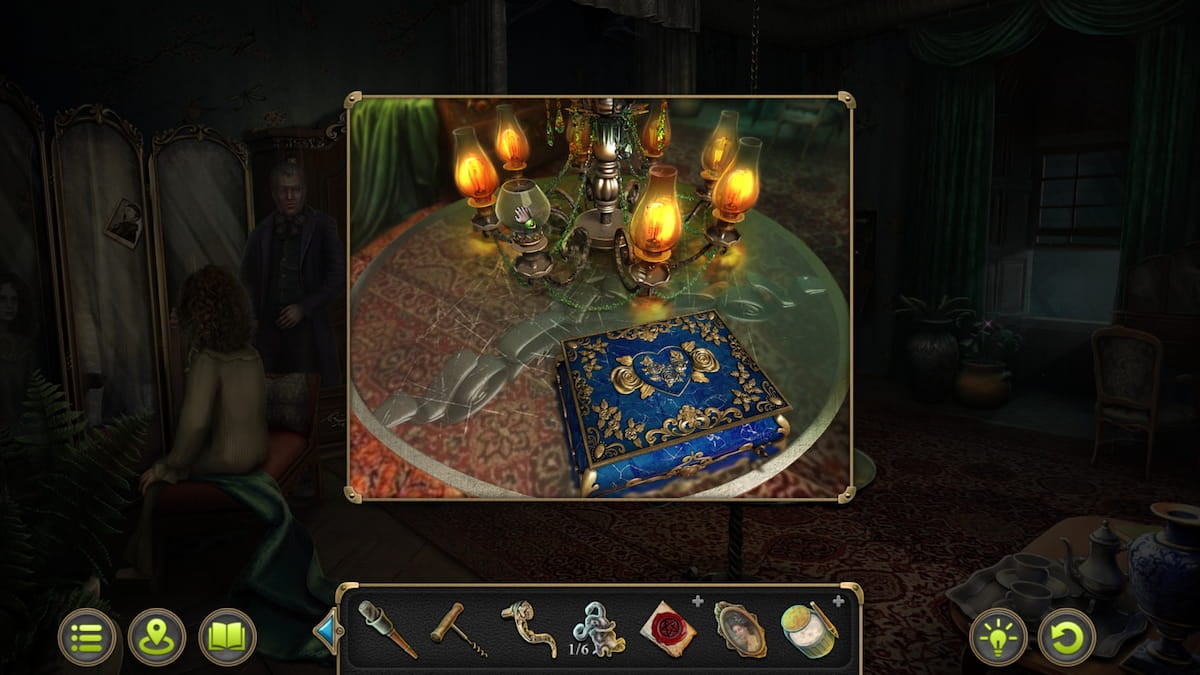
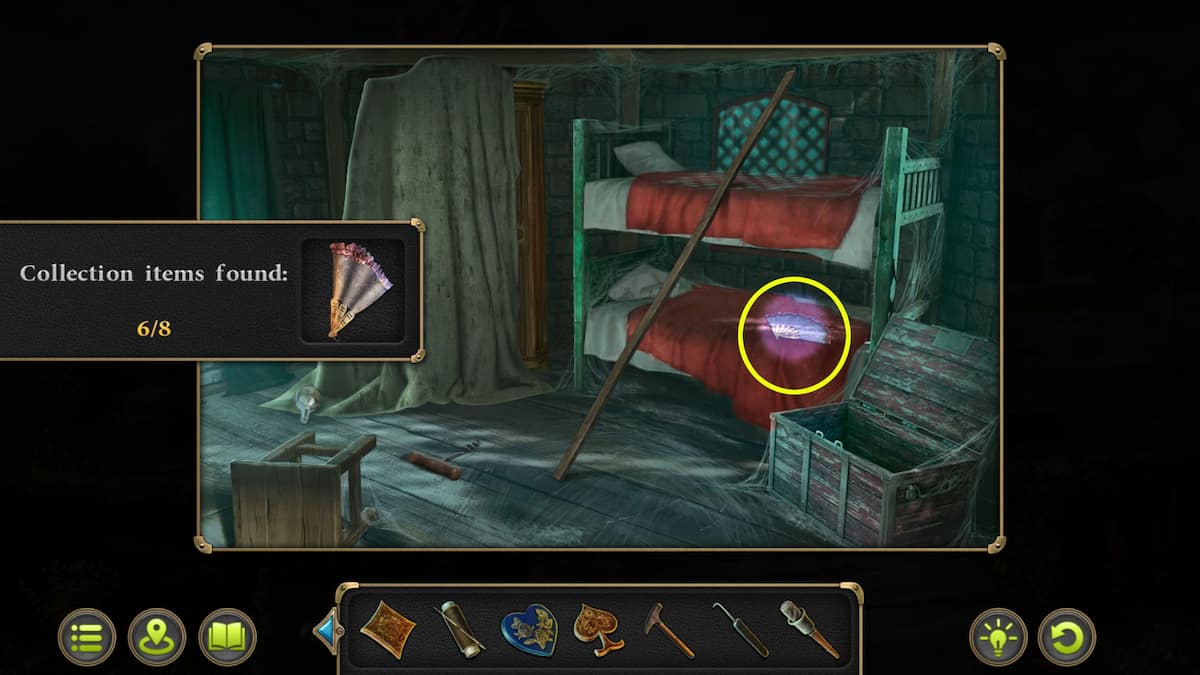
Once you’ve finished the puzzle, go out of sight and retrieve the figurine and key hidden behind the painting. Make your way back to the deceased’s bedroom and place the figurine in the center of the end table beside the bed. Find the heart on the desk, followed by using the key to unlock the chest at the foot of the bed. Take out the weight for the clock and part of the box from the chest. Lift the sheet to reveal the medallion with tweezers for safekeeping (Evidence 5/5). Head back to Diana, and utilize the weight for the clock on the left clock on the screen. Behind this clock, grab a lock pick, hammer, and a collectible fan.
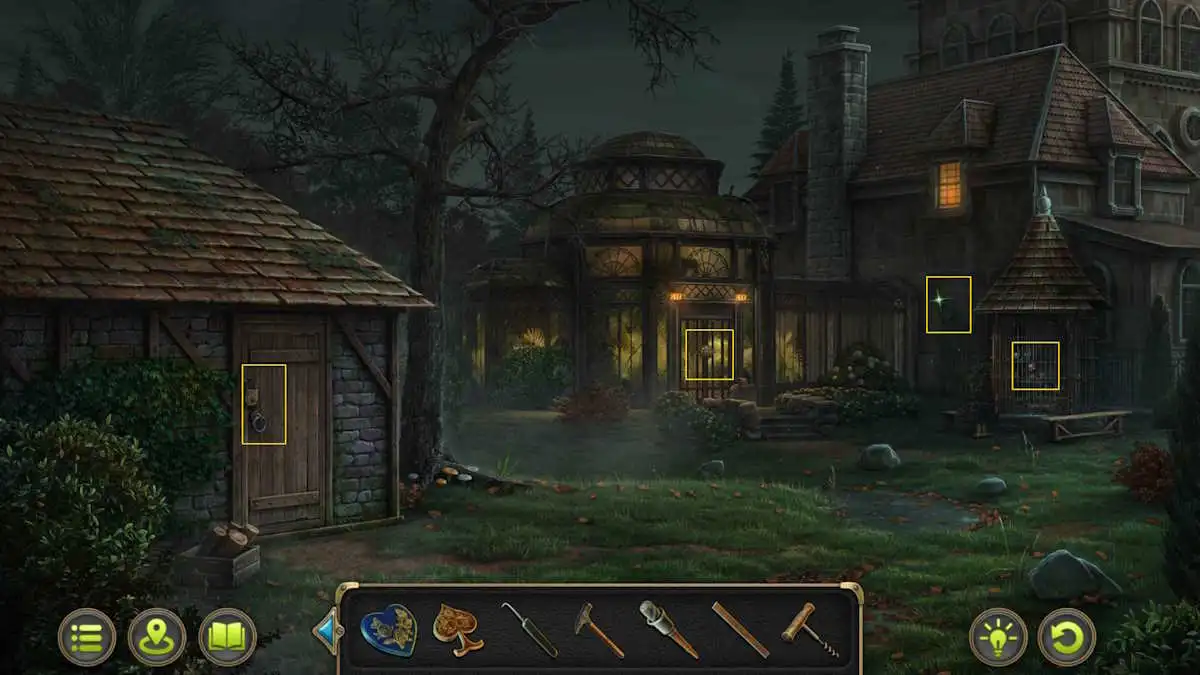
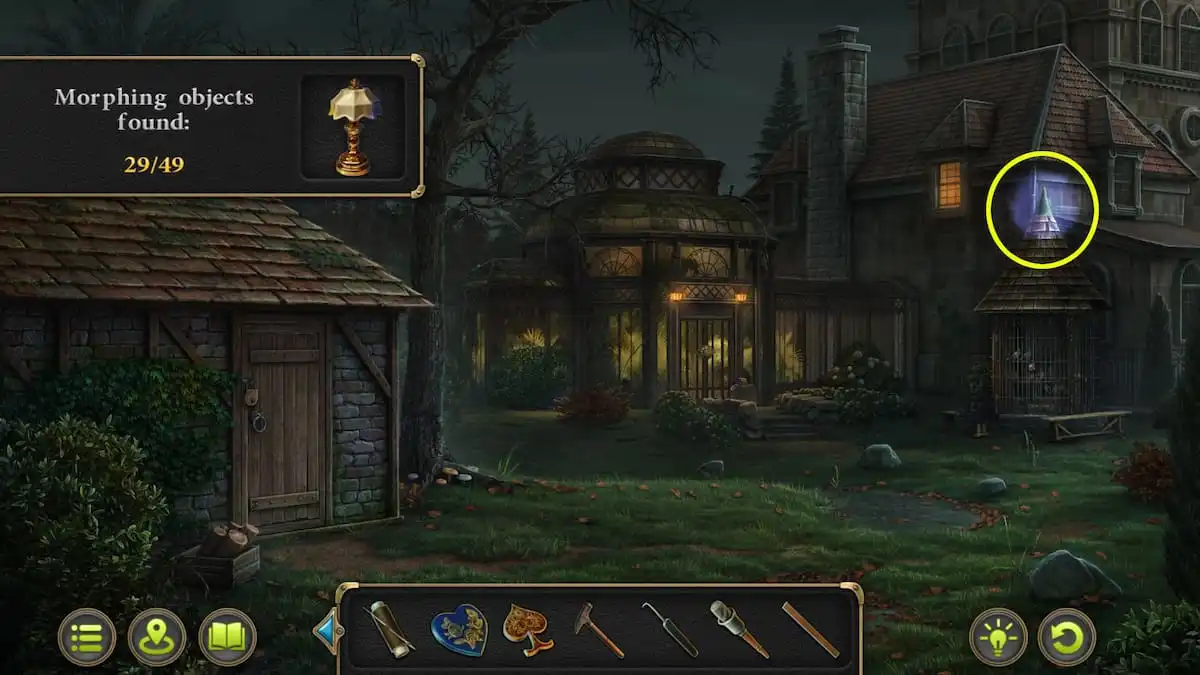
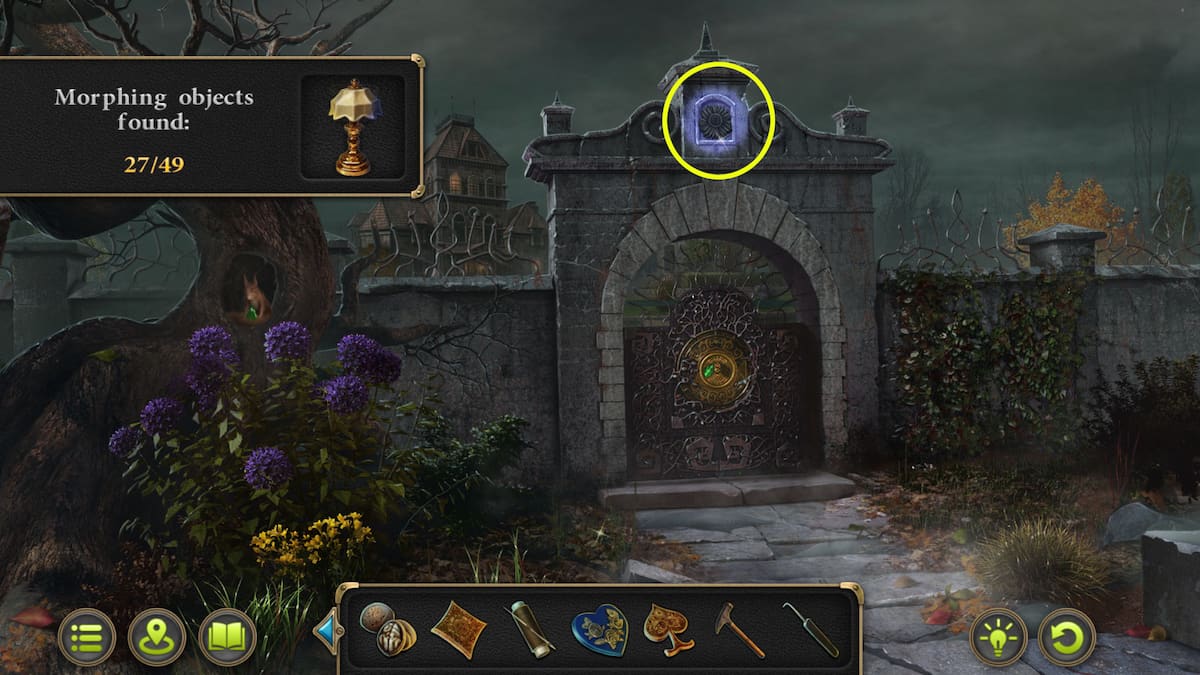
Head back to the Street, making your way this time towards the house atop the hill (click on the upper portion). Retrieve the “Fan trinket” hanging from the tree to the left and the “Transforming Item” suspended above the gate. Next, engage with the squirrel by offering it some “Nuts”; in exchange, you’ll receive a crucial piece of the lock. Insert this part into the gate before pressing it to unlock the next challenge.
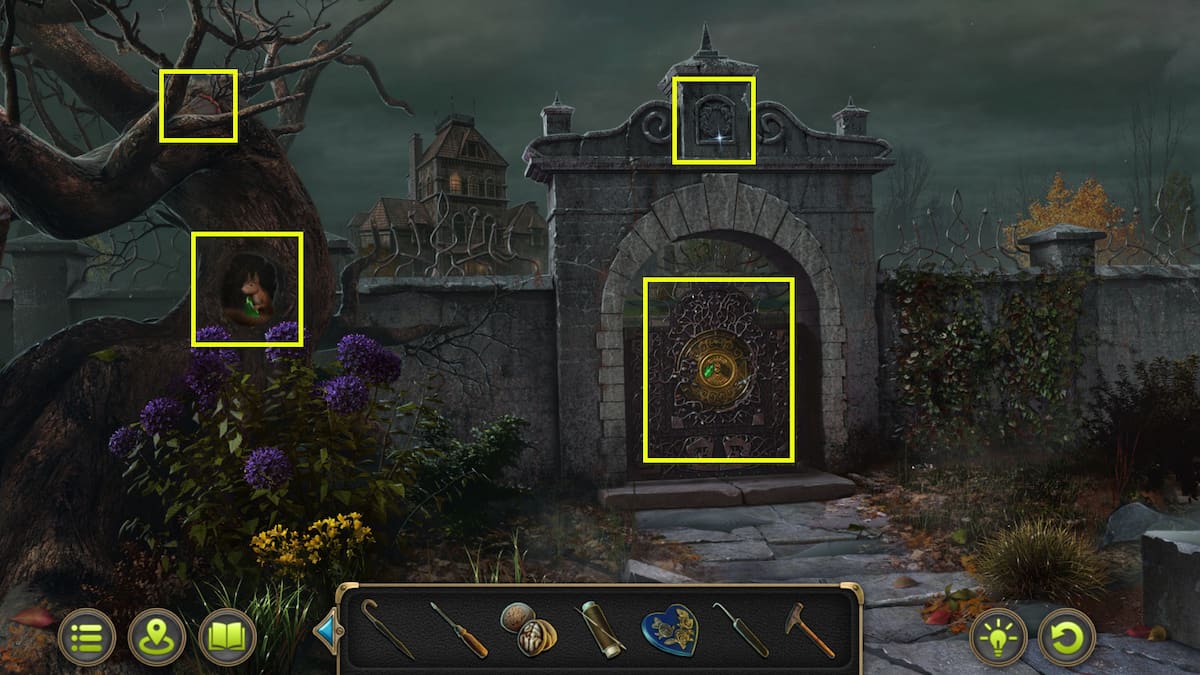
How to solve the gate puzzle
As someone who has always been intrigued by puzzles and challenges, I found these instructions for arranging triangular pieces quite fascinating. From what I gather, the objective is to position all symbols next to their matching ones, with the exception of the last two central triangular pieces. The strategy involves swapping the order of the final pieces while keeping the rest in order. Once that’s done, the remaining triangles can be placed accordingly.
Estate
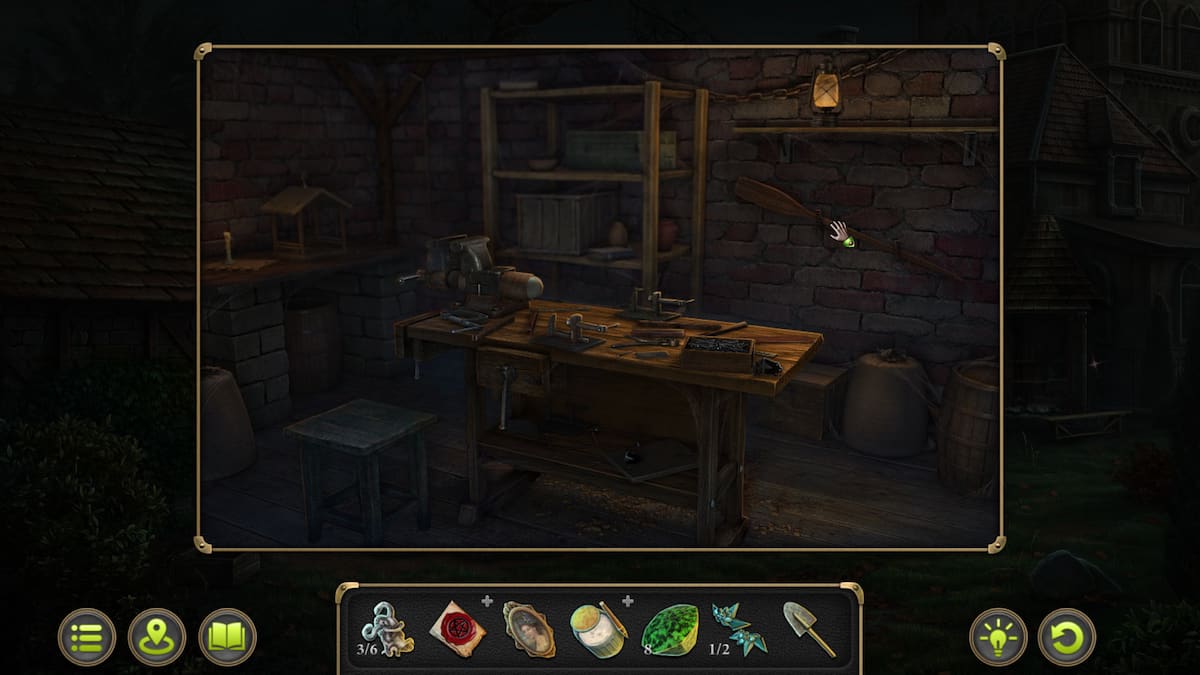
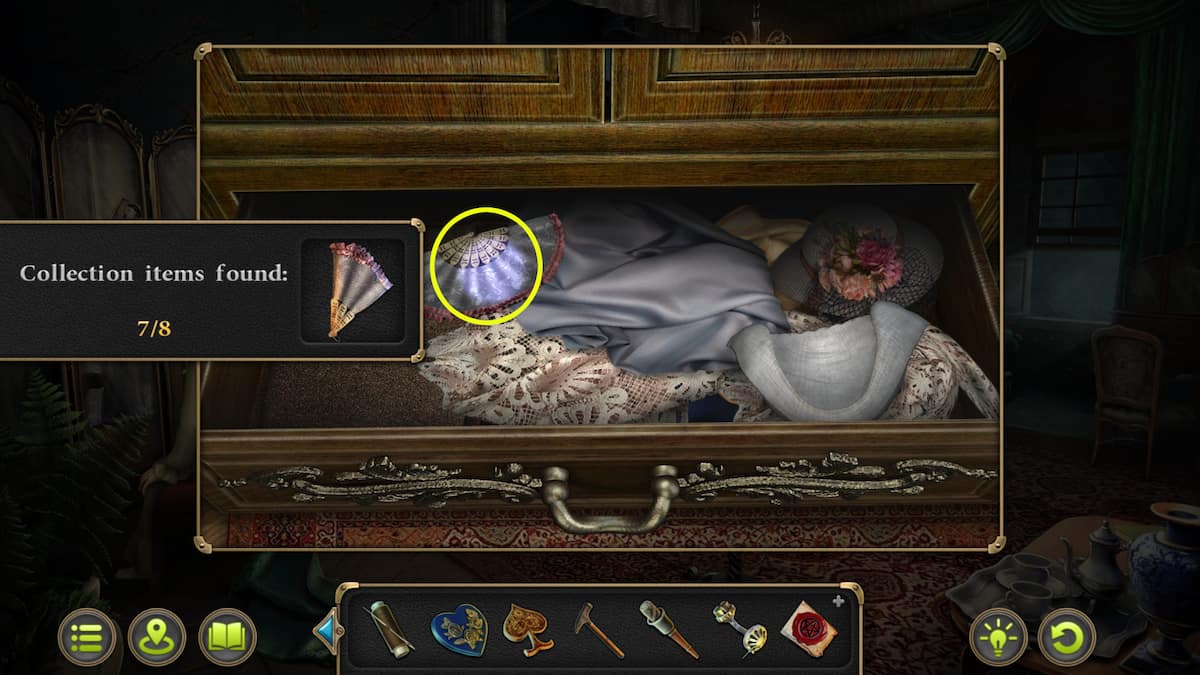
To talk with Lord Brian Shaw, go to the house’s left door, but he won’t allow you entry. Instead, press the right door to obtain the Torch. Once inside, grab the Fan Collectible lying on the bed, the Board in front of it, and the Corkscrew on the floor.
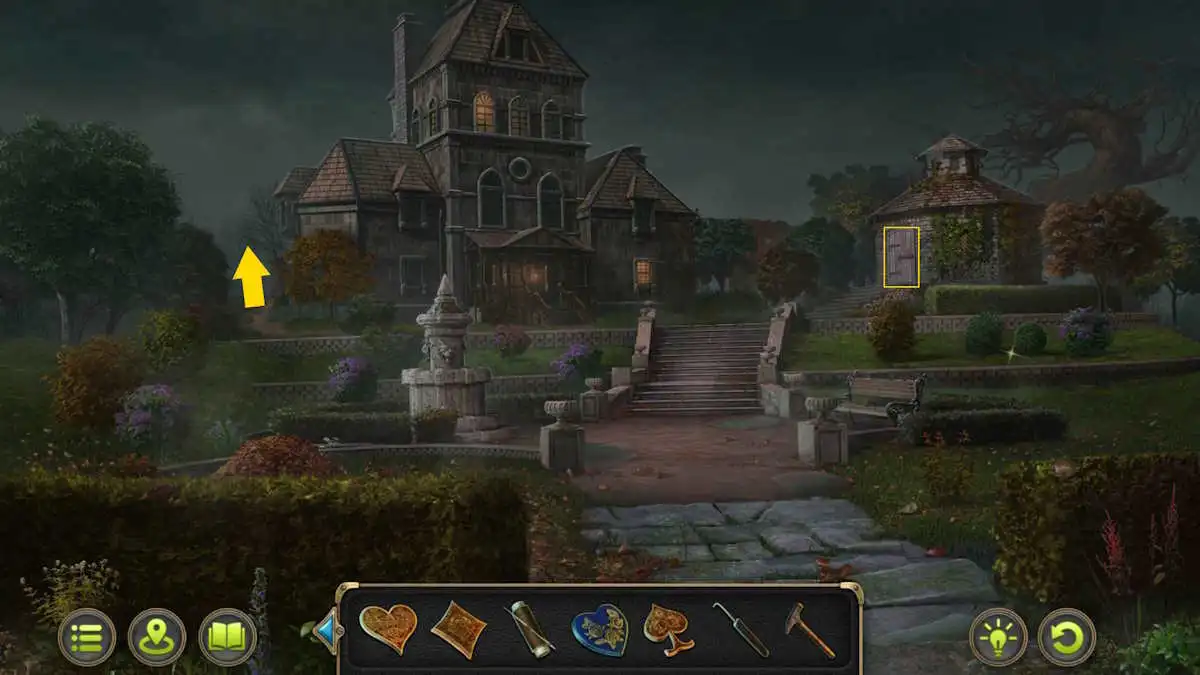
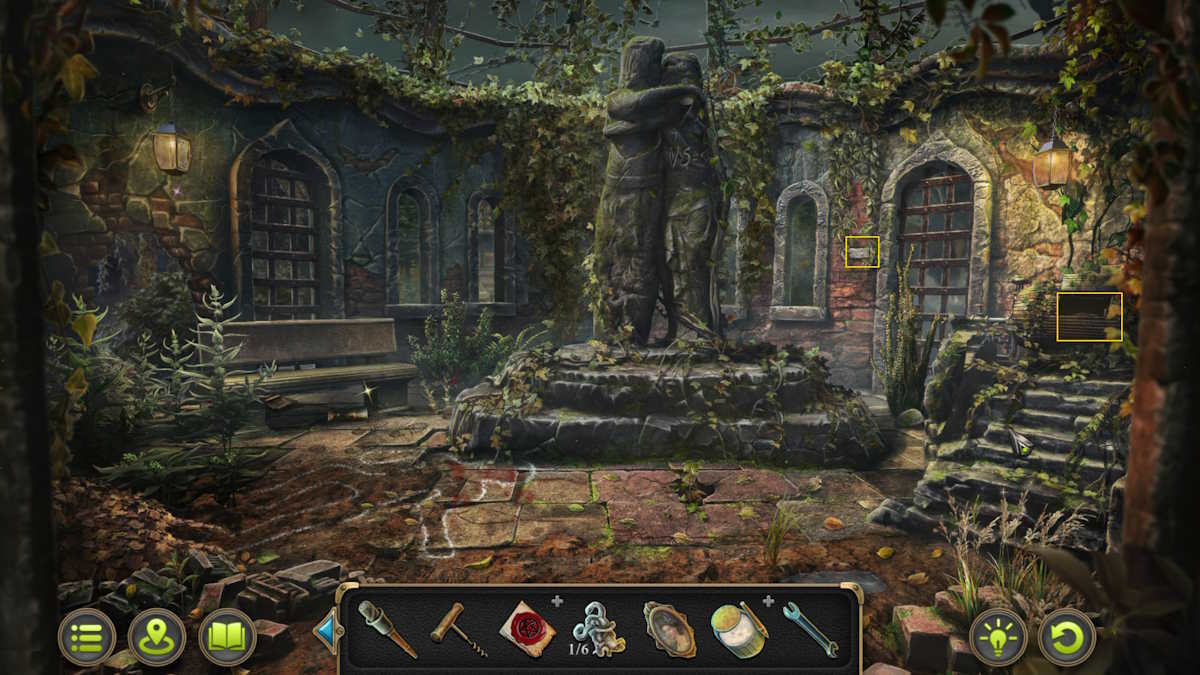
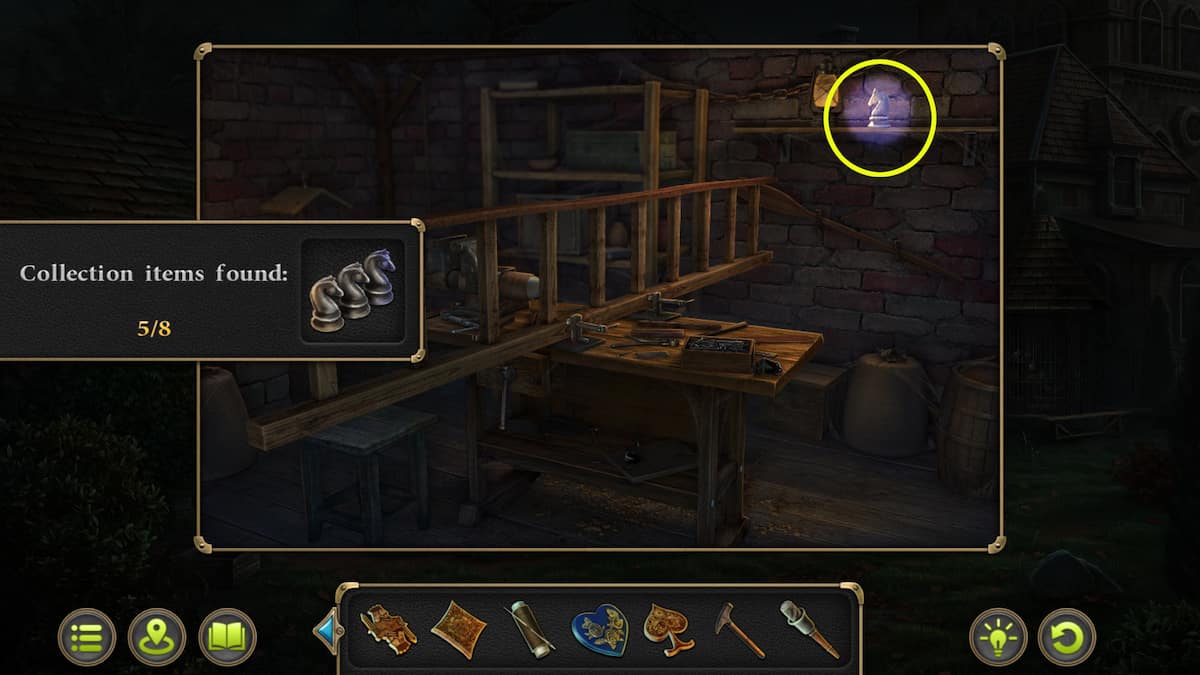
In the backyard, follow the path to the left (indicated by the arrow in the top image). Use a lockpick on the door you encounter there. Once inside, place the board onto the ladder, acquire some nails from the table, and attach them to the ladder using the hammer. Exit with the ladder (along with the collectible located at the top right corner of the image) and return outside.

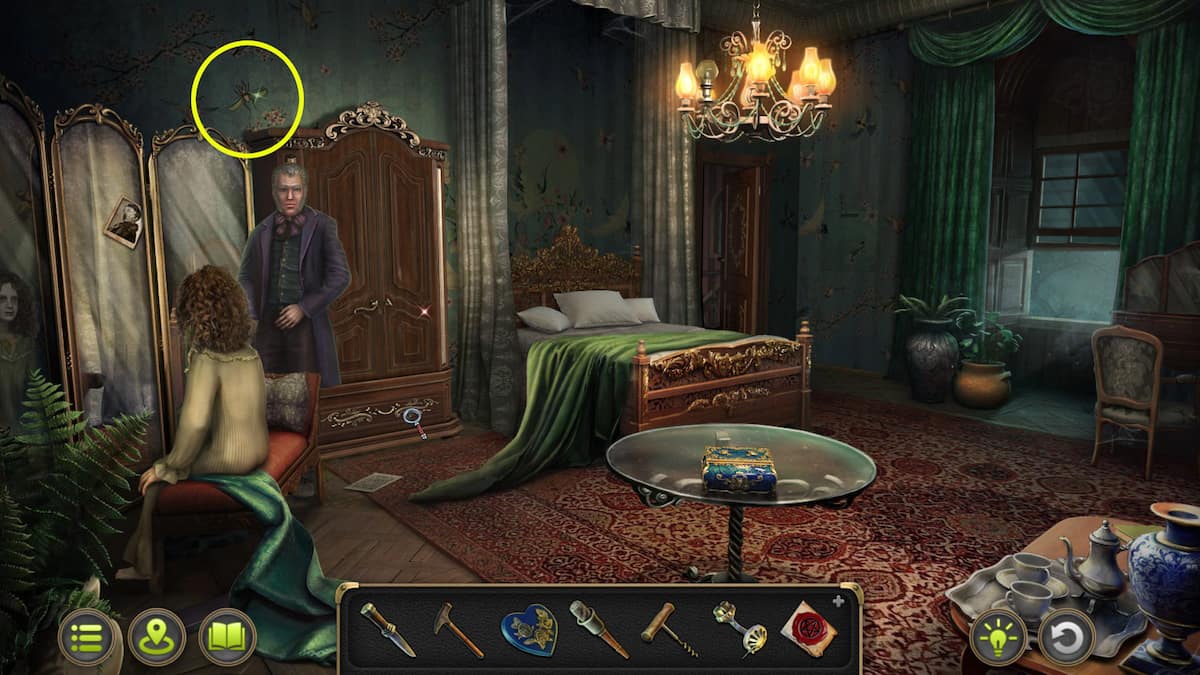
As a gamer, I’d set the ladder against the brightly glowing window first, then make my way up. I’ll find a “Tone Arm” there, keeping the window ajar, which I’ll grab before squeezing through the opening. Once inside, a cutscene will unfold, and eventually, I’ll get to chat with the father.
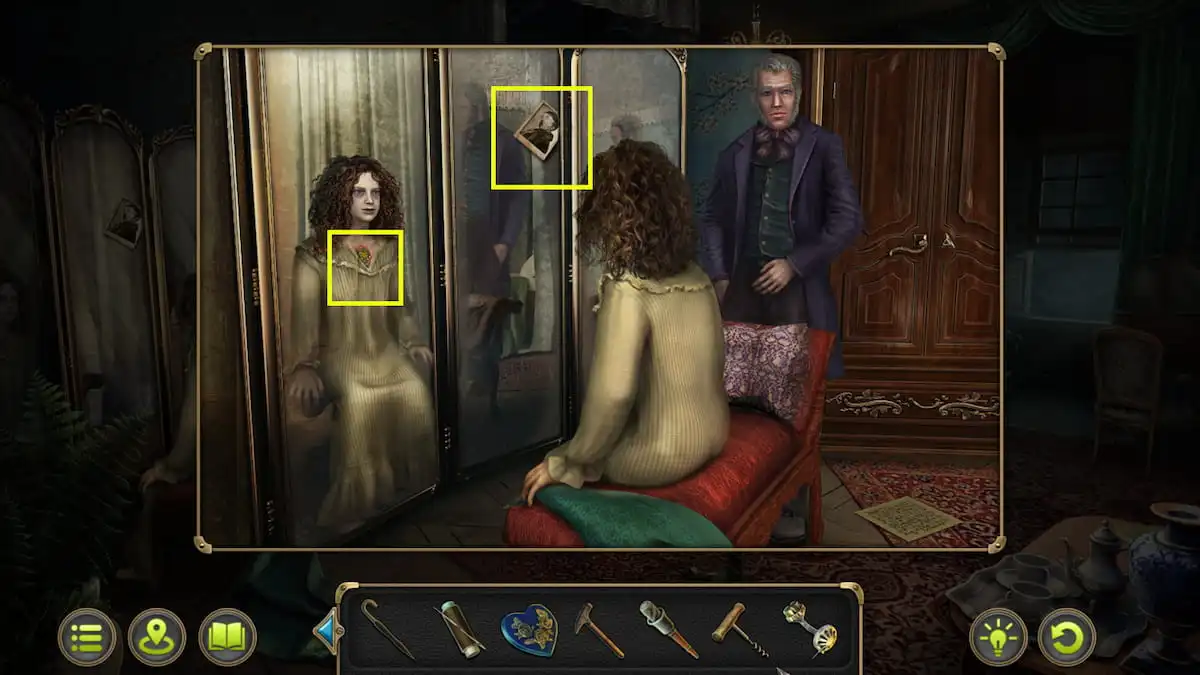
- Broach imbedded in the girl’s chest (Evidence 1/8).
- Open the drawer to the right of Shaw and move the clothes around until you uncover Cape without button (Evidence 2/8).
- Click the Collectible Fan while you are inside the drawer to acquire it.
- Look at the Photo on the Mirror (Evidence 3/8).
- There is a Morphing Object just above the wardrobe; it’s a dragonfly.
- You can also interact with the blue box on the table; put the Blue Heart from the Deceased’s Bedroom in it to open it up. You won’t be able to solve this yet.
- There is the Ceiling Light that you will need later.
- Crank in the wall is missing a gear.
- Planter has some disturbed dirt in it.

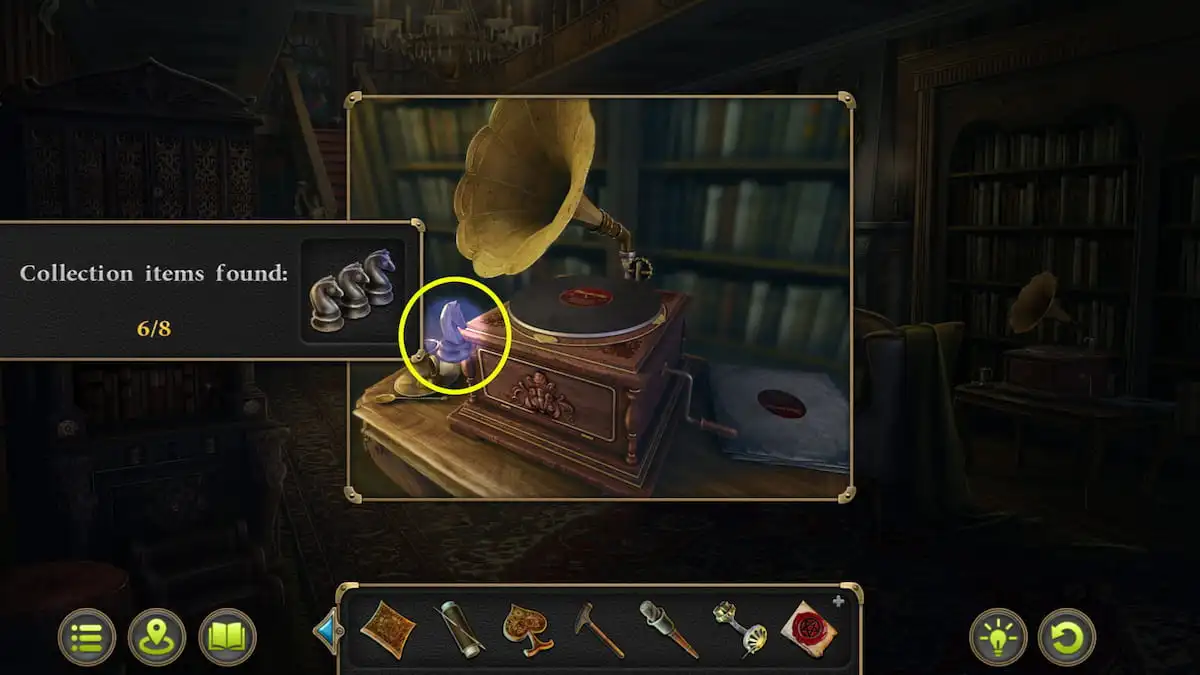
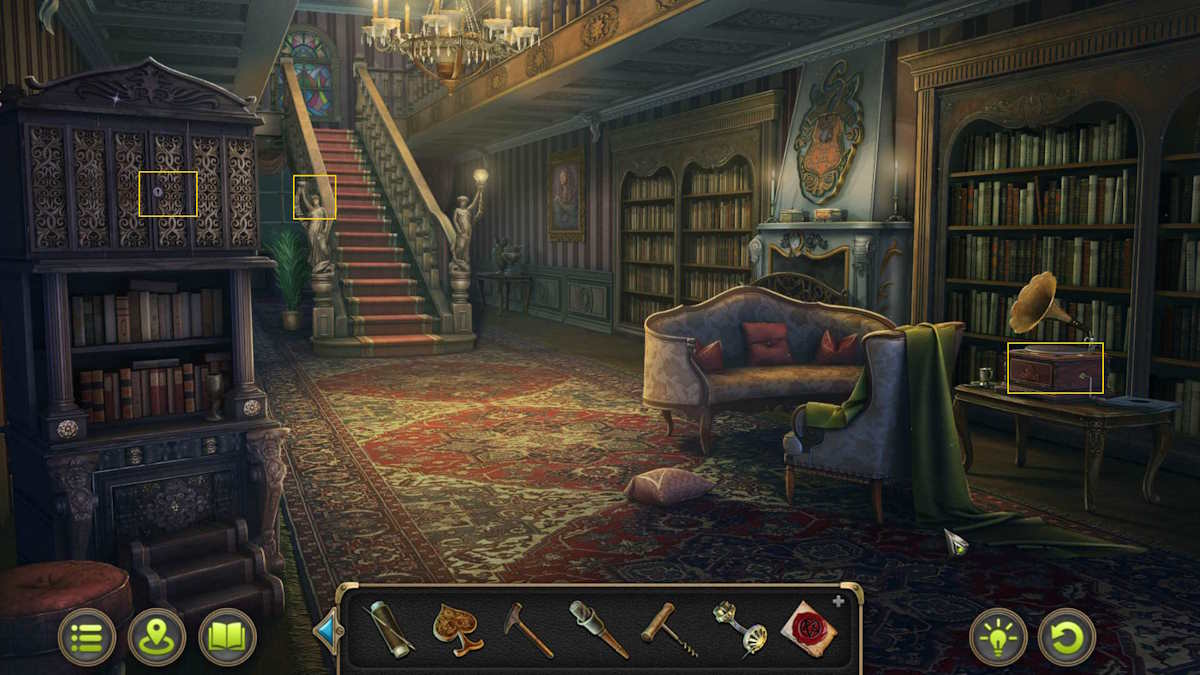
To reach the Estate, walk down the stairs and locate the doorway in the right corner. Position the “Tone arm” onto the “record player” situated on the right. Rotate the record player using the handle on its right side and retrieve the “Key”. Additionally, there’s a “Morphing Object” near the books on the left side, as well as a “Chess Collectible” next to the record player. Unfortunately, that’s all you can accomplish in this room for now, so it’s time to make your way back to the backyard.
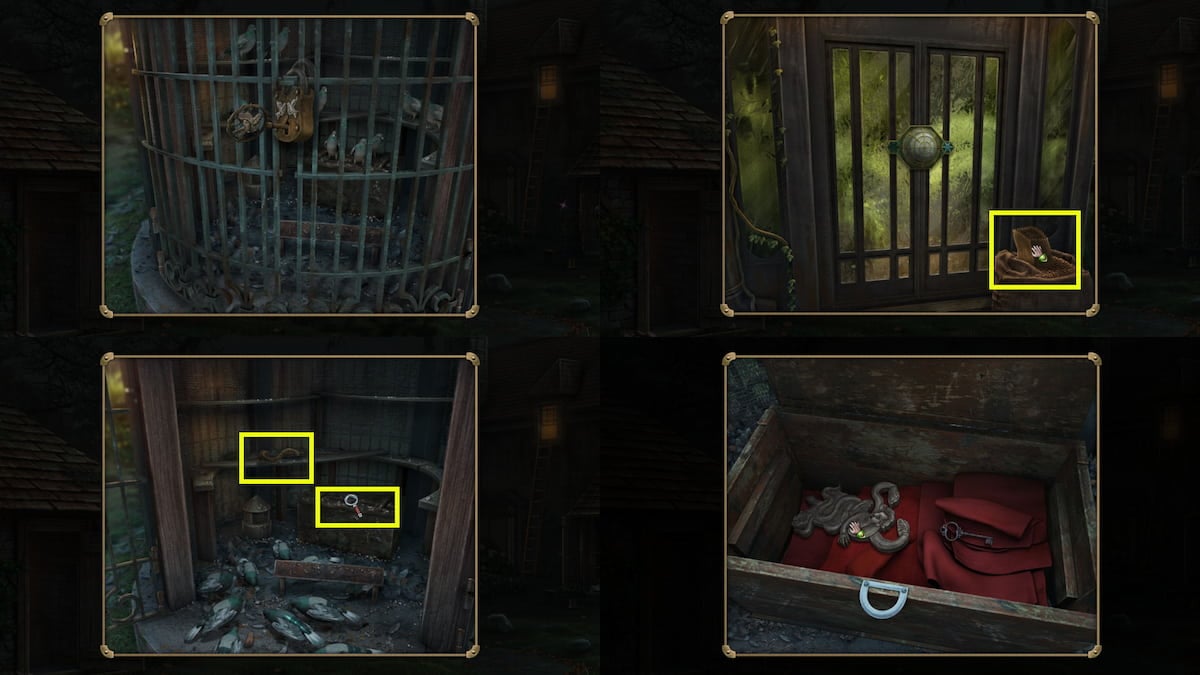
As a seasoned adventurer with countless hours spent solving intricate puzzles and exploring mysterious environments, I approach this task with confidence and excitement. Following the given instructions, I make a beeline for the birdcage and grasp the key dangling from it. My gaze then shifts towards the greenhouse door, where I notice a small pile of grain. With my experience in dealing with feathery creatures, I know that grain is an effective distraction. I scoop some up in my hand and proceed to toss it into the birdcage.
How to solve the Estate cupboard puzzle
Having spent countless hours immersed in the captivating world of puzzle games, I must admit that this seemingly uncomplicated challenge has left me utterly confounded on more than one occasion. The deception lies not in any hidden tricks or shortcuts, but rather in the intricate arrangement of blocks that demands a keen eye and meticulous planning.
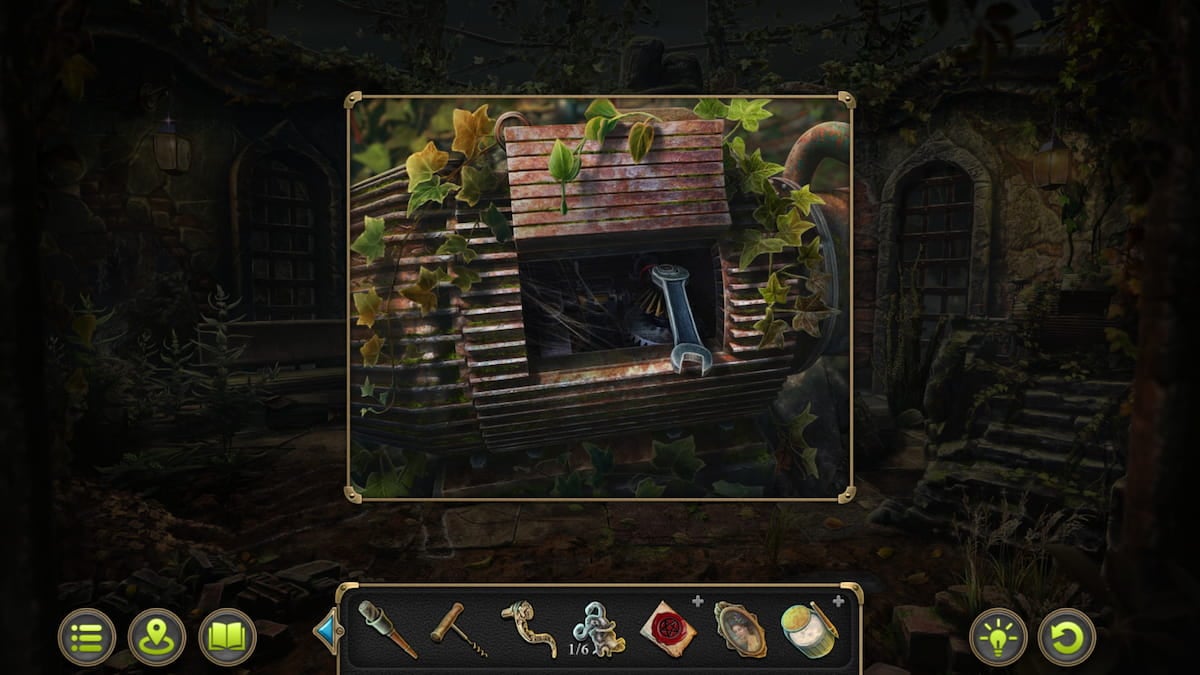
Later on, retrieve the Portrait from the cupboard, along with your grandmother’s Portrait which has a brooch (Evidence 4/8). At the same time, grab some Glue and a Wrench. Make your way back to the bedroom and utilize the Handle on the armoire to its right (next to Shaw) in order to discover Dirty Boots (Evidence 5/8).
With the help of the map, locate the spot marked as the “Site of Demise” in the Lower district. Use the tool on the right side of your screen resembling a wrench, followed by grabbing the nearby “Gear“. Make your way to the Girl’s Bedroom and employ this gear to mend the crank with a missing part situated at the back of the room near the door. Finally, once the crank is in working order, lower the light and seize the unlit “lamp” for further use.
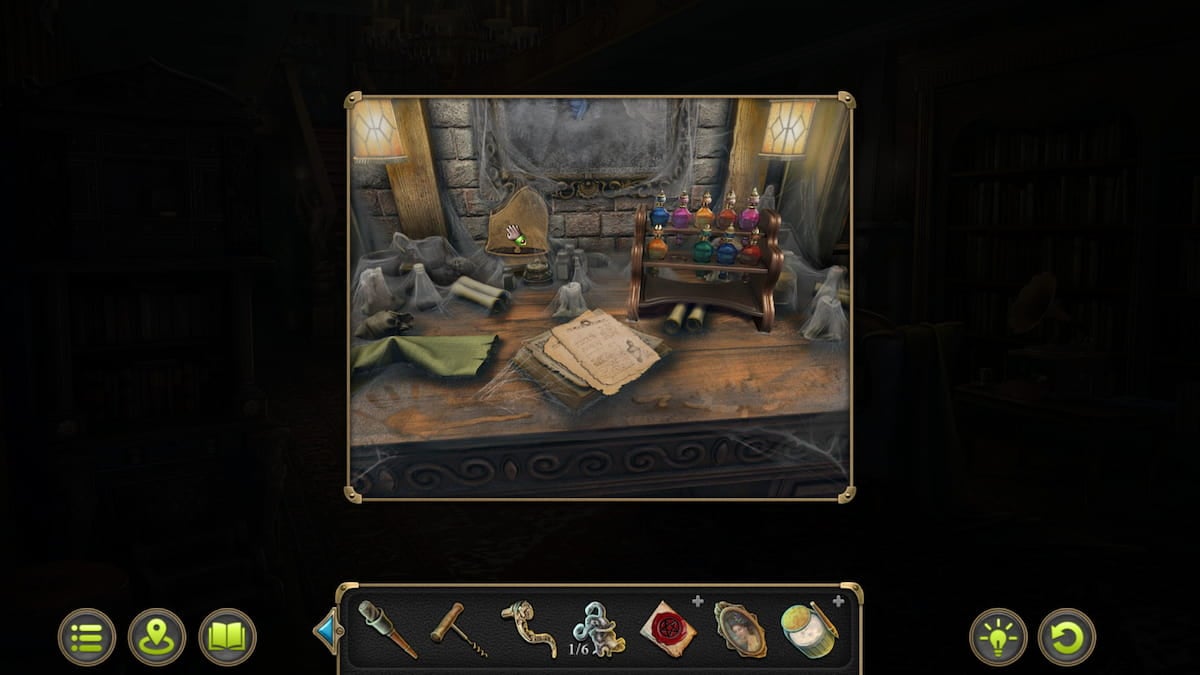
Return down the stairs and set the lamp on the banister to uncover a hidden room. Explore the documents on the desk for Grandma’s poison-related notes as indicated by Evidence 6/8; investigate the rack labeled as Poison rack according to Evidence 7/8. Lift the bell, which is located at the center of the desk beneath the painting.

Go back to the Billiards Room in the brothel and check out the balcony up above. Use a “Sewing Kit” with the torn cloth having various colored flowers, followed by a “Knife” to pick it up. Exit the Billiards Room and enter the “Lobby” of the brothel. Utilize the lit candle on the countertop to light the “Torch,” thereby obtaining the “Burning Torch.” Finally, make your way back to the Girl’s room to tackle the Blue heart enigma.
How to solve the Blue Heart puzzle
As a seasoned puzzle solver with years of experience under my belt, I wholeheartedly recommend approaching the challenge at hand with a strategic mindset. Use Clue as your trusted guide to uncover the final intended pattern. You can click it repeatedly to reveal or conceal its presence within your view. The ultimate goal is to align those colors, and I’ve found that organizing them in a single vertical line is an effective strategy. Once you have one line sorted, adjust the positioning of other lines horizontally to ensure proper order. Begin in the upper right-hand corner and systematically fill in the correct colors as you progress. For additional assistance, feel free to reference the provided video. Trust me, this method has earned me countless successes in similar puzzles and will undoubtedly help you secure another Bas Relief (2/6), along with some intriguing dialogue with Shaw. Good luck!
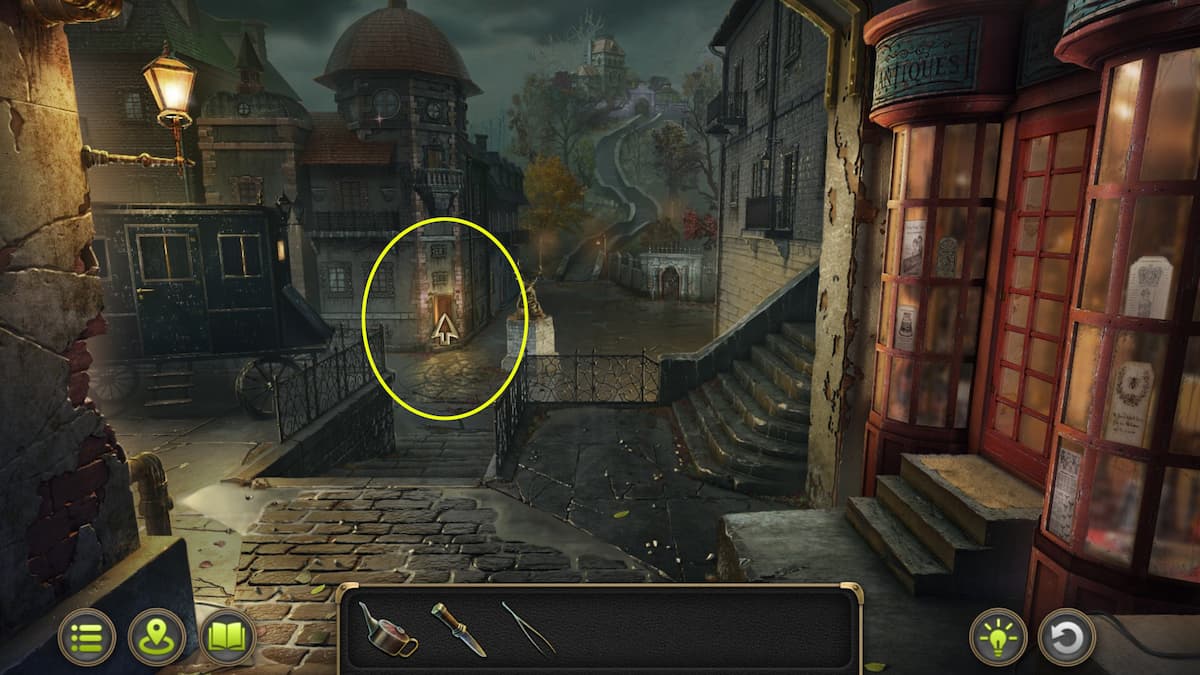
How to unlock the cemetery
At night, Shaw instructs you to go to the cemetery, but unfortunately, it is secured and not accessible. To enter the cemetery, you must present 15 metal roses at the gate. Obtain these roses from the antique shop, which can be found through the red door in the Street. Before you can collect the coins required (seven in total) from your carriage, make sure to interact with the shopkeeper and ask about the price of the metal roses.
All coin locations
Head to your carriage and you’ll find the coins scattered around in these locations:
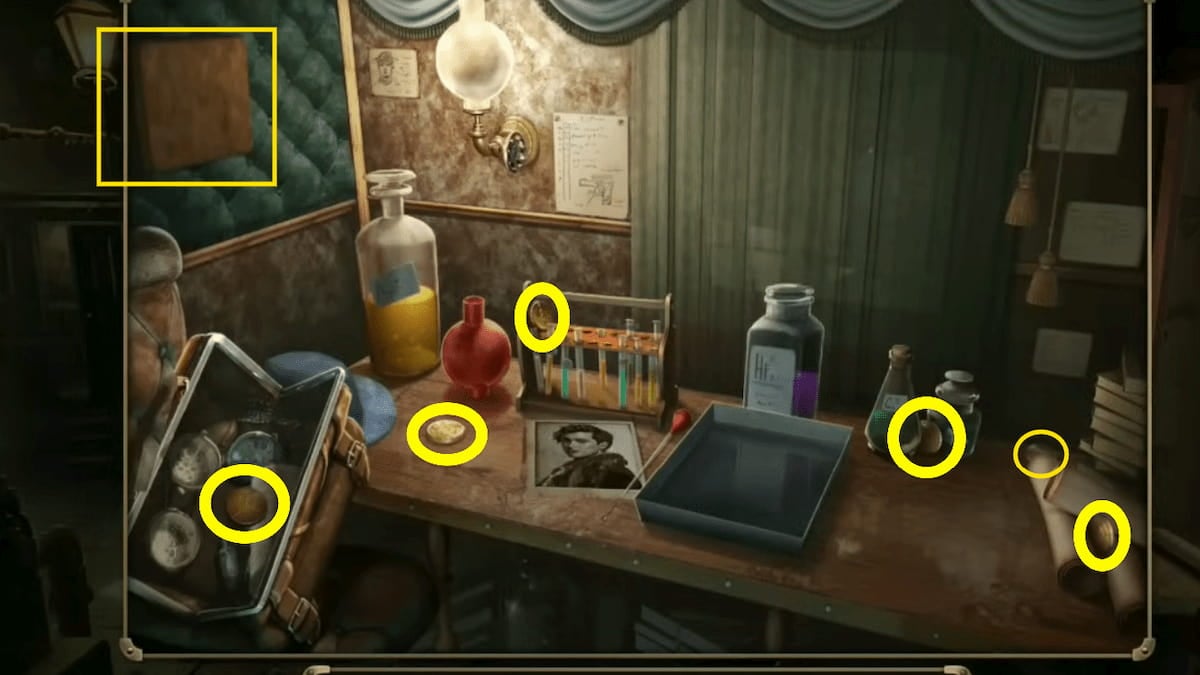
Where to find all 15 metal roses
With seven coins now in hand, your next task is to locate every rose in the store. Some of them are easily visible, but others will necessitate engaging with various boxes, bags, and other items within the shop to uncover their hidden locations.
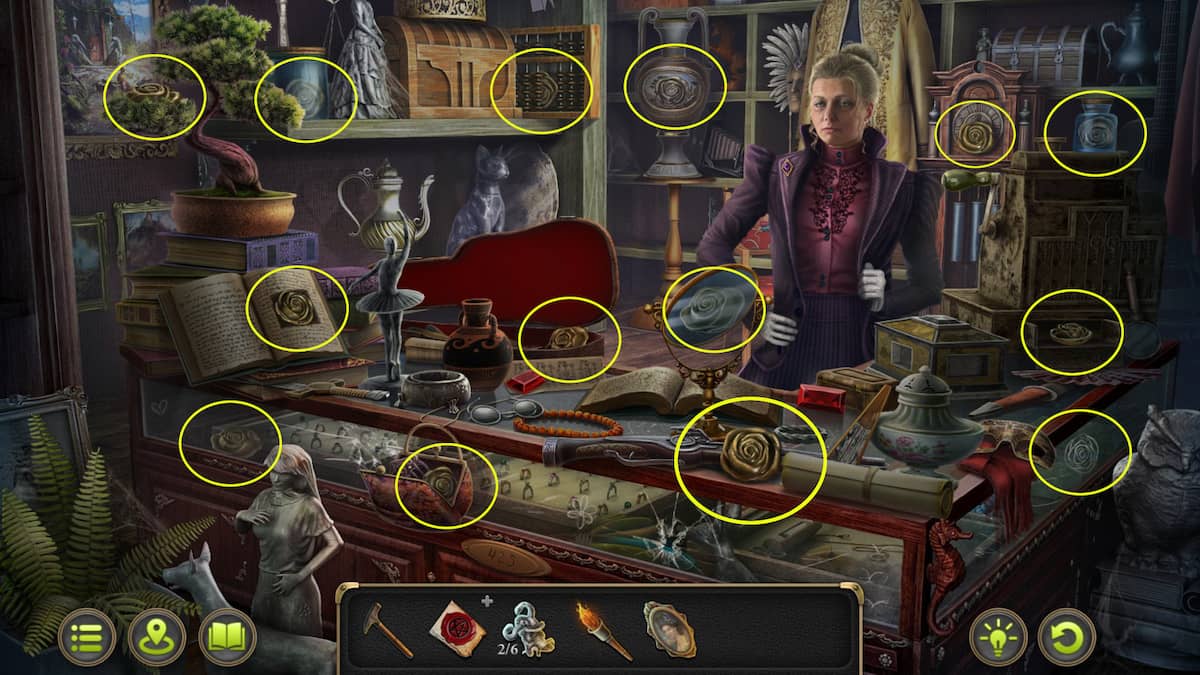
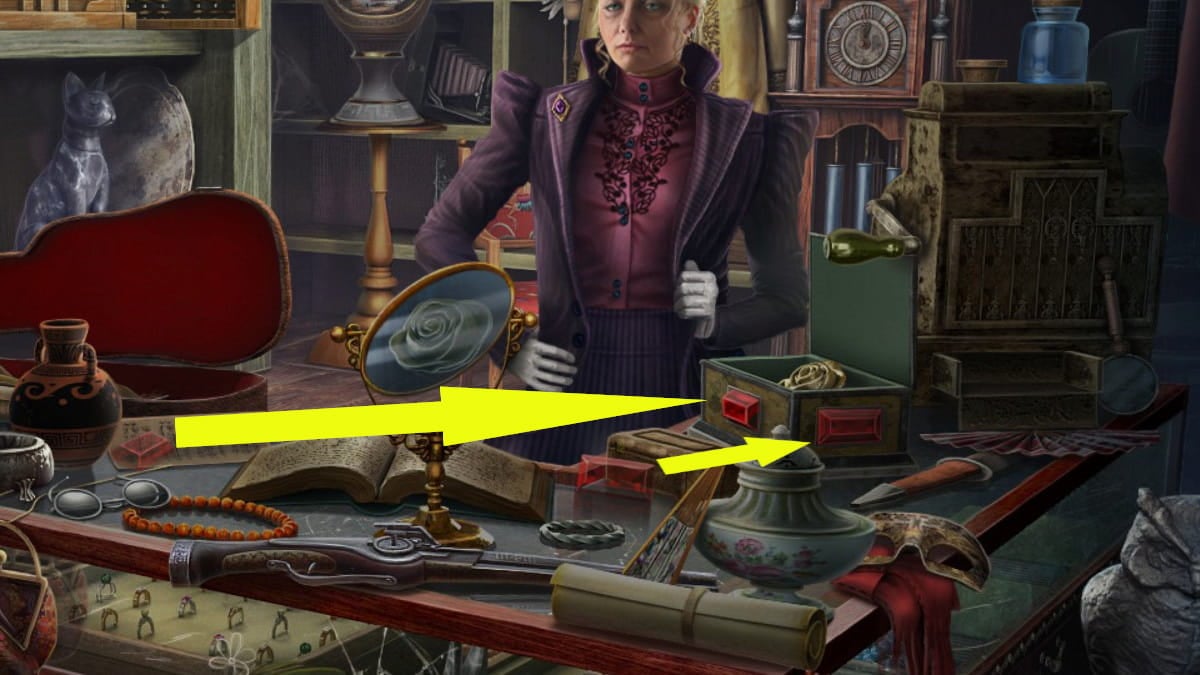
In the snapshot provided, you’ll find a box situated next to the cash register. To unlock it and retrieve the rose, kindly place the two red gems found on the counter into this box.
After gathering all fifteen metallic roses, place them into the “Cemetery Gate” for insertion. This action will trigger the solution to the Cemetery Gate enigma.
How to complete the Cemetery Gate Puzzle
As someone who has spent countless hours solving intricate puzzles, I completely understand the frustration of getting stuck on one. But fear not, dear puzzle enthusiast! I have been in your shoes before and I want to help you out.
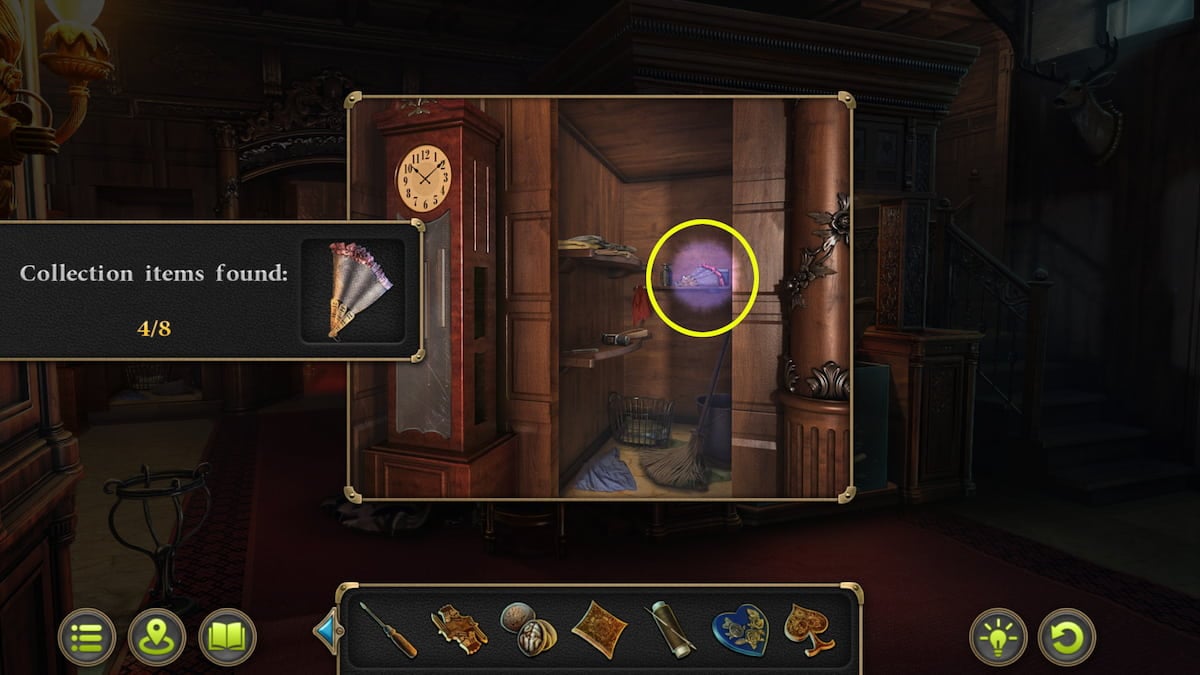
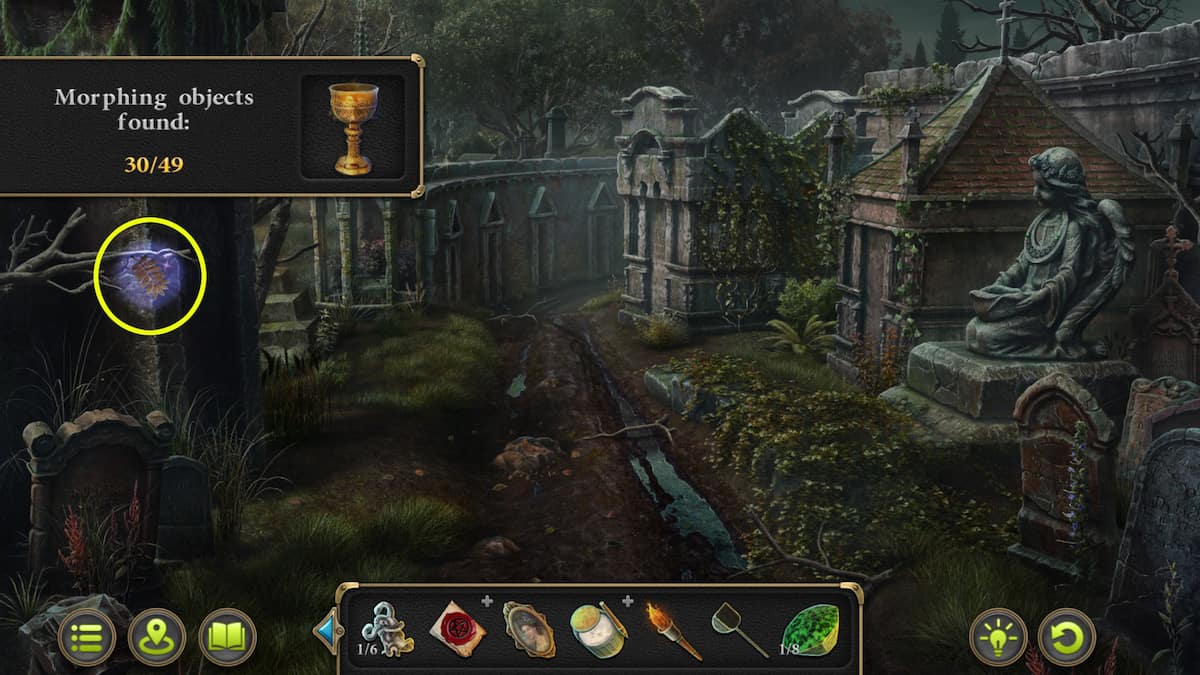
Inside the Cemetery
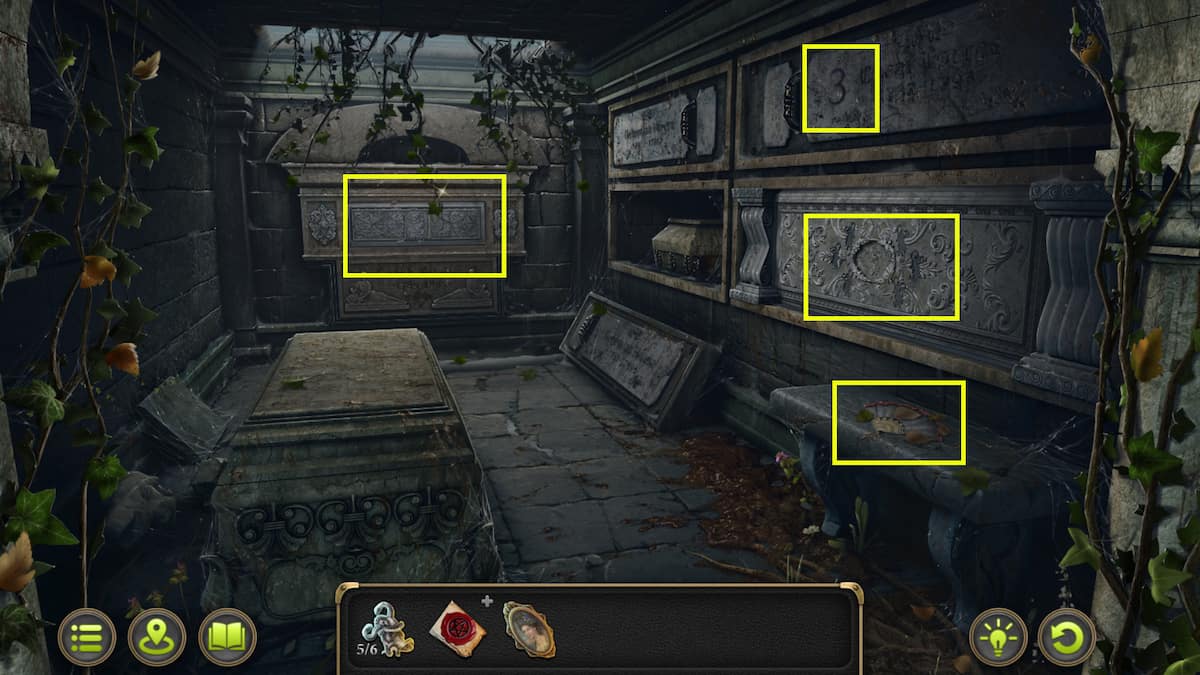
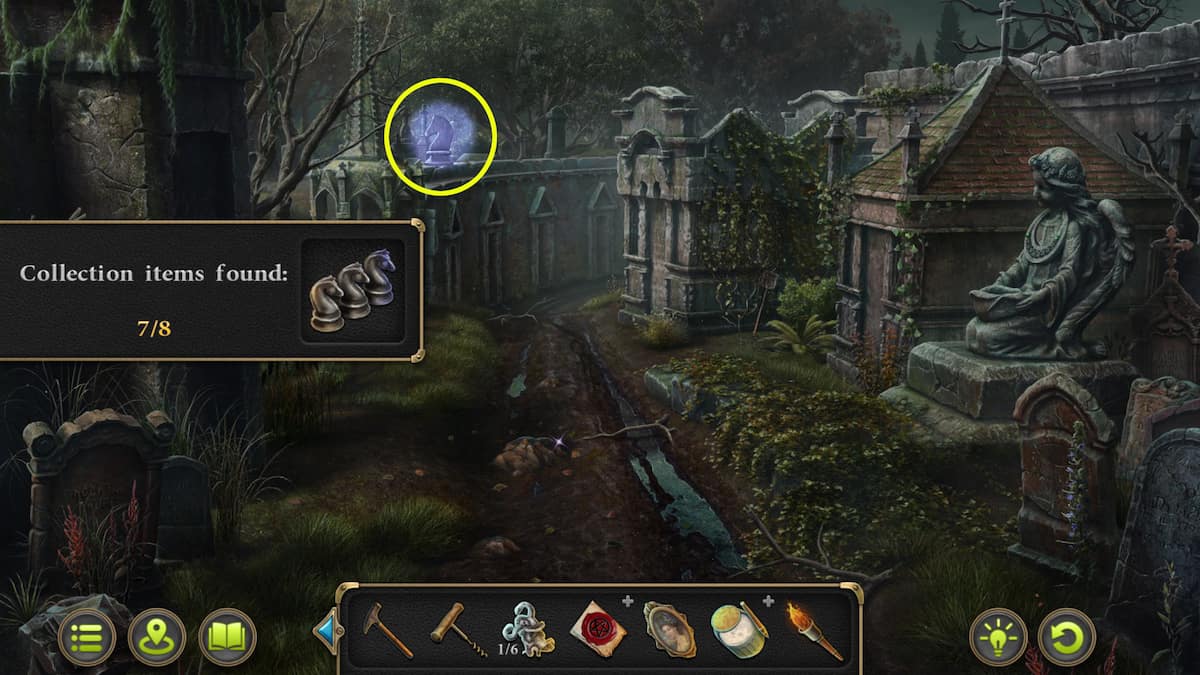
After the gate is unlatched, feel free to enter the cemetery site. This area consists of multiple sections, with the initial one being particularly noteworthy. The ensuing description will commence with the item located on the left side of the screenshot that follows.
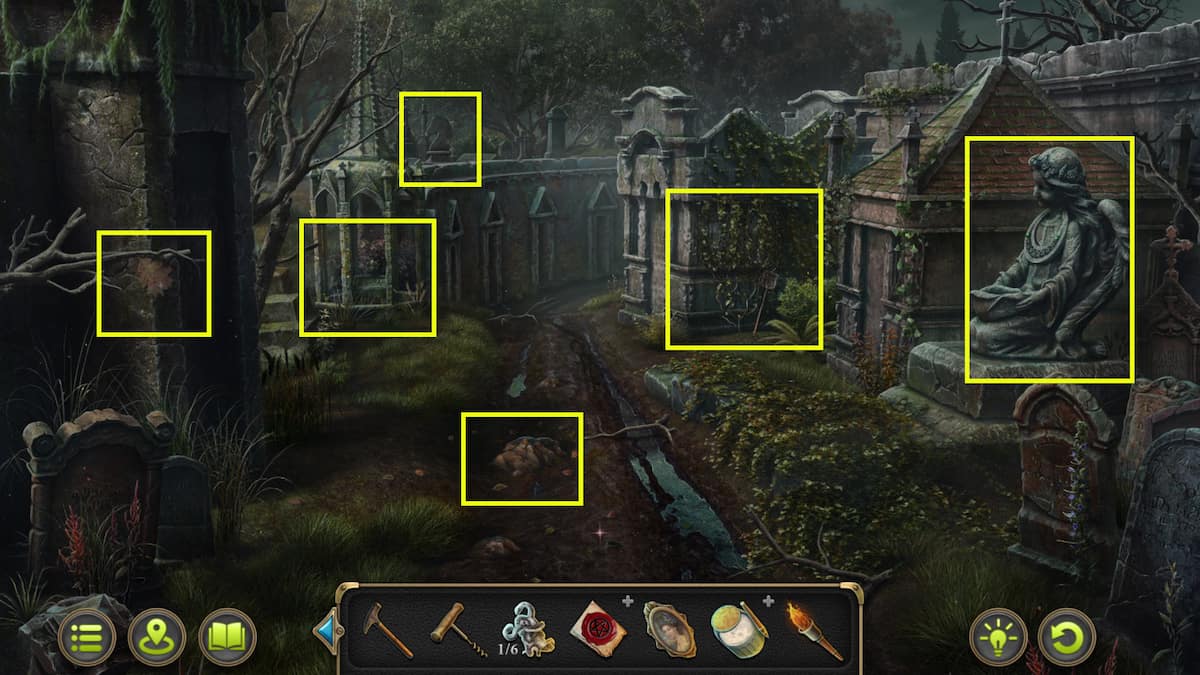
- All the way to the left, there is a leaf that is a Morphing Object hanging off the branch above the tombstones.
- There is a Chess Collectible in the upper middle of screen, above the path.
- Just below the chess collectible is a little grave area; on the stone in this little location is an Emerald (1/8)
- In the middle of the road is a stone with a Piece of the Box located in it. Break the stone with a Hammer to take it out. It will be dirty, but you can clean it later.
- To the right of the path is an overgrown patch of vines. Pick up the Hand Net from beside it.
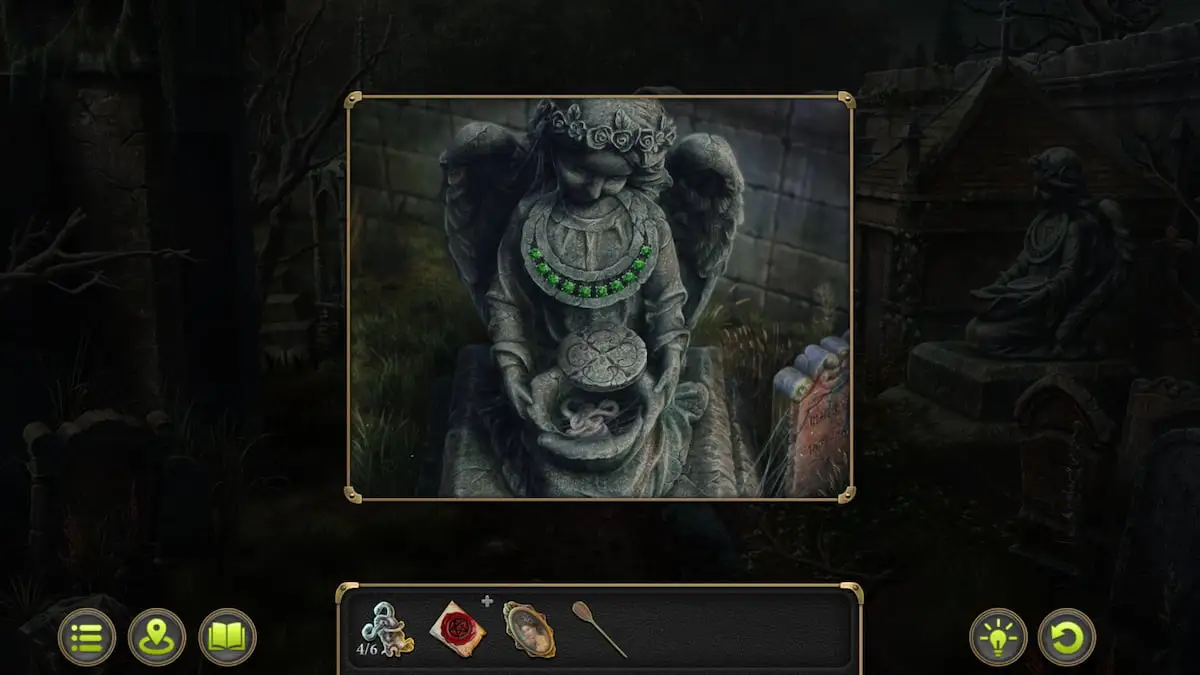
- There is an angel statue to the far right; it is missing the emeralds around its neck. You’ve already found one of these, and the rest are easy to track down.
With the acquisition of a hand net now, you’ll be able to employ it by the tranquil pond adjacent to Oscar Brown’s residence. Retrieving a billiards ball from there is your next task. Later on, transfer this ball to the billiards room situated in the brothel and place it on the pool table. Knocking the star piece out of the netting covering the pool table will be the outcome of this action.
All Part of Box pieces for the Billiards Room box
After shattering the stone and obtaining the “Box Piece” inside, you should now possess all the required components for the box lid in the Billiards Room at the Brothel. However, the piece extracted from the stone is soiled. To clean it, make your way back to the Estate Front Yard and interact with the “Fountain.” Utilize the “Cork Screw” to dislodge the fountain’s cork, revealing clean water for washing the “Box Piece.”

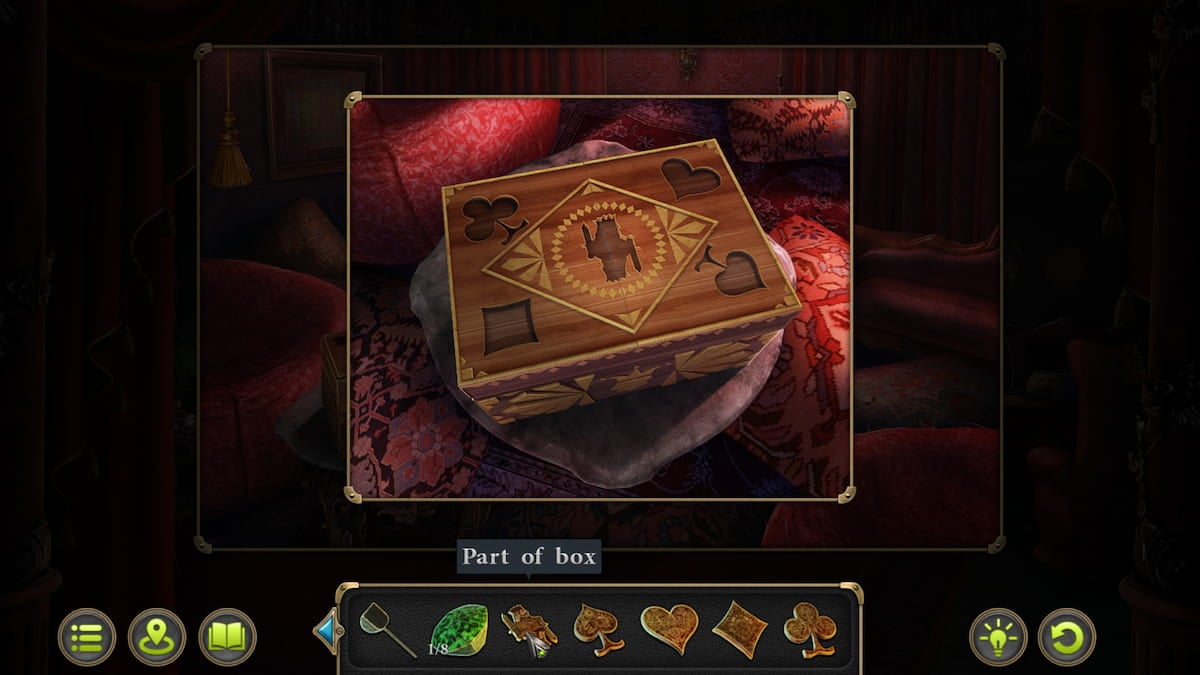
How to complete the Billiards Room box puzzle
To solve this puzzle effectively, first connect the edges of each piece so they align perfectly. Ensure all lines are linked, and continue rotating the pieces until there are no more dangling ends. As a reward for your efforts, you’ll receive another Bas Relief segment (3 out of 6).
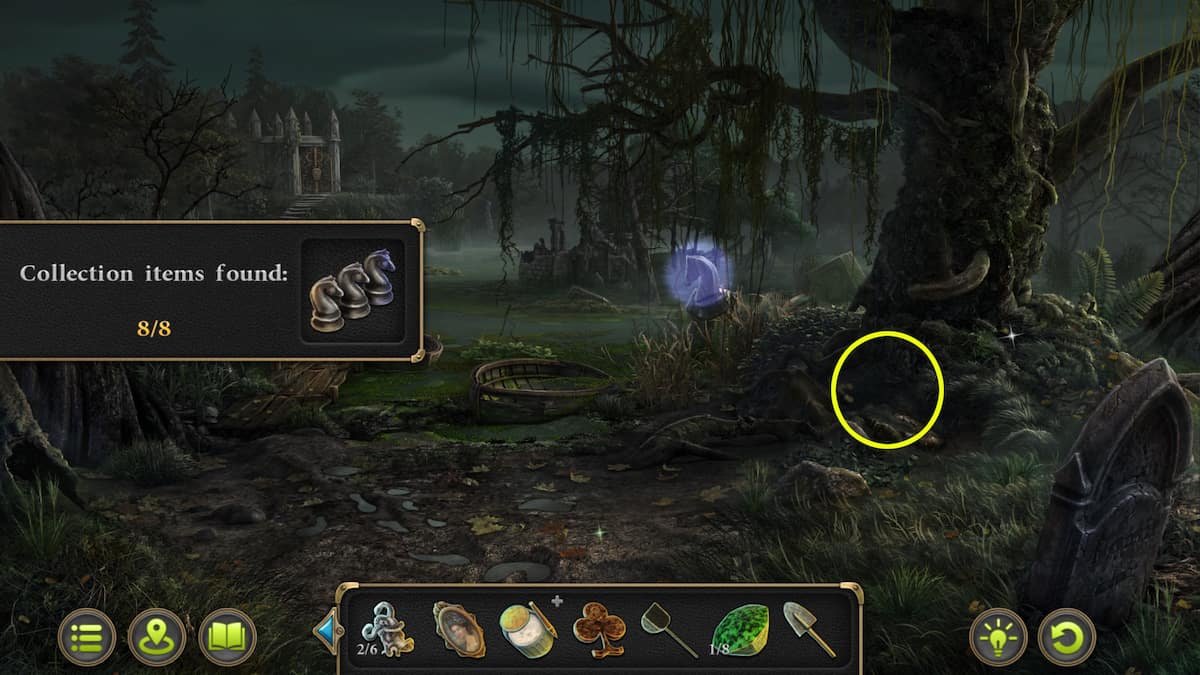
Deeper into the Cemetery
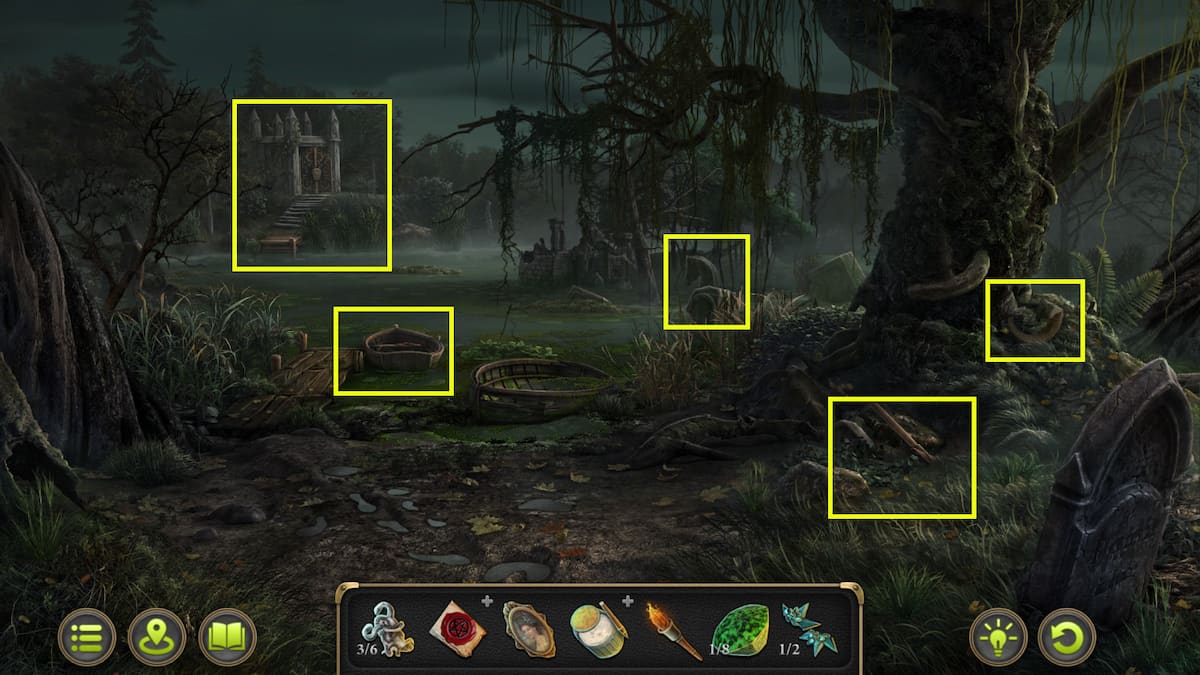
After completing the initial tasks in the Cemetery’s first area, it’s now time to explore deeper. In this section, you’ll encounter various items to interact with. However, some of these items will require objects that have not been accessible to you until now. Here’s a summary:
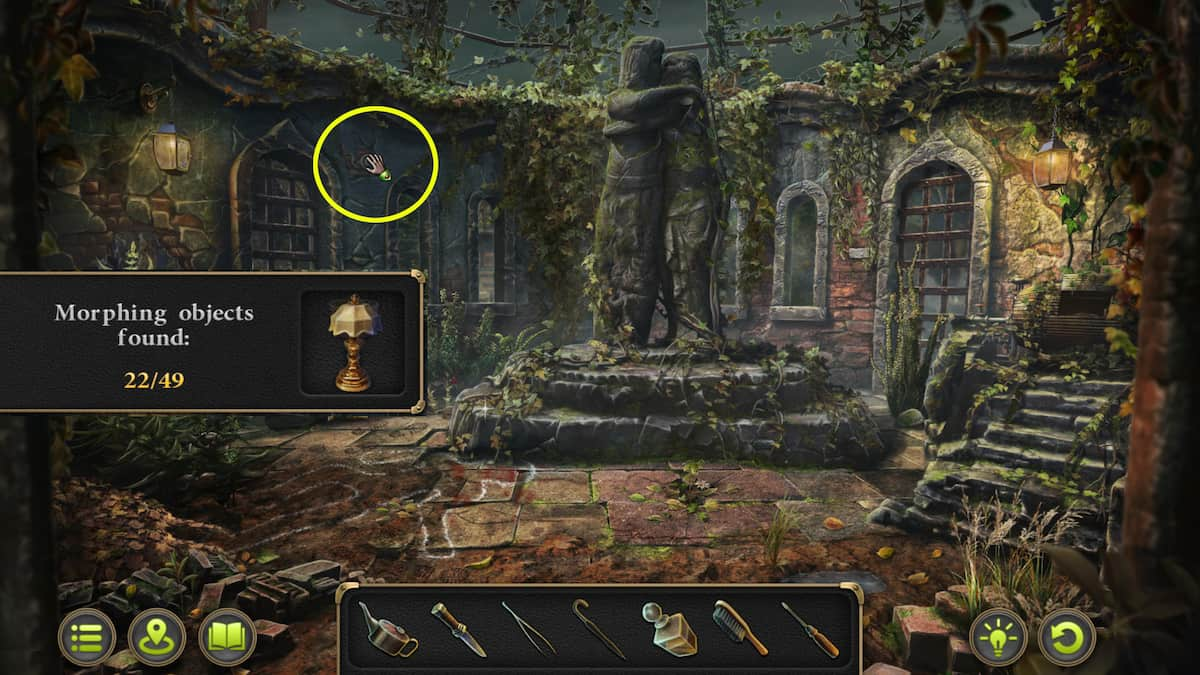
- All the way to the right, at the base of the tree, is a Morphing Object.
- Just below the morphing object and a little left is a shovel surrounded by snakes. In order to get the shovel, you need to scare away the snakes with the Burning Torch.
- In the middle of the scene, right under the branches of the tree, is a Chess Collectible.
- There is a Boat that you can use to take over to the Crypt. However, there is no oar. But you can pick up the Colander from the inside of the boat.
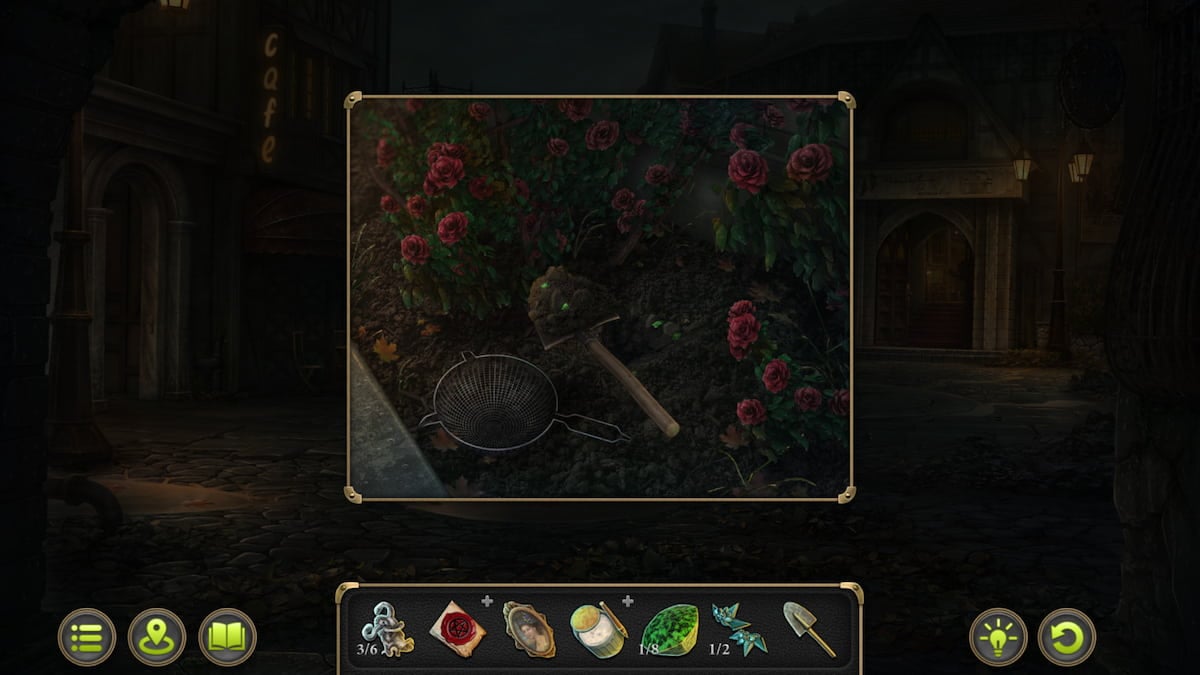

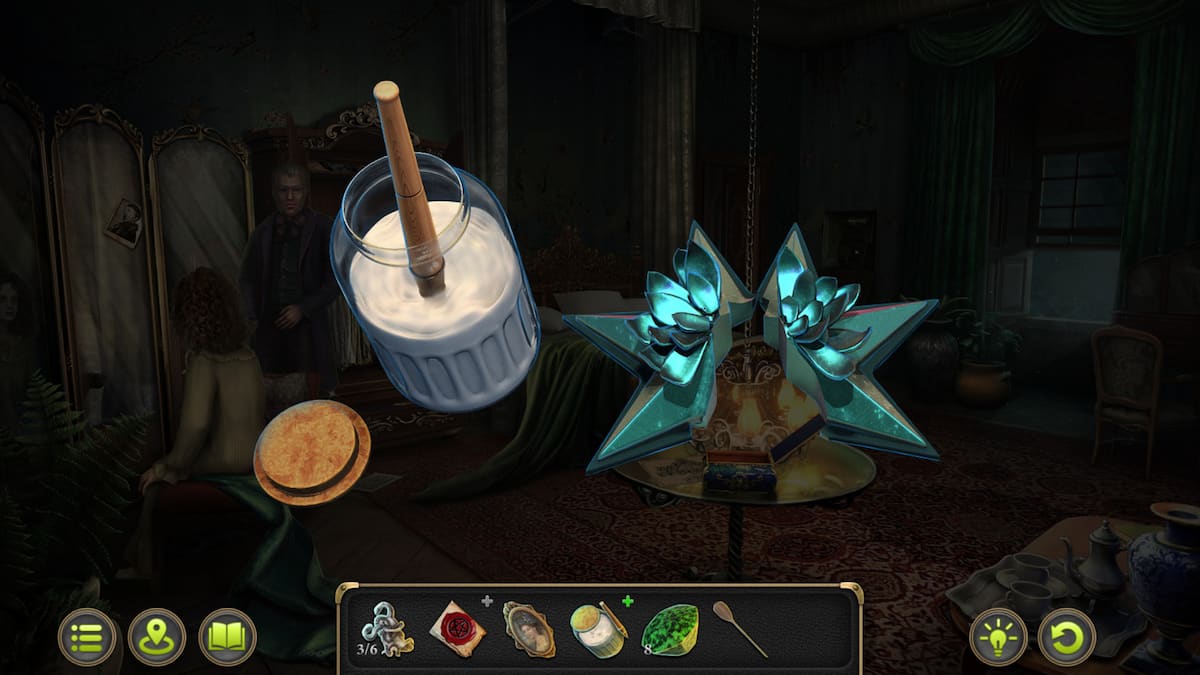
Make your way to Lower City’s Square, and engage with the rose bushes situated to the left of the Theater entrance and to the right of the doghouse. You’ll find some emeralds hidden in the soil. Use the colander and shovel to separate the gems from the earth. Travel to the Estate’s backyard, retrieve the oar from the workroom, and lastly, visit the Girl’s Bedroom within the Estate. Once there, employ the shovel on the disturbed dirt in the potted plant. This action will help you secure the second Star Piece. Finally, apply some glue to assemble the star once more.
The Greenhouse Door puzzle solution
After obtaining the “Star”, make your way to the greenhouse, which is centrally situated in the backyard of the Estate. Approach the greenhouse door, insert the “Star” into the keyhole, and work through the ensuing puzzle. Remember to rotate the vines so they don’t overlap.
Inside the Greenhouse
In the greenhouse, you’ll encounter various items for you to engage with. To make your exploration smoother, I have prepared a list, labeled for your convenience. You will be required to locate and employ several items to grab hold of other objects.
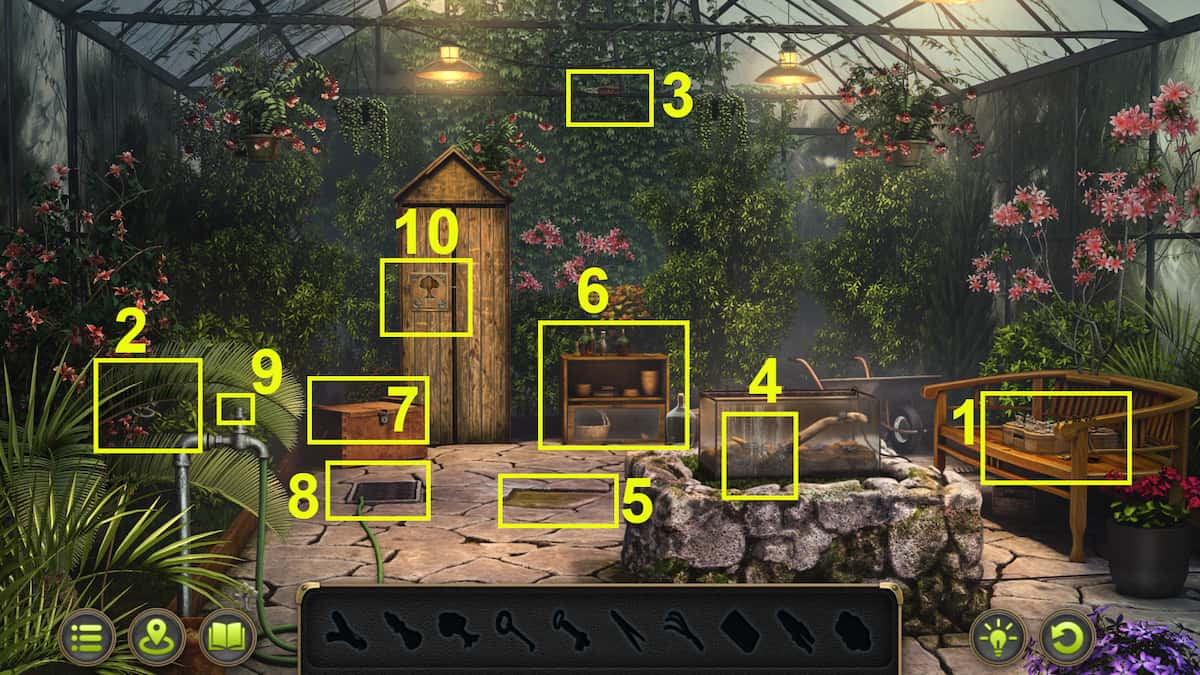
- 1 – Chess Set – There is a Slingshot sitting next to the chess set. Pick it up.
- 2 – Insecticide – Move the branches out of the way to get the insecticide.
- 3 – Use the Slingshot to knock down the Pilers.
- 4 – Use in Insecticide to kill off the bugs inside the glass tank. Once they are dead, you can pull the gardening Rake.
- 5 – Use the Rake to pry up the loose stone on the floor. This will give you Soap.
- 6 – Use the Soap on the sliding glass drawer that is stuck to get the Valve. Use the Nail on the top of this dresser and put it in the cork in the Glass Bottle with the Key in it. Use the Pliers to pull out the cork, then interact with the Glass Bottle to get the Key.
- 7 – Use the Key on the wooden box to get the Tweezers.
- 9 – Put the Valve on the faucet and turn it to fill up the grate (8).
- 8 – Use the Tweezers to grab the chess piece from inside the grate.
- 1 – Use the chess piece on the Chess Board. This will unlock the drawer in the side and give you the Silver Tree.
- 10 – Use the Silver Tree to unlock the big armoire. Complete the puzzle below to get the Machete.
How to complete the Greenhouse Tree puzzle
I’ve always found jigsaw puzzles to be a simple yet satisfying pastime. The pieces fit together like pieces of a larger story, revealing a hidden picture that comes to life as each piece finds its place. In this particular puzzle, the image is of trees that, once assembled, will grant me the tool I need for an upcoming adventure – a machete, which I’ll be using in a cemetery.
Return to the Cemetery
Go back to the cemetery and employ the newly acquired machete to clear the dense vines. On this very screen, utilize all the emeralds you’ve gathered so far to unlock another bas relief (number 4/6). Meanwhile, on the same screen, you can now apply the emeralds you’ve collected at the angel statue to reveal yet another bas relief (number 5/6). Next, proceed to the next cemetery screen and insert the oar you retrieved from the estate into the boat. Now, make your way to the crypt, but be prepared for a puzzle upon arrival.
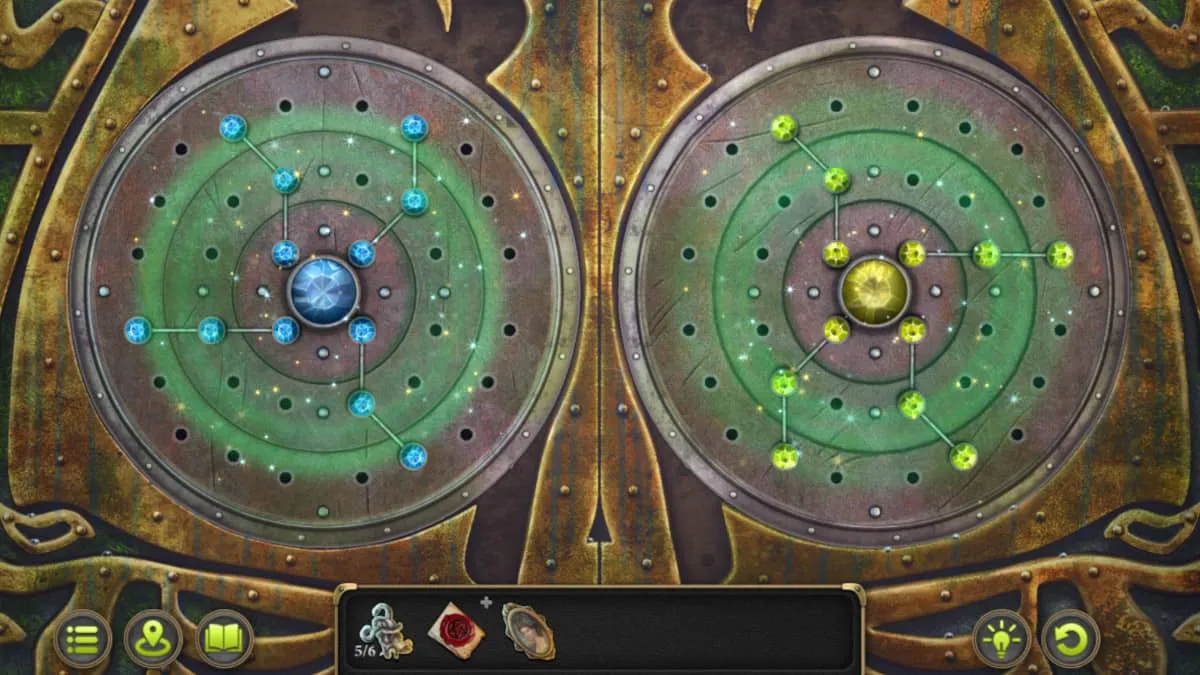
How to solve the Crypt Door puzzle
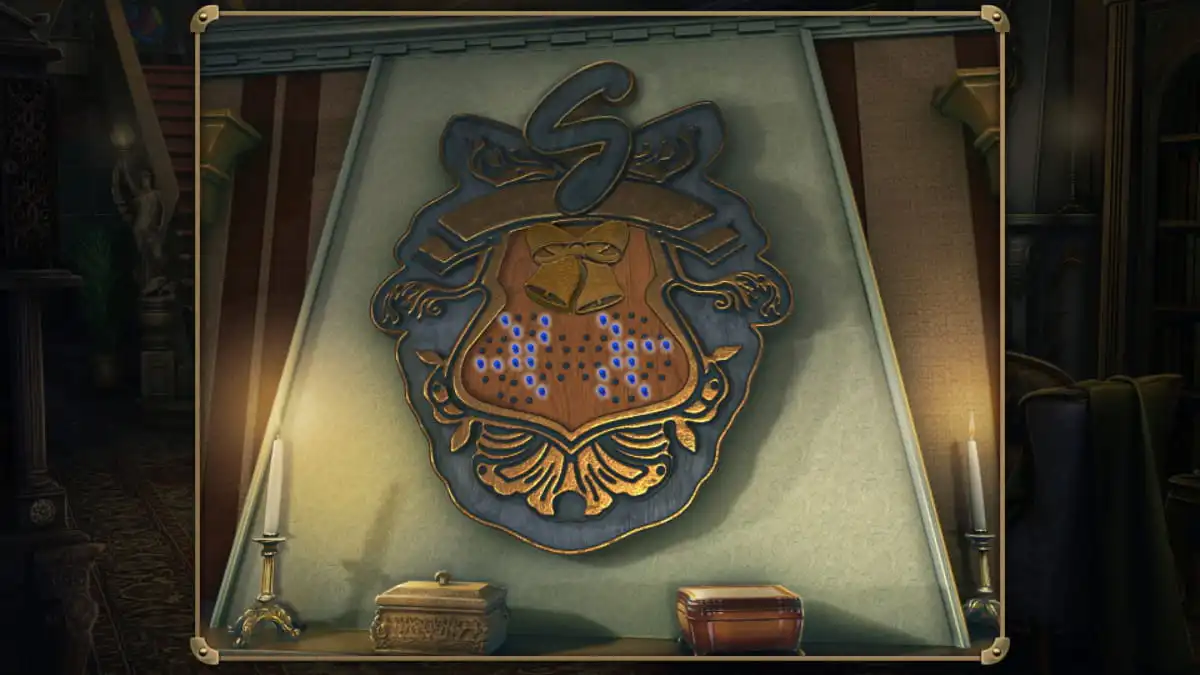
If you possess the “Bell” item in your inventory, obtained from the “Secret Room” within the Estate, kindly place it on the coat of arms above the fireplace in the Foyer area of the Estate. This action will illuminate the solution for the Crypt Door Enigma as depicted below. To interact with each arm’s base, simply click the bottom or middle jewel. Adjust the arms by clicking the top jewel.
In the Crypt
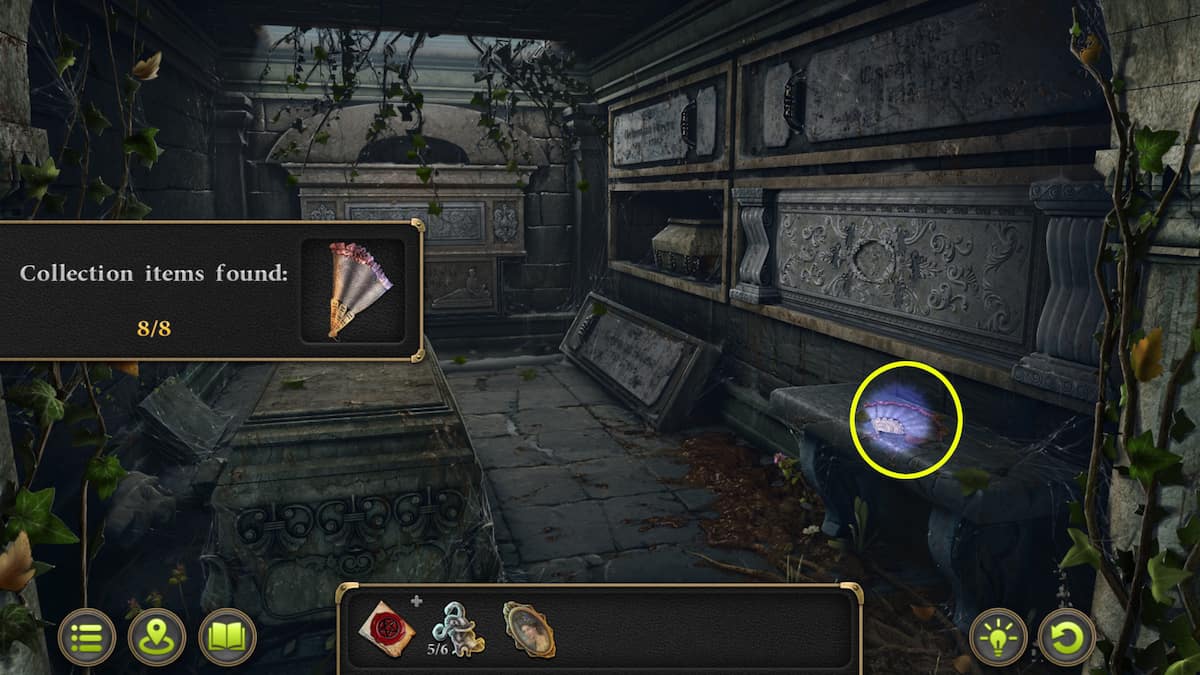
Inside the crypt, there are various items for you to engage with. Keep an eye out for a Morphing Object located in the upper right corner, and a Fan Collectible resting on the bench below. If you’ve been gathering all of these collectibles, this should be your last one. Additionally, there is likely a final Morphing Object here as well. Lastly, focus on the tomb at the back of the room. You can choose to stand near the tomb on the right side while interacting with it.
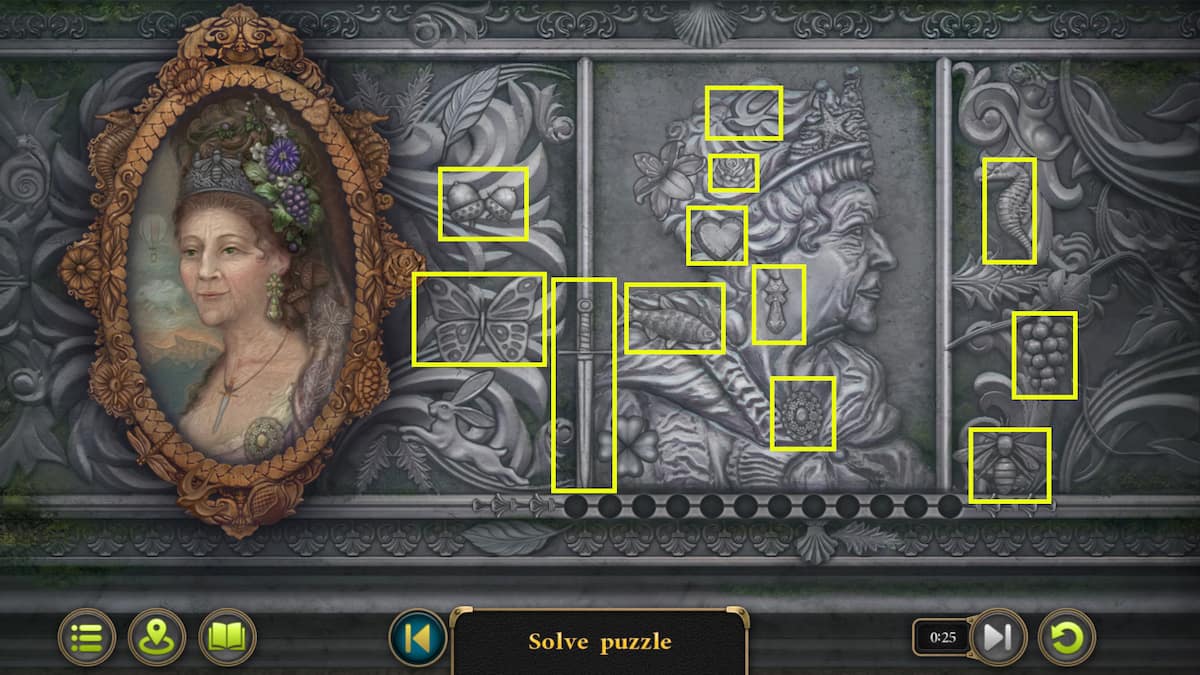
Tomb Portrait Puzzle
To enter your grandmother’s tomb, find the tomb at the room’s end and touch it. Next, place the Grandmother’s Portrait on top of the tomb. Interact with all objects that appear in both the portrait and the tomb carvings. These include: Acorns, Butterfly, Sword, Dove, Rose, Heart, Earring, Amulet, Seahorse, Grapes, and Bug. This action will grant you a Bas Relief (6/6).
Crypt Bas Relief Puzzle
In order to solve this puzzle, you will need to have collected all six Bas Relief pieces and put them into the Bas Relief in the Crypt of the Cemetery. You will also need to have uncovered the code from the cemetery wall with the Machete from the Greenhouse. Here’s how to solve it.
After opening the tomb, explore the contents inside, specifically theScroll. Following this action, the game will guide you to converse with both Shaw and Diana. Completing these conversations will wrap up the Case, including the acquisition of all collectible items.
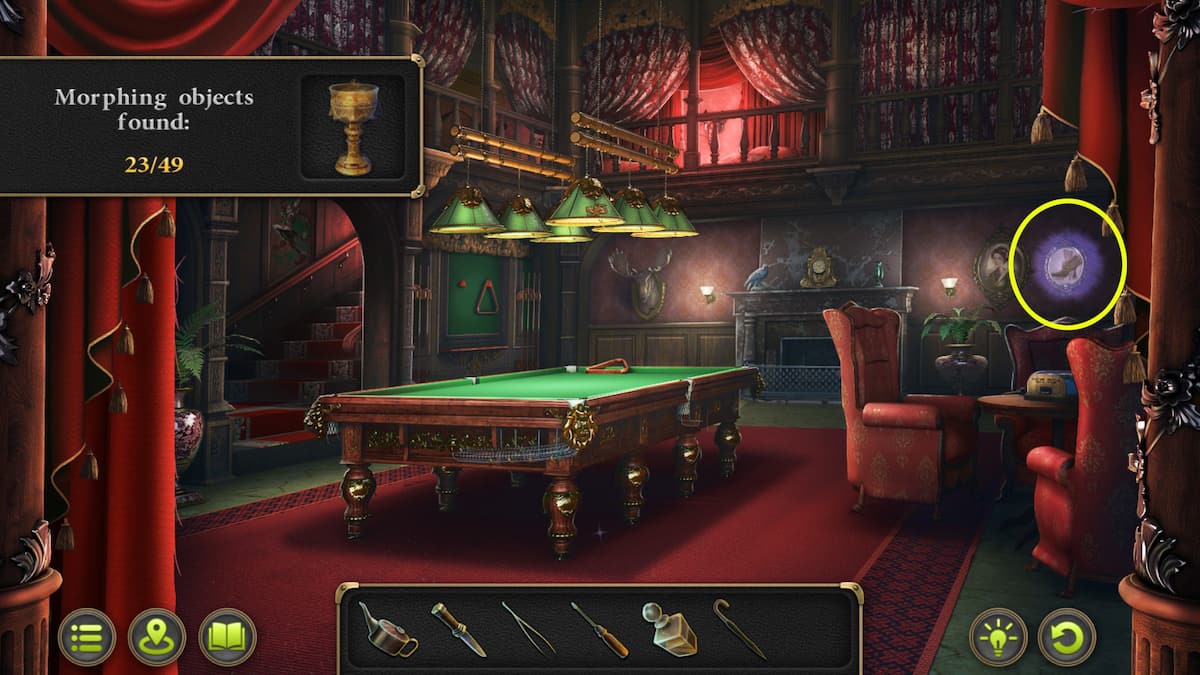
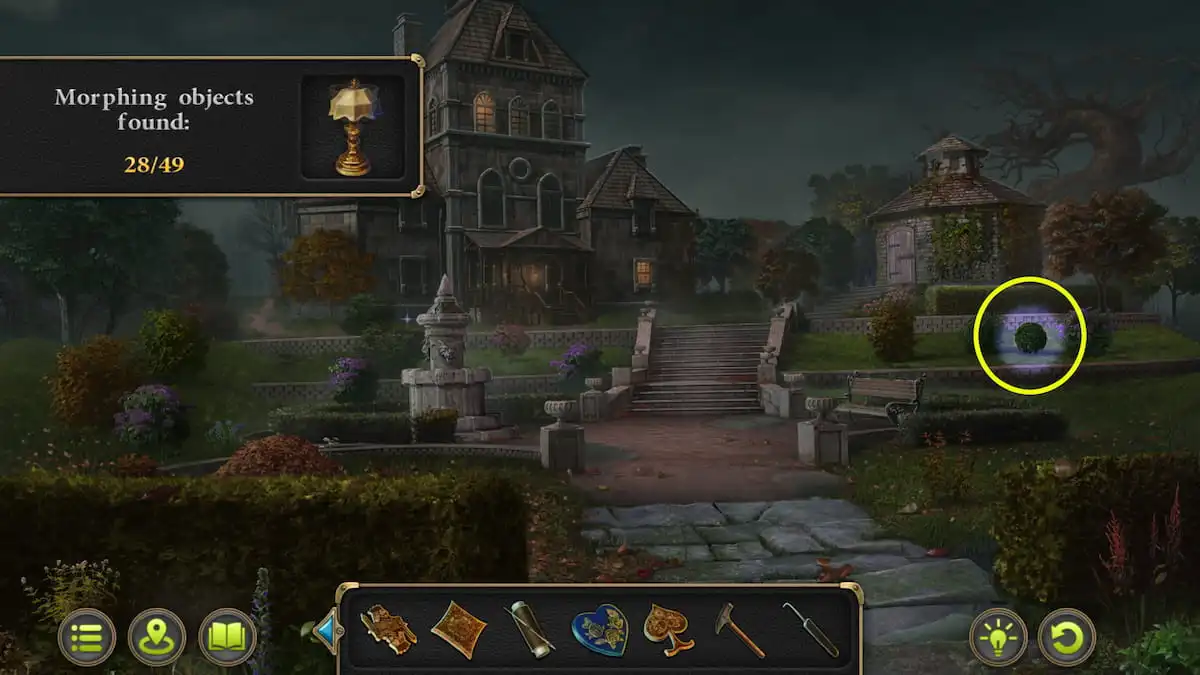
All collectibles and morphing objects in Case 2 of Mystery Detective Adventure
In Case 2, you’ll encounter a new collection consisting of 16 morphing objects, 8 Chess pieces, and 8 fans. These items are hidden throughout the maps. Some of them may prove to be quite difficult to locate. Here’s where you can find each one:
All Chess Collectibles in Case 2


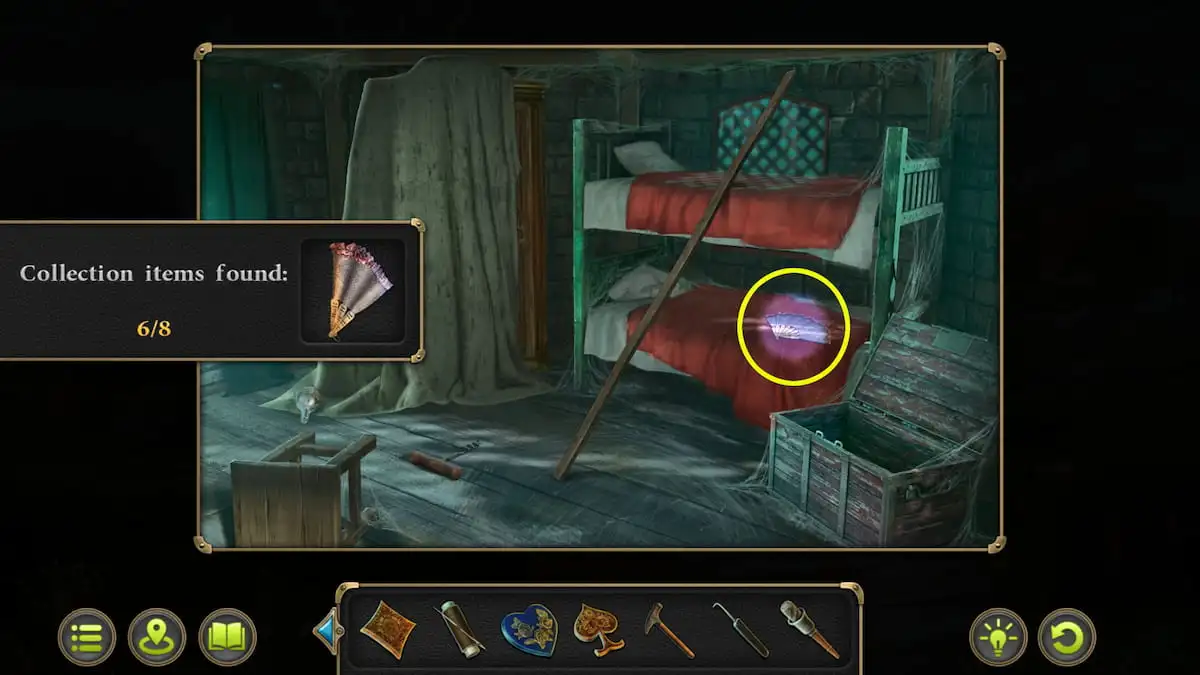
All Fan Collectibles in Case 2


All Morphing Objects in Case 2


If you’re looking for comprehensive guides to complete 100% of an indie game, try checking out the Botany Manor Walkthrough with all achievements on GamerTop instead.
Read More
- Hades Tier List: Fans Weigh In on the Best Characters and Their Unconventional Love Lives
- Smash or Pass: Analyzing the Hades Character Tier List Fun
- Why Final Fantasy Fans Crave the Return of Overworlds: A Dive into Nostalgia
- Sim Racing Setup Showcase: Community Reactions and Insights
- Understanding Movement Speed in Valorant: Knife vs. Abilities
- Why Destiny 2 Players Find the Pale Heart Lost Sectors Unenjoyable: A Deep Dive
- W PREDICTION. W cryptocurrency
- How to Handle Smurfs in Valorant: A Guide from the Community
- FutureNet Co-Founder Roman Ziemian Arrested in Montenegro Over $21M Theft
- Destiny 2: How Bungie’s Attrition Orbs Are Reshaping Weapon Builds
2024-07-25 15:23