As an old-time adventurer with years of puzzling experiences under my belt, I can confidently say that the Hidden Ruins have tested my wits to the limit! From deciphering constellations and manipulating singing bowls, to rotating boards and escaping Larissa’s clutches once again, this adventure has been a rollercoaster ride.
As a seasoned gamer with a soft spot for puzzle adventures, I’m thrilled to share my thoughts on Hidden Ruins, the latest addition to the Adventure Escape Mysteries series on Steam, which I discovered in June 2024. If you’re already immersed in this classic Professor Burns adventure, buckle up as I take you on a journey through its intricacies with my comprehensive walkthrough and puzzle guide!
How to beat AE Mysteries Hidden Ruins – Full walkthrough
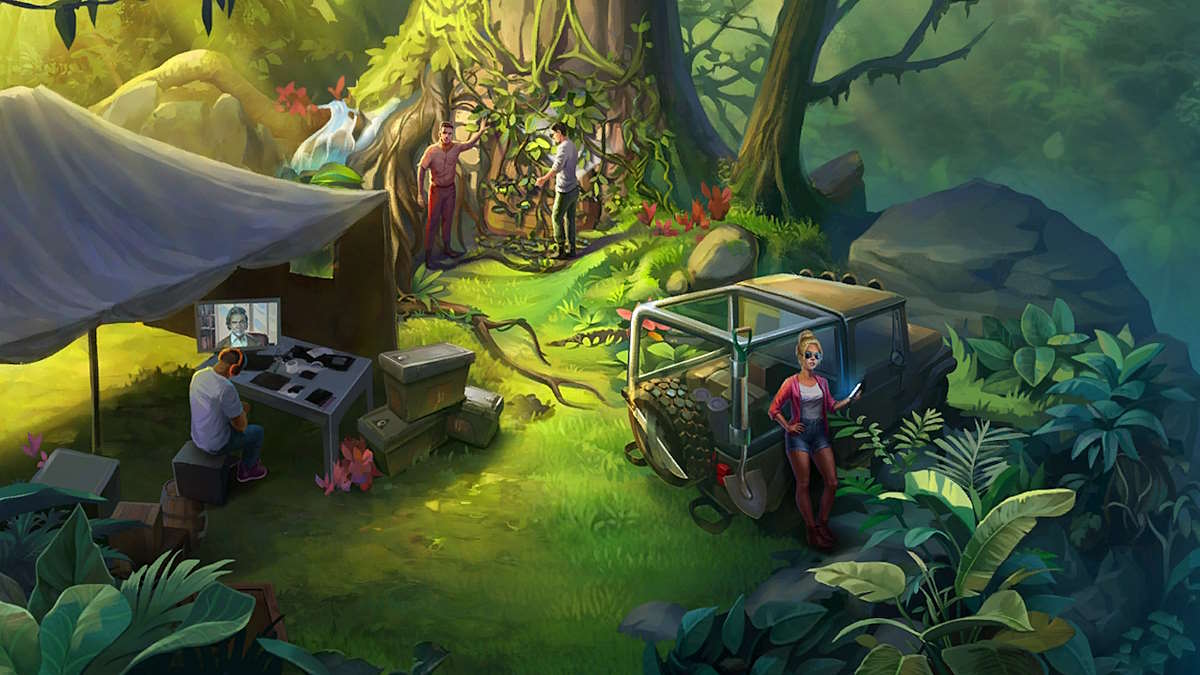
Our journey gets underway as Professor Burns, Tawa, Rachel, and Peter embark on a quest to discover the concealed remains of the ancient Kumari Civilization. To start the game on Steam, first download Adventure Escape Mysteries and then choose “Hidden Ruins” once you’ve launched its application.
This game consists of eight distinct parts, conveniently accessible through the table of contents above. Your goal is to find the Elixir of Life, a challenging quest. Be mindful that the chapters in this instruction correspond to the Steam edition of Hidden Ruins. If you’re using an older version with seven chapters instead, keep in mind that chapters 3 and 4 here merge into chapter 3 in earlier versions, so adjust your reference to the subsequent chapters accordingly, but all essential information is still provided.
Hidden Ruins Chapter 1 walkthrough
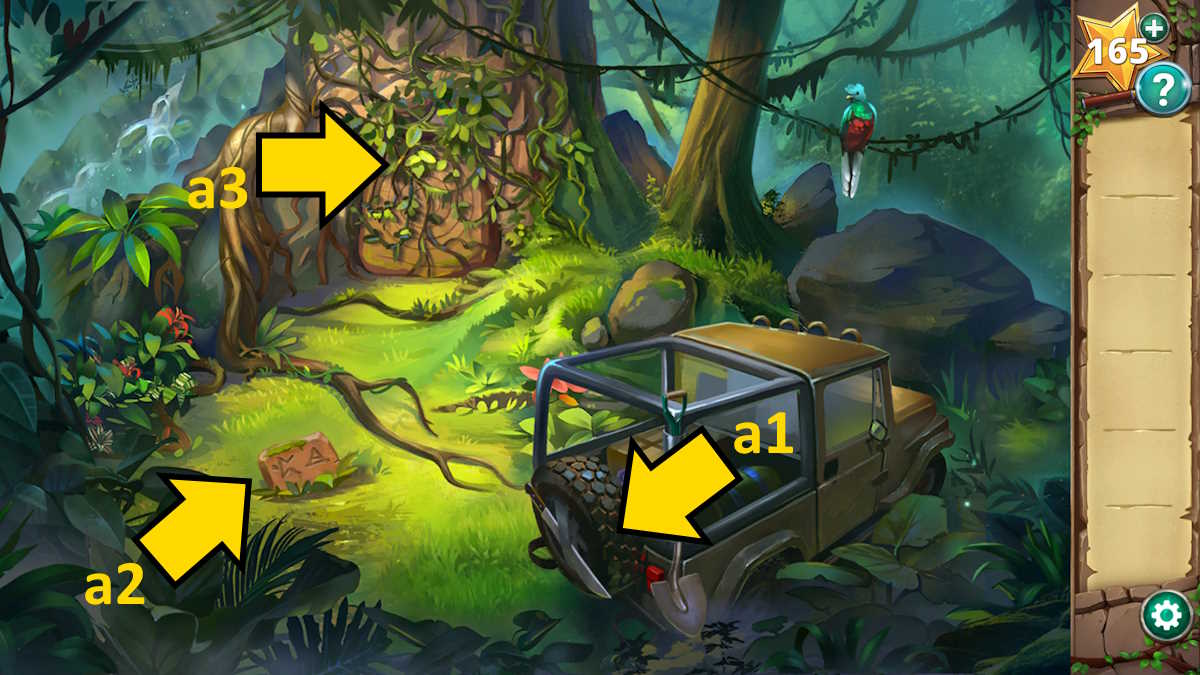
As someone who has spent years exploring ancient ruins and deciphering cryptic symbols, I can’t help but be intrigued by these instructions. Let me see now, take the machete and shovel from the back of the jeep (a1). The sun beats down mercilessly on my weathered hat as I lean into the task at hand. I’ve faced many challenges in my pursuit of knowledge, but this stone tablet before me seems to hold a secret worth uncovering.
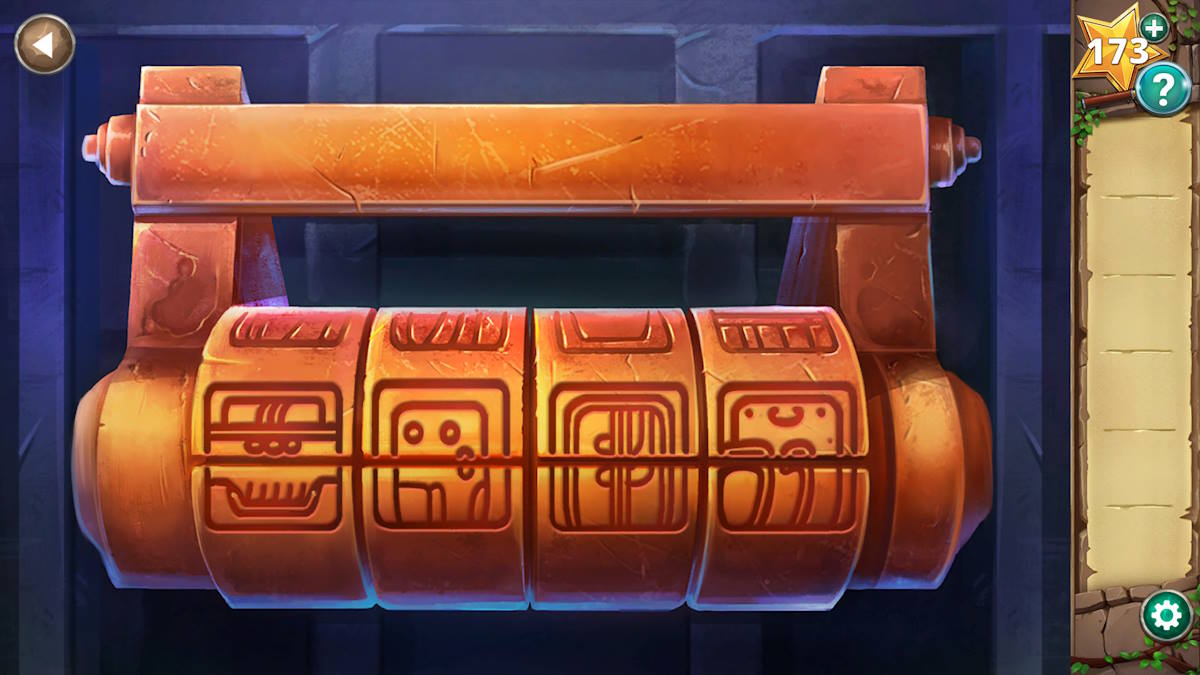
As a fan, I suggest using the machete to clear the way for the vines obstructing the door in front of me. After that, I’ll take a closer look at the door by clicking on it for a better view. To make progress, I need to adjust the positions of the rings (by dragging them) so that each symbol on the tablet aligns with its corresponding symbol on the stone tablet shown in the image above. Once this is achieved, the door will magically open up. I’ll then click once more to step inside.
As a seasoned adventurer with years of experience under my belt, I can tell you that navigating through labyrinthine paths and intricately designed rooms is no stranger to me. With a sense of familiarity and a touch of excitement, I’ll follow the instructions given.
Inside the ruins
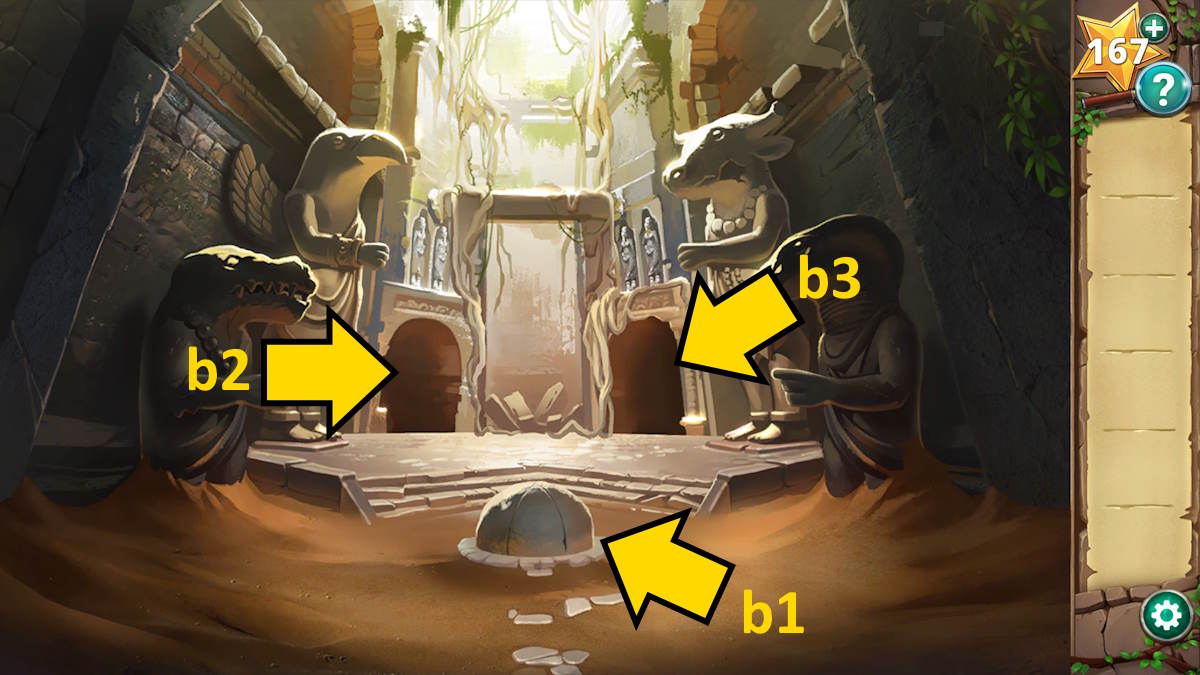
In the adjoining room, there’s a large, polished stone altar sitting in the middle. You’ll find two exit ways on its periphery; choose the one to your left (the second one).
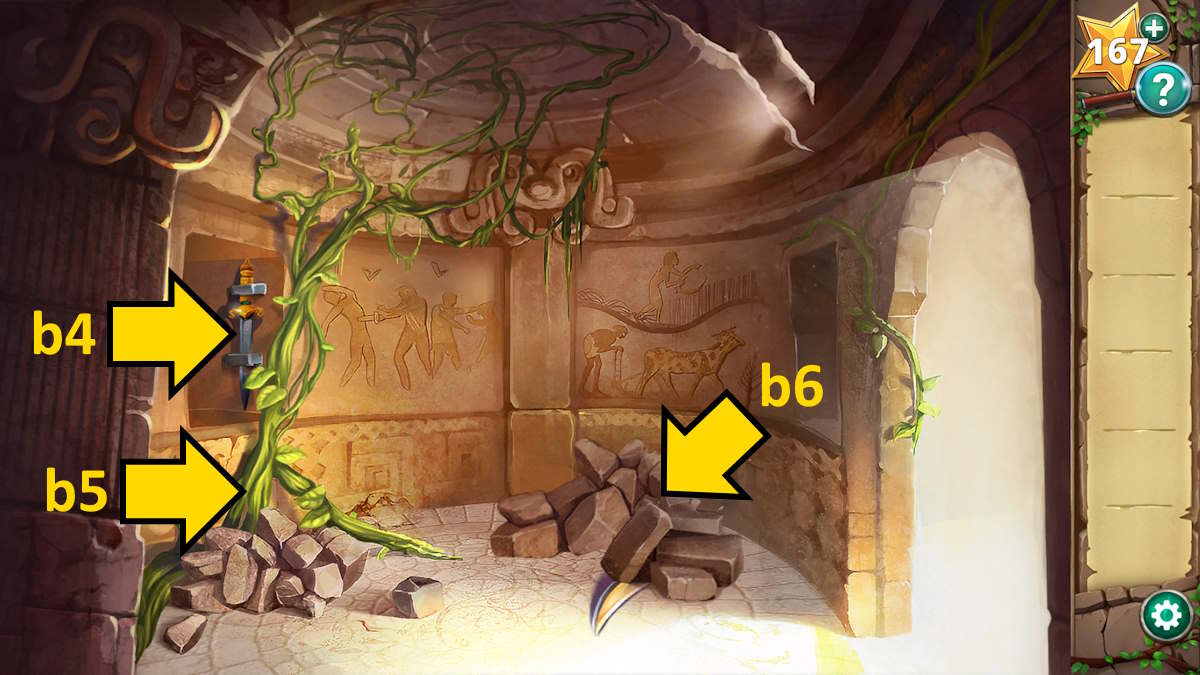
As a seasoned adventurer with years of exploration under my belt, I’ve encountered many puzzling situations like this one. With a sense of anticipation, I reach out and grab the dagger from the ancient stone wall (b4). The cool metal feels reassuringly familiar in my hand. Next, I make my way to the foliage (b5) and carefully apply the blade to the tender shoots. To my delight, a vine emerges, its tendrils curling around the dagger as it grows.
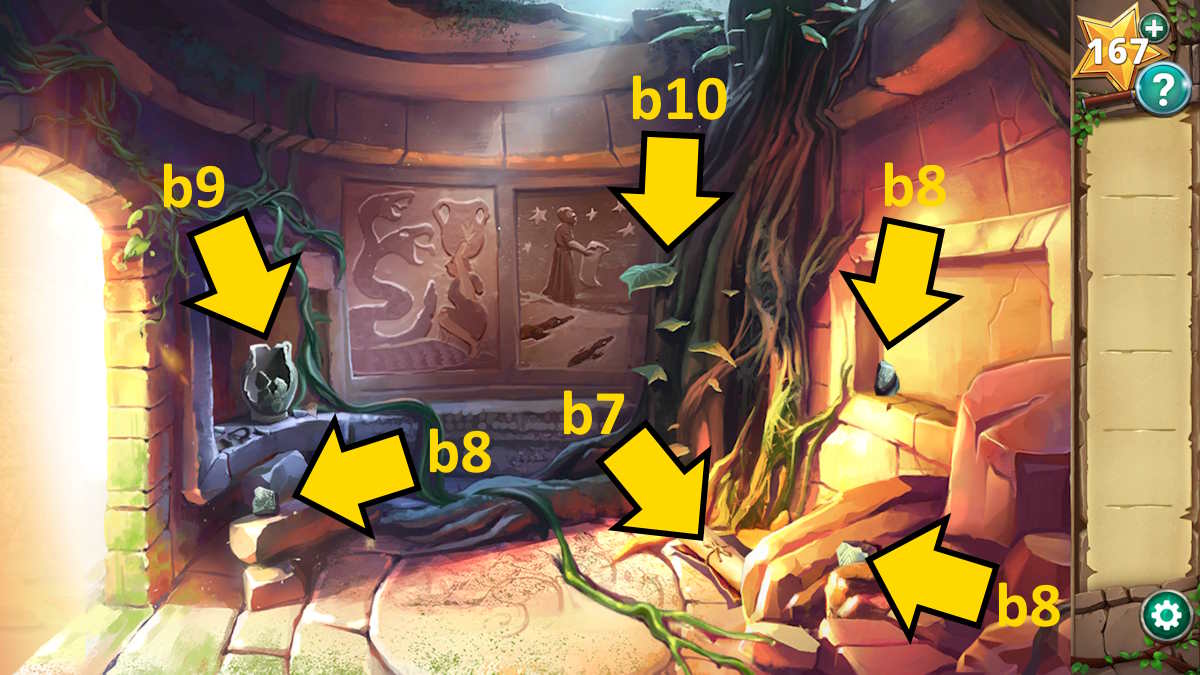
As an experienced archaeologist with years of excavation under my belt, I can confidently follow these instructions with ease. Leaving the current room and making my way to the right one, I locate the scroll and the three pottery shards as indicated. With a sense of excitement, I add them to the broken pot to kickstart the puzzle at hand.
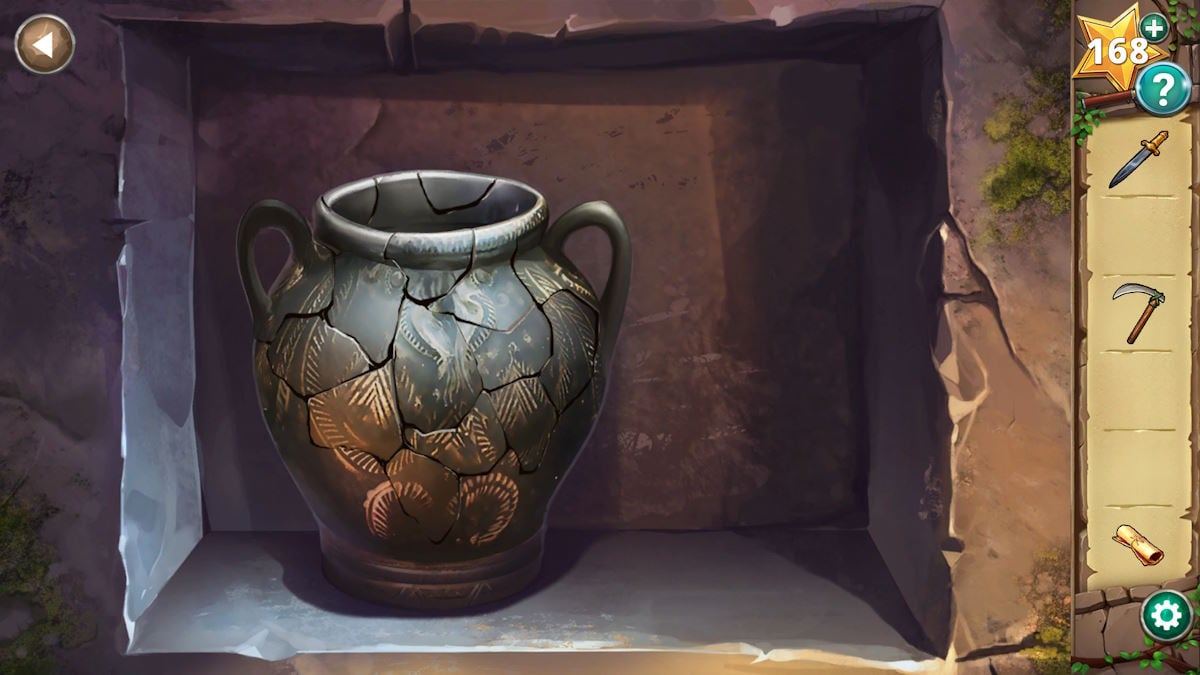
As a seasoned woodsman with years of experience living off the land, I can tell you that there’s more than meets the eye when it comes to harnessing nature’s resources for repairs. Let me walk you through this simple yet effective process.
In your current possession, there are now four distinct items. Examine the artwork adorning the walls of the adjoining chambers. Correspond the inventory’s four objects with the sculptures situated in the primary central room to attain:
- Crocodile: Scroll
- Hawk: Dagger
- Ox: Scythe
- Snake: Pot
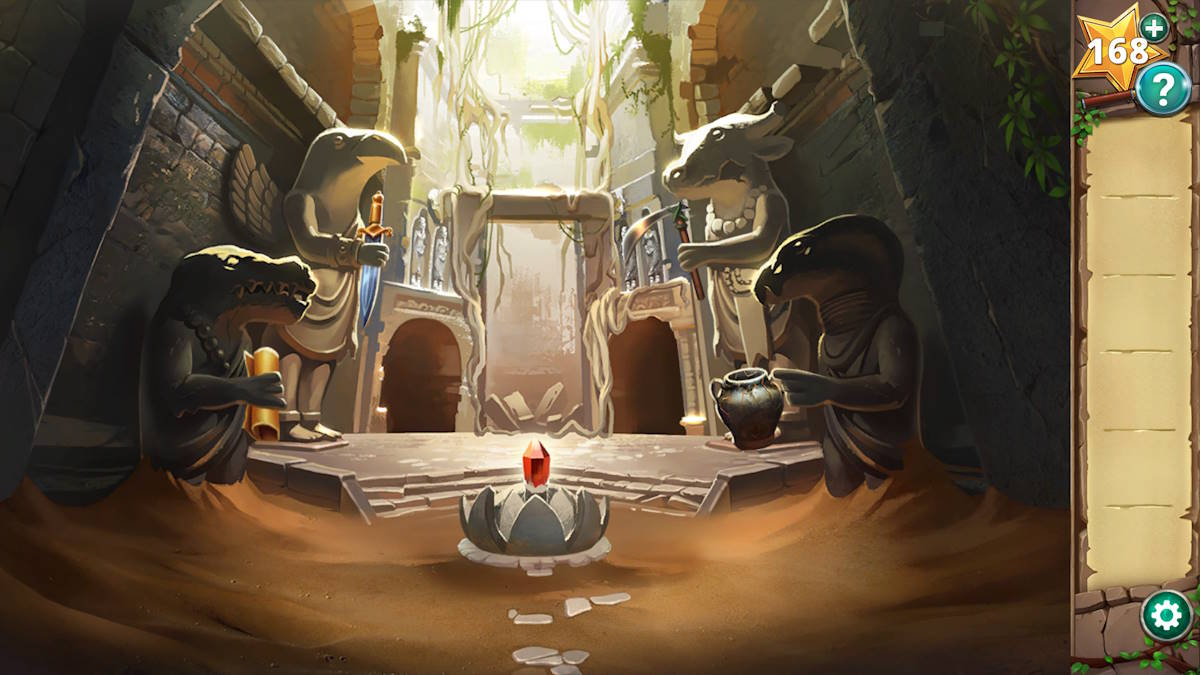
As an experienced adventurer who has faced many challenges and foes, I can tell you that those instructions are a recipe for danger. Picture this: standing before you is a lineup of ancient statues, their hands outstretched, waiting for you to place the specified items. You comply, and as your fingers touch the last artifact, a sense of triumph washes over you. But hold on a moment! The central dome begins to creak open, revealing not the treasure you sought, but the menacing figure of Larissa and her armed goons. Caught off guard, you’re ambushed in the very heart of this mysterious place. I’ve been there myself, let me tell you, it’s no walk in the park. Better prepare for a fierce battle before reaching for those items. That concludes my take on Chapter 1.
Hidden Ruins Chapter 2 walkthrough – Below the bridge

In this round, we’ll assume the role of Tawa, who plunged into the water following the blast. First, pick up the Torch located on the wall (station 1). Next, collect some Mushrooms (station 2) and a piece of Driftwood (station 3). Finally, lure the mouse away from the moss by offering it the mushrooms (station 4).
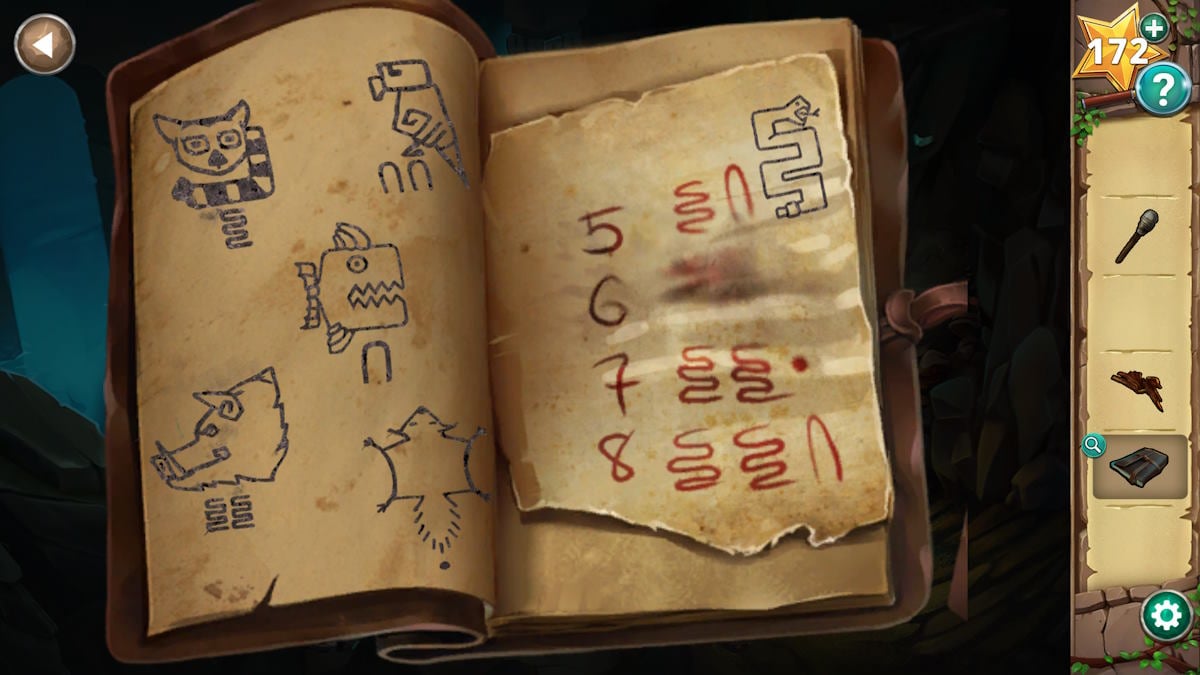
As a seasoned explorer with years of experience under my belt, I have come across many intriguing systems and artifacts in my journey. The Kumari numbering system is one such enigma that has piqued my curiosity. Following the instructions, I approach the journal (labeled c5) on the skeleton, my heart pounding with anticipation. With a sense of excitement, I click on each of the six pillars in the shimmering water.
As a gamer, I’d say: I need to collect the Flint Rocks that fall when I disturb the skeleton at position c6. Next, I’ll place the Driftwood onto the mossy spot at position c4. After that, I’ll use those Flint Rocks to create a Fire by striking them against the rough surface. Once lit, I can use the Torch on this fire to obtain a Lit Torch. Finally, to proceed further, I’ll interact with the doorway located at position c7.
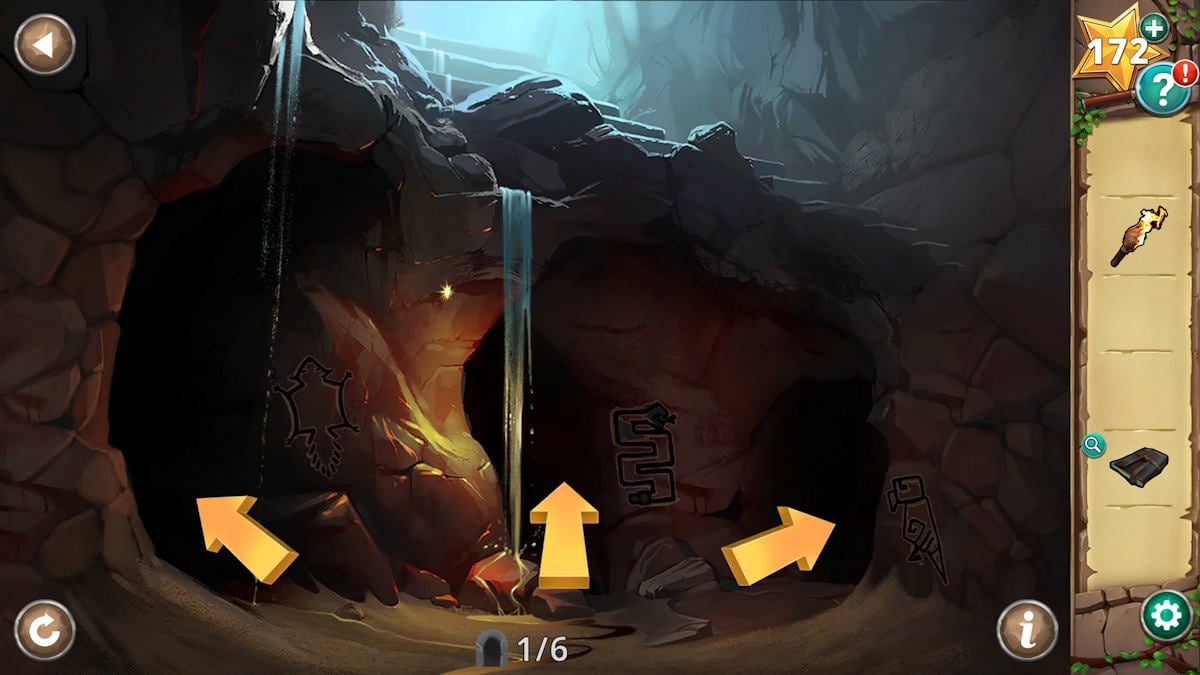
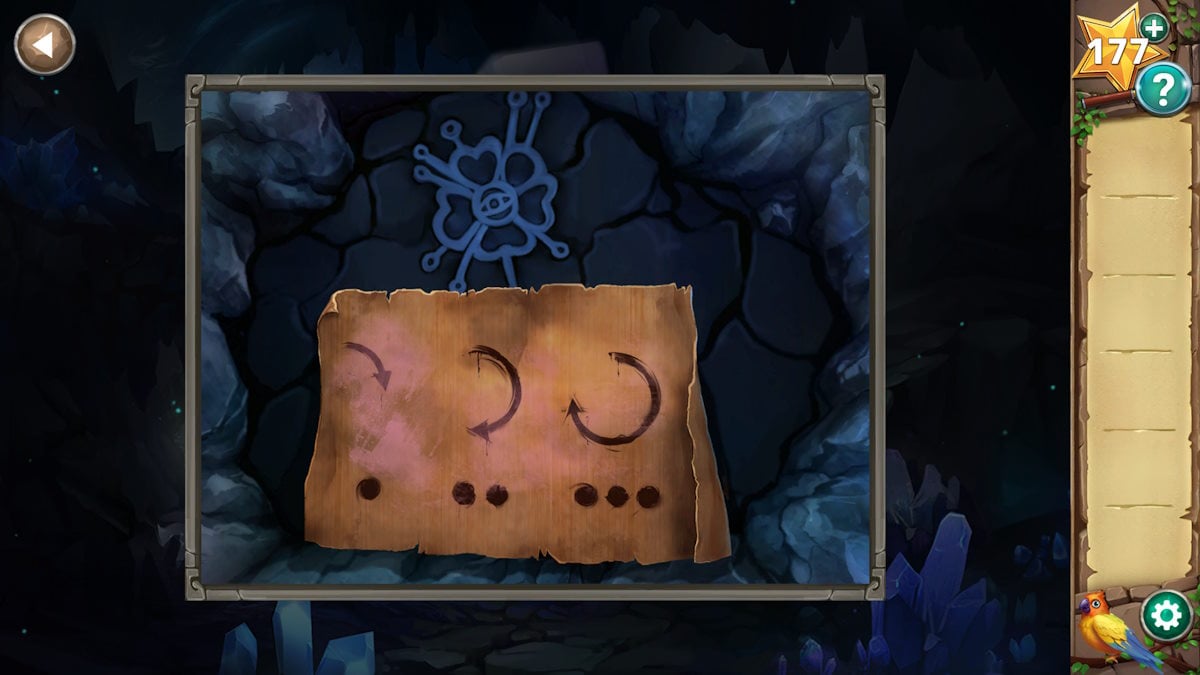
You’ve now stepped into a simple and intuitive six-part labyrinth. At each stage, you must choose the right passage to move forward. Your journal will be your guide (marked with dots for a 1 and wavy lines for a 3), but keep in mind that the sequence is as follows: in the instance of room one depicted earlier, you’d take the path to the left where the squirrel image adorns the wall.
- Squirrel (left)
- Fish (right)
- Lemur (right)
- Parrot (middle)
- Snake (left)
- Boar (right)
The sluice gate room
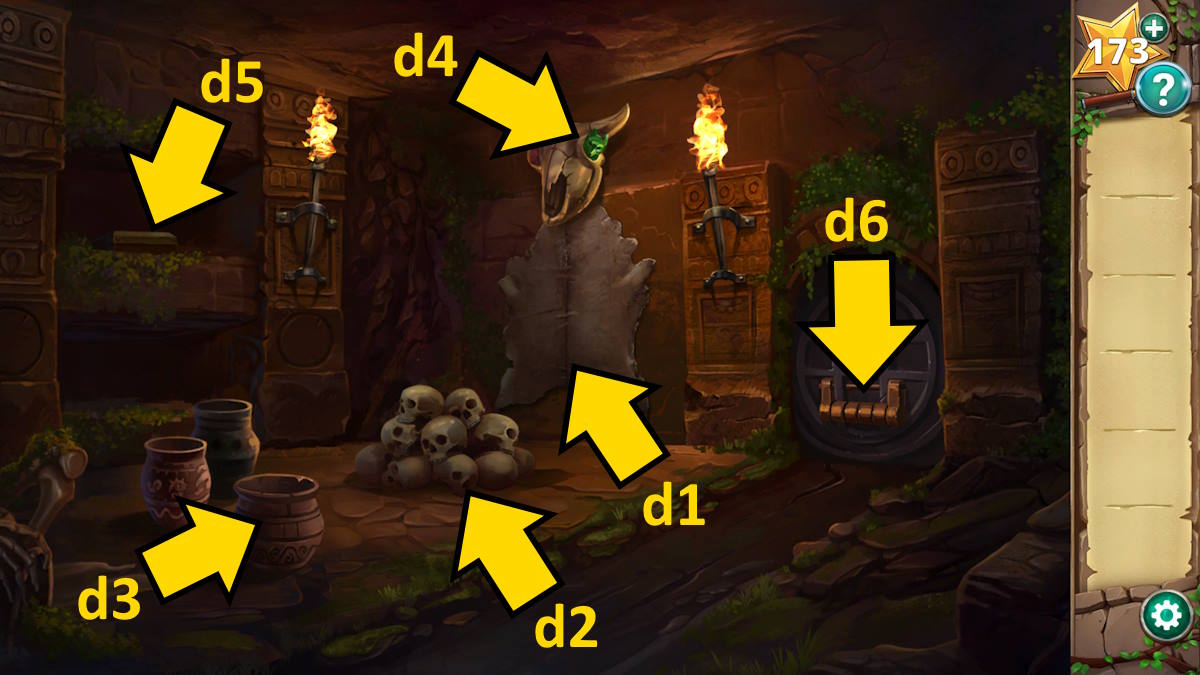
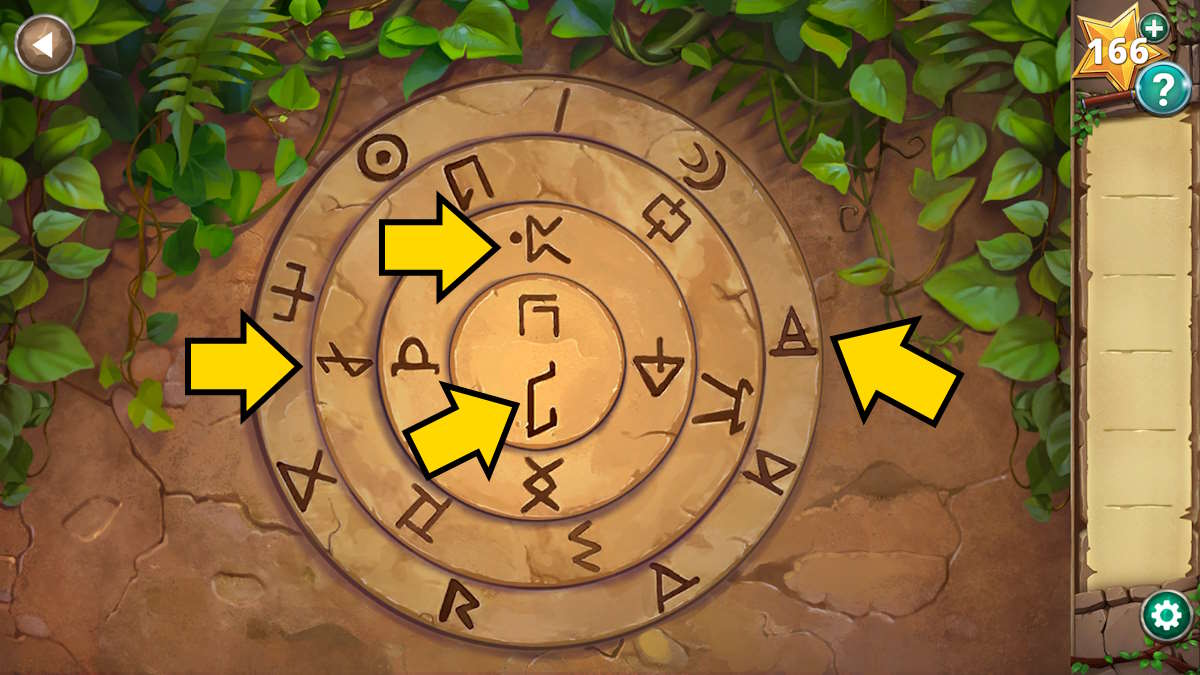
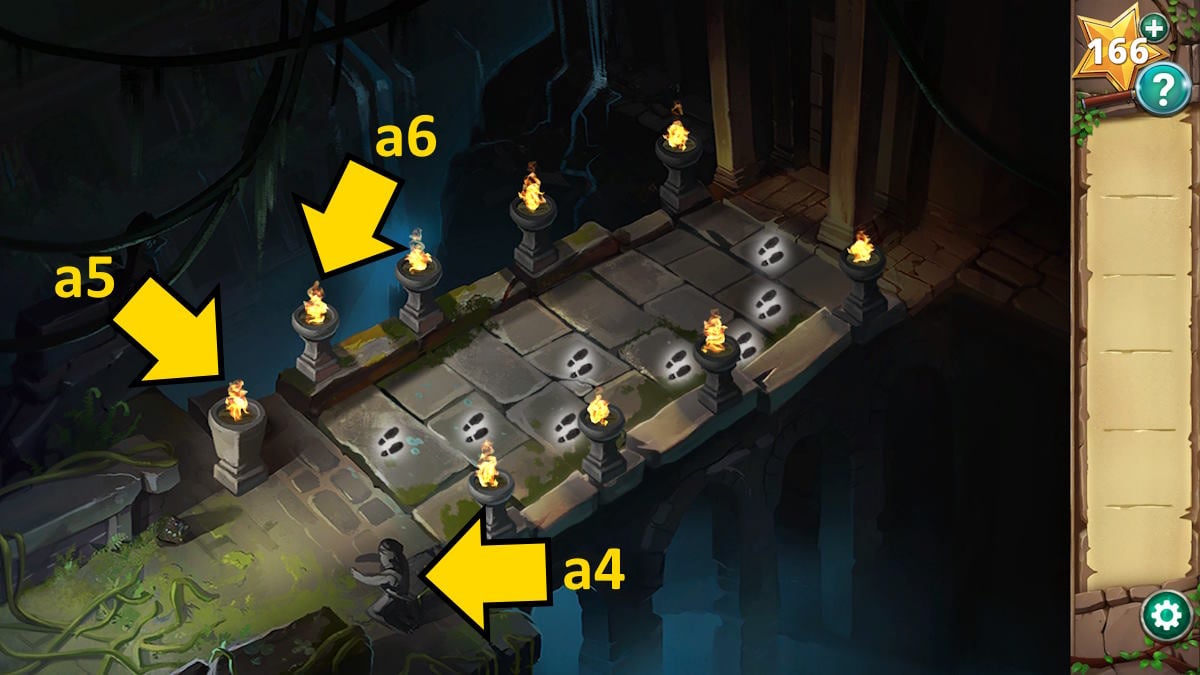
As you make your way forward, you’ll find yourself approaching a dimly lit cave. To shed some light on the area, maneuver your torch over the torches fixed to the wall. Next, grab the hide (d1) that’s lying around and touch the mound of skulls (d2) to unearth a bone. Submerge the hide in the fish oil (d3) to make it slippery, then employ it to dislodge the jade figurine (d4) from one of the skulls. Finally, utilize the bone as a makeshift reacher to grab the box situated at the room’s rear (d5), place the jade figurine inside, and start solving the puzzle.
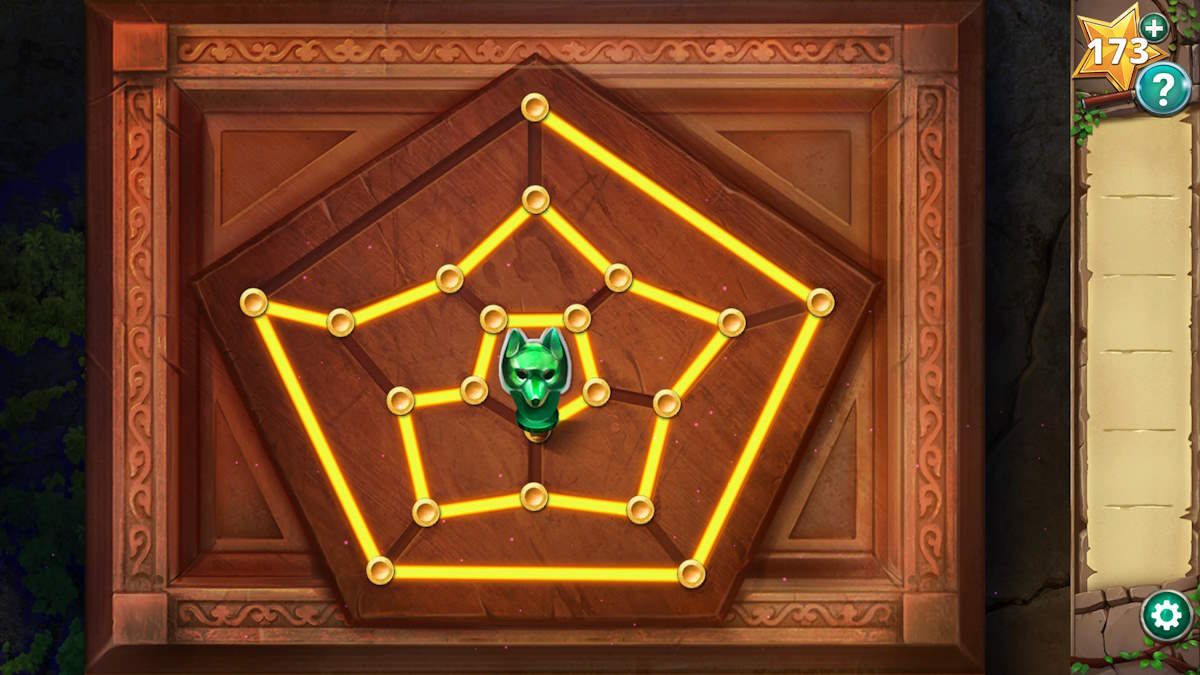
To complete the task, gently move the fox head along the design, ensuring it passes through each gold circle only once. This is achieved by tracing a spiral route around the outer circles in a clockwise direction until you’ve reached all of them. Subsequently, repeat this process with the central and inner circles before reaching the center point. The pathway is illustrated in the picture above.
As someone who has spent countless hours solving intricate puzzles and deciphering cryptic messages, I find this challenge particularly intriguing. This box holds the key to unlocking a secret, and I am eager to unravel its mysteries.
The well puzzle
At the base of the well, press anywhere to initiate a challenge and find a way back up. Every action consumes energy, but each mushroom restores it completely. Be thoughtful with your moves! The paths I’ve highlighted below should guide you through the initial and second screens of this puzzle. For the first part:
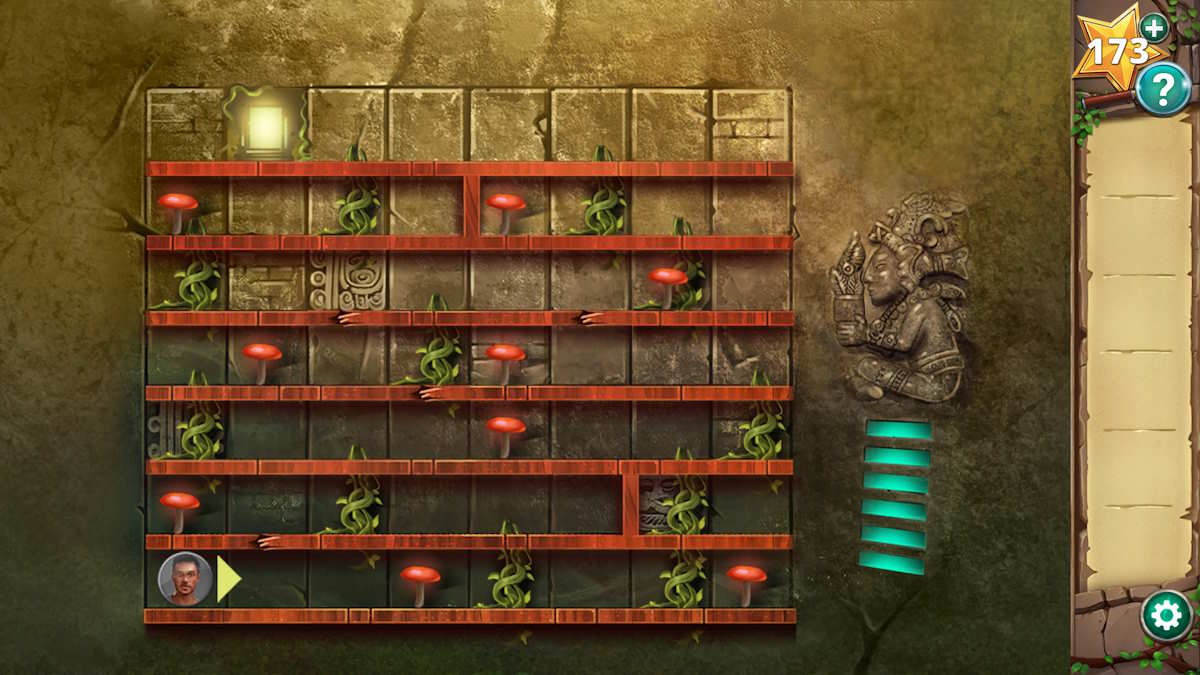
- Move all the way to the right, collecting both mushrooms, and then go up the vine on the right.
- Move all the way to the left and go up the vine there.
- Move right to the vine in the middle of the screen and go up (you don’t need to get the mushroom that’s just beyond the vine)
- Go right and then up the vine that has the mushroom at its base
- Go left to get the mushroom, then up the vine next to it
- Go left to the exit
For the second section:
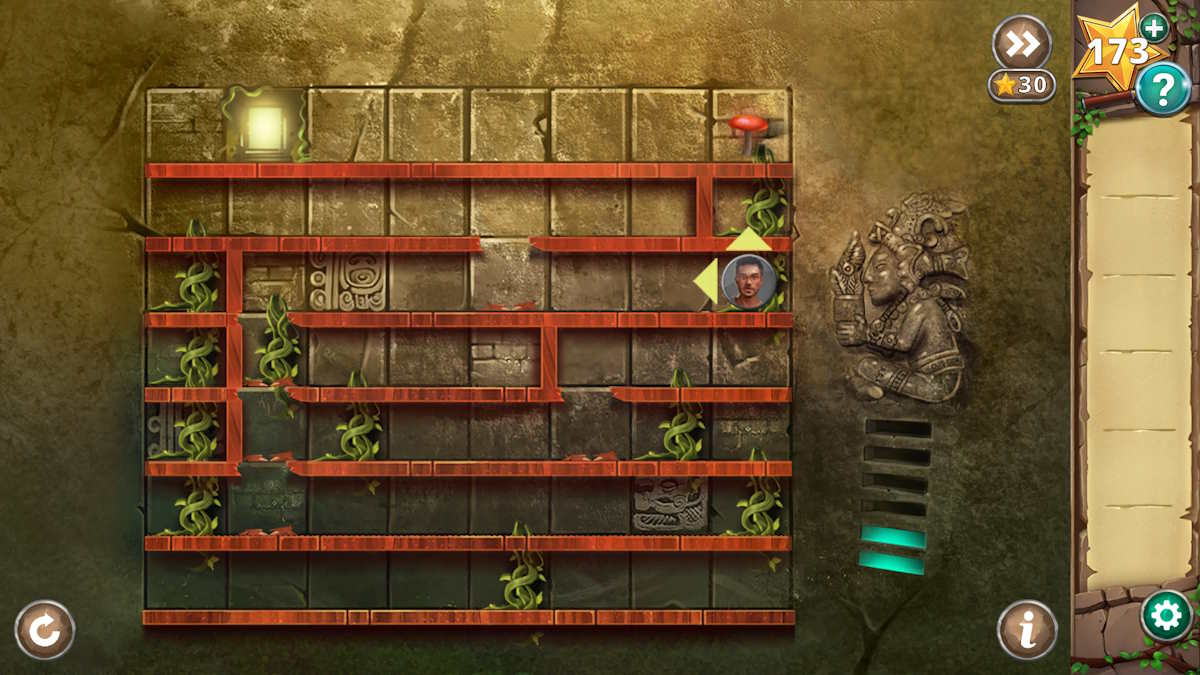
- Move right until you eat the mushroom, then come back one space and go up the vine
- Go right to the vine there and go up
- Go left to the mushroom, step one space right, then go left again to where you ate the mushroom. You’ll drop through the floor.
- Go left until you get to the vine and go up to get the mushroom
- Go back down the same vine, go left to break the floor, then right and back up the same vine
- Go right twice to eat the mushroom, all the way left, and up the vine
- Go right one space to eat the mushroom, then drop all the way to your left (down three levels)
- Go left and then up the vine (to the top) to eat the mushroom there
- Go right and eat the mushroom, then come back one space to drop down a level
- Go right to the end, u to the top level, and get the mushroom there
- Now you can simply go left to the exit and escape.
Once you exit from the top of the well, you’ve completed Chapter 2!
Hidden Ruins Chapter 3 walkthrough – Burns and Rachel
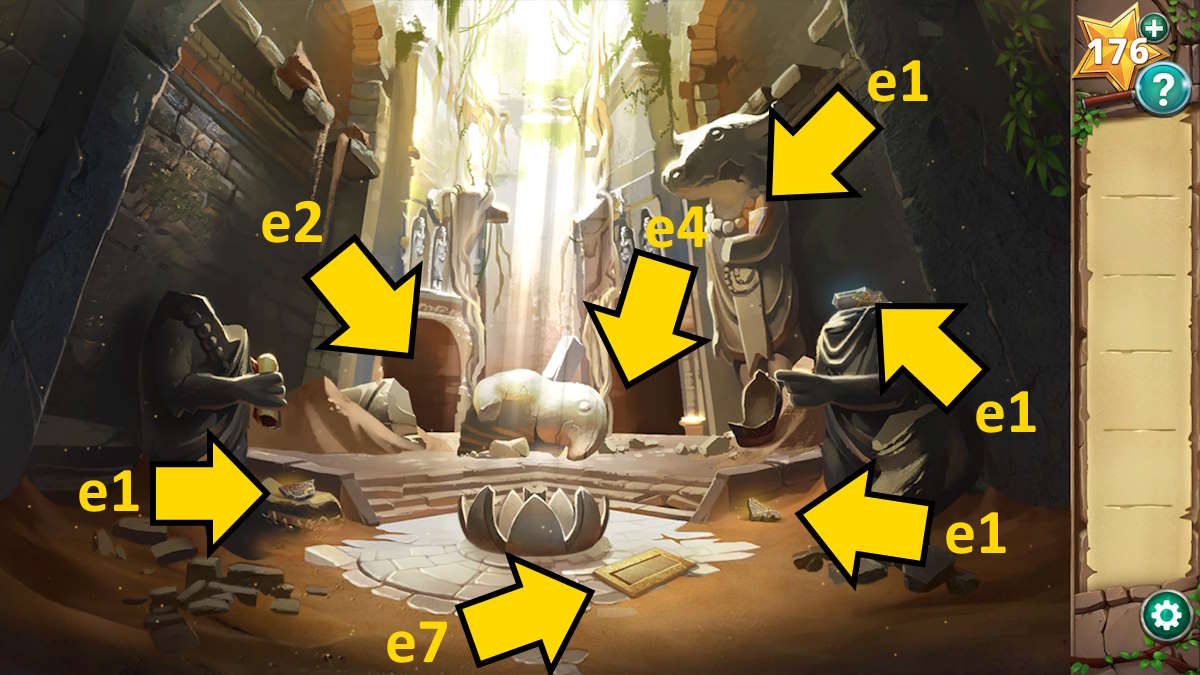
Afterward, we uncover that Professor Burns and Rachel find themselves trapped within the temple and must locate an exit. Retrieve the four fragments (e1) first, then proceed to the chamber on the left (e2).
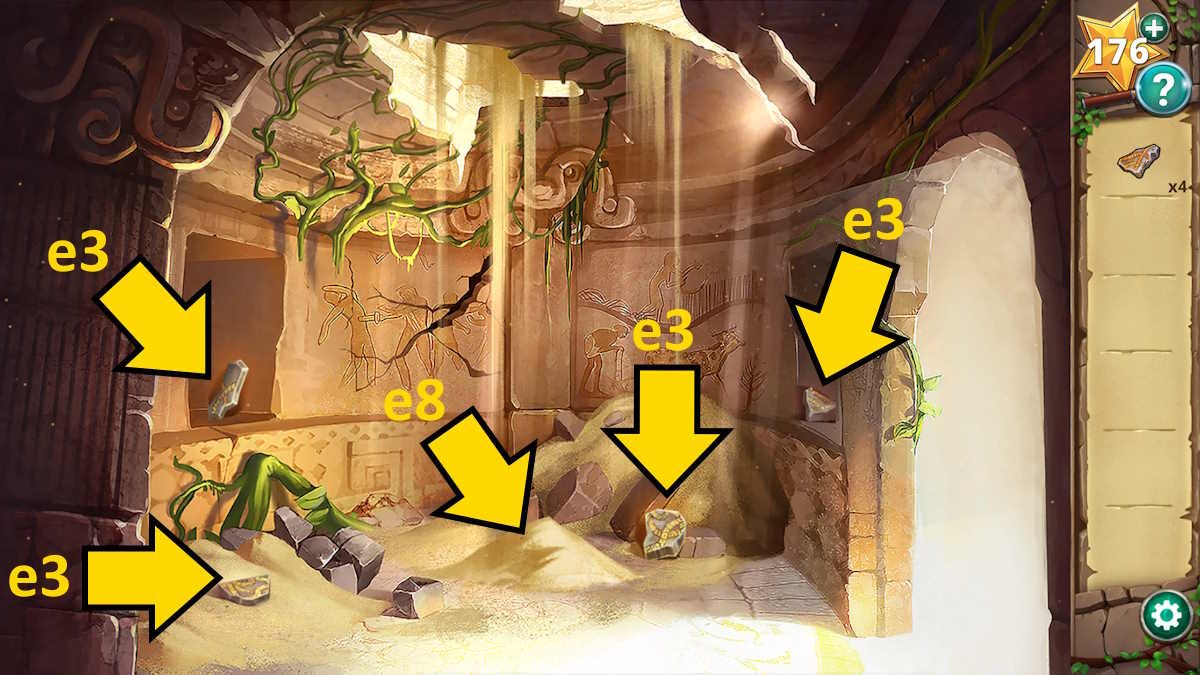
In this area, you’ll come across an additional four Fragments (e3), yet there’s no further content available at present. So, please proceed to the next room (e4).
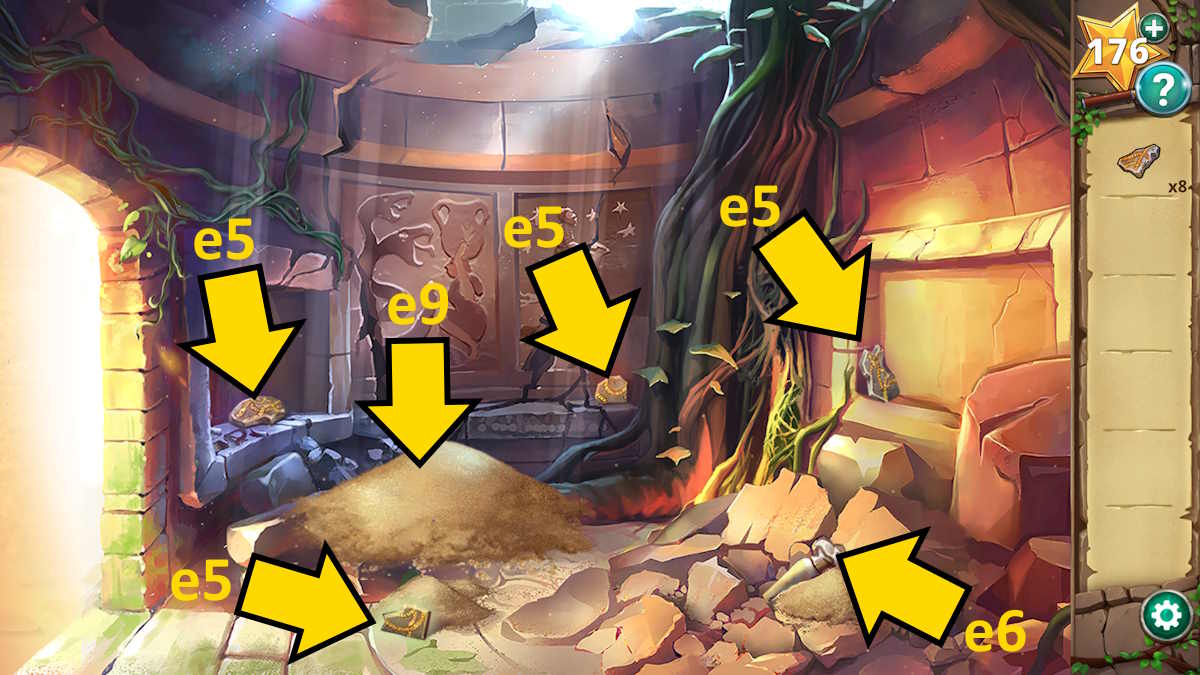
In this area, there are four additional Fragment pieces (e5) and a Hawk Figure (e6) for you. After returning to the main room, press the stone tablet (e7). Following Burns’ inspection, merge the 12 fragments with the tablet to initiate a puzzle. Then, assemble it according to the pattern I have demonstrated.
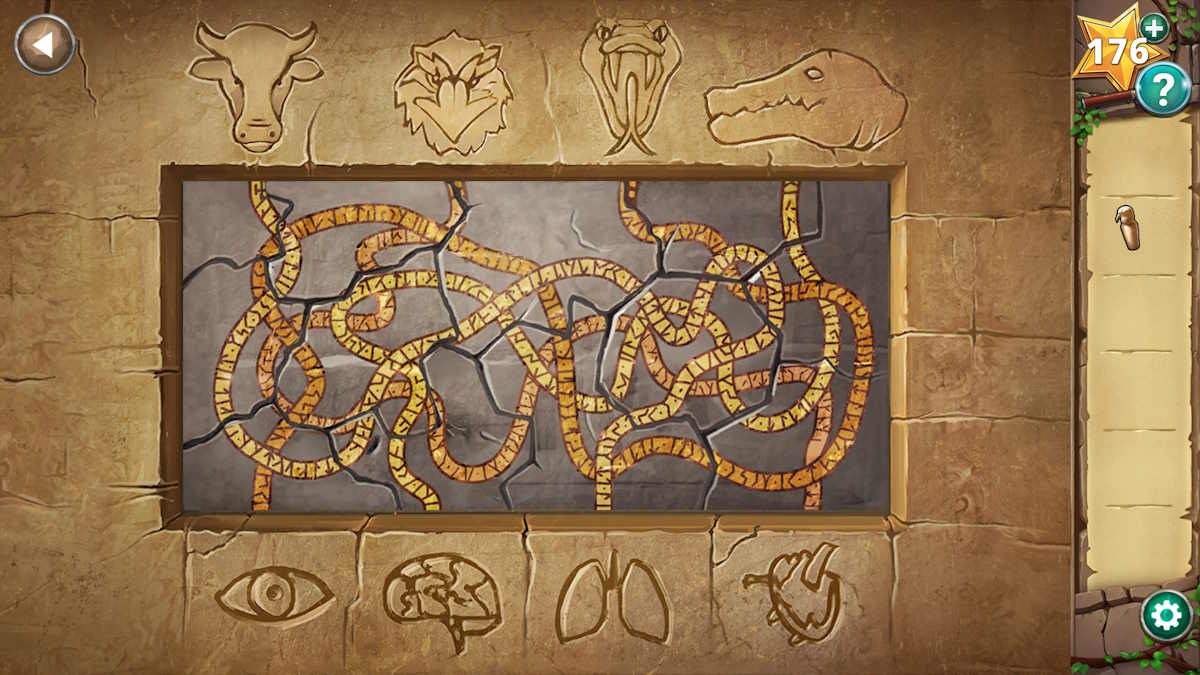
As someone who’s spent hours piecing together intricate jigsaw puzzles, I can tell you that this one is a bit more challenging than the ones I’ve done before. The ability to rotate the pieces with a simple right-click of the mouse adds an extra layer of complexity. But fear not! The different shades of grey serve as helpful guides, indicating where each piece belongs, and the corners provide additional clues. Once you’ve placed a piece in its proper spot, it becomes fixed, unable to be moved any further. It’s a satisfying feeling, knowing that you’ve successfully added another piece to the growing puzzle. And once you’ve completed the puzzle, take a moment to appreciate your hard work before making your way down the stairs that materialize next to the tablet. Trust me, it’s worth it!
The rooms below the ruins
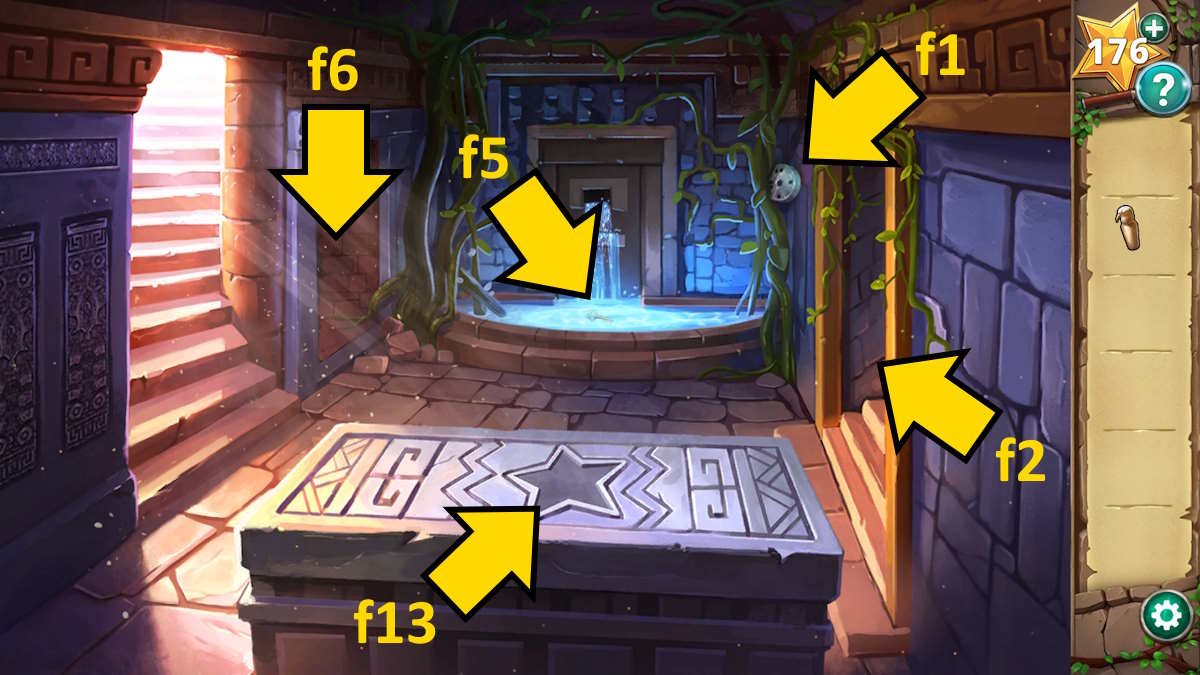
Grab the Gear from the wall (f1) and then click the door on the right (f2).
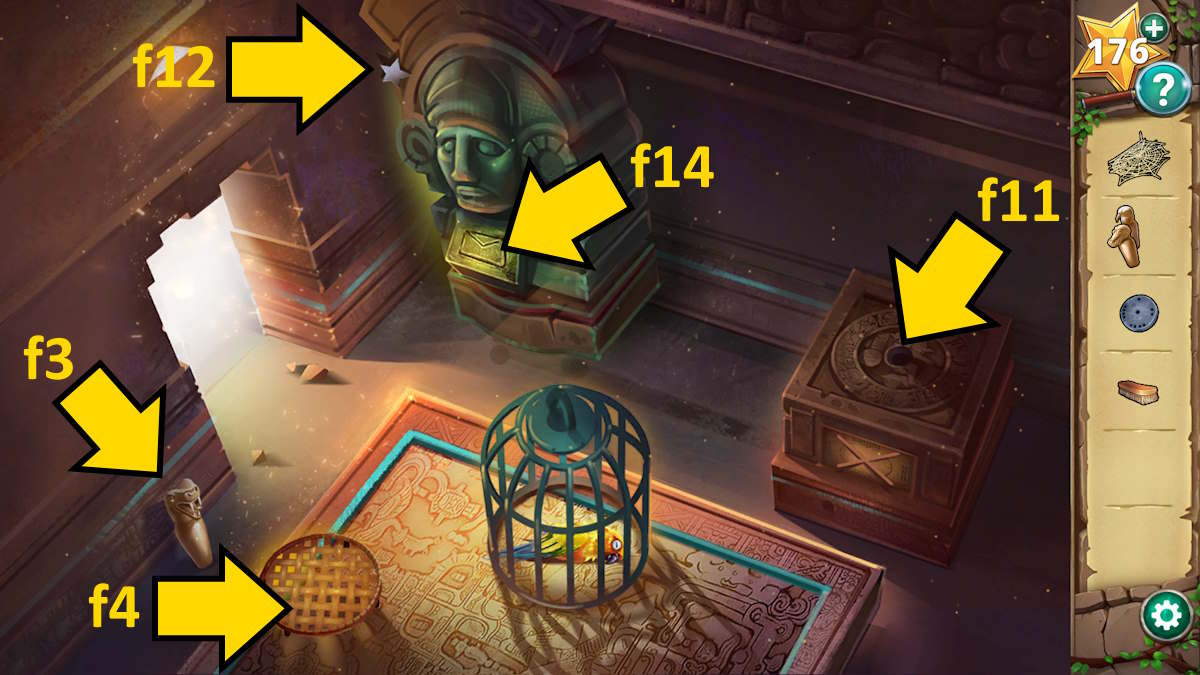
With the Snake Figurine (f3) and Sieve (f4) in hand, make your way back to the initial chamber. Employ the sieve in the pool (f5) to retrieve the concealed Key before progressing through the door on the left (f6).
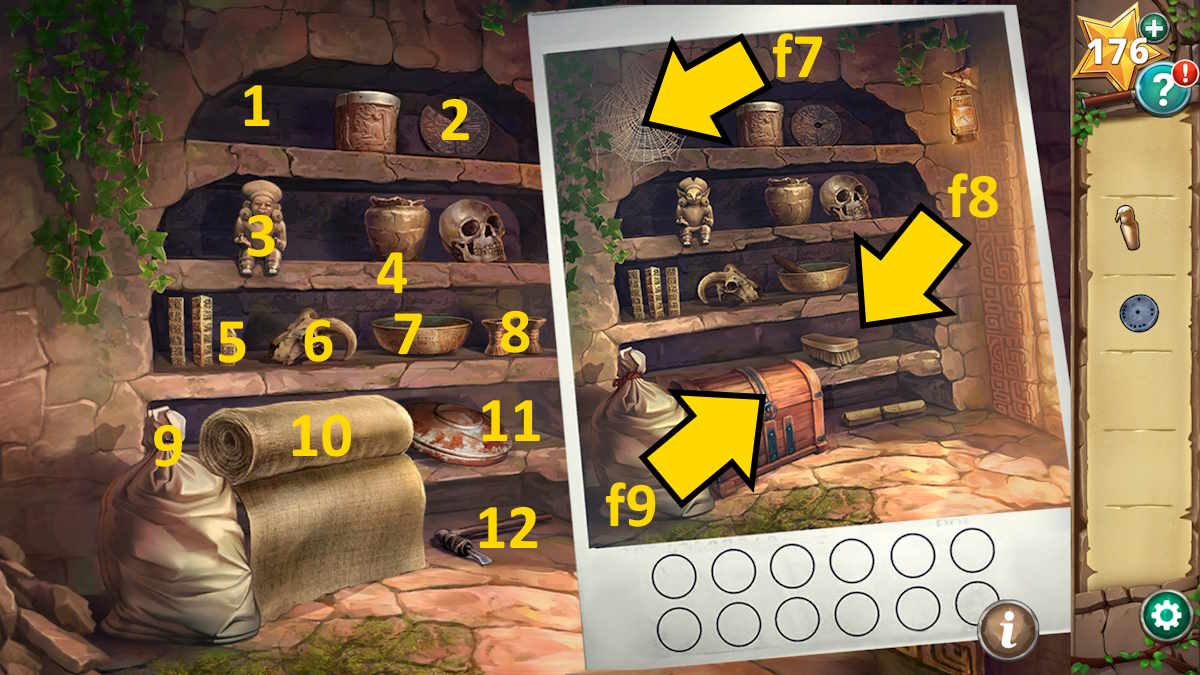
After Rachel’s unfortunate selfie incident, identify the 12 errors in the original picture (indicated above), and subsequently gather three items: the cobweb (located as f7), the crocodile figurine near the door on the floor, and the brush labeled f8. Lastly, unlock the chest using the key and retrieve the rope within.
To continue, you should go back up the stairs and head towards the room on the left. Use the brush there to clear the sand and reveal a hidden gear, which is your second gear. Next, repeat this process in the room on the right to uncover your third gear.
Heed my words, dear adventurer. Make your way back downstairs and locate the box residing in the room to your right-side (f11). Add the three gears into it. Once those gears are engaged, ensure that a total of twelve blue lights illuminate in every section. This accomplished, a pulley will materialize above the cage. Secure the rope onto this newfound apparatus and release the bird with your newfound freedom. Tend to Bert’s injury by applying the cobweb. Once you have done so, click on the healed bird (Bert) to collect it. With Bert now in your possession, use him as an item to obtain the elusive Stone Star (f12).
Go back to the main chamber and employ the celestial stone decorating the tomb (f13) to unlock it and discover an Ox Statuette. Bring the four statuettes to Bert’s room, interact with the envelope on the verdant statue (f14), and deposit the four figurines inside in a detailed view. To solve this riddle, examine the tablet you prepared earlier and consider the lines linking the four animals to distinct body sections as indicated. You will then notice:
- Snake: Eye
- Crocodile: Brain
- Ox: Lungs
- Hawk: Heart
Arrange the four figurines on the corresponding boy parts to finish the puzzle, utilizing the central area for flexibility in arranging the pieces. After successfully placing them, the green statue will move aside, revealing a hidden door nearby. Proceed through it to finish Chapter 3.
Hidden Ruins Chapter 4 walkthrough – Fixing the drone
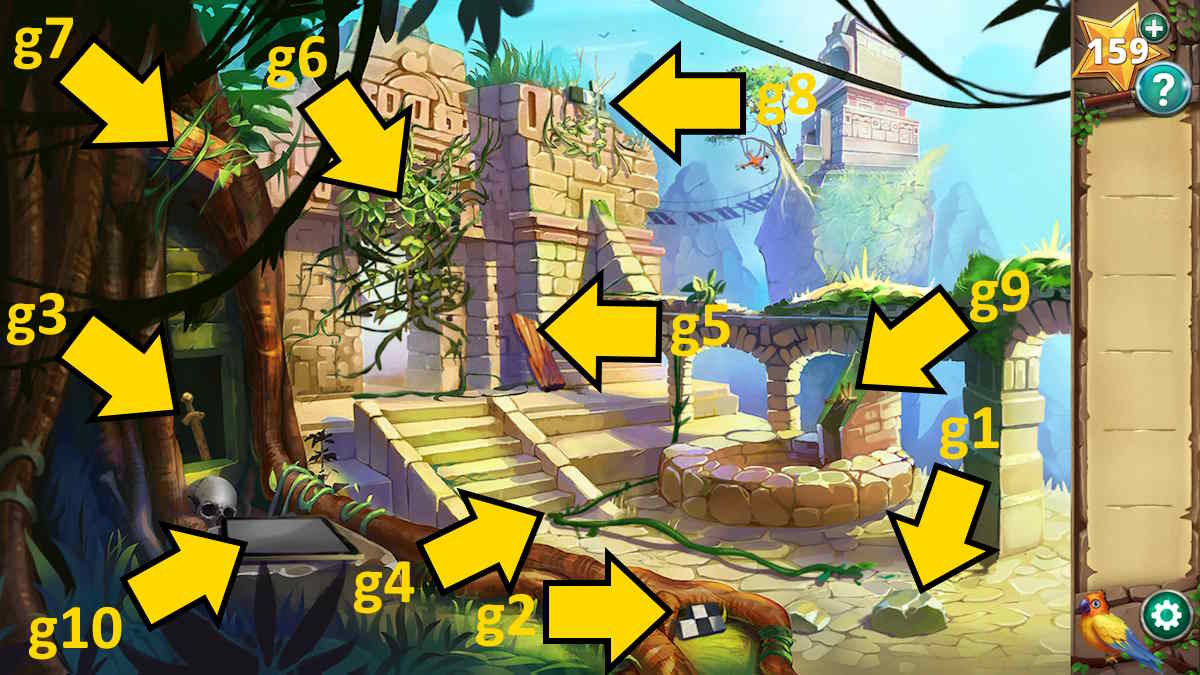
To obtain the first Checkered Piece, move the stone (g1). For the second Checkered Piece, retrieve it from the tree roots (g2).
As an old adventurer with years of experience under my belt, I’ve faced countless challenges and puzzles in my quest for treasure and knowledge. Following these instructions, I approach the wall (g3) with a sense of familiarity, reaching out to grasp the hilt of the ancient sword embedded there. With a firm grip on the blade, I set off on this new adventure.

As you make your way into the next chamber, seize a Checkered Piece number four (h1), followed by picking up piece three of the Planks (h2). Next, employ the sword to acquire vine number four (h3) and vine number five (h4). Once you’ve obtained the fifth vine, a Checkered Piece number five (h5) will appear on the floor below. Don’t forget to pick that up as well.
Repairing the bridge to the shrine
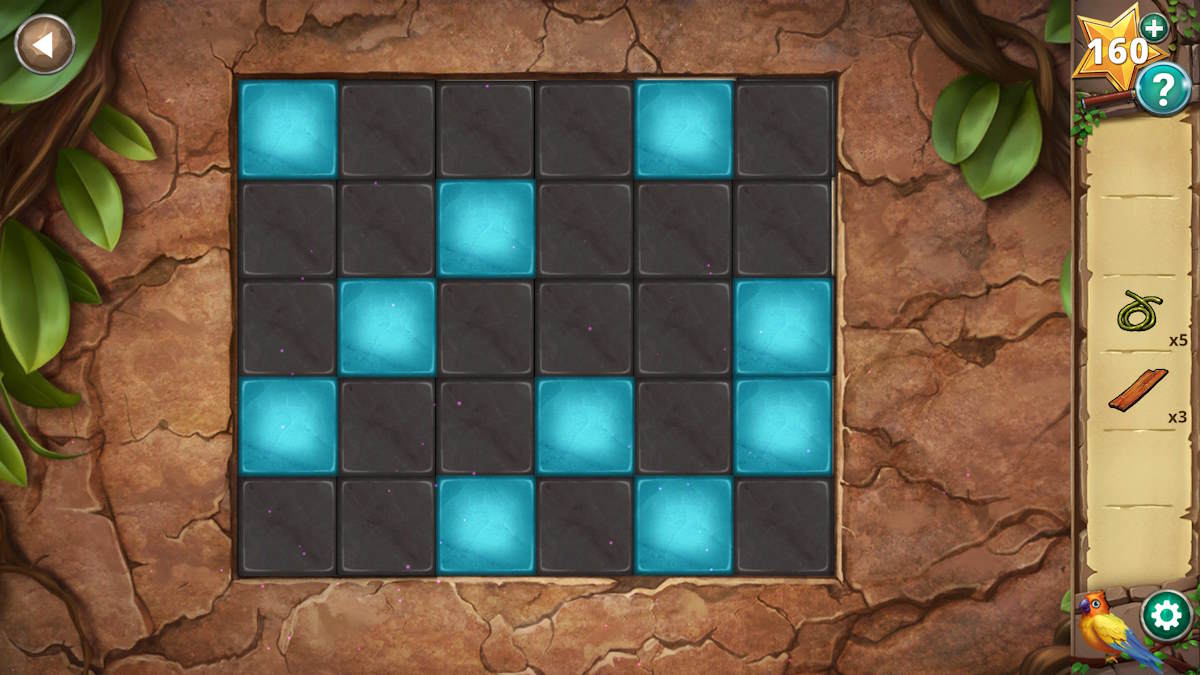
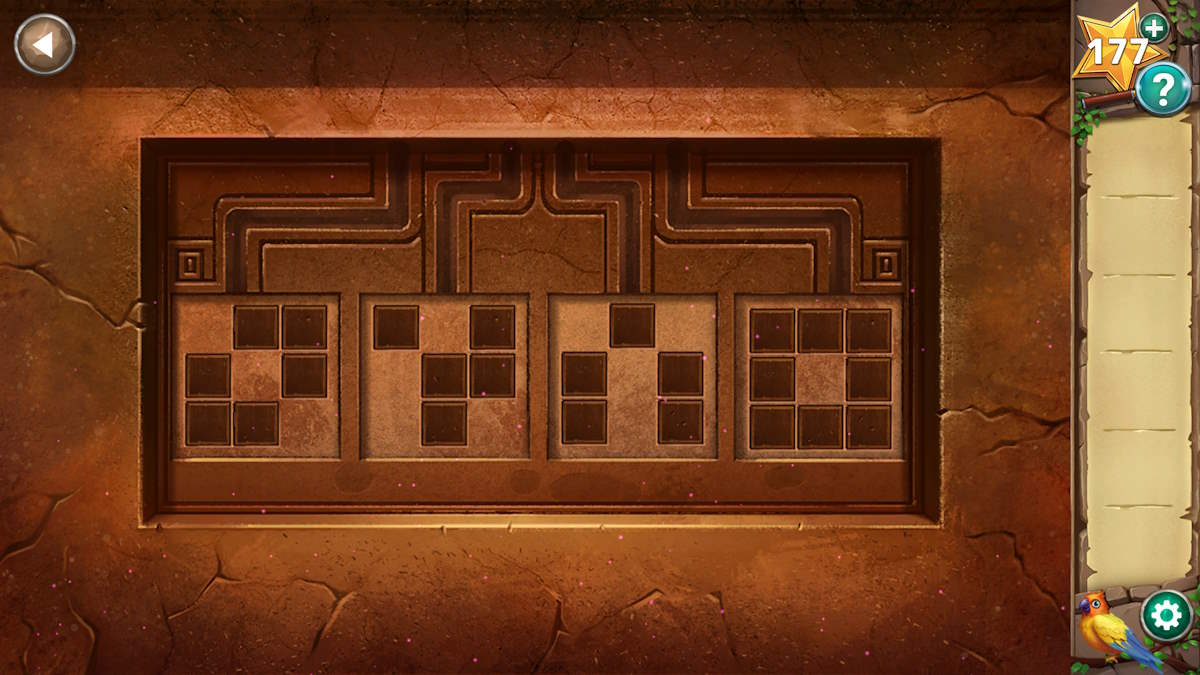
After cutting the vines against the wall (h3), place the checkered pieces there and design a chessboard pattern (b old “create” to “design”). Once finished, every spot will turn black. Keep in mind, the board has an equal number of squares as the pools outside, so replicate that layout to solve the puzzle (refer to above). Prior to passing through the door, observe the symbols located at the base of the statues here (b old “appear” to “located at the base of”).
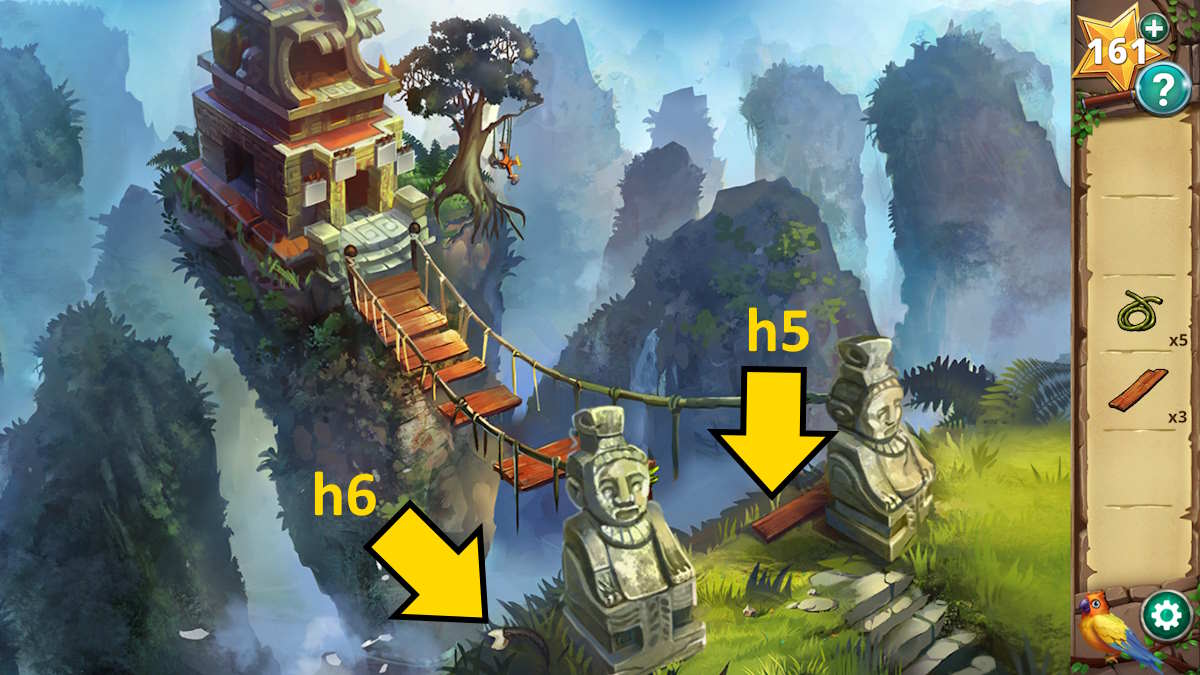
As a gamer, I’d suggest this: I’ll grab the fourth plank from the bridge’s beginning (h5) and a Bird Talon as well (h6). Heading back to the start, I’ll employ the talon to unclog the water pipe’s blockage (g9), releasing a fifth plank that I can collect. Returning to the bridge, I’ll mend it by adding one vine and then one plank until all five are firmly in place. Once repaired, I’ll cross the bridge to reach the shrine on its far side.
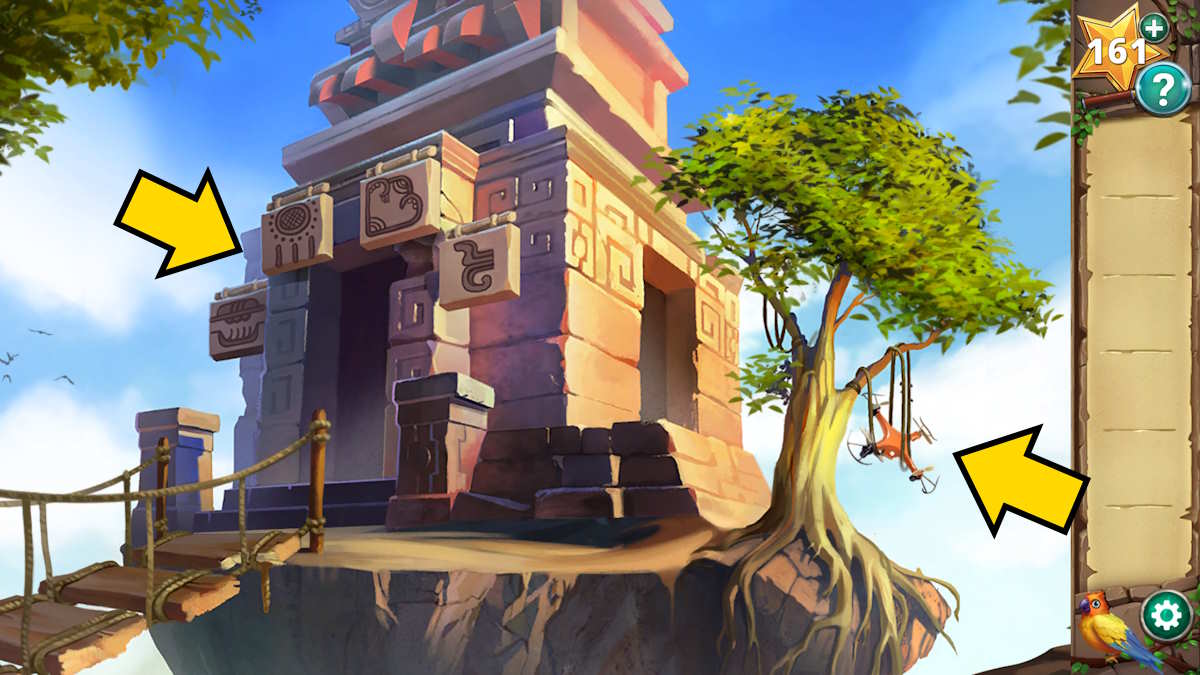
Observe the four symbols floating above the shrine, indicated here, before making your way back to the room with the water pools. Tap the designs beneath the statues in sequence, left to right, to correspond with those at the shrine. The statue second from the left will then release the “Spear” (h7). Retrieve the spear, retrace your steps to the shrine, and employ the spear to collect the “Computer Chips” and the “Drone” dangling from the tree.
Choose the tablet labeled “g10” and attach the computer chips to initiate the next challenge. Position the eight chips appropriately in their designated slots, remember that they can be inserted end-first (refer to the solution for guidance), and you’ll gain command over the drone. Make your way back to the room with the pools, select the drone from your items, tap on the vulnerable part of the wall indicated by “h8,” and click the resulting hole to finish Chapter 4.
Hidden Ruins Chapter 5 walkthrough – The river
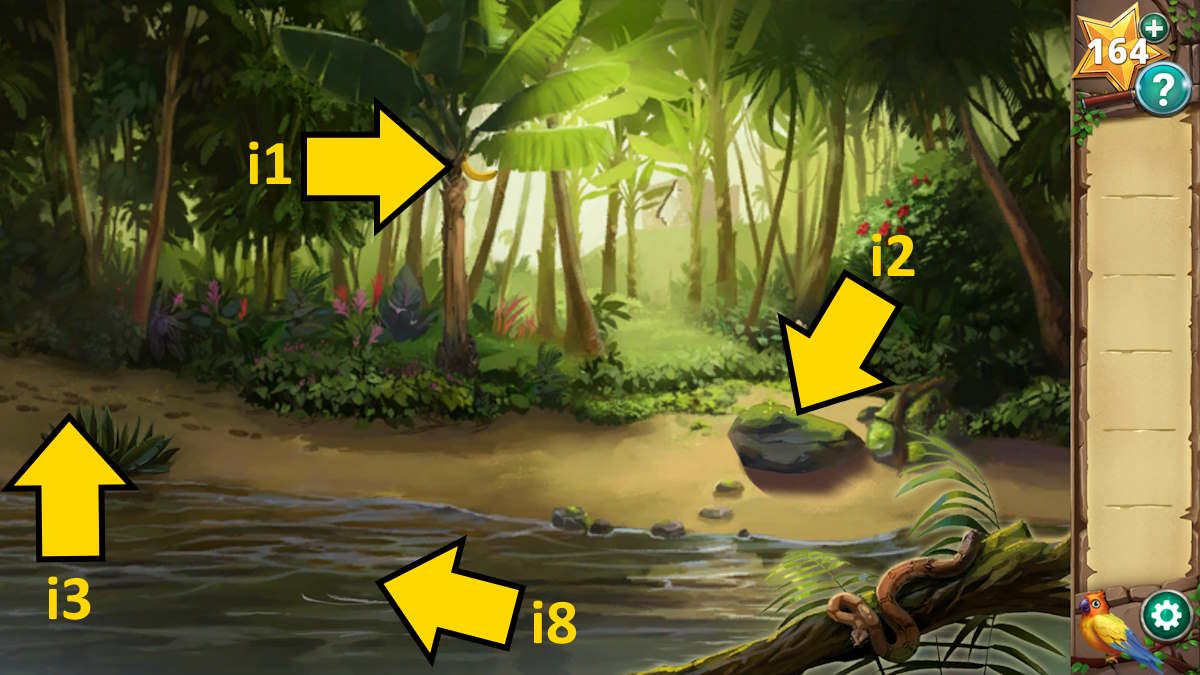
After that, make your way over the river by picking up the banana (i1) and the heavy rock (i2). Next, press the footprint icons (i3) to advance along the riverbank.
As a seasoned adventurer with years of experience under my belt, I’ve come across many perilous situations that required quick thinking and resourcefulness. Following these instructions could save someone’s life. So let me break it down:
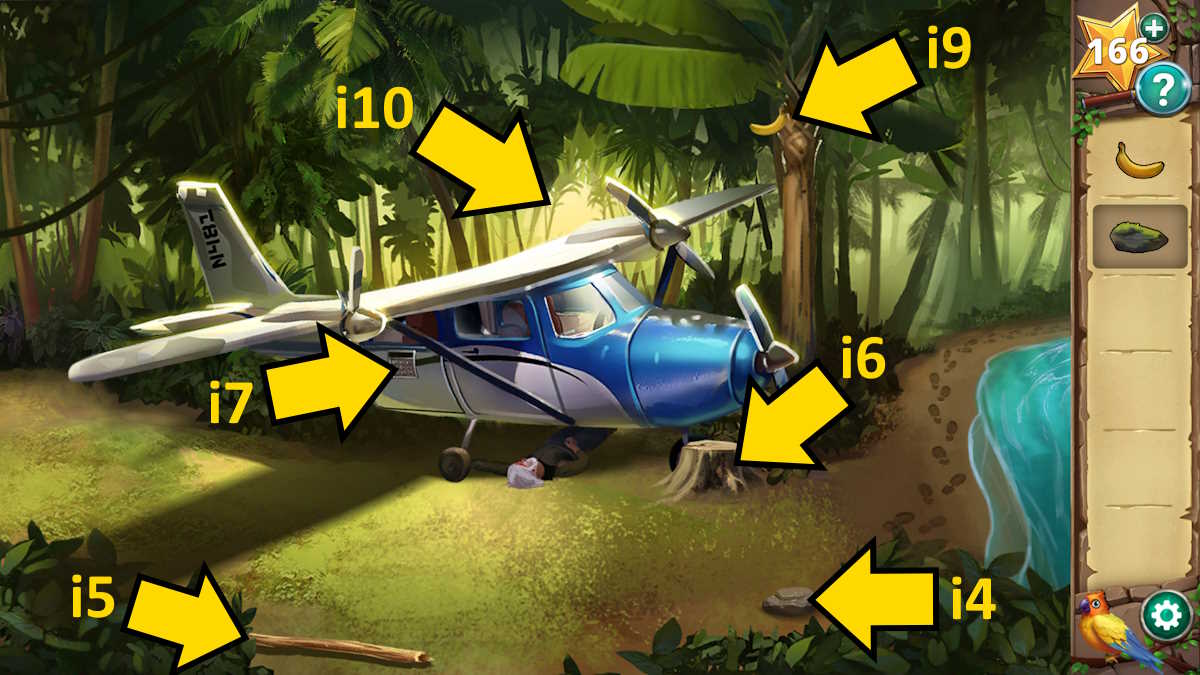
After chatting with the survivor, make your way back to the initial screen. Retrieve some worms using the fishing rod from under the heavy rock at location i2. Subsequently, cast your line in the water at location i8 to catch a fish. Bring the fish to the survivor and he’ll reward you with another banana. Have Bert fetch a third banana from location i9, and then click on the backdrop to advance to the logging camp.
The logging camp
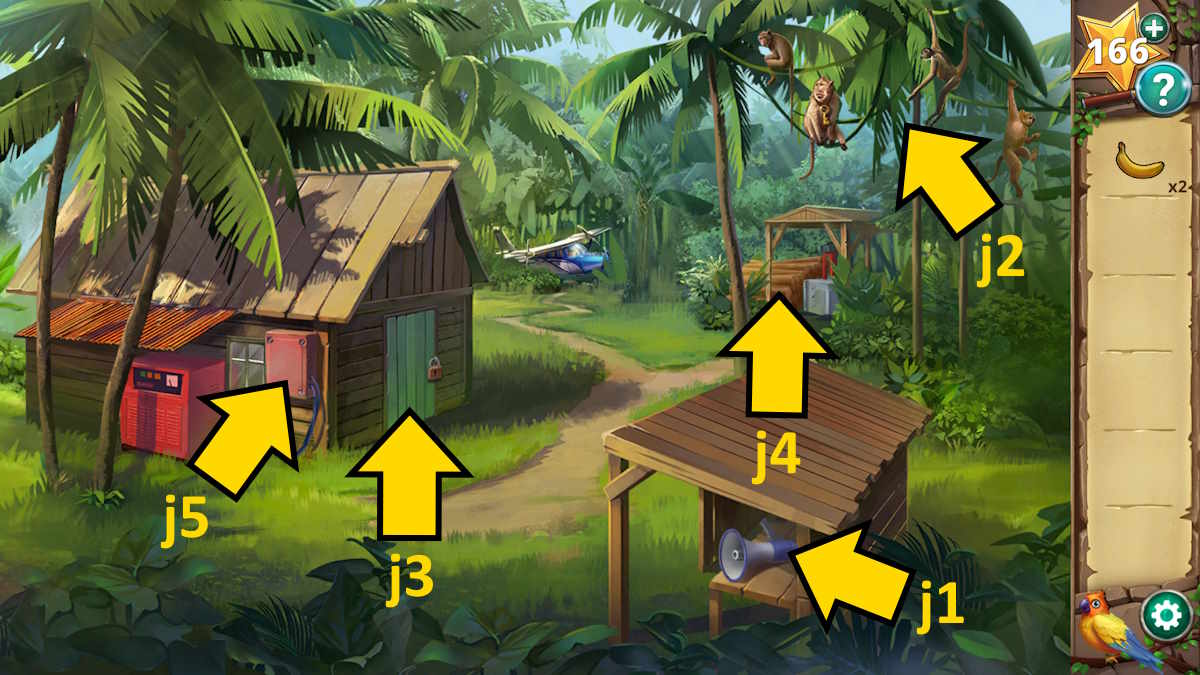
Take the Bullhorn (j1), and then click the monkeys (j2) for a close-up.
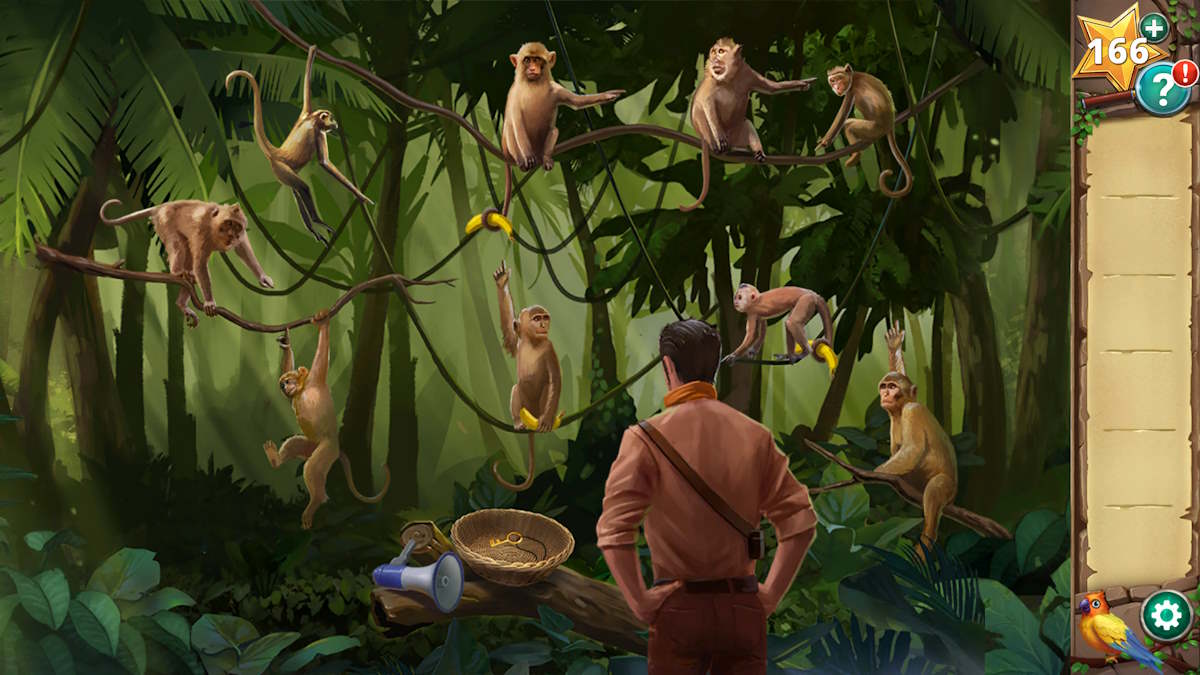
Place three bananas in the bowl first, followed by the bullhorn. Afterward, distribute the bananas among the monkeys indicated above. Once they have received their bananas, use the bullhorn to surprise them. Ensure that you have handed out bananas to the right monkeys for the final one to drop the key into the bowl. Pick up the Key and employ it to unlock (open) the shed (j3) before entering.

As an experienced troubleshooter with a knack for decoding cryptic instructions, I’ll gladly follow the steps laid out before me. With a confident stride, I approach the windowsill and pluck the first Fuse from its resting place. My eyes dart to the table next, where I deftly grab the Oil Spray with a practiced hand.
Glancing at the shift schedule posted, you’ll observe that for the visible shifts, the difference between the first and second numbers equals the third. Applying this logic, we can determine that the four absent shifts (from top to bottom) are 9468.
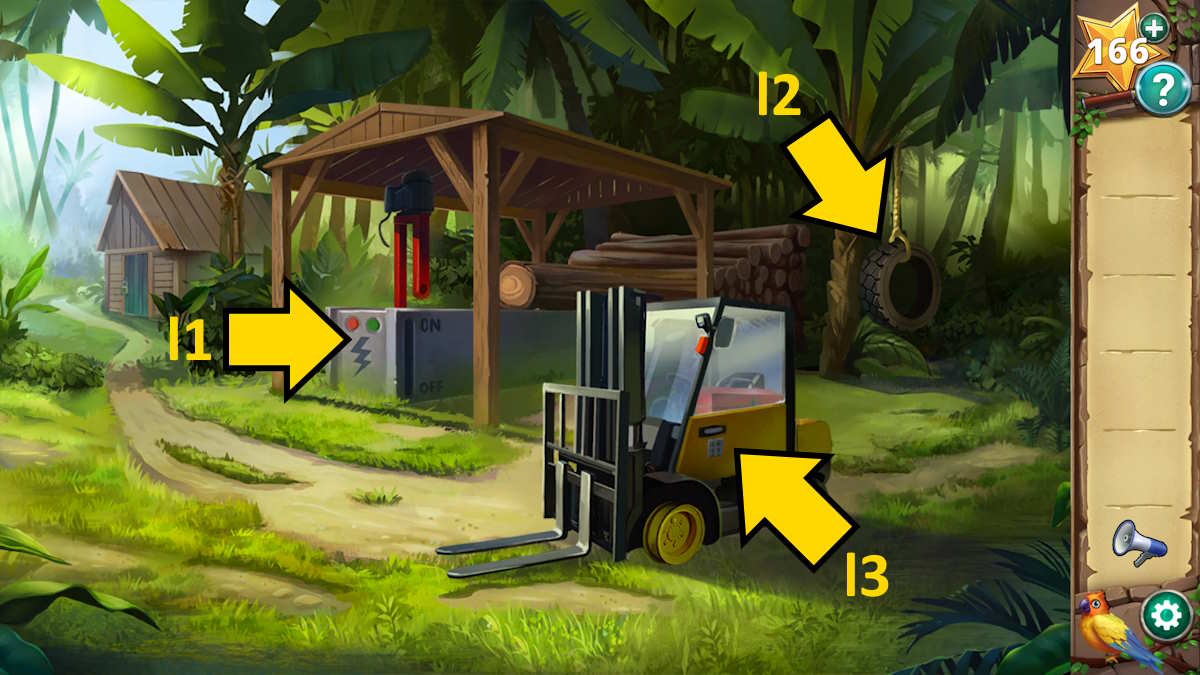
Step outside once more and identify the woodpile (j4) as your next destination. Transfer the saw blade to the sawmill (l1) and employ shears to eliminate the tire (l2), securing both the deflated tire (Flat Tire) and a Rope in the process. Use the code 9468 (l3) to unlock the forklift truck’s door, and subsequently apply oil from your supply on the rusted toolbox within to retrieve a Screwdriver.
Repairing the forklift truck
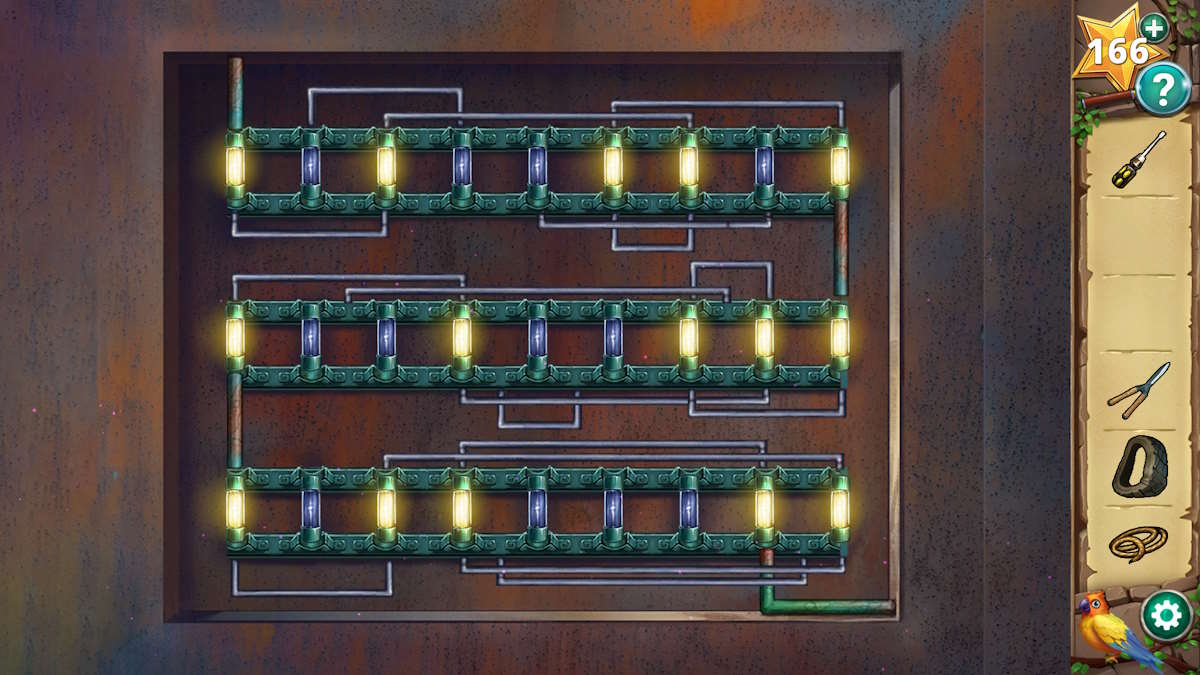
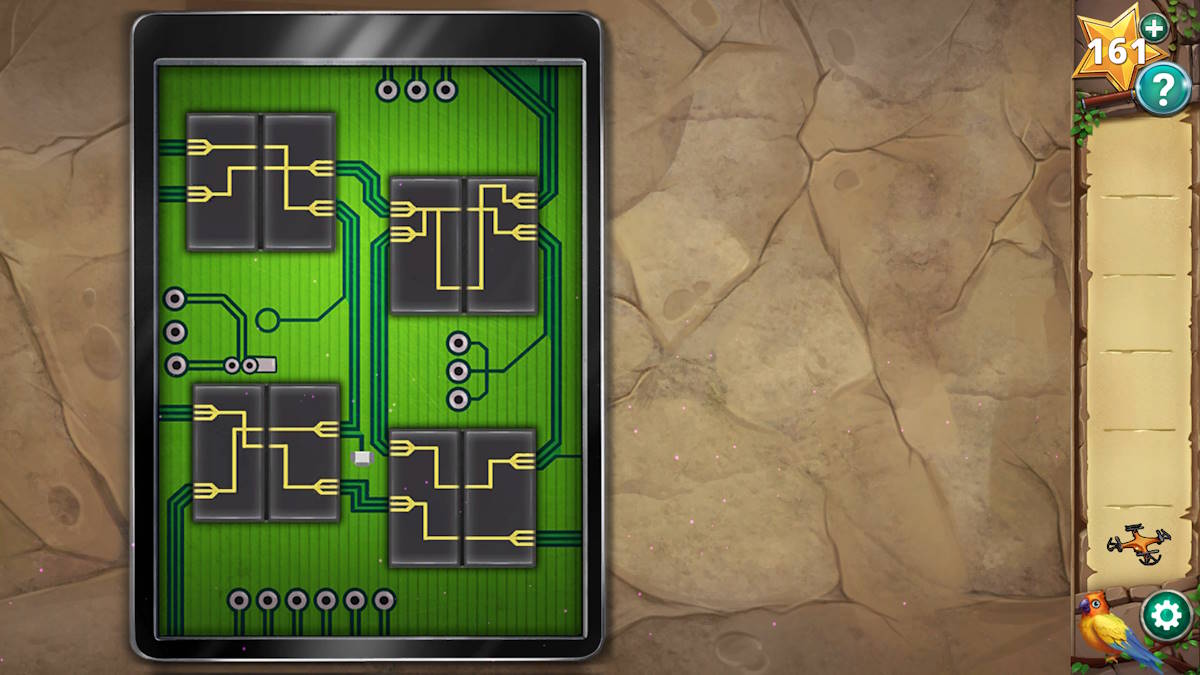
Go back to the shed and take out the screwdriver to open the cover of the outdoor fuse box (J5). Get a clear view of it by clicking on the fuse box for a closer inspection, and then insert the three fuses. To complete the electrical circuit, move the metal connectors located above and below each row of fuses to establish a connection from the top left end of the circuit board to the bottom right. Have a look at the diagram above for reference.
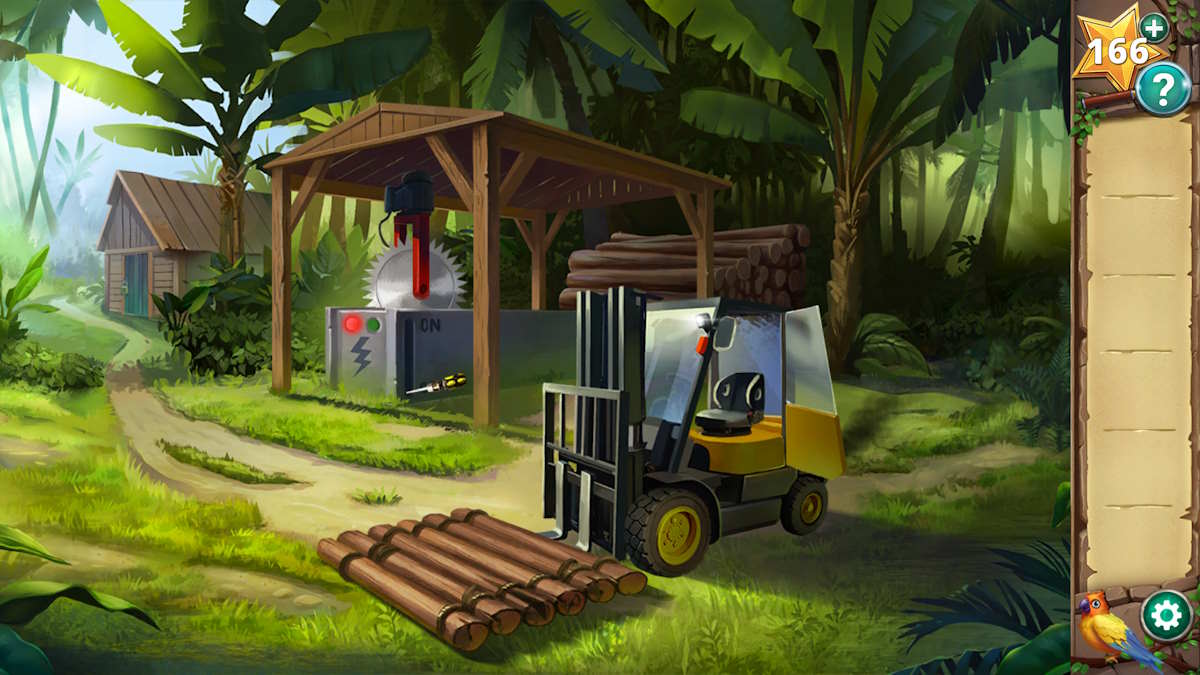
After the electricity comes back on, you’re able to return to the shed and employ the air compressor (k3) to inflate the deflated tire and retrieve it. You can then attach the tire to the forklift truck (l3), thereby completing its functionality. Utilize a screwdriver as an impromptu handle to activate the sawmill (l1). Add the rope to the logs being sawn, fashioning a raft, but you’ll require another length of rope to secure the other side.
Go back to the plane and use the shears to chop down the net where you kept the stones (step 6). Take out the stones from the cut net and obtain another Rope. Make your way to the forklift, employ the rope to finish building the raft, and voila, that concludes Chapter 5!
Hidden Ruins Chapter 6 walkthrough – Entering the pyramid
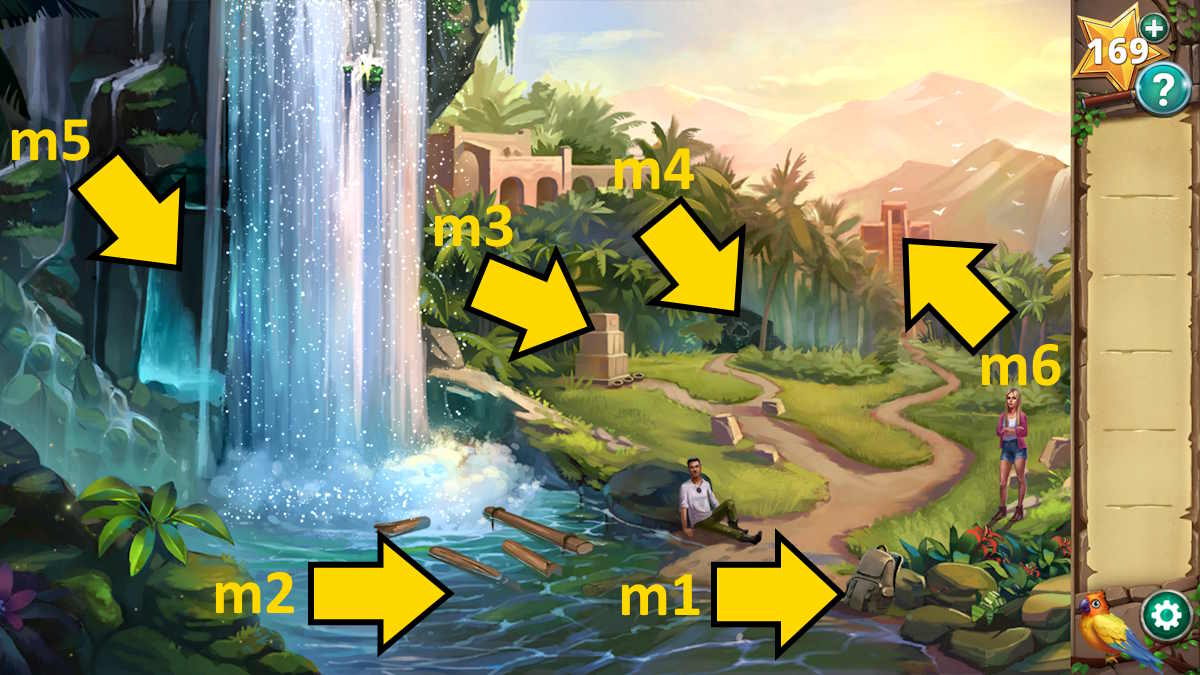
After you’ve regained your composure following the fall down the waterfall, take a peek inside your pack (m1). You’ll discover a Diving Mask and a Slingshot hidden within. Make use of the mask first (m2), and as you gaze into the water, a concentration-testing puzzle will emerge.
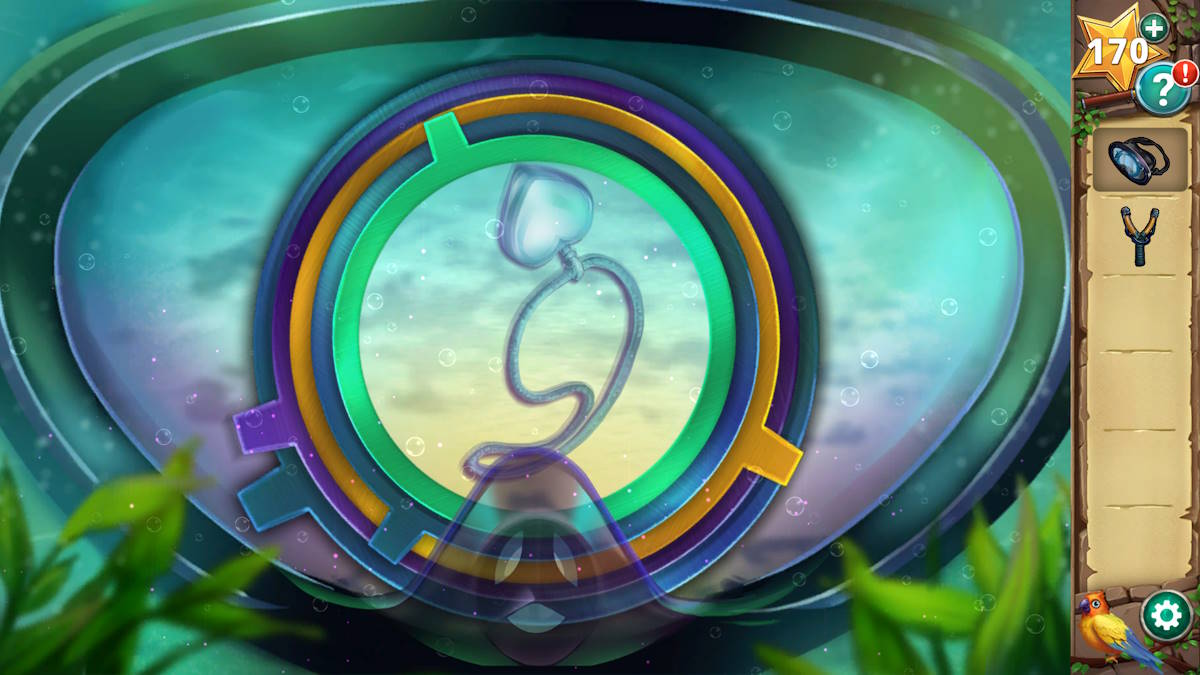
Adjust the dials to reveal three distinct objects: a boot, a bottle, and lastly a necklace (referenced earlier). The orientation of the items is irrelevant while manipulating the dials; they merely need to align for easy identification. There’s no risk in this process, feel free to keep turning until completion.
To locate monument number three, you’ll first have to perform three distinct offerings: an egg, a tooth, and a gem. Following this, Rachel will confess she misplaced a diamond from her necklace at the waterfall. Hand over the necklace to her, and she’ll reward you by opening it, revealing a Diamond Ring. Thus, one offering has been completed; two remain.
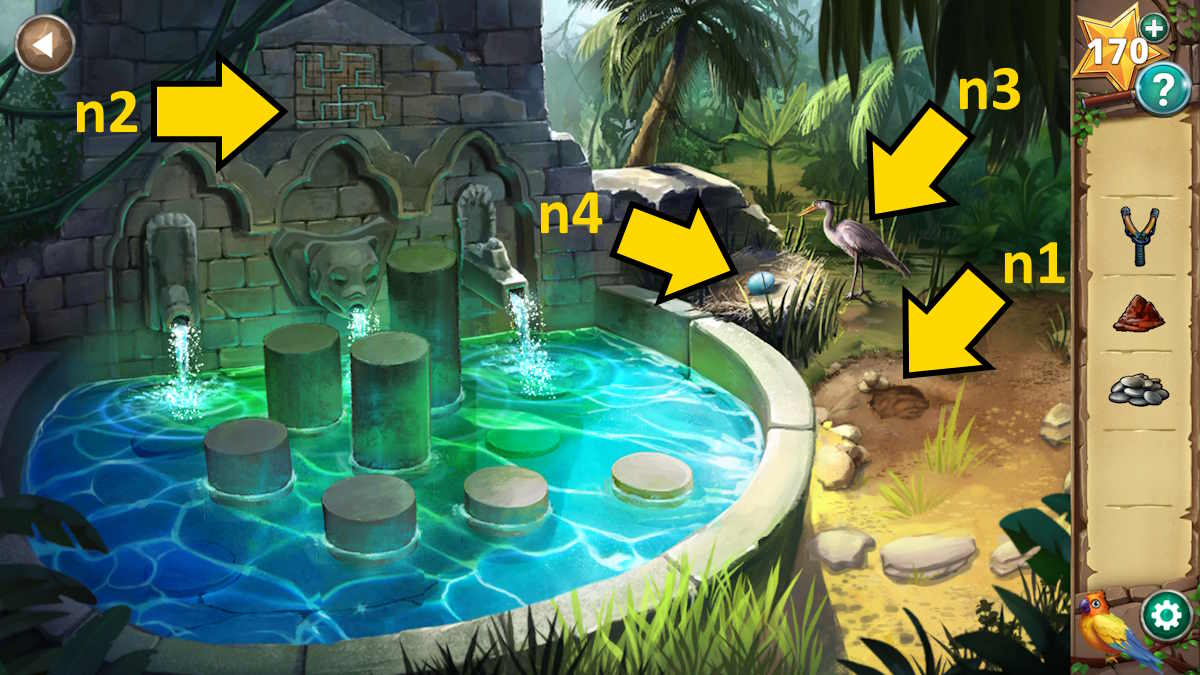
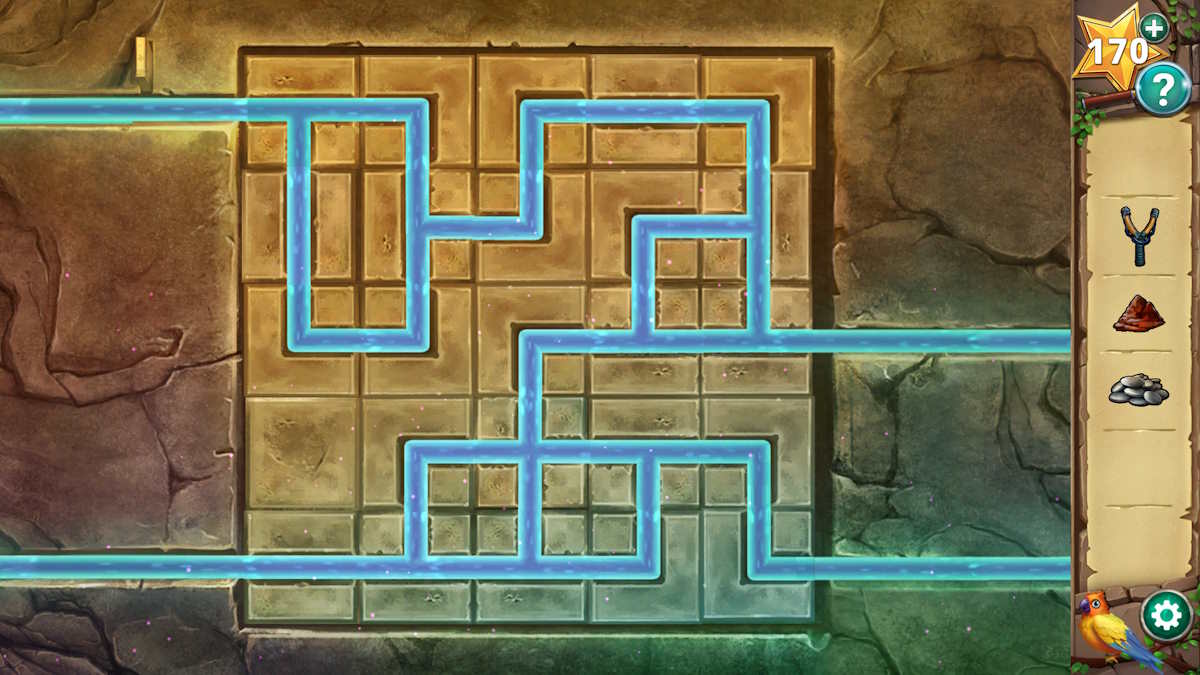
At station m4, find the nearby fountain and approach it. Gather some muddy substance (n1) in your hands. Next, tap the intricate design on the fountain’s summit (n2) to initiate a challenge. Rotate the pipes by clicking them so that water moves from the left-hand inlets to the right ones. Refer to the solution below for guidance. Once you have solved the puzzle, water will emerge from the fountain.
Observe the heights of the pillars in the fountain, labeling the shortest as number 1 and the tallest as number 7. Keep this information in mind, and afterwards make your way to the cave situated beside the waterfall (m5).
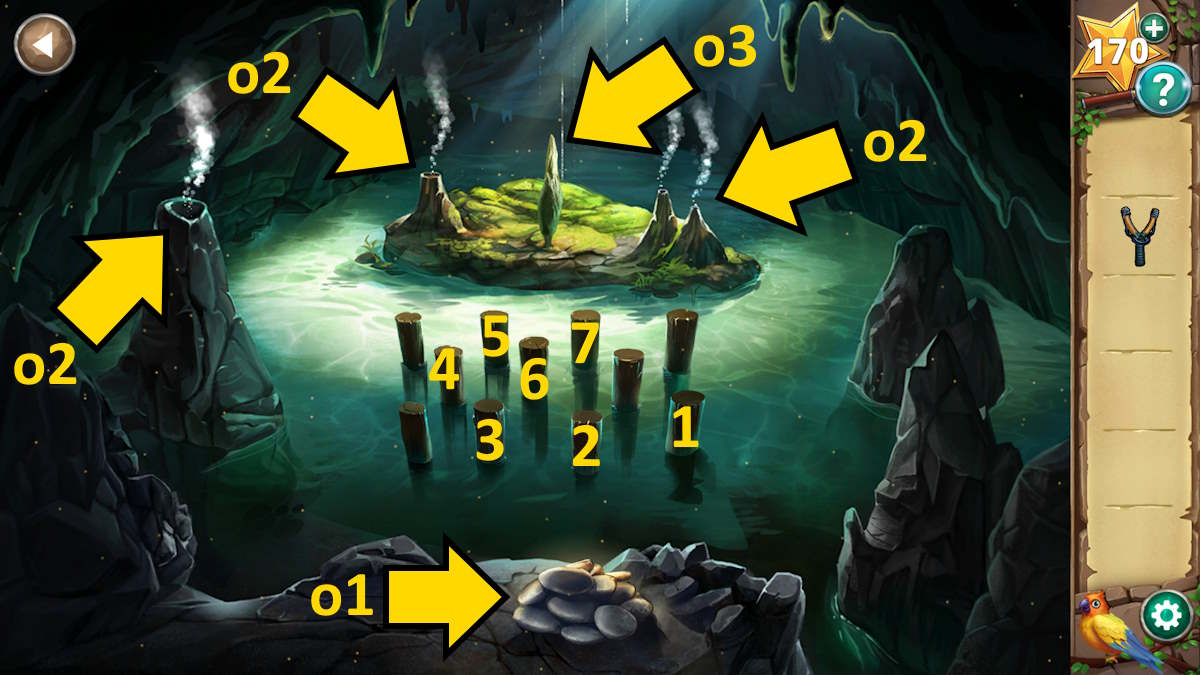
As someone who has spent countless hours by the water’s edge, observing the delicate balance of nature and the wonders it brings, I wholeheartedly agree with these instructions. I remember the thrill of discovering pebbles, their smooth texture and varied shapes a testament to the diverse world hidden beneath the surface. And just as I carefully pick them up, my mind drifts back to those logs in the water, marked for a reason I can’t quite recall yet.
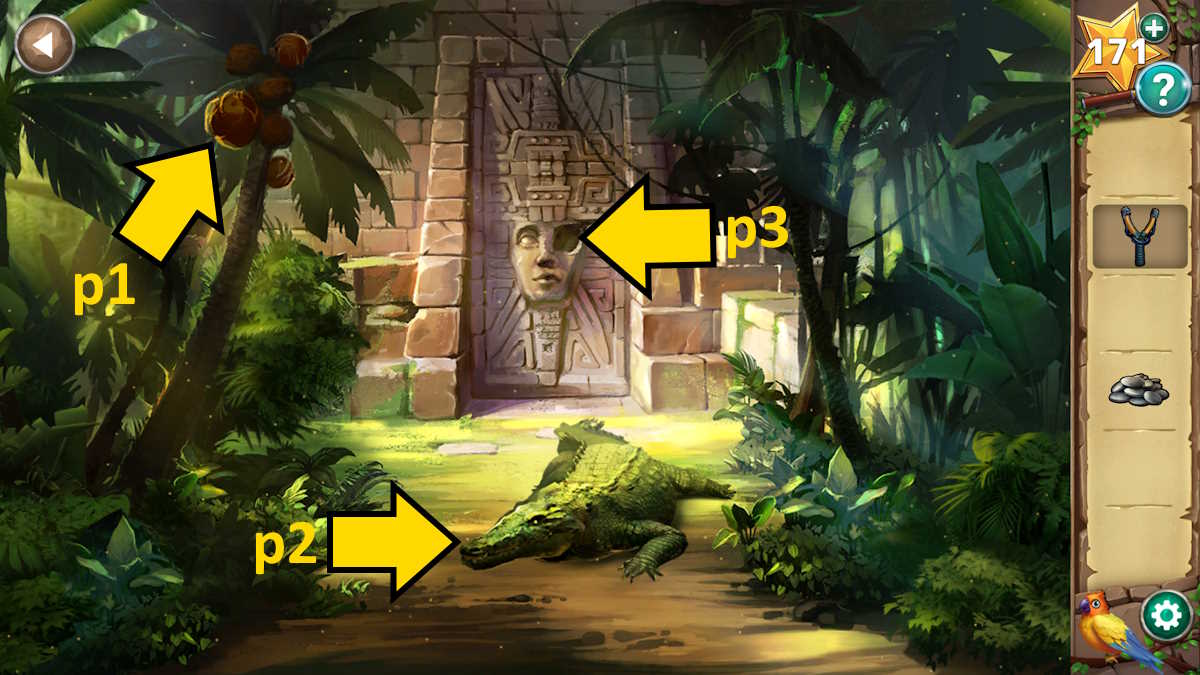
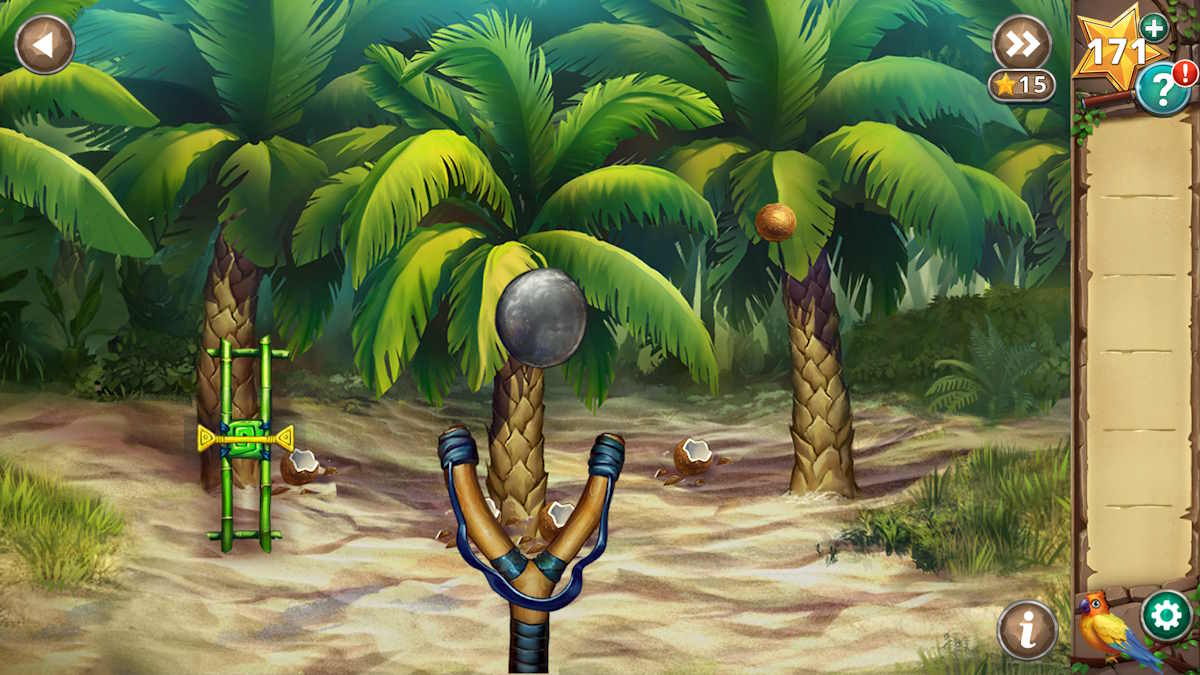
Step outside again towards the secluded pyramid in the distance (m6). Retrieve your slingshot from your belongings and approach the coconuts nearby for a closer look (p1). Enter slingshot mode once ready, add the pedestals into your field of view to initiate a mini-game. Successfully knock down all five coconuts before picking up the unbroken one (Coconut) and making your way back into the cave. Interact with the flower (o3) using the unharmed coconut to acquire a Fragrant Coconut.
Go back to the temple and hand the coconut filled with rich meat to the crocodile (step 2), which will retreat – yet not before leaving a “Crocodile Tooth” behind! Next, you need an egg. Make your way back to the fountain and employ Bert’s abilities to lure the bird nearby (point 3), enabling you to grab its “Egg” (step 4) while Bert continues his melody. Finally, head to the altar, put the three offerings in their respective baskets, and obtain the “Stone Eye” as your reward.

Go to the next pyramid and insert the eye into its slot to unlock the door. Choose the door to proceed through it, and with that accomplished, you will have finished Chapter 6!
Hidden Ruins Chapter 7 walkthrough – The inner sanctum
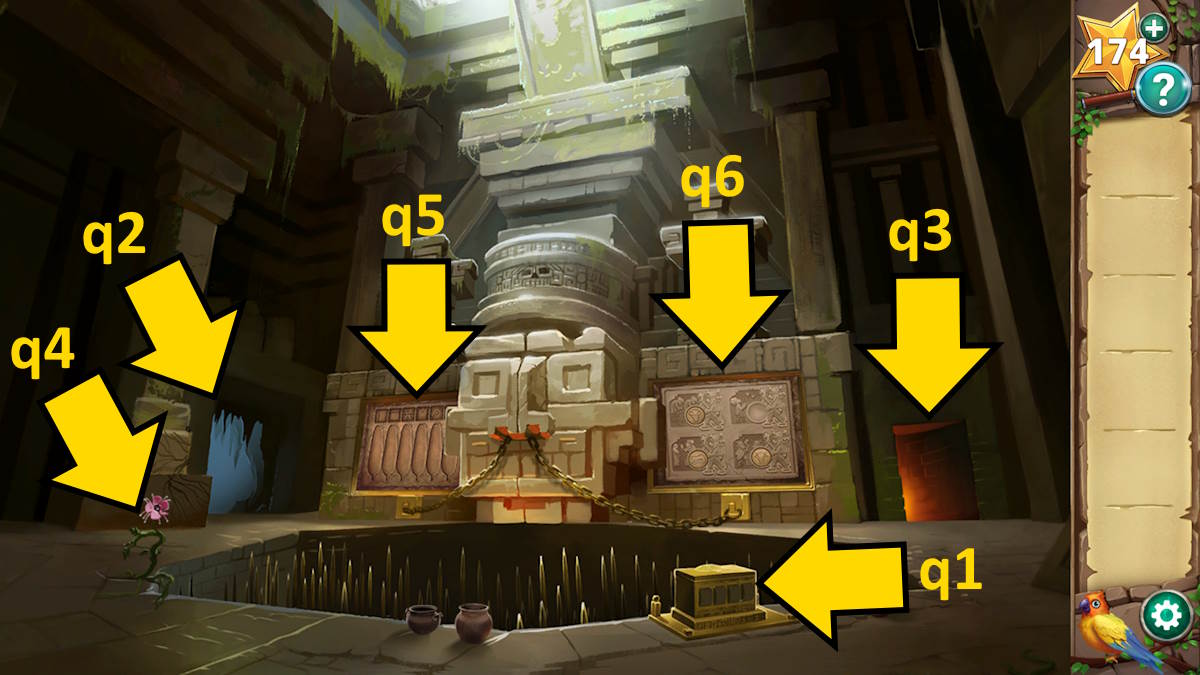
As a gamer, I approach the next challenge in this adventure by examining the inner sanctum of the pyramid. Before me lies a central door guarded by three intricate puzzles. I focus my attention on the golden code box (q1) to the side. By carefully observing the arrangement of the colored gems within each section – red, yellow, green, and then blue and purple combined on the fourth digit – I record their positions for future reference. For now, there’s no further action I can take here.
The mechanical maze
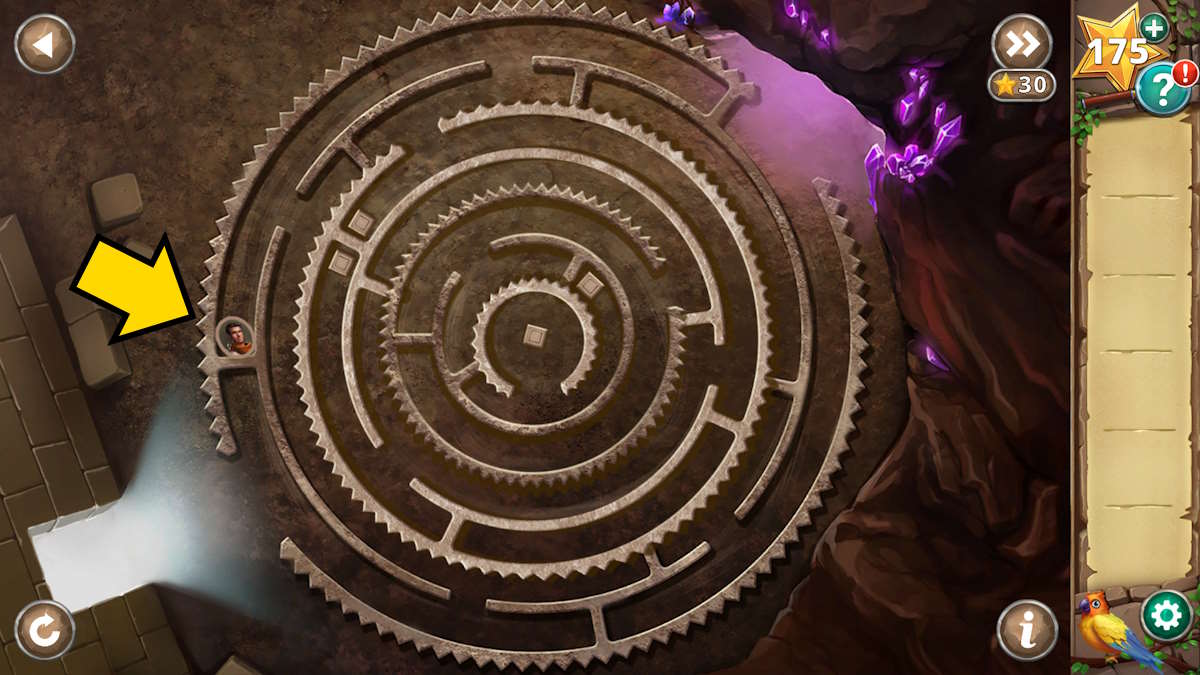
To reach a puzzle featuring a mechanical labyrinth, proceed by entering the door on the left (q2). As you maneuver your character over one of the small, square checkpoints, the maze will undergo alterations. Initially, move right, then left, and finally left again to reach the most distant square on the maze’s left side (indicated above). Keep in mind that the maze undergoes modifications exclusively when you land on one of these checkpoints.
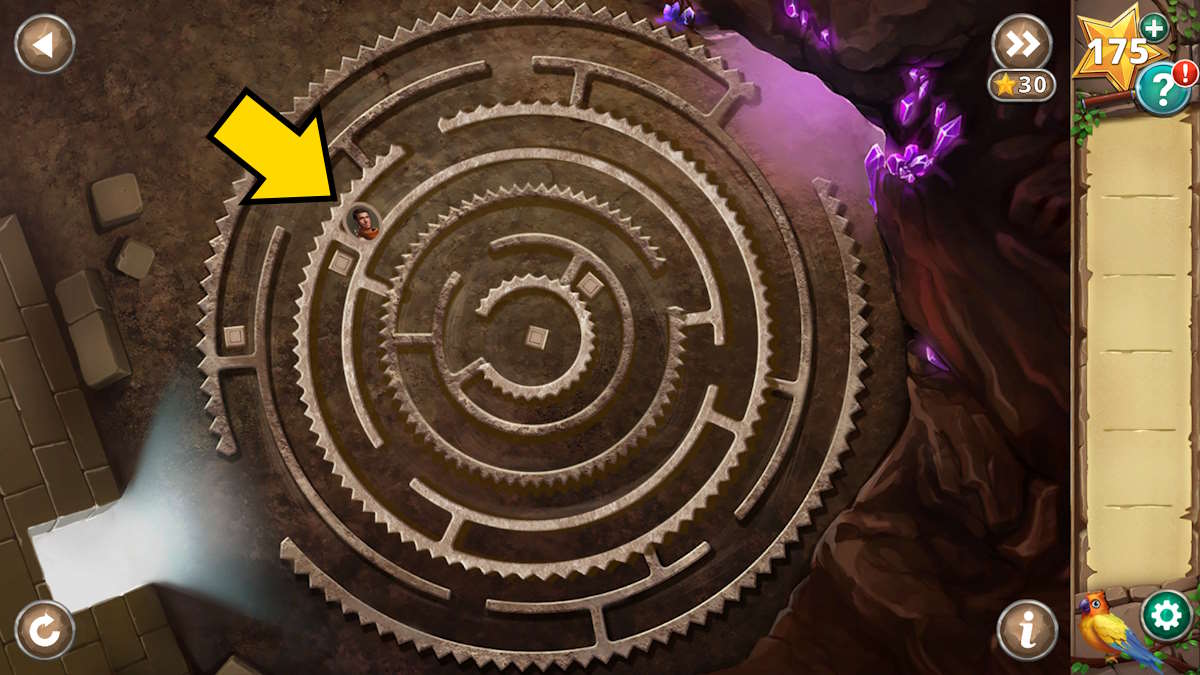
Go to approximately 12 o’clock on the outer circle, then lower your gaze, and relocate around 10 o’clock for the second square (refer to the figure above).
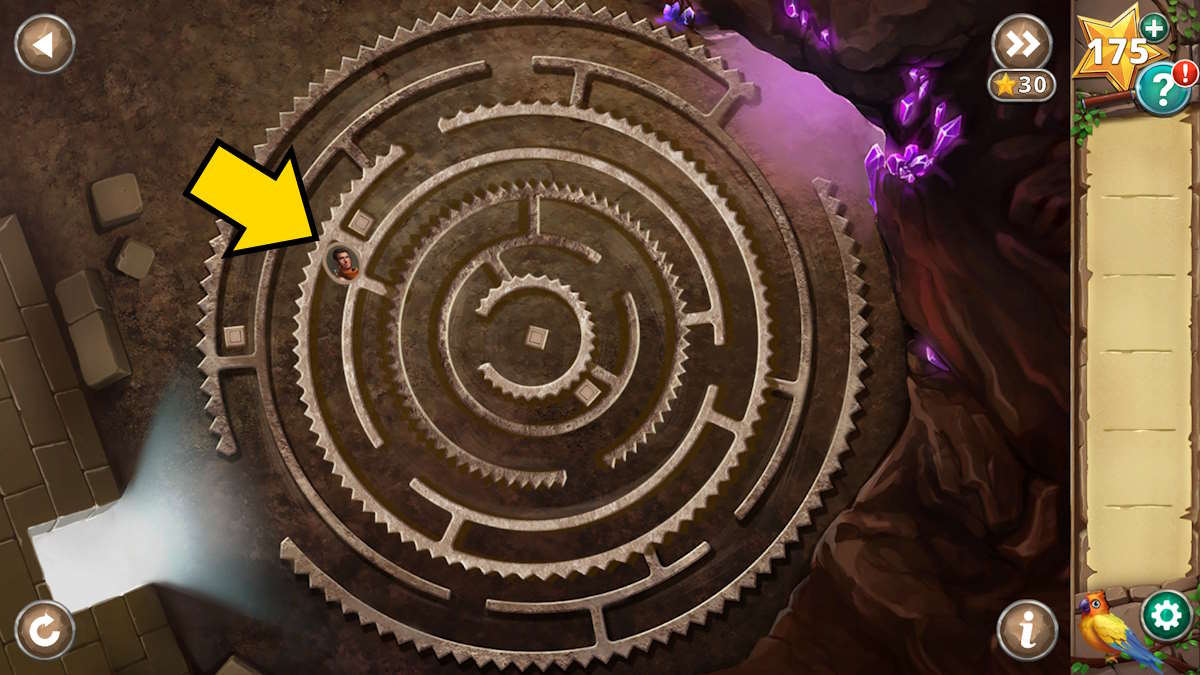
To reach the square located on the other side of the wall, go around the entire circle in this direction (pointing) before arriving at your destination.
After that, go back to the previous square you were at (refer to the earlier location)! You have the option to move off a square and then step back on it to make it active once more. Activate these two squares successively until the desired image is formed.
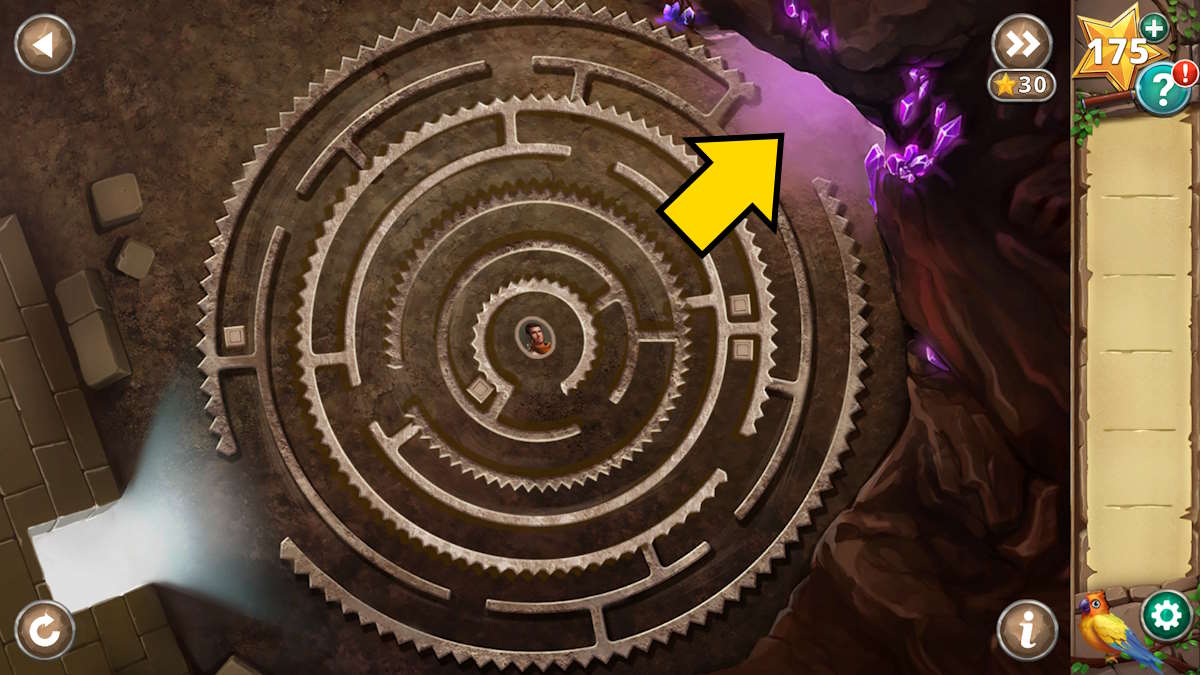
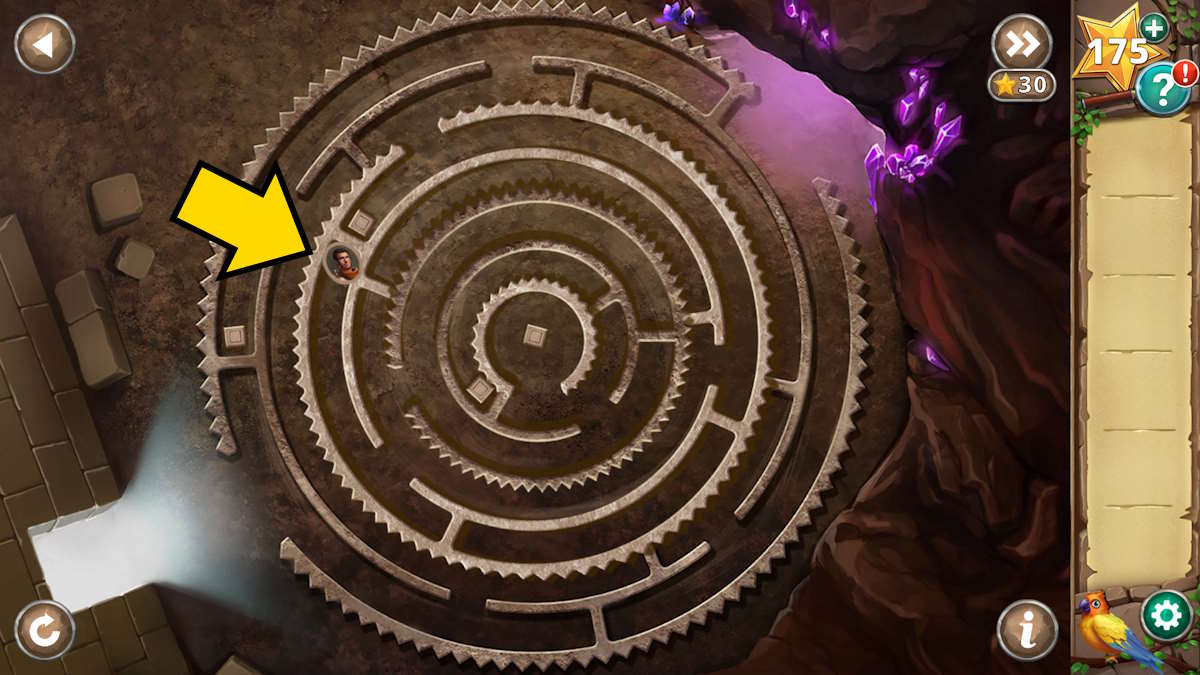
Now move into the central position and use the square there, which then allows you to step out and move over the square just outside the center. Do so, then do the middle again, to be left with the maze above. You can now walk all the way out and through the north-east exit without going over any more squares, and through to the next room.
Passing the wall of flame
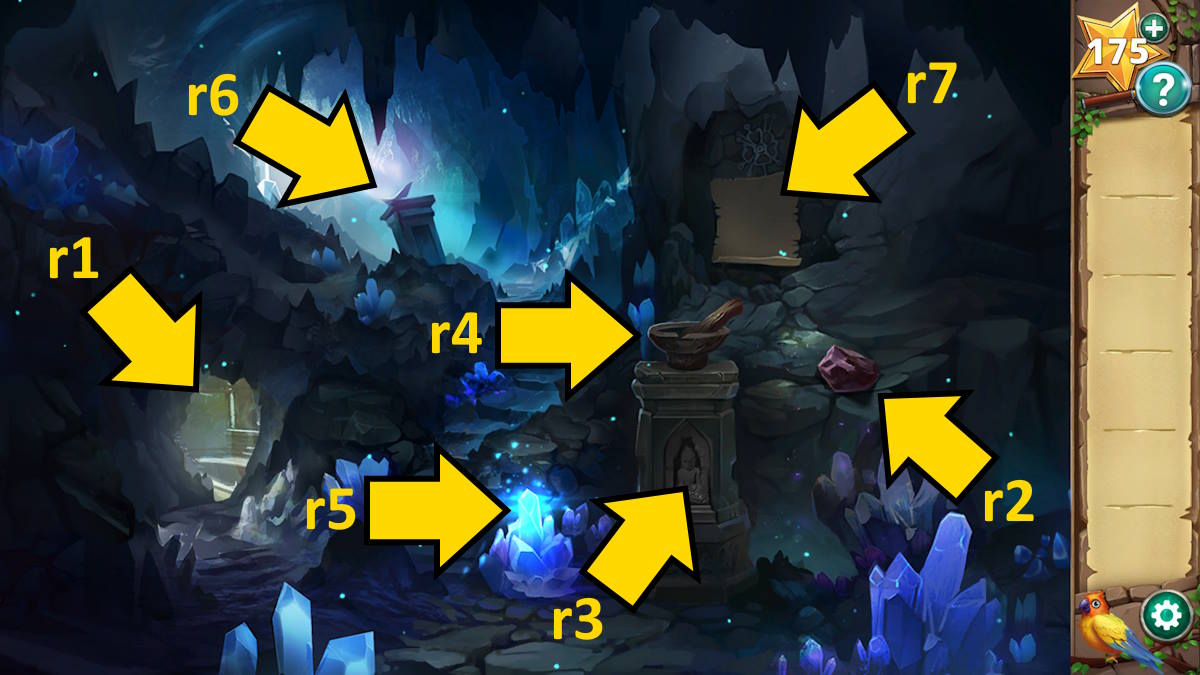
Instead of having to make your way through the labyrinth, you now have the freedom to leave and reenter the central room via exit (r1). Once you’ve retrieved the Chunk of Obsidian (r2), open the pedestal (r3) to discover some Ore. Afterward, head back to the central room. Subsequently, proceed through door (q3) to encounter a flame barrier.
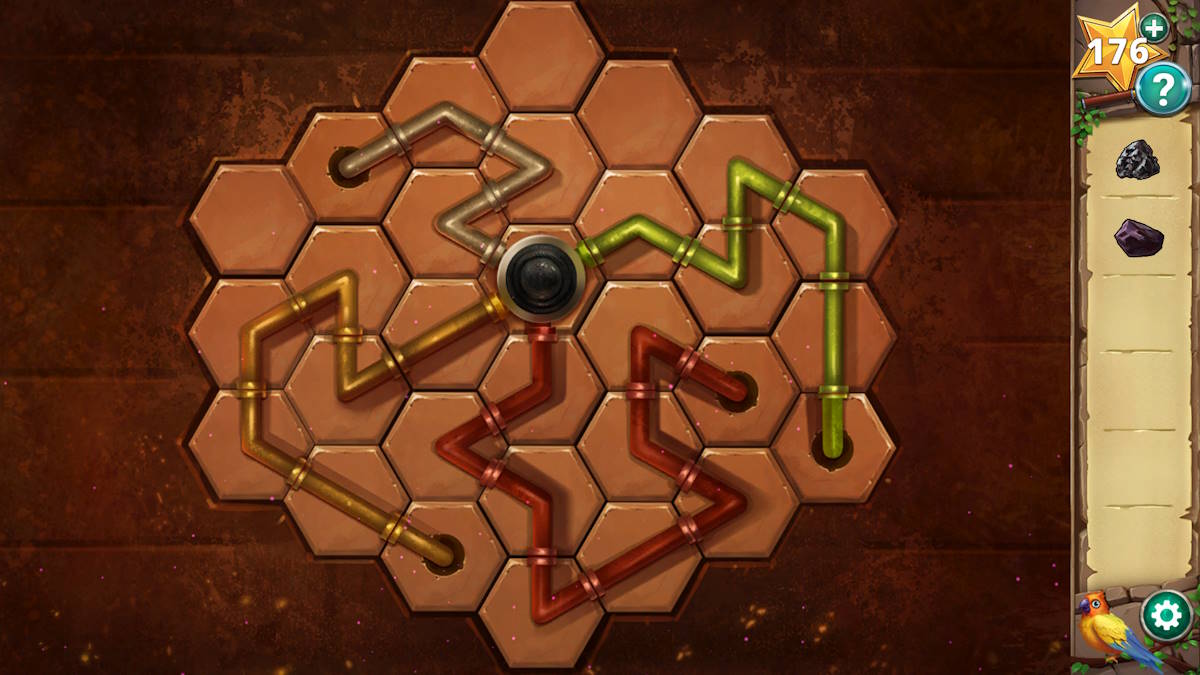
Click the device on the righthand wall to begin a pipe puzzle. The trick is to connect each of the four colored pipes to the central space. Once complete (I’ve included a solution above), the flame wall will drop.
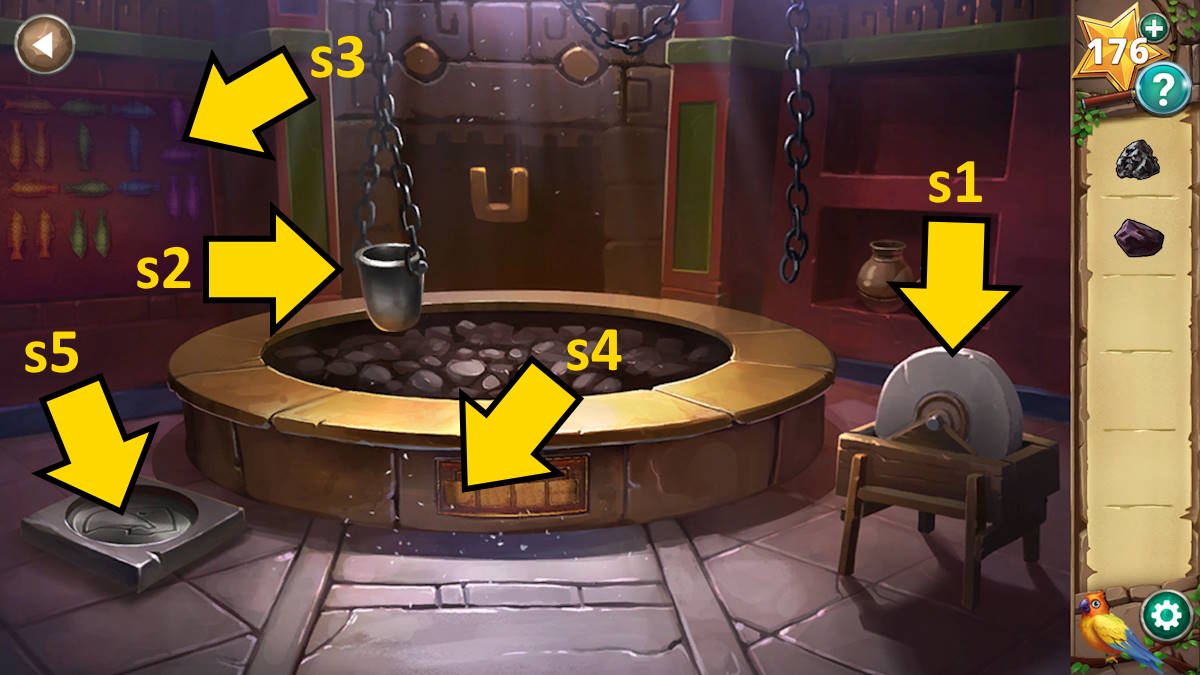
Use the obsidian against the sharpening stone (s1) to create a more pointed and effective tool, which I’ll refer to as Polished Obsidian. Then, deposit the ore inside the melting pot (s2). Examine the wall decoration (s3), observing that the hues align with those on the lock in the adjoining room. For each color, visualize a line tracing the direction each fish is swimming. Each combination of colors (blue and purple) offers a numerical value. Combine these numbers in the proper sequence to unlock the code: Red equals 5, Yellow equals 0, Green equals 9, Blue/Purple equals 8. So, the code is 5098.
Heading back to room 5098, I input the code “q1” into the keypad of the door’s code lock. Once inside, I retrieve the Stone Feathers and employ the sharpened obsidian to obtain the Flower located in spot q4. Although uncertain about how to address puzzle q5, I can add the feathers to its receptacle for future use.
Go back to the cave hidden behind the intricate labyrinth (Q2). Inside, combine the flower with the mortar and pestle (R4) to create some “Flower Extract” as a result. Next, grab the sharpened obsidian (R5), place it on the pedestal atop the stairs (R6) to illuminate a hidden message on the wall, and finally apply the flower extract (R7) onto the parchment to uncover yet another clue.
Go back to the smelter room and press the symbol at the bottom of the fireplace (s4). Input the code shown on the wall to ignite the fire. Remember, you want to create white images in the blank spaces instead of brown ones. Afterward, click the smelting bucket (s2) once more to obtain some Melted Ore. Use this Melted Ore on the mold (s5) to eventually acquire a Shield.
Passing the pit of spikes
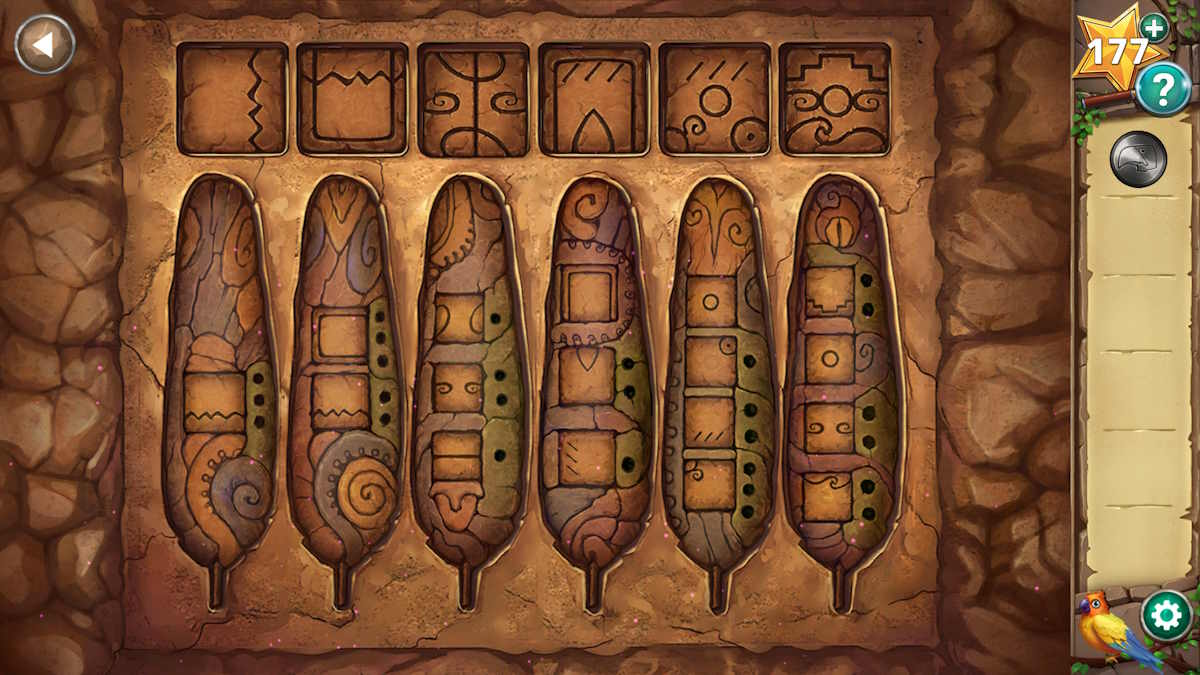
Go back to the room with the door and examine the “feathers riddle” (q5). The instructions on the parchment will inform you how many times each symbol should be rotated clockwise in order for the image above it to match correctly. Therefore, it’s essential to focus on the resulting images when rotating each one a specific number of times, rather than the actual number of turns applied to each image itself. If you encounter difficulties, the answer is provided above.
As someone who has spent years studying ancient civilizations, I find the Kumsari puzzle in this game particularly intriguing. With the bridge halfway across the river, my heart races with excitement as I approach the next challenge – the shields puzzle (q6).
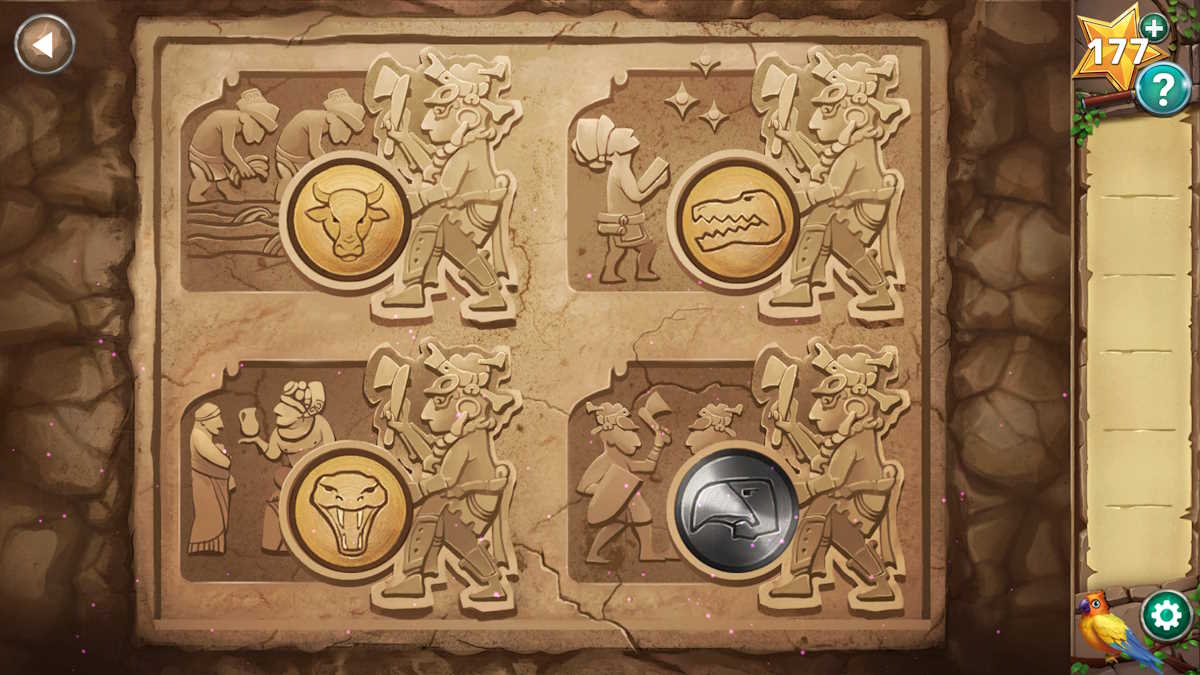
- Top-left: Ox (The Kumari did backbreaking work in the fields)
- Top-right: Crocodile (They believed the cunning water beasts were descended from the gods)
- Bottom-left: Snake (The Kumari were known as sly and slippery traders)
- Bottom-right: Hawk (The Kumari often fought from higher ground)
Hidden Ruins Chapter 8 walkthrough – The race for the elixir
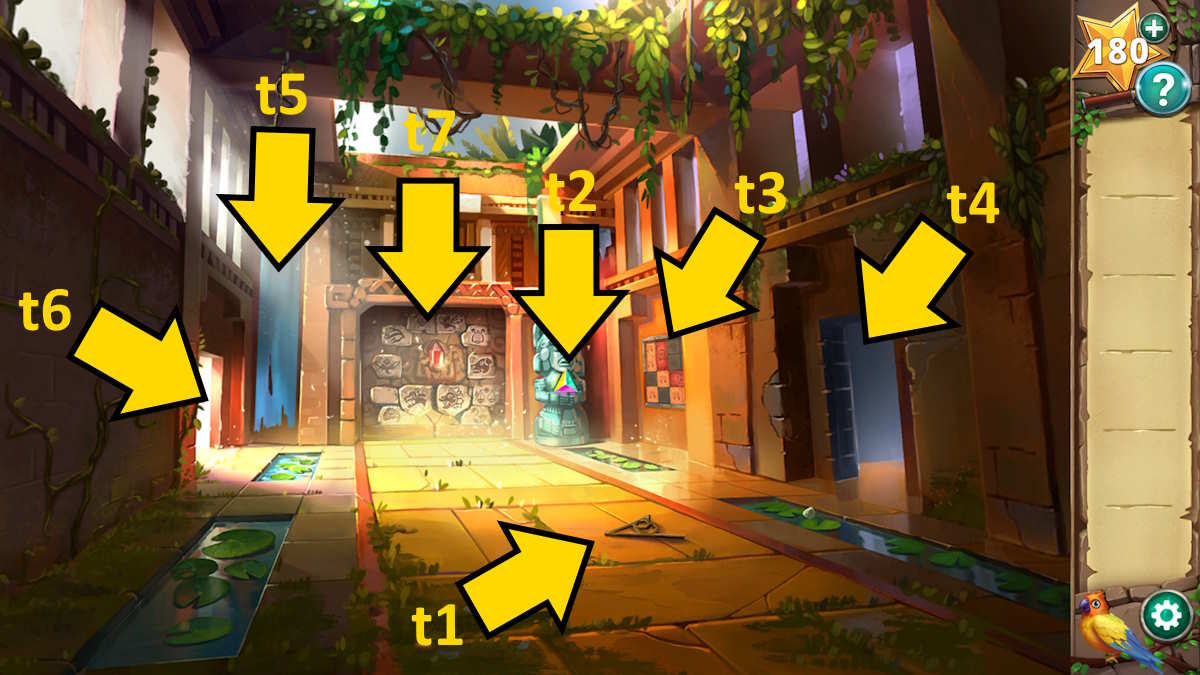
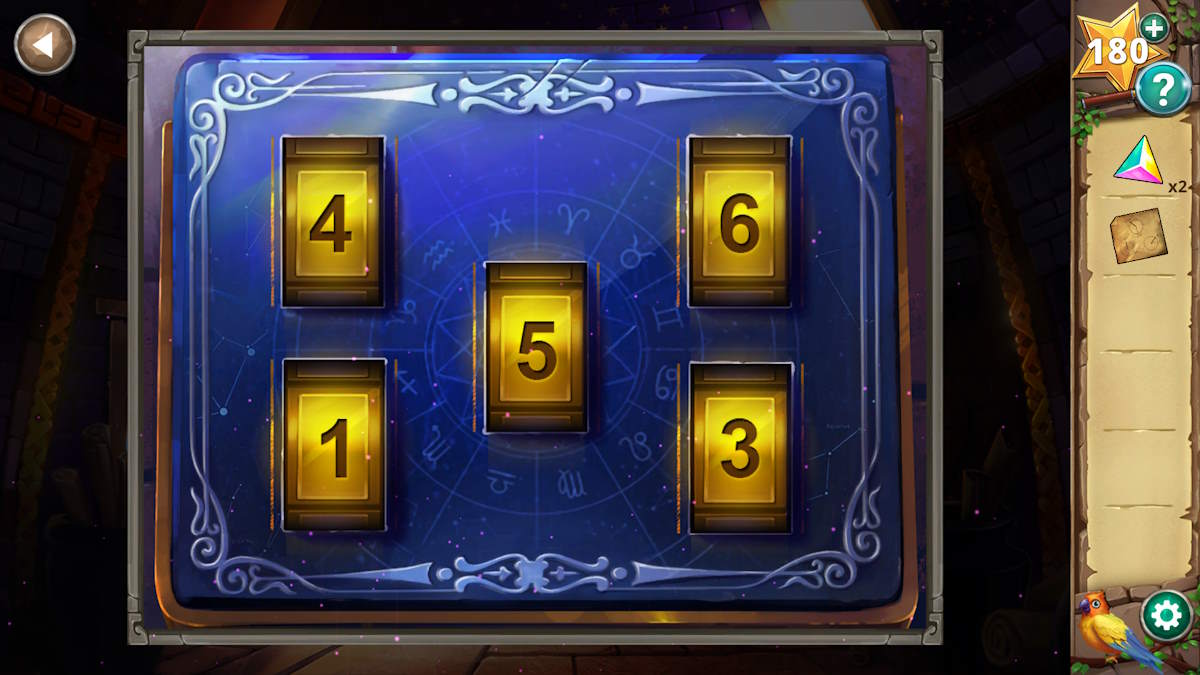
As the tale reaches its conclusion, prepare to interact with the following objects: The dial (t1) and the prism (t2). Once you’re ready, click on the wall artwork (t3) to initiate a sliding puzzle.
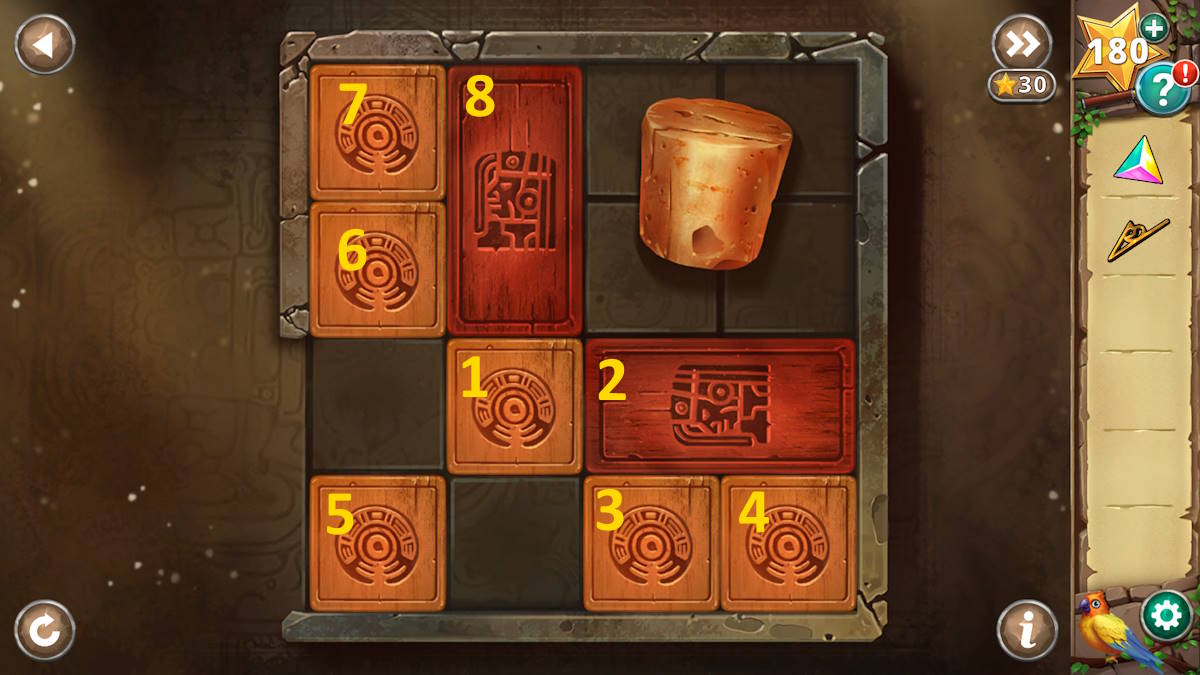
To remove the cork from the hole located at the bottom left as indicated by the image, please follow these simple steps:
- Move 1 down
- Move 2 all the way left
- Move 3 and 4 up
- Move 1 and 5 into the spaces vacated by 3 and 4(in the bottom right corner)
- Move 2 down
- Move 6 and 7 down to be next to each other above 2
- Move 8 left
- Move 7, 1, and 5 so that they surround 8, allowing you to move the cork down
- Move the two pieces to the right of 8 into the top right corner, then move 8 right

After shuffling the pieces clockwise, you’re able to keep going and shift the stopper in that direction until it comes loose. Upon removing it, you’ll obtain the Cork Plug.
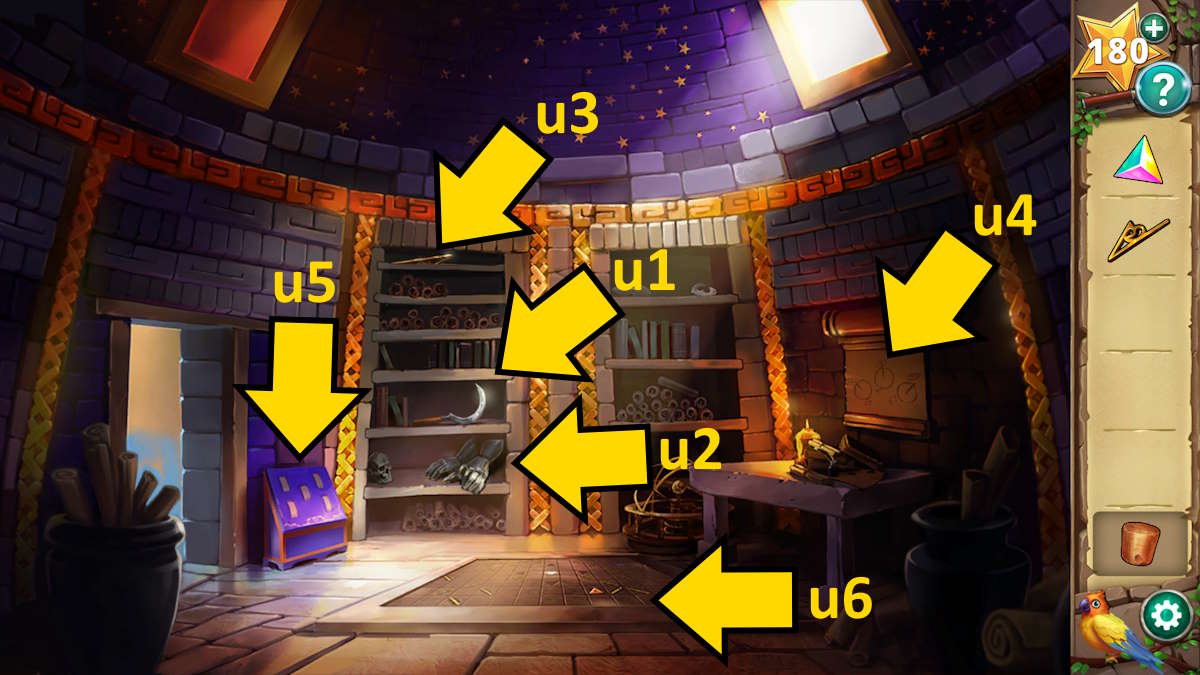
Go through the door on the right (t4). Retrieve a sickle (u1) and a pair of gloves (u2) from the nearby shelves. Afterward, instruct Bert to fetch a second dial (u3) from the same height on those very shelves. Don’t forget to check the markings on the scroll to the right of the room (u4). The dials are located at positions 3 (north), 1 (northwest), and 5 (northeast).
The fountain puzzles
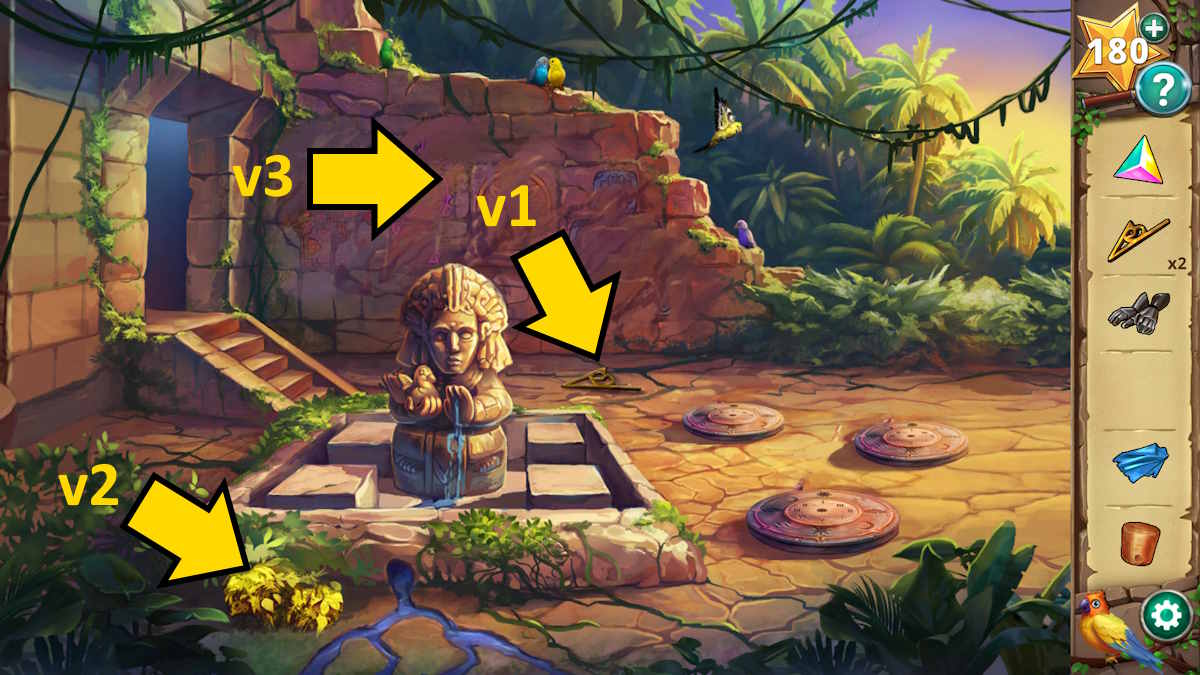
I’m back in the main room now, grab my sickle and slice down a piece of cloth (t5) before moving through the left door (t6). Next, I’ll pick up dial number three (v1), then don gloves to clear away the thorns (v2) and discover a hidden second prism. While I’m here, I see a hole in the fountain, so I’ll plug it with the cork stopper to let the water flow back in.
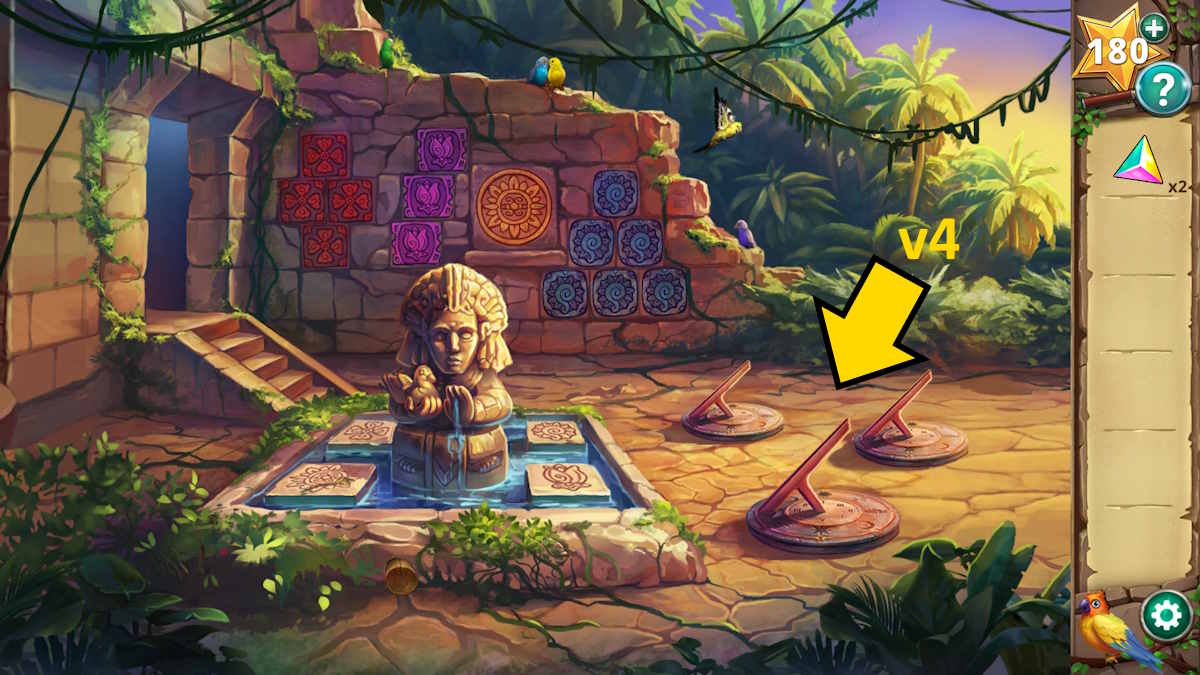
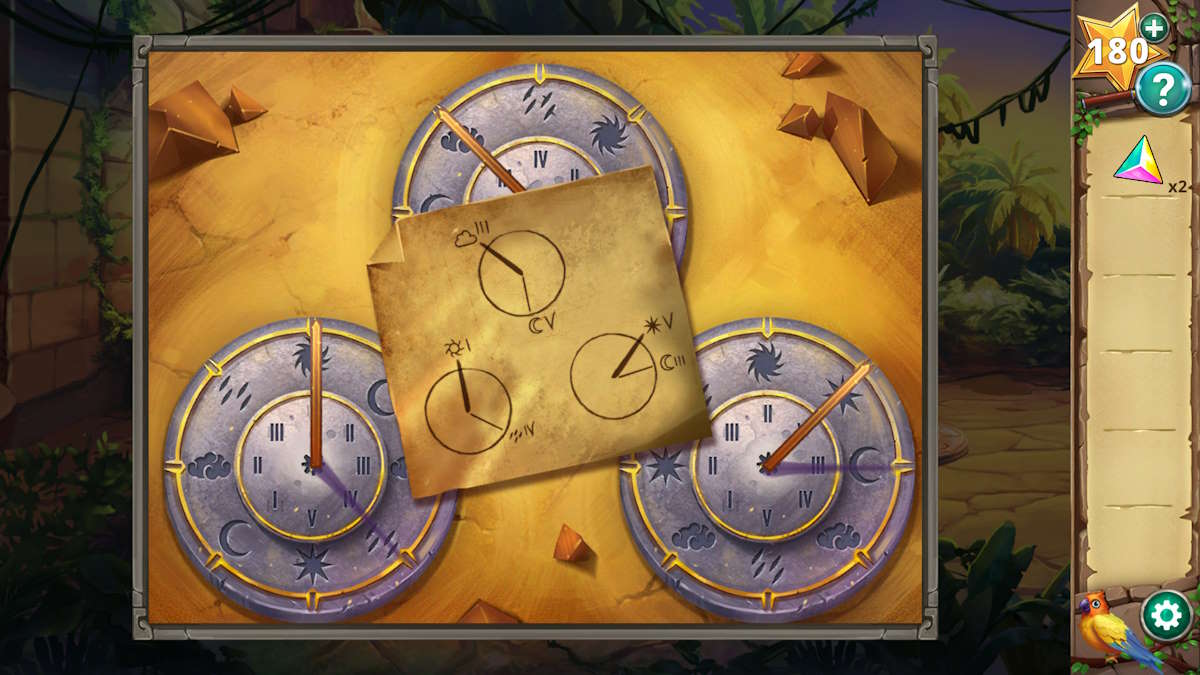
Dip the fabric into the water of the fountain first, afterwards utilize the Wet Cloth to wipe down the wall behind the fountain (v3) to uncover a hidden design. The patterns on the wall will align with the depictions on the stones in the fountain, thus summing up the designs on each corner results in a total of 4 (top left), 6 (top right), 1 (bottom left), and 3 (bottom right).
As a seasoned puzzle solver with years of experience under my belt, I find this riddle most intriguing! The image before me is filled with captivating details that demand close attention. The figure in the middle of the fountain, holding a bird so gracefully, adds a sense of tranquility to the scene. And isn’t it fascinating that there are five birds in total in this picture?
Return to the room situated to the right of the main room and pick up the purple-colored box (labeled u5) for a closer inspection. Enter the five figures you found in the garden – four numbers from the plates, followed by the number representing the birds – and the box will unlock, enabling you to retrieve the third Prism. (In case of uncertainty, please refer to the following explanation regarding the term ‘Prism’.)
The light beams puzzle

Here, you have the option to touch the virtual floor in this area (u6) and initiate a light beams challenge by adding the three prisms. Adjust the reflection angle for each mirror so that correspondingly colored gems receive illumination from beams of the same hue. After completing the task, the floor will unfurl, revealing a rising telescope from beneath.
Press the telescope button first, then add the sundial annotation in the magnified view. Next, arrange the six combination codes, in the correct sequence, by hitting the green button after each one. Once all constellations are illuminated, the box beneath the telescope will unlock, enabling you to obtain a Stone Tile. Here’s the sequence of number-weather combinations for your reference:
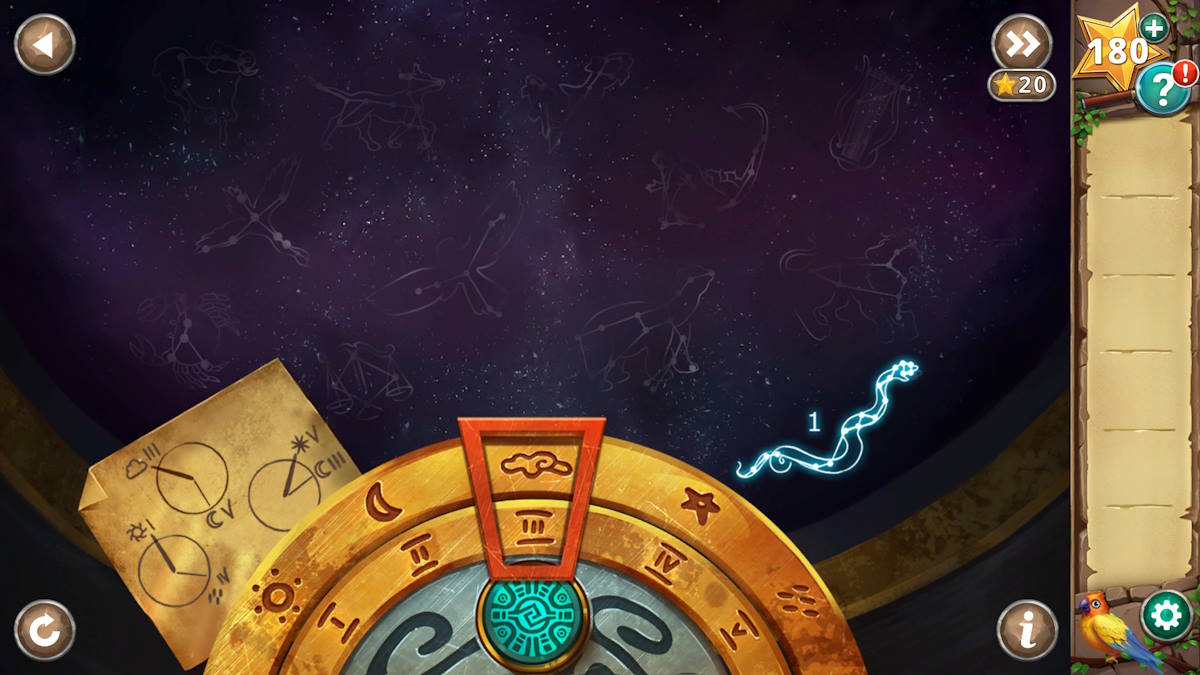
- Cloud and 3 (pictured above)
- Moon and 5
- Sun and 1
- Rain and 4
- Star and 5
Go back to the main chamber and touch the back wall marked as t7. Remember, these wall tiles carry the same symbols as the constellations you observed. So, press them in the following sequence: snake (top left), lyre (top right), dragon (right top center), swan (bottom right), ox (above bottom left), and finally dog (middle right). The wall will then rise, providing access to the elixir chamber ahead.
The singing bowls
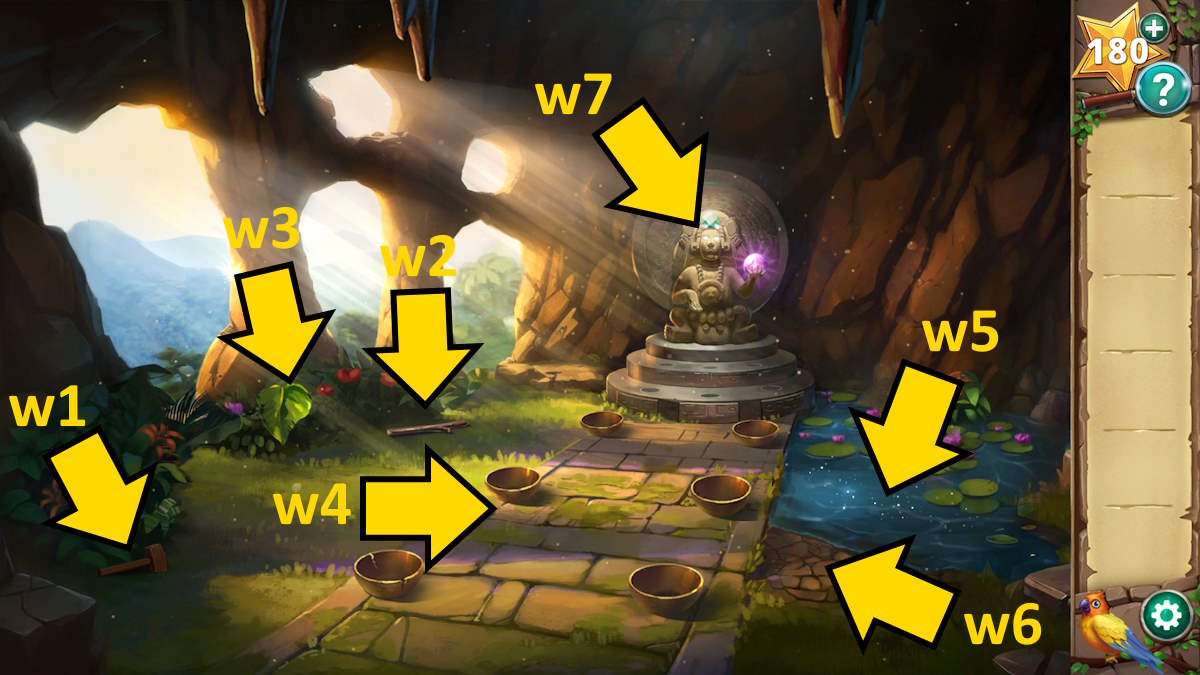
As a fan, I’d say: It may seem straightforward to gather the Mallet (w1), Twig (w2), Leaf (w3), and five Bowls (w4). But things don’t always go as planned. When attempting to take the last bowl, it unfortunately cracks. To fix this predicament, I suggest using one of the remaining bowls (w5) to fetch some water. Once you have a Bowl With Water (w5), apply it on the dried mud (w6). Next, use the stick (w2) on the wet mud and employ the leaf (w3) to pick up the clay. By combining the Leaf With Clay (w7), I can now patch up the broken bowl, resulting in a Patched Bowl.
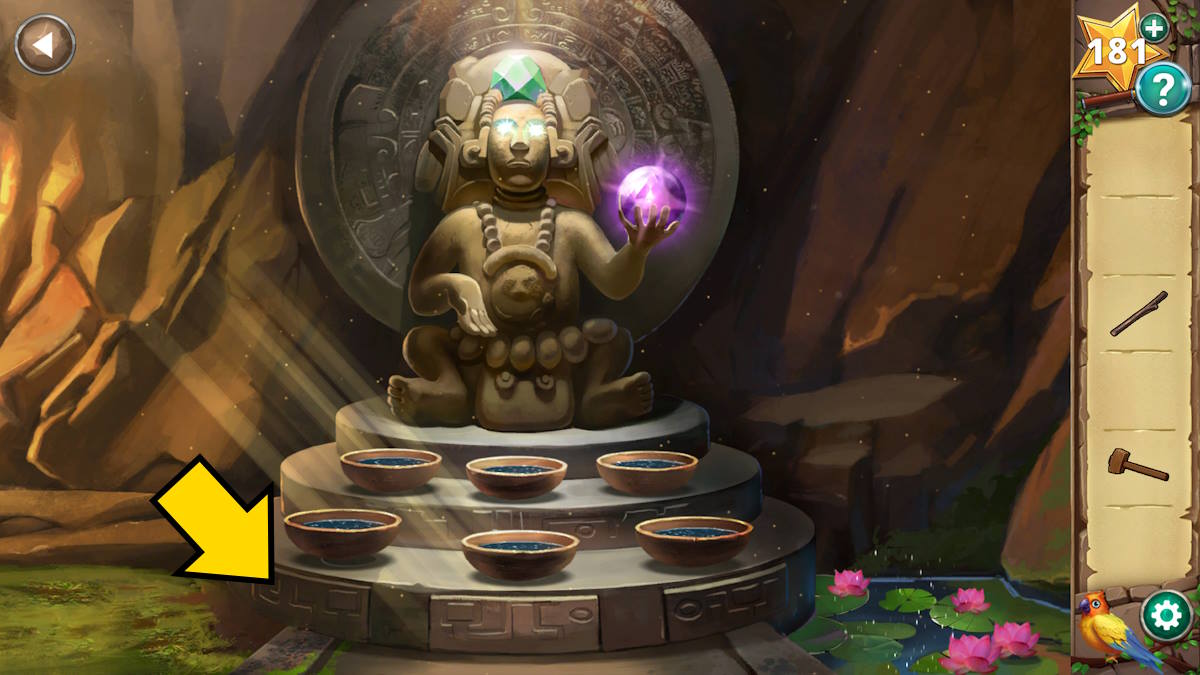
After that, make sure each of the six bowls is full. Observe the statue closely (w7) and then position the six filled bowls into the designated spots shown earlier. Upon placing the bowls, have a closer look at them and Tawa will explain they are singing bowls. Lastly, introduce the mallet in the close-up view, revealing that you must play a unique melody for it to function properly.
Select Bert and your friendly bird pal will sing the tune you need. Now you just need to use the mallet on the bowls in the correct order, which is as follows:
- Top right
- Middle bottom
- Middle top
- Bottom left
- Bottom right
- Top left
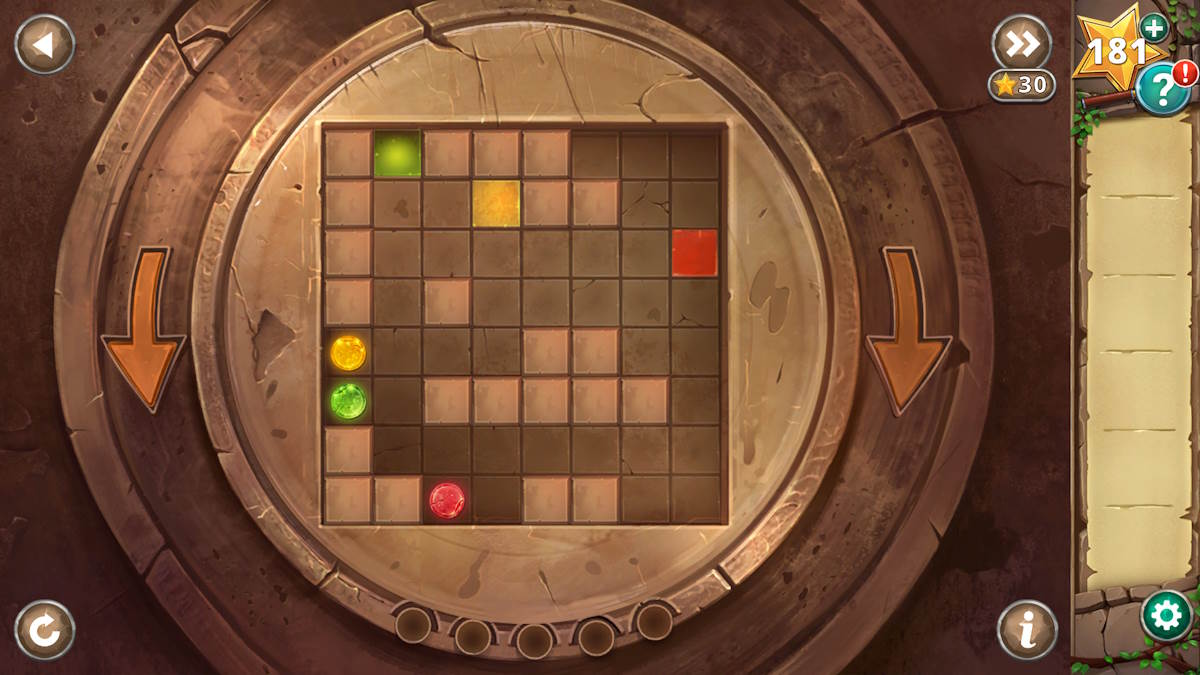
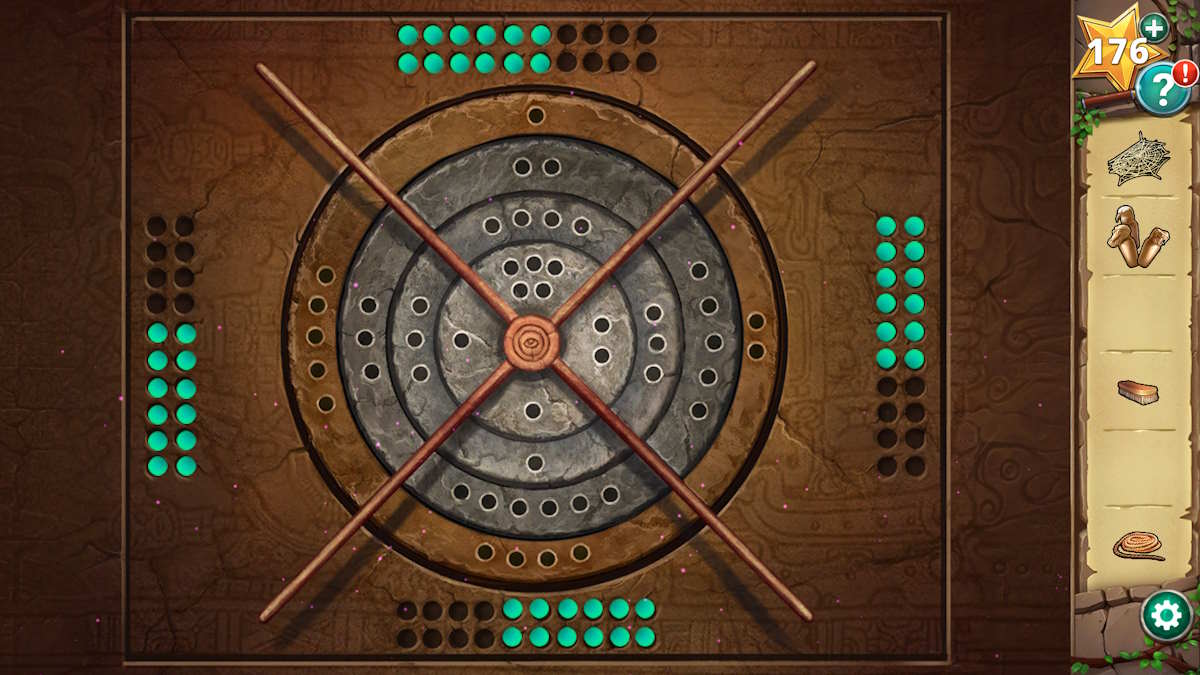
If the bottom-left panel refuses to move after you’ve completed a puzzle (indicated above), use a stick to gently coax it open and then press the disc inside to initiate the next challenge. To solve the puzzle, rotate the board by clicking on the left and right arrows. The balls will drop through their designated slots based on the following sequence: Right, Right, Right, Left, Left.
Unfortunately, opening just two fingers on the idol’s hand is insufficient. You’ll need to tackle slightly more complex versions of both puzzles an additional two times to fully open its hand (the music part remains unchanged; the middle and bottom panels below the idol hide the remaining rotation puzzles). Here are the answers:
- Music bowls 2: Top middle, bottom left, bottom middle, middle top, top right, top left
- Board rotation 2: Right, Right, Right, Right, Right, Left
- Music bowls 3: Bottom right, top left, bottom left, top middle, bottom middle, top middle, top right
- Board rotation 3: Left, Right, Right, Right, Left
When the idol’s hands have all fingers freed, you now have the chance to seize the precious elixir, called the “Elixir of Life”! But just as you’re about to make your escape, Larissa makes an unwelcome return, ready to crash the party. Yet, before you both disappear from this scene, Bert, your feathered friend, manages a triumphant laugh and helps you finish exploring the “Hidden Ruins” – well done!
If you’re a fan like me and crave more solutions for the captivating Adventure Escape Mysteries, be sure to explore the “AE Mysteries Picture Perfect walkthrough” and “Puzzle Lovers Walkthrough – Adventure Escape Mysteries” right here at GamerTop!
Read More
- ACT PREDICTION. ACT cryptocurrency
- W PREDICTION. W cryptocurrency
- PENDLE PREDICTION. PENDLE cryptocurrency
- NBA 2K25 Review: NBA 2K25 review: A small step forward but not a slam dunk
- ESO Werewolf Build: The Ultimate Guide
- Mastering Destiny 2: Tips for Speedy Grandmaster Challenges
- Rainbow Six Siege directory: Quick links to our tips & guides
- Exploring Izanami’s Lore vs. Game Design in Smite: Reddit Reactions
- Overwatch Director wants to “fundamentally change” OW2 beyond new heroes and maps
- League of Legends: Saken’s Potential Move to LOUD Sparks Mixed Reactions
2024-07-24 16:25