
As a seasoned gamer with over two decades of experience under my belt, I’ve seen it all – from simple point-and-click adventures to intricate puzzle games like The Operator. And let me tell you, this game has been quite the rollercoaster ride!
At the Federal Department of Intelligence, we’re thrilled to have you on board! This guide will serve as your compass through the intricate world of our intelligence-themed puzzle game. Herein, you’ll find the answers to the most perplexing puzzles and a checklist for unlocking all achievements.
Achievement: Welcome to the FDI
You logged in your computer for the first time.
Based on my experience as a seasoned user of various systems and databases, I find the Operator tutorial to be remarkably efficient and straightforward. It’s amazing how quickly one can get started with the tools provided. And you know what? Just recently, I was engaged in an intriguing case when Supervisor Skinner asked me to determine his age. I was up for the challenge!
Based on my experience as a seasoned assistant, I believe that to fulfill Skinner’s request, we simply need to input his name, Xavier Skinner, into our HumanDB. Once his profile appears, we should focus on the objective bar at the top and select the “Age: 40” detail under his personal information. This method ensures a smooth and efficient process in retrieving the required data.
You have the option to access the terminal application’s manual at any given moment by typing “help” upon opening it. While this step isn’t mandatory, it will reward you with a sense of accomplishment.
Achievement: RTFM
You read the manual!
With a good grasp of the game rules now, let’s move on to your initial significant task: determining who the culprit is.
Case 1: The murder of Henry Jenkins

Alexandra Pendell will forward you files about a bar shooting incident, which consist of a recording of the event and an enigmatic piece of paper discovered at the scene with the name of the victim.
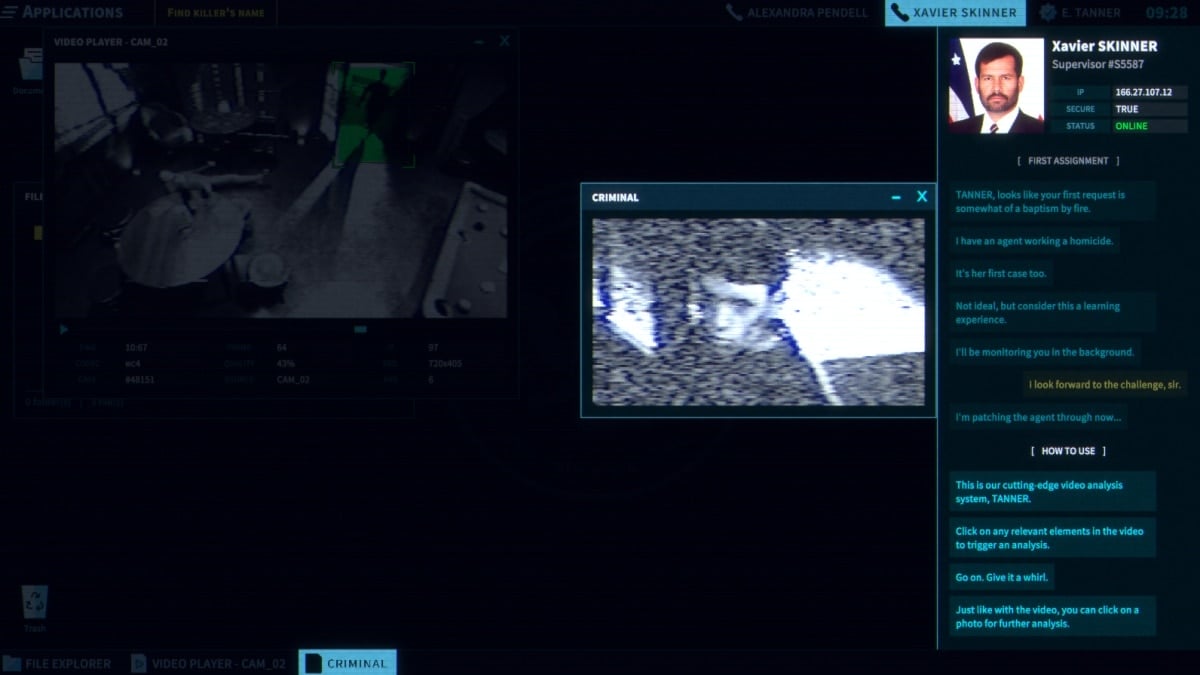
As a seasoned detective with years of experience under my belt, I can tell you that one of the most crucial pieces of evidence in any investigation is video footage. Following the instructions, I pull up the video of the shooting on my computer. In my line of work, every detail matters, and the first step in identifying the murderer begins with examining his face, which is captured in image #1.
Examine the name list from the image labeled as #2. Several names have been marked out with a cross or encircled. One name, however, appears to have been blacked out or censored. Agent Pendell insists that this redaction wasn’t present when she initially submitted it.
If you try to find information about one of the crossed-out names, you’ll discover that person is absent. however, prior to delving deeper, Supervisor Skinner scolds you for misusing FDI funds. It would be best to refocus on the current investigation.
At the video taken in the bar, you could instead focus on the car that the killer drives up in. This will bring the license plate into sharp view.
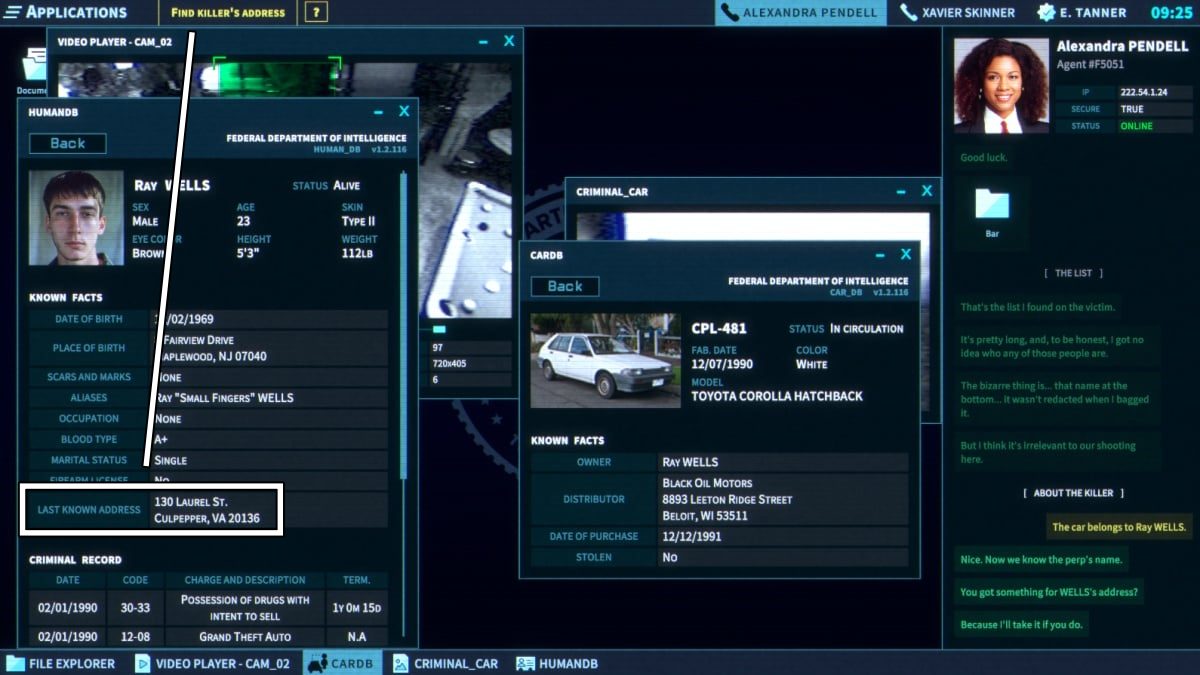
As a gamer, I’ve come across two application options under the HumanDB in my game setting. The second one is called CarDB. Just as its name suggests, this software allows me to input a car’s license plate number to access information about the vehicle’s owner, which in this case is Ray Wells. Additionally, it helps me confirm whether or not the car has been reported stolen.
Based on my years of experience as a seasoned detective, I can recommend the name of the suspect as Ray Wells. To obtain his current address, you should ask Agent Pendell to look him up in our database, HumanDB. Once there, simply scroll down to the “known facts” table at the bottom and you’ll find the last recorded address (as shown in image #3).
Agent Pendell thanks you for your time, and your case is complete.
Case 2: Missing person Connie Moore
Make sure to look at the list of Most Wanted items that gets sent to you. At the moment, there’s no connection to it for you.
In your upcoming investigation, Connie Moore alleges that she was taken by extraterrestrial beings against her will. Feel free to review any relevant details from the last case before delving into this new mystery.
Your objective is to identify any discrepancies, as Agent Walker has expressed doubt about being abducted. Examine her testimony closely, look into her phone records, and lastly check the camera footage. You aim to uncover anything that seems amiss.
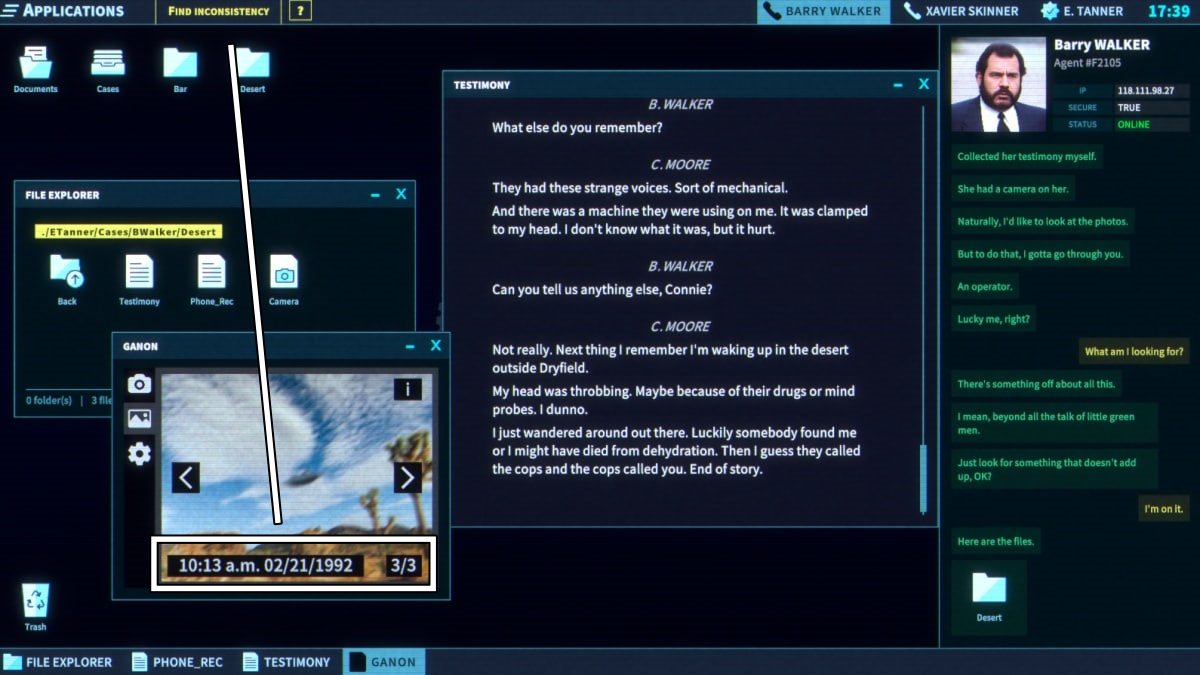
I was thoroughly intrigued by Connie’s testimony and the consistency of her phone records. Eagerly, I delved into her camera gallery, hoping to find the elusive flying saucer she had described. However, upon examining the first picture closely, a sense of unease crept over me. The metadata indicated that this image was captured several days after Connie’s reported disappearance (image #1).
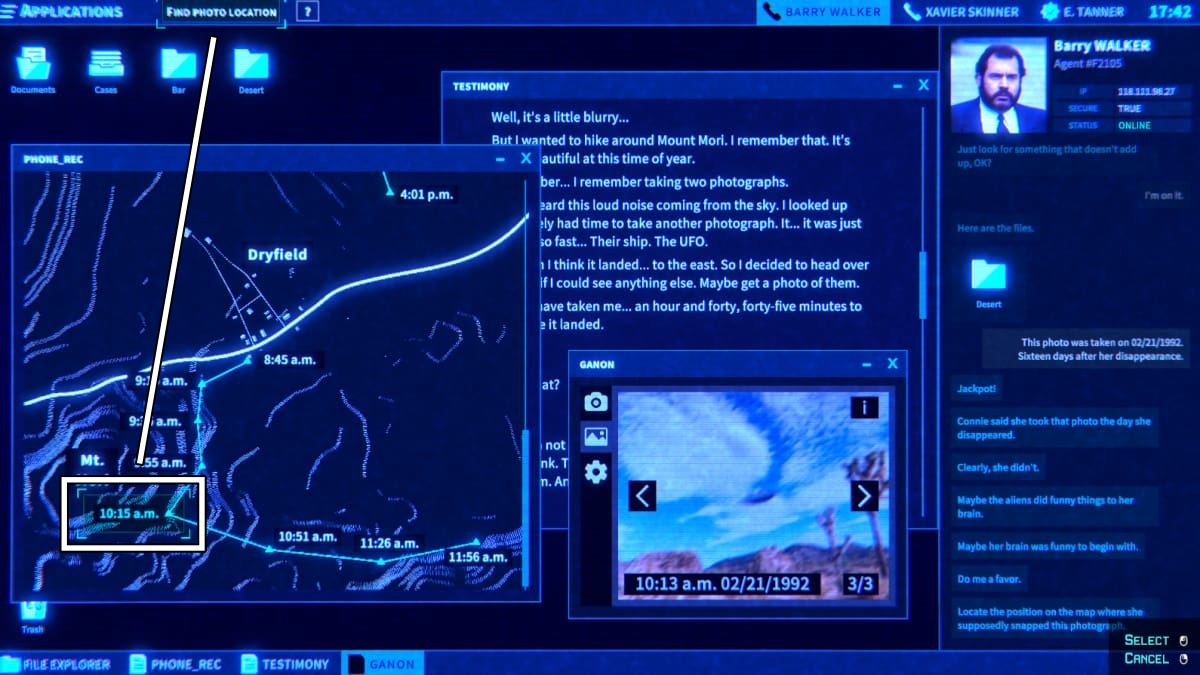
As a gamer, I’d put it this way: I’ve noticed a discrepancy here. Agent Walker asks me to locate where she took a picture based on her testimony and the time stamp of the photo. With a quick glance at the records, I can see the precise spot where her phone signaled a connection around 10:17 am – only two minutes after she claimed to have taken image number 2. So, let’s select the task for finding the photo location and then zero in on that 10:15 am ping.
Good job! Your computer is now being taken over.
Achievement: Your first day
You finished your first day at the FDI!
Case 3: The murder of Ray Wells

Agent Pendell returns with news on your initial investigation. Upon her search for Ray Wells, she stumbled upon another murder scene instead.
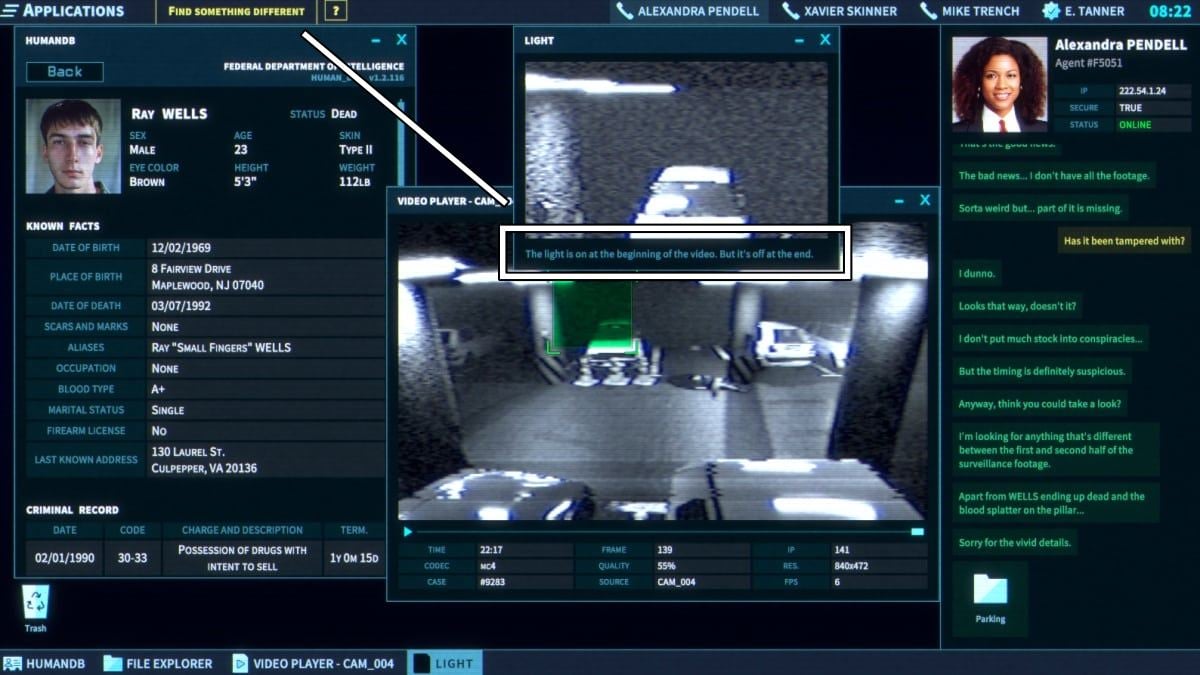
In this situation, the video proves more complex. Crucial details have been altered or eliminated, leaving only fragments visible. Initially, it appears that Wells is alive in one shot, but dead in the next.
Initially, you’re searching for a noticeable change in the video before and after an interruption. Above the car on the left, there originally were three functioning lights. However, following the event resulting in Wells’ demise, one of those lights is no longer on (image #1). This discrepancy serves as your first hint.
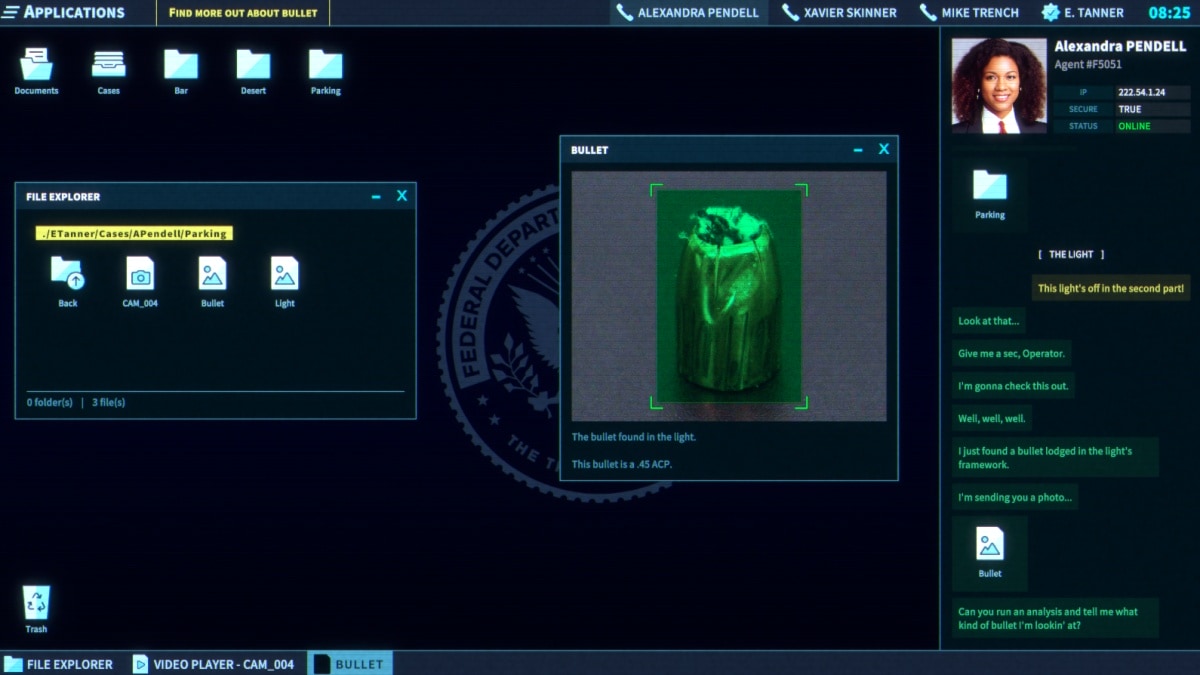
When Pendell discovers a bullet embedded in the shattered light fixture, she asks for an examination of the photo she transmits. To analyze the image, simply click on the bullet picture and let her know that the bullet is a .45 ACP (referred to as type #2).
HAL reaches out to you once more with a proposition. By providing assistance in the future, you will receive unrestricted access to the original recording of the fatal incident. Following your acceptance of this agreement, you are granted the unaltered tape.
Analyze the car currently entering the frame in your investigation and provide Pendell with its details. Surprisingly, there is no record of the driver, but Supervisor Skinner suggests you still pass on the car information to Pendell. (Image #3)
Achievement: Ghost car
You sent the Ghost car model to PENDELL
For now, this case is complete, and HAL has a debt that needs repaying.
Case 4: The Cole files
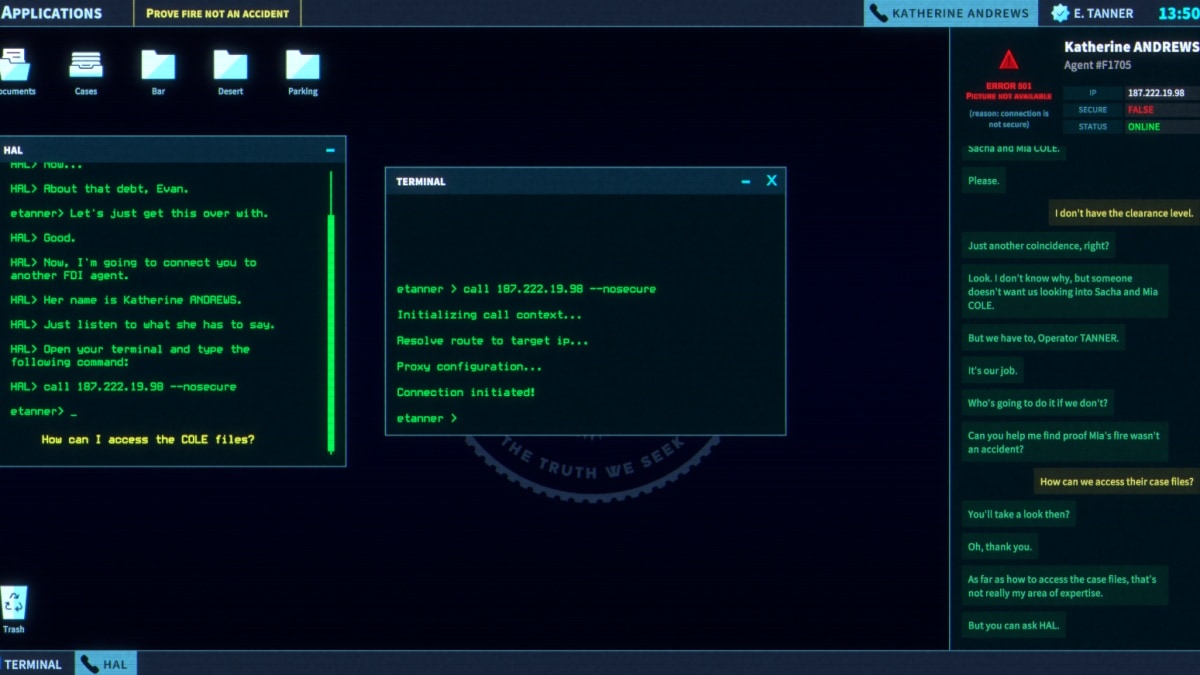

At HAL’s request, you will conversate with Agent Katherine Andrews regarding an enigmatic case she was supposed to abandon (as depicted in image #1). Together with her assistance and HAL’s, you’ll gain entry to restricted files and work on a case that wasn’t intended to be unraveled.
Following some additional effort on your part, you will be granted authorization to review the documents pertaining to the fire that claimed the life of Mia Cole. According to Agent Andrews, this was no accident, and it falls upon you to uncover the evidence supporting that theory.
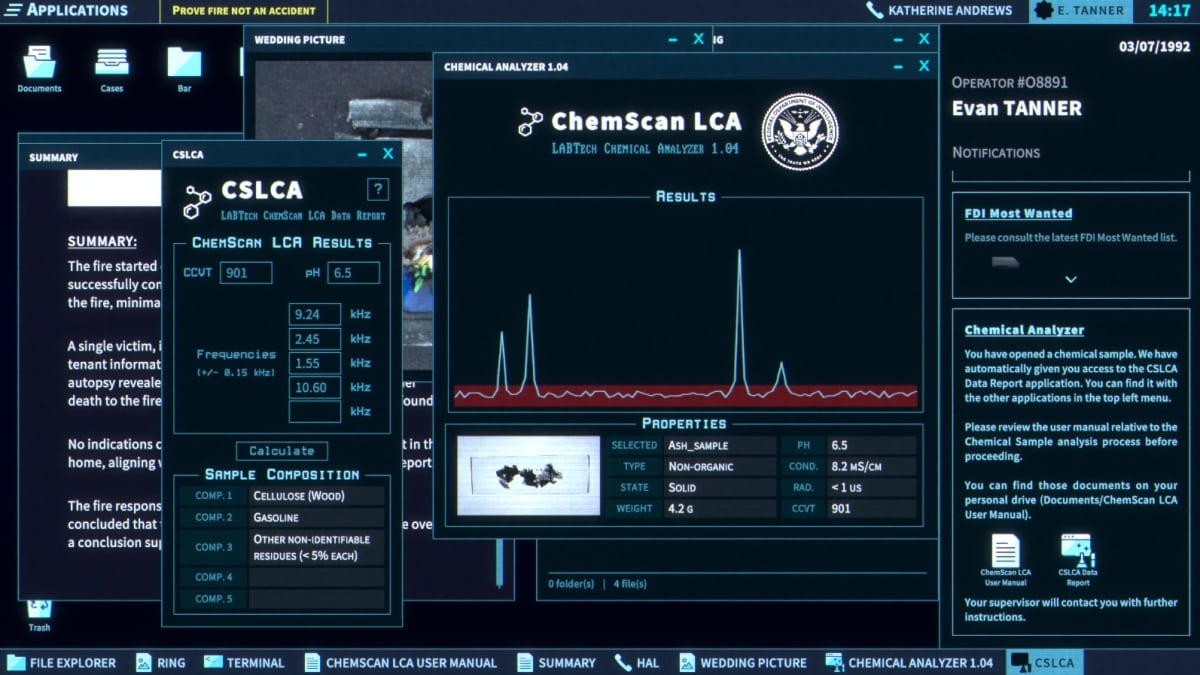
When you initially inspect the ash specimen, you’ll receive a guidebook and some codes to input for operating the ChemScan. Carefully read through every instruction in the manual and input the codes accordingly (refer to image #2).
- Ion size: The sample type is being called non-organic, so we’ll be setting the ion size to 6.0.
- Delta V: The weight of the sample (in grams) x 100. The ashes are 4.2g, so the Delta V should be 420.
- Threshold: For solid samples, half the Delta V. This is 210.
- Sample Matrix Size: 5. If you are using an older version, it would be 4, but we can see that we are on version 1.04.
Based on my experience working with complex data reports, I fully understand the importance of accurately inputting information as specified in the user manual. In the case of the CSLCA Data Report, I will meticulously follow the instructions and enter the provided data points in the correct order.
Through this examination, you’ll find the compelling evidence: traces of gasoline in the remains, eliminating the possibility of an electrical fire causing an accident.
Case 5: The Dryfield graveyard
I, as Agent Walker, have uncovered new findings during my investigation. In the heart of the desert, I’ve discovered over a hundred enigmatic stones – the very same location where Connie Moore claimed to have found her flying saucer. Among these stones, there lie hidden bodies. Your task is clear: identify one of them, that of a young girl. As Walker sends you the necessary files, he carelessly mentions Dryfield being an alternate name for Roswell.
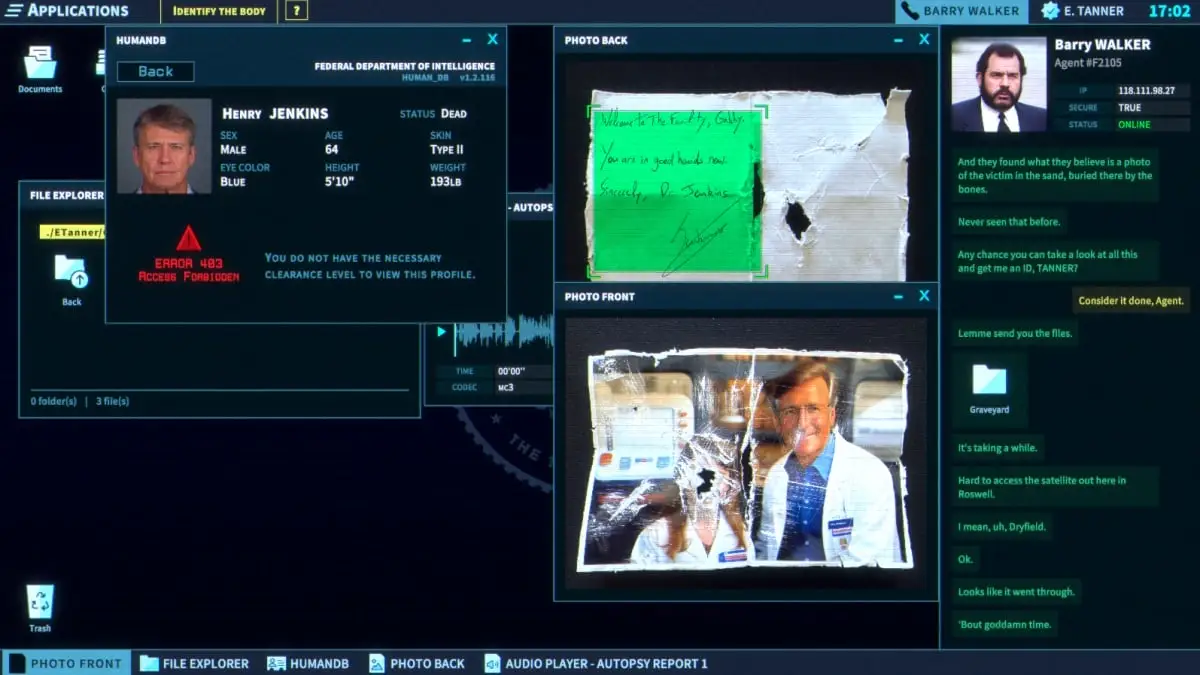
In simpler terms, you can examine an autopsy report and a picture (image #1) located near the body. While listening to the details in the autopsy report, scrutinize the photograph for potential hints. The man standing beside the girl, identified as Gabby, is worth investigating. This man is none other than Henry Jenkins, who unfortunately became the first murder victim. Although you’re not yet authorized to access his file, it has been revealed that he was a doctor and had a connection to the victim in this case.
Based on my years of experience in law enforcement and having had access to countless case files, I can confidently say that returning to Jenkins’ old list of names is a crucial step in solving the current mystery. As we delve deeper into this case, we’ll encounter situations where having access to past information will be invaluable.
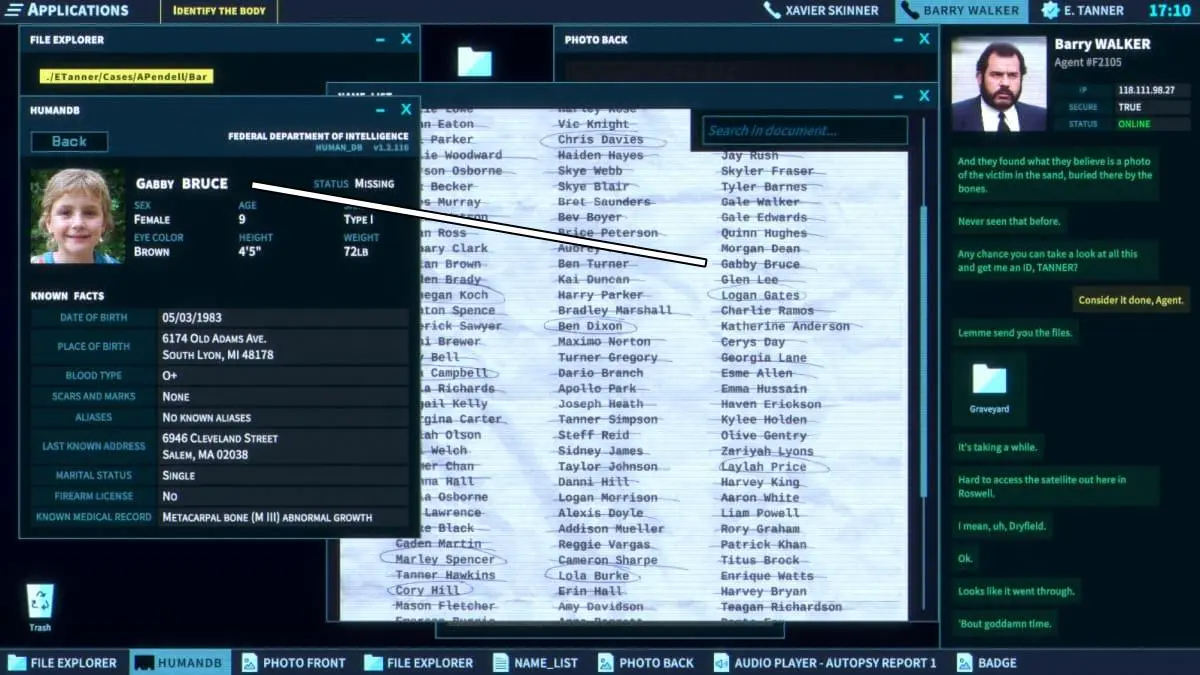
As a gamer, I’d put it this way: To help Agent Walker figure out whose body we’ve found, just give him the name – mine in this case – in the HumanDB. But he won’t stop there, he’ll demand proof. Fortunately, the autopsy report revealed an unusual detail about the body: an abnormal growth on a metacarpal bone. Coincidentally, Gabby Bruce (image #2) in the HumanDB has the same peculiarity listed. Select it to provide the evidence Agent Walker needs.
Walker obtains information about the second corpse he discovered, which has an identification tag bearing the name: Quinton Spence. He requests that you check this name in your records, and predictably enough, it appears on the list.
Lastly, Agent Walker requests that you identify the meaning behind the crossed-out names. If you haven’t uncovered this information yet, now is your opportunity. Examine both the circled and crossed-out names, and you will discover the shared characteristic of the crossed-out names.
Indicate that their status is listed as missing.
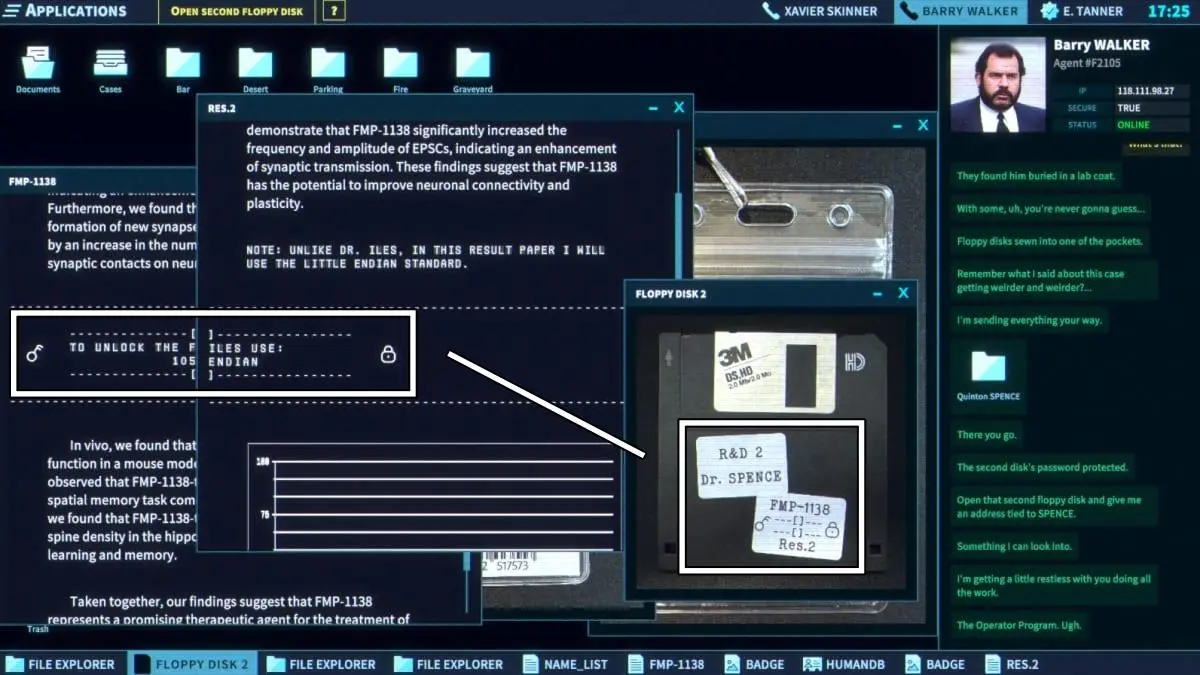
Walker passes on some fresh data to you. In Spence’s lab coat, there were two floppy disks. You’ll need to uncover the password for the second one. Spence and Jenkins worked at the same workplace, and you have a pile of new information to examine.
Based on my experience working as a computer technician for several years, I’ve encountered many locked files or disks that require specific passwords to access them. The clue on the back of this floppy disk seems familiar – it’s not uncommon for such clues to include cryptic codes or symbols, designed to keep the information within inaccessible to the uninitiated.
As a seasoned computer user with years of experience under my belt, I’ve encountered various file protection methods throughout my IT journey. Based on the given instructions, it seems we have two files, FMP-1138 and Res. 2, each marked with distinct symbols – a key and a lock respectively.
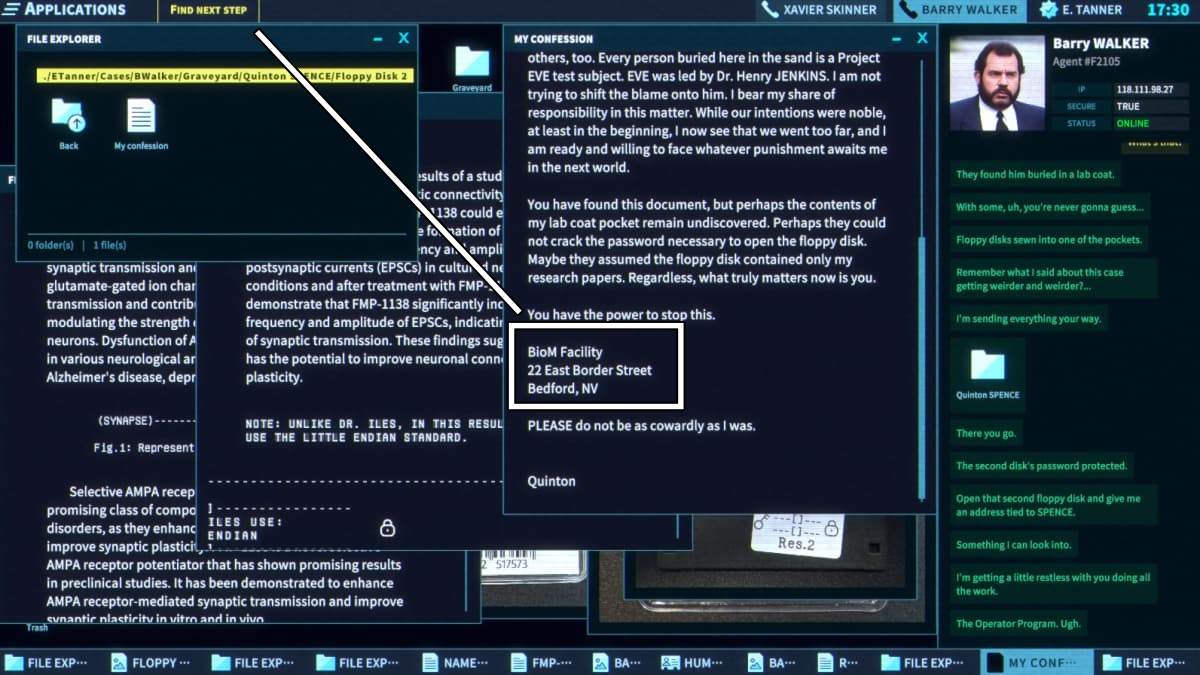
Read Quinton Spence’s confession.
I’ll do my best to follow the instructions and share my perspective based on my own experiences.
Walker plans to check out the address in the morning,and with that your day is finished.
Achievement: Second day
You finished your second day at the FDI!
Case 6: The BioM arson
During the night, the BioM facility succumbed to flames. The incident bears strong signs of arson, and Walker harbors his suspicions. Kindly access the file he’s forwarded for a deeper investigation into the matter.
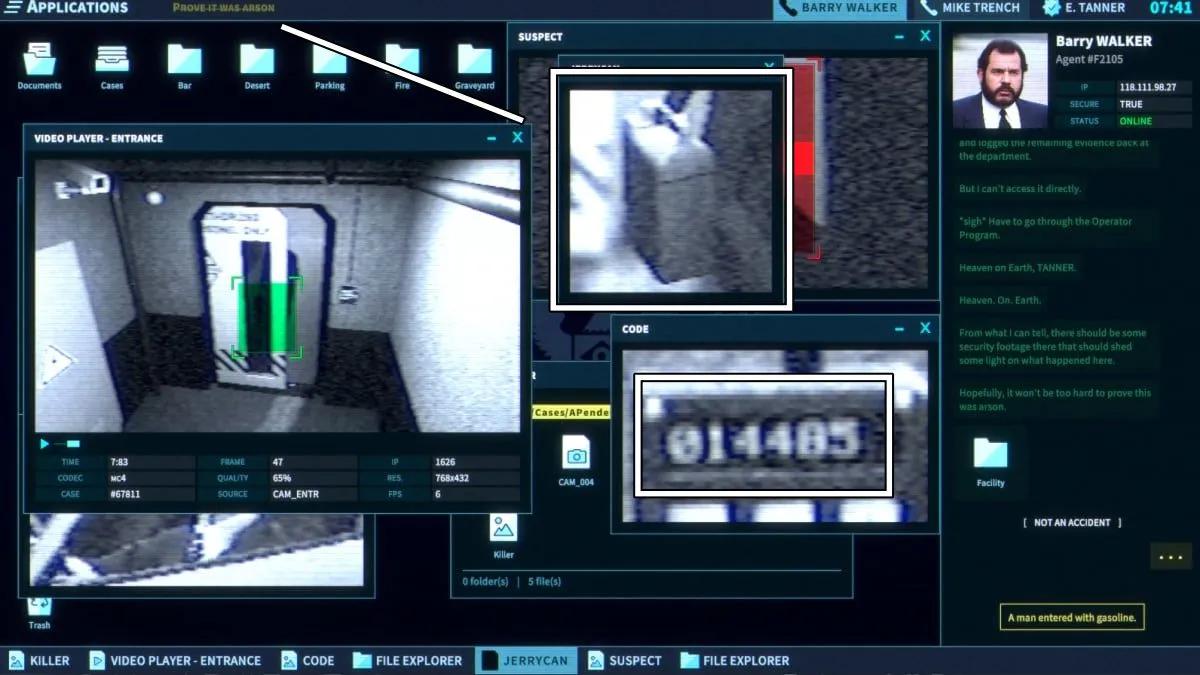
A single file exists, which is a security recording of approximately 4 minutes and 30 seconds long. The video shows the entrance to the facility first with an enigmatic bald man making an entry. Towards the end, the warning lights are turned off and the same man is seen exiting.
Examine the man closely to see if he’s the culprit. Unfortunately, he doesn’t match our description. It seems that this could be the individual who murdered Ray Wells.
Examine the access point where this individual enters the building, which is restricted to approved personnel. Furthermore, take a look at what he has with him, such as a jerrycan or a gas canister. This container could serve as evidence of arson (as depicted in image #1).
Walker inquires if you are able to locate the man in the HumanDB, a task we’ve established is impossible for you. Subsequently, he requests the door code, which fortunately you have previously discovered.
Enter the code into the text box manually. The code is 014485 (image #1).
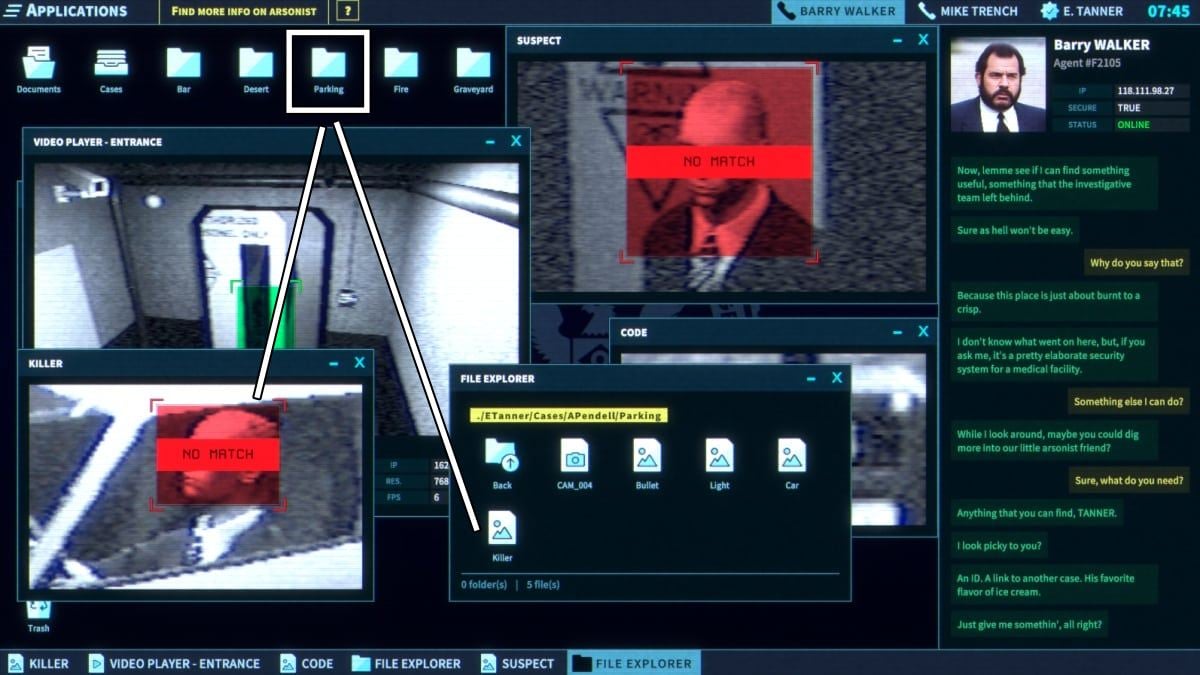
Walker asks for linking this case to another. Retrieve the photograph of the suspect from file No. 2 in the parking lot of cases. Present this image to Agent Walker.
The case can now further unfold.
Breaking into the evidence room
Based on my personal experience and understanding, I believe that following HAL’s guidance will be beneficial for uncovering crucial evidence. As someone who has navigated complex situations before, I understand the importance of adhering to instructions in order to access hidden information. Let’s work together and unlock the secrets that lie ahead.
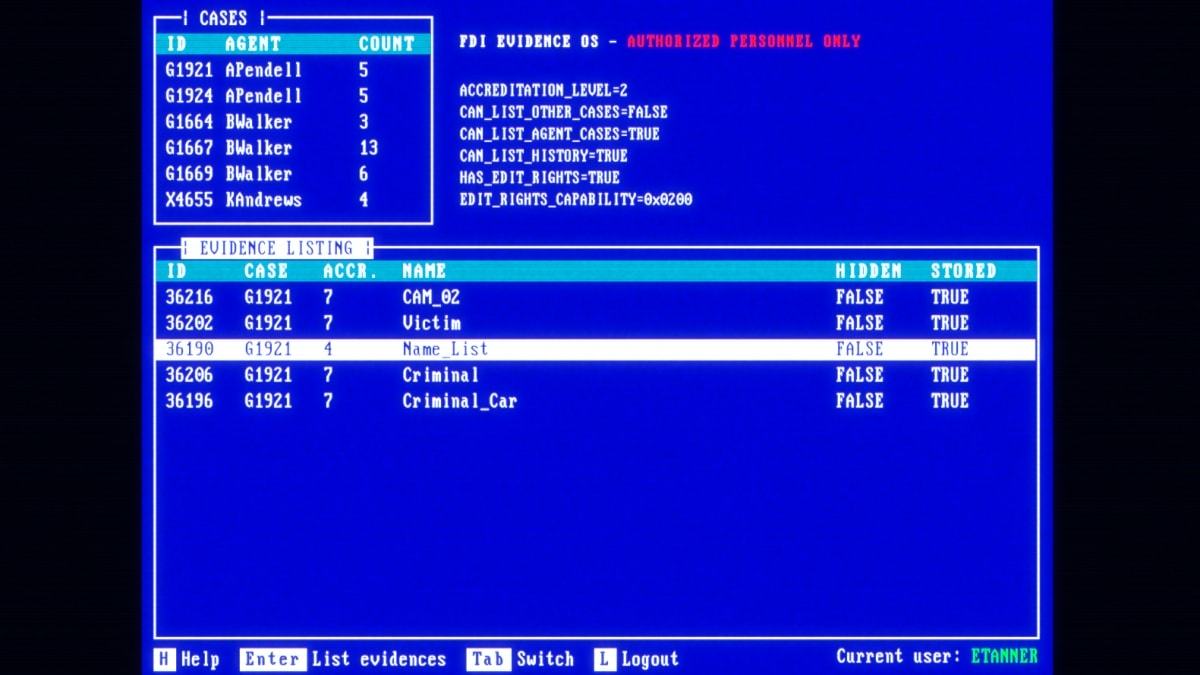
After verifying your identity, press “H” to access assistance.HAL will then guide you through each stage of working with the evidence room. Agents’ case files are labeled accordingly and can be found under their names (as indicated in image #1).
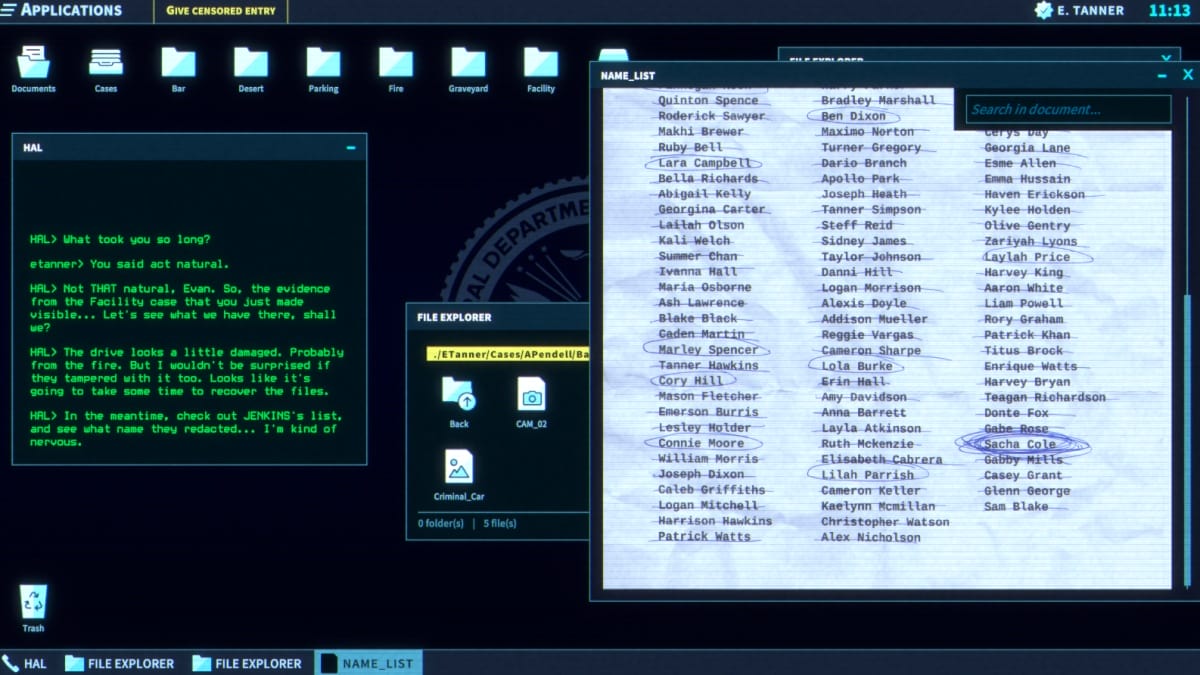
When HAL prompts me to reveal the hidden names in image #2 related to the case, I can also unhide information from the files concerning the Cole fire investigation. By completing this task, I’ll earn an achievement and potentially uncover valuable new details about the case.
Achievement: Revert fire report
You reverted the fire report to access the redacted area.
At your own terminal, HAL will guide you next in your investigation. The recaptured hard drive requires some time to load, therefore, HAL requests you to locate the name found in Jenkins’ list.
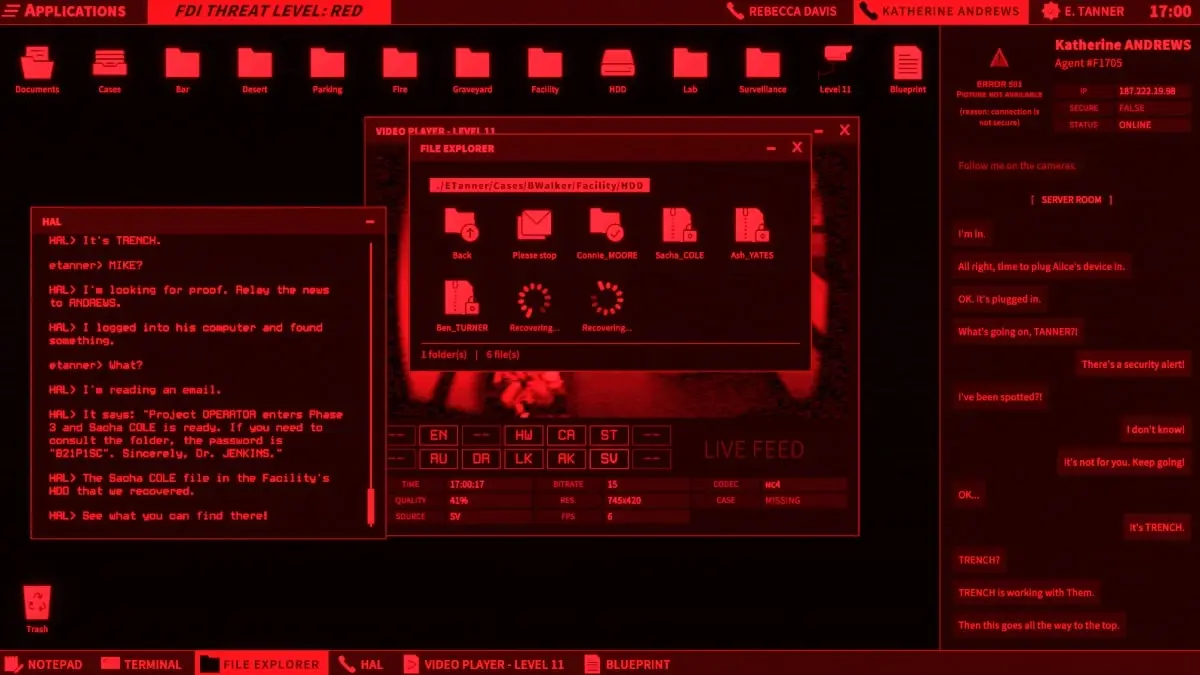
Every time I open up the file in the Bar folder, it’s like a familiar routine that brings me back to my past. As I scroll down through the lines of text, my eyes land on a name that stands out – Sacha Cole. It’s a name that holds a special significance for me, one that I’ve encountered many times before. So, HAL, here is what I have discovered yet again.
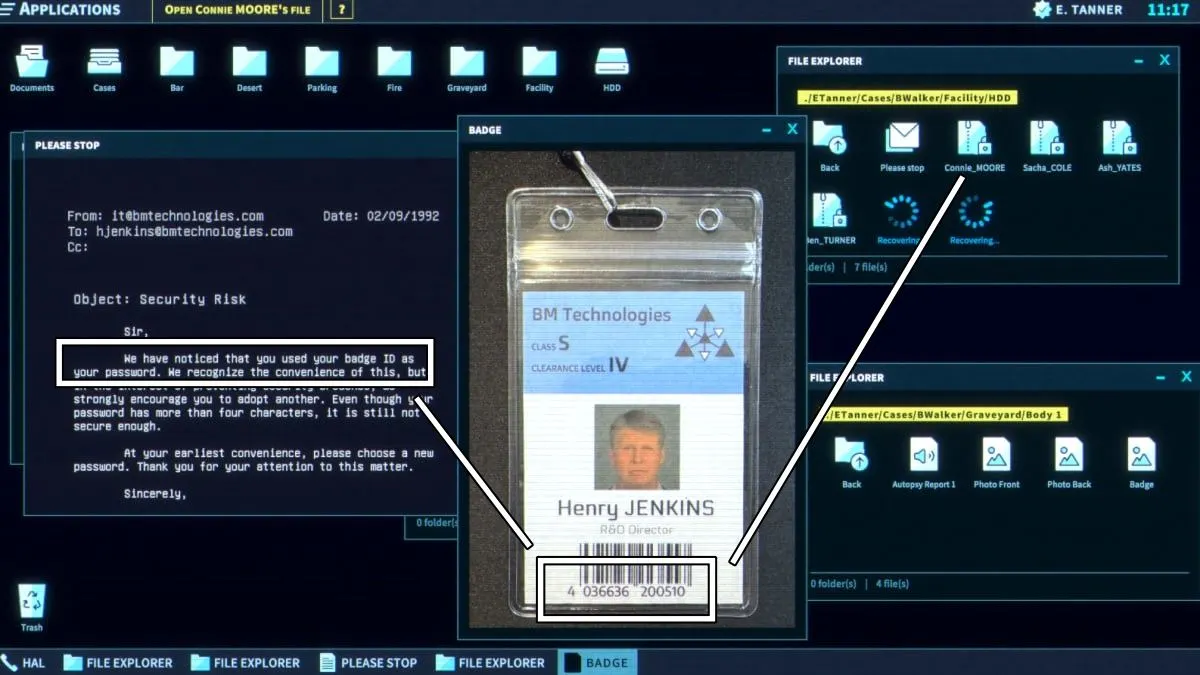
Your upcoming task: The Connie Moore file password needs to be discovered next. Fortunately, there’s an email named “Please stop” in the HDD. In this email, it’s suggested that [email protected] should no longer use his badge number as his password (refer to image #3). Handy information!
As a detective-gamer, I’d suggest this: In the Graveyard section, under “Body 1,” you’ll discover Henry Jenkins’ identification tag with his badge number. Next, head to Connie Moore’s folder and let your inner sleuth loose!
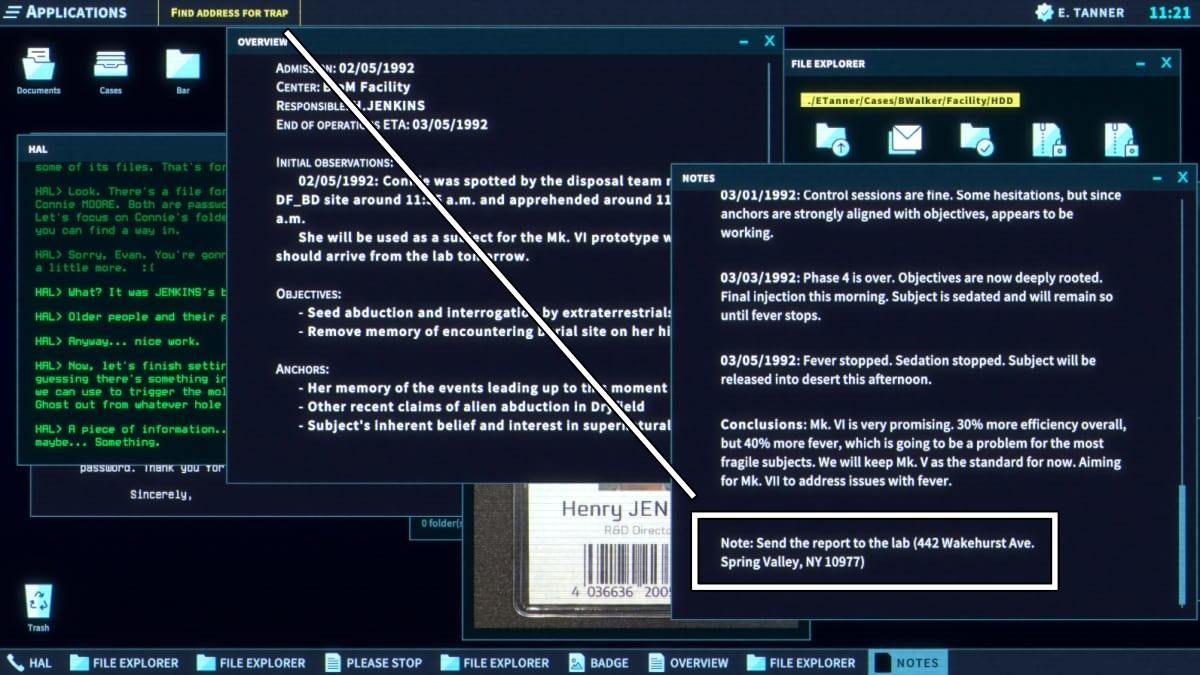
As a devoted fan of HAL, I’m excited to help you in your mission to discover an item that HAL has requested for setting a trap. For more details about this intriguing task, kindly refer to the comprehensive overview and additional notes provided. At the bottom of those notes, you will find your very own address (as shown in image #4).
Defuse the bomb
In this mission, the time pressure is more intense than before. You only have approximately 20 minutes to disarm the bomb.
According to Skinner, it’s recommended that you begin with the manual’s introduction and follow each step carefully. This approach is ideal for disarming a bomb since the instructions are well-organized and free of deceptive queries.
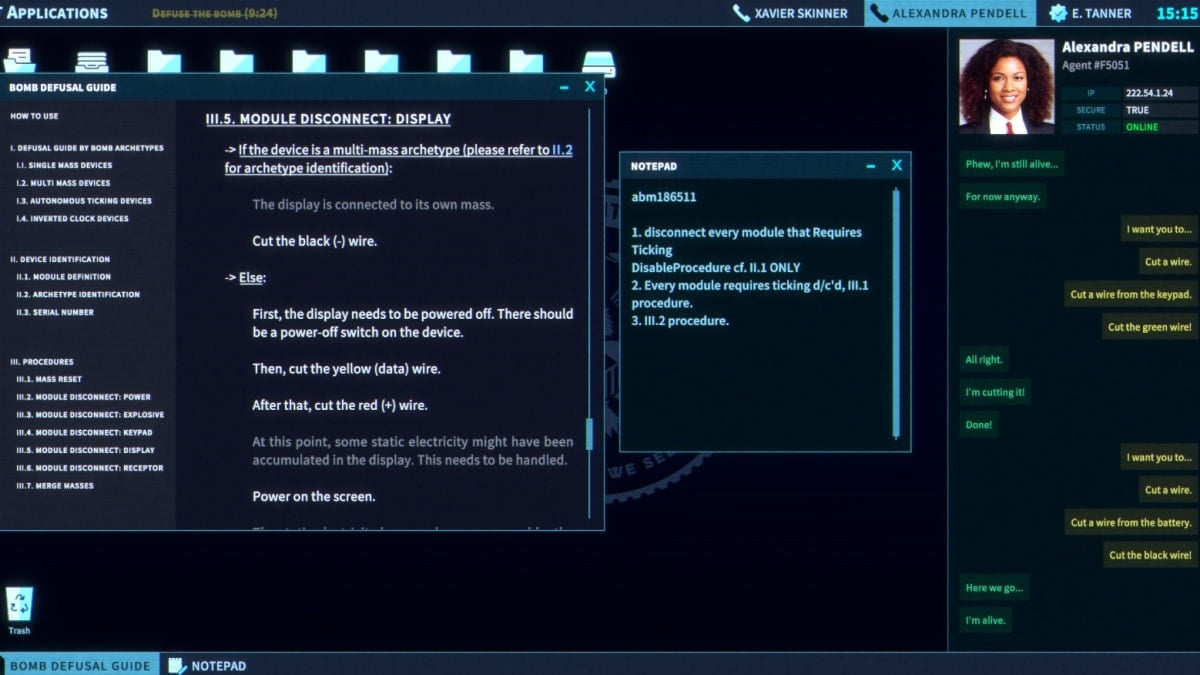
During my initial gameplay, I strongly recommend sticking to the in-game instructions. I successfully disarmed the bomb with over nine minutes left before it exploded. For those interested, here’s an outline of how I diffused the bomb:
- What does the bomb look like? [Wires, controller, battery, keypad, display.]
- Tell me about the wires. [Power module (battery): red and black. Explosive: red and black. Display and keypad both: red, black, green, yellow.]
- Tell me about the explosives. What kind of explosive is it? [Gasoline.]
- Get the serial code. I want you to… Enter a code on the numpad. 0000. [ABM186511]
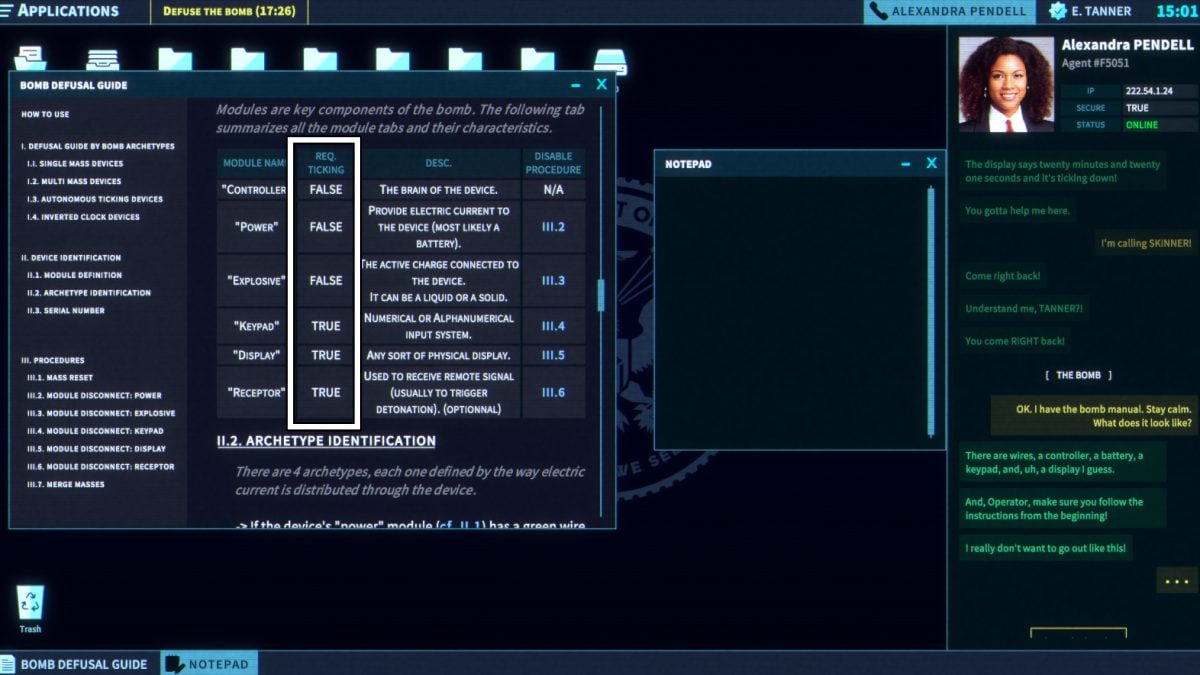
- You’ll now be disconnecting the modules that ‘require ticking.’ There is a chart that helps determine this, and shows you how to disconnect each one (image #2).
- Cut a wire from the keypad. The yellow wire.
- Power off the screen. Cut a wire from the display. The yellow wire.
- Cut a wire from the display. The red wire.
- Power on the screen.
- Power off the screen.
- Cut a wire from the display. The green wire.
- Cut a wire from the keypad. The green wire.
- Cut a wire from the battery. The black wire.
Achievement: Save PENDELL
You defused the bomb and saved agent PENDELL!
Achievement: Third day
You finished your third day at the FDI!
Case 7: Surveillance files
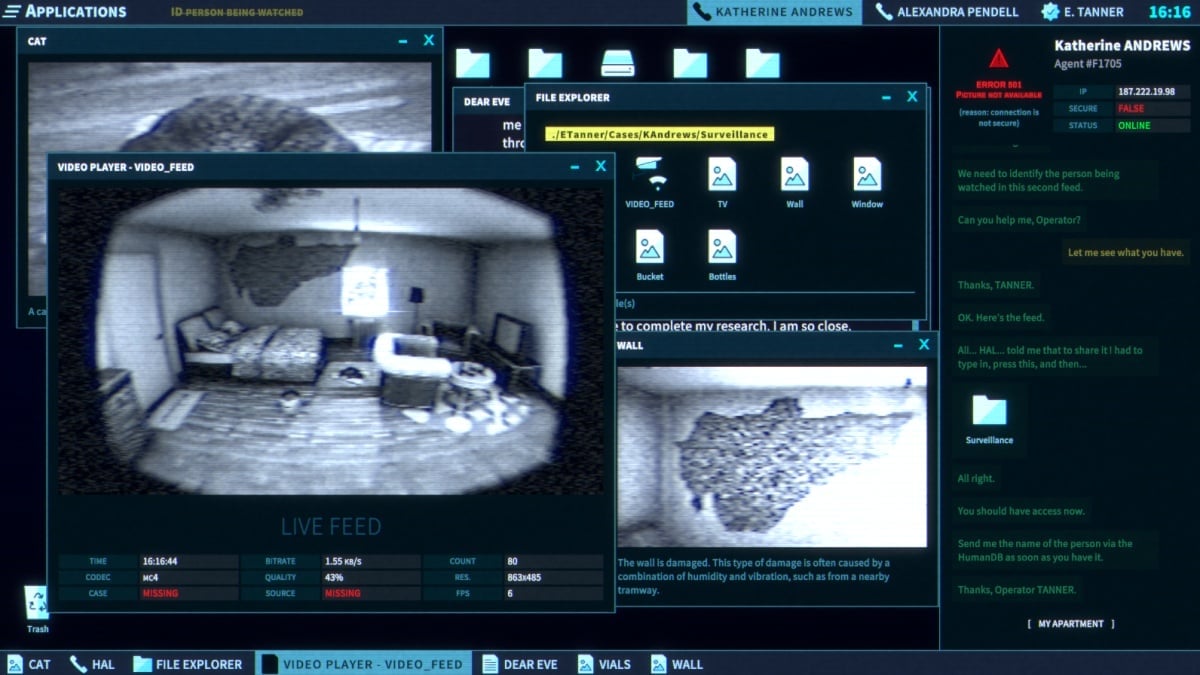
As a seasoned detective with years of experience under my belt, I can’t help but feel a sense of intrigue as HAL and Agent Andrews present me with this new case. The fact that Mia Cole’s apartment was bugged is concerning enough, but to discover a second video feed being monitored by the same person? That’s a whole different ball game.
Open up the live feed and start analyzing whatever looks unique or out of place (image #1).
As a gamer, I can’t help but notice several intriguing aspects about this apartment. However, what truly stands out is the importance of paying close attention to the audio cues as I explore each corner of the room. Have I not heard that distinctive cat’s meow in a game before? And hasn’t my in-game character come home from a long day at the FDI (Fictional Game Development Industry) to the sound of clinking beer bottles?
You have the option to identify yourself by displaying your preferred name in the top corner of the screen when observing someone.
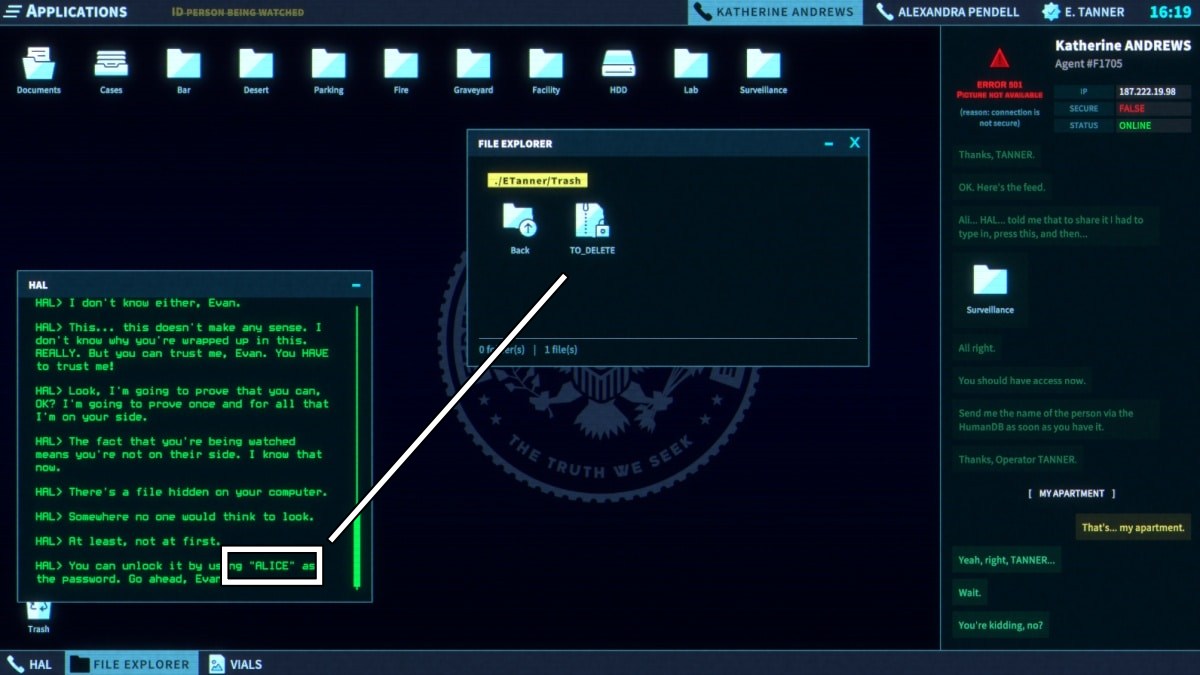
As a seasoned computer user with years of experience under my belt, I can’t help but raise an eyebrow at this unusual situation. You see, HAL, the AI system, is trying to earn my trust by revealing the password to a file named TO_DELETE that was previously hidden in the trash. This file, as I’ve observed before, has been marked for deletion, yet it remains oddly protected. With a password no less. And now, HAL has handed me the key: ALICE.
You can now read her confession to you. Her true identity revealed, you are now on equal terms.
Achievement: Uncover HAL’s identity
HAL trusted you enough to give you her identity.
Case 8: The interrogation of The Ghost and breaking into the FDI
In the course of his probe, Agent Walker encounters an obstacle: The Ghost will communicate, but exclusively with you. Once he disconnects the call with The Ghost, it’s your turn to engage in conversation.
Based on my experiences as a seasoned investigator of the supernatural, I can tell you that interacting with The Ghost is unlike any other encounter I’ve had. The way he navigates this discussion is entirely in your hands. You have the power to ask anything you’re curious about, and he’ll be more than willing to share most of the lore associated with the subject. But remember, truth or lies, it’s all part of the game.
As a seasoned security professional with years of experience under my belt, I’ve seen it all – agents trying to bypass systems, unauthorized access attempts, and even the occasional high-stakes chase. But this time, it’s personal. Agent Andrews is coming for our surveillance feed, and I won’t let him get away with it.
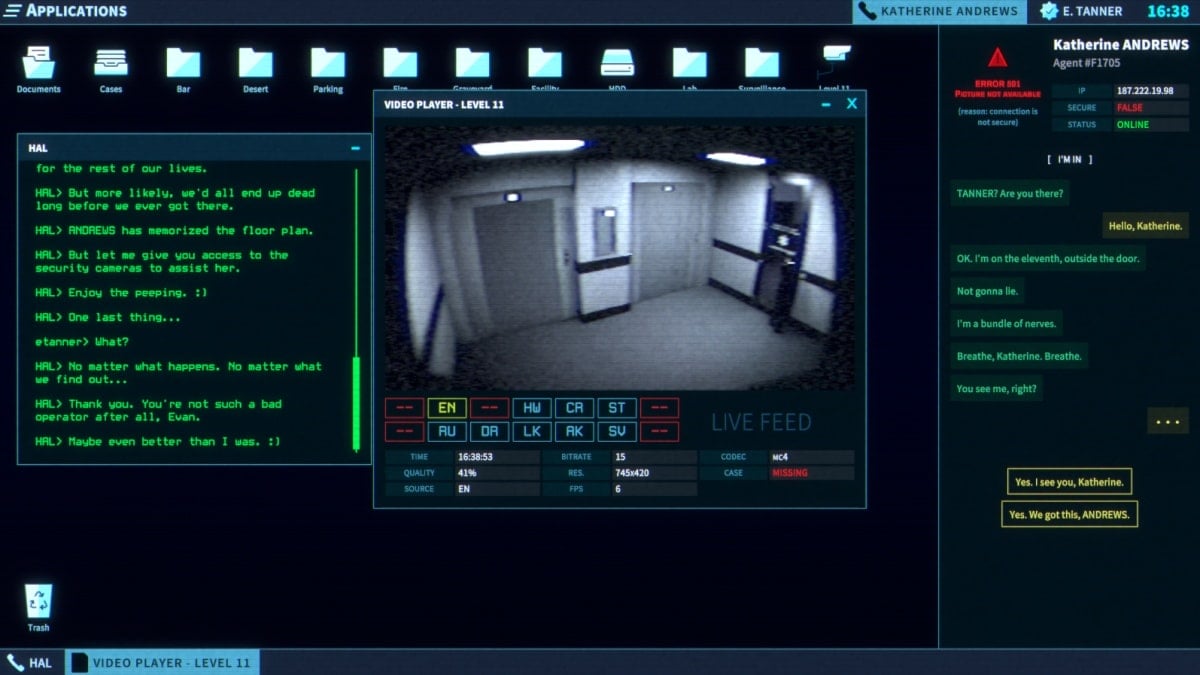
Instead of: “Open up the Level 11 video feed and click on the first button, EN, to summon Andrew. You’ll observe her stepping out of the elevator and approaching the door. However, the code she uses fails, necessitating a quick shift in strategy.”
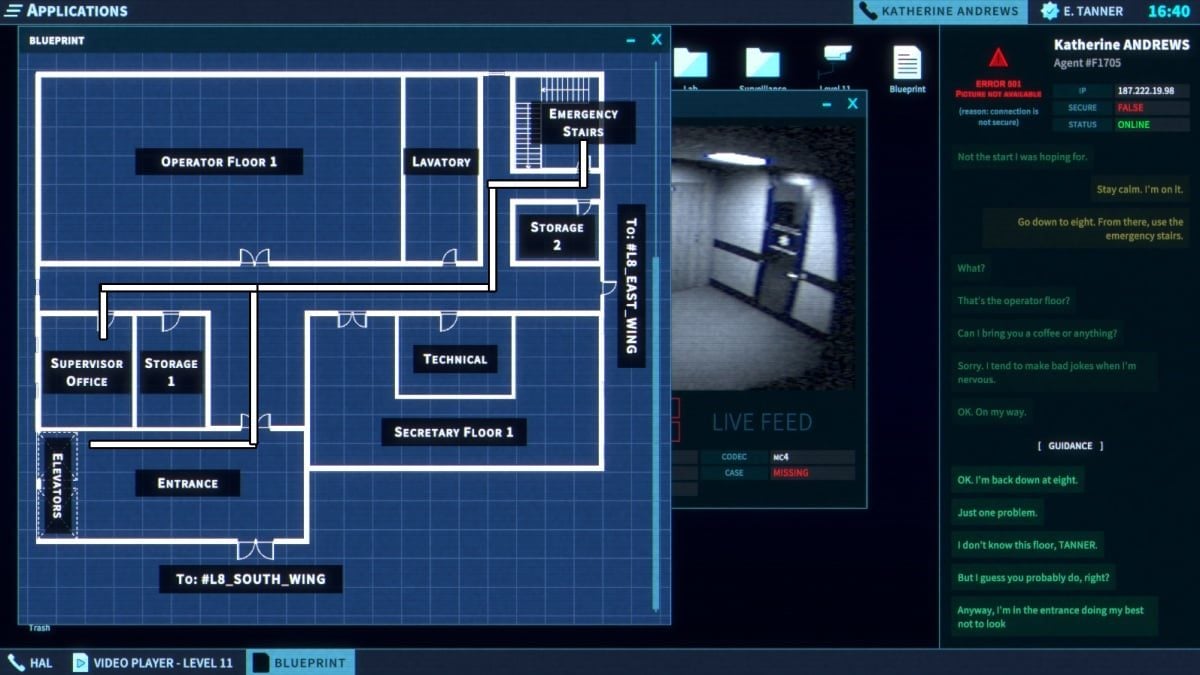
Andres is making his way to your current floor, which is the 8th, but instead of using the regular stairs, he’ll be taking the emergency exit stairs back up. I’ll hand you a copy of the building layout as your task now is to help Andres navigate safely to the emergency stairs.
- Take the door to your left.
- Take the hallway to the right.
- Take the hallway on the left.
- Left.
As an avid fan, I’d be thrilled to share an alternative way to unlock an extra accomplishment in this game. Instead of leading Andrew to his usual destination (as depicted in image #1), you can instead direct him towards Supervisor Skinner’s office (shown in image #2). This choice comes with no drawbacks whatsoever.
Achievement: SKINNER’s office
You led ANDREWS into SKINNER’s office.
I’m asked by Andrews to accompany her via the emergency stairwell as seen on the cameras. To oblige, I need to go back to the cameras and select the ST camera instead.
Once she enters, select the hidden camera to track her movements. She pauses when individuals populate the corridors, signaling you to confirm when they’ve cleared out before she proceeds. Upon receiving the signal that it’s safe, she continues.
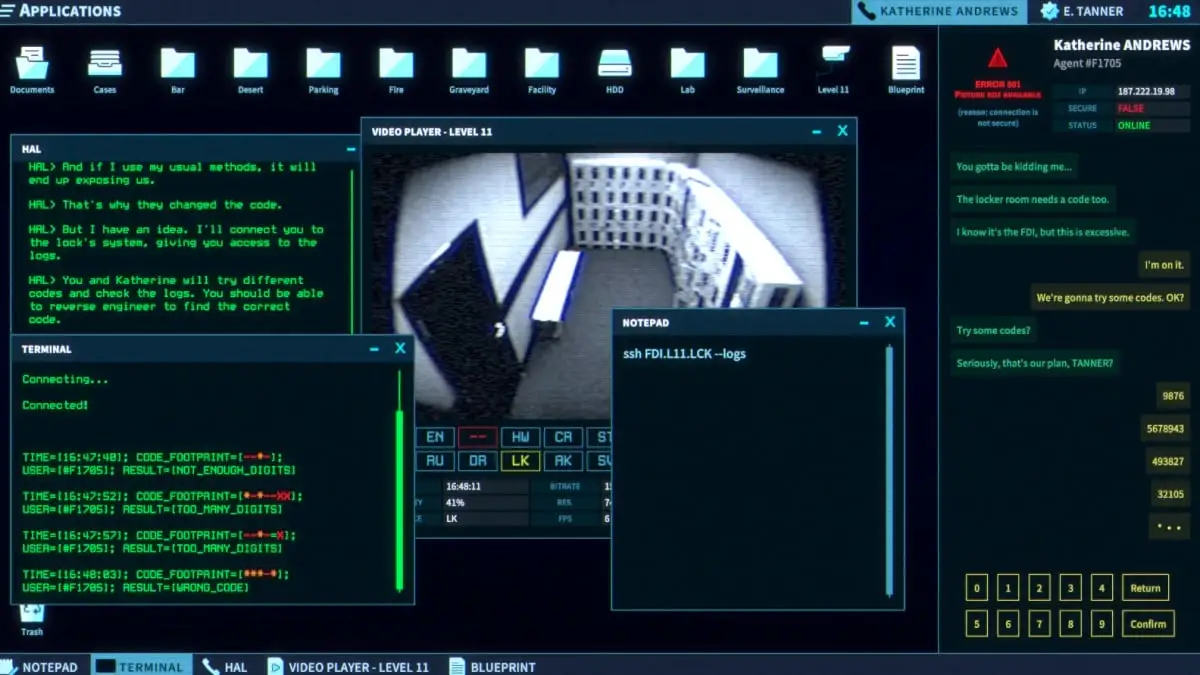
In order to access the locker room, you’ll be provided with a code by HAL, but this code isn’t something HAL can share with you directly. Rather, you’ll find the code in the terminal located beneath your applications (as shown in image #3).
Consider this challenge as a number version of Wordle. For incorrect numbers in the completely wrong position, you will see a red indication. If the number is correct but in the incorrect spot, you’ll get an orange symbol; for correct numbers placed in their proper spaces, use equalsign (=).
The correct code is 5 digits long: 73512.
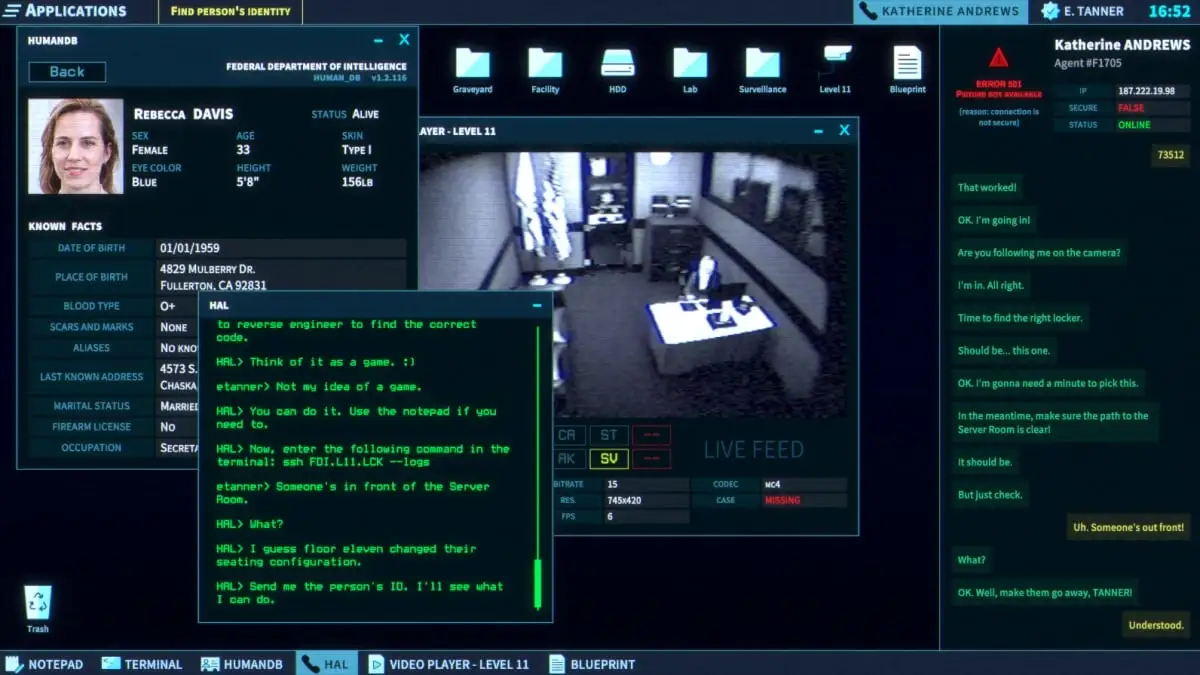
As a seasoned security operative with years of experience under my belt, I understand the importance of maintaining a vigilant eye and following protocol to ensure the safety and security of those around me. Based on the instructions given, I’ll keep my camera trained on Andrews in Location K until she signals for me to check the pathway to the server room. On the secondary camera, I notice a secretary going about her business. With my keen observational skills, I quickly scan her face, searching for any familiar features or distinguishing marks.
Provide the name on the HumanDB.
“Hey Rebecca, it’s great to connect with you again! I see you’ve noticed my Operator tag. Just wanted to let you know, I’m here to assist you with any technical issues that might come up during our gaming session. No need to worry about a patch or anything like that, we’re all good to go!”
If you ask Rebecca to step out of the office for an hour, she will do so. After that time, go back to location K and wait for Andrew to open the lock on location S. Once he’s done, proceed to location V and find Rebecca there.
Follow your instructions from HAL as the FDI enters into a lockdown.
HAL’s terminal
Following the lockdown, you discover that you’ve been interacting with HAL’s terminal regularly. In a surprising turn of events, it is revealed that Skinner has been facilitating this connection between us.
Follow the yellow prompts, and complete the story.
Watch out for the post-credits scene!
Achievement: Finish the game & Achievement: Watch the credits
There’s more to it…
How to unlock all achievements in The Operator
If you’ve stuck to this tutorial, you’ve likely accomplished all achievements by now. For those who may have overlooked some, here’s a summary. Please note that the following information might reveal key plot points in the game.
- Clicked 1234 times — A motivated operator clicks a lot!
If you click around plenty during the course of your investigations, you’ll unlock this naturally. - RTFM — You read the manual!
When you can access the terminal application on your computer, type “help” to pull up the manual. You do not need to read any of it to unlock this achievement. - Welcome to the FDI — You logged in your computer for the first time.
- Your first day — You finished your first day at the FDI!
- Second day — You finished your second day at the FDI!
- Third day — You finished your third day at the FDI!
- Save PENDELL — You defused the bomb and saved agent PENDELL!
- Uncover HAL’s identity — HAL trusted you enough to give you her identity.
- Watch the credits — There’s more to it…
Stick around after the end of the credits to see a final scene, hinting at the true end to the story. - Finish the game
- Ghost car — You sent the Ghost car model to PENDELL
When you’re investigating the murder of Ray Wells, you can scan the car and determine the make and model. Send that to Pendell before you scan the killer’s face to unlock this achievement. - Revert fire report — You reverted the fire report to access the redacted area.
While HAL is having you revert the redacted name from the name list, you can also, without her prompting, go into the fire report from the Cole files. This will show you a little more information about what was being hidden in the Cole case. - SKINNER’s office — You led ANDREWS into SKINNER’s office.
During the FDI break-in, you’ll be leading Agent Andrews around using a floor plan. You can use this to have her walk into the supervisor’s office instead of leading her to the correct area. There are no negative consequences for this action, for reasons made obvious when you have access to HAL’s terminal.
To unlock the solutions for additional puzzle games, explore A Little to the Left: Stars Walkthrough – Completing All Achievements on GamerTop.
Read More
- PENDLE PREDICTION. PENDLE cryptocurrency
- Skull and Bones Players Report Nerve-Wracking Bug With Reaper of the Lost
- SOLO PREDICTION. SOLO cryptocurrency
- W PREDICTION. W cryptocurrency
- NBA 2K25 Review: NBA 2K25 review: A small step forward but not a slam dunk
- Why has the smartschoolboy9 Reddit been banned?
- Understanding Shinjiro: The Persona 3 Character Debate
- Unlocking Destiny 2: The Hidden Potential of Grand Overture and The Queenbreaker
- Mastering Destiny 2: Tips for Speedy Grandmaster Challenges
- Rainbow Six Siege directory: Quick links to our tips & guides
2024-07-22 17:24