We’ve all played with that one person who makes an amazing play that leaves everyone stunned. Now it’s your turn! When a large group of enemy robots attacks and your team starts to panic, you can be the one to calmly eliminate the entire threat with a smart tactic. This trick with the Luremine isn’t just a good way to destroy robots; it’s a game-changing move that can save your team from defeat and make you look like a brilliant strategist. Get ready to turn a chaotic battle into an easy win that your friends will be talking about for a long time.
Key Takeaways
- Think Vertically to Create the Perfect Trap: Stop throwing Luremines on the ground. Instead, stick them high up on walls or towers to create an irresistible target for flying enemies, keeping the lure safe from ground units and clustering aerial threats for an easy cleanup.
- Layer Stratagems for a Devastating One-Two Punch: A Luremine is just the bait; the real damage comes from the follow-up. Coordinate with your team to stun the clustered enemies with an EMS strike, then obliterate the helpless swarm with an Autocannon Sentry or Orbital Laser.
- Communicate Clearly to Synchronize Your Attack: This strategy relies on perfect timing. Use callouts to let your squad know where the lure is placed and when the swarm has gathered, ensuring your stun and damage stratagems are deployed at the right moment for a clean sweep.
What Are Luremines in Helldivers 2?
When you’re overwhelmed by enemies – whether it’s a huge wave of Terminids or a swarm of Automatons – a clever distraction can be your best bet. That’s what Luremines are for. Don’t think of them as weapons; they’re more about controlling the crowd. When you deploy a Luremine, it sends out a strong signal that draws nearby enemies towards it. Instead of attacking you and your team, they’ll all rush towards the mine instead.
Luremines give you valuable time to react – whether that means reloading, moving to a better position, calling in support, or falling back. They don’t directly hurt enemies, but they’re powerful because they let you control the battlefield. Think of them as a way to break up large groups of enemies and turn a messy fight into one you can manage. You can use them to draw enemies into traps, distract them from important targets, or rescue teammates who are in trouble. Truly skilled Helldivers know that winning isn’t just about having the biggest guns – it’s about being smarter than the enemy.
How They Work Against Flying Threats
Enemies that fly can make an easy mission very difficult, as they attack from directions where your cover won’t help. Luremines are great for dealing with these flying enemies. When you use one, it creates a signal that pulls them down from the air and gathers them in one spot. This makes them easy to hit with explosives or a Sentry turret.
To really take down enemies, try throwing a Luremine followed quickly by an EMS Mortar or Strike. The Luremine will gather enemies together, and the EMS will stun them, leaving them vulnerable. This buys your team valuable time to eliminate them before they can spread out and become a threat again.
The Basics of Strategic Placement
How you position your Luremine is crucial, just as important as when you use it. A lot of players make the mistake of simply throwing it into a group of enemies, which usually results in it being destroyed immediately. Instead, try being strategic. A great technique is to toss the Luremine onto a wall or a rock. This makes it harder for ground-based enemies to reach, but the signal will still draw their attention, keeping them busy as they try to get to it.
Luremines are also excellent for escaping tough situations. If you’re being pursued by a large group of enemies you can’t fight, throw a Luremine behind you while you run. This will distract them, allowing you to create distance, recover, and then fight when you’re ready.
Why Flying Enemies Overrun Your Missions
It’s incredibly frustrating to be successfully clearing out a bug nest in Helldivers 2 when flying enemies suddenly attack. These aerial threats can quickly ruin a mission if you’re not ready for them. They come at you from unexpected directions, making it hard to focus and creating a dangerous situation, especially when a large enemy like a Bile Titan is also attacking.
Many teams struggle with aerial enemies. The strategies that work against ground-based threats like Chargers don’t work well in the air. You can’t dodge a fast-moving Shrieker the same way you avoid a Charger on the ground. Their speed and large numbers create chaos, quickly draining your supplies and testing your team’s limits. Before you realize it, you’re overrun, running low on ammunition, and desperately requesting backup just to make it through the next few moments. Figuring out why these flying enemies are so dangerous is the key to regaining control of the skies and achieving victory.
Understanding the Overseer Swarm
The Overseer swarm is incredibly chaotic. Conditions can change in an instant – one moment the sky is clear, and the next you’re suddenly fighting off a dozen of these flying creatures. They don’t arrive gradually; instead, they appear in huge, overwhelming numbers, causing immediate panic. One player reported seeing ten materialize seemingly from nowhere, a truly frightening sight even for experienced Helldivers.
The biggest danger isn’t how many of them there are, but how they disrupt combat. They can confuse your own units, like Harvesters, scatter enemy lines, and quickly turn an organized battle into chaos. If you’re trying to concentrate your attacks on a ground target, a sudden swarm of these creatures will force you to look up, making you an easy target for threats nearby.
Why Your Usual Tactics Don’t Work
If you’ve found yourself firing repeatedly at flying enemies with little effect, you’ve probably realized standard weapons just aren’t enough. These enemies are quick, move unpredictably, and can take a lot of damage. Even powerful abilities often feel ineffective – players have noted that even a large explosive strike sometimes barely impacts a group of them, making it feel like a risky move.
This challenging situation pushes players to think outside the box. Some Helldivers suggest using EMS strikes or mortars to briefly stun the swarm and create space, but these are only short-term solutions. They give you a little time, but don’t solve the underlying problem. To really win against the swarm in the air, you need a strategy that exploits its weaknesses.
How to Execute the Satellite Tower Luremine Strategy
Tired of being harassed by flying enemies? This strategy turns the simple luremine into a powerful anti-air defense. By placing them carefully and at the right time, you can create an irresistible trap for any flying threat. When missions are flooded with enemies like Shriekers and Overseers, usual tactics often aren’t enough – your defenses get overwhelmed and it’s hard to hit the enemies above. This trick changes everything, especially in missions where controlling the air is key to surviving and escaping. By using the environment’s height to your advantage, you can trap entire groups of flying enemies, giving your team the space they need to complete their goals and get out safely. It’s a straightforward idea that can dramatically improve your chances of success, turning a chaotic fight into an easy win. This isn’t just about taking down a few enemies; it’s about controlling the battlefield. Let’s look at how to do it and make those skies safe again.
Set Up Your Elevated Traps
To start, you need to place your luremines in high locations. Think satellite towers, walls, or rock ledges. This stops ground enemies from accidentally triggering them too early. You want to create a trap that flying enemies will target, leaving your team safe on the ground. As seen in gameplay, you can even throw them onto walls to ensure ground units can’t set them off.
Time Your Placement for Maximum Chaos
As a fan, I’ve found that timing is key with luremines. The best way to use them is to place one on an objective before it starts moving – like when you’re doing a satellite dish alignment. I saw one player share a brilliant example: they tossed a luremine onto a satellite tower, and as it rose, it attracted all the flying enemies for the entire mission! Seriously, it creates this amazing, practically unkillable distraction that keeps those airborne threats busy. It’s like a super attractive target they can’t ignore, letting you focus on what you need to do down below without constantly looking up.
Create a Lasting Aerial Distraction
When you activate your upgraded lure, it creates a strong, sustained distraction. It constantly pulls flying enemies together in one spot, keeping them away from your team. This effectively deals with Overseers and also disorients other enemy types – one player even noticed it confused Harvesters and Mortar Overseers. This confusion gives your team a significant advantage, letting you concentrate your attacks on important targets and finish objectives without being constantly bothered from the air.
Unleash the Overseer Feeding Frenzy
Once you’ve carefully positioned your Luremine on a tall structure like a satellite tower, prepare for a spectacular battle. Flying enemies, particularly Overseers, are drawn to it like moths to a flame. They’ll cluster around the Luremine, creating a dense, chaotic group that’s easy to destroy. It’s truly impressive to watch! One player even reported seeing ten Overseers completely fixated on the Luremine, which also seemed to confuse nearby Harvesters.
This tactic transforms a normally protective measure into a strong attack, giving you control of the battlefield and allowing you to choose how the fight happens. Instead of being surrounded and overwhelmed, you draw all enemy fire to one spot. The important thing is to be ready for the intense response you’ll create. This isn’t just a simple diversion; it’s a carefully planned ambush that will impress your team.
Manage the Controlled Mayhem
Throwing a Luremine isn’t just about distracting enemies with something shiny. It actually draws them in, causing them to gather closely and attack the lure in a predictable way. This lets you set up a deadly trap. But be careful – even when focused on the lure, a large group of enemies is still dangerous. If the Luremine is destroyed quickly, they’ll become even more concentrated and aggressive. The key is to use their focus on the lure to your advantage and strike while they’re distracted.
Use Sentries to Mop Up Survivors
Now that all the flying enemies are grouped together, it’s time to take them out! This is a great chance to use your automated defenses. A powerful gun like an Autocannon or MG Sentry, with a clear view of where the enemies are gathering, can quickly destroy the entire swarm. To make cleanup even easier, consider stunning them before they arrive. A well-timed EMS Mortar or strike will leave them helpless, making them easy targets for your sentries – or even a direct hit from an Orbital Laser. This strategy will practically eliminate any chance of them fighting back.
Keep Your Squad Safe in the Chaos
No matter how well you plan, things can still go wrong – a teammate might get in the way, or a powerful enemy could suddenly appear. When that happens, remember that Luremines aren’t just for offense; they’re great for getting out of trouble. If you need to quickly move to a safer spot, throwing a Luremine behind you can distract enemies and give your team valuable time. This can be crucial for escaping a bad situation or helping a teammate who’s been knocked down. Stay aware of your surroundings and be prepared to use Luremines to protect your team and keep them in the fight.
The Best Locations for Deadly Aerial Traps
Just knowing how to use a luremine isn’t enough – knowing where to place it is what truly makes a skilled Helldiver. A well-placed luremine can transform a simple distraction into a deadly trap, saving your team from being overrun. It’s about thinking strategically and using the terrain to your benefit. Look for areas where enemies naturally gather, where they’re exposed, and where you can create the most mayhem.
Before you launch your lure, take a moment to study the environment. Look for narrow passages, walls, and areas where enemies frequently appear. The most effective spots aren’t always immediately apparent – a simple wall or alley can be ideal for setting your trap. Skillful placement lets you control the enemy swarm, choosing where the battle takes place and ensuring you have the upper hand. This strategic thinking is key to success, whether you’re facing off against creatures or perfecting your Warzone gear. Think of the map not just as a path, but as a tool. Every feature – rocks, buildings, canyons – can be an advantage if you know how to use it.
Target High-Traffic Spawn Zones
Okay, so I’ve learned the best way to use luremines! Basically, you want to put them right where enemies are already showing up. Think about those super busy spots – like right outside a bug nest or near where bots are being built. That’s where you’ll get the most action! If you place your luremine in those spawn areas, you’ll pull in a bunch of enemies all at once, making a perfect target for things like orbital strikes or machine gun sentries. It’s like setting out a huge pile of food and just waiting for all the Overseers to come running. It’s not just about distracting them, though – it’s about stopping them before they even get close to my team. It’s a game changer!
Use Walls and Structures to Your Advantage
Want to seriously improve your luremine strategy? Try sticking them to walls! Placing luremines on the ground leaves them vulnerable to quick destruction by enemies. But if you attach them to high places like buildings, rocks, or the satellite tower, ground units can’t reach them. This makes flying enemies bunch up around the lure, creating an easy target. This keeps your trap safe until you’re ready and lets you control exactly where the swarm gathers, making it much easier for your team to eliminate them.
Why Urban Maps Are a Goldmine
Keep an eye out for city maps during missions – they’re perfect for using luremines! Urban areas are ideal for trappers because the streets, alleys, and buildings guide enemies into predictable paths. You can set up luremines to funnel large groups of enemies into kill zones, turning corners into deadly traps. The tight spaces make enemies easy targets, letting your traps do most of the work.
Coordinate Luremines With Your Squad
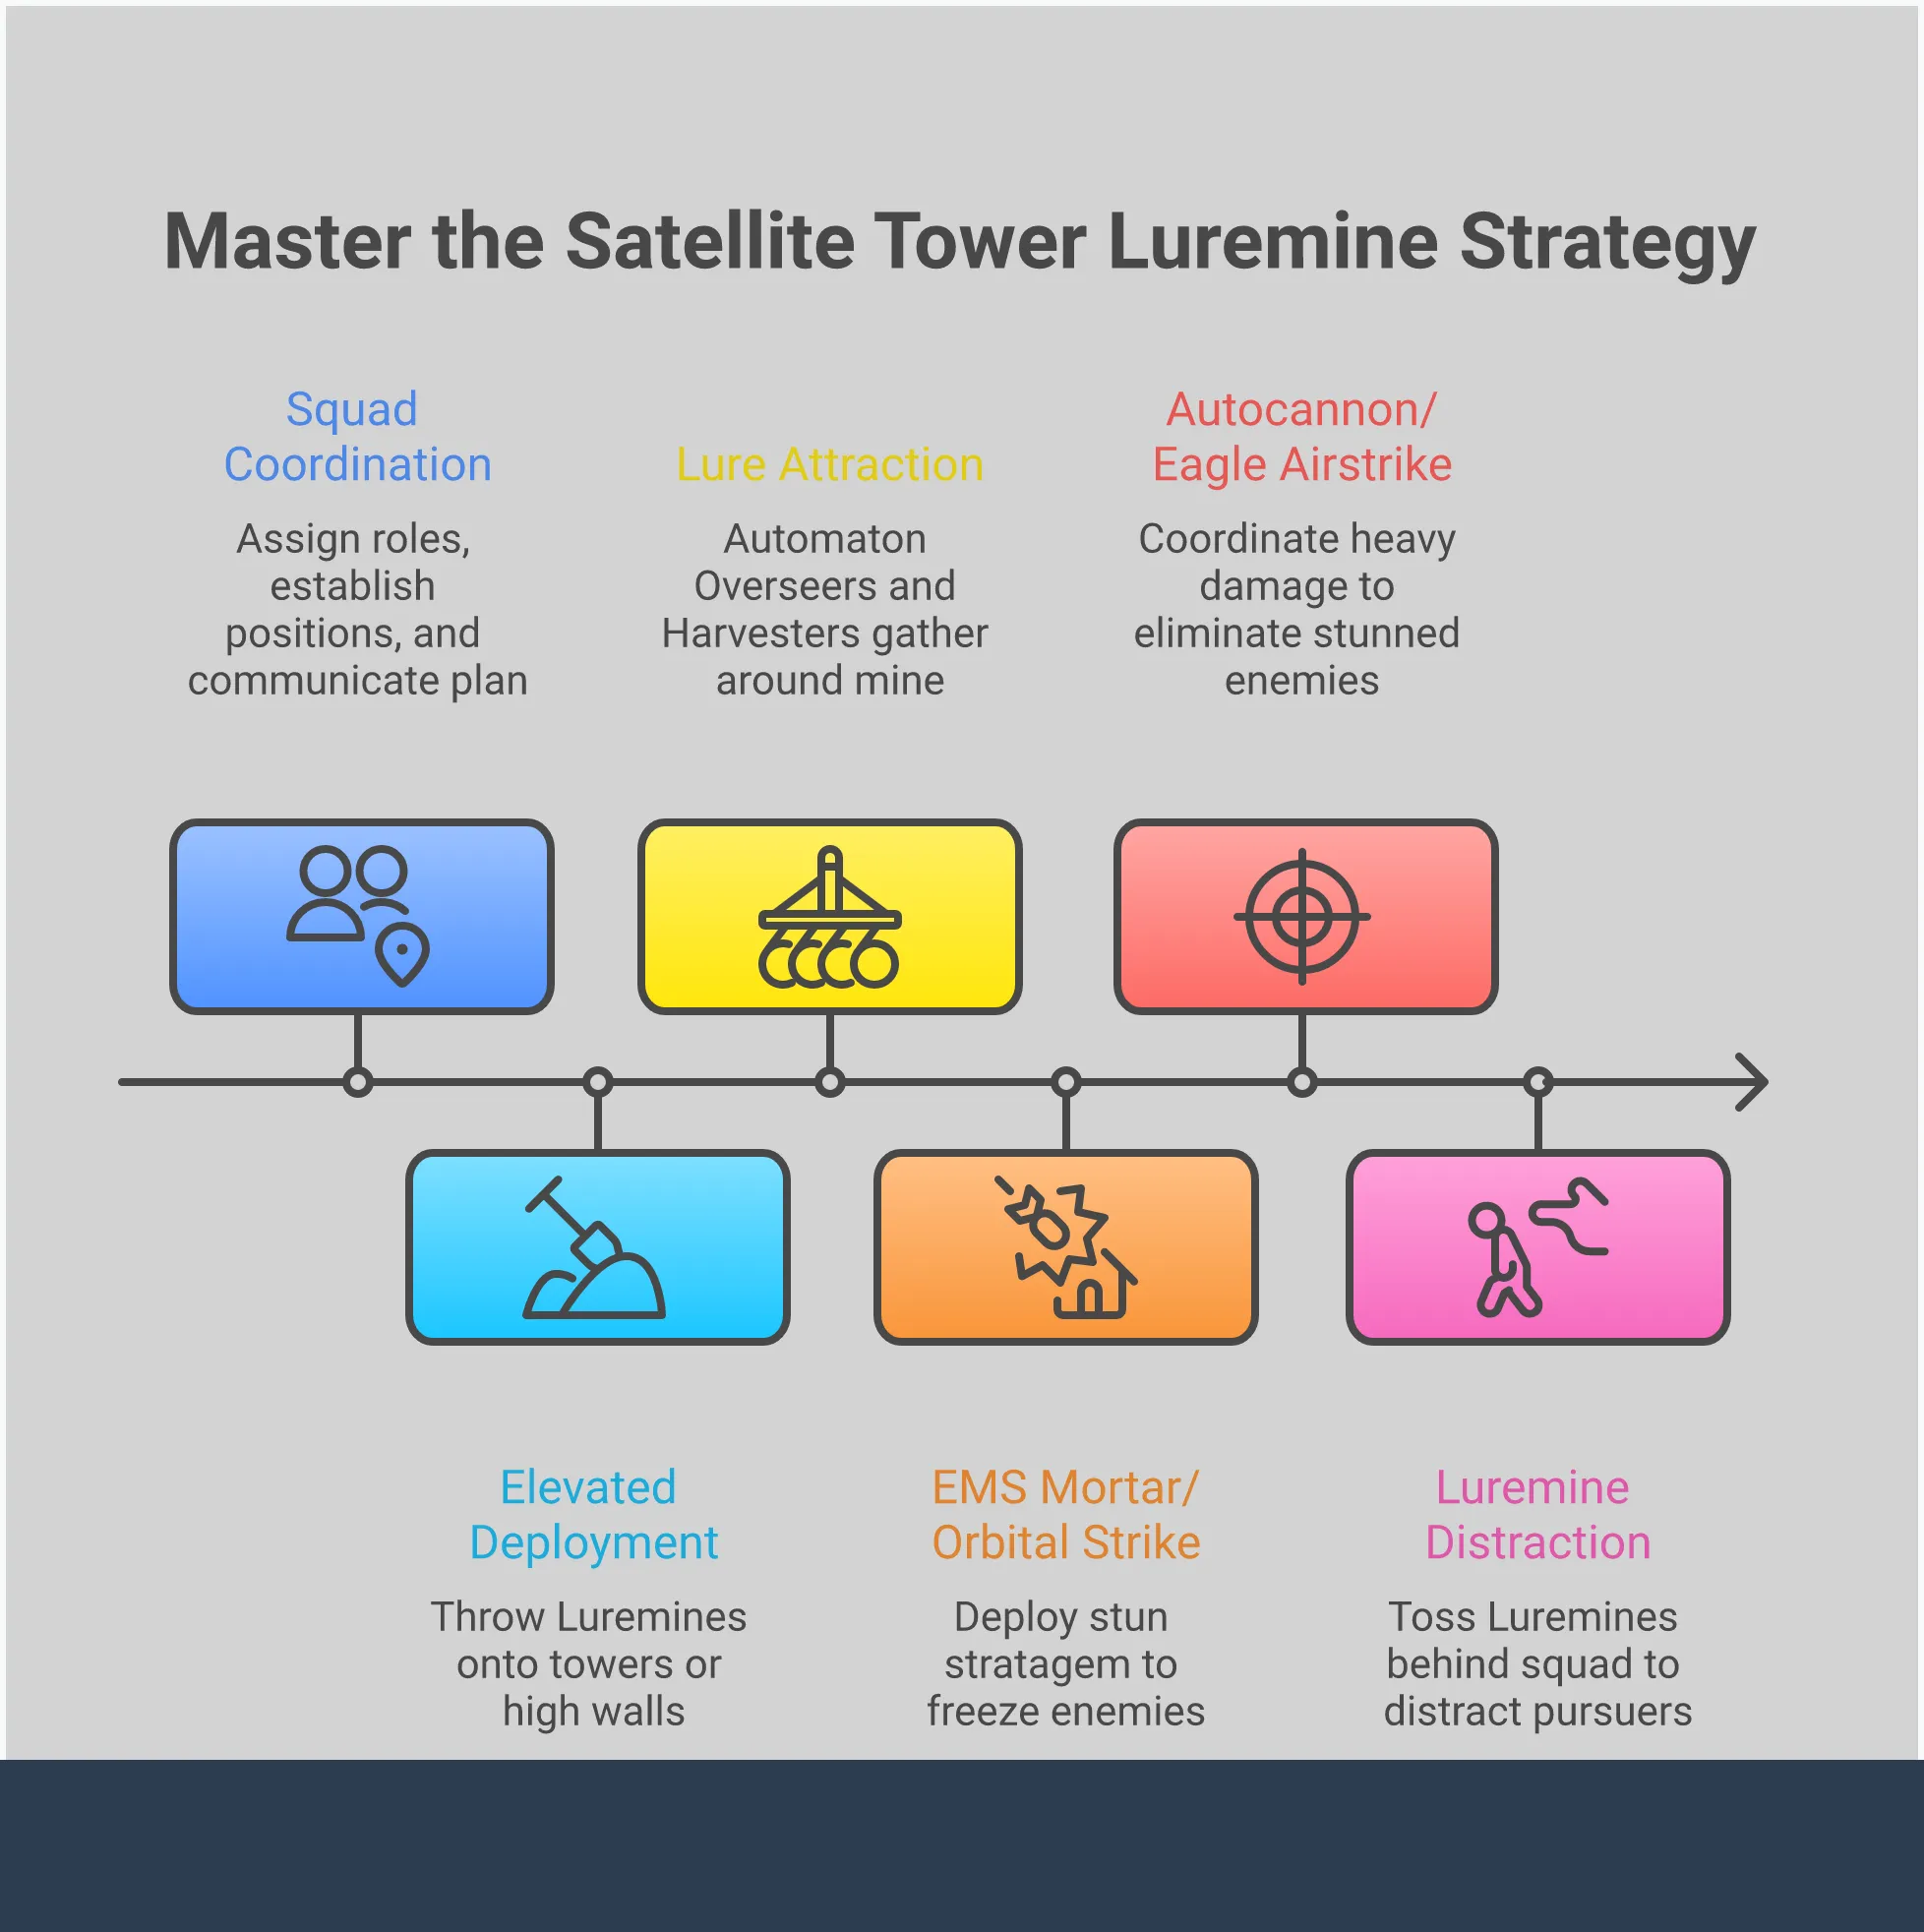
The Luremine trick is really effective, but it works best as a team effort. To pull it off successfully, everyone needs to know what they’re doing. When your squad is coordinated, a simple distraction can become a devastating aerial ambush. Don’t think of it as just using a Stratagem – think of it as a precisely timed, destructive performance. Good communication, smart positioning, and attacks that happen at the same time are what make the difference between a mediocre attempt and a complete victory against flying enemies. It’s not about one player saving the day; it’s about four Helldivers working together like a well-tuned machine to deliver a coordinated attack. Before starting a mission, make sure everyone understands the plan: one person handles the Luremines, another is ready to stun, and the other two focus on dealing heavy damage. A little bit of planning beforehand can make a huge difference.
Position Your Team for Air Control
Good squad teamwork starts with where everyone positions themselves. Don’t just lay traps randomly – think about controlling the area. Instead of placing Luremines on the ground where anything can set them off, have your team throw them onto walls, towers, or high rocks. This keeps them safe from ground enemies and ensures they’ll trigger on the flying enemies you want to target. This tactic draws flying enemies like Overseers to a specific, high-up spot. Then, your squad can line up and easily shoot them as they gather. Smart positioning turns a simple lure into a deadly trap.
Combine Sentries and Airstrikes
After setting up the Luremine to attract enemies, it’s time to unleash a powerful attack. Combining different Stratagems is key to success. Have a teammate deploy an EMS Mortar Sentry or call in an EMS strike close to the Luremine to stun the gathered flying enemies, keeping them in one place and making them vulnerable. While they’re stunned, other teammates can then call in powerful strikes like an Eagle Airstrike, Orbital Laser, or a Gatling Sentry, focusing fire on the swarm. This combination of luring enemies, stunning them, and then destroying them is highly effective. By using multiple sentries and airstrikes together, you can create a devastating combo that eliminates entire waves before they can even attack.
Nail Your Communication and Timing
Success depends on clear and well-timed teamwork. Use clear signals to coordinate every action. Tell your team where you’re placing the Luremine so they can get ready, and warn them when enemies are approaching so they can deploy stuns and attacks instantly. Timing is also key when moving – if you’re falling back from a fight, tossing a Luremine behind you can distract enemies and give you time to reload and regroup. Working together to place mines at the right moment can turn a dangerous situation into a smart escape, showing that even a retreat can be turned into a tactical advantage.
Which Flying Enemies Fall for This Trick?
The satellite tower ‘lure’ is a really effective way to deal with the Automaton’s most frustrating flying units. However, it doesn’t work on everything. It’s important to know which enemies will be attracted to the lure and which won’t, so you’re not caught by surprise. This strategy is specifically for countering the Automaton’s air forces and won’t work against the bug enemies.
Focus on eliminating the flying units that scout the battlefield, request backup, and generally cause trouble. By luring them together onto a high tower, you take away their ability to move around freely, making them easy targets. It’s like creating a trap for these bots. Let’s look at which enemies this strategy works best against, and which ones need a different approach.
How Overseers React
The real power of this tactic comes from the Overseers themselves. These flying scouts are designed to check out anything unusual, and the sound of a luremine on a satellite tower instantly grabs their attention. One player reported seeing up to ten Overseers rush to the tower, completely ignoring the players on the ground. The lure doesn’t just attract them; it seems to disorient them, making them easy to hit with a sentry gun. This effectively turns a scattered danger into a single, focused target.
Distracting Harvesters
Although a luremine won’t destroy a Harvester dropship, it can definitely throw off its flight path. Harvesters are attracted to the lure, and players have found they become very distracted by it. Instead of sending Devastators your way, a Harvester might pause near your tower, investigating the signal. This gives your team valuable time to reload, move to a better position, or deal with the bots that are already attacking. It’s a great tactic for controlling enemy reinforcements and preventing your base from being overwhelmed.
How Other Aerial Threats Respond
This tactic works well with Automaton scouts and dropships, but it’s not a universal solution for all airborne threats. For example, Terminid Shriekers won’t be fooled by luremines at all. When dealing with other flying enemies that aren’t affected by this method, you’ll need to use alternative strategies. Many players suggest using an EMS strike or a Mortar Sentry to temporarily disable them, creating an opening for your team to eliminate them with standard weapons or other offensive Stratagems. It’s important to always have a plan B for enemies that won’t be tricked by your traps.
Advanced Luremine Combos to Own the Skies
You’re great at attaching Luremines to towers, and that’s a good base skill. Now, let’s take it further. The key is to use Luremines as part of bigger, more complex traps. Combining them with other tools and the surroundings can turn a simple distraction into a deadly area. These advanced combinations will give you control of the battlefield, making sure enemy air units are always caught off guard. Let’s explore some strategies to make you the expert at dealing with aerial threats for your team.
Combine Multiple Stratagems
Think of your Luremine as a way to attract enemies. Once you have them gathered, you need to follow up with a powerful attack. A really effective tactic is to use a Luremine to set off a Hellbomb. Simply draw the enemy swarm towards the unexploded bomb, throw down your Luremine on top of it, and watch the massive explosion. The Luremine groups the enemies together, and the Hellbomb wipes them out instantly. You can use this same idea with other attacks. Throw a Luremine into a narrow passage and get ready to call in an Eagle Airstrike or Orbital Laser. When the enemies cluster together, unleash the attack! It’s about combining your abilities for the biggest possible effect.
Create Environmental Traps
Effective traps blend into the environment. Don’t just place your Luremines on the ground – think about using walls or high spots like rocks. Ground enemies will likely overlook them, but flying enemies will be drawn in, grouping together around the mine. This creates an easy target for you and your team. This strategy works especially well on maps with tall buildings or cliffs, letting you control where enemies go and setting up a clear shot while protecting your trap from being accidentally triggered by the wrong enemies.
Always Plan an Escape Route
While setting up a surprise attack from above can be really exciting, it also risks drawing enemies your way. Always have an escape route planned before launching an attack, especially if you’re summoning a large group of enemies. Having tools like an EMS Mortar or Stun Grenade can buy you valuable time to create space. One player recommends that an EMS strike can temporarily disable enemies, giving you a chance to reload and move to a better position. This isn’t about running away, but about staying in control. By skillfully managing the enemies you attract, you can control the battle and avoid being overwhelmed.
Common Mistakes That Sabotage Your Strategy
Even the best plans can fail if small mistakes are made. Luremines are strong tools, but they’re not perfect. It’s just as important to know how to avoid misusing them as it is to know how to use them effectively. A badly placed luremine or over-reliance on them can quickly turn a smart trap into a danger for your team. Let’s look at common mistakes and how to avoid them, so you can maintain control and work together successfully, rather than causing problems for your allies.
Placement Errors That Backfire
The placement of your Luremine is crucial. A badly thrown lure can actually attract enemies towards you or your teammates, especially when they’re vulnerable. It’s tempting to quickly toss one behind you while fleeing, but this often makes things worse. Remember, the distraction is powerful, and careless throws can backfire. Before throwing, take a moment to think about where the enemies will move. Your goal is to draw them away from your team and any important targets, not just to a different, equally bad location.
When Luremines Won’t Stick
Many players mistakenly believe you can directly attach Luremines to enemies. If you’ve tried sticking one to a rushing Harvester and it just bounced off, you’re not the only one! Luremines are meant to stick to surfaces – walls, buildings, the ground – not creatures. A helpful player highlighted this, asking if they only stick to surfaces, and that’s correct. Don’t waste your Luremine trying to hit a moving target. Instead, aim for nearby objects or the ground to create a distraction. This is much more reliable and makes sure the lure actually works as intended.
Don’t Rely on a Single Tactic
Luremines are great tools, but don’t rely on them completely. Enemies sometimes seem to find you no matter what, which can be really annoying. If you only use Luremines, you’ll be caught off guard when they don’t work, or when a new enemy appears. It’s important to have a plan B! Try combining Luremines with other strategies like sentry guns, airstrikes, or teamwork. Varying your approach will always be more successful than doing the same thing every time.
Frequently Asked Questions
Okay, so I’ve been messing around with Luremines, and they’re amazing against those robotic Overseers and Harvesters. But what about the bugs? Turns out, Shriekers totally ignore them – so don’t bother trying to shoot them down with Luremines. However, they’re still super useful on the ground! I’ve found I can lay a Luremine and pull a bunch of Chargers and Bile Spewers into a nice, tight group, which makes them easy pickings for an Orbital Laser or Eagle Airstrike. It’s a game changer for horde control!
I’m finding my Luremines are destroyed really quickly. What could I be doing wrong? Usually, it’s about where you put them. If you’re throwing Luremines on the ground during a fight, enemies like Devastators and Chargers will immediately run over and destroy them. The trick is to place them somewhere hard to reach. Try throwing them onto walls, tall rocks, or buildings. This makes them better at catching flying enemies and keeps ground enemies from destroying them.
As a solo player, I was wondering if this strategy would even work for me, but it totally does! You basically have to do everything yourself – set up the distraction and take advantage of it. I’ve been using the Luremine to pull enemies off the objective I’m trying to complete, which gives me some breathing room. Even better, I can throw a Luremine and then immediately follow up with my own Autocannon Sentry or an Eagle Airstrike for a really effective combo. It’s a lifesaver when you don’t have teammates to cover you!
To get the most out of your Luremine, combine it with either an EMS Mortar Sentry or an EMS Orbital Strike. The Luremine gathers all flying enemies together, and then the EMS stuns them, making them easy targets. This allows you and your sentries to quickly eliminate the grouped enemies before they can escape or attack.
Does this attract all enemies on the map? No, it won’t alert enemies from all over the place. The Luremine only affects enemies who are already close by or happen to be patrolling nearby. It’s designed to deal with threats in a specific area, not to draw enemies from across the entire map.
Read More
- Off Campus Season 1 Soundtrack Guide
- Chainsaw Man Volume 24’s Cover Art Reveals a Brand-New Denji
- X-Men ’97 Finally Gave Gambit the Hero Moment He Deserved
- 46 Years Later, The Mandalorian & Grogu Answers A Major Empire Strikes Back Question
- HoI4 fans harsh reactions to the announcement of another DLC pack
- 10 Worst End-Game Couples In Sitcom History
- Emily Henry Says to ‘Trust the Vision’ For Beach Read Adaptation
- Gold Rate Forecast
- Katanire’s Yae Miko Cosplay: Genshin Impact Masterpiece
- DoorDash responds after customer uses AI to make food look bad and get a refund
2026-02-09 15:06