Learn all the essential details about the top 10 shields in Avowed, understanding why they are considered the best and least effective choices.
In this way, the sentence is clear, easy to understand, and maintains the original intent while making it more engaging for readers.
In simpler terms, the game “Avowed” is a role-playing game developed by Obsidian Entertainment and published by Xbox Game Studios. It takes place within the Pillars of Eternity universe and centers around events happening in the Living Lands, where you’ll unravel a hidden mystery. The shield in this game serves as a defensive tool, helping to block attacks, lessen incoming damage, and offer unique passive abilities. This is a one-handed weapon designed to boost survivability during challenging encounters. By blocking attacks, you can reduce the damage taken.
In this guide, we’ll talk about the top 10 shields in Avowed, each with special features like restoring health, calling upon allies, or attacking foes. Enhancing your shield boosts its capabilities and efficiency. Each player can select a shield that matches their preferred strategy, as it significantly influences gameplay. As a tank player, selecting the optimal shield is essential since your performance primarily relies on it. In this guide, we’ll cover the best 10 shields in Avowed, detailing their attributes and providing tips for obtaining them during your adventures through the world.
Top 10 Best Shields in Avowed Ranked
A shield serves as a protective tool that boosts your durability and enables you to manage numerous adversaries more efficiently. Shields enable you to ward off incoming attacks and even retaliate in close combat situations. They reduce damage from both melee and ranged assaults, but timing is crucial for minimizing harm. Additionally, they help conserve stamina by absorbing hits without causing immediate depletion. Furthermore, shields can act as a form of resistance to stagger effects, preventing you from being easily pushed back or stunned. Some shields even provide protection against magical attacks, so selecting the right one is crucial.
Employing a shield in your non-dominant hand provides an optimal defensive approach, enabling you to block, parry, deflect, and safeguard effectively. Initially, acquiring the Shield Bash passive is incredibly beneficial as it allows for enemy interruption and stun accumulation. Additionally, passives such as Parry and Reflect significantly enhance your survivability. Consequently, even if you’re not adopting a tank-like playstyle, it’s advisable to incorporate this combo on your secondary bar. However, keep in mind that a shield necessitates numerous passive skills to make the defensive aspects worthwhile, and it offers only modest offensive benefits.
Ranking Best Shields in Avowed
Below are the 10 best Shields in Avowed ranked from best to worst:
- Tree of Life- The best Shield that provides regenerates health and reduces incoming elemental damage.
- Sun and Moon- Regenerates health during the day and essence at night.
- Bastion of Solace- It provides a chance to inflict fire damage on attackers when blocking and increases health and stamina.
- Unflinching Duty- This shield provides you a chance to avoid melee damage and increases maximum stamina.
- Sun of Black Heaven- It provides you a chance to restore essence when blocking and increases maximum essence.
- Beetle’s Bulwark- This shield summons a beetle companion when parrying below 75% health and offers fire resistance.
- Wind and Wave- It increases movement speed and provides frost resistance.
- Nimanna’s Ward- It provides temporary health on successful parries and reduces damage from spirits.
- Spindlewalker- This shield resists slowing by webs and has a chance to lay slowing webs when parrying.
- Nature’s Ward- This lower-tier shield deals damage to attackers when blocking and has a chance to remove the poisoned effect.
10) Nature’s Ward
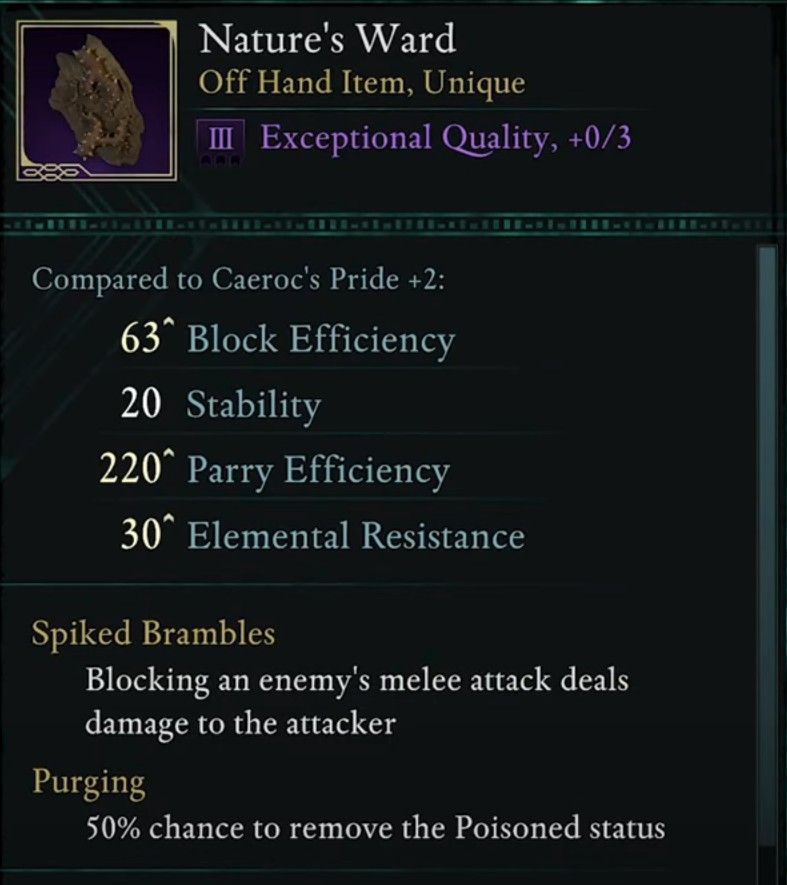
- Block Efficiency: 63
- Stability: 20
- Parry Efficiency: 220
- Elemental Resistance: 30
The Nature’s Ward, ranked lower among our shields, has a weaker blocking capacity and less potential for elemental resistance. Despite this, it exhibits good parry efficiency, enabling you to respond effectively to enemy attacks. This shield comes with two unique advantages that boost its combat effectiveness. Spiked Brambles lets you thwart melee attacks from enemies, inflicting damage on the aggressor. Purging offers a 50% chance of eliminating the Poisoned status. You can acquire the Nature’s Ward in a Locked Tower situated within Delemgan Glade, located in the Emerald Stair region.
To get to the Locked Tower from Roch Arch Beacons, head west. Upon spotting a tower, veer right. After you’ve passed that tower, you’ll come across a wooden pathway; follow it straight. You’ll see a button there – press it to open the door. Inside the tower, you’ll find Nature’s Ward in a coffin. This solid shield is great for defensive and tanky gameplay, but we rank it lower due to its low blocking efficiency and its less-than-ideal suitability for aggressive playstyles.
9) Spindlewalker
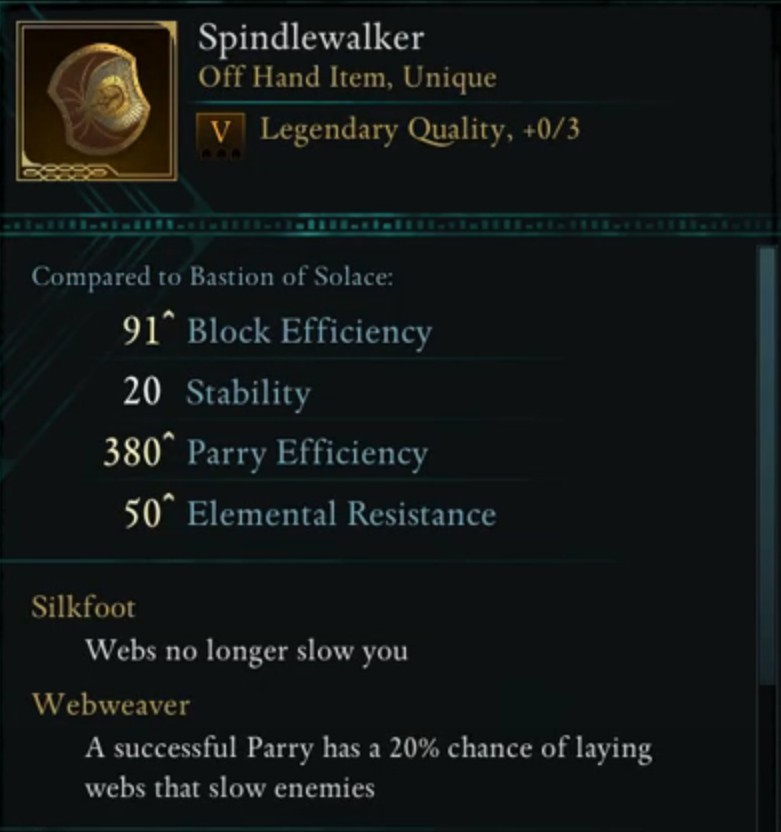
- Block Efficiency: 67
- Stability: 20
- Parry Efficiency: 240
- Elemental Resistance: 33
As a gamer, I find myself lingering near the bottom of our shield-ranked list with the Spindlewalker shield. Despite its mediocre blocking capabilities, this damage-absorbing beauty truly shines when it comes to parrying. It boasts two combat-enhancing bonuses: the Silkfoot bonus, which frees me from web-imposed sluggishness, and the Webweaver enchantment, which increases the odds of my parries trapping enemies in slowing webs by 20%. You can find this intriguing shield at the Researcher’s House within Shatterscarp’s Scaedclef. Just remember to grab a nearby house’s key up north and carry three lockpicks to unlock its mysteries.
Getting the key will cause Ash Blight to appear outside your home. Enhancing this shield can boost its blocking effectiveness and improve its parrying abilities. Consider using this shield during early to mid-game battles. The Spindlewalker is great for managing crowds, especially against enemies that employ web attacks. We’ve positioned the Spindlewalker beneath the Nimanna’s Ward and above the Nature’s Ward because it has minimal defensive advantages but provides decent stability in combat.
8) Nimanna’s Ward
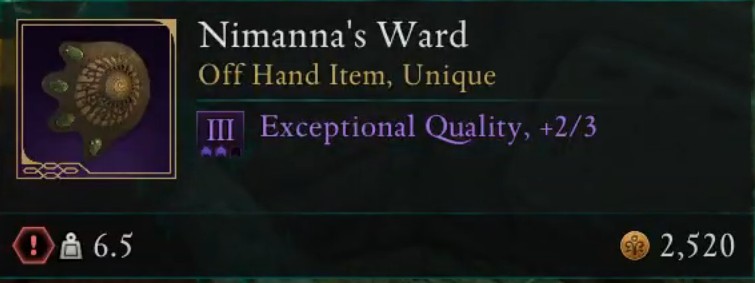
- Block Efficiency: 77
- Stability: 20
- Parry Efficiency: 300
- Elemental Resistance: 40
Nimanna’s Guard ranks 8th among our shields, boasting exceptional parry performance and minimal block requirements. It offers two distinctive advantages that amplify its usefulness in battles. The Soulkeeping Parry feature enables a temporary health boost upon successful parries, enhancing your character’s resilience temporarily. Additionally, the Spirit Ward bonus reduces damage taken from spirits by 5%. You can find Nimanna’s Guard in Naku Kubel within Shatterscarp during the Shadows of the Past events. To start the quest, interact with the Ryngrim within their domain during Face Your Fears.
After finishing the Trial of Wisdom, take a right in the next room. Inside the treasure chest there, you’ll discover Nimanna’s Ward and the Corrupted Adra. This shield is beneficial for players aiming for extra protection against spirit-based adversaries. Combine it with Shield Bash to boost your blocking power, particularly in demanding situations. We’ve positioned Nimanna’s Ward beneath Wind and Wave due to its situational charms and block performance.
7) Wind and Wave
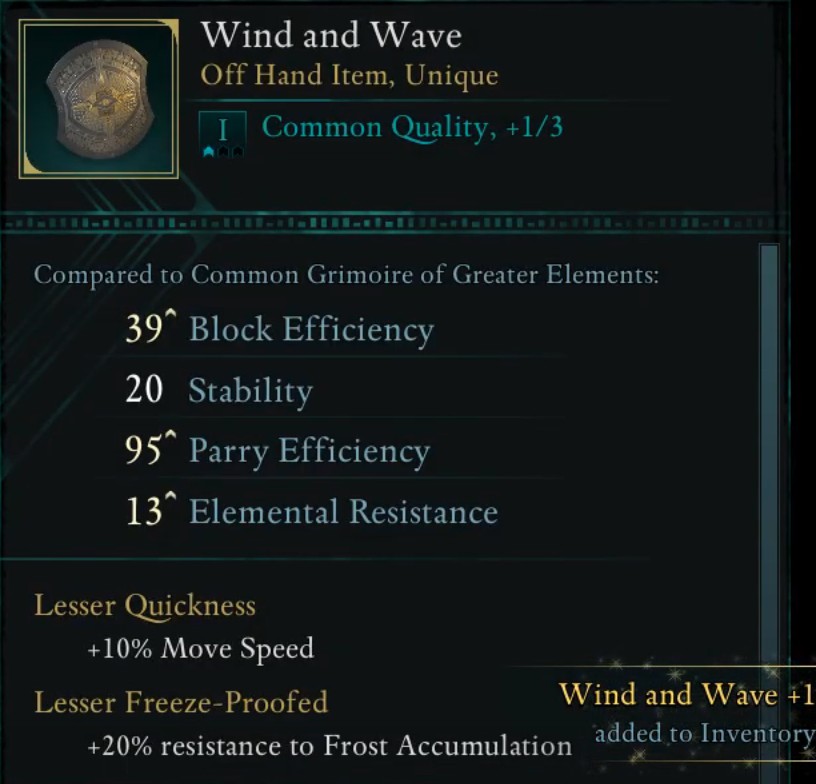
- Block Efficiency: 49
- Stability: 20
- Parry Efficiency: 140
- Elemental Resistance: 20
In a nutshell, Wand and Wave provides advanced protective features, enabling you to lessen the damage received from opponents in battles. This shield has two advantages that elevate its performance:
1. Lesser Quickness boosts your character’s speed by 10%, making them swift on the battlefield.
2. Lesser Freeze-Proofed grants an additional 20% resistance to Frost Accumulation, making it handy against frosty attacks.
You can find Wind and Wave in the Dawnshore region, located northeast of the Old Pargrun Wall, close to the River. To reach it, ascend the scaffolding on the side since the main entrance is obstructed. At the lighthouse in Claviger’s Landing, you’ll eventually come across the map at the top.
From Claviger’s Landing, head northwards along the river, moving towards a bridge situated east of the Old Pargrun Wall. Follow the riverbank until you come across a cluster of roots close to the edge. Dive beneath the water near these roots to discover a secret passage. Inside this passage, you’ll uncover a hidden treasure, consisting of the Wind and Wave shield and a chest filled with helpful items. This shield is ideal for early to mid-game play since it offers reasonable protection without excessive weight. It also provides resistance against frost damage-dealing enemies. However, it’s not recommended for tanking due to its lack of high defense and parry efficiency. Instead, you’ll find this shield beneath the Beetle’s Bulwark.
6) Beetle’s Bulwark
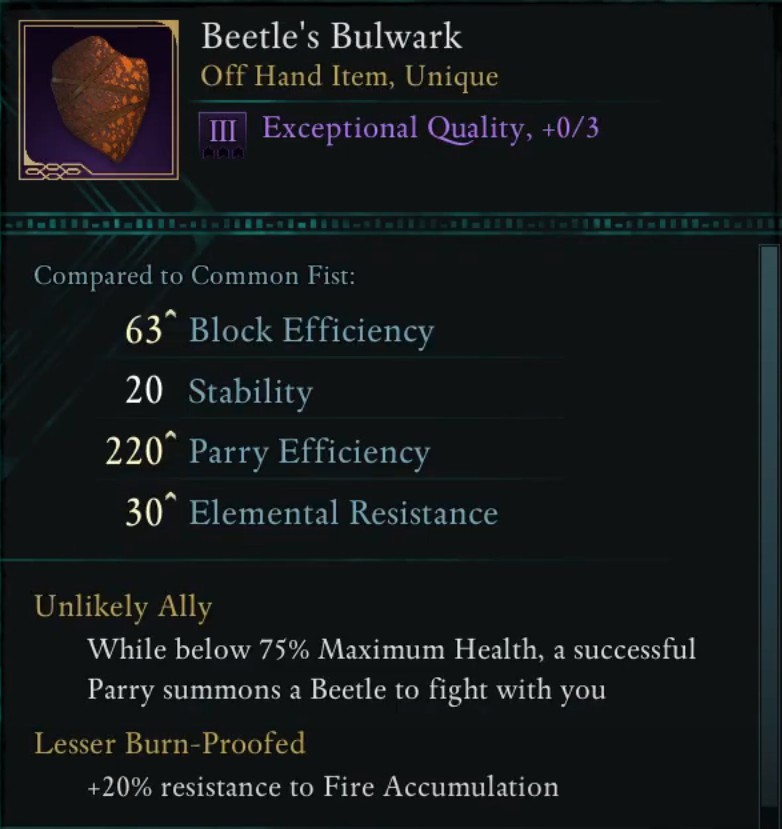
- Block Efficiency: 49
- Stability: 20
- Parry Efficiency: 140
- Elemental Resistance: 20
In simpler terms, “Beetle’s Bulwark” is a shield used under the light of the “Black Heaven,” but it may not be very effective against strong opponents in the final stages of the game as it doesn’t absorb much damage. This shield has two special abilities that enhance its performance in the game. The first ability, “Unlikely Ally,” summons a beetle to fight with you after a successful parry when your health is below 75%. The second ability, “Lesser Burn-Proofed,” gives you a 20% resistance to fire damage accumulation. You can buy the “Beetle’s Bulwark” from a merchant named Sanza, who is situated at “Sanza’s Makeshift Emporium” in “Paradis Hightown,” within the city of “Paradis” in the region of “Dawnshore.
You can purchase it at Sanza’s Temporary Marketplace, which is situated in High Market, Paradis City, Dawnshore. The upgrade of this shield enhances its performance during battles, making it a more potent damage-absorbing item. Initially, the Beetle’s Bulwark comes with Fine quality and can be upgraded to Exceptional, Superb, and Legendary standards. It is particularly useful for early to mid-level stages as it offers additional combat assistance through summoning a beetle. Since it has a lower blocking and parrying efficiency compared to the Sun of Black Heaven, we have placed it below it in the hierarchy.
5) Sun of Black Heaven
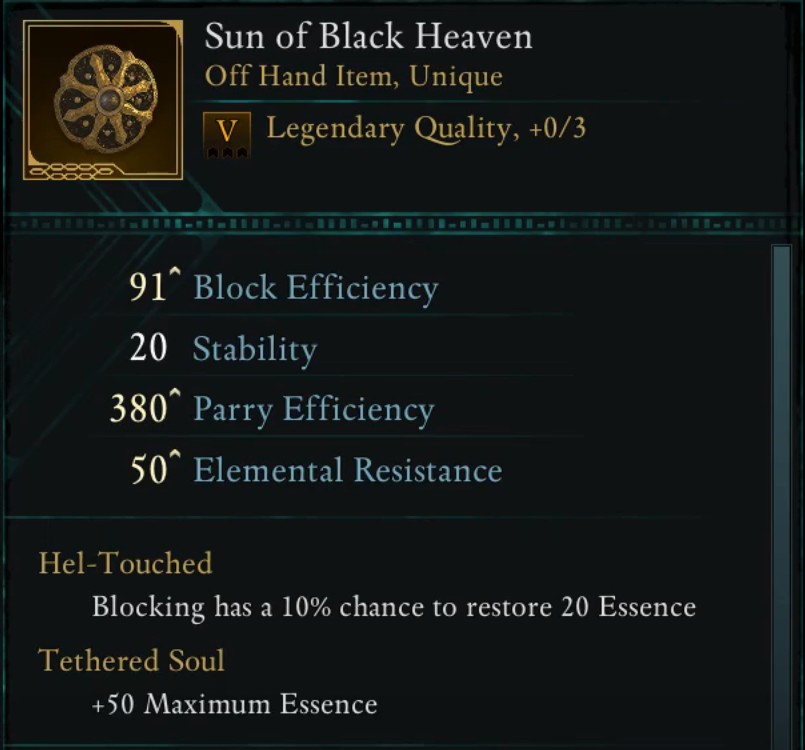
- Block Efficiency: 91
- Stability: 20
- Parry Efficiency: 380
- Elemental Resistance: 50
In our top five shields, the Shield of the Ebon Sky shines due to its good block and parry efficiency. This guard is perfect for players who rely extensively on Essence. You can buy the Shield of the Ebon Sky from Quartermaster Yorgu at Solace Keep in the Galawain’s Tusks region, priced at 73,125 Skeyt. The Shield of the Ebon Sky is highly respected among Essence-focused builds, providing both defensive advantages and benefits for managing Essence.
This distinctive shield offers two special advantages named Hel-Touched and Tethered Soul. The first, Hel-Touched, provides a rare bonus that thwarts a 10% chance to replenish 20 essence points. The second, Tethered Soul, enables you to maximize your essence reserves. When combined with abilities such as Shield Bash, it becomes more effective in battle situations. It offers outstanding protection with a Block Efficiency of 91 and Parry Efficiency of 380. However, keep in mind that this unique shield is pricey and may not be as beneficial for pure tank characters.
4) Unflinching Duty
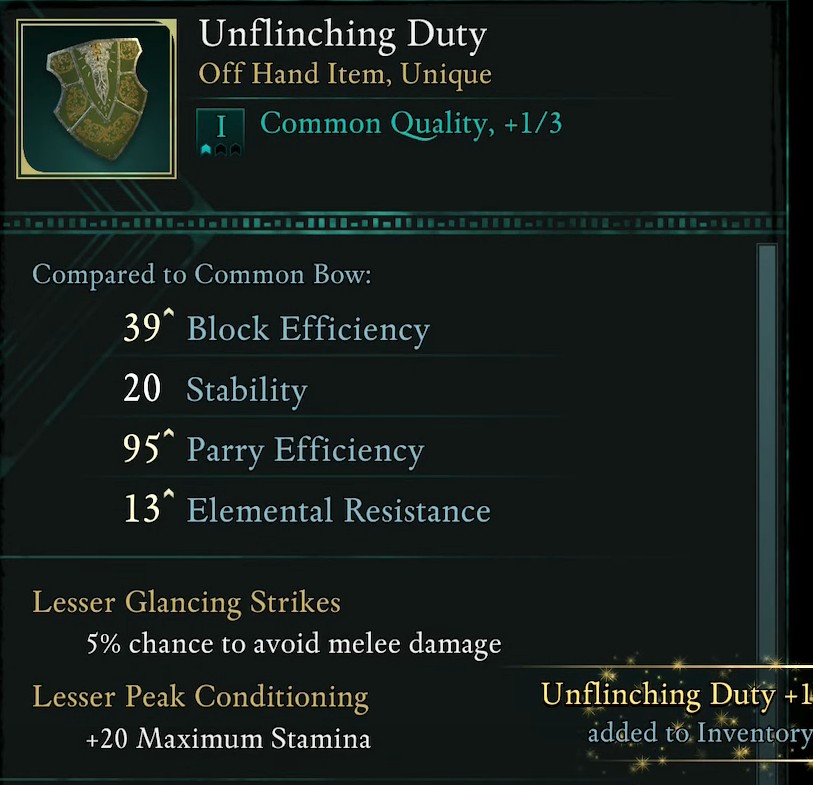
- Block Efficiency: 39
- Stability: 20
- Parry Efficiency: 95
- Elemental Resistance: 13
The “Unyielding Responsibility” ranks fourth on our list due to its moderate defense against hostile assaults. This protective barrier grants you a 5% chance of dodging melee attacks and enhances your total Stamina level. Initially, the Lesser Glancing Blow enhancement offers a 5% chance to dodge melee damage, which might seem small but it’s an effective early-game advantage that boosts your survivability. The Lesser Peak Conditioning enhancement increases your overall Stamina by 20 points, providing additional strength for more combat actions, including activating this shield. The primary enchantment on weapons can be improved in Avowed; however, the Lesser Glancing Blow enchantment on the “Unyielding Responsibility” shield cannot be upgraded. Nonetheless, you can enhance the shield at the Workbench to higher qualities, thereby raising its base stats.
Location
Upon arriving at the docks following my tutorial, I receive a pivotal mission titled “Message From Afar.” This quest leads me on a search for the Ambassador, as I’ve been informed that he and the town’s leader have gone missing after venturing into The Strangleroot Forest. Located to the north of the Old Pargrun Wall, this ominous woodland is where my search begins. Fortunately, there’s a fast-travel beacon situated near The Strangleroot’s entrance, making navigation easier.
Instruct Kai (or deploy his magic/grenade) to torch the thorny bushes and advance inside. Navigate through the woods at a leisurely pace, but keep moving north. The bear has potent swiping attacks that you should evade. Whenever you feel overwhelmed, utilize Kai’s initial ability to draw the beast’s attention away from you. After defeating the bear, the ambassador will make an appearance. Look for the fallen soldier’s corpse nearby, and next to him, you’ll spot the Unflinching Duty shield with a golden outline.
This version aims to make the instructions easier to understand and more conversational in tone while maintaining the original meaning.
This shield, known as Unyielding Duty, doesn’t deplete your energy as rapidly as other shields might. It also provides a 5% chance to dodge melee attacks. Plus, it boosts your maximum stamina by 20 points, enabling more blocking, dodging, and attack opportunities. Regrettably, this shield doesn’t have any offensive advantages; it’s strictly for defense. We rank it slightly lower than the Bastion of Solace because its defensive power isn’t as robust as that shield.
3) Bastion of Solace
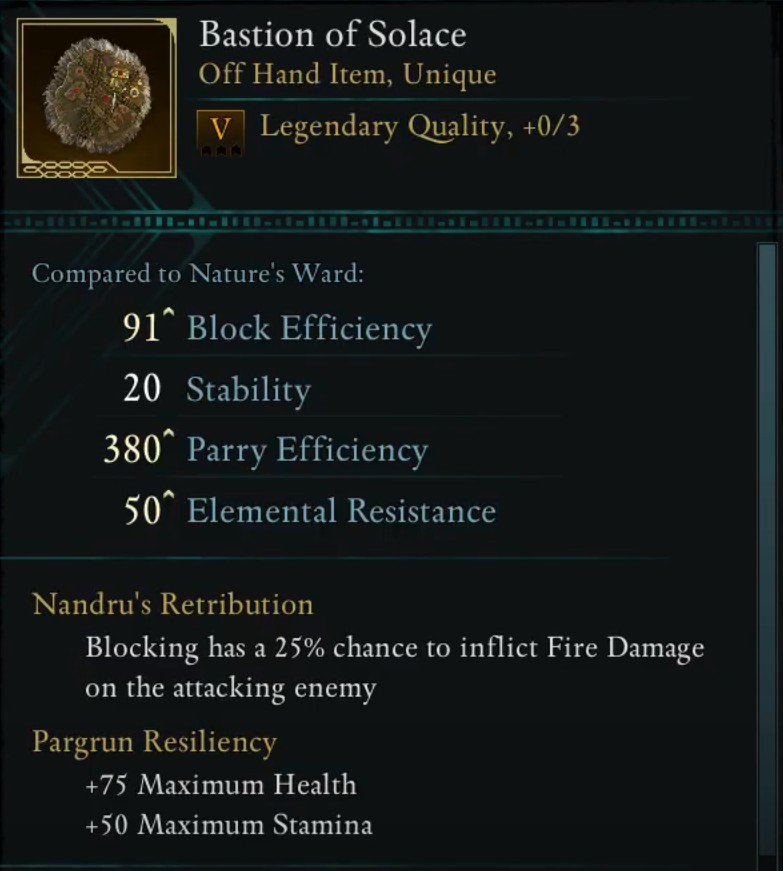
- Block Efficiency: 91
- Stability: 20
- Parry Efficiency: 380
- Elemental Resistance: 50
The third-ranked shield in our selection is the Bastion of Solace, which stands out for its robust defensive and offensive advantages. This shield proves particularly useful during challenging encounters due to its high block and parry efficiency. Acquiring this shield is part of the main quest, “Our Dreams Divide Us Still,” found within the Galawain’s Tusks region. To obtain it, you must make a choice between Doom or Save Solace Keep when presented with the option. Upon making your decision, speak with Mihala at Solace Keep to receive the shield as a reward. The Bastion of Solace comes equipped with two exclusive abilities, each offering unique benefits to your character: Nandru’s Retribution grants you a 25% chance that your blocks will deal Fire Damage to the attacking enemy.
Paragrun Resilience enhances Maximum Health by 75 and Maximum Stamina by 50. Begin with a Superb quality of this guard, then upgrade to higher levels at a workbench. To initiate the upgrades, you’ll need Blackwood Branches and Cave Coral. The Bastion of Solace offers robust defensive statistics, plus added health and stamina bonuses. This makes it an excellent pick for tank-style builds and beneficial for melee fighters looking to soak up damage. Due to its weight, we recommend placing this shield below the Sun and Moon symbols on your inventory, as it’s heavier than some other shields and may not be optimal for magic-focused character builds.
2) Sun and Moon
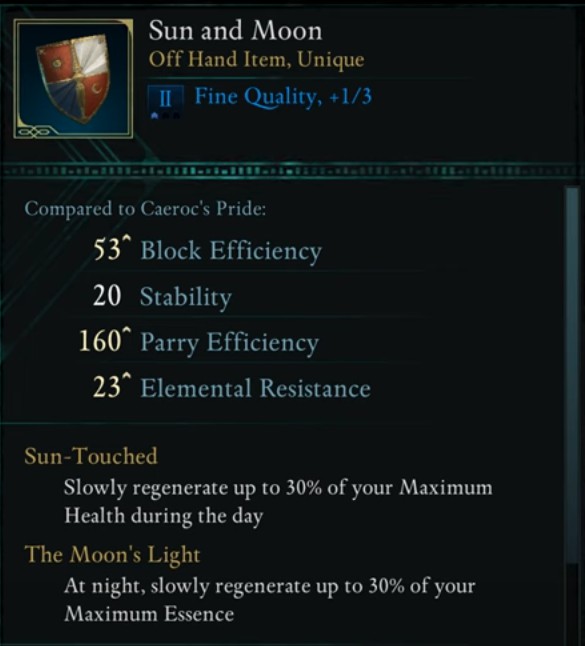
- Block Efficiency: 53
- Stability: 20
- Parry Efficiency: 160
- Elemental Resistance: 23
In our list, the Sun and Moon Shield ranks second, boasting exceptional abilities in both blocking and parrying, plus the restoration of maximum health. It offers two exclusive bonuses: Sun-Touched, which gradually restores up to 30% of your max health during daylight hours; and The Moon’s Light, which regenerates up to 30% of your maximum essence at night. This shield is particularly effective in late-game content due to its robust defense, making it an ideal choice for those advanced battles.
To acquire the Sun and Moon shield, travel to Felipe’s Depression located within the Emerald Stair region, southwest of Maxim’s Claim. Start by heading from Fior mes Iverno in a southerly direction. When you reach Felipe’s Depression, locate a sinkhole and carefully jump inside, ensuring you have enough health to endure the fall.
Next, advance towards the tree root that leads to an entrance, where you will encounter hostile creatures. As you move forward straight ahead, you’ll come across a coffin covered in webs. Inside this webby coffin lies the Rusty Key.
Proceed up the stairs and find a locked door adorned with intricate etchings. Use the Rusty Key to unlock this door and reveal the Sun and Moon shield within.
As a fan, I can confidently say that wielding the Sun and Moon in battle provides a fantastic experience, allowing for prolonged skirmishes without the constant need for potions. This versatility makes it an excellent fit for hybrid playstyles that seamlessly blend health and essence resources. For spellblade characters who master both melee combat and magical abilities, this duo offers robust protection, albeit not as tanky as the Tree of Life.
1) Tree of Life

- Block Efficiency: 63
- Stability: 20
- Parry Efficiency: 220
- Elemental Resistance: 30
In our rankings, the Tree of Life stands out as the top choice for its robust defensive qualities. It boasts exceptional block efficiency, fortifying your character while also providing resistance to elements. The parry feature enables you to deflect enemy attacks and retaliate with a potent counterstrike. Enhancing the Tree of Life increases its block efficiency, stability, parry efficiency, and elemental resistance. What sets this shield apart is its unique attributes that make it particularly effective in challenging situations. Unending Regrowth allows for gradual recovery of up to 30% of your maximum health. The All Season perk reduces incoming damage from Fire, Frost, and Shock elements by 15%.
Location
To acquire the Tree of Life, follow these steps:
1. Travel to Fior mes Iverno and initiate the five available bounties there.
2. Look for the Bounty Board near the Fior Plaza Beacon upon arrival in Fior mes Iverno.
3. Find the Belderreno bounty at Naku Tedek Grounds, located in the southern part of Emerald Stair.
4. The Trantons’ bounty can be found in the Western Forest, beware as they are high-level enemies that consume potions to heal themselves.
5. Inside The Grotto, northwest of Fior mes Iverno, you will find Old Nuna.
6. Navigate through the Wildwoods area and reach the Delemgan bounty in the Western Forest.
7. To locate The Xaurips bounty, go to the Abandoned Farms.
8. After completing all five bounties, head back to Bounty Master Martella in Fior mes Iverno to claim your Tree of Life.
Gather all necessary components to enhance the “Tree of Life” on your workbench, improving its defensive capabilities in battles. Initially of Exceptional quality, you’ll upgrade it to Superb and eventually Legendary. This is an ideal shield for players who appreciate passive healing and elemental protection, especially during endgame conflicts. The “Tree of Life” proves particularly beneficial in intense battles due to its ability to lessen incoming damage from enemies and provide chances to counterattack by parrying their strikes.
FAQs about 10 Best Shields in Avowed Ranked
What is Shield in Avowed?
Protective barriers enable you to ward off incoming assaults, even striking back at foes during close-quarter battles. They lessen the impact of both melee and ranged attacks.
Which is the best Shield in Avowed?
As a gamer immersed in the world of Avowed, I can confidently say that the Tree of Life shield stands out as the top choice. Its exceptional block efficiency and elemental resistance make my character a force to be reckoned with, boosting power like nothing else.
Can upgrading the Shield increase its effectiveness?
Absolutely, I can enhance my shield for improved protection and deflection! With each upgrade, I boost its potency against formidable opponents, making it a reliable ally in challenging situations.
Read More
- Who Is Harley Wallace? The Heartbreaking Truth Behind Bring Her Back’s Dedication
- Basketball Zero Boombox & Music ID Codes – Roblox
- 50 Ankle Break & Score Sound ID Codes for Basketball Zero
- TikToker goes viral with world’s “most expensive” 24k gold Labubu
- Revisiting Peter Jackson’s Epic Monster Masterpiece: King Kong’s Lasting Impact on Cinema
- 100 Most-Watched TV Series of 2024-25 Across Streaming, Broadcast and Cable: ‘Squid Game’ Leads This Season’s Rankers
- How to watch the South Park Donald Trump PSA free online
- League of Legends MSI 2025: Full schedule, qualified teams & more
- KFC launches “Kentucky Fried Comeback” with free chicken and new menu item
- 50 Goal Sound ID Codes for Blue Lock Rivals
2025-03-04 00:15