Most Helldivers 2 players have a story about the Portable Hellbomb – it’s either a clutch save that turned the tide of battle, or a spectacularly funny mistake that wiped out the whole team! This powerful tool is a recipe for unpredictable moments and often leads to the game’s most memorable highlights. This guide will help you use the Hellbomb to create more heroic plays and avoid accidentally taking out your friends.
Key Takeaways
- Make Your Placement Count: The most effective Hellbomb drops are deep inside enemy territory. Push into a nest or facility, plant the bomb at the heart of the problem, and make sure you have a clear path to run.
- Your Squad’s Safety Comes First: The Hellbomb has a massive, indiscriminate blast radius. Use clear callouts to give your teammates enough time to evacuate the area and prevent mission-ending friendly fire.
- Choose Gear That Helps You Escape: Since the Hellbomb takes your backpack slot, your other Stratagems should focus on crowd control and mobility. Pair it with an EMS Mortar to slow pursuers or a Jump Pack to create a quick exit.
What is the Portable Hellbomb?
The Portable Hellbomb is like having your own instant apocalypse on your back. This deployable weapon lets you call in a tactical nuke anywhere on the map, not just near objectives. It’s a powerful tool that can instantly destroy enemy bases, eliminate entire groups of enemies, and completely change the course of a battle. Use it when you need to completely wipe out everything around you – bugs or bots!
How It Works
The Portable Hellbomb is surprisingly easy to use, despite its power. To deploy it, simply press the ‘Use Backpack Function’ button – that’s ‘5’ on a computer or ‘D-Pad Down’ on PlayStation. What’s really cool is that it’s a team effort. A teammate can approach you and activate the bomb using the ‘Portable Hellbomb’ prompt (‘E’ on PC, ‘X’ on PlayStation). This opens up strategic possibilities, like having a teammate detonate it while you distract enemies.
The Nitty-Gritty: Damage and Blast Radius
Let’s be clear: this device is incredibly powerful – essentially a portable explosive weapon. It’s built to cause massive destruction, capable of instantly eliminating entire groups of enemies. The Hellbomb has a deadly blast radius of 25 meters, instantly destroying anything within that area. Beyond that, within 45 meters, it still causes significant damage and can knock down even large enemies. Because of its wide range, careful placement is crucial. You need to strategically deploy it to maximize damage to the enemy while ensuring your team stays safe.
The 10-Second Countdown to Destruction
Okay, so listen up, because the B-100 Portable Hellbomb is not a toy. Once you activate it, there’s no stopping the countdown – ten seconds until BOOM. Seriously, you can’t disarm it, so your only option is to run. My go-to strategy? I like to run right into the biggest group of bugs or the center of an automaton base, drop that bomb, and then just haul tail. Those ten seconds feel like forever when you’ve got a horde chasing you, but trust me, watching everything go up in flames is so worth it. It’s easily one of the most satisfying explosions in the whole game!
How to Unlock and Equip the Portable Hellbomb
Okay, so getting the Portable Hellbomb isn’t too hard, but you gotta know where to find it first. Once you do find it, actually using the thing is all about timing and not being a scaredy-cat. Let me break down exactly how to get it and, more importantly, how to use it without accidentally turning myself into a pile of ash!
What You Need to Unlock It
You can’t find the B-100 Portable Hellbomb during missions – you have to buy it. The way to unlock it is by purchasing the Servants of Freedom Warbond. Consider it a key upgrade for taking on tougher enemies and really bringing the fight to the bugs and bots. It’s a must-have item if you’re a dedicated Helldiver who wants to maximize your impact when spreading managed democracy. Be sure to unlock it before heading into your next challenging mission.
Equipping It for Your Next Mission
Once you’ve unlocked the Portable Hellbomb, using it is easy. Press ‘5’ on a PC or the D-Pad Down on a PlayStation 5. But be careful – once you activate it, you can’t stop it! So, make sure you place it strategically. The best approach is to move far into an enemy base – like a heavily guarded outpost or a large nest – before activating the bomb. This way, you’ll get the most damage and eliminate the most important enemies.
Portable vs. Standard Hellbomb: Which One to Choose?
Okay, Helldiver, let’s discuss explosives. You have two ways to cause major damage: the standard Hellbomb, given to you for missions, and the new Portable Hellbomb you can carry. Choosing the right one for each situation is crucial for successfully spreading democracy – and keeping your team alive!
The standard Hellbomb is a dependable option for destroying specific targets, like enemy factories. The Portable Hellbomb offers much more flexibility – it’s a powerful explosive you can deploy wherever and whenever you need it. This allows for creative problem-solving and lets you decide how to approach challenges, rather than being limited to pre-set objectives. Ultimately, it depends on whether you prefer following instructions or taking control.
Portability and Placement
The main difference between the two is how you use them. A regular Hellbomb is fixed in place and can only be deployed at specific locations during a mission – you set it, arm it, and get out of the way. The Portable Hellbomb, on the other hand, is carried in your backpack, letting you place a powerful explosion anywhere on the map. You can deploy it yourself using a button, or a teammate can do it for you. This allows you to set traps in Bug Nests, block off key pathways, or even detonate it right next to a dangerous enemy. Essentially, the battlefield is open to your creativity, and the Portable Hellbomb is a very explosive way to express it.
Comparing Damage and Strategy
Both Hellbombs create the powerful, satisfying explosions you want. The Portable Hellbomb is especially effective, clearing out large areas and helping you overcome tough situations. Players are even using it against the game’s hardest bosses, like the Hive Lord! This changes how you play – instead of just completing missions, you can now control the battlefield. You’re not just destroying targets, you’re building traps and creating your own advantages. It’s a powerful, offensive option for Helldivers who want to take charge and leave a lasting impact.
Know When to Use Each Type
When should you use each Hellbomb type? The standard Hellbomb is best when the mission specifically calls for it – it’s designed for those situations and doesn’t take up a valuable Stratagem slot. Think of the Portable Hellbomb as a powerful, flexible option. It’s perfect for clearing out strong enemy positions from within, like pushing deep into a base, planting the bomb, and fighting your way out before it explodes. It also works really well on defense missions – set it near a key entrance and detonate it when a large group of enemies attacks.
Prime Targets for Your Portable Hellbomb
Having a powerful explosive device is one thing, but knowing where to use it to achieve the greatest impact is crucial. This isn’t just about destruction; it’s a precise tool for overcoming major obstacles. The trick is to pinpoint key targets where a single, large explosion can quickly change the outcome of a battle or secure an important area. Consider it a way to instantly eliminate threats to Super Earth.
Focus on getting a significant advantage in exchange for sacrificing a backpack slot. Before setting the bomb, ask yourself: Will this explosion eliminate a tough enemy that would otherwise require a lot of team resources? Or will it quickly clear out a group of enemies that would normally take a long time to defeat with grenades? These are the key considerations. Let’s look at the best spots to make a big impact with explosives.
Taking Down Heavies and Elites
If a huge enemy like a Bile Titan or Automaton Tank shows up, everyone on your team will focus on taking it down. That’s the ideal time to use a Portable Hellbomb. While your teammates keep the enemy busy, you can quickly run in, place the bomb near its feet, and get out of there fast. It’s a risky move, but it can save your team a lot of ammo and resources.
The most effective way to accomplish this is to infiltrate heavily guarded areas where these powerful units frequently patrol. Rather than engaging in direct combat, use stealth to approach undetected, set your trap, and let the timer handle the rest. This strategy works particularly well against fixed targets like Cannon Turrets, which can hold your team back with long-range fire.
Clearing Nests and Facilities
The Portable Hellbomb is a real game-changer. While regular Hellbombs are useful for specific tasks, the B-100 version lets you unleash that same devastating force on any enemy building anywhere on the map. Have a group of Bug Holes or Automaton Fabricators that are too far apart for an Orbital Strike? The Hellbomb is the perfect solution.
The key is to use your grenades strategically. Try to hit the center of an enemy nest to destroy multiple holes at once, or target a Fabricator’s vent to eliminate it quickly. This preserves your grenades for other threats and allows you to take out tough areas with a single, powerful move. It’s the fastest way to complete objectives that require destroying everything and stop the enemy from building more before they overwhelm you.
Wiping Out Crowds and Controlling Chokepoints
Often, you’ll face more danger from a large number of smaller enemies than from one big one, especially when they swarm through a tight space. When you’re trying to escape a dangerous situation or dealing with a sudden insect attack, the Portable Hellbomb is great for quickly clearing out crowds. Deploying it in a narrow passage will either stop the enemy rush or blast those who keep coming.
This is a really effective way to defend your team. It gives you crucial moments to reload weapons, move to a better location, or ask for backup. You can use it to block enemies while you finish a task, or to create a safe space when you need to fall back quickly. Just be sure to tell your teammates what you’re doing – accidentally hitting a friendly player can ruin everything!
How to Deploy the Hellbomb and Survive
Okay, Helldivers, let’s cover how to use the Hellbomb effectively. While unleashing its power is incredibly satisfying, it’s also a quick way to wipe out yourself and your team if you’re not careful. Successfully using the Hellbomb requires planning, accuracy, and avoiding getting caught in the blast. It’s a powerful tool, but you need to use it strategically.
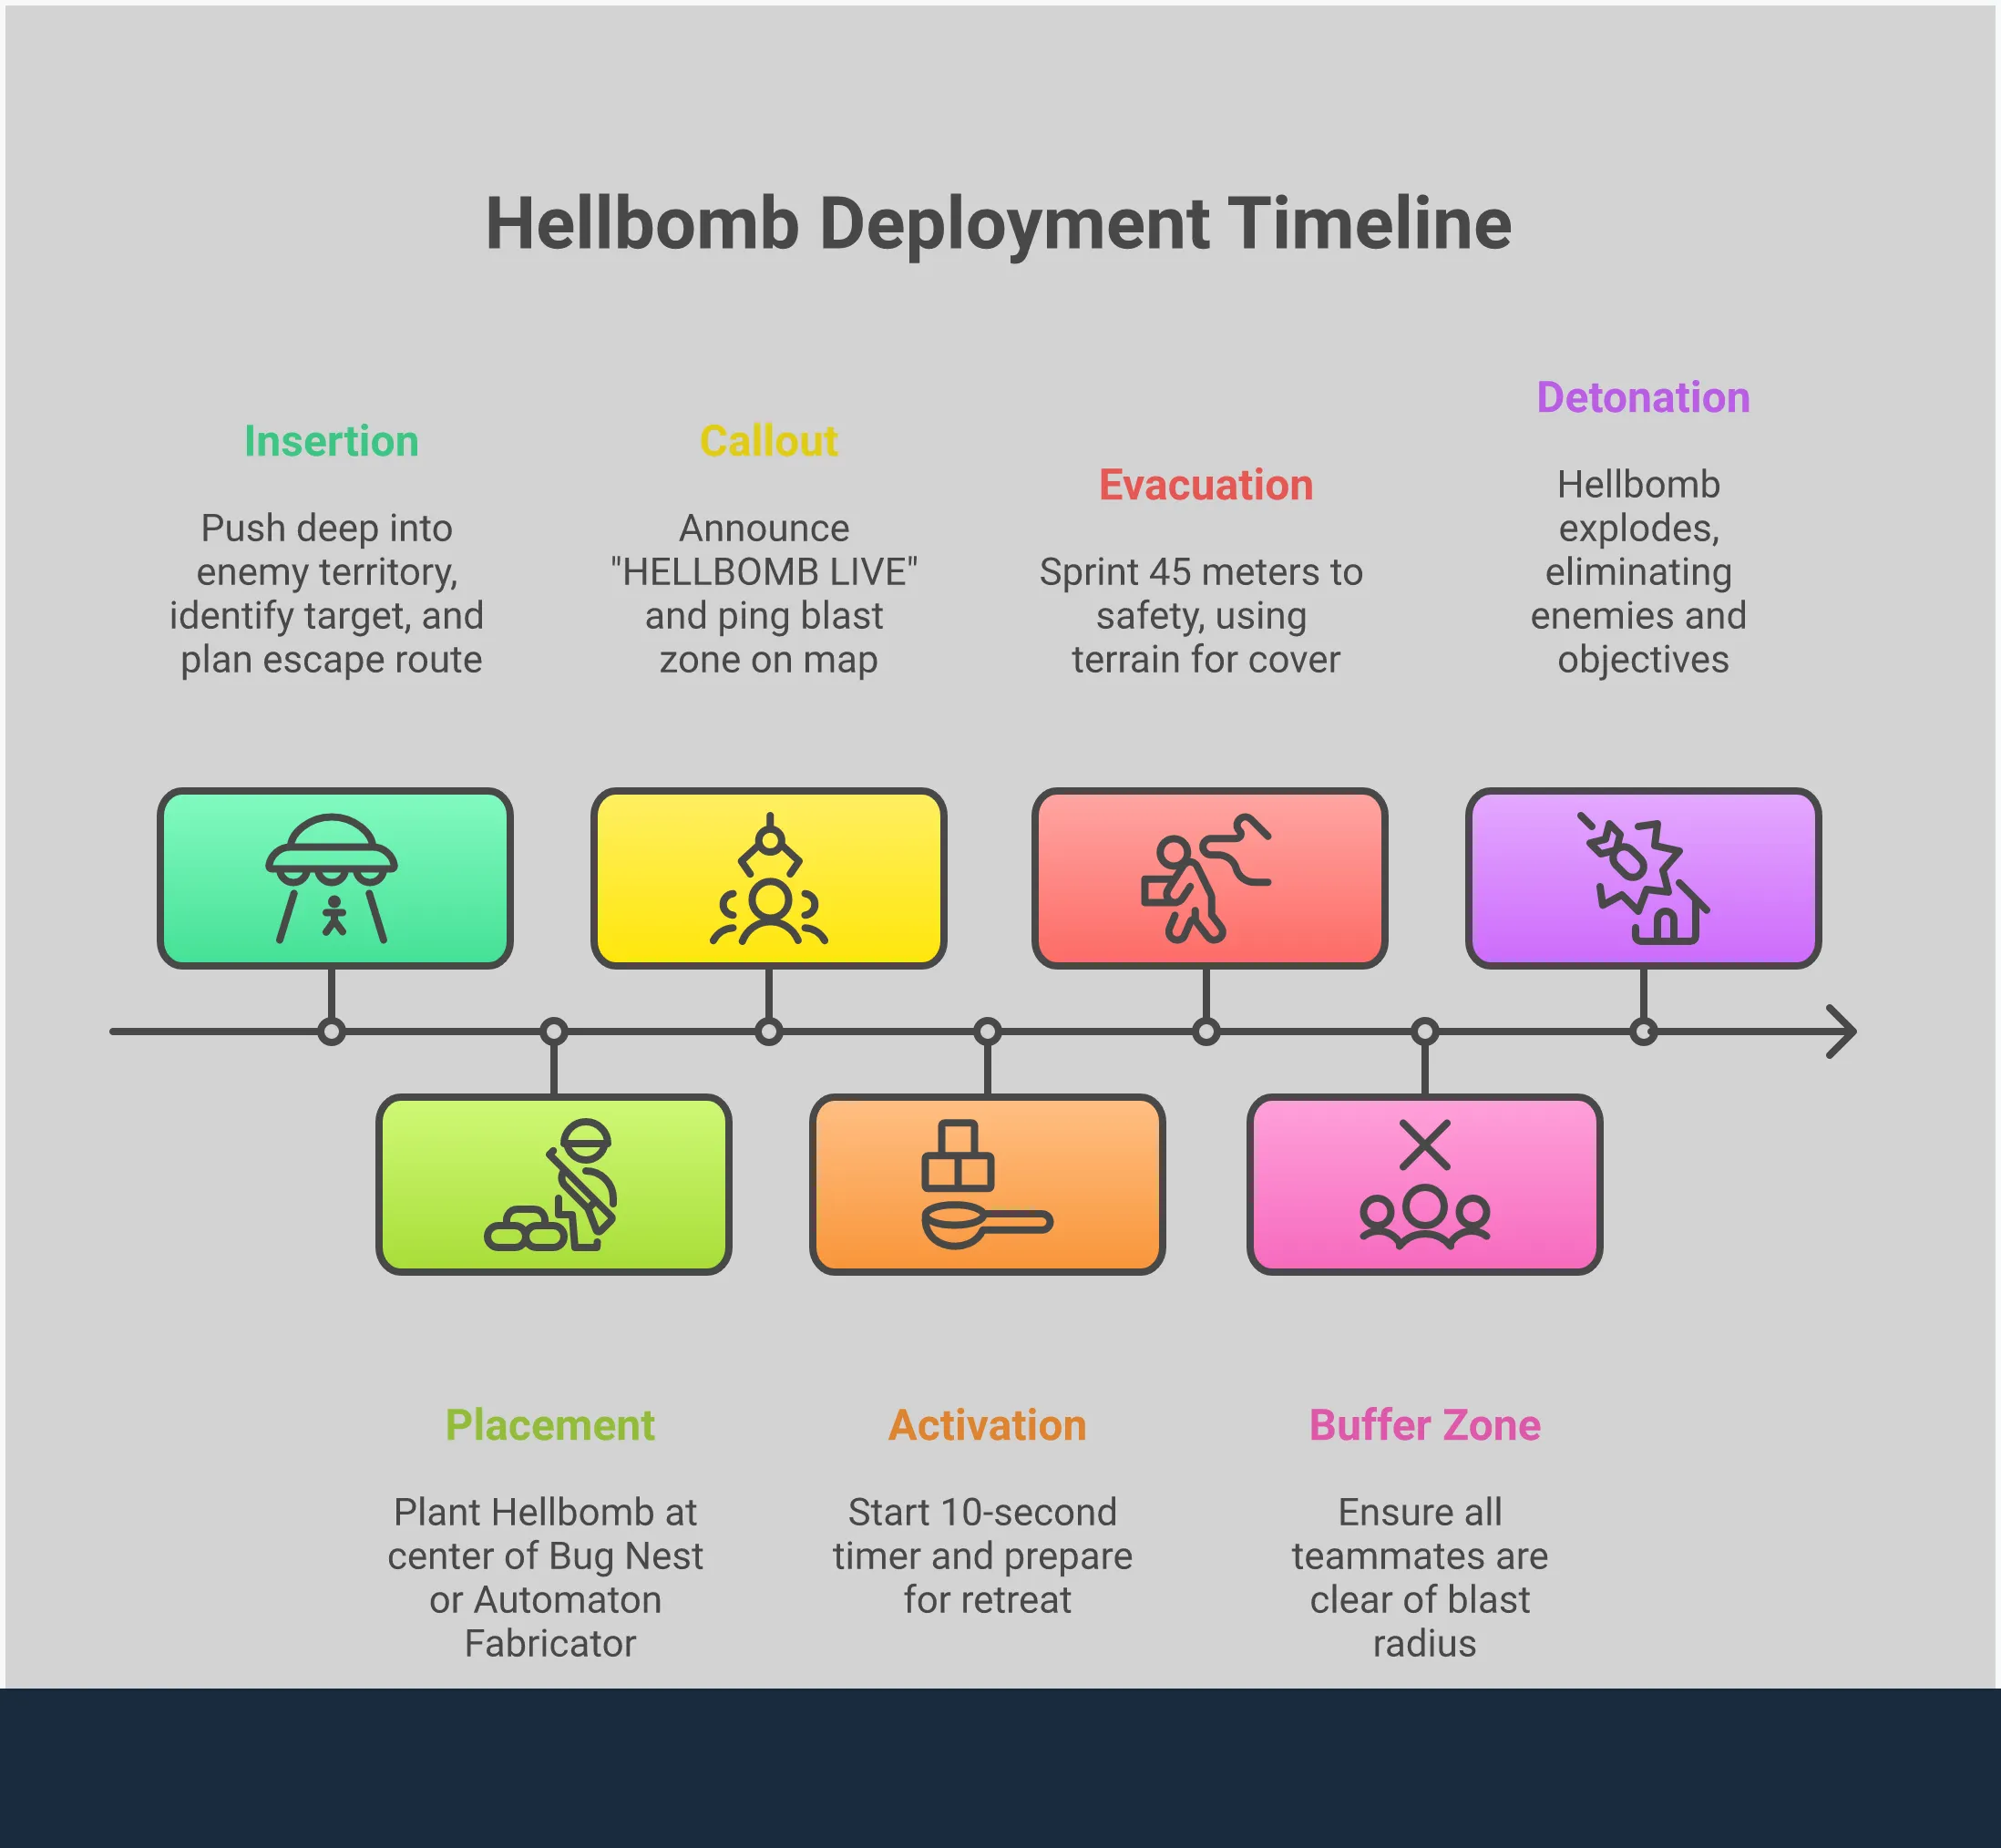
Successfully calling in this powerful strike is all about careful planning – it’s a three-part process. First, choose the right location. Second, make sure your team understands the plan. And third, time everything perfectly. If you mess up any of those steps, you’ll likely fail spectacularly. But if you get it right, you can wipe out entire enemy bases with one massive blast, all in the name of progress. Before you even consider calling it in, you need to know where it will land, how you’ll escape, and who will cover your retreat. That’s the difference between being a legend and becoming a warning to others.
Find Your Spot and Plan Your Escape
The B-100 Portable Hellbomb lives up to its name – it’s designed to go wherever you do. Unlike regular Hellbombs fixed in place near objectives, you can carry this one with you. The ideal tactic is to venture deep into enemy territory – like right into the core of a big Automaton factory or the center of a large Terminid nest – and place it somewhere it will create maximum disruption.
The most important thing to remember, which people often overlook, is having an escape plan. Before you set the device, know exactly how you’re going to get out. Those ten seconds will feel much shorter when you’re running for your life with enemies close behind. Find a clear route and make sure you’re in good enough shape to sprint to safety. Setting the bomb is simple – surviving to talk about it is what makes you a hero.
Communicate With Your Squad
Now’s not the time to be quiet and try to handle things on your own. The Hellbomb is dangerous and can easily kill everyone around, even your teammates. Talking to each other is crucial. Because anyone wearing the backpack or standing close by can set it off, you need to coordinate. Just a quick heads-up like, “I’m dropping the Hellbomb here, let’s go!” could save the whole team.
Be careful when using this with new players who aren’t using voice chat. A poorly timed Hellbomb can quickly ruin a mission and wipe out your whole team. Make sure to clearly announce when you’re deploying it – something like “HELLBOMB LIVE!” – so everyone knows to get out of the way. Your teammates will appreciate the warning, and you’ll avoid accidentally killing them and becoming a laughingstock.
Nail the Timing
Good timing is crucial with the Portable Hellbomb. It has a blast radius of 25 meters, and once the 10-second timer starts, you can’t stop it. Since it can’t be disarmed, make sure you’re certain before you use it. The best time to deploy it is when enemies are grouped closely together, like during a bug swarm or a robot attack. Dropping it right in the middle of them will cause the most damage.
Before you detonate the Hellbomb, quickly check where your teammates are. Make sure they have enough time to get clear – there’s nothing worse than accidentally eliminating a teammate who was trying to help! Coordinate with the timer, run as fast as you can, and dive to safety right before impact for a dramatic finish. A perfectly timed Hellbomb can turn a failing mission into a success.
Building the Perfect Hellbomb Loadout
The Portable Hellbomb isn’t something you just add to any team setup – it defines how you play. To really use it well, you need to build your entire kit around quickly planting the bomb and escaping. Imagine you’re making a high-pressure delivery, except your package is incredibly explosive! Success depends on creating a brief opening to rush into enemy territory, plant the device, and get clear before it detonates, all while being shot at. This means prioritizing weapons and support tools that control crowds and boost your speed. You’re not aiming for a long fight; you’re executing a precise operation. Stratagems that stun, slow, or distract enemies are key, and lighter armor with speed or stamina boosts can be the difference between victory and becoming a casualty of your own explosion. It’s a risky but potentially game-changing strategy, but it requires a highly focused and specialized loadout to pull off.
The Best Stratagems and Weapons to Pair It With
Because the Portable Hellbomb fills your backpack slot, you’ll need to choose your other Stratagems carefully. For getting around quickly, the Jump Pack is a great option, allowing you to jump over obstacles and escape danger. If you’d rather focus on defense, an EMS Mortar Sentry can slow down enemies as you head towards your goal, giving you time to plant the bomb. When it comes to weapons, choose something dependable for close combat. The SG-225 Breaker shotgun or the P-19 Redeemer machine pistol are both effective at clearing a path through large groups as you approach the target.
Tailor Your Build to the Mission
A powerful Hellbomb setup that works well against the Terminid bugs won’t be as useful against the Automaton robots. Before starting a mission, check the objectives and what kind of enemies you’ll be facing. The Hellbomb is best used to break into heavily defended bases or bug nests. When fighting bugs, combine it with a Flamethrower to quickly eliminate smaller enemies as you move forward. Against robots, use an Autocannon or Railgun to destroy important targets like Devastators from a safe distance, then move in to plant the bomb near a Fabricator. Remember to adjust your equipment to match the specific threats you’ll encounter.
Making Room for the Hellbomb
The main downside of using the Portable Hellbomb is that it takes up a backpack slot, meaning you can’t also bring useful items like a Shield Generator, the “Guard Dog” rover, or a Supply Pack. But there’s a workaround! Because the Hellbomb is a one-time use item, treat it like a temporary backpack. A good tactic is to call in another backpack Stratagem – maybe a Supply Pack for your teammates – after you’ve planted the bomb. This lets you quickly clear a tough area and then switch to supporting your team for the rest of the mission.
When to Call Down the Hellbomb
A skilled Helldiver knows exactly when to use their Portable Hellbomb – it’s the difference between victory and becoming a crater. Don’t waste it on small threats; save it for when you’re truly desperate. Strategic timing is crucial. Before deploying, carefully evaluate the situation. Are you overwhelmed by enemies your usual weapons can’t handle? Is there a large group of powerful enemies that needs to be eliminated quickly? Using the Hellbomb effectively means making a smart decision to unleash massive firepower at the right moment. It’s for those fights where only complete destruction will do. Consider it a last resort, but one that solves problems with a satisfying, explosive solution.
Consider the Mission Objectives
Okay, so the Portable Hellbomb is awesome because of how mobile it is. Unlike the regular Hellbombs that are always stuck near objectives, this one I can call down anywhere on the map as a backpack Stratagem. Seriously, that changes everything. I can use it to take out annoying secondary targets like Automaton Fabricators or Spore Spewers that are way off the beaten path. And if a big brute like a Bile Titan or a whole bunch of Hulks decide to ruin my day while I’m exploring, I’ve got a solution. Basically, it lets me bring the explosion to the enemy instead of having to drag them all the way to a fixed bomb site. It’s like my own personal ‘delete’ button for anything heavily armored or any structure that’s blocking my path to victory.
Work Around the Cooldown Timer
The Portable Hellbomb is incredibly powerful, but it has a long recharge time after each use. Because of this, you need to be strategic about when you deploy it. Don’t waste it on small groups of enemies – you’ll wish you hadn’t when a larger, more dangerous threat appears. Before calling in the Hellbomb, always consider if the situation truly warrants such a massive attack. Could you handle the problem with other tools like orbital strikes or airstrikes? The Hellbomb is best saved for emergencies that require overwhelming force – it’s a powerful ability, but you won’t have it available often, so use it wisely.
Use It for Emergencies and Tactical Plays
The Portable Hellbomb is incredibly useful in two main situations: rescuing your team when they’re overwhelmed and creating powerful traps. If your squad is surrounded during an escape or while defending an important objective, a Hellbomb can be a last-ditch effort to clear the area and create space. You can also use it to plan ahead. Spot a narrow passage where enemies are gathering? Place a Hellbomb to surprise them. When defending, plant it near the objective and detonate it when enemies swarm. It’s a great way to control an area and use the enemy’s numbers against them with a massive explosion.
Common Mistakes That Will Get You Killed
The Portable Hellbomb is a hugely rewarding Stratagem, but it’s also incredibly risky. It’s easy to accidentally wipe out your whole team, fail the mission, and make a big mistake. We’ve all witnessed it, and many of us have been the ones to cause it. The difference between a brilliant move and a total disaster with this Stratagem is very small.
Mastering the Hellbomb isn’t about learning tricks – it’s about avoiding mistakes. You need to be aware of your surroundings, communicate clearly with your team, and always remember just how large its explosion is. Avoiding these common errors will prevent frustration and keep your team from needing constant backup. Let’s go over the typical mishaps so you can be the one who saves the day, instead of accidentally destroying everything.
Avoid Blowing Up Your Friends
It might seem obvious, but people often forget: the Portable Hellbomb is incredibly powerful. It can seriously damage even the game’s strongest enemies, like the Hive Lord. That means it can easily wipe out your teammates if they’re not prepared – especially if they’re reloading their Stalwart. So, before you use it, always talk to your team first.
Quick communication – whether it’s through voice chat or a quick message – is crucial for mission success. If a Hellbomb is deployed, shout a warning, use the ping system, or do anything to let your team know it’s active and where it is. Everyone needs to get out of the area right away. Remember, keeping your teammates safe is more important than watching the explosion – dead Helldivers can’t liberate planets!
Bad Placement and Worse Timing
Using a Hellbomb effectively requires careful planning, it’s not something to use randomly in a crisis. The location and timing are the most important things to consider. Don’t waste it in an empty area, and don’t use it when you’re already surrounded – that will just make things worse. You need to anticipate what’s going to happen and use it strategically.
When defending an objective, a smart tactic is to place your bomb near a narrow passage or doorway where enemies are sure to come through. This effectively creates a deadly trap. But timing is critical – you want to detonate the bomb so the ten-second countdown finishes right as the largest group of enemies enters the blast radius. A perfectly positioned bomb won’t do much good if it goes off at the wrong moment.
Know When Not to Use It
Successfully using the Hellbomb means knowing when not to bring it along. If you’re playing with new players who are still getting the hang of things, a Hellbomb is a recipe for disaster. They might miss the warning beep or underestimate how big the explosion will be, and as one player warned, that could lead to some serious problems.
Don’t just use the Hellbomb because you can! Think about where you are and what’s happening. A small, closed-in area isn’t ideal, and it’s useless if your team can’t coordinate. The Hellbomb is best for taking control of big spaces and taking out important enemies. If the situation doesn’t match that, choose a different Stratagem – it’ll be more helpful for you and your team.
Master Advanced Hellbomb Strategies
Once you’re comfortable with the fundamentals, it’s time to get strategic. The Portable Hellbomb isn’t simply for destroying targets – it’s a powerful tool that can turn the tide of battle. Skilled players use it to control the battlefield, create traps, and unleash maximum destruction for Super Earth. With careful planning, you can truly master its explosive potential and become a more effective soldier.
Use It as a Distraction
The Portable Hellbomb is like an incredibly loud and dangerous signal for enemies. Once activated, its flashing light and beeping sound will draw their attention. You can use this to your benefit by turning the bomb into bait. Throw it into an open space, away from your team, and enemies like Chargers and Bile Spewers will move towards it. This will distract them from attacking you and your teammates, giving you time to reload, heal an ally, or concentrate your fire on the biggest threat. It’s a great way to create an opportunity when you’re feeling overrun.
Create Devastating Stratagem Combos
The Hellbomb is already a strong weapon, but it becomes even more effective when used with other Stratagems. The key is to trap enemies within its blast radius during the 10-second arming time. Stratagems like the Orbital EMS Strike or EMS Mortar Sentry work great for this, as they can stun large groups of enemies and hold them in place. You can also use a Stun Grenade to freeze a dangerous Bile Titan directly over the bomb. By carefully choosing your Stratagem combinations, you can create a devastating chain reaction that can wipe out even the toughest enemy defenses.
Get the Most Bang for Your Buck
To get the most out of the Hellbomb, you need to be daring. The best strategy is to get right into the middle of a strong enemy base or a large group before detonating it. Focus on the biggest, toughest enemy you can find, or the structure that’s creating the most enemies. Get close to something like an Automaton Fabricator or directly under a Bile Titan before setting the bomb. It’s a risky move, but incredibly satisfying when it works. Successfully destroying a major threat with one well-placed explosion will save your team a lot of ammo and Stratagem usage.
Related Articles
- Deus Ex LFG: Connect with Other Augs in LFG Feature on Z League App
Frequently Asked Questions
Okay, so I’ve been wondering about the Portable Hellbomb – is it really worth ditching my backpack slot for it? Honestly, giving up something like a Shield Generator or my Guard Dog feels rough. But here’s how I’m looking at it: the Hellbomb is like a super powerful key. It lets my team get past obstacles we just can’t handle normally. It’s not for every single mission, sure, but if we’re staring down a seriously fortified enemy base or a massive Bile Titan, trading some personal protection for that kind of raw power? Totally worth it, in my opinion.
Once you’ve armed the Hellbomb, you can’t cancel it. The 10-second timer is irreversible – neither you nor your teammates can stop it. That’s why it’s crucial to plan carefully beforehand. Double-check your placement, make sure everyone on your team understands the plan, and have a clear escape route ready before you activate it.
To use the Hellbomb effectively without hurting your teammates, clear communication is key. As soon as you plan to deploy it, tell your team! A loud and clear warning like, “Hellbomb going live, clear the area!” is crucial. Make sure everyone understands where the bomb is and which way to run to safety. Using a map ping to indicate the location is also a great idea. The goal is to eliminate enemies only – a successful Hellbomb doesn’t harm your allies.
Yes, the Portable Hellbomb is very effective against objectives like Bug Nests and Fabricators! In fact, that’s one of its strongest points. It’s just as powerful as the Hellbombs provided during missions. You can use it to quickly collapse multiple tunnels in a Terminid nest, or completely disable an Automaton Fabricator, stopping it from making more bots. It’s a great way to clear out objectives that are hard to get to.
If you’re just starting out with the Hellbomb, here’s a simple tactic: find a stationary target like a medium-sized Bug Nest or Automaton outpost. Run in, place the bomb in the center, and immediately run away! Don’t try to fight – this lets you learn how the timer and explosion range work without worrying about hitting a moving enemy.
Read More
- United Airlines can now kick passengers off flights and ban them for not using headphones
- Crimson Desert: Disconnected Truth Puzzle Guide
- All 9 Coalition Heroes In Invincible Season 4 & Their Powers
- Mewgenics vinyl limited editions now available to pre-order
- How to Get to the Undercoast in Esoteric Ebb
- Grey’s Anatomy Season 23 Confirmed for 2026-2027 Broadcast Season
- The Boys Season 5 Spoilers: Every Major Character Death If the Show Follows the Comics
- NASA astronaut reveals horrifying tentacled alien is actually just a potato
- DTF St. Louis Recap: Time Alone from the World
- Katanire’s Yae Miko Cosplay: Genshin Impact Masterpiece
2026-01-12 17:21