We’ve all faced those intense moments in battle: things aren’t going as planned, you’re low on ammo, and someone calls for a Hellbomb! What happens next can be a spectacular victory… or a quick return to base for everyone. The key to success is teamwork. The Hellbomb is a powerful team-based weapon that requires clear communication, trust, and a well-thought-out plan to avoid disaster. This guide will teach you how to coordinate with your team to place, arm, and detonate the Hellbomb for the biggest possible effect, ensuring it helps you win the fight.
Key Takeaways
- Treat the Hellbomb as a Tactical Tool: Use it proactively to destroy key enemy structures, create defensive chokepoints, or clear a path for your squad. A well-placed bomb shapes the battlefield to your advantage, rather than just reacting to the biggest threat.
- Prioritize Squad Safety Above All Else: The Hellbomb’s greatest risk is friendly fire. Always communicate your plan before deploying, establish a clear escape route for everyone, and never arm the device until your team is safely out of the massive blast radius.
- Build a Loadout That Supports Your Plan: Carrying the Hellbomb uses your backpack slot, so make it count. Equip versatile weapons to handle smaller threats while you position the bomb, and bring Stratagems that can protect you or slow enemies down, giving you the time needed to arm it safely.
What is a Portable Hellbomb?
Ever wish you had a way to instantly level the playing field? The Portable Hellbomb lets you do just that. This powerful ability allows you to call in a huge explosion wherever you are, potentially turning the course of any battle with a single, devastating blast. Unlike fixed Hellbomb locations, this one moves with you, making it perfect for wiping out entrenched enemies, sealing off dangerous breaches, or simply making a dramatic impact. Consider it your go-to solution when you’re completely overwhelmed and need to quickly eliminate a large number of foes. Now, let’s dive into the details of how this incredible piece of technology works.
The Hellbomb’s Design
The Portable Hellbomb is a deployable backpack Stratagem that lets you call in a powerful explosion whenever and wherever you need it. Unlike fixed Hellbombs, you’re not limited to specific locations on the map. This gives you a lot more freedom in combat – you can carry it into enemy territory to take out key targets like Fabricators from a surprising direction, or use it to block a powerful enemy like a Bile Titan. Essentially, it lets you deliver a massive blast exactly where it will do the most damage, regardless of the map’s limitations.
Key Features
The B-100 Portable Hellbomb delivers powerful, on-demand explosive force. It’s designed to obliterate a wide area, destroying everything from armored vehicles to entire structures. This versatility makes it excellent for both clearing objectives and holding defensive positions. Because you control exactly when and where it detonates, it gives you a significant advantage in battle. You can use it to create temporary roadblocks, funnel enemies into a trap, or eliminate tough targets that are resistant to regular weapons.
How to Activate It
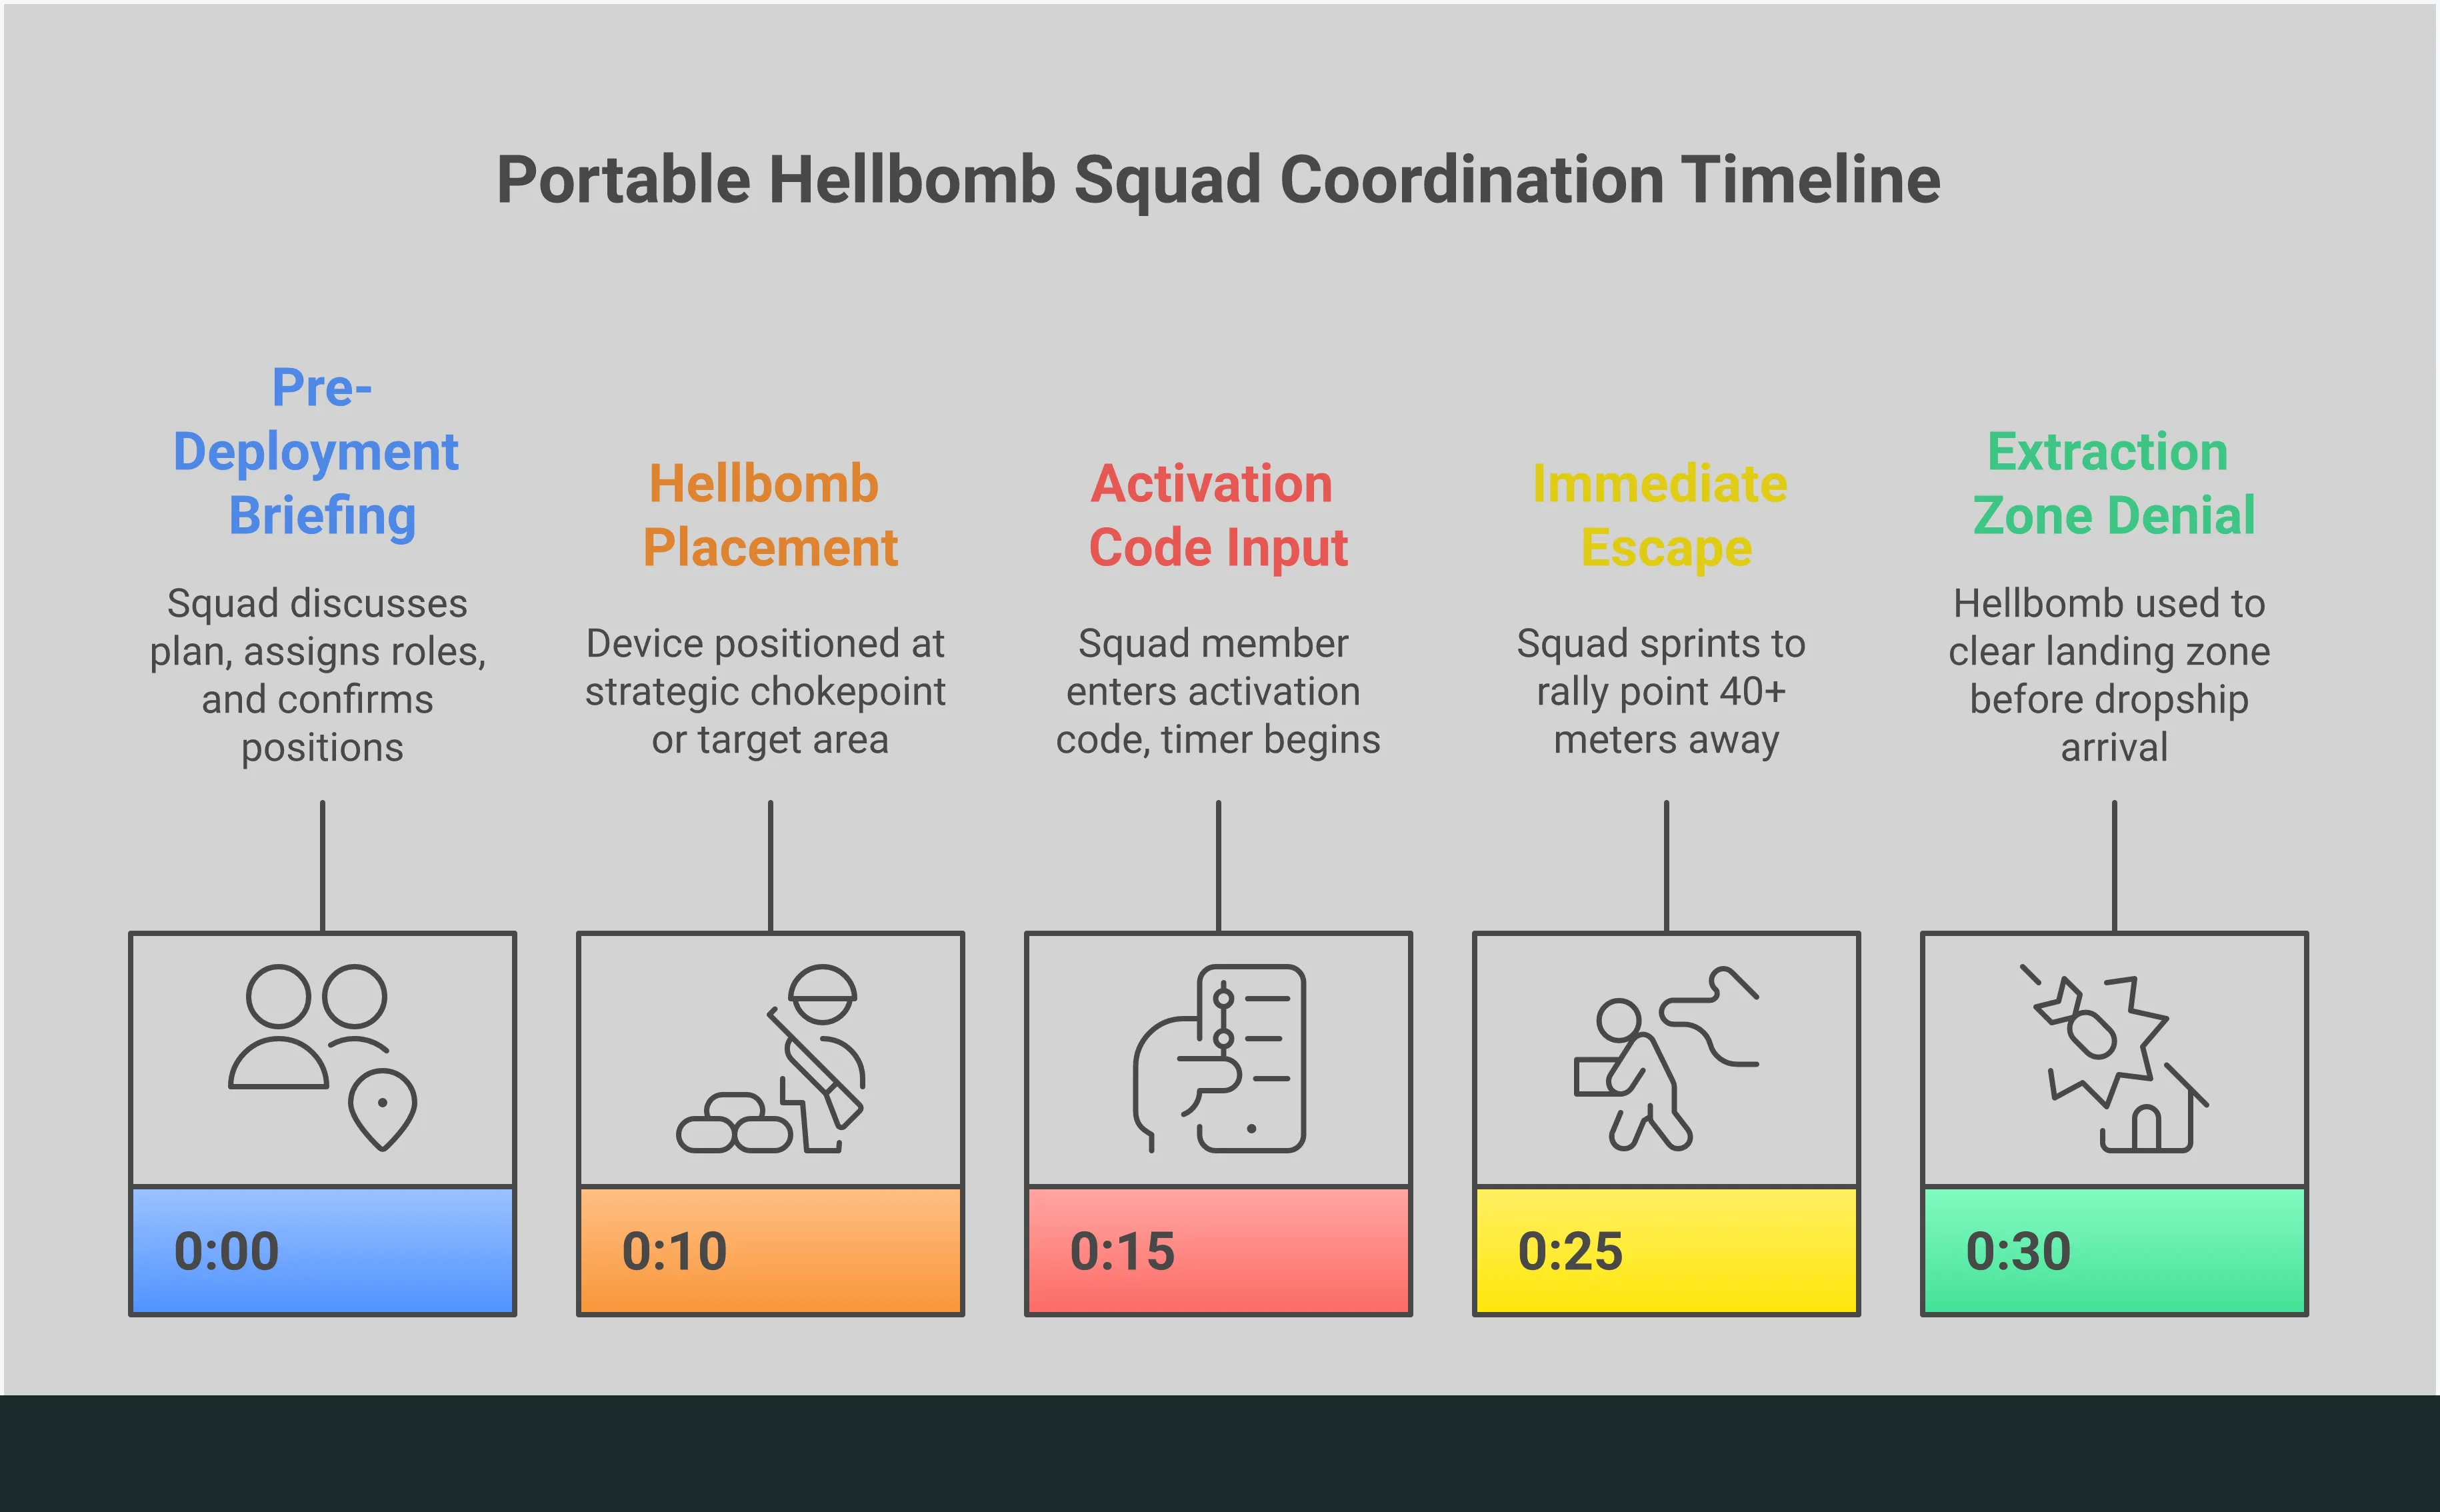
The Portable Hellbomb might look dangerous, but it’s designed to prevent accidental explosions. It needs to be intentionally activated. When you call in this Stratagem, it arrives as a backpack. Put it on, walk to where you want the bomb, and place it. Then, enter an activation code on its keypad – just like with other Hellbombs used for objectives. This gives you a short time to move to safety before it explodes.
How to Deploy a Hellbomb
So, you’ve got the Hellbomb, one of the most powerful weapons in the game! It’s not just for looks – it can wipe out entire enemy bases and help you win tough fights. But be careful! It has a huge blast radius, so you need to use it smartly, pay attention to your surroundings, and talk to your team. Let’s go over how to use it effectively so you don’t accidentally destroy your teammates!
Nail the Activation and Timing
What makes the Portable Hellbomb so effective is how versatile it is. Instead of being fixed in place like standard objective-based bombs, this B-100 model is a backpack item you can deploy anywhere to maximize disruption. Once placed, you need a few seconds to arm it with an activation code, so ensure you’re in a safe spot, ideally with a teammate providing cover. Proper timing is crucial—activate it too soon, and enemies might move out of range. Wait too long, and you risk being overwhelmed.
Know the Blast Radius
The Hellbomb creates a huge explosion. Anything caught within its blast radius – including enemies, structures, and even your own team – will be completely destroyed. Before you detonate it, quickly check to make sure your teammates are safe and you have some cover. This bomb is incredibly powerful but doesn’t discriminate, so being cautious is key. It’s a great weapon, but only if you can protect your squad from the blast.
Find Your Safe Distance
Once the bomb is set, your only goal is to get away as fast as possible. Don’t just run—sprint! Imagine a dangerous creature is chasing you. Try to create at least 30-40 meters of distance between yourself and the bomb, ideally by getting behind something solid like a large rock or hill. A helpful trick: use a stim right before it explodes—it could save your life. Even if you survive the blast, the force can knock you down, and the fall could be fatal.
Communicate with Your Team
The most important thing to remember is to communicate with your team. Using a Hellbomb without warning almost always leads to everyone getting eliminated. Always tell your teammates what you’re planning before you deploy it – a quick message like “I’m dropping a Hellbomb on the nest!” is vital. This gives them time to move to safety. Hellbombs are most effective when used as part of a coordinated attack, just like planning your gear with your squad beforehand. Working together makes everything more powerful.
When to Use a Hellbomb
The Hellbomb isn’t just a big explosion – it can completely turn the tide of battle if used strategically. Knowing *when* to use it is the key difference between a new and experienced Helldiver. It’s not about creating the most destruction, but about causing the *right* kind of disruption at the perfect moment. Consider it your go-to solution when things get really tough.
The Hellbomb is a powerful tool for dealing with any threat, whether it’s robots or insectoids. What makes it truly effective is how flexible it is – you can use it to create an opening, protect a key area, or eliminate a dangerous enemy. The most important thing is to think carefully before using it. Take a moment to look at the situation and decide where the blast will do the most good and what you’re trying to accomplish. Using it strategically can turn the tide of a battle and become a legendary moment for your team.
Annihilate Heavy Enemies
Certain enemies are tough enough to ignore your standard weapons. When facing powerful foes like Bile Titans or groups of Hulks, it’s time to use your heaviest firepower. The B-100 Portable Hellbomb is perfect for quickly eliminating these major threats to your team. Rather than wasting all your ammunition and tactical items on a single, heavily armored enemy, you can deploy a Hellbomb, draw the enemy near it, and detonate it. This is a very effective way to deal with a huge threat while saving your resources for the rest of the battle.
Defend Your Base
Okay, so when I’m in those missions where I *have* to hold a position, the Hellbomb is my go-to. Seriously, whether it’s protecting a landing zone, setting off a missile, or keeping civilians safe, enemies just keep coming! Luckily, the Hellbomb is portable, which means I can place it exactly where I need it to create a really dangerous zone. I usually put it at a narrow spot where enemies have to come through, then *boom* – wipes out the whole wave! It’s the best way to completely lock down an area, hands down.
Create a Tactical Advantage
What makes the Portable Hellbomb so effective? It needs to be triggered by hand. This allows you to set it as a trap and gain an advantage. Place it near enemy nests or factories, then wait for the right moment to detonate it. You could draw a patrol into its range, or wait until a dropship lands its troops before triggering it. This control over timing transforms a defensive tool into a powerful attack, letting you clear out areas with pinpoint accuracy.
Manage Your Resources
Helldivers 2 is fundamentally about managing your resources carefully. Every shot, grenade, and special ability matters. The Hellbomb, when used strategically, is a really powerful tool. A single, well-aimed bomb can do the work of many orbital strikes or a complete resupply of ammunition. Before attacking a tough enemy base, dropping a Hellbomb to weaken it first can save your team a lot of trouble and precious supplies. It’s a clever way to conserve your other powerful abilities for later in the mission.
Coordinate with Your Squad
The Hellbomb isn’t something you use alone – it’s a team effort, like conducting an orchestra of destruction. Successfully using it takes more than just knowing *when* to detonate it. You need clear communication, precise timing, and everyone on your team needs to understand the plan. When your squad works together, the Hellbomb is an incredibly powerful weapon for achieving your objectives. But without coordination, it’s likely to send everyone back to base prematurely – and in multiple pieces.
To really succeed with this tactic, think of it as something the whole team uses together. Before you activate it, everyone needs to know what they’re doing. Who will provide covering fire? Who will distract the enemy? And crucially, where will everyone run when it begins? Planning these details ahead of time is what separates a fantastic win from a funny, but disastrous, team defeat.
Watch Your Positioning
The best thing about the Portable Hellbomb is that you can move it – so use that to your advantage! Unlike the Hellbombs you find at specific locations, you can place this one exactly where it will do the most good. Think strategically: where can you drop it to destroy a Bile Titan *and* close a Bug Breach at the same time? The goal is to maximize damage to enemies while creating a safe escape route for your team. Always ping the location before throwing it so your teammates know where it’s going and can provide backup fire.
Plan Your Escape Route
It seems simple, but many Helldivers accidentally get blown up by their own weapons. Before launching any bomb, your team needs a clear escape plan. The explosion range is significant, so make sure everyone is far away when it detonates. A good habit is to start running as soon as you arm the bomb. Clearly tell your team where to go – something like, “Bomb armed, retreat to the east!” – can prevent disaster. Also, be sure your escape route isn’t blocked by smaller enemies that could slow you down.
Avoid Friendly Fire
There’s nothing worse than accidentally hitting your teammates with an explosion. The Hellbomb is incredibly powerful, so it’s vital to communicate clearly before using it. Always tell your squad what you’re planning *before* you call it down – for example, say something like, “I’m dropping a Hellbomb on the Automaton Fabricator, watch for the blast!” This gives everyone time to move to safety. A perfectly timed Hellbomb can wipe out an enemy outpost, but a surprise one will likely take out your own team. Let’s avoid that.
Manage Your Supplies
The Hellbomb takes up valuable space in your backpack – space that could be used for helpful tools like a Guard Dog or extra supplies. So, when you deploy it, make sure it’s worth it! Unlike some other Stratagems, you have to activate it yourself, meaning it won’t accidentally explode if you’re attacked from behind – that’s a definite plus. Still, it’s a powerful resource, so don’t waste it on small groups of enemies you could easily defeat with your regular weapons. Save it for tough targets or critical moments where its large blast radius can really change the battle. Working with your team to time your Hellbomb drops will ensure you get the most out of this powerful Helldivers 2 Stratagem.
Advanced Hellbomb Tactics
After you get the hang of the Hellbomb’s basic use, you can start employing it in clever and strategic ways. It’s more than just for destroying bug hives – it’s a powerful tool for controlling the battlefield. By thinking creatively, you can turn the tide of battle and achieve amazing wins for Super Earth. These advanced techniques focus on using the Hellbomb’s explosion with accuracy and intention, allowing you to outmaneuver enemies and help your team succeed.
Create Chain Reactions
What makes the B-100 Portable Hellbomb so effective is its flexibility. Unlike some Stratagems, you can deploy it anywhere you find a good spot. Look for things that will make it explode even bigger – like existing explosives, unexploded shells, or even other Stratagems your team has set up. A well-placed Hellbomb can create a huge chain reaction, clearing out a much larger area than normal. This is ideal for destroying multiple tough enemies or eliminating an entire enemy patrol before they can react.
Use It for an Emergency Escape
Surrounded by enemies in Deep Rock Galactic? The Hellbomb is your emergency escape tool. If your team is about to be overwhelmed by Terminids, deploying a Hellbomb can create a crucial distraction. The resulting explosion will scatter the enemies, giving you and your teammates a few vital seconds to fall back, reload, and get into a better position. It’s a dangerous option – you need to move away from the blast radius – but sometimes a strategically placed Hellbomb is the only way to survive and complete the mission. It’s like building your own escape route.
Control the Battlefield
The Hellbomb isn’t just about dealing damage – it controls where enemies can go. You can use it to cut off routes, funneling enemies into a deadly area where your team is ready to attack with weapons and support strikes. It’s excellent for preventing enemies from accessing certain areas. Placing one near an objective gives your team crucial time to complete tasks or call for pickup. It effectively says, “This way is blocked,” and makes the enemy change their plans, giving your squad a significant edge in battle.
Maximize Your Impact
Okay, so the Hellbomb isn’t just about blowing stuff up, trust me. I’ve been playing around with it, and the explosion itself is super useful. I’ll often throw one down to create a quick smoke screen – it gives my team cover to push forward or even revive someone who’s down. It’s also amazing for breaking up those tightly packed groups of enemies with tons of armor. Instead of facing a wall of shields, I can scatter them and pick them off one by one. Basically, a good Hellbomb player doesn’t just focus on damage; we use it to totally control the flow of the battle and turn the tide in our favor.
Plan Your Loadout
Going into battle without a plan is a sure way to fail. The Hellbomb is powerful, but it needs support to be truly effective. Winning depends on choosing gear that complements the Hellbomb and fits your team’s overall strategy. Don’t think of your equipment as separate pieces – see it as a complete set of tools for maximum impact. With a well-planned loadout, you’ll be ready to handle any threat on Super Earth, whether it’s a single enemy scout or a massive titan attack.
Choose Complementary Weapons
Carrying a Hellbomb makes you incredibly powerful, like a mobile explosive. However, it limits your immediate fighting options to that one massive blast. You’ll need other weapons to cover your weaknesses. Since the Hellbomb takes up your backpack slot, choose a main and side weapon that can handle enemies while you get into position. A flexible assault rifle is great for dealing with groups, or a powerful shotgun can quickly clear a path. Focus on weapons that let you and your team defend yourselves, so you can successfully plant the bomb and watch it explode!
Pick Supporting Stratagems
The Hellbomb is a special tactic, so your other four tactic slots should focus on defense or dealing with threats that don’t require a nuke. Think about bringing a Shield Generator Pack to protect yourself while setting up the Hellbomb, or an Eagle Airstrike to weaken enemies first. Tactics like Mortar Sentries or EMS Strikes can slow down approaching enemies, giving you time to deploy the Hellbomb safely. The key is to build a setup where each tactic complements your main goal of using the Hellbomb effectively.
Build the Right Team
A lone Helldiver can be dangerous, but a well-coordinated team is truly powerful. What your squad brings to the fight is crucial. If someone is carrying the Hellbomb, everyone else should choose equipment that supports that role. For example, one player could handle air defenses, another could eliminate weaker enemies, and a third could provide fire support and resupply teammates. Talking beforehand about who’s bringing what is essential. A balanced team can use the Hellbomb’s strength to destroy enemies strategically, turning a messy fight into a carefully planned operation. Don’t just equip everyone with Hellbombs; create a team with a variety of tools that work well together.
Common Hellbomb Mistakes (and How to Fix Them)
It’s a familiar sight: a Hellbomb explodes, eliminating one Scavenger but, unfortunately, also a nearby Helldiver. While it can be funny, this doesn’t really help Super Earth win the war. The Hellbomb is a powerful weapon, but common errors can turn a great explosion into a mistake. Let’s look at the most frequent problems and how to use these effectively like an experienced player.
Bad Placements
Okay, so I’ve learned the hard way that a Hellbomb is amazing, but only if you use it smart. Just chucking it anywhere is a total waste! You really need to think about *where* you’re throwing it. Before I even think about tossing one, I scout the area first. What am I trying to accomplish? Am I sealing off a bug hole, taking out a factory, or wiping out a tough outpost? Once I know, I aim for the center of everything – right where it’ll do the most damage. I try to put the beacon *inside* a big group of enemies, or right against whatever building I need to destroy. What I used to do was put it too close to what I was defending, or somewhere enemies could hide and survive the blast – big mistake! You have to think like you’re setting a demolition charge – find the weakest point and *boom*.
Poor Timing
That startup process for the Hellbomb feels incredibly slow when a Charger is chasing you. Don’t rush it – that’s a common error. The bomb won’t detonate until *you* activate it, so there’s no need to panic. Wait for the right moment – let a big enemy like the Bile Titan get closer, or let more robots come out of the fabricator, before starting the activation. But don’t wait *too* long either! If your team is already being overwhelmed, you might not have time to arm the bomb and escape. The best time to activate it is right as the main enemy group enters the blast radius, giving you and your teammates enough time to run to safety.
Misjudging the Blast Zone
The Hellbomb has a huge blast radius, and it’s easy to wipe out your whole team or fail a mission if you don’t respect its power. It’s a fantastic tool, but you need to understand just how far the explosion will reach before using it. A smart move is to pick a safe spot *before* you arm the bomb – and then move even further back than you think necessary. Use things like rocks, hills, or buildings for cover. Don’t underestimate the shrapnel; always prioritize keeping your squad safe, even if it means a slightly less ideal bomb location.
Lack of Communication
A Hellbomb is only helpful as a surprise to your opponents. Dropping one without warning on your own team creates chaos and can even lead to friendly fire – like accidentally trying to give supplies to someone who’s actually carrying a bomb! Talking to your teammates is crucial. Use your microphone or the game’s ping system to let them know when you’re dropping a Hellbomb, especially where and when you’re arming it, and which way you’re running to get clear. A Hellbomb that’s announced and coordinated is a great tactical move, but a silent one is almost guaranteed to eliminate your own team.
Pro-Level Hellbomb Strategies
Once you’re comfortable with the Hellbomb’s fundamentals, you can use it to really stand out to your team. It’s not just about causing explosions; it’s about dictating how the mission unfolds. Think of the Hellbomb as a tool for creating new strategies. It can transform a difficult defense into a surprise attack, or completely destroy an enemy base.
Experienced Helldivers use the Hellbomb to control how battles unfold. It’s a powerful tool for blocking off areas, intimidating enemies, and managing the battlefield, all in one explosion. A strategically placed Hellbomb can be the key to success against any threat, whether it’s a swarm of Terminids or a tough Automaton squad. It can mean the difference between a narrow escape and a clean, efficient victory with all objectives completed. Learning to use the Hellbomb effectively isn’t just about responding to danger—it’s about creating it and taking control. It takes planning and courage, but successfully executing a Hellbomb strategy is incredibly rewarding. Let’s explore some specific tactics that distinguish skilled players from beginners.
Break Through Enemy Lines
Sometimes, directly attacking an enemy base is too difficult. Instead of a head-on assault, use the Portable Hellbomb to blast your own way in. This useful tool isn’t limited to specific spots, letting you sneak behind enemy lines and place the bomb near important structures like their Fabricator or a heavily defended area. This will scatter the enemy, creating the perfect opportunity for your team to advance and complete the mission. It’s a risky tactic, but can significantly speed up your progress.
Set Up a Strong Defense
If enemies are relentlessly attacking your base, the Hellbomb can be a lifesaver. Instead of dropping it randomly, use it strategically. Place it in a narrow passage where enemies are forced to gather. You can then throw the Hellbomb to the precise location you want it to explode, turning that pathway into a dangerous trap. Wait until it’s surrounded by tough enemies like Chargers and Bile Spewers, then detonate it for a huge killstreak that helps your team survive and conserve ammo.
Master Crowd Control
There’s nothing more stressful for a Helldiver than being surrounded by enemies. The Portable Hellbomb is the perfect solution when you’re completely overwhelmed. It’s a massive bomb you can carry and detonate whenever you need to, giving you incredible control over large groups of enemies. Spot a Bile Titan and its horde of Hunters coming your way? Drop the Hellbomb, lead them into the blast zone, and watch them disappear in a flash of green! This is particularly useful during extractions when enemies are closing in from all directions and you need to quickly secure a landing zone.
Optimize Your Resources
As a big fan of this game, I’ve found the Hellbomb to be seriously useful. Why waste a powerful Orbital Laser on just one Automaton base when the Hellbomb can handle it just as well? It’s one of the best ways to clear out objectives without using up your really strong offensive options too quickly. I love combining it with a Mortar Sentry – they really work together to soften up enemies before I move in. That way, I can save my big guns for when things *really* go south, like when a couple of Hulks show up and try to ruin everything!
Frequently Asked Questions
The main difference between the standard Hellbombs found at objectives and the B-100 Portable Hellbomb is where you can use them. The Hellbombs already placed on the map are fixed in position and can only be detonated at that specific location. The B-100 Portable Hellbomb is a deployable item you carry, allowing you to strategically place a large explosion wherever you need it – for defense, ambushes, or targeting enemies away from objectives.
Will the Portable Hellbomb explode if I’m shot while carrying it? Luckily, no. It’s completely safe until you set it down and enter the activation code. You can be shot, fall, or even be killed while carrying it, and it won’t explode. This design allows you to carry it into enemy areas without the risk of a single bullet causing a devastating explosion for you and your team.
Whether to use a Hellbomb on a large enemy or a building depends on the current situation. If a powerful enemy like a Bile Titan is about to destroy your team, focus on taking it down immediately. But if you have time, destroying an Automaton Fabricator or a group of bug holes can be smarter in the long run, as it prevents more enemies from appearing. Generally, use the Hellbomb on whatever will save your team the most trouble and prevent future attacks.
If you die while carrying the Hellbomb, it will simply drop to the ground. Any of your teammates can then pick it up and continue the mission, so you won’t lose access to its power.
It’s frustrating when your teammates get caught in your Hellbomb blast! The best way to avoid this is to communicate clearly. Before you place the Stratagem beacon, tell your team what you’re doing – a simple message like, “I’m planting a Hellbomb on the nest, clear to the west!” works great. Once it’s armed, let them know you’re moving away. Also, use the ping system to mark where the bomb is so everyone can see the danger zone and stay clear.
Read More
- United Airlines can now kick passengers off flights and ban them for not using headphones
- Crimson Desert: Disconnected Truth Puzzle Guide
- All 9 Coalition Heroes In Invincible Season 4 & Their Powers
- Mewgenics vinyl limited editions now available to pre-order
- The Boys Season 5 Spoilers: Every Major Character Death If the Show Follows the Comics
- Invincible Season 4 Episode 6 Release Date, Time, Where to Watch
- Grok’s ‘Ask’ feature no longer free as X moves it behind paywall
- Assassin’s Creed Shadows will get upgraded PSSR support on PS5 Pro with Title Update 1.1.9 launching April 7
- Grey’s Anatomy Season 23 Confirmed for 2026-2027 Broadcast Season
- Crimson Desert Guide – How to Pay Fines, Bounties & Debt
2025-10-20 16:13