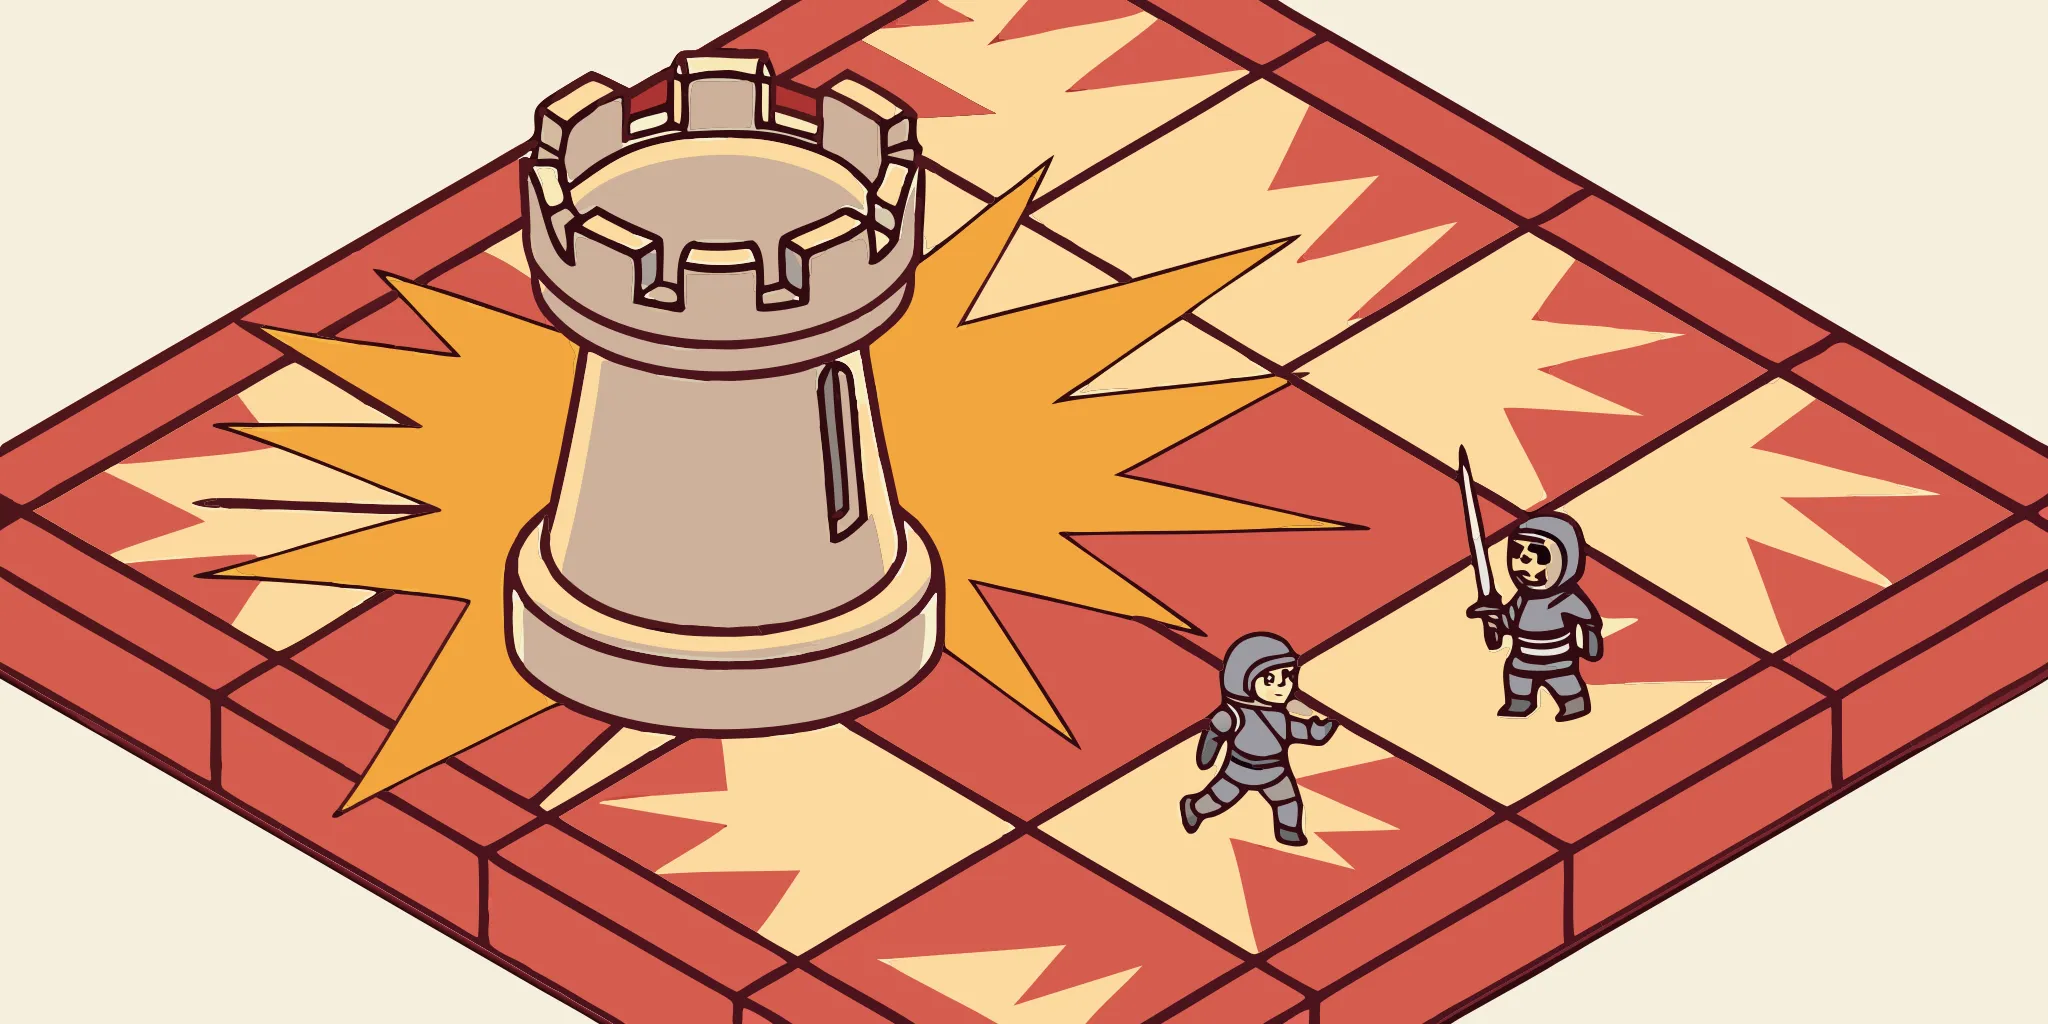
There’s a unique satisfaction in seeing a large enemy ground attack fall apart before it even reaches your defenses, and the Bomb Tower is perfect for achieving that. For a low cost of just four elixir, this defensive building can absorb a lot of damage and destroy entire groups of troops with its area-of-effect attacks. It makes your opponent change their plans, giving you valuable time to build up an elixir advantage. This guide will show you how to position it effectively, keep it safe, and use it to counter opponents who depend on ground troops.
Key Takeaways
- Place it in the middle to control the game: The best spot for your Bomb Tower is in the center of your arena. This placement pulls ground troops from both lanes into a kill zone, protecting your towers and neutralizing threats before they can do damage.
- Cover its weakness with air support: Since the Bomb Tower can’t target flying units, you must include air defense in your deck. Cards like the Musketeer or Archers are perfect partners, creating a balanced defense that covers all angles.
- Use defense to create your best offense: A well-played Bomb Tower stops a major push and gives you an elixir advantage. This is the perfect moment to launch a counter-attack, catching your opponent when they’re low on elixir and vulnerable.
So, What’s the Deal with the Bomb Tower?
The Bomb Tower is a super dependable defensive building that can often stop ground attacks all by itself. To use it effectively, though, you need to know what it’s good at, where it struggles, and how its explosions work. It might seem simple at first, but with the right placement and timing, it can become the foundation of a strong defense. It’s effective against everything from large groups of enemies to single, powerful units. Let’s take a closer look at why it works so well and how to use it to defend your base and annoy your opponents.
The Nitty-Gritty: Stats and Mechanics
The Bomb Tower is a common building you unlock in Arena 4 (Spell Valley). It’s great for defending against ground troops because it’s very durable and can take a lot of damage. It throws bombs that hit multiple enemies at once, making it especially effective against groups like Skeletons or Barbarians. While it has good range, allowing it to attack from a safe distance, it can’t target flying troops. Things like Minions, Balloons, and Baby Dragons will simply fly over it, so you’ll need another way to deal with air attacks.
That Explosive Goodbye: The Death Bomb
The Bomb Tower is unique because of how it’s destroyed. Instead of simply vanishing, it leaves behind a large bomb that explodes after three seconds. This bomb deals heavy damage to any nearby ground troops – often more than a full attack with Arrows. This final explosion makes the Bomb Tower incredibly useful, even when destroyed. It can wipe out enemy troops, giving you an elixir advantage and potentially protecting your Crown Tower.
Why the Bomb Tower is a Defensive Beast
Feeling swamped by enemy attacks? The Bomb Tower is a game-changer. This building isn’t just for show – it’s a strong defense that can completely halt an incoming rush. It’s so good because it’s tough, controls groups of enemies, and is strategically valuable. For only four Elixir, you get a defensive structure that can take a lot of damage and deal serious punishment to ground troops.
Okay, so the Bomb Tower? Seriously changes everything. Forget about your opponent just throwing a ton of troops at your bridge – that’s not gonna work anymore. They have to deal with this massive tower first, which buys me so much time to build up my Elixir and get ready to strike back. It’s like the ultimate anchor for my defense, giving me a super solid base to control the match. When I see that Bomb Tower up, I know I’m safe from a lot of those really frustrating ground attacks. It basically lets me dictate how the whole game plays out.
Built to Last: High Hitpoints
The Bomb Tower is known for being incredibly durable. It can take a lot of damage – like a tank – and stay standing for a long time, even when attacked by multiple enemies. This is really important because it buys you time to draw new cards, lets your Crown Towers damage opponents, and allows you to save up Elixir for a strong counterattack. While other buildings fall quickly, the Bomb Tower remains effective throughout the entire match.
Wiping Out Swarms with Splash Damage
It’s incredibly rewarding to see a large group of weaker enemies, like Skeletons or Goblins, instantly defeated by a well-placed bomb. The Bomb Tower is especially good at taking out these types of ‘swarm’ units because of its area-of-effect damage. Instead of focusing on one enemy, it explodes, damaging everything nearby – making it ideal against large numbers of fragile troops. Plus, even when destroyed, the Bomb Tower delivers one last powerful explosion, often wiping out any remaining enemies.
The Ultimate Counter to Ground Rushes
Ugh, as a Clash player, nothing is more annoying than watching a Hog Rider or Elite Barbarians charging right for my towers! But honestly, the Bomb Tower has been a lifesaver. I’ve found it’s amazing at stopping those quick ground attacks. I usually put it right in the middle of my arena, and it pulls those rushers away from my Crown Towers and into a perfect spot for my defenses to destroy them. It just does consistent damage and has a ton of health, so it usually wipes out those popular attack strategies, and often leaves my opponent with an Elixir disadvantage. It’s so satisfying to completely shut down their offense!
Every Hero Has a Weakness: The Bomb Tower’s Flaws
We love the Bomb Tower, but it definitely has weaknesses. Smart players will try to take advantage of them, so it’s important to know what those are. Understanding these flaws will help you predict attacks and create a well-rounded deck. Let’s look at the three biggest vulnerabilities of the Bomb Tower.
Its Biggest Blind Spot: Air Attacks
The Bomb Tower has one major flaw: it can’t attack flying enemies. This leaves it useless against cards like Minions, Lava Hounds, and Balloons. Opponents can simply send flying troops over your Bomb Tower and attack your main towers directly. If you rely solely on a Bomb Tower for defense and your opponent uses a Balloon, you’ll likely lose. Always be prepared to defend against air attacks with other options.
The Price of Power: Elixir Cost
The Bomb Tower costs a significant four elixir, which can be both helpful and risky. It’s very effective against groups of ground troops, but spending so much elixir on defense can leave you vulnerable. If your opponent tricks you into using it on a small attack, they might launch a powerful counter-attack while you don’t have enough elixir to defend. Timing is crucial – playing it too soon can quickly put you at a disadvantage and cause you to lose the game.
How Spells Can Topple Your Tower
The Bomb Tower is fairly durable, but it can still be destroyed with attacks. Spells like Fireball, Poison, and Lightning will damage it over time, and a direct hit from a Rocket will eliminate it. Smart players will try to hit both your Bomb Tower and a Crown Tower with a single spell for extra benefit. Because it’s often placed in the middle, it’s an easy target. Pay attention to when your opponent uses their spells – if they’re holding onto a Fireball, they might be waiting for you to place your Bomb Tower so they can gain a significant elixir advantage.
Location, Location, Location: Placing Your Bomb Tower
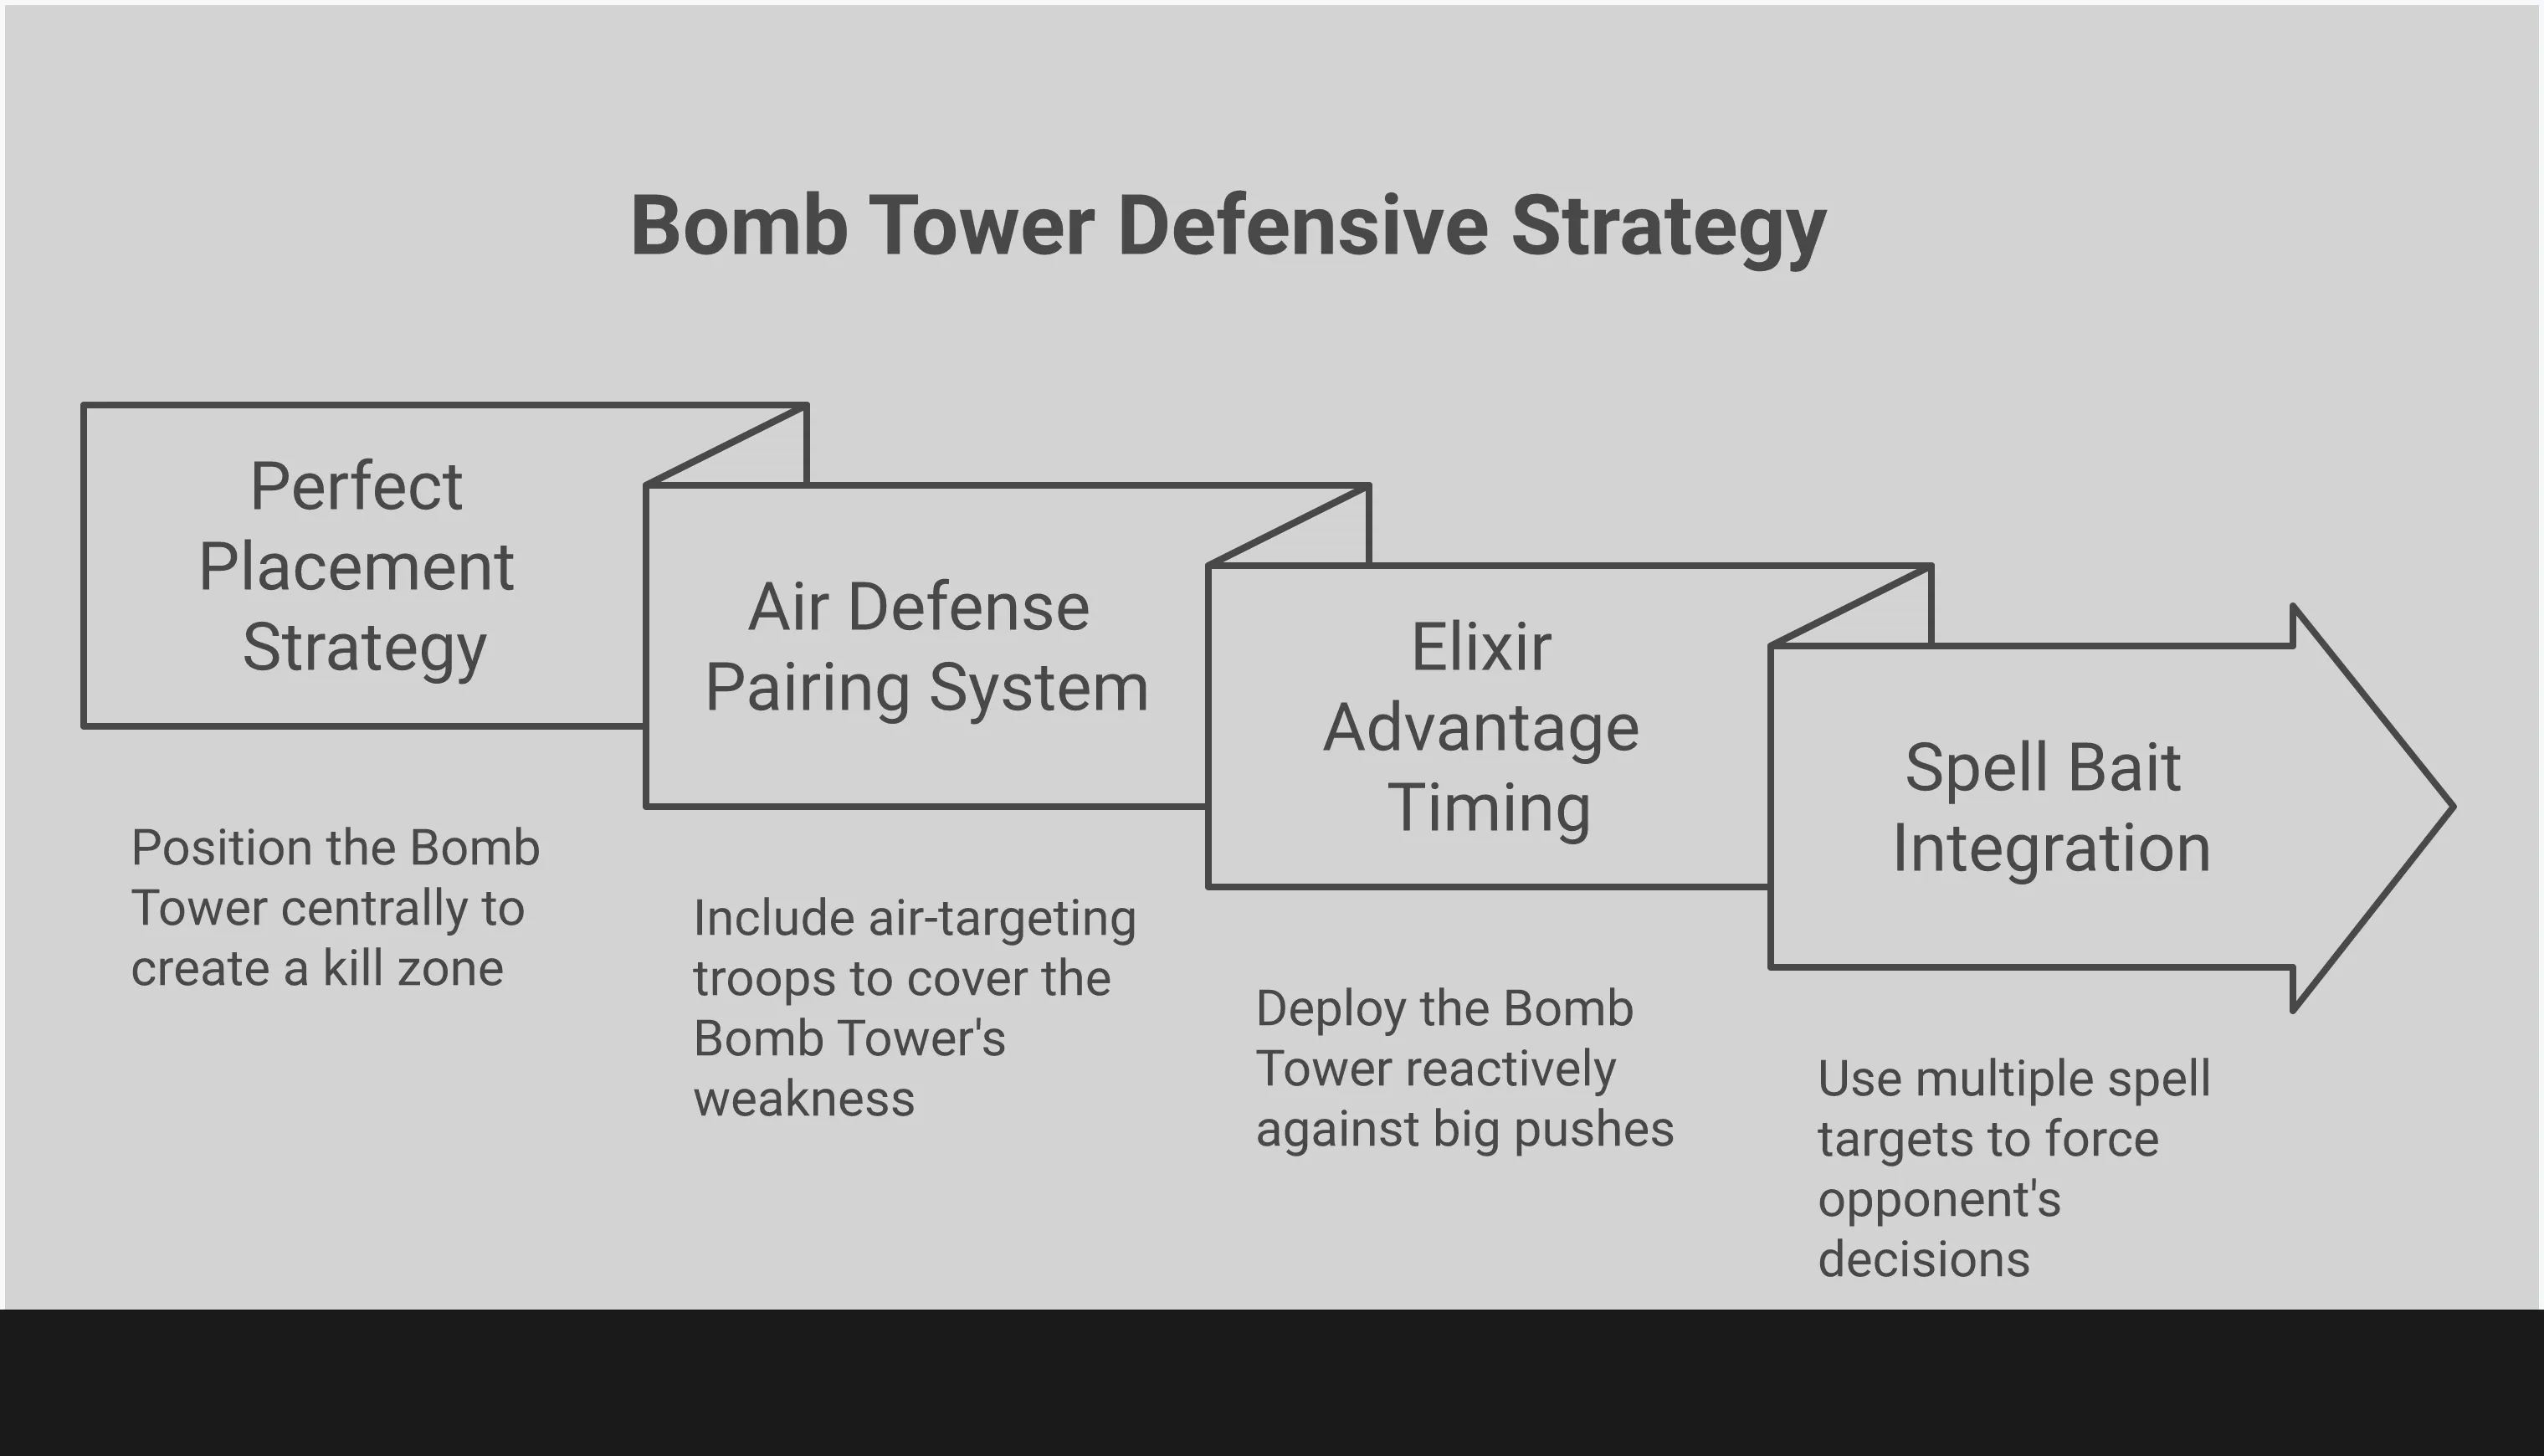
The location of your Bomb Tower is crucial for a strong defense. Simply placing it anywhere won’t work – you’ll waste resources and likely see it destroyed quickly. Instead, think strategically about where you put it to control how enemies move and maximize its powerful splash damage and durability. Consider it the cornerstone of your defense. A well-positioned Bomb Tower can single-handedly stop an enemy attack, but a bad placement will barely slow them down. Here are three key rules for placing Bomb Towers effectively, helping you defend expertly and frustrate your opponents.
Rule #1: Place It in the Middle
The ideal location for your Bomb Tower is usually near the center of your side of the arena. A good rule of thumb is to place it three tiles away from the river and one tile in front of your King Tower. This common placement is popular in Clash Royale for a good reason: it makes ground troops from both sides move towards the middle, drawing them into the Bomb Tower’s blast radius and away from your Crown Towers. This maximizes the Bomb Tower’s defensive range, helping it protect both lanes. It also allows your Crown Towers to easily attack enemy troops while they’re focused on the Bomb Tower.
Protect Your Crown Towers
The Bomb Tower is great at protecting your Crown Towers. It attacks enemies within a close range, meaning it can hit troops attacking your tower and damage the tower itself at the same time. This is really helpful for reducing the amount of damage your towers take. If you position it well – especially in the center of your base – it creates a strong defense that draws enemies in and safeguards your most important buildings, making it a key component of any good defense.
Dodge Those Pesky Spells
The Bomb Tower is very durable. Unlike most defenses, it can withstand a lot of damage from spells. A Fireball won’t destroy it quickly, and even Poison takes time to have a significant effect. This is a major benefit compared to defenses like the Cannon, which is easily destroyed by a Fireball, or the Tombstone, which The Log can quickly counter. This toughness makes the Bomb Tower a dependable choice. Opponents need to spend a good amount of Elixir or launch a full attack to overcome it, often giving you an Elixir advantage and the opportunity to counter-attack.
Outsmart Your Opponent: Countering Popular Decks
Understanding what your Bomb Tower does well is good, but truly mastering it means using it to disrupt your opponent’s entire plan. The Bomb Tower is a great choice against many common and annoying attack styles. Whether you’re facing a huge wave of small troops, a massive Golem, or a quick rush, a strategically placed Bomb Tower can completely change the battle. It’s about identifying your opponent’s attack and using the Bomb Tower to create a defense they can’t overcome. Let’s explore how to make your opponents wish they hadn’t faced you.
Making Swarm Decks Weep
Few things are as frustrating as watching a swarm of enemies, like Skeleton Army or Goblin Barrel, rushing your tower. That’s where the Bomb Tower really excels. Its area-of-effect damage quickly eliminates groups of weak units. A single Bomb Tower can stop an entire wave of Barbarians or Goblins, giving you a significant Elixir advantage. Plus, the explosion it leaves behind when destroyed often finishes off any remaining enemies. This makes it a very dependable defense against swarm-based attacks, often forcing your opponent to change their strategy.
Stopping Tanks and Beatdown Pushes Cold
It’s understandable to feel worried when strong units like Golems or P.E.K.K.A.s attack, but the Bomb Tower is a great counter. It’s durable enough to draw their attention, letting your other defenses safely damage them. The Bomb Tower especially protects against fast, powerful ground attacks from cards like the Hog Rider or Elite Barbarians. Plus, its area-of-effect damage is incredibly helpful for taking out weaker troops hiding behind the main attacker, stopping the whole attack before it gets dangerous.
Putting an End to Bridge Spam
Bridge spam decks try to win by constantly attacking and overwhelming your defenses. The Bomb Tower is a great way to stop this strategy. If you place it in the center of your base – a key defensive tactic – you create a dangerous area for enemy troops. Fast units like the Battle Ram or Hog Rider will be forced to go around the Bomb Tower, taking damage and slowing down before they can reach your towers. This smart positioning can shut down your opponent’s attacks and give you time to build up your own offense.
Who’s on the Team? Best Bomb Tower Pairings
The Bomb Tower is a powerful defense, but it needs help from other cards to really shine. While strong, it has a clear weakness that opponents will quickly try to take advantage of. A successful Bomb Tower strategy isn’t just about placing it and hoping it works – it’s about building a team around it that protects its weak spots and maximizes its power. When you find the right combination of cards, you can create a nearly impenetrable defense that will stop even the most relentless attacks.
Your Bomb Tower is like the sturdy defender of your team – it takes the brunt of attacks and manages ground troops. But even strong defenses need help! You’ll want cards that can deal with threats the Bomb Tower struggles with, disrupt your opponent’s plans, and quickly get you back to your essential defensive cards. The best card combinations will completely shut down enemy attacks and even let you launch powerful counter-offensives. Let’s explore some top pairings to make your Bomb Tower the star player in the arena.
Covering Your Weakness: Air Defense Partners
The Bomb Tower is great at destroying ground troops, but it completely ignores anything flying. Your opponent will quickly realize this and start sending air units like Minions, Baby Dragons, or Balloons your way as soon as they see it. That’s why strong air defense is essential! Good options to pair with the Bomb Tower include the Musketeer or Archers, which can safely target air units while the Bomb Tower handles ground troops. Even cheaper defenses like Spear Goblins or a timely Snowball can be surprisingly effective, making it very difficult for your opponent to attack.
Create a Win-Win with Spell Bait
Want to try a clever strategy? The Bomb Tower is a tempting target for powerful spells like Fireball or Rocket. You can use this to your advantage with a “spell bait” deck. The idea is simple: load your deck with cards your opponent will also want to destroy with spells, like Barbarians, Goblin Barrel, or Princess. When you place your Bomb Tower, your opponent will be stuck deciding: do they waste their big spell on the tower, or save it for the other threats you’ll send their way? Either choice benefits you, as you’re making them pick the less damaging option while you gain a significant advantage.
Fitting the Bomb Tower into a Cycle Deck
Although a 4-Elixir building might feel slow for a quick-playing deck, the Bomb Tower can be a really strong defensive centerpiece. It’s excellent at stopping large ground attacks on its own, giving you a chance to gain an Elixir advantage and play more cards. While the Bomb Tower handles threats like Golems or E-Giants, you can quickly play cheaper cards like Skeletons and Ice Spirit to get back to your main strategy. The Bomb Tower offers great defense, letting you build a faster, more agile deck overall. That’s why it’s commonly used in Miner control decks – it provides a solid base for a quick and flexible approach.
Timing is Everything: When to Play the Bomb Tower
It’s one thing to know how to use the Bomb Tower, but truly skilled players know when to use it. Because it’s a defensive building, its strength lies in responding to what your opponent does, not in starting an attack. Placing it too early wastes valuable elixir and leaves you vulnerable on the other side of the map. Waiting too long means your Crown Tower is already under attack. The key is patience and predicting your opponent’s moves. Think of the Bomb Tower as a powerful backup plan – save it for the perfect moment to stop a large enemy push and turn the battle in your favor. It’s about timing, and if you play it right, you’ll consistently win.
Play It Defensively, Not Aggressively
While it’s tempting to use the Bomb Tower to slowly damage your opponent’s tower, it’s much more effective as a defense. Its strength lies in stopping quick, powerful ground attacks like the Hog Rider or Elite Barbarians. When you see those troops heading for your tower, place the Bomb Tower in the center of your side of the arena. This will draw the attackers into a dangerous area, protecting your towers and eliminating the threat. Don’t place the Bomb Tower down without a target – that just wastes elixir and tells your opponent how to attack!
How to Gain an Elixir Advantage
As a player, I absolutely love the Bomb Tower! It’s a game-changer for building up an elixir advantage, which is key to winning. Since it costs 5 elixir, you really want it to eliminate enemy troops worth more than that. It’s super effective against groups of weaker troops, but you can get even more out of it. The Bomb Tower’s attack range is big enough to hit enemies targeting my Crown Tower and damage the tower itself with its splash attack! If you place it well, you can stop an attack and even deal some damage back, forcing your opponent to waste even more elixir just to counter your defense. It’s a really smart way to play!
Read Your Opponent’s Moves
Successfully using the Bomb Tower means anticipating what your opponent will do next. Since it can’t target air troops, they’ll likely follow up an attack you stop with air units like Minions or a Balloon. Building a well-rounded deck is crucial – always have a way to defend against air attacks, such as keeping a Rocket or Fireball handy for threats like Inferno Dragons or Balloons. Watch what cards your opponent is using to predict their next move.
Rookie Mistakes: What Not to Do with Your Bomb Tower
Everyone messes up sometimes, whether it leads to losing a tower, a battle, or just feeling embarrassed. The Bomb Tower is a strong defensive card, but it’s easy to make mistakes that make it cost too much Elixir and become ineffective. Let’s look at some common errors so you can avoid them and build a great defense. Mastering these basics will help you improve your game and really annoy your opponents with a solid, reliable defense.
Don’t Just Drop It Anywhere
New players often make the mistake of quickly placing a Bomb Tower directly in the path of rushing troops like Hog Riders or Goblin swarms. Try not to do that! Placing it too close to the bridge or your towers reduces its impact. Instead, the best spot for a Bomb Tower is usually in the center of your side of the arena, a few tiles back from the river. This lets it draw enemies from both sides, forcing them to travel a long distance into its range while your towers also attack.
Don’t Waste Your Elixir
The Bomb Tower is best used to destroy large groups of enemy troops and stop quick attacks, like those led by the Hog Rider or Elite Barbarians. It’s not a good idea to use it against single, tough enemies like a Knight or Valkyrie, because it costs too much Elixir for what it accomplishes. Instead, think of the Bomb Tower as a long-term investment. Place it to defend against pushes that would otherwise be overwhelming, and use its area damage to eliminate several units at once for a good Elixir advantage. Don’t waste it on single, weak targets – save it for when it can really make a difference.
Don’t Forget About the Sky
The Bomb Tower has one major weakness: it can’t defend against air troops. Things like Minions, Baby Dragons, and Balloons easily bypass it to attack your other defenses, leaving the Bomb Tower useless. Don’t depend on it to handle air attacks by itself. Your defense needs other cards, such as Archers, a Musketeer, or a spell like Fireball, to deal with the aerial attacks your opponent will likely send once they see you’ve placed a Bomb Tower.
Pro-Level Plays: Advanced Bomb Tower Tactics
Okay, so you’ve got the hang of the Bomb Tower basics? Awesome! Now it’s time to really unlock its potential. I’ve realized it’s way more than just something to throw down and defend with. It’s a total game-changer if you use it strategically. Honestly, learning these advanced tactics is what makes the difference between being a decent player and a really good one. If you start thinking ahead and predicting what your opponent will do, you can turn the Bomb Tower into the star of your whole deck! Let’s dive into how we can use it to trick our opponents and finally start winning more consistently.
Baiting Spells and Big Plays
Your Bomb Tower is a valuable building, so your opponent will likely try to destroy it, particularly if they use ground troops like the Hog Rider or Elite Barbarians. You can use this to your benefit by intentionally making it a target to force them to use their powerful spells. If they spend six elixir on a Rocket to take out your five-elixir Bomb Tower, you’ve gained an elixir advantage and created an opportunity to counter-attack. This is a key strategy in spell bait decks. Also, remember that the Bomb Tower is vulnerable to air attacks. If you think your opponent has a strong spell for dealing with your air troops, place the Bomb Tower first to make them use it.
Setting Up a Wall of Defense
Where you place your Bomb Tower is crucial. Ideally, put it in the middle of your arena, three spaces away from the river and one space in front of your King Tower. This location makes ground troops from both sides walk into its blast range, distracting them from attacking your Crown Towers and creating a central area where they can be easily defeated. The Bomb Tower’s wide area of effect damages multiple enemies while keeping itself relatively safe. You can build an even stronger defense by combining it with other troops – for instance, an Ice Wizard placed behind the Bomb Tower will slow down enemies, allowing the Bomb Tower to eliminate them more effectively.
Turning Defense into Offense
The best way to win is often a strong defense. If your Bomb Tower stops a big enemy attack, you’ll likely have more elixir and a good opportunity to strike back. The Bomb Tower’s final explosion is key – it can finish off weakened enemy troops, opening up a clear path for your own forces. This is the ideal time to send a quick troop, like a Hog Rider or Ram Rider, across the bridge. Your opponent will be short on elixir after their failed attack, making them vulnerable to your powerful counter-attack, and turning their attempt to attack into your victory.
Frequently Asked Questions
Generally, putting your Bomb Tower in the middle of your battle arena is the best strategy. It’s common for a reason – it makes ground troops from both sides walk into its attack range, distracting them from targeting your Crown Towers. This provides the strongest overall defense. While you might occasionally adjust its position slightly based on the specific situation, keeping it centered will give you the most consistent and dependable protection in nearly every battle.
Ugh, it’s so frustrating when my opponent just Rockets my Bomb Tower! But honestly, I’ve started to see it as a good thing. If they waste a six-elixir Rocket on my four-elixir tower, I’m actually up two elixir! That’s my signal to push and go on the offensive while they’re scrambling to recover. I’m even thinking of tweaking my deck to include more ‘spell bait’ – things like a Princess or Goblin Barrel – to really make them sweat and force them to make tough choices. It puts me in the driver’s seat, honestly.
The Bomb Tower costs a good amount of elixir (4), so it’s important to use it wisely. Don’t play it to deal with single, weak troops like a Knight or Valkyrie – that’s a waste of elixir and its potential. Instead, save the Bomb Tower for bigger attacks with multiple units, or to stop powerful threats like a Hog Rider or Elite Barbarians. It’s most effective when it can really slow down a large push your opponent has invested a lot of elixir into.
The biggest problem players have with this card is forgetting how vulnerable it is to flying troops. They often place it down thinking they’re safe, only to see Balloons or Minion Hordes easily bypass it and destroy their tower. Don’t depend on it as your only defense! You need to include another card in your deck that can deal with air attacks, or a clever opponent will always take advantage of this weakness.
Okay, so this thing can’t hit air troops, which is a problem, right? I’m always trying to figure out what to play with it to keep it safe. There’s no single best answer, but you need something that can deal with flying units. I usually go with classics like the Musketeer or Archers – I put them behind the Bomb Tower so it tanks the damage while they take out the air troops. If I’m playing a quicker deck, even Spear Goblins or a quick spell can work in a pinch. Seriously though, always be prepared for those air attacks – it’s the key to winning!
Read More
- Off Campus Season 1 Soundtrack Guide
- 46 Years Later, The Mandalorian & Grogu Answers A Major Empire Strikes Back Question
- X-Men ’97 Finally Gave Gambit the Hero Moment He Deserved
- Chainsaw Man Volume 24’s Cover Art Reveals a Brand-New Denji
- HoI4 fans harsh reactions to the announcement of another DLC pack
- 10 Worst End-Game Couples In Sitcom History
- Hatsune Miku cosplayer goes viral selling $15 cups of “foot juice” to thirsty anime fans
- Gold Rate Forecast
- DoorDash responds after customer uses AI to make food look bad and get a refund
- Emily Henry Says to ‘Trust the Vision’ For Beach Read Adaptation
2025-11-17 15:50